1
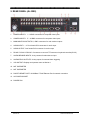
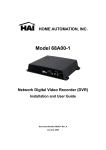
NUVICO
APEX LITE DIGITAL VIDEO RECORDER
AL-400
AL-800
AL-1600
AL-3200
Revision 6.0
0
APEX LITE SERIES DVR
CONTENT VERIFICATION
Before installing the DVR, please make sure that the following items are included in the
box:
1.
2.
3.
4.
5.
6.
Digital Video Recorder
Remote Controller
DVR Client Software CD
Power Cable
Two AAA Batteries
This Instruction Manual
If any of these materials are missing, please contact the vendor or NUVICO customer
help desk immediately at (866) 523-1700.
Revision 6.0
1
APEX LITE SERIES DVR
DISCLAIMER
•
While every effort has been made to ensure that the information contained in this
guide is accurate and complete, no liability can be accepted for any errors or
omissions.
• NUVICO reserves the right to change the specifications of the hardware and
software described herein at any time without prior notice.
• No part of this guide may be reproduced, transmitted, transcribed, stored in a
retrieval system, or translated into any language in any form, by any means, without
prior written permission of NUVICO.
• NUVICO makes no warranties for damages resulting from corrupted or lost data due
to a mistaken operation or malfunction of the Digital Video Recorder, the software,
the hard drives, personal computers, peripheral devices, or unapproved/unsupported
devices.
Trademark Acknowledgements
•
•
•
•
NUVICO, NUVICO EasyNet –VMS, NUVICO EasyNet - WebViewer are trademarks
of NUVICO, Inc.
SV35 series HDDs are a trademark of Seagate Corporation.
Microsoft, Windows98, Windows ME, Windows NT, Windows XP, Internet Explorer
are either registered trademarks or trademarks of Microsoft Corporation in the
United States and/or other countries.
Other names and products not mentioned above may be registered trademarks or
trademarks of their respective companies.
Copyright ©2008 NUVICO, Inc. All rights reserved.
Revision 6.0
2
APEX LITE SERIES DVR
FCC NOTICE
APEX Digital Video Recorders
This device complies with Part 15 of the FCC Rules.
following two conditions;
Operation is subject to the
1. This device may not cause harmful interference, and
2. This device must accept any interference received, including interference that may
cause undesired operation.
Note: This equipment has been tested and found to comply with the limits for Class B
digital devices, pursuant to Part 15 of the FCC rules. These limits are designed to
provide reasonable protection against harmful interference in a residential installation.
This equipment generates, uses and can radiate radio frequency energy and, if not
installed and used in accordance with the instructions, may cause harmful interference
to radio communications. However, there is no guarantee that interference will not
occur in a particular installation. If this equipment does cause harmful interference to
radio or television reception, which can be determined by turning the equipment off and
on, the user is encouraged to try to correct the interference by on or more of the
following measures:
• Reorient or relocate the receiving antenna.
• Increase the separation between the equipment and receiver.
• Connect the equipment into an outlet on a circuit different from that to which the
receiver is connected.
• Consult the dealer or an experience radio/TV technician for help.
The hard disk provided with the digital video recorder must be used with this equipment
in order to comply with Class B limits in subpart B of Part 15 on FCC rules.
Do not make any changes or modifications to the equipment unless otherwise specified
in the manual. If such changes or modifications should be made, you could be required
to stop operation of the equipment.
NUVICO, Inc.
53 Smith Street, Englewood, NJ 07631
Tel: (866) 523-1700
Canadian Radio Interference Regulations
THIS CLASS B DIGITAL APPARATUS MEETS ALL REQUIREMENTS OF THE
CANADIAN INTERFERENCE CAUSING EQUIPMENT REGULATIONS.
Revision 6.0
3
APEX LITE SERIES DVR
Read this First
Test Sessions
Before you try to record important subjects, we highly recommend that you make
several test recording and playback sessions to ensure that the Digital Video Recorder
is operating and being operated correctly. Please note that NUVICO, its subsidiaries
and affiliates, and its distributors are not liable for any consequential damages arising
from any malfunction of a Digital Video Recorder or its accessory, including the hard
disk drive, which results in the failure of an image to be recorded or to be recorded in a
format that is machine sensible.
The Privacy act of 1974 (5 U.S.C. § 552a)
Please note that NUVICO Digital Video Recorders are intended for recording of
surveillance use and should never be used in a manner that invades other people’s
privacy or contravenes international or domestic privacy act and its regulations. Please
be advised that in certain cases the recording of individuals, private properties, or
commercial properties by means of camera or other devices may contravene legal
rights of such individuals even if the images were recorded for personal use.
Warranty Limitations
This Digital Video Recorder’s warranty is only effective in the country of sale. If a
problem arises while the DVR is in use abroad, please convey it back to the country of
sale before proceeding with a warranty claim to NUVICO customer help desk.
Revision 6.0
4
APEX LITE SERIES DVR
SAFETY PRECAUTIONS
• Before using the Digital Video Recorder, please ensure that you read and understand
the safety precautions described below. Always ensure that the Digital Video
Recorder is operated correctly.
• The safety precautions noted on the following pages are intended to instruct you in
the safe and correct operation of the DVR and its accessories to prevent injuries or
damage to the self, other persons and equipment.
• In this Instruction Manual, the term “DVR”, “equipment” and “device” refers primarily
to the Digital Video Recorder and its accessories such as power supply and its
remote controller.
WARNING
• Do not cover the ventilation opening or slots on the outer casing. To prevent the
DVR from overheating, provide at least two inches of air space around the vent and
the slots.
• Do not drop metallic parts through slots. This could permanently damage the Digital
Video Recorder. Immediately turn the DVR’s power off or unplug the power cord
from the power outlet. Contact a qualified service personnel authorized by the
equipment distributor or a NUVICO customer help desk.
• Do not attempt to disassemble or alter any part of the equipment that is not expressly
described in this guide. Disassembly or alteration may result in high voltage
electrical shock. Internal inspections, alterations and repairs should be conducted
by qualified service personnel authorized by the equipment distributor or NUVICO
customer help desk.
• Stop operating the equipment immediately if it emits smoke or noxious fumes.
Failure to do so may result in fire or electrical shock. Immediately turn the DVR’s
power off, remove the power cable from the power outlet. Confirm that smoke and
fume emissions have ceased. Please consult the DVR distributor or the closest
NUVICO customer help desk.
• Stop operating the equipment if a heavy object is dropped or the casing is damaged.
Do not strike or shake. Failure to do so may result in fire or electrical shock.
Immediately turn the DVR’s power off or unplug the power cord from the power
outlet. Please consult the DVR distributor or the closest NUVICO customer help
desk.
• Do not allow the equipment come into contact with, or become immersed in, water or
other liquids. Do not allow liquids to enter the interior. The DVR has not been
waterproofed. If the exterior comes into contact with liquids or salt air, wipe it dry
with a soft, absorbent cloth. In the event that the water or other foreign substances
enter the interior, immediately turn the DVR’s Power off or unplug the power cord
from the power outlet. Continued use of the equipment may result in fire or electrical
shock. Please consult the DVR distributor or the closest NUVICO customer help
desk.
Revision 6.0
5
APEX LITE SERIES DVR
• Do not use substances containing alcohol, benzene, thinners or other flammable
substances to clean or maintain the equipment. The use of these substances may
lead to fire. Use a dry cloth on a regular periodic basis and wipe away the dust and
dirt that collects on the device. In dusty, humid or greasy environments, the dust
that collects around the ventilation or the slots on the outer casing over long periods
of time may become saturated with humidity and short-circuit, leading to fire.
• Do not cut, damage, alter or place heavy items on the power cord. Any of these
actions may cause an electrical short circuit, which may lead to fire or electrical
shock.
• Do not handle the device or power cord if the hands are wet. Handling it with wet
hands may lead to electrical shock. When unplugging the cord, ensure that you hold
the solid portion of the plug. Pulling on the flexible portion of the cord may damage
or expose the wire and insulation, creating the potential for fires or electrical shocks.
• Use only the recommended power accessories. Use of power sources not expressly
recommended for this equipment may lead to overheating, distortion of the
equipment, fire, electrical shock or other hazards.
• Do not place the battery near a heat source or expose it to direct flame or heat.
Neither should you immerse them in water. Such exposure may damage the battery
and lead to the leakage of corrosive liquids, fire, electrical shock, explosion or
serious injury.
• Do not attempt to disassemble, alter or apply heat to the battery. There is serious
risk of injury due to an explosion. Immediately flush with water any area of the body,
or clothing that comes into contact with the inner contents of the battery. If the eyes
or mouth contact these substances, immediately flush with water and seek medical
assistance from a medical professional.
• Avoid dropping or subjecting the battery to severe impacts that could damage the
casings. It could lead to leakage and injury.
• Do not short-circuit the battery terminals with metallic objects, such as key holders. It
could lead to overheating, burns and other injuries.
• The supplied power supply and power cord are designed for exclusive use with the
Digital Video Recorder. Do not use it with other products or battery. There is a risk
of fire and other hazards.
Revision 6.0
6
APEX LITE SERIES DVR
CAUTION
• Avoid using, placing or storing the equipment in places subject to strong sunlight or
high temperatures, such as the greenhouse or trunk of a car. Exposure to intense
sunlight and heat may cause the battery to leak, overheat or explode, resulting in fire,
burns or other injuries. High temperatures may also cause deformation of the casing.
Ensure that there is good ventilation when using the equipment.
• Do not store the equipment in humid or dusty areas. Storage in such areas could
lead to fire, electrical shock or other damage.
• Do not operate the DVR beyond its specified temperature, humidity or power source
ratings. Do not use the DVR in an extreme environment such as in high temperature
or high humidity. Use the device at temperatures within 41°F - 104°F and humidity
below 90 %. The normal operating power source for this device is 110V-220V AC
50/60Hz.
PREVENTING MALFUNCTION
• Avoid Strong Magnetic Fields. Never place the DVR in close proximity to electric
motors or other equipment generating strong electromagnetic fields. Exposures to
strong magnetic fields may cause malfunctions or corrupt image data.
• Avoid Condensation Related Problems. Moving the equipment rapidly between hot
and cold temperatures may cause condensation (water droplets) to form on its
external and internal surfaces. You can avoid this by placing the equipment in an
airtight, resealable plastic bag and letting it adjust to temperature changes slowly
before removing it from the bag.
• If Condensation forms inside the Digital Video Recorder. Stop using the equipment
immediately if you detect condensation. Continued use may damage the equipment.
Remove the power cord from the power outlet and wait until the moisture evaporates
completely before resuming use.
Revision 6.0
7
APEX LITE SERIES DVR
TABLE OF CONTENTS
CONTENT VERIFICATION..................................................................................................................................... 1
DISCLAIMER ............................................................................................................................................................. 2
FCC NOTICE .............................................................................................................................................................. 3
READ THIS FIRST..................................................................................................................................................... 4
SAFETY PRECAUTIONS ......................................................................................................................................... 5
WARNING ................................................................................................................................................................... 5
CAUTION .................................................................................................................................................................... 7
PREVENTING MALFUNCTION ............................................................................................................................. 7
TABLE OF CONTENTS ............................................................................................................................................ 8
DIGITAL VIDEO RECORDER LAYOUT ............................................................................................................ 10
1. FRONT PANEL (AL-400, AL-800, AL-1600) ................................................................................................. 10
1. FRONT PANEL (AL-3200) .............................................................................................................................. 12
2. REAR PANEL (AL-400, 800, 1600) ................................................................................................................. 14
2. REAR PANEL (AL-3200) ................................................................................................................................. 15
3. IR REMOTE CONTROLLER......................................................................................................................... 16
4. INSTALLATION AND CONNECTION ........................................................................................................ 18
5. ALARM CONNECTION ................................................................................................................................. 18
DEFAULT ADMIN LOGIN PASSWORD ............................................................................................................. 19
I. QUICK SETUP ...................................................................................................................................................... 20
A. DATE/TIME ..................................................................................................................................................... 20
B. GLOBAL RECORD ......................................................................................................................................... 20
C. RECORD WIZARD ......................................................................................................................................... 21
1. FRAME RATE PRIORITY .............................................................................................................................. 21
2. PICTURE QUALITY PRIORITY .................................................................................................................... 21
D. PANIC RECORD ............................................................................................................................................. 22
II. BASIC OPERATION ........................................................................................................................................... 23
A. MAIN SCREEN ................................................................................................................................................ 23
1. LIVE VIEW SWITCH SEQUENCE ................................................................................................................ 24
2. AUTOMATIC SEQUENCE ............................................................................................................................ 25
3. ZOOM ............................................................................................................................................................ 26
C. PLAYBACK ..................................................................................................................................................... 27
1. PLAY BACK CONTROL ................................................................................................................................ 27
2. AUDIO PLAYBACK ....................................................................................................................................... 28
III. ADVANCED OPERATION............................................................................................................................... 29
A. LOCK ................................................................................................................................................................ 29
1. Built-in CD/DVD............................................................................................................................................ 30
2. USB FLASH MEMORY DRIVE - “USB” ...................................................................................................... 30
3. USB FLASH MEMORY DRIVE – “USB(AVI)” ............................................................................................. 31
4. MINI PLAYER ................................................................................................................................................ 31
C. PAN / TILT / ZOOM CONTROL ................................................................................................................... 32
D. PLAYBACK ..................................................................................................................................................... 34
1. GOTO SEARCH ............................................................................................................................................. 34
2. LOG SEARCH ................................................................................................................................................ 34
3. CALENDAR SEARCH .................................................................................................................................... 35
Revision 6.0
8
APEX LITE SERIES DVR
IV. ADVANCED SETUP .......................................................................................................................................... 36
A. ADVANCED RECORD ................................................................................................................................... 36
1. SCHEDULE OFF .......................................................................................................................................... 36
2. SCHEDULE ON ............................................................................................................................................. 38
B. EVENT .............................................................................................................................................................. 40
1. MOTION SETUP ........................................................................................................................................... 40
2. ALARM SOURCE .......................................................................................................................................... 41
3. ALARM ACTION............................................................................................................................................ 42
C. DEVICE ............................................................................................................................................................ 43
1. CAMERA ........................................................................................................................................................ 43
2. MONITOR ...................................................................................................................................................... 43
3.AUDIO ........................................................................................................................................................... 44
4. COM PORT .................................................................................................................................................... 44
5. TEXT INPUTS ................................................................................................................................................ 44
D. NETWORK ...................................................................................................................................................... 45
1. NETWORK ..................................................................................................................................................... 45
2. DDNS ............................................................................................................................................................. 45
3. NTP SETTING................................................................................................................................................ 46
4. NOTIFICATION............................................................................................................................................. 46
CONFIGURING THE DVR WITH A ROUTER INTO A LAN ....................................................................... 47
CONFIGURING THE DVR WITH A CROSSOVER CABLE ......................................................................... 51
E. SYSTEM ........................................................................................................................................................... 54
1. LOCAL USER ................................................................................................................................................ 54
2. REMOTE USER ............................................................................................................................................. 55
3. HOLIDAY SCHEDULE ................................................................................................................................. 55
4. DISK UTILITY ............................................................................................................................................... 55
5. SYSTEM INFO ............................................................................................................................................... 57
6. SYSTEM ALARM............................................................................................................................................ 58
7.STATUS OVERVIEW ..................................................................................................................................... 58
8.DISK OVERVIEW .......................................................................................................................................... 59
F. MAXIMUM RECORDING RATE & RESOLUTION LIMIT PER CHANNEL WITH ADVANCED
FEATURES ........................................................................................................................................................... 59
V. NUVICO EASYNET - WEBVIEWER ............................................................................................................... 60
A. INSTALLING THE NUVICO EASYNET - WEBVIEWER ........................................................................... 60
B. USING THE NUVICO EASYNET - WEBVIEWER........................................................................................... 62
1. MAIN DISPLAY ............................................................................................................................................. 62
2. CONFIGURATION TOOLS ........................................................................................................................... 63
3. PLAYBACK .................................................................................................................................................... 64
4. PTZ CONTROL .............................................................................................................................................. 66
VI. TECHNICAL SUPPORT ................................................................................................................................... 67
Revision 6.0
9
APEX LITE SERIES DVR
DIGITAL VIDEO RECORDER LAYOUT
1. FRONT PANEL (AL-400, AL-800, AL-1600)
1. POWER BUTTON
This button turns the unit on or off.
2. NUMERIC BUTTONS 1 ~ 16
These buttons have a number of functions to enter data and to make selections. They are used to enter
numerical values when prompted for the password and to make channel/camera selection.
3.
RECORD / STOP / PLAYBACK / STILL
RECORD: Start recording
STOP: Stop recording or playback
PLAYBACK: Start playback of recorded data. By default, the playback starts from the latest
recording on the hard drive. Pressing this button once more during the playback will change the
direction of the playback.
• STILL: Pause playback
•
•
•
4. STATUS INDICATOR
Five LEDs display the status of the Digital Video Recorder. From the left, Power, Recording, Network,
Lock, Back up, HDD-1, HDD-2, HDD-R.
5. USB 2.0 PORT
The USB port is to connect external backup devices such as thumb drive. Also used for a mouse.
6. DVD-RW
The tray to insert the blank media, CD-R or DVD-R for backup
7. DIRECTIONAL BUTTONS / ENTER BUTTON
The directional buttons are used in various ways:
• Navigate through menus
• Control PTZ cameras
• UP: Freeze live images
• Down: Display next set of channels on a live display mode
• Right: Instant playback
The Enter button is used on the menu of the DVR.
Revision 6.0
10
APEX LITE SERIES DVR
8. MENU
The menu button is to access the main menu of the DVR.
9. ESC
The ESC button is to exit from the main or each menu of the DVR.
10. PTZ
This button is to accesses PTZ control mode.
11. ZOOM
This button is used to digitally zoom into a specific area in live screen. Use directional buttons to navigate.
When utilizing NUVICO PTZ camera, this button functions as Focus button in PTZ menu mode.
12. WIDE
This button is used to zoom out within PTZ control.
13. TELE
This button is used to zoom in within PTZ control.
14. DISPLAY
This button is used to switch between multiple display modes.
15. MONITOR
This button is used to select different monitors to control between MONITOR 1 and SPOT MONITOR.
It can be disabled by turning MONITOR button OFF from the SYSTEM INFO menu.
16. SEQUENCE
This button is used to activate camera sequencing. Press and hold to activate Sequence Tour List.
17. SELECT
This button is used to select a camera for PTZ control in multi display mode.
18. LOCK
This button is used to lock the buttons on the front panel/remote controller by logging off. Press it again
and then apply appropriate password to deactivate the function.
It can be disabled by turning AUTO LOGIN function on from the LOCAL USER menu.
19. SEARCH
This button accesses the search menu. The search menu includes Calendar/ Log and GOTO search.
20. BACKUP
This button is to enter backup menu.
21. ACKNOWLEDGE
This button is used to manually turn off alarm relay and buzzer when set for unlimited duration.
22. OSD
This button is used to change on screen display.
23. PANIC
This button is used to manually turn on/off the Panic recording mode. It can be manually configured in
Quick Setup menu.
Revision 6.0
11
APEX LITE SERIES DVR
1. FRONT PANEL (AL-3200)
1. POWER BUTTON
This button turns the unit on or off.
2. NUMERIC BUTTONS 1 ~ 32
These buttons have a number of functions to enter data and to make selections. They are used to enter
numerical values when prompted for the password and to make channel/camera selection.
3.
RECORD / STOP / PLAYBACK / STILL
RECORD: Start recording
STOP: Stop recording or playback
PLAYBACK: Start playback of recorded data. By default, the playback starts from the latest
recording on the hard drive. Pressing this button once more during the playback will change the
direction of the playback.
• STILL: Pause playback
•
•
•
4. STATUS INDICATOR
Five LEDs display the status of the Digital Video Recorder. From the left, Power, Recording, Network,
Lock, Back up, HDD-1, HDD-2, HDD-3, HDD-4.
5. USB 2.0 PORT
The USB port is to connect external backup devices such as thumb drive. Also used for a mouse
6. DVD-RW
The tray to insert the blank media, CD-R or DVD-R for backup
7. DIRECTIONAL BUTTONS / ENTER BUTTON
The directional buttons are used in various ways:
• Navigate through menus
• Control PTZ cameras
• UP: Freeze live images
• Down: Display next set of channels on a live display mode
• Right: Instant playback
The Enter button is used on the menu of the DVR.
8. MENU
The menu button is to access the main menu of the DVR.
9. ESC
The ESC button is to exit from the main or each menu of the DVR.
Revision 6.0
12
APEX LITE SERIES DVR
10. PTZ
This button is to accesses PTZ control mode.
11. ZOOM
This button is used to digitally zoom into a specific area in live screen. Use directional buttons to navigate.
When utilizing NUVICO PTZ camera, this button functions as Focus button in PTZ menu mode.
12. WIDE
This button is used to zoom out within PTZ control.
13. TELE
This button is used to zoom in within PTZ control.
14. DISPLAY
This button is used to switch between multiple display modes.
15. MONITOR
This button is used to select different monitors to control between MONITOR 1 and SPOT MONITOR.
It can be disabled by turning MONITOR button OFF from the SYSTEM INFO menu.
16. SEQUENCE
This button is used to activate camera sequencing. Press and hold to activate Sequence Tour List.
17. SELECT
This button is used to select a camera for PTZ control in multi display mode.
18. LOCK
This button is used to lock the buttons on the front panel/remote controller by logging off. Press it again
and then apply appropriate password to deactivate the function.
It can be disabled by turning AUTO LOGIN function on from the LOCAL USER menu.
19. SEARCH
This button accesses the search menu. The search menu includes Calendar/ Log and GOTO search.
20. BACKUP
This button is to enter backup menu.
21. ACKNOWLEDGE
This button is used to manually turn off alarm relay and buzzer when set for unlimited duration.
22. OSD
This button is used to change on screen display.
23. PANIC
This button is used to manually turn on/off the Panic recording mode. It can be manually configured in
Quick Setup menu.
Revision 6.0
13
APEX LITE SERIES DVR
2. REAR PANEL (AL-400, 800, 1600)
1.
CAMERA INPUTS: AL-400: 1 ~ 4, AL-800: 1~8, AL-1600: 1~ 16
BNC connectors for composite video inputs
2.
LOOP OUTPUTS: BNC connectors for composite video outputs
3.
MONITOR OUTPUTS:
Main (top) : Displays OSDs, menu, and single channel view as well as multi channel views
Spot (bottom) : Displays single channel view only without any OSDs
4.
AUDIO INPUT 1 ~ 4: Four female RCA connectors for audio input
5.
AUDIO OUTPUT: One female RCA connector for audio output
6.
RS-485 / RS-422 / RS-232C: Connectors to connect PTZ cameras or keyboard controller(CK-3X)
7.
ALARM SENSOR INPUTS: 4, 8, 16 dry contacts for alarm/sensor input
8.
ALARM RELAY OUTPUTS: 2 relay outputs for external alarm triggering
9.
VGA OUTPUT: Displays and operates same as Monitor 1
10. RJ45 ETHERNET PORT: 10/100Base-T RJ45 Ethernet Port for network connection
11. TERMINATION SWITCH
12. AC POWER SOCKET
Revision 6.0
14
APEX LITE SERIES DVR
2. REAR PANEL (AL-3200)
1.
CAMERA INPUTS: 1 ~ 16 BNC connectors for composite video inputs
2.
CAMERA INPUTS: 17 ~ 32 BNC connectors for composite video inputs
3.
MAIN MONITOR OUTPUTS 1,2: BNC connectors for main monitor outputs
4.
AUDIO INPUT 1 ~ 4: Four female RCA connectors for audio input
5.
AUDIO OUTPUT: One female RCA connector for audio output
6.
RS-485 / RS-422 / RS-232C: Connectors to connect PTZ cameras or keyboard controller(CK-3X)
7.
ALARM SENSOR INPUTS: 16 dry contacts for alarm/sensor input
8.
ALARM RELAY OUTPUTS: 4 relay outputs for external alarm triggering
9.
VGA OUTPUT: Displays and operates same as Monitor 1
10. NOT SUPPORTED
11. NOT SUPPORTED
12. RJ45 ETHERNET PORT: 10/100Base-T RJ45 Ethernet Port for network connection
13. AC POWER SOCKET
14. POWER FAN
Revision 6.0
15
APEX LITE SERIES DVR
3. IR REMOTE CONTROLLER
1. POWER : This button turns the DVR off.
2. ID : This is button is to set the ID of the remote controller. Press this button 16 times or until
the DVR beeps to match the ID with the DVR
3. MON : This button is used to select different monitors to control.
4. SEQ : This button is used to activate camera sequencing. Press and hold to activate Sequence
Tour List.
5. SELECT : This button is used to select a camera for PTZ control in multi display mode.
6. LOCK : This button is used to lock the buttons on the front panel/remote controller by logging off.
Press it again and then apply appropriate password to login.
7. BACKUP: This button is to enter BACKUP menu.
8. ACK : This button is used to manually turn off alarm relay and buzzer when set for unlimited
duration.
9. OSD : This button is used to change on screen display.
10. PANIC : This button is used to manually turn on/off the Panic recording mode. It can be manually
configured in Quick Setup menu.
Revision 6.0
16
APEX LITE SERIES DVR
11. Numeric Buttons 0~9 & +10
12. DISPLAY : This button is used to switch between multiple display modes.
13. MENU : The menu button is to access the main menu of the DVR.
14. TIME : This button accesses the search menu.
15. EVENT : RESERVED
16. ESC : The ESC button is to exit from the main or each menu of the DVR.
17. DIRECTIONAL BUTTONS / ENTER BUTTON
The directional buttons are used in various ways:
• Navigate through menus
• Control PTZ cameras
The Enter button is used on the menu of the DVR.
18. WIDE : This button is used to zoom out within PTZ control mode.
19. TELE : This button is used to zoom in within PTZ control mode.
20. FAST REWIND : During playback mode, press this button to fast rewind.
21. STEP REVERSE : During playback mode, press this button to play picture by picture in reverse
direction.
22. STEP FORWARD : During playback mode, press this button to play picture by picture in forward
direction.
23. FAST FORWARD : During playback mode, press this button to fast forward.
24. STOP : During live mode, press this button to stop recording. During playback mode, press this
button to return to live mode.
25. STILL : During playback mode, press this button to pause the playback.
26. PLAY : During live mode, press this button to start playback. During playback mode, press this
button to switch play direction.
27. REC : Press this button to start recording.
28. PTZ : Press this button to activate/deactivate PTZ mode.
29. ZOOM : This button is to digitally zoom into a specific area in live screen. Use directional buttons
to navigate. When utilizing NUVICO PTZ camera, this button functions as Focus button in PTZ
menu mode.
30. INFO : RESERVED
Revision 6.0
17
APEX LITE SERIES DVR
4. INSTALLATION AND CONNECTION
5. ALARM CONNECTION
A1
A2
A3
A4
G
1
A5
ALARM IN
2
ALARM OUT
ALARM SENSOR
ALARM BUZZER
Revision 6.0
18
APEX LITE SERIES DVR
DEFAULT ADMIN LOGIN PASSWORD
The default admin password for DVR is “000000.”
Mouse operation basics:
Scroll: Navigates through the menus and sub menus.
Left click: Select an item and change a value in some menu.
Right click: Displays mouse menu from the live mode also used same as an ESC button in the
menu
Revision 6.0
19
APEX LITE SERIES DVR
I. QUICK SETUP
When the DVR is powered on for the very first time, the time and date may be incorrect. Before any
other operation of the Digital Video Recorder, it is important to setup the time and the date.
Directional buttons are used to navigate through all the main categories and their submenus. ENTER
button is used to access and to save the settings and to change the values in certain sub-menus.ESC
button is used to revert back to previous settings and exiting the submenus without saving any changes.
A. DATE/TIME
To adjust the date & time, stop the recording first.
Go to the MENU then select QUICK SETUP. Under the
DATE/TIME tab.
Set appropriate time zone, daylight saving option, date, and time.
Select SAVE to apply new values.
When finished, exit from the Menu then press the Record button
to start recording.
B. GLOBAL RECORD
The DVR is set with predefined record settings on initial power-up. The unit will start recording
immediately. Please note that the default recording setting is ON. The factory default setting is NORMAL
recording as follow:
ALL CHANNELS
USE
RESOLUTION
PPS
QUALITY
MOTION
AL-400
ON
FIELD
7
Q5
OFF
AL-800
ON
FIELD
7
Q5
OFF
AL-1600
ON
FIELD
7
Q5
OFF
AL-3200
ON
FIELD
7
Q5
OFF
Revision 6.0
20
APEX LITE SERIES DVR
For quick set up, GLOBAL RECORD can be used to apply one
record setting to all cameras.
For resolution:
• D1 stands for 720 x 480 (4 CIF),
• FIELD stands for 720 x 240 (2 CIF),
• CIF stands for 360 x 240.
•
For Quality:
• Q1: Lowest quality
• Q5: Highest quality
MAXIMUM RECORDING RATES
PER CHANNEL
CIF
FIELD
D1
QUALITY
AL-400
30
30
30
Q5
AL-800
30
30
15
Q5
AL-1600
30
15
7
Q5
AL-3200
30
15
7
Q5
Enter the desired recording values then select SAVE to apply.
C. RECORD WIZARD
Categorized as FRAME RATE PRIORITY and PICTURE QUALITY PRIORITY, the RECORD WIZARD
is used to set the recording parameters by entering desired days of recording at the given HDD capacity.
After programming desired values, simply select SAVE and the DVR will automatically apply the
appropriate settings.
1. FRAME RATE PRIORITY
Set recording priority with FRAME RATE to maintain FRAME
RATE at the highest as possible level.
As the number of days increase, the DVR may decrease the
resolution and the picture quality as compensation.
*Warning: This is for reference only. Actual days of recording may vary.
2. PICTURE QUALITY PRIORITY
Set recording priority with PICTURE QUALITY to maintain
PICTURE QUALITY at the high as possible level.
As the number of days increase, the DVR may decrease the
frame rate and the resolution as compensation.
*Warning: This is for reference only. Actual days of recording may vary.
Revision 6.0
21
APEX LITE SERIES DVR
D. PANIC RECORD
PANIC RECORD may be used in case of emergency. The DVR
will record according to the PANIC RECORD setting when the
PANIC button is pressed.
The recording rate on the PANIC RECORD also counted as part
of total recording rate. Please set the FRAME RATE to 1 if it is
not used.
Revision 6.0
22
APEX LITE SERIES DVR
II. BASIC OPERATION
This section will cover basic features of the DVR such as simple recording and playback. It will also
cover the main screen outlining many alert, operational, channel, DVR status, time, and hard drive space
counter. Moreover, it will also address several live view modes the DVR has to offer, which include multichannel view modes, automatic sequence modes and zoom features. Finally, this section will also cover
the information screen where all basic information about the DVR is displayed, as well as the log screen
where all activities of the DVR are logged.
A. MAIN SCREEN
STANDARD INTERFACE ICON LIST
RECORD
PTZ MODE
MOTION
PERCENTAGES OF USED
SPACES ON THE HDD
ALARM
MOTION GAUGE
VIDEO LOSS
AUDIO
MONITOR NUMBER
SEQUENCE TOUR LIST
USER SEQUENCE TOUR LIST
MOUSE INTERFACE ICON LIST
BUTTONS
MOVE ICON BAR TO BOTTOM
OF THE SCREEN
PLEASE REFER PAGE10 FOR
DETAIL
DISPLAY NEXT SET OF
CAMERAS
The icons on the mouse menu are similar set of icons as standard menu. They also responses the same
way as DVR buttons would do. See page16 for “Mouse operation basics “for how each buttons on the
mouse works.
Revision 6.0
23
APEX LITE SERIES DVR
B. LIVE VIEW
LIVE VIEW displays each channel at 30 frames per second, for a total of 480(960) frames per second
on the AL-400,800,1600,3200.
1. LIVE VIEW SWITCH SEQUENCE
The APEX DVR has numerous display modes, from single, quad, 9, and 16 channel display modes.
The single channel display mode can be accessed directly by pressing the appropriate channel button.
The rest of the display modes can be accessed sequentially by pressing the display button. The following
illustrations display the order of live view mode sequences:
Live View Sequence of APEX DVR
* AL-3200:
By default Monitor 1 displays cam 1~16, Monitor 2 displays cam 17~32.
Monitor switch function can be used to toggle between cam 1~16 and cam
17~32 on the Monitor 1 and VGA.
Revision 6.0
24
APEX LITE SERIES DVR
2. AUTOMATIC SEQUENCE
There are several different sequence modes that can be selected and activated. Press the display
button or a numeric button to access the desired channel view mode. Thereafter, press the SEQ button
to activate the sequence mode. In addition, APEX series DVRs support “User sequence” mode which let
user customize channels and view modes to sequence.
Please refer to DEVICE under MONITOR section of the menu for more information. The following
illustrations demonstrate sample display sequences and their combinations.
Single channel view mode automatic sequence
Quad view mode automatic sequence
Nine channel view mode automatic sequence
* AL-3200:
By default Monitor 1 displays cam 1~16, Monitor 2 displays cam 17~32.
Monitor switch function can be used to toggle between cam 1~16 and cam
17~32 on the Monitor 1 and VGA.
Down arrow from the DVR or
Revision 6.0
can be used to manually move to the next set of channels.
25
APEX LITE SERIES DVR
3. ZOOM
From LIVE VIEW mode, it is possible to zoom into a portion of the screen to get a digitally zoomed
view of the section.
Press the zoom button to digitally zoom in the picture.
Use the directional buttons to move the zoom area.
Press the zoom button once more to return to normal view.
Revision 6.0
26
APEX LITE SERIES DVR
C. PLAYBACK
1. PLAY BACK CONTROL
When the PLAY button is pressed during LIVE mode, the DVR will play back the most recent data.
When the DVR reaches the end of the recorded data, it will freeze on the last recorded frame.
The recorded file can be playback in various modes. The user can perform reverse playback, fast reverse
and fast forward up to 32 times the normal speed, pause, or view picture by picture using the step buttons.
AL-3200 requires monitor switching from monitor 1 to 2 in order to play 17 ~ 32 channels.
Press the PLAY button from the DVR or press
button. The play icon will be displayed.
The DVR will begin playback from the most recently generated data if playing back for the first time.
Press the PLAY button once more and the DVR will change its
playback direction to reverse.
PLAYBACK, REVERSE: Press to start playback. During the playback, press it again for
reverse playback.
PAUSE:
appears on the screen.
PICTURE BY PICTURE: After paused, use these buttons to view picture by picture.
FAST REVERSE, FAST FORWARD: Press the button repeatedly to play up to 32x than the
normal speed.
Press playback button to go back to normal speed.
STOP: Stops playback and exit from the playback mode.
PLAYBACK SPEED: Indicates current playback speed. 1, 2, 4, 8, 16, 32 times.
Press directional arrows to reverse the playback direction during fast playback.
Revision 6.0
27
APEX LITE SERIES DVR
2. AUDIO PLAYBACK
The APEX LITE DVRs supports 4 channels audio recording. Unlike video data that can be recorded at
various recording rates, an audio data is always recorded in real time,. The audio can only be heard in
single channel viewing mode.
If the audio is present during playback, the audio icon will appear
on the top right corner of the screen.
Revision 6.0
28
APEX LITE SERIES DVR
III. ADVANCED OPERATION
This section will cover advanced features of the DVR. This instruction manual will assume that the
section on basic operation has been read and understood. The advanced operation will require
occasional reference to some of the features explained in the ADVANCED SETTINGS section. This
section will address LOCK, BACKUP, Pan/Tilt/Zoom camera control and advanced playback functions.
A. LOCK
The buttons on the DVR can be locked by pressing the LOCK
button.
Once locked, the lock LED will illuminate, and all buttons will be
disabled except the lock button.
Pressing buttons on the DVR or the remote controller will have
no effect.
To unlock the buttons, press the lock button or double click on
the screen if mouse is used, and then enter the appropriate
password to unlock the buttons.
Revision 6.0
29
APEX LITE SERIES DVR
B. BACKUP
The APEX DVR offers a variety of backup methods, from the built-in DVD-RW to a USB thumb drive.
AL-3200 requires monitor switching to perform CUSTOM channel mode backup.
1. Built-in CD/DVD
The APEX DVR comes with a built-in DVD-RW where video backup can be easily made. It supports
blank CD-R and DVD-R media.
1. Select MEDIA as CD/DVD.
2. Highlight EJECT then press the ENTER button to open the tray. When the tray opens, insert a
blank CD-R or DVD-R then close the tray.
3. To copy all the cameras, set CHANNEL as ALL otherwise, set CHANNEL as CUSTOM. To specify
cameras, go down to CHANNEL LIST and press the number buttons associated with the camera
numbers.
4. Set the desired backup range then select START.
*ESTIMATE provides the file size based on all cameras.
2. USB FLASH MEMORY DRIVE - “USB”
1. Insert a USB thumb drive then set MEDIA as USB.
2. If necessary, select FORMAT(FAT32) to format the device.
*Warning: Formatting will delete all the data in the USB thumb
drive. If necessary, copy or transfer the data to another device
before formatting.
3. To copy all the cameras, set CHANNEL as ALL otherwise,
set CHANNEL as CUSTOM. To specify cameras, go down to
CHANNEL LIST and press the number buttons associated with
the camera numbers.
4. Set the desired backup range then select START.
*ESTIMATE provides the file size based on all cameras.
Revision 6.0
30
APEX LITE SERIES DVR
3. USB FLASH MEMORY DRIVE – “USB(AVI)”
1. Insert a USB thumb drive then set MEDIA as USB(AVI).
2. If necessary, select FORMAT(FAT32) to format the device.
*Warning: Formatting will delete all the data in the USB thumb
drive. If necessary, copy or transfer the data to another device
before formatting.
3. Select the desired camera for AVI backup.
4. Set the start time and the duration (max. 60 min) then select
START.
*To play the avi file on the Windows Media Player, installing a
codec may require. Codec installer can be found in the Client Software CD.
4. MINI PLAYER
Upon Backup, the Mini Player will be copied into the optical
media or USB thumb drive automatically. There is no need to
install separate software to view the clips.
For advanced playback options, please use NUVICO EasyNet
- VMS.
Revision 6.0
31
APEX LITE SERIES DVR
C. PAN / TILT / ZOOM CONTROL
The APEX DVR supports a variety of PTZ cameras. Please read the PTZ manufacturer’s instruction
manual and confirm their settings fully prior to proceeding to any attempts to connect and control the PTZ
camera through the APEX DVR. Please match the configurations of the DVR with the PTZ settings in
following menus DEVICE˧
˧COM PORT and DEVICE˧
˧CAMERA˧
˧PTZ ID in the main MENU.
COM PORT
COM PORT: Name and type of the port that is used to connect the PTZ
PTZ ID
PTZ ID: ID number of the PTZ camera. It is suggested to match with channel numbers
To control a PTZ camera press the appropriate channel number to display in full screen then press
PTZ button to control the PTZ camera.
icon is displayed while in PTZ control mode. Controlling
PTZ function is also supported from the remote controller and Mouse.
Notice: While in PTZ mode, no other buttons will work in DVR operation mode. To exit from a PTZ mode,
press PTZ button and
icon will be disappeared.
The remote controller and the PTZ GUI share the same button layout. A remote controller can be used to
control a PTZ if a mouse is not present. Some buttons and functions only works with NUVICO PTZ
models in NUVICO protocol.
DIRECTION: Also used as a directional, enter and esc button in the PTZ menu.
Press right click on the mouse to hide the PTZ GUI.
MOUSE MOVEMENT TRACK: For NUVICO PTZs, a PTZ camera can be moved with the
mouse clicks on the picture.
The camera will track the mouse movement and change its speed based on the distance of
the mouse point from the center of the picture.
MENU: Access menu of the PTZ camera.
ESC
Revision 6.0
32
APEX LITE SERIES DVR
TELE, WIDE: Zoom in and out. Also used as a enter button on the PRESET, TOUR,
PATTERN and SCAN function setup menu.
FUNCTIONS: Used as an Iris Close/Open during IRIS mode. Also used as a focus Far/Near in
FOCUS mode.
In FOCUS mode it can be used as a ‘save & exit’ button in PRESET, TOUR, PATTERN and
SCAN function setup menu.
PRESET: Press desired preset number + PRESET button to run a preset.
Press this button to open a preset programming menu.
TOUR: Press desired tour number + TOUR button to run a tour.
Press this button to open a tour programming menu.
PATTERN: Press desired pattern number + PATTERN button to run a pattern.
Press this button to open a pattern programming menu.
SCAN: Press desired scan number + SCAN button to run a scan.
Press this button to open a scan programming menu.
Home: Press 1 + HOME button to run a home function.
SPEED CONTROL: Press desire number + SPD button to change control speed.
AUTO FOCUS/ AUTO IRIS
DELETE: Used to delete a preset.
PTZ: Enter or Exit from PTZ control mode.
MODE: Toggles between FOCUS and IRIS mode.
SHIFT: Press desired number and press this button to program a preset
NUMERIC BUTTONS: double click the video to display numeric keyboard. Right click to hide.
Press PTZ button to initiate PTZ function. The PTZ icon will appear
on the status bar. Thereafter, use the navigation buttons, as well as
Tele and Wide buttons, to control the PTZ camera.
In case using NUVICO protocol, the PTZ camera menu can be
accessed by pressing MENU button.
Revision 6.0
33
APEX LITE SERIES DVR
D. PLAYBACK
APEX DVR offers various search options for the video playback. It includes instant playback by
pressing playback button from the LIVE mode.
AL-3200 requires monitor switching to playback 17~32 channel.
Press the SEARCH button to access various search modes.
1. GOTO SEARCH
GOTO may be used to play back precise Date & Time.
Input desired date & time then select GO. The playback date &
time will change on the status bar.
Press ESC button to remove SEARCH window from the screen.
2. LOG SEARCH
LOG SEARCH allows for playback by event history logs.
Select desired time range for log search. Choose the type of the
event (motion, alarm) or select all.
Select SEARCH, list of event will be generated. Select desired
event from the link then press the ENTER button.
Press ESC button to exit from search mode.
Revision 6.0
34
APEX LITE SERIES DVR
3. CALENDAR SEARCH
Choose CALENDAR SEARCH from the main SEARCH menu.
Use the directional buttons to navigate to the desired YEAR,
MONTH. Highlight the calendar body and press ENTER to select
desired date.
Choose the yellow marked recorded date and press ENTER to
access the selected date.
Use the directional buttons to navigate to the desired hour and
minute slot.
Color bar code:
Normal record: Yellow
Event record: Red
SEL button can be used to mark user defined backup time.
Press SEL button when playback reaches the desired start time for
backup.
icon displays.
While
icon blinks, press SEL button once again soon as the
playback reaches the desired end time for the backup.
While
stays still, press BACKUP button to access the
backup menu. The pre-marked start and end time for the backup
should be in the time range set area of the backup menu.
While the DVR is playing back in any division mode, any number or the DISPLAY button can be pressed
to change the display mode.
Same control applies while in mouse control mode.
Revision 6.0
35
APEX LITE SERIES DVR
IV. ADVANCED SETUP
A. ADVANCED RECORD
ADVANCED RECORD offers two modes, SCHEDULE ON and SCHEDULE OFF. With SCHEDULE
OFF, users may set different recording parameters on a camera by camera basis. Detailed recording
configuration may be set by turning on the schedule option. With the SCHEDULE ON, the APEX DVR
offers more detail-oriented recording options, including ALARM RECORD mode.
1. SCHEDULE OFF
1.1 CONTINUOUS
CONTINUOUS recording setup is for a normal recording. In this
menu different settings can be configured for each camera.
Use combination of the ENTER button and the directional buttons
to change the setting.
USE
USE: Defines uses of normal recording. If it’s ON the channel will record all the time. If it’s
OFF it will not record (*for the motion recording ONLY mode, it should be kept OFF)
RES
RESOLUTION:
D1 stands for 720 x 480 (4 CIF),
FIELD stands for 720 x 240 (2 CIF),
CIF stands for 360 x 240.
PPS
RECORDING FRAME RATE
QUALITY
QUALITY:
Q1: Lowest quality
Q5: Highest quality
MOTION
MOTION ON/OFF: Motion record function ON/OFF. Also linked to the USE of MOTION setup
menu.
NEXT PAGE: Go up or down for more menu pages.
SEARCH
Revision 6.0
SEARCH BUTTON: After adjusting a value, press SEARCH button to apply to the rest.
36
APEX LITE SERIES DVR
1.2 MOTION
Enter desired FRAME RATE, QUALITY, PRE-RECORD, and
POST-RECORD settings for motion-based recording.
*The recording resolution follows by the CONTINUOUS record
mode.
USE
USE: Defines use of motion based recording.
If CONTINUOUS:OFF / MOTION:ON : the channel only records when motion is detected.
If CONTINUOUS:ON / MOTION:ON : the channel records based on the CONTINUOUS
record setup, it only changes its recording mode when motion is detected.
If CONTINUOUS:ON / MOTION:OFF : the channel always records as long as the
recording is on.
PPS
RECORDING FRAME RATE
QUALITY
PRE
POST(sec)
QUALITY:
Q1: Lowest quality
Q5: Highest quality
PRE RECORDING TIME: Buffer recording time interval before the event occurs.
POST RECORDING TIME: Additional recording time after the event finishes.
NEXT PAGE: Go up or down for more menu pages.
SEARCH
Revision 6.0
SEARCH BUTTON: After adjusting a value, press SEARCH button to apply to the rest.
37
APEX LITE SERIES DVR
2. SCHEDULE ON
When the schedule is on, users may define their own daytime, nighttime, as well as weekend record
settings. In case utilizing external alarm sources, ALARM RECORD settings can be adjusted.
2.1 SCHEDULE - DAY
Select DAY to configure the time range that will follow the
SCHEDULE - DAY setting.
The rest of the hour will automatically follow the SCHEDULE NIGHT setting.
Enter desired record settings for daytime recording.
ALARM record can be turned ON/OFF for each channel.
Refer page 36,37 for the detail of the configuration.
2.2 SCHEDULE - NIGHT
Enter the desired record setting for nighttime recording.
ALARM record can be turned ON/OFF for each channel.
Refer page 36,37 for the detail of the configuration.
2.3 SCHEDULE - WEEKEND
Select WEEKEND to set the days that will follow the weekend
schedule. Thereafter, enter the desired record setting for weekend
recording.
ALARM record can be turned ON/OFF for each channel.
Refer page 36,37 for the detail of the configuration.
Revision 6.0
38
APEX LITE SERIES DVR
2.4 MOTION - DAY
Enter the desired record settings for daytime motion recording.
Refer page 36,37 for the detail of the configuration.
2.5 MOTION - NIGHT
Enter the desired record settings for NIGHT motion recording.
Refer page 36,37 for the detail of the configuration.
2.6 MOTION - WEEKEND
Enter the desired record settings for WEEKEND motion recording.
Refer page 36,37 for the detail of the configuration.
2.7 ALARM RECORDING
Each channel can be mapped with single, four or ANY input
SENSOR.
Enter the desired record settings for ALARM RECORDING
PRE and POST recording duration follows by MOTION durations.
Refer page 36,37 for the detail of the configuration.
Revision 6.0
39
APEX LITE SERIES DVR
B. EVENT
Event menu allows customization of motion related options as well as alarm related options.
1. MOTION SETUP
Motion grids as well as the sensitivity level can be adjusted under
Motion Setup.
If Camera is set as ALL, the values will be applied to all the
cameras.
To make individual adjustment, select Camera Select and then
press the left or right arrow button to desired channel.
CAMERA SELECT
SENSITIVITY LEVEL
MOTION GRIDS
TEXT TO MOTION
CUSTOMIZE
Revision 6.0
CAMERA SELECT:
ALL: Applies to all cameras.
# OF CAMERA: Adjust single camera.
SENSITIVITY LEVEL:
LEVEL1: Less sensitive
LEVEL10: Most sensitive.
MOTION GRIDS: SELECT ALL, CLEAR ALL, SELECT AREA
TEXT TO MOTION ON/OFF: Handles POS text input as a motion event.
MOTION GRIDS CUSTOMIZATION
40
APEX LITE SERIES DVR
1.1 MOTION GRIDS
By default, all the motion grids are activated for all cameras and
the sensitivity level is 7.
To modify the setting, select the camera then adjust the sensitivity
level. To activate/deactivate motion grids, select Customize..
Use the combination of the enter button and the directional buttons
to activate or de-activate the grids.
Clear: detection OFF
Colored: detection ON
2. ALARM SOURCE
In case utilizing Alarm Inputs for alarm recording,
configure the appropriate circuit type, N/O or N/C.
Additionally, PTZ event preset may be configured.
When an event such as alarm trigger, motion, or
video loss occurs, APEX DVR sends preset
command to PTZ camera.
See the action policy below for the sample screen.
SOURCE OF THE EVENT
ACTION OF THE PTZ CAMERA ON CHANNEL1
SENSOR 1
PRESET 2
SENSOR 2
PRESET 5
MOTION
PRESET 8
POS TEXT
PRESET 9
VIDEO LOSS ON CH 3
PRESET 7
Revision 6.0
41
APEX LITE SERIES DVR
3. ALARM ACTION
ALARM ACTION configures how APEX DVR notifies
when an event occurs.
RELAY CONFIGURATION: duration time after the
relay is triggered.
BUZZER: duration time after the buzzer is ringed.
See the action policy below for the sample screen.
SOURCE OF THE EVENT
ALARM ACTIONS
SENSOR OR MOTION ON 1,2,3,4 ONLY
RELAY1
ANY SENSOR OR MOTION
RELAY2
SENSOR OR MOTION ON 10 ONLY
ANY POS TEXT
Revision 6.0
BUZZER, E-MAIL
RELAY 2
42
APEX LITE SERIES DVR
C. DEVICE
DEVICE menu allows customization of attached devices such as CAMERAS, MONITORS, AUDIO
DEVICES, COMPORT for PTZ cameras, and Keyboard controller (CK-3X) and TEXT INPUT DEVICES
for POS system.
1. CAMERA
Following display configuration can be customized from CAMERA
menu.
NAME, STATUS, VIDEO TYPE(auto), COLOR MODE, AGC,
BRIGHTNESS, CONTRAST.
PTZ PORT: Select COM port
PTZ ID: Address of the PTZ camera
For the PTZ port configuration, please refer to COM PORT section of the manual.
2. MONITOR
Each monitor can be configured in a different way. Select the appropriate monitor prior to making any
adjustment.
AL-1600 supports 1 main BNC, 1 VGA and 1 spot output. Each
main BNC and spot output can be configured for different
functions.
AL-3200 supports 2 main BNC (MON 1:1~16ch, MON
2:17~32ch) and 1 VGA. MONITOR SWITCHING function can be
used to switch between monitors.
Revision 6.0
43
APEX LITE SERIES DVR
MONITOR SELECT
EVENT POP-UP
CAMERA SEQ
VGA MODE
MONITOR SELECT: MAIN MONITOR/ SPOT MONITOR(AL-400,800,1600),
MONITOR 1,2(AL-3200)
EVENT POP-UP INTERVAL: Displays a camera(s) in full screen when an alarm
or motion triggers.
CAMERA SEQUENCE INTERVAL
VGA DISPLAY MODE: 800x600, 1024x768, 1280x1024
COVERT CHANNEL LIST
CONVERT CHANNEL LIST: Configure channels to be hidden on LIVE and
PLAYBACK. The hidden channels are still being recorded.
Each monitor can have different set of hidden channels.
SEQUENCE TOUR LIST
SEQUENCE TOUR LIST: Customized tour mode up to 16 custom sets. Each set can
display from single camera display to 16 camera display mode.
MONITOR SWITCHING
MONITOR SWITCHING ON/OFF: Toggle between monitor 1 and 2 on MONITOR 1
and VGA output. (ONLY AVAILABLE IN AL-3200)
3. AUDIO
DVR allows user to synchronize audio channels with desired video
channel. Also, the Audio Gain level may be adjusted.
4. COM PORT
Configure devices such as PTZ cameras and Keyboard Controller
that utilize COM ports.
RS-232C is fixed for COM 1
RS-485 is fixed for COM 2 & 3
After making physical connection, Select the appropriate device
and then enter the corresponding baud rate, parity, stopbit, and
databit.
*COM1 can be connected directly to the serial port of the NUVICO junction box for NVCK-3X keyboard
controller for a direct communication.
5. TEXT INPUTS
Configure text input devices such as POS system.
COM1 must set to TEXT mode in order for the TEXT INPUTS
mode to function properly.
*APEX DVR supports VSI Pro from AVE in single and network
mode.
Revision 6.0
44
APEX LITE SERIES DVR
D. NETWORK
The DVR utilizes widely available broadband Internet connections such as T1, Cable, and DSL to
allow remote access, monitoring, playback and control of the DVR in a relatively reliable manner.
1. NETWORK
Input the appropriate values for network connection.
To find out the values, please contact the network administrator
or Internet Service Provider.
Even if the DVR is connected to a dynamic ip services, the DVR
can be viewed from a remote location by using NUVICO Dynamic
DNS service.
Hostname formats:
Internet Explorer: http://hostname.connectip.net:port#
NUVICO EasyNet VMS: hostname.connectip.net
2. DDNS
The server URL is set as connectip.net, hosted by NUVICO.
It can manually be turned off if the user does not want to use
NUVICO server.
Revision 6.0
45
APEX LITE SERIES DVR
3. NTP SETTING
If an NTP server is available for time sync, enter the appropriate
values.
NTP MODE
Client: set to be a client for a time server
Server: set to be a time server for other APEX DVR.
SERVER LOCATION: Indicates the network location of the time
server.
LOCAL SERVER IP: IP address of the server if it is in local
network, otherwise default public ip address will be used for time
synchronization.
4. NOTIFICATION
Enter receiver’s e-mail address for simple e-mail notification.
If a local SMTP server must be used, the information should be
obtained by an IT professional.
The DVR will send notifications related to the system
abnormalities such as;
HDD Fail, Alarm, Fan Fail, Password Fail, DDNS Register Fail,
and Video Loss.
ATTACH PICTURE option is ONLY supported when ENCODING PRIORITY is set to RECORDING.
Refer SYSTEM menu for more detail.
Revision 6.0
46
APEX LITE SERIES DVR
CONFIGURING THE DVR WITH A ROUTER INTO A LAN
The majority of any network will often consist of a single IP address which shares the internet access
through a router. This IP address may be any external (public) static IP address or any dynamic IP
address issued by the Internet Service Provider.
The purpose of a router is to enable multiple personal computers and any other devices that require
internet connection to access the internet simultaneously. Most routers by default enable (open)
commonly used ports so that mainstream applications such as Hypertext Transfer Protocol (HTTP, Port
80), File Transfer Protocol (FTP, Port 21), Telnet (Port 23) and Post Office Protocol 3 (POP3, Port 110)
are used.
Over the next pages, Linksys WRT54G was used to illustrate a sample procedure.
Revision 6.0
47
APEX LITE SERIES DVR
Open Internet Explorer then type in http://192.168.1.1 to access the router. Enter the User Name and
Password to access the router. You will then be taken to the main menu. The factory user name is blank
and password is admin.
Revision 6.0
48
APEX LITE SERIES DVR
Click on Application & Gaming tab to access port forwarding configuration page.
Revision 6.0
49
APEX LITE SERIES DVR
Enter the three designated port: 7000 for the DVR. Point each port to the DVR. Illustration shows that
the DVR’s IP address being 192.168.1.85.
In the following examples, DVR7000 was used. Make sure you enable the port forwarding.
Port 7000 is added as shown.
Revision 6.0
50
APEX LITE SERIES DVR
CONFIGURING THE DVR WITH A CROSSOVER CABLE
This section will explain how to configure the computer to connect directly to the DVR. The following
illustration was based on a computer system running Windows XP Professional.
On the PC, click on Start, Settings, then
Control Panel to open the Control Panel.
Double-Click on ‘Network Connections’ to
open the network settings window.
Right-Click on the ‘Local Area Connection’
icon to drop a pull-down menu, then click on
Properties to enter the Local Area
Connection Properties.
Revision 6.0
51
APEX LITE SERIES DVR
Double-Click ‘Internet Protocol (TCP/IP)’ to
edit IP address information.
Select ‘Use the following IP address’, and enter
a matching network address and host address
for the computer. In this illustration, the IP
address entered is 192.168.0.50. Please note
that any host address may be used as long as
it does not conflict with the router’s host
address (1) and the DVR’s host address. Click
‘OK’ to save the settings.
Revision 6.0
52
APEX LITE SERIES DVR
Click OK to save the settings.
Revision 6.0
53
APEX LITE SERIES DVR
E. SYSTEM
The SYSTEM Menu allows modification of system features such as Local and Remote Passwords,
Holiday Schedule, Disk Utility, System Info, System Alarm, and Status Overview.
1. LOCAL USER
Up to 5 Local User Account levels with different privileges.
USE
USE Y/N: Enable/Disable the use of the user
PW
PASSWORD: Must be 6 numeric digits
MENU
PB
COPY
PTZ
AUTO LOGIN
Revision 6.0
MENU: Access for the menu
PLAYBACK: Access for Search & Playback
COPY/BACKUP: Access for Backup
PTZ CAMERA: Access for PTZ camera control
AUTO LOGIN: A default user can be set to bypass all password prompts
54
APEX LITE SERIES DVR
2. REMOTE USER
Up to 10 Remote User Accounts can be configured.
It is possible to assign different privileges, playback and relay
control, to different remote user accounts.
Detail settings for remote user accounts can be configured with
even greater detail including channel access on NUVICO EasyNet
- VMS, the client software or on NUVICO EasyNet – WebViewer,
the web client software.
USE
USE Y/N: Enable/Disable the use of the user
ID
ID: ID for the user
PW
PASSWORD: Must be under 15 numeric digits and alphabet characters
RL
RELAY: Access to control relay remotely
PB
PLAYBACK: Access for remote Search & Playback
ADDITIONAL ACCESS CONTROL THROUGH REMOTE CLIENT SOFTWARE
MICROPHONE
PTZ
MICROPHONE: Access for two-way auto
PTZ CAMERA: Access for PTZ camera control
QUICK REC
INSTANT RECORDING: Access for remote instant recording
CHANNELS
Channel access can be customized for each user
3. HOLIDAY SCHEDULE
Users may define their own Holidays if necessary. During the
Holidays, the DVR will record as the Weekend Schedule recording.
4. DISK UTILITY
By default, the hard disk drive will overwrite from the beginning
when it becomes full. BLOCK PLAYBACK, DISK FULL ALARM
and HDD TEMP ALARM features can be modified, if desired.
DISK FULL alarm only activates when HDD ALMOST FULL alarm
is activated under SYSTEM ALARM section of the menu
Revision 6.0
55
APEX LITE SERIES DVR
4.1 DISK MANAGER
Disk Manager is used to format/reuse a hard disk drive, as well
as to check the presence of Bad Blocks on the HDDs.
Status description:
ON: the disk is physically connected and ready to record
OFF: the disk is physically connected but not ready to record.
NO: the disk is physically NOT connected
* DVD-RW always indicates as OFF.
* Recording must be stopped to access DISK MANAGER
To format a hard disk drive, select OFF under STATUS, then
press ENTER. Select OK for format.
*If the hard disk was previously used from an APEX DVR and
want to reuse it, select CANCEL for reuse without disk format.
A disk can be removed for storing purposes.
Select ON under STATUS, then press ENTER.
Once a disk is removed, the STATUS changes to NO.
Select NO under STATUS, then press ENTER to remove the disk
from the list.
4.2 USB UTILITY
This menu allows users to update the firmware and load/save
settings with a USB thumb drive.
Revision 6.0
56
APEX LITE SERIES DVR
5. SYSTEM INFO
System information and options.
REMOTE CONTROL ID
KEYBOARD CONTROL ADDR
DVR NAME
RECORD NO VIDEO
PLAYBACK DEINTERLACE
ENCODING PRIORITY
KEY TONE
LANGUAGES
TRANSPARENCY
ID set for remote controller. Up to 16 can be set
Address to be controlled by NVCK-3X keyboard controller
DVR name listed on the VMS network viewer
DVR also records a blank video during motion only recording. It also records
while there is no video.
De-interlace full D1 picture to eliminate white interlace lines
RECORDING/NETWORK: changes encoding mode for full recording or faster
network transmission (some limitation applies during network mode)
Key tone for DVR buttons and remote controller
OSD language options
Transparency level control for OSD and MENU.
MONITOR KEY
ON/OFF. Enable /Disable MON button on the DVR
MAC ADDRESS
MAC address for the network port
*For faster network streaming, DVR may compensate 2 or 3 frames from recording when the Encoding
priority is set to Network.
5.1 SYSTEM LOG
All system-related events and alerts of the DVR are listed in
chronological order, starting from the most recent.
Press ENTER to navigate through the logs. Use LEFT or RIGHT
arrow button to move by pages.
Revision 6.0
57
APEX LITE SERIES DVR
6. SYSTEM ALARM
The DVR uses various event sources for system alert.
SYSTEM ALARM SOURCE
HDD FAIL
HDD ALMOST FULL
Sends an alert incase of hard disk fail or errors
Sends an alert when HDD is almost full based on DISK UTILITY configuration
PASSWORD FAIL
Sends an alert incase of login attempt fails
DDNS REG-FAIL
Sends an alert when DDNS registration fails
VIDEO LOSS
Sends an alert incase of video loss (*a camera must set to USE OFF from the
DEVICE menu in order to bypass the VIDEO LOSS)
SYSTEM ALARM METHOD
WANING MESSAGE
BUZZER
Pop-up message
Audible buzzer built-in to the DVR
SEND E-MAIL
Sends e-mail based on the configuration of NOTIFICATION under NETWORK menu
RELAY-4 ON
Triggers relay 4
*HDD ALMOST FULL is only functional when HDD OVERWRITE is set to OFF.
7. STATUS OVERVIEW
STATUS OVERVIEW displays
Current record settings, Host Name, Firmware Version, Total
HDD Size, Free Space, and the status of the installed HDDs.
When the DVR cannot detect a hard disk drive, the corresponding
drive port is displayed in red.
Revision 6.0
58
APEX LITE SERIES DVR
8. DISK OVERVIEW
Displays the status of all internal hard disk drives that are connected.
Supports RECORDING, S.M.A.R.T and TEMPERATURE mode
F. MAXIMUM RECORDING RATE & RESOLUTION LIMIT PER
CHANNEL WITH ADVANCED FEATURES
ADVANCED FEATURES
NETWORK PRIORITY
Revision 6.0
AL-400
AL-800
AL-1600
AL-3200
15 pps @ CIF / Q5
15 pps @ CIF / Q5
15 pps @ CIF / Q5
15 pps @ CIF / Q5
59
APEX LITE SERIES DVR
V. NUVICO EasyNet - WebViewer
A. INSTALLING THE NUVICO EasyNet - WEBVIEWER
When a PC connects to the APEX DVR, the PC will automatically search for the web client viewer. If the
web client software has not been installed, the DVR will direct the PC to an installer file which will
download and install the APEX plug-in.
Before installing the NUVICO EasyNet - WebViewer, please verify that the computer onto which the
program is being installed meets the minimum requirements:
MINIMUM REQUIREMENTS
Intel Core™2 Duo 2.4Ghz
2 GB
512 MB
1024 x 1024
Windows XP SP2
8.1 or Higher
6
CPU
MEMORY
Video Card
Resolution
Operating System
Direct X
Internet Explorer
Open Internet Explorer and enter the DVR’s IP address.
“admin” is the default USER ID as well as the PASSWORD.
If the WebViewer application is not found, then an ActiveX
installation prompt will appear.
As illustrated, click the prompt bar to install the ActiveX control.
Click ‘Install’ to proceed.
Revision 6.0
60
APEX LITE SERIES DVR
Turn off all the web browser programs.
Installation in progress
After the installation is completed, click ‘Close’.
Revision 6.0
61
APEX LITE SERIES DVR
B. USING THE NUVICO EasyNet - WebViewer
Open Internet Explorer, type the DVR’s IP address to connect, then
type the user ID and the password.
1. MAIN DISPLAY
1. CONFIG: Click to access Configuration Tools
2. Playback: Click to access playback
3. Camera: Click to turn on/off the camera from live view
4. Split Mode: Click on desired view mode icon to change split mode
5. Event Log: Displays and update event log in real time
6. Motion Icon: Indicates motion activity on camera
7. Alarm Icon: Indicates alarm event on camera
8. Alarm Indication: Indicates alarm event
9. Relay Control: If a relay device is present at the DVR, relay output may be controlled
10. Microphone: Two-way audio
11. DVR name
12. De-interlace on/off
Revision 6.0
62
APEX LITE SERIES DVR
2. CONFIGURATION TOOLS
Click ‘Config’ to access Configuration Tools
1
2
3
4
5
6
1. System Information: Indicates the DVR’s information such as model, hardware version, firmware
version, MAC address, and IP address
2. Recording: Configures record settings
3. Event:: Configures event-related options
4. Device: Configures devices such as cameras, audio devices, PTZ, etc.
5. Network: Configures network-related settings
6. System: Configures system-related options
Revision 6.0
63
APEX LITE SERIES DVR
3. PLAYBACK
1. HDD Information: Displays HDD-related information such as capacity, available space, earliest
recording, and most recent recording
2. Calendar: Click to select the date to play back
3. HDD Gauge: Displays percentage of used space out of total HDD capacity
4. Config: Click to access Configuration Tools
5. Save Image: Click to take a snapshot
6. Print: Click to print an image to a printer
7. Live: Click to return to live mode
8. Backup utility: Click to download recorded data to the local PC
Revision 6.0
64
APEX LITE SERIES DVR
8.1 REC
Choose Start Time and End Time, then camera(s). Next, select
‘File Name’ to designate a download folder as well as the file
name. To make the file password protected, enter the
password and verify the password.
8.2 AVI
Recorded data also may be downloaded as an AVI file,
however, only one camera can be selected to download.
*Warning: The AVI file may not be played back from
Windows Media Player. The APEX codec must be
installed on the PC in order to play back.
9. PB Control: (From the left) Step Reverse, Fast Rewind, Play or Reverse Play, Pause, Fast Forward,
Step Forward
10. DirectX Control: Click on the icon to enable/disable DirectX
11. Audio PB: Click on the speaker icon to enable/disable mute. Also use the slide bar to control volume.
12. Split Mode: Click on the desired view mode icon to change split mode
13. GO TO: After selecting a date from the calendar, enter the time to play back
Revision 6.0
65
APEX LITE SERIES DVR
4. PTZ CONTROL
To control a PTZ camera, right click on the PTZ camera
video, then click ‘PTZ’ to enter PTZ mode.
When a crosshair appears in the middle of the screen,
click on the picture to pan or tilt. Use the mouse scroll (if
equipped) to zoom in or zoom out.
Revision 6.0
66
APEX LITE SERIES DVR
VI. TECHNICAL SUPPORT
Please consult this manual, as well as our website FAQs thoroughly before contacting
the NUVICO Help Desk. The NUVICO help desk is available Monday through Friday,
9:00am to 5:30pm Eastern Standard Time.
TOLL-FREE: 866–523–1700
TEL:
201–541–1605
FAX:
201–541–1620
E-MAIL:
[email protected]
HOMEPAGE: http://www.nuvico.com
Revision 6.0
67
APEX LITE SERIES DVR
Notes
Revision 6.0
68
APEX LITE SERIES DVR
Notes
Revision 6.0
69
APEX LITE SERIES DVR