1
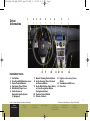
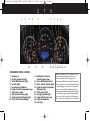
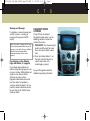
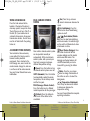
70520_08a_CTS_QRG_062207.qxp:CTS 2007 A
6/22/07
4:16 PM
Page 1
C U S TO M E R C O N V E N I E N C E / P E R S O N A L I Z AT I O N G U I D E
70520_08a_CTS_QRG_062207.qxp:CTS 2007 A
C
6/22/07
T
4:16 PM
S
Page 2
TABLE OF CONTENTS
DRIVER INFORMATION
Instrument Panel . . . . . . . . . . . .1
Instrument Panel Cluster . . . . . . .2
Driver Information Center . . . . . .3
DVD Navigation System Controls 4
SAFETY & SECURITY
Keyless Access System . . . . . . . .5
COMFORT/CONVENIENCE
Daytime Running Lamps . . . . . . .6
Rainsense™ Windshield Wipers .6
Heated Windshield Washer Fluid .7
Power Window Controls . . . . . . .7
Universal Home Remote . . . . . . .7
Sunroof . . . . . . . . . . . . . . . . . . . .8
Ultrasonic Rear Parking Assist . . .8
Setting The Clock . . . . . . . . . . . .8
Trunk Lock Release . . . . . . . . . . .9
Accessory Power Outlet(s) . . . . .9
Dual Climate Control System . . . .9
XM™ Satellite Radio . . . . . . . . .14
Six-Disc CD Changer Controls . .14
OnStar® . . . . . . . . . . . . . . . . . . .15
SEATS & MIRRORS
Passenger Air Bag Status
Indicator . . . . . . . . . . . . . . . . . .10
Power Seat Adjustment . . . . . . .10
Heated and Ventilated Seats . . .10
POWERTRAIN & MAINTENANCE
Engine . . . . . . . . . . . . . . . . . . . .15
Transmission . . . . . . . . . . . . . . .16
Traction & Stability . . . . . . . . . .16
Automatic Dimming Rearview
Mirror . . . . . . . . . . . . . . . . . . . .11
Power Outside Rearview
Mirrors . . . . . . . . . . . . . . . . . . .11
Memory Seat and Mirrors . . . . .11
Curb View Assist Mirror . . . . . . .12
OWNER PRIVILEGES™
Roadside Service . . . . . . . . . . . .17
Customer Assistance . . . . . . . . .17
Cadillac Online . . . . . . . . . . . . .17
AUDIO/PERSONALIZATION/
COMMUNICATION
Audio Systems . . . . . . . . . . . . .12
Hard Disk Drive (HDD) . . . . . . .13
70520_08a_CTS_QRG_062207.qxp:CTS 2007 A
1
Driver
Information
6/22/07
2
3
Air Outlets
Turn Signal/Multifunction Lever
Cruise Control Buttons
Instrument Panel Cluster
Windshield Wiper Lever
Audio System or
Navigation/Audio System
(if equipped)
Page 3
5
4
8
INSTRUMENT PANEL
1.
2.
3.
4.
5.
6.
4:16 PM
9
Safety &
Security
10
11 12
7. Hazard Warning Flasher Button
8. Audio Steering Wheel Controls
and Source Button
9. Audio Mute Button (Base Radio)
or Voice Recognition Button
(Navigation System)
10. Traction Control Button
11. Climate Controls
7
1
13
14
12. Lighter or Accessory Power
Outlet
13. Transmission Shift Lever
14. Glove Box
J Reviewed with Customer (Please Check Box)
Refer to Owner Manual for further information.
Driver
Information
6
1
Comfort/
Convenience
Seats & Mirrors
Audio/
Personalization/
Communication
Powertrain &
Maintenance
Owner
Privileges™
1
70520_08a_CTS_QRG_062207.qxp:CTS 2007 A
1
2
3
C
6/22/07
4
10
T
4:16 PM
5
11
S
Page 4
6
12
7
13 14
8
9
15 16 17 18
19
INSTRUMENT PANEL CLUSTER
1.
2.
3.
4.
5.
6.
7.
8.
9.
10.
Tachometer
Air Bag Readiness Light
Safety Belt Reminder Light
Security Light
Speedometer/Odometer
Engine Coolant Temperature Gage
Tire Pressure Light
ABS System Warning Light
Traction Control Warning Light
Driver Shift Control Display
11. Malfunction Indicator
(Check Engine) Lamp
12. Driver Information Center
13. Brake System Warning Light
14. Engine Coolant Temperature
Warning Light
15. Oil Pressure Light
16. Charging System Light
17. Engine Oil Pressure Gage
18. Lights On Reminder
19. Fuel Gage
Note: The instrument cluster is designed to let you
know about many important aspects of your
vehicle’s operation. Some of the gages and
indicators may differ from the illustration presented.
The message center can provide critical information
to prevent damage to your vehicle. It is important
for you to read your Owner Manual and become
familiar with the information that is being relayed to
you by the lights, gages and indicators, particularly
the message center, as well as what action can be
taken to ensure your safety and to prevent damage.
70520_08a_CTS_QRG_062207.qxp:CTS 2007 A
6/22/07
DRIVER INFORMATION CENTER
Your vehicle’s Driver Information Center
(DIC) provides vehicle information,
vehicle feature customization and
vehicle warning messages. The DIC
messages will be shown on your
instrument cluster display. The DIC
buttons are located on the left side
of the instrument panel. To operate the
DIC, the ignition switch must be in the
Run position.
(Customization): Press this button
to scroll through the customization
settings.
To customize features:
1. Place the vehicle in Park (P).
2. Press the
(Customization) button
to enter the feature settings menu.
Repeated presses scroll through the
available features.
3. Press the
(Set/Reset) button to
access the settings for the feature
being displayed.
4. Press the
(Menu Up/Down) button
to scroll through the available settings
for each feature.
5. Press the
(Set/Reset) button to
choose the setting being displayed and
move to the next feature.
4:16 PM
Page 5
(Trip/Fuel): Press this button to
scroll through the following trip and
fuel information:
• Odometer
• Trip A or Trip B
• Fuel Range (until empty)
• Average Fuel Economy
• Timer
• Instantaneous Fuel Economy
• Average Speed
• Speedometer
Safety &
Security
(Set/Reset): Press
and hold this button to
reset DIC information
while it is displayed or
to acknowledge a
warning message. This
button is also used for
Customization; press to
select feature settings.
(Menu Up/Down): Press
this button to scroll up or
down the menu items.
J Reviewed with Customer (Please Check Box)
Refer to Owner Manual for further information.
Driver
Information
(Vehicle Information):
Press this button to scroll
through the following
vehicle information:
• Oil Life Remaining
• Units (English/Metric)
• Parking Assist
• Tire Pressure
• Battery Voltage
• Calibrate Compass
• Change Compass Zone
• Relearn Remote Key
Comfort/
Convenience
Seats & Mirrors
Audio/
Personalization/
Communication
Powertrain &
Maintenance
Owner
Privileges™
3
70520_08a_CTS_QRG_062207.qxp:CTS 2007 A
Warnings and Messages
If a problem is sensed in one of your
vehicle’s systems, a warning or
message will appear on the DIC
display.
Note: Your vehicle’s warnings and messages
provide critical information that can prevent
damage to your vehicle. Review your Owner
Manual to become familiar with the
information displayed and the action
required.
Check Engine or other Warning
Lights with OnStar® (if equipped)
If your check engine light or any
other warning message appears, you
can press the blue OnStar button and
speak to a live advisor. OnStar
Advisors can access certain
diagnostic information and can tell
you how serious the problem is,
what you should do about it, or can
contact a dealer or Roadside service
for you. Refer to the OnStar Owner
Guide for details.
C
6/22/07
T
4:16 PM
S
Page 6
NAVIGATION SYSTEM
CONTROLS
If your CTS has the optional
Navigation/Audio system, use the
following controls to access the
vehicle status menu.
1. TUNE/SELECT: Turn the lower right
knob to scroll through the menu.
Press the knob to select a menu
item.
2. Press the bulleted button (•) on
the right side of the display to
select a menu item or to
acknowledge a prompt.
See your Navigation manual for
additional operating instructions.
70520_08a_CTS_QRG_062207.qxp:CTS 2007 A
6/22/07
4:16 PM
Page 7
Safety & Security
KEYLESS ACCESS SYSTEM
(if equipped)
With a Keyless Access System, you
can keep the Keyless Access
transmitter in a pocket or purse and
operate the doors, ignition and trunk.
The transmitter communicates with
the vehicle’s computer system via
radio antennas.
(Lock): Press this button once to
lock all the doors. Press twice to also
flash the turn signals twice and
sound the horn once.
(Unlock): Press this button to
unlock the driver’s door. Press it
again within 5 seconds to unlock all
remaining doors.
(Remote Start): This feature can
be used to start the engine from
outside the vehicle.
To remote start the vehicle:
1. Aim the transmitter at the vehicle.
2. Press and release the Lock button
on the transmitter.
3. Immediately press and hold the
Remote Start button for about four
seconds. When the parking lamps
flash, release the button. The
engine will start and the parking
lamps will remain on. The engine
will continue running for
10 minutes.
4. Repeat these steps for a 10-minute
time extension. Only two
consecutive remote starts are
allowed.
J Reviewed with Customer (Please Check Box)
Refer to Owner Manual for further information.
Driver
Information
Safety &
Security
When you enter the vehicle after a
remote start, apply the brake and
push and turn the ignition knob to
the Run position before driving.
(Remote Trunk Release): Press
this button to release the trunk lid
when the engine is off or the shift
lever is in Park (P).
The trunk may also be opened using
the Trunk Release button located at
the rear of the driver’s door map
pocket.
(Vehicle Locator/Panic
Alarm): Press this button to locate
your vehicle in a parking lot. The
horn will chirp three times and the
headlamps and turn signal lamps will
flash three times.
To sound the panic alarm, press and
hold the button for three seconds.
The horn will chirp and the turn
signal lamps will flash for 30
seconds. Press the button again to
cancel the panic alarm. The vehicle
must be turned off to use the alarm.
Comfort/
Convenience
Seats & Mirrors
Audio/
Personalization/
Communication
Powertrain &
Maintenance
Owner
Privileges™
5
70520_08a_CTS_QRG_062207.qxp:CTS 2007 A
C
6/22/07
T
4:17 PM
S
Page 8
Comfort/Convenience
DAYTIME RUNNING LAMPS
(DRL)
Your vehicle’s Daytime Running
Lamps (DRL) automatically illuminate.
The sensor that activates the DRL
and the headlights automatically is
located on top of the instrument
panel. Avoid covering the sensor to
ensure proper light operation.
RAINSENSE™
WINDSHIELD WIPERS
The Rainsense windshield wipers use
a sensor to automatically operate the
wipers when needed, depending on
driving conditions and the sensitivity
setting. If the system is left on for
long periods, an occasional wipe
may occur without any moisture on
the windshield to indicate the system
is activated.
The headlamps also will be turned on
automatically when the Rainsense
wipers are active if the exterior lamp
control switch is in the AUTO
position.
Note: Do not place stickers or other
items on the exterior glass surface
directly in front of the moisture sensor.
Doing this could cause the moisture
sensor to malfunction.
WIPER CONTROLS
The lever to operate the windshield
wipers and washers is located on the
right side of the steering column.
(Mist): Pull the lever down
and release for a single wiping cycle;
hold the lever down for more cycles.
(Off): Place the lever in this
position to turn off the wipers.
(Delay): Place the lever in this
position to set a delay between
wipes.
(Delay Adjustment): Rotate the
band on the lever to adjust the length
of the delay between wipes. The
closer you move the band toward
Mist, the longer the delay.
1 (Low Speed): Place the lever in this
position for slow, steady wiping
cycles.
2 (High Speed): Place the lever in
this position for rapid wiping cycles.
70520_08a_CTS_QRG_062207.qxp:CTS 2007 A
Washers: Press the button located
on the end of the wiper lever to
cycle the windshield washer.
Headlamp Washers (if equipped)
The headlamp washers are activated
when the windshield washer is
activated. This occurs only when
the headlamps are on. To wash the
headlamps, press the washer button
located at the end of the windshield
wiper lever.
HEATED WINDSHIELD WASHER
FLUID (if equipped)
The heated windshield washer fluid
system can help clear ice, tree sap
and bugs from the windshield.
Press the
(Heated Washer Fluid)
button, located on the climate
control system panel, to start four
automatic heated wash/wipe/pause
cycles. The washer fluid may take up
to 40 seconds to heat before the first
cleaning cycle. The remaining
cleaning cycles may take about
20 seconds to occur.
To cancel any remaining cycles, press
the
button again.
6/22/07
4:17 PM
Page 9
POWER WINDOW CONTROLS
UNIVERSAL HOME REMOTE
Express Down
All of your vehicle’s windows are
equipped with an express-down
feature. Press the switch to the
second position to activate the
express-down feature. Press down
again or pull up briefly on the switch
to stop the window.
Express Up
This feature is on both front power
windows. Pull the switch up to the
second position to activate the
express-up feature. Pull up again or
press down on the switch briefly to
stop the window.
The Universal Home Remote, located
on the overhead console, is a
combined universal transmitter and
receiver that can activate up to
three devices, such as garage door
openers, entry door locks, gates and
security systems.
It’s recommended that you read the
instructions in your Owner Manual
completely before attempting to
program any of the three channels
on the Universal Home Remote. The
engine should be turned off when
programming the remote.
TIRE SEALANT AND
COMPRESSOR KIT (if equipped)
The Tire Sealant and Compressor kit
is located in the trunk. The kit can be
used to temporarily fill a flat tire so
you can safely drive to a repair
facility.
See your Owner Manual for complete
operating instructions.
J Reviewed with Customer (Please Check Box)
Refer to Owner Manual for further information.
Driver
Information
Safety &
Security
Note: Do not use the Universal Home
Remote with any garage door opener that
does not have the “stop and reverse”
feature or any opener manufactured
before April 1, 1982.
Comfort/
Convenience
Seats & Mirrors
Audio/
Personalization/
Communication
Powertrain &
Maintenance
Owner
Privileges™
7
70520_08a_CTS_QRG_062207.qxp:CTS 2007 A
SUNROOF (if equipped)
1
2
C
6/22/07
T
4:17 PM
S
Page 10
hold the front of the switch (2) to
open the sunroof. Press and hold the
rear of the switch (2) to close the
sunroof from either position.
The sunroof will express open if you
briefly press the button and release.
ULTRASONIC REAR PARKING
ASSIST
The control switch for the sunroof is
located on the overhead console. It
will operate only while the ignition is
on or Retained Accessory Power is
active.
Sunshade: Press and hold the front
of the switch (1) to open the
sunshade; or the rear of the switch
(1) to close the sunshade.
The sunshade will express open if
you briefly press the button and
release
Sunroof: Press and hold the front of
the switch (2) to vent the sunroof.
From the vent position, press and
This feature uses ultrasonic sensors
on the rear bumpers to help you
avoid colliding with objects when
parking the vehicle. It operates only
at speeds less than 5 mph (8 km/h).
The rear parking assist display is
located near the rear window and
provides the following indicators:
• At distances between 40 inches
(1 m) and 8 ft. (2.5 m), a single
amber light will come on.
• At distances between 23 inches
(0.6 m) and 40 inches (1 m), two
amber lights will come on.
• At distances between 12 inches
(0.3 m) and 23 inches (0.6 m),
three lights (amber/amber/red)
will be on.
• At distances less than 12 inches
(0.3 m), a beeping sound will
repeat for a short time and all
three lights (amber/amber/red)
will flash.
The system can be disabled through
the Driver Information Center (DIC).
See your Owner Manual for more
information.
SETTING THE CLOCK
The clock adjustment buttons are
located on the instrument panel
below the clock face. Press and hold
the right button to move the clock
hands forward or the left button to
move the clock hands backward.
Holding the button causes the hands
to move quickly. Press and release
either button to adjust the time in
one minute increments.
70520_08a_CTS_QRG_062207.qxp:CTS 2007 A
TRUNK LOCK RELEASE
Press the trunk release button,
located at the back of the driver’s
door map pocket, to open the trunk.
The shift lever must be in Park (P) or
Neutral (N) if your vehicle has an
automatic transmission. For manual
transmission vehicles, the shift lever
must be in Neutral with the parking
brake set.
ACCESSORY POWER OUTLET(S)
Your vehicle has three accessory
power outlets that can be used to
connect auxiliary electrical
equipment. One is located in the
front storage area, one is inside the
center console storage bin, and one
is on the rear of the center console.
See your Owner Manual from more
information.
6/22/07
4:17 PM
Page 11
DUAL CLIMATE CONTROL
SYSTEM
Your vehicle’s climate control system
can be operated manually or
automatically. With a dual climate
control system, both you and your
front seat passenger can choose
different temperature settings.
(Power): Press this button to turn
the climate control system on or off.
AUTO (Automatic): Press this button
to automatically control the inside
temperature, the air delivery mode
and the fan speed.
PASS (Passenger Climate Control):
Press this button to set a different
inside temperature for the passenger.
(Defrost): Press this button to
direct most of the airflow to the
windshield
Refer to Owner Manual for further information.
Driver
Information
Safety &
Security
Comfort/
Convenience
Seats & Mirrors
(Fan): Press the up or down
arrow to increase or decrease fan
speed.
(Air Conditioning): Press this
button to turn the air conditioning
system on or off.
/
(Recirculation/Outside
Air): Press to select recirculation or
outside air modes. An indicator light
on the switch will illuminate to show
which mode is active.
(Rear Window Defogger): Press
this button to activate the rear
window defogger and the heated
outside rearview mirrors. The
defogger and heated mirrors will
shut off automatically or can be
turned off by pressing the button
again.
(Mode): Press the up or down
arrow to change the direction of
the airflow as well as to select the
defog mode.
/
(Temperature Adjustment):
Press the up or down arrow button
to increase or decrease the
temperature setting.
See your Owner Manual for complete
operating instructions.
J Reviewed with Customer (Please Check Box)
Audio/
Personalization/
Communication
Powertrain &
Maintenance
Owner
Privileges™
9
70520_08a_CTS_QRG_062207.qxp:CTS 2007 A
Seats & Mirrors
PASSENGER AIR BAG STATUS
INDICATOR
Your vehicle is equipped with a
Passenger Sensing System located in
the front passenger seat for the front
passenger frontal air bag, and a
passenger air bag status indicator
located below the clock on the
instrument panel.
Note: It is recommended that children
not be placed in the front passenger seat,
even with the Passenger Sensing System.
All children should be secured in a rear
seat, including an infant riding in a rearfacing infant seat, a child riding in a
forward-facing child seat and an older
child riding in a booster seat.
C
6/22/07
T
4:17 PM
S
Page 12
1. Move the front or rear part of the
control lever up or down to raise
or lower the front or rear of the
cushion.
2. Push down or pull up at the center
of the control lever to raise or
lower the entire seat.
3. Slide the control lever forward or
rearward to move the entire seat
in that direction.
Power Recliner (if equipped)
The power recliner controls are
located to the rear of the adjustment
controls.
4. Move the top of the control lever
forward to raise the seatback or
rearward to recline the seatback.
2
POWER SEAT ADJUSTMENT
(if equipped)
The eight-way power seat controls
are located on the outboard sides of
driver and passenger seats (if
equipped).
4
1
1
3
Power Lumbar (if equipped)
The power adjustable lumbar feature
is controlled by a two-way switch
located rearward of the power seat
switch. Press the switch in either
direction to adjust the lumbar in the
seatback to your most comfortable
position.
HEATED AND VENTILATED
SEATS (if equipped)
The buttons for the heated and
ventilated front seats are located on
the climate control panel. Continue
to press and release the desired
button to cycle through the
temperature settings of high,
medium and low.
(Heated Seat and Seatback):
Press this button to control the
heated seat and seatback.
(Ventilated Seat): Press this
button to control the ventilated seat.
The climate control display shows the
current setting, or blank if off.
70520_08a_CTS_QRG_062207.qxp:CTS 2007 A
AUTOMATIC DIMMING
REARVIEW MIRROR
The automatic dimming feature
becomes active every time the
vehicle is started.
(On/Off): Press this button to turn
the automatic dimming mirror off or
back on while driving. The symbol on
the button will illuminate when
automatic dimming is active.
POWER OUTSIDE REARVIEW
MIRRORS
6/22/07
4:17 PM
Page 13
desired outside mirror. The neutral
position will turn the power
operation capability off.
2. Press the directional arrow on the
control button to move the mirror
in that direction.
The mirrors can be folded manually
inward to prevent damage in car
washes or garages. Return the
mirrors to their normal positions
before driving. The mirrors also are
heated to clear fog, snow or ice
when the rear defogger is on. Refer
to the Comfort/Convenience section
of this guide.
MEMORY SEAT AND MIRRORS
The controls for both outside
rearview mirrors are located on the
driver’s side armrest.
1. Press the left or right side of the
rocker switch to operate the
Setting Driver’s Position
The buttons to set the seat and
mirror memory are on the driver’s
doors. Adjust the driver’s seat,
including the seatback recliner and
both outside mirrors.
1. Press and hold button 1 until two
beeps are heard to confirm
memory setting.
2. Repeat the procedure using button
2 to store memory for a
second driver.
J Reviewed with Customer (Please Check Box)
Refer to Owner Manual for further information.
Driver
Information
Safety &
Security
Setting Exit Position
1. Press button 1 or the Unlock
button on the keyless entry
transmitter with number 1 on the
back.
2. Adjust the driver’s seat to the
desired exit position.
3. Press and hold the exit button
until two beeps are heard to
confirm exit memory setting.
Repeat the procedure for a second
driver using button 2 or the
Unlock symbol on the keyless
entry transmitter with 2 on the
back.
To recall stored exit positions, press
and release the exit button . A
beep will sound and the seat will
move to the memory exit position
for the identified
driver. If no exit
position is stored,
the seat will
move all the
way back.
Comfort/
Convenience
Seats & Mirrors
Audio/
Personalization/
Communication
Powertrain &
Maintenance
Owner
Privileges™
11
70520_08a_CTS_QRG_062207.qxp:CTS 2007 A
Vehicles with automatic transmissions
must be in Park (P) to recall exit
positions. For manual transmissions,
the parking brake must be set if the
engine is running.
C
6/22/07
T
4:17 PM
S
Page 14
Audio/Personalization/Communication
CURB VIEW ASSIST MIRROR
When activated through the Driver
Information Center (DIC), the mirrors
will tilt to a pre-selected position
when the vehicle is shifted into
Reverse (R) to assist the driver when
parallel parking. If further adjustment
is needed, the standard power
controls can be used. Five seconds
after shifting out of Reverse (R), the
mirror will return to its original
position. The Curb View Assist
feature can be enabled/disabled
through the DIC.
AUDIO SYSTEMS
While most of the features on your
radio will look familiar, following are
some that may be new.
VOL
(Volume/Power): Press this
knob to turn the system on or off.
Turn the knob to adjust the volume.
TUNE/TONE: Turn this knob to select
radio stations. Press the knob to
adjust the speaker tone and balance.
AUDIO: Press this button to access
the audio modes. To choose a mode,
use the touch screen or continually
press the AUDIO button to toggle
through the available modes.
AM: Select to access AM frequency.
FM: Select to access FM frequency.
XMTM (if equipped): Select to access
XMTM satellite radio
CD: Select to play a CD, an MP3
player or Hard Drive Device (HDD)(if
equipped) instead of the radio.
HDD: Select to access the Hard Drive
Device feature.
AUX: Select to automatically search
for a device connected to the
auxiliary input jack.
70520_08a_CTS_QRG_062207.qxp:CTS 2007 A
Optional Hard Drive Device
(HDD) and Navigation Radio
Features
REC (Record): Press this button to
store a song from a media source to
the HDD.
CONFIG: Press this button to display
the system configuration menu.
MENU/SELECT: Turn this knob to
scroll through a list of available radio
stations and functions. Press the knob
to select a station or menu option.
DEL: Press this button to erase
selections from the HDD
menu/memory.
INFO (Information): Press this button
to access “Speech Rec Help”. If
equipped with XM, this button will
access “Weather” information.
FAV (Favorites): Press this button to
go through up to six pages of any
combination (AM, FM or XM, if
equipped) of preset radio stations.
On each page, up to six stations are
available by using the six pushbuttons
below the radio display or on the
Navigation touch screen.
SEEK
: While listening to AM,
FM, or XM, press the left or right
6/22/07
4:17 PM
Page 15
arrow button to go to the previous or
next radio station. When a CD or
HDD selection is playing, press the
left or right arrows to go to the start
of the current track or MP3 file or the
next track or MP3 file.
(Eject): Press this button once to
eject the currently playing CD or DVD
(if equipped); or, if equipped with the
multiple-disc CD player, press and
hold this button to eject all CDs. If a
CD is not removed after several
seconds, it will be pulled back into
the player automatically.
/ (Play/Pause): Press this button
to play a media source or to pause a
currently playing media source. Use
this button to initiate time shift mode
which allows you to play back AM,
FM or XM content for the previous
60 minutes. This feature will continue
to work even if the ignition is turned
off.
FWD/
REV (Forward/
Reverse): Press and hold the right or
left arrow button to advance or
reverse through a CD or MP3 track.
These buttons are also used to move
through time shift audio.
Safety &
Security
Radios with a Hard Drive Device
(HDD) can store songs from a CD or
media storage device to your audio
system. A USB port is located in the
center console storage bin, between
the Accessory Power Outlet and the
auxiliary input jack.
To access the HDD:
1. Press the AUDIO button then
select the HDD tab or press the
AUDIO button multiple times to
toggle to this source.
2. Turn the Menu/Select knob to
select an option from the HDD
menu.
3. Press the Menu/Select knob to go
to the next menu.
Press the REC button to store a song
or songs for the selected source.
See your Owner Manual for more
detailed information about this
feature.
J Reviewed with Customer (Please Check Box)
Refer to Owner Manual for further information.
Driver
Information
Hard Drive Device (HDD)
(if equipped)
Comfort/
Convenience
Seats & Mirrors
Audio/
Personalization/
Communication
Powertrain &
Maintenance
Owner
Privileges™
13
70520_08a_CTS_QRG_062207.qxp:CTS 2007 A
Setting Favorite Stations
To store favorite stations:
1. Tune to the desired station.
2. Press the FAV button to display the
page where the station is to be
stored.
3. Press and hold one of the six
pushbuttons or Navigation touch
screen until a beep sounds.
4. Repeat the steps for each
pushbutton on each page. You can
select up to six pages for which
there are six favorites per page.
To set the number of favorite
station pages:
1. Press the CONFIG button to
display the radio setup menu.
2. Select the RADIO tab.
3. Select the number of preset pages
you want.
C
6/22/07
T
4:17 PM
S
Page 16
Note: Choosing to engage in extended
searching for specific audio stations or
songs by using buttons and knobs — or to
give extended attention to entertainment
tasks — can lead you to look away from
the road frequently or longer than usual.
Looking away from the road for prolonged
periods may cause you to miss seeing
things on the road that you need to see.
Be sure to keep your eyes on the road and
mind on the drive — and avoid engaging
in extended searching for specific items
while driving.
XM™ SATELLITE RADIO
XM Satellite Radio offers more than
170 channels of digital-quality sound
that goes wherever you go – coast to
coast. XM can display song title, artist
or entertainment genre by pressing
the INFO (Information) button.
After a free trial period, activation
and service subscription fees apply.
Service is based in the continental
U.S. and Canada.
For more information, visit XM online
at www.XMradio.com or call
1-800-XMXM (9696).
SIX-DISC CD
CHANGER CONTROLS
Loading One Disc:
With the ignition on or off, do the
following:
1. Press and release the Load
button and wait for the message
to insert the disc.
2. Load the disc. Insert a disc
partway into the slot, label side
up. The player will pull the disc in.
Loading Multiple Discs:
With the ignition on or off, do the
following:
1. Press and hold the Load button
for five seconds. A beep will be
heard and Load All Discs will
appear on the display.
Note: If you add any label to a CD, insert
more than one CD into the slot at a time,
or attempt to play scratched or damaged
CDs, you could damage the CD player.
When using the CD player, use only CDs in
good condition without any label, load
one CD at a time, and keep the CD player
and the loading slot free of foreign
materials, liquids and debris.
70520_08a_CTS_QRG_062207.qxp:CTS 2007 A
2. Follow the displayed instructions
and load a disc partway into the
slot, label side up. The player will
pull it in.
3. To cancel loading CDs, press the
load button again.
If the radio is on, the last disc loaded
will begin to play automatically.
ONSTAR
®
(if equipped)
You have one year of OnStar service
from the date you purchased your
new vehicle. All Cadillacs come with
the up-level Directions &
Connections Plan. Your vehicle has a
wide variety of capabilities, from
Remote Door Unlock to Automatic
Airbag Notification to Hands-Free
Calling. And you can get driving
directions using OnStar Turn-by-Turn
Navigation. Live Advisors are
available 24 hours a day 7 days a
week and can provide you with
many of the services listed below.
• Turn-by-Turn Navigation
• OnStar Vehicle Diagnostic email
• Automatic Airbag Notification
6/22/07
4:17 PM
Page 17
• Automatic Advanced Crash
Notification
• Emergency Services
• Remote Door Unlock
• Cadillac “Did you know” ask
vehicle questions
• Stolen Vehicle Location Assistance
• Hands-Free Calling with 30
calling minutes
• Roadside Assistance
• Fuel Station Location
• Information & Connections services
• Virtual Advisor, GPS based
Traffic & Weather
• Fuel Station Location
For Remote Door Unlock or Stolen
Vehicle Location Assistance call
1.888 4ONSTAR (1.888.466.7827).
Visit onstar.com or onstar.ca. For
more information about OnStar refer
to the OnStar Owner Guide.
See Section 2 of your Owner Manual.
Safety &
Security
ENGINE
Fuel
Your CTS is equipped with an
18-gallon (68.1 L) fuel tank. When
your vehicle gets low on fuel, the
Fuel Level Low message displays in
the Driver Information Center.
The fuel door is located on the
passenger side of the vehicle and can
be opened by pressing the rear edge
of the door with your fingers.
Coolant Heater (if equipped)
The engine coolant heater can make
starting the engine easier at
temperatures below 0°F (-18°C).
For best results, the coolant heater
should be plugged in at least four
hours before starting your vehicle.
Note: The grade of gasoline you use can
affect the performance of your vehicle and
may even cause damage. Please refer to
your Owner Manual for complete
information regarding suggested octane
ratings for optimum performance.
J Reviewed with Customer (Please Check Box)
Refer to Owner Manual for further information.
Driver
Information
Powertrain &
Maintenance
Comfort/
Convenience
Seats & Mirrors
Audio/
Personalization/
Communication
Powertrain &
Maintenance
Owner
Privileges™
15
70520_08a_CTS_QRG_062207.qxp:CTS 2007 A
TRANSMISSION
Automatic Overdrive
Automatic Overdrive is best used for
normal driving. To activate passing
gear when going less than 35 mph
(56 km/h), push the accelerator
about halfway down; when doing
more than 35 mph (56 km/h), push
the accelerator all the way down. For
further information regarding gear
selection for various driving
conditions, refer to your Owner
Manual.
Driver Shift Control (automatic
transmission only)
The Driver Shift Control (DSC) mode
allows you to change gears similar to
a manual transmission. To use the
DSC mode:
1. Slide the gearshift lever from
Drive (D) to the right to Manual
Mode (M).
2. Press the gearshift lever forward to
upshift or rearward to downshift.
Activation of the DSC mode is
indicated in the DIC. The display
above the (M) in the cluster will
change to a number indicating the
requested gear range.
C
6/22/07
T
4:17 PM
S
Page 18
When in DSC mode, if you do not
move the gearshift lever forward or
rearward to shift, the transmission
will be in sport mode and will still
shift automatically.
The transmission will only allow
shifting into gears
appropriate for the
vehicle speed and
engine rpm. The
transmission will not
automatically shift to
the next higher gear if
the rpm is too high.
TRACTION & STABILITY
Traction Control System
The Traction Control System is
enabled every time you start your
vehicle. When one or more of the
drive wheels begin to spin from
traction loss, the Traction Control
System will apply braking to the
spinning wheel(s) and may reduce
engine power until traction is
regained.
If your vehicle becomes stuck, and
rocking the vehicle is required, the
system should be turned off.
Press the button located on the
instrument panel to turn the system
off or back on.
StabiliTrak® – Stability Control
System
StabiliTrak® is an advanced computercontrolled system that assists with
directional control of the vehicle
during sudden maneuvers or lowtraction situations. It is normal to
hear the system working, and the
system will automatically disengage
cruise control when activated.
70520_08a_CTS_QRG_062207.qxp:CTS 2007 A
6/22/07
4:17 PM
Page 19
Owner PrivilegesTM
To make your ownership experience
as satisfying and rewarding as
possible, we are proud to provide
you with Cadillac’s exceptional
Owner Privileges, designed to
accommodate you anytime and
anywhere.
ROADSIDE SERVICE
1-800-882-1112
Roadside Service provides every
Cadillac owner with the advantage of
contacting a Cadillac advisor and,
when appropriate, a Cadillac-trained
dealer technician who can provide
on-site services:
• Towing Service
• Battery Jump-Starting
• Lockout Assistance
• Fuel Delivery
• Flat Tire Assistance
(covers change only)
Roadside Assistance and OnStar®
(if equipped)
Push the OnStar button, the vehicle
will send your GPS location to the
OnStar Advisor who will speak to
you, assess your problem, contact
Roadside Assistance and relay your
exact location so you get the help
you need.
Trip Interruption: If your trip is
interrupted due to a component
failure covered under warranty,
incidental expenses may be
reimbursed, including hotel, meals
and rental car.
Courtesy Transportation may also
be provided for warranted repairs,
including shuttle service for sameday repairs and loaner transportation
for overnight repair. Roadside Service
is also available to Cadillac customers
beyond the warranty period for a
charge.
CUSTOMER ASSISTANCE
1-800-458-8006
In Canada, call 1-888-446-2000.
Should you need to ask a question,
make a comment, or request
additional information, the exclusive
Cadillac Customer Assistance Center
is staffed around the clock with
professionals to serve you.
When you call Cadillac Roadside
Service or Customer Assistance,
Refer to Owner Manual for further information.
Driver
Information
Safety &
Security
Comfort/
Convenience
Seats & Mirrors
when possible, please provide the
phone advisor with:
• Your telephone number
• Your location
• Your Cadillac’s location
• A description of the problem
• Vehicle Identification Number
• Year and model of your Cadillac
• Delivery date
• Current mileage
CADILLAC ONLINE
For more information about your
Cadillac, including access to the
Cadillac Owner Center at My
GMLink, visit www.cadillac.com.
Certain restrictions, precautions and
safety procedures apply to your vehicle.
Please read your Owner Manual for
complete instructions. All information
contained herein is based on information
available at the time of printing and is
subject to change without notice.
CTS is a registered trademark of Cadillac
Motor Car Division and General Motors
Corporation. Copyright 2007 by Cadillac
Motor Car Division. All rights reserved.
J Reviewed with Customer (Please Check Box)
Audio/
Personalization/
Communication
Powertrain &
Maintenance
Owner
Privileges™
17
70520_08a_CTS_QRG_062207.qxp:CTS 2007 A
6/22/07
4:17 PM
Page 20
!15864566=A!