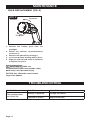
1
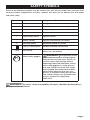
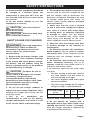
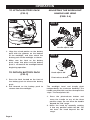
20 Volt Worklight
PUSH
241-0423
OPERATOR’S MANUAL
CAUTION: Read, understand and follow all safety rules and
instructions before using this tool. These safety instructions should be
followed at all times. Failure to follow these safety instructions could
result in injury to yourself or others. Also, failure to read and follow these
instructions may cause damage to your equipment.
For questions / comments, technical assistance or repair parts –
Please Call Toll Free: 1-866-917-4374. (M-F 8am – 6pm EST.)
table of contents
Safety Symbols. . . . . . . . . . . . . . . . . . . . . . . . . . . . . . . . . . . . . . . . . . . . . . . . . . . . . . . . . . Page 2
Safety Instructions. . . . . . . . . . . . . . . . . . . . . . . . . . . . . . . . . . . . . . . . . . . . . . . . . . . . . . . Page 3
Overview/Specifications . . . . . . . . . . . . . . . . . . . . . . . . . . . . . . . . . . . . . . . . . . . . . . . Pages 7-8
Assembly . . . . . . . . . . . . . . . . . . . . . . . . . . . . . . . . . . . . . . . . . . . . . . . . . . . . . . . . . . . . . . Page 8
Operation . . . . . . . . . . . . . . . . . . . . . . . . . . . . . . . . . . . . . . . . . . . . . . . . . . . . . . . . . . . . . . Page 9
Maintenance. . . . . . . . . . . . . . . . . . . . . . . . . . . . . . . . . . . . . . . . . . . . . . . . . . . . . . . . . . . Page 10
Troubleshooting. . . . . . . . . . . . . . . . . . . . . . . . . . . . . . . . . . . . . . . . . . . . . . . . . . . . . . . . Page 11
Warranty. . . . . . . . . . . . . . . . . . . . . . . . . . . . . . . . . . . . . . . . . . . . . . . . . . . . . . . . . . . . . . Page 14
safety symbols
Some of the following symbols may be used on this tool. Please study them and learn their
meaning. Proper interpretation of these symbols will allow you to operate the tool better
and more safely.
Symbol
Name
Designation / Explanation
V
Volts
Voltage
A
Amperes
Current
Hz
Hertz
Frequency (cycles per second)
W
Watts
Power
∿
Alternating current
Type of current
�
Direct current
Type or characteristic of current
no
No-load speed
Rotational speed at no load
Class II construction
Double insulated construction
Per minute
Revolutions, strokes, surface speed
orbits, etc., per minute
.../min
Wear safety goggles
WARNING: The operation of any
power tool can result in foreign objects
being thrown into your eyes, which can
result in severe eye damage. Before
beginning power tool operation, always
wear safety goggles or safety glasses
with side shields and a full-face shield
when needed. We recommend a Wide
Vision Safety Mask for use over eyeglasses or standard safety glasses with
side shields. Always use eye protection
which is marked to comply with
ANSI Z87.1.
WARNING: To ensure safety and reliability, all repairs should be performed by a
qualified service technician.
Page 2
safety INSTRUCTIONS
The purpose of safety symbols is to attract your attention to possible dangers. The safety
symbols and the explanations with them deserve your careful attention and understanding.
The symbol warnings do not, by themselves, eliminate any danger. The instructions and
warnings they give are no substitutes for proper accident prevention measures.
WARNING: Be sure to read and understand all safety instructions in this manual,
including all safety alert symbols such as “DANGER,” ”WARNING,” and “CAUTION”
before using this tool. Failure to follow all instructions listed below may result in electric
shock, fire, and/or serious personal injury.
SYMBOL MEANING
SAFETY ALERT SYMBOL: Indicates DANGER, WARNING, OR CAUTION.
May be used in conjunction with other symbols or pictographs.
DANGER: Indicates an imminently hazardous situation, which, if not avoided,
will result in death or serious injury.
WARNING: Indicates a potentially hazardous situation, which, if not avoided,
could result in death or serious injury.
CAUTION: Indicates a potentially hazardous situation, which, if not avoided,
could result in minor or moderate injury.
NOTICE: (Without Safety Alert Symbol) Indicates a situation that may result in property
damage.
SAVE THESE INSTRUCTIONS!
Page 3
safety INSTRUCTIONS
IMPORTANT SAFETY
INSTRUCTIONS
Electrical safety
Read all of the instructions before using
the appliance.
1. To reduce the risk of injury, close
supervision is necessary when an
appliance is used near children.
2. Only use attachments recommended
or sold by the manufacturer.
3. Do not use outdoors.
4. For a portable appliance – To reduce
the risk of electric shock, do not put
Flashlight and Battery Pack in water or
other liquid. Do not place or store the
appliance where it can fall or be pulled
into a tub or sink.
5. The lens gets very hot during use. To
reduce the risk of burns, do not touch
the lens while it is hot. To reduce the
risk of fire, keep away from combustible
materials while in operation.
1. Power tool plugs must match the outlet.
Never modify the plug in any way. Do not
use any adapter plugs with earthed
(grounded) power tools. Unmodified plugs
and matching outlets will reduce the risk of
electric shock.
2. Avoid body contact with earthed or
grounded surfaces such as pipes, radiators,
ranges and refrigerators. There is an
increased risk of electric shock if your body
is earthed or grounded.
3. Do not expose power tools to rain or
wet conditions. Water entering a power tool
will increase the risk of electric shock.
4. Do not abuse the cord. Never use the
cord for carrying, pulling or unplugging
the power tool. Keep the cord away from
heat, oil, sharp edges or moving
parts. Damaged or entangled cords
increase the risk of electric shock.
5. When operating a power tool outdoors,
use an extension cord suitable for outdoor
use. Use of a cord suitable for outdoor use
reduces the risk of electric shock.
6. If operating a power tool in a damp
location is unavoidable, use a groundfault circuit interrupter (GFCI) protected
supply. Use of a GFCI reduces the risk of
electric shock.
GENERAL SAFETY RULES
Battery tool use and care
INSTRUCTIONS PERTAINING TO RISK OF
FIRE, ELECTRIC SHOCK, OR INJURY TO
PERSONS
WARNING: When using electric
appliances, basic precautions should
always be followed, including the
following:
WARNING: Read all safety
warnings and instructions. Failure to
follow the warnings and instructions may
result in electric shock, fire and/or serious
injury.
Save all warnings and instructions for
future reference.
The term power tool in the warnings refers
to your mains-operated (corded) power tool
or battery-operated (cordless) power tool.
1. Recharge only with the charger
specified by the manufacturer. A charger
that is suitable for one type of battery pack
may create a risk of fire when used with
another battery pack.
2. Use power tools only with specifically
designated battery packs. Use of any other
battery packs may create a risk of injury and
fire.
Page 4
safety INSTRUCTIONS
3. When the battery pack is not in use,
keep it away from other metal objects,
like paper clips, coins, keys, nails,
screws or other small metal objects that
can make a connection from one
terminal to another. Shorting the battery
terminals together may cause burns or a
fire.
4. Under abusive conditions, liquid may
be ejected from the battery; avoid contact.
If contact accidentally occurs, flush with
water. If liquid contacts eyes, also seek
medical help. Liquid ejected from the
battery may cause irritation or burns.
5. Use only with the batteries and charger
listed:
SERVICE
6. Know your worklight. Read the
operator’s manual carefully. Learn the
applications and limitations, as well as the
specific potential hazards related to this
tool. Following this rule will reduce the risk
of electric shock, fire or serious injury.
7. Battery tools do not have to be plugged
into an electrical outlet; therefore, they are
always in operating condition. Be aware
of possible hazards when not using your
battery tool or when changing accessories.
Following this rule will reduce the risk of
electric shock, fire or serious personal injury.
8. Do not stare directly into the worklight.
Avoid direct eye contact; never project the
worklight into others’ eyes. Failure to do so
will lead to serious personal injury.
9. Remove the battery pack from the worklight
before performing any maintenance or cleaning.
10. Do not disassemble the worklight.
11. Do not place the worklight or battery
pack near fire or heat. They may explode.
12. Do not operate the worklight or the
charger near flammable liquids or in a
gaseous or explosive environment. Internal
sparks may ignite fumes.
13. To reduce the risk of electric shock, do
not put the worklight, battery or charger in
water or other liquid. Do not place or store
the product where it can fall or be pulled into
a tub or sink.
14. Do not store the worklight in a damp or
wet location.
1. Have your power tool serviced by a
qualified repair person using only identical
replacement parts. This will ensure that the
safety of the power tool is maintained.
SPECIFIC SAFETY RULES FOR
CORDLESS WORKLIGHT
1. Do not operate the tool or charger
near flammable liquids or in gaseous or
explosive atmospheres. Internal sparks
may ignite fumes.
2. The light lens becomes hot during use:
During or immediately after use, don’t lay
the tool flat on the light lens surface or
place the lens area onto a plastic or
fabric covered surface.
• Handle the tool with care around any
flammable surface.
• Do not use or permit use of the tool in
bed or sleeping bags. This tool lens can
melt fabric and a burn injury could result.
3. Do not let gasoline, oils, petroleumbased products, etc., come in contact with
plastic parts. They contain chemicals that
can damage, weaken, or destroy plastic.
4. DO NOT stare directly at the light or
project the light directly into the eyes of
others near by.
Page 5
Battery pack
Charger
252-8024
252-8028
252-8030
252-8031
252-8032
252-8036
252-8037
252-8044
252-8029
252-8033
252-8034
safety INSTRUCTIONS
15. For best results, your battery tool should
be charged in a location where the
temperature is more that 32°F (0°C) but
less that 104°F (40°C). Do not store outside
or in vehicles.
16. Do not permit children to use the
worklight; it is not a toy.
CAUTION: Hot surface! Risk of
burns-do not touch!
CAUTION: Risk of fire-keep away
from combustible materials.
SAFETY RULES FOR CHARGER
WARNING: Read and understand
all instructions. Failure to follow all
instructions listed below may result in
electric shock, fire, and/or serious
personal injury.
1. Before using the battery charger, read
all instructions and cautionary markings
in this manual and on the battery charger,
the battery, and the product using the
battery to prevent misuse of the products
and possible injury or damage.
CAUTION: To reduce the risk of
electric shock or damage to the charger
and battery, charge only these
rechargeable batteries specifically
designated on your charger’s label. Other
types of batteries may burst, causing
personal injury or damage.
2. Do not use the charger outdoors or
expose it to wet or damp conditions. Water
entering the charger will increase the risk
of electric shock.
3. Use
of
an
attachment
not
recommended or sold by the batterycharger manufacturer may result in a risk
of fire, electric shock or personal injury.
4. Do not abuse the cord or charger. Never
use the cord to carry the charger. Do not
pull the charger cord to disconnect the
plug from a receptacle. Damage to the cord
or charger could occur and create an
electric shock hazard. Replace damaged
cords immediately.
5. Make sure that the cord is located
so that it will not be stepped on, tripped
over, come in contact with sharp edges
or moving parts, or otherwise subjected
to damage or stress. This will reduce
the risk of accidental falls, which could
cause injury and damage to the cord,
which could then result in electric shock.
6. Keep the cord and charger from heat
to prevent damage to the housing or
internal parts.
7. Do not allow gasoline, oils, petroleumbased products, etc. to come in contact
with plastic parts. These materials contain
chemicals that can damage, weaken, or
destroy plastic.
8. An extension cord should not be used
unless absolutely necessary. Use of an
improper extension cord could result in a
risk of fire and electric shock.
If an extension cord must be used, make
sure that:
• The pins on plug of extension cord are
the same number, size and shape as
those of the plug on charger.
• The cord is properly wired and in good
electrical condition.
• The size is large enough for AC ampere
rating of charger as specified below:
The Cord Length
(Feet)
25’
50’
100’
Cord Size (AWG)
16
16
16
NOTICE: AWG = American Wire Gauge
9. Do not operate the charger with a
damaged cord or plug, which could cause
shorting and electric shock. If damaged,
have the charger repaired or replaced by
a qualified service technician.
Page 6
safety INSTRUCTIONS
10. Do not operate the charger if it has
received a sharp blow, been dropped, or
has otherwise been damaged in any way.
Take it to a qualified service technician
for an electrical check to determine if the
charger is in good working order.
11. Do not disassemble the charger. Take
it to a qualified service technician when
service or repair is required. Incorrect
reassembly may result in a risk of electric
shock or fire.
12. Unplug the charger from the electrical
outlet before attempting any maintenance
or cleaning to reduce the risk of electric
shock.
13. Disconnect the charger from the
power supply when not in use. This will
reduce the risk of electric shock or
damage to the charger if metal items
should fall into the opening. It will also help
prevent damage to the charger during a
power surge.
14. Risk of electric shock. Do not touch the
uninsulated portion of the output connector
or uninsulated battery terminal.
15. Save these instructions. Refer to them
frequently and use them to instruct others
who may use this tool. If you lend this tool
to someone else, also lend these
instructions to them to prevent misuse of
the product and possible injury.
overview
FIG. 1
Reflector
Head
Adjustable focus loop
Switch
Bulb
Handle
Pivot-release button
PUSH
WARNING:
The safe use of this
product requires an understanding of the
information on the tool and in this
operator’s manual, as well as knowledge
of the project you are attempting. Before
use of this product, familiarize yourself
with all operating features and safety
rules.
Page 7
• A
djustable focus loop: Focus
worklight by rotating the focus loop.
the
• Handle pivot: The adjustable handle
pivots 130° and features 3 positive stops
for maximum flexibility.
• Head pivot: The adjustable head pivots
90° and allows for precise positioning of
the light beam.
Specifications
Illumination source
Incandescent lamp
Run-time
More than 2 hours
Bulb Type
Incandescent ( single contact base)
Bulb power
18V DC 300mA
Pivoting head
90 degrees
Pivoting handle
130 degrees
Worklight weight (without battery)
10 oz.
assembly
WARNING:
If any part is broken or
missing, DO NOT attempt to attach the
battery or operate the worklight until
the broken or missing part is replaced.
Failure to do so could result in possible
serious injury.
PACKING LIST
Worklight, Operator’s Manual
WARNING: Do not attempt to
modify this worklight or create
accessories not recommended for use
with this worklight. Any such alteration or
modification is misuse and could result in
a hazardous condition leading to possible
serious injury.
UNPACKING
This product has been shipped completely
assembled.
1. Carefully remove the tool and any
accessories from the box. Make sure
that all items listed in the packing list
are included.
2. Inspect the tool carefully to make sure
that no breakage or damage occurred
during shipping.
3. Do not discard the packing material
until you have carefully inspected and
satisfactorily operated the tool.
4. If any part is damaged or missing,
please refer to the numbers listed on
the back page of the operator’s manual.
Page 8
operation
TO ATTACH BATTERY PACK
(FIG. 2)
FIG. 2
ADJUSTING THE WORKLIGHT
HANDLE AND HEAD
(FIGS. 3-4)
FIG. 3
PUSH
Handle adjusts 130°
PUSH
1. Align the raised portion on the battery
pack with the grooves on the bottom
of the worklight, and then attach the
battery pack to the worklight as shown.
FIG. 4
2. Make sure the latch on the battery
pack snaps into place and the battery
pack is secured to the worklight before
beginning operation.
TO DETACH BATTERY PACK
(FIG. 2)
PUSH
Head adjusts 90°
PUSH
Pivot-release button
1. Press the latch located on the front of
the battery pack to release the battery
pack.
2. Pull forward on the battery pack to
remove from the worklight.
The worklight head and handle pivot
independently for maximum flexibility. The
handle can pivot 130° and has three positive
stops. The head pivots 90°.
1. Press the pivot-release button and
move the handle to any of the three
positive stops. Do not force the handle
beyond the 130° range.
2. Move the head by manually rotating
it into any position within the 90°. Do
not force the head beyond the 90°
range.
Page 9
Maintenance
GENERAL MAINTENANCE
The tool may be cleaned most effectively
with compressed dry air. Always wear
safety goggles when cleaning tools with
compressed air.
Avoid using solvents when cleaning
plastic parts. Most plastics are susceptible
to damage from various types of
commercial
solvents
and
may
be
damaged by their use. Use clean cloths to
remove dirt, dust, oil, grease, etc.
WARNING: Do not at any time let
brake fluid, gasoline, petroleum-based
products, penetrating oils, etc., to come in
contact with plastic parts. Chemicals can
damage, weaken or destroy plastic which
may result in serious personal injury.
Only the parts shown in the parts list are
intended to be repaired or replaced by the
customer. All other parts should be
replaced at a service center.
BATTERIES
The battery pack is equipped with
Lithium-Ion rechargeable batteries. The
duration of use from each charge will
depend on the type of work performed.
The batteries in this tool have been
designed to provide maximum trouble free
life. Like all batteries, they will eventually
wear out. Do not disassemble the
battery pack or attempt to replace the
batteries. Handling of the batteries,
especially when wearing rings and jewelry
could result in a serious burn.
For Lithium-Ion battery pack storage longer
than 30 days:
• Store the Lithium-Ion battery pack
where the temperature is below 80°F
(26°C) and free of moisture.
• Store Lithium-Ion battery packs in a
30%-50% charged condition.
• Every six months of storage, fully
charge the Lithium-Ion battery pack.
• Exterior may be cleaned with a cloth or
soft non-metallic brush.
BATTERY PACK REMOVAL
AND PREPARATION FOR
RECYCLING
To preserve natural resources, please
recycle or dispose of batteries properly.
This product contains lithium-ion batteries.
Local, state, or federal laws may prohibit
disposal of lithium-ion batteries in ordinary
trash. Consult your local waste authority
for
information
regarding
available
recycling and/or disposal options.
WARNING: Upon removal of the
battery pack for disposal or recycling,
cover the battery pack’s terminals with
heavy-duty adhesive tape. Do not attempt
to destroy or disassemble battery pack or
remove any of its components. LithiumIon batteries must be recycled or
disposed of properly. Also, never touch
both terminals with metal objects and/
or body parts as short circuit may result.
Keep away from children. Failure to
comply with these warnings could result
in fire and/or serious injury.
To obtain the longest possible battery life,
read and understand the operator’s
manual.
It is good practice to unplug the Charger/
Adapter and remove the Lithium-Ion
battery pack when not in use.
Page 10
Maintenance
BULB REPLACEMENT (FIG. 5)
FIG. 5
To loosen
To tighten
PUSH
1. Remove the battery pack from the
worklight.
2. Rotate the reflector counterclockwise
to remove it.
3. Remove the old bulb by rotating it.
4. Insert new bulb by rotating bulb in place.
5. Align the reflector and rotate it clockwise
to tighten into place.
WARNING: ONLY use
recommended replacement bulbs; other
bulbs may cause personal injury.
NOTICE: Use 18V bulbs rated current
larger than 300mA.
TROUBLESHOOTING
PROBLEM
CAUSE
SOLUTION
The worklight does
not illuminate.
Battery is depleted.
Charge the battery.
The bulb is broken.
Replace the bulb.
Page 11
notes
Page 12
notes
Page 13
20 VOLT WORKLIGHT
WARRANTY
90-DAY MONEY BACK GUARANTEE:
This MASTERFORCE® brand power tool carries our 90-DAY Money Back
Guarantee. If you are not completely satisfied with your MASTERFORCE® brand
power tool for any reason within ninety (90) days from the date of purchase, return
the tool with your original receipt to any MENARDS® retail store, and we will provide
you a refund – no questions asked.
3-YEAR LIMITED WARRANTY:
This MASTERFORCE® brand power tool carries our famous No Hassle 3-Year
Limited Warranty to the original purchaser.
If, during normal use, this
MASTERFORCE® power tool breaks or fails due to a defect in material or
workmanship within three (3) years from the date of original purchase, simply bring
this tool with the original sales receipt back to your nearest MENARDS® retail store.
At its discretion, MASTERFORCE® agrees to have the tool or any defective part(s)
repaired or replaced with the same or similar MASTERFORCE® product or part
free of charge, within the stated warranty period, when returned by the original
purchaser with original sales receipt. Not withstanding the foregoing, this limited
warranty does not cover any damage that has resulted from abuse or misuse of
the Merchandise. This warranty: (1) excludes expendable parts including but not
limited to blades, brushes, belts, bits, light bulbs, and/or batteries; (2) shall be void
if this tool is used for commercial and/or rental purposes; and (3) does not cover any
losses, injuries to persons/property or costs. This warranty does give you specific
legal rights and you may have other rights, which vary from state to state. Be
careful, tools are dangerous if improperly used or maintained. Seller’s employees
are not qualified to advise you on the use of this Merchandise. Any oral
representation(s) made will not be binding on seller or its employees. The rights
under this limited warranty are to the original purchaser of the Merchandise and may
not be transferred to any subsequent owner. This limited warranty is in lieu of all
warranties, expressed or implied including warranties or merchantability and fitness
for a particular purpose. Seller shall not be liable for any special, incidental, or
consequential damages. The sole exclusive remedy against the seller will be for the
replacement of any defects as provided herein, as long as the seller is willing or
able to replace this product or is willing to refund the purchase price as provided
above. For insurance purposes, seller is not allowed to demonstrate any of these
power tools for you.
For questions / comments, technical assistance or repair parts – Please Call Toll
Free at: 1-866-917-4374. (M-F 8am – 6pm EST)
SAVE YOUR RECEIPTS
THIS WARRANTY IS VOID WITHOUT THEM
Page 14
© 2013 Menard, Inc., Eau Claire, WI 54703
Page 15
09/2013