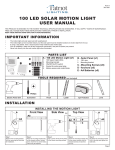
1
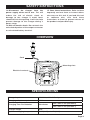
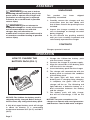
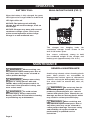
12 Volt Lithium-Ion
Battery Charger
252-8020
OPERATOR’S MANUAL
CAUTION: To Reduce The Risk Of Injury, User Must Read And
Understand The Operator’s Manual. Save These Instructions For
Future Reference.
For questions / comments, technical assistance or repair parts –
Please Call Toll Free: 1-866-917-4374. (M-F 8am – 6pm EST.)
Page 1
table of contents
Safety Symbols. . . . . . . . . . . . . . . . . . . . . . . . . . . . . . . . . . . . . . . . . . . . . . . . . . . . . . . . . . Page 2
Safety Instructions. . . . . . . . . . . . . . . . . . . . . . . . . . . . . . . . . . . . . . . . . . . . . . . . . . . . . . . Page 3
Overview/Specifications . . . . . . . . . . . . . . . . . . . . . . . . . . . . . . . . . . . . . . . . . . . . . . . . . . Page 6
Assembly . . . . . . . . . . . . . . . . . . . . . . . . . . . . . . . . . . . . . . . . . . . . . . . . . . . . . . . . . . . . . . Page 7
Operation . . . . . . . . . . . . . . . . . . . . . . . . . . . . . . . . . . . . . . . . . . . . . . . . . . . . . . . . . . . . . . Page 7
Maintenance. . . . . . . . . . . . . . . . . . . . . . . . . . . . . . . . . . . . . . . . . . . . . . . . . . . . . . . . . . . . Page 9
Troubleshooting. . . . . . . . . . . . . . . . . . . . . . . . . . . . . . . . . . . . . . . . . . . . . . . . . . . . . . . . Page 10
Warranty. . . . . . . . . . . . . . . . . . . . . . . . . . . . . . . . . . . . . . . . . . . . . . . . . . . . . . . . . . . . . . Page 14
safety symbols
Some of these following symbols may be used on this tool. Please study them and learn their
meaning. Proper interpretation of these symbols will allow you to operate the tool better and
more safely.
Symbol
Name
Designation / Explanation
V
Volts
Voltage
A
Amperes
Current
Hz
Hertz
Frequency (cycles per second)
W
Watts
Power
∿
Alternating current
Type of current
�
Direct current
Type of characteristic of current
no
No-load speed
Rotational speed at no load
Class II construction
Double insulated construction
Per minute
Revolutions, strokes, surface speed
orbits, etc., per minute
.../min
Wear safety goggles
WARNING: The operation of any
power tool can result in foreign objects
being thrown into your eyes, which can
result in severe eye damage. Before
beginning power tool operation, always
wear safety goggles or safety glasses
with side shields and a full-face shield
when needed. We recommend a Wide
Vision Safety Mask for use over eyeglasses or standard safety glasses with
side shields. Always use eye protection
which is marked to comply with
ANSI Z87.1.
WARNING: To ensure safety and reliability, all repairs should be performed by a
qualified service technician.
Page 2
safety INSTRUCTIONS
The purpose of safety symbols is to attract your attention to possible dangers. The safety
symbols and the explanations with them deserve your careful attention and understanding.
The symbol warnings do not, by themselves, eliminate any danger. The instructions and
warnings they give are no substitutes for proper accident prevention measures.
WARNING: Be sure to read and understand all safety instructions in this manual,
including all safety alert symbols such as “DANGER,” ”WARNING,” and “CAUTION”
before using this power source. Failure to following all instructions listed below may
result in electric shock, fire, and/or serious personal injury.
SYMBOL MEANING
SAFETY ALERT SYMBOL: Indicates DANGER, WARNING, OR CAUTION.
May be used in conjunction with other symbols or pictographs.
DANGER: Indicates an imminently hazardous situation, which, if not avoided,
will result in death or serious injury.
WARNING: Indicates a potentially hazardous situation, which, if not avoided,
could result in death or serious injury.
CAUTION: Indicates a potentially hazardous situation, which, if not avoided,
could result in minor or moderate injury.
NOTICE: (Without Safety Alert Symbol) Indicates a situation that may result in property
damage.
SAVE THESE INSTRUCTIONS!
Page 3
safety INSTRUCTIONS
WARNING:
For Indoor use only.
WARNING:
Dry location use only.
WARNING:
Risk of fire and
electric shock.
WARNING:
Risk of injury.
WARNING: Charge only 252-8016,
252-8017 rechargeable battery pack.
Other types of battery pack may burst,
causing injury and damage.
GENERAL SAFETY RULES
WARNING: Read all safety
warnings and instructions. Failure to
follow the warnings and instructions may
result in electric shock, fire and/or
serious injury.
Save all warnings and instructions for
future reference.
The term power tool in the warnings
refers to your mains-operated (corded)
power tool or battery-operated (cordless)
power tool.
WORK AREA SAFETY
1. Keep the work area clean and well lit.
Cluttered or dark areas invite accidents.
2. Do not operate power tools in
explosive atmospheres, such as in the
presence of flammable liquids, gases or
dust. Power tools create sparks which
may ignite the dust or fumes.
3. Keep children and bystanders away
while operating a power tool. Distractions
can cause you to lose control.
ELECTRICAL SAFETY
1. Power tool plugs must match the
outlet. Never modify the plug in any way.
Do not use any adapter plugs with earthed
(grounded) power tools. Unmodified plugs
and matching outlets will reduce risk of
electric shock.
2. Avoid body contact with earthed or
grounded surfaces such as pipes,
radiators, ranges and refrigerators. There
is an increased risk of electric shock if your
body is earthed or grounded.
3. Do not expose power tools to rain or
wet conditions. Water entering a power tool
will increase the risk of electric shock.
4. Do not abuse the cord. Never use the
cord for carrying, pulling or unplugging the
power tool. Keep cord away from heat, oil,
sharp edges or moving parts. Damaged or
entangled cords increase the risk of electric
shock.
5. When operating a power tool outdoors,
use an extension cord suitable for outdoor
use. Use of a cord suitable for outdoor use
reduces the risk of electric shock.
6. If operating a power tool in a damp
location is unavoidable, use a ground-fault
circuit interrupter (GFCI) protected supply.
Use of a GFCI reduces the risk of electric
shock.
SERVICE
1. Have your power tool serviced by a
qualified repair person using only identical
replacement parts. This will ensure that the
safety of the power tool is maintained.
Page 4
safety INSTRUCTIONS
SAFETY RULES FOR CHARGER
WARNING: Read and understand
all instructions. Failure to follow all
instructions listed below may result in
electric shock, fire, and/or serious
personal injury.
1. Before using the battery charger, read
all instructions and cautionary markings
in this manual and on the battery charger,
the battery, and the product using the
battery to prevent misuse of the products
and possible injury or damage.
CAUTION: To reduce the risk of
electric shock or damage to the charger
and battery, charge only those
rechargeable batteries specifically
designated on your charger’s label. Other
types of batteries may burst, causing
personal injury or damage.
2. Do not use the charger outdoors or
expose it to wet or damp conditions.
Water entering the charger will increase
the risk of electric shock.
3. Use
of
an
attachment
not
recommended or sold by the batterycharger manufacturer may result in a
risk of fire, electric shock or injury to
persons.
4. Do not abuse the cord or charger.
Never use the cord to carry the charger. Do
not pull the charger cord to disconnect the
plug from the receptacle. Damage to the
cord or charger could occur and create
an electric shock hazard. Replace
damaged cords immediately.
5. Make sure that the cord is located so
that it will not be stepped on, tripped
over, come in contact with sharp edges or
moving parts, or otherwise subjected to
damage or stress. This will reduce the
risk of accidental falls, which could cause
injury and damage to the cord, and could
then result in electric shock.
6. Keep the cord and charger from heat to
prevent damage to the housing or internal
parts.
Page 5
7. Do not allow gasoline, oils, petroleumbased products, etc. to come in contact
with plastic parts. These materials contain
chemicals that can damage, weaken, or
destroy plastic.
8. An extension cord should not be used
unless absolutely necessary. Use of an
improper extension cord could result in a
risk of fire and electric shock.
If an extension cord must be used, make
sure that:
• The pins on plug of extension cord are
the same number, size and shape as
those of the plug on charger.
• The cord is properly wired and in good
electrical condition.
• The size is large enough for AC ampere
rating of charger as specified below:
The Cord Length
(Feet)
25’
50’
100’
Cord Size (AWG)
16
16
16
NOTICE: AWG = American Wire Gauge
9. Do not operate the charger with a
damaged cord or plug, which could cause
shorting and electric shock. If damaged,
have the charger repaired or replaced by
a qualified service technician.
10. Do not operate the charger if it has
received a sharp blow, been dropped, or
has otherwise been damaged in any way.
Take it to a qualified service technician
for an electrical check to determine if the
charger is in good working order.
11. Do not disassemble the charger. Take
it to a qualified service technician when
service or repair is required. Incorrect
reassembly may result in a risk of electric
shock or fire.
12. Unplug the charger from the electrical
outlet before attempting any maintenance
or cleaning to reduce the risk of electric
shock.
safety INSTRUCTIONS
13. Disconnect the charger from the
power supply when not in use. This will
reduce the risk of electric shock or
damage to the charger if metal items
should fall into the opening. It will also help
prevent damage to the charger during a
power surge.
14. Risk of electric shock. Do not touch the
uninsulated portion of the output connector
or uninsulated battery terminal.
15. Save these instructions. Refer to them
frequently and use them to instruct others
who may use this tool. If you lend this tool
to someone else, also lend these
instructions to them to prevent misuse of
the product and possible injury.
overview
Cord
Mounting slots
Electrical contacts
Specifications
Charger input
120-Volts, 60Hz AC only
Charging adaptor output
12 V
Charging Time For Batteries
30 minutes
Charger weight
9 oz.
Optimum charging temperature
50°F (10°C) –104°F (40°C)
12V 1.3Ah Li-Ion (252-8016)
12V 1.5Ah Li-Ion (252-8017)
Page 6
ASSEMBLY
WARNING: If any part is broken
or missing, do not attempt to plug in the
power cord or operate the charger until
the broken or missing part is replaced.
Failure to do so could result in possible
serious injury.
WARNING: Do not attempt to
modify this charger or create accessories
not recommended for use with this
charger. Any such alteration or
modification is misuse and could result in
a hazardous condition leading to possible
serious injury.
UNPACKING
This
product
has
completely assembled.
been
shipped
1. Carefully remove the charger and any
accessories from the box. Make sure
that all items listed in the packing list are
included.
2. Inspect the charger carefully to make
sure no breakage or damage occurred
during shipping.
3.Do not discard the packing material
until you have carefully inspected and
satisfactorily operated the charger.
Contents
Charger, operator’s manual
operation
HOW TO CHARGE THE
BATTERY PACK (Fig. 1)
FIG. 1
12V
6
252-801
of
.
fire
rec cru inerate of
Do notssemble,
o or Inc
a
reach
disa ve 212 F out of Made in Chin
abo p battery 09,2009
Kee ldren.
chi
: Risk ns.
NING and bur
WAR, explosion,harge, sh, heat
NOTICE: The Lithium-Ion battery pack is
shipped partially charged. Before using it
the first time, fully charge the battery pack.
A fully discharged battery pack will charge
in about 30 minutes in a surrounding
temperature between 50°F (10°C) and 104°F
(40°C).
Page 7
1. Charge the Lithium-Ion battery pack
with the correct charger.
2. Connect the charger to a power supply.
3. Align the raised ribs of the battery pack
with the slot in the charger.
4. Insert the battery pack into the charger.
5. The charger will communicate with the
battery pack to evaluate the condition
of the battery pack.
6. The green light will flash while the
battery pack is charging. After charging
is complete, the green LED on the
charger will be on. The flickering red
light indicates a defective battery or a
bad connection between the battery
and the charger.
7.The battery pack will fully charge,
but will not overcharge, if left on the
charger.
NOTICE: For your convenience, the
charger can operate with most generators
and inverters rated at 300 watts or higher.
operation
LED FUNCTIONS OF CHARGER (Fig. 2)
FIG. 2
LED INDICATOR
BATTERY
PACK
RED LED
GREEN
LED
ACTION
Hot/Cold
battery
On
Off
Fast charge will begin
when battery returns
to 50°F (10°C)
and 104°F (40°C)
Defective
Flashing
Off
Battery pack or
charger is defective
Charging
Off
Flashing
Charging
Fully
charged
Off
On
Charging is
complete
CHARGING A HOT
BATTERY PACK
If the battery pack is above normal
temperature range, the red LED of the
charger will illuminate and the green
LED will be off. When the battery pack
cools down to approximately 104°F (40°C),
the charger will automatically begin
charging.
CHARGING A COLD
BATTERY PACK
If the battery pack is below the normal
temperature range, the red LED will
illuminate and the green LED will be off.
When the battery warms to a temperature
of more than 50°F (10°C), the charger will
automatically begin charging.
DEFECTIVE BATTERY
If the charger detects a problem, the red
LED will begin flashing and the green
LED will be off.
1. If registering as defective, remove and
reinsert the battery pack in the charger.
If the LED status reads “defective” a
second time, try to charge a different
battery pack.
2.If a different battery pack charges
normally, dispose of the defective
battery pack (see Maintenance section).
3. If a different battery pack also indicates
“defective,” the charger may be
defective.
BATTERY CHARGING
If the battery pack is being charged within
a normal surrounding temperature range
(50°F to 104°F), the green LED will begin
flashing and the red LED will be off.
Page 8
operation
BATTERY FULL
WALL-MOUNT HOLES (Fig. 3)
When the battery is fully charged, the green
LED Light on the charger will be on and the red
LED light will be off.
FIG. 3
NOTICE: The battery pack will fully
charge, but will not overcharge, if left on
the charger.
NOTICE: Charger may warm with several
continuous charge cycles. This is part
of the normal operation of the charge.
Charge in a well ventilated area.
The charger has hanging holes for
convenient storage. Install screws in the
wall 2-1/8 inches apart.
Use screws sufficiently strong to hold
the combined weight of the charger and
battery pack (approximately 1 lb. 3 oz.).
Maintenance
WARNING:
When servicing, use
only identical replacement parts. Use of
any other parts may create a hazard or
cause product damage.
WARNING: Always wear safety
goggles or safety glasses with side
shields when using compressed air to
clean tool. If the operation is dusty, also
wear a dust mask.
WARNING: To avoid serious
personal injury, always remove the
battery pack from the tool when cleaning
or performing any maintenance.
GENERAL MAINTENANCE
Avoid using solvents when cleaning plastic
parts. Most plastics are susceptible to
damage from various types of commercial
solvents and may be damaged by their use.
Use clean cloths to remove dirt, dust, oil,
grease, etc.
WARNING: Do not at any time let
brake fluid, gasoline, petroleum-based
products, penetrating oils, etc. come in
contact with plastic parts. Chemicals can
damage, weaken or destroy plastic which
may result in serious personal injury.
WARNING: When servicing, use
only identical replacement parts. Use of
any other parts may create a hazard or
cause product damage. To ensure safety
and reliability, all repairs should be
performed by a qualified service
technician.
Page 9
troubleshooting
PROBLEM
CAUSE
SOLUTION
The battery pack isn’t
charging.
The battery pack isn’t
connected to the charger.
Attach the battery pack to the
charger.
Page 10
notes
Page 11
notes
Page 12
notes
Page 13
12 Volt Lithium-ion BATTERY CHARGER
WARRANTY
90-DAY MONEY BACK GUARANTEE:
This MASTERFORCE® brand power tool carries our 90-DAY Money Back
Guarantee. If you are not completely satisfied with your MASTERFORCE® brand
power tool for any reason within ninety (90) days from the date of purchase, return
the tool with your original receipt to any MENARDS® retail store, and we will provide
you a refund – no questions asked.
3-YEAR LIMITED WARRANTY:
This MASTERFORCE® brand power tool carries our famous No Hassle 3-Year
Limited Warranty to the original purchaser.
If, during normal use, this
MASTERFORCE® power tool breaks or fails due to a defect in material or
workmanship within three (3) years from the date of original purchase, simply bring
this tool with the original sales receipt back to your nearest MENARDS® retail store.
At its discretion, MASTERFORCE® agrees to have the tool or any defective part(s)
repaired or replaced with the same or similar MASTERFORCE® product or part
free of charge, within the stated warranty period, when returned by the original
purchaser with original sales receipt. Not withstanding the foregoing, this limited
warranty does not cover any damage that has resulted from abuse or misuse of
the Merchandise. This warranty: (1) excludes expendable parts including but not
limited to blades, brushes, belts, bits, light bulbs, and/or batteries; (2) shall be void
if this tool is used for commercial and/or rental purposes; and (3) does not cover any
losses, injuries to persons/property or costs. This warranty does give you specific
legal rights and you may have other rights, which vary from state to state. Be
careful, tools are dangerous if improperly used or maintained. Seller’s employees
are not qualified to advise you on the use of this Merchandise. Any oral
representation(s) made will not be binding on seller or its employees. The rights
under this limited warranty are to the original purchaser of the Merchandise and may
not be transferred to any subsequent owner. This limited warranty is in lieu of all
warranties, expressed or implied including warranties or merchantability and fitness
for a particular purpose. Seller shall not be liable for any special, incidental, or
consequential damages. The sole exclusive remedy against the seller will be for the
replacement of any defects as provided herein, as long as the seller is willing or
able to replace this product or is willing to refund the purchase price as provided
above. For insurance purposes, seller is not allowed to demonstrate any of these
power tools for you.
For questions / comments, technical assistance or repair parts – Please Call Toll
Free at: 1-866-917-4374. (M-F 8am – 6pm EST)
SAVE YOUR RECEIPTS
THIS WARRANTY IS VOID WITHOUT THEM
Page 14
© 2013 Menard, Inc., Eau Claire, WI 54703
Page 16
09/2013