1
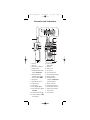
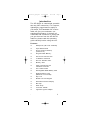
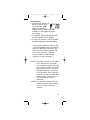
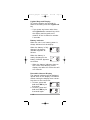
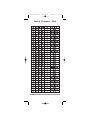
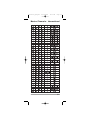
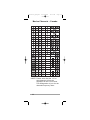
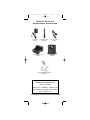
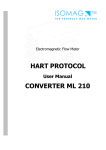
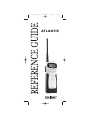
Atlantis_OM.qxd
06/08/2001
4:51 PM
Page 1
ATLANTIS
Atlantis_OM.qxd
06/08/2001
4:51 PM
Page 2
Three- Year Limited Warranty
Important: Evidence of original purchase is required for warranty service.
WARRANTOR: UNIDEN AMERICA CORPORATION (Uniden)
ELEMENTS OF WARRANTY: Uniden warrants for three years, to the original
retail owner, this Product excluding the NiMH battery pack to be free from
defects in materials and craftsmanship with only the limitations or exclusions
set out below. Uniden warrants for 12 months, to the original retail owner, the
NiMH battery pack to be free from defects in material and craftsmanship with
only the limitations or exclusions set out below.
WARRANTY DURATION: This warranty to the original user shall terminate and
be of no further effect 36 months (12 months for the NiMH battery pack) after
the date of original retail sale. The warranty is invalid if the Product is
(A) damaged or not maintained as reasonable or necessary, (B) modified,
altered, or used as part of any conversion kits, subassemblies, or any
configurations not sold by Uniden, (C) improperly installed, (D) serviced or
repaired by someone other than an authorized Uniden service center for a
defect or malfunction covered by this warranty, (E) used in any conjunction with
equipment or parts or as part of any system not manufactured by Uniden, or
(F) installed or programmed by anyone other than as detailed by the Owner's
Manual for this product.
STATEMENT OF REMEDY: In the event that the product does not conform to
this warranty at any time while this warranty is in effect, warrantor will either, at
its option, repair or replace the defective unit and return it to you without
charge for parts, service, or any other cost (except shipping and handling)
incurred by warrantor or its representatives in connection with the performance
of this warranty. Warrantor, at its option, may replace the unit with a new or
refurbished unit. THE LIMITED WARRANTY SET FORTH ABOVE IS THE SOLE
AND ENTIRE WARRANTY PERTAINING TO THE PRODUCT AND IS IN LIEU
OF AND EXCLUDES ALL OTHER WARRANTIES OF ANY NATURE WHATSOEVER, WHETHER EXPRESS, IMPLIED OR ARISING BY OPERATION OF LAW,
INCLUDING, BUT NOT LIMITED TO ANY IMPLIED WARRANTIES OF
MERCHANTABILITY OR FITNESS FOR A PARTICULAR PURPOSE. THIS
WARRANTY DOES NOT COVER OR PROVIDE FOR THE REIMBURSEMENT
OR PAYMENT OF INCIDENTAL OR CONSEQUENTIAL DAMAGES. Some states
do not allow this exclusion or limitation of incidental or consequential damages
so the above limitation or exclusion may not apply to you.
LEGAL REMEDIES: This warranty gives you specific legal rights, and you may
also have other rights which vary from state to state. This warranty is void
outside the United States of America.
PROCEDURE FOR OBTAINING PERFORMANCE OF WARRANTY:
If, after following the instructions in the Owner's Manual you are certain that the
Product is defective, pack the Product carefully (preferably in its original
packaging). The Product should include all parts and accessories originally
packaged with the Product. Include evidence of original purchase and a note
describing the defect that has caused you to return it. The Product should be
shipped freight prepaid, by traceable means, to warrantor at:
Uniden America Corporation
Parts and Service Division
4700 Amon Carter Boulevard
Fort Worth, TX 76155
(800) 554-3988, 7AM to 5PM Central Time
Monday through Friday
Atlantis_OM.qxd
06/08/2001
4:51 PM
Page 3
Controls and Indicators
1. Antenna
2. Belt Clip
3. PTT (Push to Talk) Key
4. Light/Lock Key
5. WX Mode/Weather Alert
Button (WX ALERT)
6. USA/International/
Canadian Button (UIC)
7. Memory Button (MEM)
8. Microphone
9. Volume/Power Knob
10. Squelch Knob
11. LCD Display
12. Scan Button (Scan)
13. 16/9-Triple Watch Button
(16/9 TRI)
14. Channel Up Button (▲)
15. TX Power Button (1/5W)
Invert Display
16. Channel Down
Button (▼)
17. Speaker
18. Battery Pack
A. TX Indicator
B. TX Power Indicator
C. Channel Number Display
D. Battery Indicator
E. USA/International/
Canadian (US/INT/CAN)
Channel Indicator
F. Memory Indicator
G. Triple Watch Indicator
H. Weather Mode Indicator
I. Weather Alert Indicator
J. Lock Indicator
K. Scan Indicator
Atlantis_OM.qxd
06/08/2001
4:51 PM
Page 4
Warning!
☞ The ATLANTIS is watertight only
when both the antenna and the
battery are properly attached.
☞ Do not operate the transmitter of
any radio equipment near electrical
blasting caps or in an explosive
atmosphere.
☞ Do not let children operate any
transmitter-equipped radio equipment without proper supervision.
☞ Have your radio equipment serviced
by a qualified technician.
☞ Do not operate the transmitter of
any radio equipment with the
antenna touching or close to the
eyes, face, or exposed body parts.
NiMH Battery Pack Warning
☞ This equipment contains a NiMH
Battery Pack.
☞ The NiMH Battery Pack contained in
this equipment may explode if
disposed of in a fire.
☞ Do not short-circuit the Battery
Pack.
☞ Do not charge the NiMH Battery
Pack used in this equipment with
any charger other than the one
designed to charge this Battery
Pack. Using another charger may
damage the Battery Pack or cause
the Battery Pack to explode.
☞ NiMH batteries must be disposed of
properly.
Atlantis_OM.qxd
06/08/2001
4:51 PM
Page 5
Contents
FCC Notice . . . . . . . . . . . . . . . . .
Introduction . . . . . . . . . . . . . . . .
Features . . . . . . . . . . . . . . . . . .
Technical Support and Service . . .
Maritime Radio Service Operation
Parts and Accessories . . . . . . . .
Getting Started . . . . . . . . . . . . . .
Mounting the cradle holder . . . . .
Attaching the Antenna . . . . . . . . .
Attaching the Battery Pack . . . . .
Attaching the Spacer . . . . . . . . .
Charging the Battery Pack . . . . . .
Operation . . . . . . . . . . . . . . . . . .
Turning on the Unit
and Setting Squelch . . . . . . . . . .
Selecting a Channel . . . . . . . . . .
One-touch Channel 16/9 . . . . . . .
Triple Watch . . . . . . . . . . . . . . . .
Monitoring Weather Channels . . .
Weather Alert . . . . . . . . . . . . . . .
USA, International
and Canadian Channels . . . . . . .
Programming a Channel
into Memory . . . . . . . . . . . . . . . .
Deleting a Channel from
Memory . . . . . . . . . . . . . . . . . . .
Scanning . . . . . . . . . . . . . . . . . .
Transmitting . . . . . . . . . . . . . . . .
Lighted Keys and Display . . . . . .
Battery Indicator . . . . . . . . . . . . .
Reversible Channel Display . . . . .
Key Lock . . . . . . . . . . . . . . . . . .
Marine Channels - USA . . . . . . . .
Marine Channels - International . .
Marine Channels - Canada . . . . . .
Parts and Accessories . . . . . . . .
Specifications . . . . . . . . . . . . . . .
Troubleshooting . . . . . . . . . . . . .
. .2
. .3
. .3
. .4
. .4
. .5
. .6
. .6
. .6
. .7
. .8
. .9
.10
.10
.11
.11
.12
.13
.14
.15
.15
.15
.16
.17
.18
.18
.18
.19
.20
.21
.22
.23
.24
.25
1
Atlantis_OM.qxd
06/08/2001
4:51 PM
Page 6
FCC NOTICE
Unauthorized changes or modifications
to this equipment may void compliance
with FCC Rules. Any change or modification must be approved in writing by
Uniden.
This equipment has been tested and
found to comply with the limits for a
Class B digital device, pursuant to
Part 15 of the FCC Rules. These limits
are designed to provide reasonable
protection against harmful interference
in a marine installation. This equipment
generates, uses and can radiate radio
frequency energy and, if not installed
and used in accordance with the
instructions, may cause harmful interference to radio communications.
However, there is no guarantee that
interference will not occur in a particular installation. If this equipment does
cause harmful interference to radio or
television reception, which can be
determined by turning the equipment
off and on, the user is encouraged to
try to correct the interference by one or
the following measures:
Consult the dealer or an experienced
marine electronics technician for help.
2
Atlantis_OM.qxd
06/08/2001
4:51 PM
Page 7
Introduction
The ATLANTIS is a watertight, portable
two-way VHF transceiver. It is compact,
lightweight, rugged and fits easily in
your hand, This handheld VHF marine
radio will give you consistent, outstanding performance in virtually all
conditions and situations.To insure that
you get the most from the ATLANTIS'
features, please read this operating
guide carefully before using the unit.
Features
➠
Waterproof (JIS Level 4/CFR46)
➠
Triple Watch Mode
➠
Priority Channel Startup
(Channel 16)
➠
Programmable Memory
➠
One-Touch Channel 16/9
➠
10 Weather Channels
➠
N.O.A.A. Weather Alert
➠
Memory Scan
➠
USA, International and
Canadian Channels
➠
The Cradle Holder
➠
Rechargeable NiMH Battery Pack
➠
Alkaline Battery Pack
(Batteries not included)
➠
Key Lock
➠
Backlit LCD and Keypad
➠
Reversible Channel Display
➠
Belt Clip
➠
Wrist Strap
➠
TX Power 1W/5W
➠
Cigarette Lighter Adapter
3
Atlantis_OM.qxd
06/08/2001
4:51 PM
Page 8
Technical Support and Service
Your Uniden dealer can provide you
with sales assistance and information.
If your marine radio does not perform
properly, follow the troubleshooting tips
in the back of this reference guide. For
technical support contact Uniden
Repair/Service department at
1-800-235-3874. The radio contains no
user-serviceable parts. Unauthorized
adjustment will void the warranty and
may cause illegal radio operation. Be
sure that a qualified technician service
your radio equipment.
Caution : Changes or modifications to
this Product not expressly
approved by Uniden, or
operation of this product
In any other than as
detailed by this Operating
Guide, can void your
Authority to operate this
product.
Maritime Radio Service Operation
This transmitter will operate on
channels/frequencies that have
restricted use in the United States.
The channel assignments include
frequencies assigned for exclusive
use of the U.S. Coast Guard, use in
Canada, and international waters.
Operation in these frequencies without
proper authorization is strictly forbidden. For frequencies/channels that are
currently for use in the world see page
19 thru 21. Please contact the FCC
Call Center at 1-888-CALL-FCC for
any additional channel information.
4
Atlantis_OM.qxd
06/08/2001
4:51 PM
Page 9
Included in this Package
5
Atlantis_OM.qxd
06/08/2001
4:51 PM
Page 10
Getting Started
Mounting the Cradle Holder
1. Mount the cradle holder to either a
counter or wall.
2. Plug one end of the cigarette lighter
adapter into the cigarette lighter jack
and the other end into the charging
jack on the battery pack of the radio in
cradle holder.
Attaching the Antenna
Attach the antenna to the ATLANTIS.
Be sure the antenna is firmly seated.
6
Atlantis_OM.qxd
06/08/2001
4:51 PM
Page 11
Attaching the Battery Pack
1. Slide the battery pack onto the bottom
of the radio
2. Use a coin or screwdriver to turn the
screw that connects the battery pack
to the ATLANTIS. Be sure the battery
pack fits tightly against the
ATLANTIS' body.
7
Atlantis_OM.qxd
06/08/2001
4:51 PM
Page 12
Attaching the spacer to the beltclip
A spacer is included to be used with
the optional Speaker/Microphone. The
spacer must be affixed to the beltclip
of your ATLANTIS radio.
Remove the backing from the spacer
and attach it to the upper part of the
beltclip.
Do not operate your ATLANTIS radio when
using the optional Speaker/Microphone
unless the spacer is properly affixed behind
the beltclip.
In order to reduce the likelihood of excessive radio frequency exposure, the spacer
is provided for you to increase the distance
between the radio antenna and the human
body when operating the radio while
attached to your belt. Additional steps
should be taken to maintain a separation
distance of at least 1 inch between the
antenna and the human body.
8
Atlantis_OM.qxd
06/08/2001
4:51 PM
Page 13
Charging the Battery Pack
Your marine radio is powered by a
specially designed NiMH battery pack
or an Alkaline battery pack. (Alkaline
batteries are not included.) Before
operating the ATLANTIS, charge the
NiMH battery pack for 15 hours without
interruption the first time.
1. Place the ATLANTIS in the cradle
holder.
☞ You can monitor incoming calls while
the ATLANTIS is in the cradle holder.
☞ You can charge the battery pack
alone or connected to the
ATLANTIS.
☞ Periodically, the NiMH battery
should be fully drained prior to
recharging.
9
Atlantis_OM.qxd
06/08/2001
4:51 PM
Page 14
Operation
☞ When you press any key (except
PTT), a short tone sounds.
☞ When you turn on your ATLANTIS, it
is automatically tuned to channel 16,
the United States Coast Guard
frequency for distress, safety, and
calling.
☞ See the foldout in the front of the
operating guide for button, knob, and
key positions.
Turning on the Unit and Setting Squelch
1. Before you turn on the
unit, turn the Squelch
knob fully counter
clockwise.
2. Then, turn on the Unit
by turning the
Volume/Power knob
clockwise until you
hear a hissing sound.
3. Turn the Squelch knob
clockwise, just until the
hissing sound stops.
Use the knob to adjust
to the desired squelch
level. Think of the
squelch control as a
frequency gate which
controls access to
weak or strong signals depending on
its setting.
☞ To listen to a weak or distant station,
turn the knob counterclockwise.
☞ If the tracking squelch control is
adjusted so you continually hear a
hissing sound, the unit will not scan
properly.
4. To turn off the unit, turn the
Volume/Power knob counterclockwise.
10
Atlantis_OM.qxd
06/08/2001
4:51 PM
Page 15
Selecting a Channel
1. Turn on your ATLANTIS.
2. To select a higher
channel, press the ▲
arrow key.
3. To select a lower
channel, press the ▼
arrow key.
☞ To change the channel continuously,
press and hold the ▲ or ▼ key.
One-touch Channel 16/9
Example: While you are monitoring
channel 20, you want to
check channel 16 or 9.
1. You are now on
channel 20.
2. To monitor channel 16,
press the 16/9/TRI
button.
3. To monitor channel 9,
press the 16/9/TRI
button again.
4. To return to channel 20, press the
16/9/tri button again.
11
Atlantis_OM.qxd
06/08/2001
4:51 PM
Page 16
Triple Watch
Triple Watch mode monitors channels
16 and 9 for a signal while you listen
to the currently selected channel. The
marine radio checks channel 16 and 9
for activity every 2 seconds.
1. To select Triple Watch
mode, press and hold
the 16/9/TRI button for
2 seconds. A confirma-tion tone sounds.
2. To exit from Triple
Watch, press and hold
16/9/TRI for 2 seconds.
A confirmation tone
sounds.
☞ While in Triple Watch mode, you can
change the currently selected
channel using the ▲ or ▼ arrow key.
☞ A momentary press of the 16/9/TRI
button interrupts Triple Watch mode
and remains on 16. Press 16/9/TRI
again to monitor channel 9. A third
press will return to the main channel
and resume the Triple Watch mode.
At anytime you may press and hold
the 16/9/Tri button for 2 seconds to
return to the previous Triple
Watch mode.
12
Atlantis_OM.qxd
06/08/2001
4:51 PM
Page 17
Monitoring Weather Channels
The ATLANTIS has 10 preprogrammed
weather channel frequencies,
represented by 1 through 10.
1. To listen to the weather
channels in your area,
press WX/ALERT . WX
appears on the display.
2. To move up, press the ▲
arrow key.
3. To move down, press
the ▼ arrow key.
4. To exit, press
WX/ALERT . WX
disappears from the
display.
☞ To change the channel continuously,
press and hold the ▲ or ▼ arrow
button for more than 1 second.
13
Atlantis_OM.qxd
06/08/2001
4:51 PM
Page 18
Weather Alert
Weather Alert allows your ATLANTIS to
function as a severe weather radio. If
NOAA issues a severe weather warning while the Weather Alert is turned
on, the ATLANTIS sounds an alert
tone. You will then hear the
emergency weather broadcast.
1. To use Weather Alert,
select the weather
Channel in your area
2. Press and hold
WX/ALERT for 2 seconds.
A confirmation tone sounds.
3. When the unit receives
a warning signal, it
beeps for 5 seconds.
WX, ALERT, and the
channel number blink to receive the
emergency weather broadcast.
4. To turn off Weather Alert, press and
hold WX/ALERT for 2 seconds. A
confirmation tone sounds.
☞ When Weather Alert is activated, the
highest priority is given to this function. If the unit is in scan, Triple
Watch, or any other marine
channels, it checks for the weather
alert signals every 7 seconds and
switches to the Weather Channel
automatically.
*NOTE: Be sure the volume is set to a
high level when using the
Weather Alert mode. This will
insure that you will hear the
Alert tone even in a noisy
environment.
14
Atlantis_OM.qxd
06/08/2001
4:51 PM
Page 19
USA, International and Canada Channels
1. The ATLANTIS is
initially set for USA
marine channels When
you turn on your radio.
2. To receive and transmit
on international marine
channels, press U/I/C .
3. To receive and transmit
on Canadian marine
channels, press U/I/C
again.
4. The radio will keep the last mode
setting that was selected when turned
back on.
☞ For USA, international and Canadian
marine channels and functions, refer
to the tables starting on page 20.
Programming Channel into Memory
Before using the scanning feature, you
have to program channels into memory.
1. Select the channel to enter into
memory by pressing the ▲ or ▼
arrow key.
2. Press the MEM button
to store the channel.
MEM appears on the
display.
Deleting a channel from memory
1. Select the channel to delete from
memory by pressing the ▲ or ▼
arrow key.
2. Press the MEM button. MEM disappears from the display.
15
Atlantis_OM.qxd
06/08/2001
4:51 PM
Page 20
Scanning
1. To begin scanning the
programmed channels,
press the SCAN button.
MEM, SCAN and TRIPLE appear on
the display.
2. To stop scanning, press the SCAN
button once more. SCAN and TRIPLE
disappear from the display.
☞ Scanning starts from the lowest to
highest channel and stops when it
finds an active channel. It remains
on that channel until the transmission ends, then resumes scanning
after a 3 second delay period.
☞ When in the scan mode, the unit
automatically activates the Triple
Watch feature. To deactivate Triple
Watch from the scanning mode,
press and hold the 16/9/TRI button
for 2 seconds. TRIPLE disappears
from the display.
16
Atlantis_OM.qxd
06/08/2001
4:51 PM
Page 21
Transmitting
1. Transmission power can
be set to either 5W or
1W. Press the 1/5W
button to make the
change, then the 5W or the 1W
indicator on the display changes
accordingly.
2. To transmit, press and hold the PTT
key. TX appears on the display.
3. To return to receive, release the PTT
key. TX disappears from the display.
☞ If the battery indicator drops to the
1-mark level blinking on the display,
when the PTT key is pressed, the
radio will not transmit and the TX
icon starts blinking. ( Refer to
the description of the Battery
Indicator on the next page. )
*NOTE: Channels 13 and 67 are ONLY
to be used in the 1W mode.
For emergency cases only the
user may override to 5W mode
by pressing the PTT key and
then hold down the 1/5W key
for 2 seconds. After the transmission is made the radio will
automatically revert back to
the 1W mode for these
channels.
*NOTE: For maximum battery life, the
default transmit power setting
is 1W for each individual
channel.
17
Atlantis_OM.qxd
06/08/2001
4:51 PM
Page 22
Lighted Keys and Display
To light the display and keypad for
about 5 seconds, press the Light/Lock
key.
☞ If you press any button other than
the Light/Lock or transmit key while
the display and key pad are lit,
remains in the lit status for another
5 seconds.
Battery Indicator
When the unit is on, battery power is
always indicated on the display.
When the battery is fully
charged, the battery
indicator appears as
follows:
When the battery is
nearly discharged, the
battery indicator appears
as follows:
☞ When the battery indicator drops to
the 1-mark level blinking on the
display, the radio will receive but will
not transmit.
Reversible Channel Display
The channel indicator can be displayed
upside down on the display. This feature
makes viewing the display more convenient when on the user's belt.
1. To invert, press and
hold the 1/5W key for
2 seconds.
2. To return, press and
hold the 1/5W key for
2 seconds again.
18
Atlantis_OM.qxd
06/08/2001
4:51 PM
Page 23
Key Lock
To prevent accidental entries, you can
lock the keypad.
1. Press and hold the Light/Lock key for
2 seconds. The unit will sound a
confirmation tone to confirm that the
keypad is locked with LOCK indica-tion on the display.
2. To unlock the keypad, press and hold
the Light/Lock key again for
2 seconds. The unit will sound a
confirmation tone to confirm that the
keypad is unlocked, and LOCK will
disappear.
☞ You can also unlock the keypad by
turning the radio off and then on
again.
19
Atlantis_OM.qxd
06/08/2001
4:52 PM
Marine Channels - USA
20
Page 24
Atlantis_OM.qxd
06/08/2001
4:52 PM
Page 25
Marine Channels - International
21
Atlantis_OM.qxd
06/08/2001
4:52 PM
Page 26
Marine Channels - Canada
*NOTE: Please note that the "A" for
the channels will not be
displayed in the LCD screen.
This designation is just for the
channel/frequency chart.
22
Atlantis_OM.qxd
06/08/2001
4:53 PM
Page 27
Optional Parts and
Replacement Accessories
AC Adapter
(ACATL)
Flexible Antenna
(HHATL08)
Alkaline Battery Pack
(BPATL)
Car DC Adapter
(PCATL)
Cradle Holder
(HHATL85
External Speaker/Microphone
(HHATL07)
See your local dealer or contact
Uniden Parts Department
(800)-554-3988
Hours: M-F 7:00AM to 5:00PM CST
We can also be reached on the web at
www.uniden.com
23
Atlantis_OM.qxd
06/08/2001
4:53 PM
Page 28
Product Specifications
GENERAL
Channels:
All current USA, International,
Canadian, and
Weather Channels
Controls:
Volume & power on/off knob,
Squelch knob, Ch. up/down,
Ch. 16/Ch. 9 or Triple watch,
1 or 5 Watt, Light or Keypad
lock, Push to talk, UIC.,
Mem Scan, Weather Alert,
All N.O.A.A WX Channels.
Status Indicators:
Channel readout,
Battery Strength Indicator,
Lock, 1W/5W, US/INT/CAN,
Triple Watch, TX, Mem, Scan,
WX Alert, WX
Channel Display:
Backlit LCD
Channel Selector:
Up/down
Antenna Connector:
SMA type (female)
Size:
150 mm (H) x 57 mm (W) x
37 mm (D) 5 7/8” (H) x 2 1/4”
(W) x 1 1/2” (D)
13.1 ounces (Batteries installed)
Weight:
Charge Power Source:
12V DC Plug (included)
(optional) AC Adapter ACATL
Antenna Impedance:
50 W
Speaker:
4 W 1.0W
Operating Temperature Range:
-20°c ~ +50°c
Power Source:
NiMH rechargeable battery/
1350 mAH or 6 AA Alkaline
batteries (batteries not included)
Battery Input Voltage:
9v Alk./7.2v NiMH
TRANSMITTER
Frequency Range:
156 ~ 158 MHz
Frequency Stability:
±500Hz
Power Output:
5 watt, 1 Watt - selectable
Spurious Emissions:
5W, -70 dBc
Current Drain:
High - 1.3 Amps
Low - 600 Milliamps
Modulation:
FM ±5 KHz deviation
(FCC designator F3E)
RECEIVER
Receiver Type:
Dual conversion
superheterodyne
Signal-To-Noise:
40 dB Nominal
Frequency Range:
156 ~ 164 MHz
Receiver Sensitivity:
0.25 µv AT 12 dB SINAD
Audio Output Power:
1 Watt
Atlantis_OM.qxd
06/08/2001
4:53 PM
Page 29
Troubleshooting
à Not enough range
Cause: Line of sight blocked
Ú Switch to 5W mode
(if available).
à Will not transmit on 5 watt range but
will transmit on the 1 watt range.
Cause: Low voltage.
Ú Recharge or replace the
batteries.
(Use high quality alkaline
batteries).
à Battery will not hold a charge.
Cause: Battery has developed a
memory.
Ú Periodically, drain the NiMH
battery before recharging.
(This can be done by
listening to the weather
channel until the
battery drains).
à Strange Display
Cause: Inverted display has
been activated.
Ú Press and hold the 1/5W key
for 2 seconds.
Atlantis_OM.qxd
06/08/2001
4:53 PM
Page 30
FCC Safety Precautions
When operating your portable marine VHF radio transceiver, you should know
that the antenna radiates radio frequency energy. This radio was designed to
meet the FCC's rules and regulations for the maximum permissible exposure to
radio frequency energy. This design was tested and found to be compliant to
the strict requirements established by the FCC.
The belt clip is provided for the purpose of carrying the radio ONLY. Do not
attempt to activate the transmitter from this position unless you have installed
the proper Uniden speaker/microphone accessory.
WARNING: It is up to the user to properly operate this radio transmitter to
insure safe operation. Please adhere to the following:
Ú Never allow children to operate the radio without adult supervision and the
knowledge of the following safety guidelines.
Ú Hold the radio transceiver to your face, but always maintain at least a 1 inch
separation distance between your body (including the face and eyes) and
any surface of the radio.
Ú Never allow the antenna to touch the human body or to come within 1 inch
when the transmitter is active.
Ú When using an external speaker or microphone, USE ONLY THE UNIDEN
MODEL HHATL07. This accessory is designed to be used with a spacer that
keeps the radiating parts of the portable marine VHF radio away from the
human body at a distance where the radiated energy is below the maximum
permissive level. Use of any other accessory for this purpose may invalidate
your authority to operate this device!
Atlantis_OM.qxd
06/08/2001
4:53 PM
Page 31