1
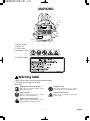
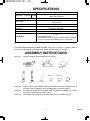
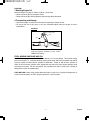
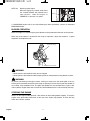
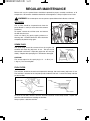
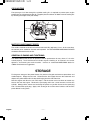
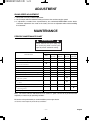
BL85
BACKPACK BLOWER
TABLE OF CONTENTS
Foreword ··························································1
Safety symbols·················································1
Specifications ···················································4
Assembly instructions ······································4
Before operation···············································5
Operating instructions ······································8
Regular maintenance·····································10
Storage···························································11
Emission control information························· 12
FOREWORD
This Owner’s/Operator’s Manual is designed to familiarize the operator with the various features
and component parts of the equipment and to assist you with the assembly, operation and
maintenance of your new Backpack Blower.
It is essential that any operator of this Backpack Blower product reads and understands the
contents of this manual before using the Backpack Blower.
Important safety instructions will be identified by the following safety symbol:
Failure to comply with the instructions in this manual may result in serious injury or death.
For additional assistance, contact any local authorized Maruyama dealer.
MANUAL SAFETY SYMBOLS
Throughout this manual and on the product itself, you will find safety alerts and helpful, information
message preceded by symbols or key words. The following is an explanation of those symbols and
key words and what they mean to you.
This symbol accompanied by the words WARNING and
DANGER calls attention to an act or condition that can lead
to serious personal injury to operator and bystanders.
English
—1—
MARKING
④
①
②
③
⑤
① MODEL NAME
② SERIAL No.
③ C-Tick LABEL
④ WARNING LABEL
⑤ CAUTION LABEL
Warning label
• Always remove dirt or mud to make the indications legible.
• The following alarm labels are attached.
Alarm label
Read operation manual thoroughly.
Make sure you read the operation manual
thoroughly prior to use.
Prohibition of fire
Don't put a naked flame close to a place
where supplying fuel or doing maintenance.
Wear a protector.
Wear protectors such as hat, safety
glasses, ear plugs during work.
Cautions for exhaust gas.
Take care not to breathe in exhaust gas
from the engine.
Cautions for high temperatures
Muffler of engine, fin of cylinder, etc. are at
high temperatures. Don't touch them.
—2—
English
WARNING
1.
2.
3.
4.
5.
6.
7.
8.
9.
10.
11.
12.
13.
14.
15.
16.
17.
18.
19.
20.
21.
22.
23.
Read and understand this Owner's/Operator's Manual before using the power blower. Be thoroughly familiar with the
proper use of the power blower.
Never allow children to operate the power blower. It is not a toy. Never allow adults to operate the unit without first
reading the Owner's / Operator's Manual.
Become familiar with the controls and know how to stop the engine quickly.
Always use eye protection and hearing protection.
Keep the area of operation clear of all persons, particularly small children and pets.
Do not point the blower nozzle in the direction of people or pets.
Never operate a power blower when you are fatigued.
Never operate a power blower without proper guards or other protective safety devices in place.
Dress properly; do not wear loose clothing or jewelry that can be caught in moving parts. Always wear substantial
footwear, long pant, and long sleeved shirt.
Gasoline is highly flammable; handle it carefully.
A. Do not smoke while handling gasoline.
B. Use an approved fuel container for storing the gasoline/oil mixture.
C. Do not fill the fuel tank when the engine is hot or running
D. Fill the fuel tank outdoors and only up to one-half inch from the top of the tank. Do not fill the filler neck.
E. Wipe away any spilled gasoline before starting the engine.
Always be sure of your footing; keep a firm hold of the blower pipes, and walk, never run while operating a power
blower.
Use the correct accessories. Do not use the power blower for any job except that for which it is intended .
Keep all fasteners tight and be sure the power blower is in safe working condition. Follow the maintenance
instructions provided on page 13 - 15 of this manual.
Do not put hands or feet near or under the rotating parts. Keep clear at all times.
If the power blower should start to vibrate abnormally, stop the engine immediately and check for the cause. Vibration
is generally a warning of trouble.
Avoid using the power blower near rocks, gravel, stones and similar matter in order to avoid dangerous flying debris.
Use the power blower only in daylight or good artificial light.
Do not allow bystanders in work area.
Do not operate without guard(s) in place.
Do not operate in unventilated area.
To reduce the risk of injury associated with the inhalation of dust, use a face filter mask in dusty conditions.
To reduce the risk of injury associated with contacting rotating part, stop the engine before installing or removing
attachments.
To reduce the risk of fire and burn injury:
-Move at least 10ft (3m) away from the fueling point before starting engine.
-Always store gasoline in approved container.
Operating techniques
A.
B.
C.
D.
E.
F.
G.
H.
I.
J.
English
Operate power equipment only at reasonable hours - not early in the morning or late at night when people might be
disturbed. Comply with times listed in local ordinances. Usual recommendations are 9:00 am. to 5:00 p.m., Monday
through Saturday.
To reduce noise levels, limit the number of pieces of equipment used at any one time.
To reduce noise levels, operate power blowers at the lowest possible throttle speed to do the job.
Check your equipment before operation, especially the muffler, air intakes, and air filters.
Use rakes and brooms to loosen debris before blowing.
In dusty conditions, slightly dampen surfaces when water is available.
Conserve water by using power blowers instead of hoses for many lawn and garden applications, including areas
such as gutters, screens, patios, grills, porches, and gardens.
Watch out for children, pets, open windows, or freshly washed cars, and blow debris safely away.
Use the full blower nozzle extension so the air stream can work close to the ground.
After using blowers and other equipment, CLEAN UP! Dispose of debris in trash receptacles.
—3—
SPECIFICATIONS
Models
BL85
14.4 x 19.1 x 20.1 in.
(365 x 485 x 535 mm)
Dimensions L x W x H Standard
Dry Weight
21.1 lbs. (9.6 kg)
Engine Type
Kawasaki/2-Stroke Air cooled
TK65 for EPA
Displacement
Ignition System
Carburetor
Fuel Tank Capacity
64.7 cc
Electric
All position diaphragm
0.5 gal (2.0 lit)
50:1
Using Maruyama 50:1
2-Cycle Engine Oil or any quality 2-cycle engine oil designed
for use in air-cooled, high performance 2-cycle engines.
Fuel Mixture:
The MARUYAMA BACKPACK POWER BLOWER comes with an Owner's / Operator's Manual.
Assembly and attachment of the throttle lever bracket and blower pipes are required.
ASSEMBLY INSTRUCTIONS
STEP #1)
Locate and identify all the components (see sketch).
FLEXIBLE PIPE
SWIVEL
PIPE
STEP #2)
STEP #3)
STEP #4)
STRAIGHT
PIPE
BOX SPANNER
BENT PIPE
OPERATOR'S
MANUAL
BANDS(S)
BANDS(S)
3.2 in.
4.0 in.
CLAMP
Prepare the flat head screwdriver Using the BANDS, connect the FLEXIBLE PIPE to
the blower, and the SWIVEL PIPE to the flexible pipe (see sketch page 5).
Assemble the STRAIGHT PIPE, BENT PIPE, and FAN-BLOW HEAD, then connect
them to the swivel pipe (see sketch page 5).
Slide handle over swivel pipe and tighten retainer knob. (see sketch page 5).
—4—
English
Standard
AIR CLEANER
RECOIL STARTER
THROTTLE LEVER
ENGINE
BLOWER HOUSING
BENT PIPE
STRAIGHT PIPE
BAND
CLAMP
SWIVEL PIPE
FLEXIBLE PIPE
FUEL TANK
PRIMER BULB
RETURN PIPE
SHOULDER
STRAPS
Accessories
BACK PAD
SERIAL NUMBER
(BLOWER HOUSING)
HIP BELT
BEFORE OPERATION
Be sure the power blower is correctly assembled and all fasteners and fittings are properly secured.
THROTTLE LEVER
Standard
Before operating the power blower, release the knob, knove the throttle grip to the position in the
illustration, and tighten knob to secure in place.
THROTTLE
LEVER
KNOB
When the power blower is strapped to the back of the operator, the throttle lever of is located on the
tube.
English
—5—
CAUTION!
1.Shutting Engine Off
Before shutting the engine off, allow it to idle for a short while.
• Never stop the engine by closing the choke.
• Never stop the engine during operation while running above idle speed.
2.Transporting and Storage
• Shut off the engine and allow it to cool before transporting or storing the unit.
• Do not put the unit on dry grass or near any flammable object unless the engine is cold or
cooled down.
Standard
HIGH SPEED
IDLE SPEED
STOP
IDLE
HIGH
The lowest position of lever is "STOP setting,
and the highest position is the "FULL
THROTTLE" setting.
FUEL: MIXING GASOLINE AND OIL
CAUTION! The engine used on this Backpack blower is of a 2-cycle design. The internal moving
parts of the engine, i.e., crankshaft bearings, piston pin bearings and piston to cylinder wall contact
surfaces, require oil mixed with the gasoline for lubrication. Failure to add oil to the gasoline or
failure to mix oil with the gasoline at the appropriate ratio will cause major engine damage which
will void your warranty. For your fuel premix, only use Maruyama 50:1 2-Cycle Oil or a quality oil
designed for 2-cycle air-cooled engine.
FUEL MIXTURE: When using genuine Maruyama 50:1 2-Cycle Oil, or a quality oil designed for 2cycle air-cooled engines, oil ratio is 50 parts gasoline to 1 part oil or 50:1.
—6—
English
FUEL; MIXING GASOLINE AND OIL
CAUTION! If Maruyama brand oil is not used,
never use a mixing ratio less than 50:1
regardless of the oil package mixing
instructions. Ratios less the 50:1, (for
example, 60:1, 80:1, 100:1), reduce the
amount of lubrication to the internal moving
parts of the engine and can cause damage.
Gasoline
50:1 2-Cycle Oil
5 Litres
100 ml
10 Litres
200 ml
20 Litres
400 ml
MIXING INSTRUCTIONS: Always mix fuel and oil in a clean container approved for gasoline.
Mark the container to identify it as fuel mix for the Backpack Blower. Use regular unleaded
gasoline and fill the container with half the required amount of gasoline. Pour the correct amount
of oil into the container then add the remaining amount of gasoline. Close the container tightly and
shake it momentarily to evenly mix the oil and the gasoline before filling the fuel tank on the
Backpack Blower.
GAS
OIL
GAS
FILL MARK
HALF GASOLINE
ADD OIL
ADD REMAINING
GASOLINE
SHAKE
(MIX OIL AND GASOLINE)
When refilling the Backpack Blower fuel tank, clean around the fuel tank cap to prevent dirt and
debris for entering the tank during cap removal. Always shake the premix fuel container
momentarily before filling the fuel tank.
Always use a spout or funnel when fueling to reduce fuel spillage. Only fill the tank to within 1/2
inch from the top of the tank. Avoid filing to the top of the tank filler neck.
NOTE:
1. Never mix gasoline and oil directly in the Backpack Blower fuel tank.
CAUTION!
1. Do not use National Marine Manufacturer’s Association (NMMA) or BIA certified oils. This type
or 2-cycle engine oil does not have the proper additives for air-cooled, 2-cycle engines and can
cause engine damage.
2. Do not use automotive motor oil. This type of oil does not have the proper additives for aircooled, 2-cycled engines and can cause engine damage.
English
—7—
OPERATING INSTRUCTIONS
STARTING PROCEDURE
STEP #2)
Move the "CHOKE LEVER" fully up ward to
the closed position. If the engine is already
warm, only a partial or open (no choke) choke
setting may be required.
STEP #1)
Pump the "PRIMER BULB" under of the
carburetor until fuel can be seen flowing
through the "FUEL-RETURN LINE".
CLOSE
PRIMER
BULB
CHOKE
LEVER
OPEN
FUEL
RETURN LINE
Standard
STEP #3)
Set the throttle lever at 1/2 speed.
HIGH SPEED
IDLE SPEED
STOP
CAUTION!
Press down the "AIR FILTER COVER" and Pull the
"STARTER GRIP" briskly to start the engine.
NOTE: Only short pulls are necessary. Never pull the
starter cord to its fullest extension. Never let go of the
starter grip until it is at the fully returned position.
STARTER GRIP
—8—
English
STEP #4)
Warming up the engine.
When the engine has started, slowly move
the "CHOKE LEVER" fully upward to the
open position. Allow the engine to
"WARM-UP" at less than 1/2 speed.
OPEN
If a MARUYAMA engine fails to start after following the above procedures, contact an authorized
MARUYAMA dealer.
BLOWER OPERATION
When the engine has warmed-up, the power blower can be positioned on the back of the operator.
When the power blower is positioned and ready for operation, adjust the throttle to a speed
required to accomplish the task.
Intake grille of the
blower housing
OPERATING POSITION
WARNING
• Never operate a power blower when you are fatigued.
• Never operate a power blower without proper guards or other protective safety devices in place.
WARNING
To prevent overheating and engine seizure, cooling air comes from the intake grille of the fan
housing and is pushed by the blower fan through an opening in the fan housing over the cylinder fin
area, taking away combustion heat. The grille and cylinder fins must be kept clean of grass, dust
and any debris. Engine failure due to lack of this "Normal Maintenance" is not covered by warranty.
STOPPING THE ENGINE
Always run the engine at idle speed for a few minutes to allow cooling before stopping. To stop the
engine, move the throttle control lever all the way to the engine stop position, or move the stop
switch to the "STOP" position.
English
—9—
REGULAR MAINTENANCE
Before each use, the power blower should be inspected for proper assembly and fitness of all
components. All fasteners should be checked for correct tightness. Always inspect for fuel leaks.
WARNING Do not attempt to start or operate a power blower that indicates a fuel leak.
AIR FILTER
AIR FILTER
(PAPER)
The air filter should be inspected each time the
power blower is used (or more often with extreme
conditions).
To inspect, remove the air filter cover and remove
the filter from the case.
Clean air filter(s) by gently tapping element or
cleaning with a suitabe solvent the filter should be
completely dry before using again.
SPARK PLUG
The spark plug should be removed from the engine and
checked after each fifty (50) hours of use. The tips can be
cleaned with a stiff brush. Adjust the gap to 0.6 - 0.7 mm (see
sketch). Replace the spark plug if it is oil-fouled or damaged .
TIPS
PROPER GAP
0.6 - 0.7 mm
CAUTION!
The correct torque for the spark plug is 12 - 17 N • m (1.2 1.7kg • m). Do not over-tighten.
FUEL FILTER
The fuel filter should be cleaned and inspected for damage after each twenty (20) hours of use.
The fuel filter is attached to the fuel pick-up tube inside the fuel tank. Loosen the clamp and take
out the fuel filter.
CLAMP
FUEL TUBE
WEIGHT
GROMMET
FUEL FILTER
FUEL FILTER
To clean the fuel filter, remove it from the fuel tube and wash it with safety solvent. Inspect and
clean the fuel tank before re-installing the fuel filter.
Always replace a defective fuel filter.
— 10 —
English
COOLING FINS
Free passage of air flow through the cylinder cooling fins is required to prevent poor engine
performance and shortened engine life. Regularly check and clean all debris from the cooling fins
by removing the engine cover (see sketch).
ENGINE COVER
COOLING
FINS
MUFFLER AND EXHAUST PORTS
The muffler should be removed and serviced after each fifty (50) hours of use. At the same time,
the exhaust ports should be cleaned and inspected. An AUTHORIZED MARUYAMA DEALER
should be contacted for this service.
GENERAL CLEANING AND TIGHTENING
The MARUYAMA power blower will provide maximum performance for many hours, if it is maintained properly. Good maintenance includes regular checking of all fasteners for correct
tightness, and cleaning the entire machine. Contact an authorized MARUYAMA dealer for
additional maintenance suggestions.
STORAGE
For long-term storage of the power blower, first perform all regular maintenance procedures and
needed repairs. Empty the fuel tank. Disconnect the fuel supply line from the carburetor and
depress the primer bulb until fuel stops discharging from the fuel-return line.
Start the engine and allow it to run until it stops. Pull the starter cord a few times to remove any
excess fuel from the engine. Remove the spark plug and insert a small amount of oil into the
cylinder. Slowly pull the starter cord and bring the piston to a position closest to the spark plug
hole. Re-install the spark plug. Apply a thin coating of oil to all the metal surfaces and store the
power blower in a dry place.
English
— 11 —
EMISSION CONTROL INFORMATION
FUEL INFORMATION
THIS ENGINE IS CERTIFIED TO OPERATE ON UNLEADED REGULAR GRADE GASOLINE
ONLY. A minimum of 87 octane of the antiknock index is recommended. The antiknock index is
posted on service station pumps in the U.S.A..
EMISSION CONTROL INFORMATION
To protect the environment in which we all live, Kawasaki has incorporated an exhaust
emission control system.
EXHAUST AND EVAPORATIVE EMISSION CONTROL SYSTEM
The system reduces the amount of pollutants discharged into the atmosphere by the exhaust of
this engine. The fuel tank, ignition and exhaust systems of this engine have been carefully
designed and constructed to ensure an efficient engine with low exhaust pollutant and low
evaporate emission levels. If you purchased your (Blower, Trimmer, Hedge Trimmer) in the state
of California, the engine included catalytic converter system, and the fuel tank includes low
evaporative emission system.
MAINTENANCE AND WARRANTY
Proper maintenance is necessary to ensure that your engine will continue to have low
emission levels. This Owners Manual contains those maintenance recommendations
for your engine. Those items identified by the Periodic Maintenance Char t are
necessary to ensure compliance with the applicable standards.
As the owner of the (Blower, Trimmer, Hedge Trimmer), you have the responsibility to
make sure that the recommended maintenance is carried out according to the
instructions in this Owners Manual at your own expense.
The Maruyama Limited Emission Control System Warranty requires that you return your
(Blower, Trimmer, Hedge Trimmer) to an authorized Maruyama (Blower, Trimmer,
Hedge Trimmer) dealer for remedy under warranty. Please read the warranty carefully,
and keep it valid by complying with the owner's obligations it contains.
— 12 —
English
FUEL RECOMMENDATIONS
FUEL
The Kawasaki TK series 2-stroke engines require a gasoline-oil mixture.
Use only clean, fresh, unleaded regular grade gasoline.
Octane Rating
The octane rating of a gasoline is a measure of its resistance to "knocking".
Use of a minimum of 87 octane of the antiknock index is recommended. The antiknock index is
posted on service station pumps.
NOTE:
• If "knocking or pinging" occurs, use a different brand of gasoline or higher octane rating.
WARNING:
Gasoline is extremely flammable and can
be explosive under certain conditions.
Turn the engine switch OFF. Do not
smoke. Make sure the area is well
ventilated and free from any source of
flame of sparks : this includes any
appliance with a pilot light.
2-STROKE ENGINE OIL MIXING
Oil must be mixed with the gasoline to lubricate the piston, cylinder, crankshaft, bearings, and
connecting rod bearings.
Recommended Engine Oil: 2-stroke air cooled brand oil
Gasoline and engine oil mixing ratio: 50 : 1 (gasoline 50, 2-stroke Engine Oil 1)
NOTE:
•
•
•
•
Do not mix gasoline and oil directly in the fuel tank.
The lubricative quality of this mixture deteriorates rapidly.
Do not use gasoline that has been stored longer than two months.
To ensure proper starting at low ambient temperatures, fresh winter grade fuel must be used.
CAUTION: The engine is shipped without fuel.
English
— 13 —
ADJUSTMENT
IDLING SPEED ADJUSTMENT
1. Idle speed is the only available adjustment.
2. Do not tamper with the carburetor setting to increase the maximum engine speed.
3. If adjustment is needed, have it performed by your authorized MARUYAMA service dealer.
Carburetor adjustments are made at the factory and are not adjustable without disassembling
the carburetor.
MAINTENANCE
PERIODIC MAINTENANCE CHART
WARNING:
Always remove the spark plug cap
from spark plug when servicing the
engine to prevent accidental starting.
Interval
MAINTENANCE
Daily
Check and replenish fuel
●
Check for fuel leakage
●
Check bolts, nuts and screws
for looseness and loss
●
First
20 hours
Every
20 hours
Every
50 hours
●
Clean fuel filter
★ Clean air filter element
●
●
Tighten bolts and nuts
●
●
Clean spark plug and adjust electrode gap
★ Remove dust and dirt from cylinder fins
●
M
Remove carbon deposits on piston head
and inside cylinder
●
M
Remove carbon deposits in the exhaust pipe
of muffler
●
●
M Clean net of spark arrester (if equipped)
M
Every
100 hours
Check the sliding portion of crankshaft,
●
connecting rod etc.
Fuel tube
It is recommended to replace every 3 years.
Note: The service intervals indicated are to be used as a guide. Service to be performed more
frequently as necessary by operating condition.
M: Service to be performed by an authorized Maruyama engine dealer.
★: Service more frequently under dusty conditions.
— 14 —
English
4-15, Uchikanda 3-chome, Chiyoda-ku, Tokyo TEL 81-3-3252-2285 http://www.maruyama.co.jp
P/N 131881-00
13.01 TAP/F