1
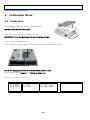
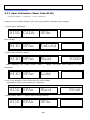
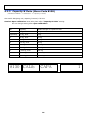
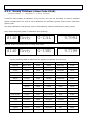
CL5000J Series Service Manual (English) Rev. 2007. 09. 06 1 Table of Contents 1. Proper Operation ................................................................................................................................................5 1.1 Introduction..............................................................................................................................................5 1.2 Model and Specificationl .........................................................................................................................6 1.3 Environmental Conditions & Safety .......................................................................................................7 1.4 Leveling and Footer Location .................................................................................................................8 1.5 Power Outlet and Requirements .......................................................................................................... 10 2. Classification .................................................................................................................................................... 11 3. 2.1 Scale Overview ..................................................................................................................................... 11 2.2 Display and Indicators .......................................................................................................................... 12 2.3 Printer ................................................................................................................................................... 13 2.4 Commuication ....................................................................................................................................... 14 2.5 Key Pad ................................................................................................................................................. 15 Getting Started .............................................................................................................................................. 16 3.1 Sealing Method ..................................................................................................................................... 16 3.2 Installation of the Label Roll ................................................................................................................ 16 3.3 Turning Power On .................................................................................................................................. 18 3.4 Program Menu and Tree ...................................................................................................................... 18 3.4.1 How to access PROGRAM MODE .............................................................................................. 18 3.4.2 Program Menu Tree ..................................................................................................................... 19 3.4.3 4. Calibration Menu Tree ............................................................................................................... 20 Calibration Mode ........................................................................................................................................... 21 4.1 Calibration............................................................................................................................................. 21 4.1.1 Span Calibration (Menu Code 8110) ................................................................................................... 22 4.1.2 Span/Zero Fine Adjust (Menu Code 8120) ...................................................................................... 23 4.1.3 Capacity & Units (Menu Code 8130) ............................................................................................... 24 4.1.4 Gravity Constant (Menu Code 8140)................................................................................................ 25 4.1.5 Hysteresis Calibration (Menu Code 8160) ......................................................................................... 27 4.1.6 A/D Set (Menu Code 8180) ........................................................................................................ 28 4.1.6.1 A/D Initialize (Menu Code 8183) .............................................................................................. 28 4.1.6.2 A/D FirmWare Update (Menu Code 8187) ............................................................................... 28 4.2 System Options ..................................................................................................................................... 29 4.2.1 System Clear ..................................................................................................................................... 29 4.2.1.1 Clear PLU (Menu Code 8211) ................................................................................................ 29 4.2.1.2 Clear Table (Menu Code 8212) .............................................................................................. 29 4.2.1.2 Clear Table (Menu Code 8213) .............................................................................................. 29 4.2.1.3 Clear All (Menu Code 8214) ..................................................................................................... 29 4.2.2 Set Scale Type .................................................................................................................................. 30 2 4.3 4.7 Printer Hardware.................................................................................................................................. 31 4.3.1 Label Size (Menu Code 8320) ................................................................................................... 31 4.3.2 Sensor Calibration (Menu Code 8330) ...................................................................................... 31 4.3.3 Sensor & Motor <<Peel >> (Menu Code 8340) ........................................................................ 31 4.3.4 Print Intensity (Menu Code 8350) ............................................................................................. 31 4.3.5 Adjust Feed Length (Menu Code 8360) .................................................................................... 32 4.3.6 Label Pre-print (Menu Code 8370) ........................................................................................... 32 4.3.7 Printer Initialize (Menu Code 8380) .......................................................................................... 32 Self Test ............................................................................................................................................... 33 4.7.1 Display Test (Menu Code 8510)................................................................................................ 33 4.7.2 A/D Test (Menu Code 8520) ..................................................................................................... 33 4.7.3 Keyboard Test (Menu Code 8530) ............................................................................................ 33 4.7.4 Chess Print (Menu Code 8540) ................................................................................................. 34 5. Parameter ...................................................................................................................................................... 35 6. Servicing & Parts Replacement ....................................................................... ¡Error! Marcador no definido. 7. 6.1 Platform Safety Overload Adjustment ..................................................... ¡Error! Marcador no definido. 6.2 Removing the Upper Case ....................................................................... ¡Error! Marcador no definido. 6.3 Main board Replacement (TODO : change) ............................................ ¡Error! Marcador no definido. 6.4 Power Supply Replacement ..................................................................... ¡Error! Marcador no definido. 6.5 Load Cell & AD Converter Replacement ................................................ ¡Error! Marcador no definido. 6.6 Print Assembly Replacement ................................................................... ¡Error! Marcador no definido. 6.7 Display Replacement ................................................................................ ¡Error! Marcador no definido. 6.8 Keyboard Replacement A,B(with/without breaking sealing) ................. ¡Error! Marcador no definido. Update ............................................................................................................... ¡Error! Marcador no definido. 7.1 8. 9. F/W update ............................................................................................... ¡Error! Marcador no definido. Schematic & Diagrams ...................................................................................... ¡Error! Marcador no definido. 8.1 System Block Diagram ............................................................................. ¡Error! Marcador no definido. 8.2 Connection Diagram ................................................................................. ¡Error! Marcador no definido. 8.3 I/O Pin Connection ................................................................................... ¡Error! Marcador no definido. 8.4 Main PCB .................................................................................................. ¡Error! Marcador no definido. 8.5 A/D PCB .................................................................................................... ¡Error! Marcador no definido. 8.6 Display PCB .............................................................................................. ¡Error! Marcador no definido. 8.7 I/O PCB ..................................................................................................... ¡Error! Marcador no definido. 8.8 Printer I/O PCB ........................................................................................ ¡Error! Marcador no definido. 8.9 Slot PCB .................................................................................................... ¡Error! Marcador no definido. Exploded Views ................................................................................................. ¡Error! Marcador no definido. 9.1 Scale Assy (B,P-type) ............................................................................. ¡Error! Marcador no definido. 9.2 Body Assy (B,P-type) .............................................................................. ¡Error! Marcador no definido. 9.3 Platform (B,P-type) ................................................................................. ¡Error! Marcador no definido. 3 10. 9.4 Upper Case ............................................................................................... ¡Error! Marcador no definido. 9.5 Pole display (P-type) ............................................................................... ¡Error! Marcador no definido. 9.6 Printer Assembly ...................................................................................... ¡Error! Marcador no definido. 9.7 Printer Header Assemble ........................................................................ ¡Error! Marcador no definido. 9.8 Cartridge ................................................................................................... ¡Error! Marcador no definido. 9.9 Tray assembly (B,P-type) ....................................................................... ¡Error! Marcador no definido. Part List ........................................................................................................... ¡Error! Marcador no definido. 10.1 Electronic ................................................................................................ ¡Error! Marcador no definido. 10.2 Mechnical ................................................................................................ ¡Error! Marcador no definido. 12. Revision .............................................................................................................. ¡Error! Marcador no definido. 4 1. Proper Operation 1.1 Introduction Thank you for purchasing the CAS CL5000J price computing printer scale. We have designed this equipment with advanced features, high quality construction, and user-friendly menu driven programming. We are confident that you will find the CAS CL5000J scale will meet all of your most demanding needs. Sales data is easily acquired through many of the available. Also available: High speed printer, 53 preset keys (106 using the SHIFT key or double click) per department, and several operation modes that enable you to control & access to the scale. For larger operations, CL5000J has in-store network that can link-up to 32 scales. RS-232 port, ethernet port enable to export and import program data for time-save mangement. On-time operation possible because of PLU and all other data files are kept locally in each scale’ s memory bank; the scale’ s speed is the same as a stand-alone unit in a network. The CL5000J can use with label. Also cartridge loading mechanism helps to refill the label roll easyly. Also you can print logos, templates, ingredient messages, advertisement lines, and more to promots your store. Remember, for proper installation and maintenance please read the CL5000J Manual before use. A wide variety of supplies, accessories, and expansion options are available through CAS Corporation for whatever your new and increasing demands may require The CL5000J also comes with the SP-2 software package. This software runs on any PC using the 95/98/2000/XP Windows OS. You can design your own label formats on your computer screen and save them to your hard drive. on the printer. With this percise interface, the labels you see on-screen appear exactly You can also manage all of the CL5000J’ s programs and options like pricing, PLU programming, etc. You can upload data from a CL5000J or download data. This is ideal solution for an emergency scale backup system. All this and many more features are packed into the SP-2 software package. SP-2 software package enhances your business next level. 5 1.2 Model and Specificationl Model CL5000J Series Capacity 6Kg 15Kg 30Kg Interval 1g/2g 2g/5g 5g/10g Max Tare -2.999Kg -5.998Kg -9.995Kg 7-segment VFD Display Tare: 4 digit Weight: 5 digit Unit Price: 6 digit Total Price : 6 digit Zero Pass Range 1~50% (default 10%) Re-Zero Range 1~50% (default 2%) Overload Range Max Capa. ~ Max Capa. + 255d (default Max+9d) A/D Conversion Rate Measurement type Platter type Key Speed Key Approx. 8/sec Load cell SUS B-Type PLU Key : 48, Function Key: 36 P,RType PLU Key : 96 Report Label Size Barcode Type Font Printer Type Dimensions PLU Key : 144 PLU 1~999999 6000 Ingredient 400 Char 1~100 100 user defined Barcode Format 1~20 20 Department 1~99 99 Origin 1~500 500 Group 1~99 99 Label Format Default :30, User:10 40 Bitmap 1~5 5 Quantity Symbol 1~8 8 Tare Table 1~99 99 Data Table Printing Resolution PLU Key : 72, Function Key: 36 Scale, PLU, Misc. PLU, Group, Department, Hourly 202 dpi Width: 40mm ~ 60mm, Length: 30mm ~ 80mm EAN13, I2OF5, CODE128C , Offer varoius sizes of label format, e.g Small, Middle, Large Size, and on the label format, also offers varioous types of fonts, such as Italic,Bold,Underline,Throgh Line, Double through line, Reverse,shadow, outline etc. Direct Thermal Print B-Type 408 x 432 x 173 mm P-Type 408 x 493 x 542 mm R-Type 408 x 493 x 607 mm Tray : 380 x 244 mm 6 1.3 Environmental Conditions & Safety 1) Please avoid the following hostile conditions Temperatures below or exceeding: Ungrounded electrical outlet -10° C ~ 40° C (14° F ~ 104° F) Excessive vibration Unstable or flimsy surface Wind or fans functioning in direct Shared electrical outlet contact with weighing platform. Direct sunlight Dust or dirt High humidity Poor ventilation 2) Environmental Protection The scale should be installed in a dry and liquid free environment. When the scale is installed in a high humidity or wet-type environment, be sure to avoid spilling or spraying directly on any surface of the scale. 3) Personal Safety It is very important to be aware of personal safety whenever maintaining or operating this equipment. We have tried to place warning labels and other indicators at the actual location on the equipment where the danger is most likely to occur. Warnings and cautions that are necessary for the safe operation of the scale are contained in this manual. Please, make sure to read carefully ALL warnings and cautions before operating the scale. 4) Observe the following safety precautions Shut the scale OFF and unplug the scale whenever you are changing the label roll or whenever working in the printer bay. The outlet that the scale is plugged into, should be properly grounded. Whenever connecting or disconnecting ANY cables from the scale, be sure to hold the cables by the end connector. Failure to do so may cause a short circuit. Maintain a static-free work area. The outlet used must have the proper voltage ratings. 7 1.4 Leveling and Footer Location 1) Location This scale must be placed on a flat and stable surface. Please keep the scale away from the direct path of oscillating fans, ventilation systems, or strong drafts as these air disturbances can be picked-up by the scale’ s very sensitive weighing platform and may cause incorrect weight readings. 1.1) General Footer Factory setting (Footer location is following picture) 1.2) Short Case Footer Unscrow the footer and place in center hole for narrow place. 8 2) Leveling If the scale is not properly leveled, please adjust the 4 adjustable legs at the bottom of the scale. Turn the legs clockwise or counterclockwise so as to center the bubble of the leveling gauge inside the indicated circle. Turning the adjustable legs counter-clockwise (viewed from top of scale) will lower that part of the scale. Turning the adjustable legs clockwise (viewed from top of scale) will raise that part of the scale. (See Fig.) 9 1.5 Power Outlet and Requirements Power Source : AC 100~240V, 50/60Hz, 1.5A Power consumption : Max 90W CL5000J’s outlet is on bottom of scale. RS232C Power Outlet Power Switch 1) The CL5000J is designed to be used almost anywhere in the world! Like the many appliances of today, the CL5000J is designed with an automatically switching power supply. This allows operation when connected to an AC source from 100V to 240V at 50/60Hz with 5% tolerance. NOTE: Please make sure that the power lines used for the CL5000J are dedicated lines with No high-noise devices (such as compressors, motors, etc) running on it. Also, make sure that the wiring to the electrical socket is correct. If you are uncertain as to the state of your work’ electrical lines, please contact a certified electrician. 2) Once you are sure as to the safety of the electrical line, make sure to ONLY plug the scale into a 3- prong outlet. The third prong is a safety ground and an electrician should properly wire this if it is not correct or if you are unsure. Failure to this CAN result in electrical shock from use of this or any electronic scale. 3) Do not use any 3-prong to 2-prong adapters or break-off the third prong from the CLP power cord. 4) The third prong is necessary and must be properly connected. If you have any problems or questions regarding this matter, make sure to contact the CAS Service Department. 10 2. Classification 2.1 Scale Overview CL5000J has 2 differrnt type Standard Type, Pole Type(R,P). ■ Standard Type ■ Pole Type P ■ Pole Type R 11 2.2 Display and Indicators There is VFD display on CL5000J. VFD display indicates program tare, weight, unit price, total price. Underbar inicates stable, net, zero, auto, save, prepack, D/C, shift, data transfer. ■ Display: 4/5/6/6 TO DO : Insert Picture ■ Indicators SYMBOLS DESCRIPTION ST (▼) Stable weight indicator NET (▼) Net weight indicator ▶ 0◀ Zero weight indicator AUTO Print Mode indicator SAVE Auto clearing status indicator PREPACK Auto clearing status indicator DC (▼) Discount status indicator SHIFT (▼) Speed key shift status indicator TR Data transmission status indicator 12 2.3 Printer •Cartridge type print mechanism •High quality ROHM printer head (50km/5x107pulses) •Improved a rotating force by using 2 independent motors •Large compartment for 120mm paper roll •High speed at 75 mm/sec. •5 intensity ranges for paper roll quality adjustment •Supports Paper •Labels, •Continuous strip labels, •Lineless paper 13 2.4 Commuication ■ Standard ① RS232 ② Ethernet ① RS232 Ethernet 14 2.5 Key Pad Key pad is like following picture (This may change depands on contury) ■ Standard Type Keypad ■ Pole Type Keypad 15 3. Getting Started 3.1 Sealing Method 3.2 Installation of the Label Roll ■ Label Specifications Outer diameter of roll : 100mm Inner diameter of roll : 40mm Width of receipt roll : 40, 50, 60mm Width of label roll : 60mm(MAX) ■ Print Area Width of label : 60mm(MAX) Length of label : 80mm(MAX) 16 To install the label roll at ANY time you must follow the directions in this section: 1) Press the ON/OFF key and make sure that the display is completely off. Open the printer’ s side- access panel. (See fig.1) 2) Lift up TPH lever as fig 2. 3) Remove cartridge as fig. 3. 4) Remove Pick-Up Spool assembley and paper guide from the cartridge as fig. 4. 4 5) Place the label in the scale as fig. 5 5 6) Press the FEED key. NOTE: For auto label calibration press FEED key two or three times * If label position is not correct, you have to check the followings: a. Label size (Label setting menu) b. Feed Adjustment (Feed adjustment menu) c. Senseor calibration (Sensor Calibration menu) 17 3.3 Turning Power On When you turn on scale, display will show below scren. 0.000 CAS CL5000 0.000 0.00 vEr 1.0 0.00 3.4 Program Menu and Tree 3.4.1 How to access PROGRAM MODE You can see the Program Menu screen by pressing the MENU key. 1100 PGm PLU You can use both keys, DATE-TIME/▲ and PLU/▼ to move other menu. Once you choose a suitable menu, press PRINT key to execute program. NOTE: Refer to the function keys avaiable program and calibration menu. Program and Calibration Menu, Function Key Description DATE-TIME/▲, PLU/▼ Selects a different menu PRINT Executes command or selects the submenu X/ESC Exits the Menu 1100 PGm PLU Digit 1100 indicates Menu code. You should press PRINT key at prior menu to see sub menu screen as below. 1120 PGm Edit Whole Program and Calibration Menu Tree is described from next pages. Refer to each code of Program and Calibration Menu Tree in following pages. 18 3.4.2 Program Menu Tree CODE 1100 Menu PLU CODE Sub Menu 1120 1144 1150 1160 New/Edit Expand Item LIST Speed Key 1240 Sales Message 1250 1260 1270 1280 Origin Barcode Tare Unit Symbol 1200 PLU Table1 1300 PLU Table2 1310 Message 1400 Store Data Table 1410 Store 1500 Global Setting 1510 1520 Label Format Barcode 1600 1700 Report Printing 1610 Report Print 1650 Clear All 1710 Print Label Item 1730 1830 1840 1852 1860 1800 Scale Config 1870 1890 H/W Setting CODE Sub Menu 1611 1612 1613 1614 1615 1616 Scale PLU Misc. PLU Group Department Hourly 1732 Label Size 1733 Sensor Calibration 1734 Peel Sensor 1735 Print Intensity 1736 Adjust Feed Length 1737 Label Preprint 1738 Initialize Printer Department/Store/speed key number Date/Time Change Password 1861 Display 1862 A/D Test 1863 Keypad 1864 Chess Printer 1865 Printer Sensor Scale Parameter Clear Memory 19 1861 1862 1863 1864 PLU Table1 Table2 All 1900 Communication 1910 Network Setting 1912 DHCP 1913 IP 1915 RS232C Baudrate 3.4.3 Calibration Menu Tree CODE 8100 8200 Menu Calibration System Options CODE Sub Menu 8110 8120 8130 8140 8160 Span Calibration Span/Zero Fine Adjust Capacity & Units Gravity Setting Hysteresis Calibration 8180 A/D Set 8210 System Clear CODE 8183 A/D Initialize 8187 A/D F/W Update 8211 8212 Clear PLU Clear Table1 8213 Clear Table2 8214 Clear All 8220 Set Scale Type Printer Hardware 8320 8330 8340 8350 8360 8370 8380 Label Size (Height) Sensor Calibration Peel Sensor Printer Intensity Adjust Feed Length Label Pre-print Initialize Printer 8500 Self Test 8510 8520 8530 8540 8550 Display Test A/D Test Keyboard Test Printer Test(Chess) Printer Sensor 8600 Parameter Setting 8600 [Parameter Setting Mode] 8300 20 Sub Menu 4. Calibration Mode 4.1 Calibration Execute Weight Calibration and A/D related settings (Access Authorized CAS Tester only) Open the tray and remove the calibration sealing. (CAUATION: Lift the tray Right side first and unlock the left side) Order to access calibration mode: Insert a stick into the CAL switch. Switch power on, while pushing the CAL button. NOTE: For Hanging type: Pull forward the bottom handle to open Refer to each code of Program and Calibration Menu Tree. First page of Calibration mode 8100 CAL CALibr 21 4.1.1 Span Calibration (Menu Code 8110) (Calibration MENU -> Calibration -> Span Calibration) *Requires set of certified weights. (For best result prepare 15kg/6kg (max) weights) ① Select “Span Calibration” 8110 CALib SPAn Press “PRINT” 8110 SPAn UnLoAd ② Empty tray and press “PRINT” 8110 SPAn Wait4 10329 While calibrating zero display shows “Wait4” ~ “Wait0” and follow next message for Span Calibration. 8110 SPAn LoAd ③ Put on the Weight for Max. Capacities then press “PRINT” *Menu 8130 sets the max capacity for calibration. 8110 SPAn Wait4 Display shows “Wait4” ~ “Wait0” then following message 8110 SPAn SPAn 22 78048 4.1.2 Span/Zero Fine Adjust (Menu Code 8120) (Calibration MENU -> Calibration -> Span/Zero Fine Adjust) This mode is for fine tuning of scale after span Cal. Please put Max weight on the tray and adjust A/D results at 60000, using the cursor key “◀ ▶ .” and Number key. ① Select menu “Span/Zero Fine Adjust”, no weight is on the tray 8120 FinE AdJUSt 0 If internal value is not set to zero, press “ ZERO” key.. ② Put Max. Capacity weight on the tray 8120 FinE AdJUSt 60012 And this screen is a just sample data for testing. This sample data are perhaps not the same as the data that you will have with your scale. - Internal value 60012 needs to change 60000 Press ▶ X 12 Times to decrease internal value. 8120 FinE AdJUSt 23 60000 4.1.3 Capacity & Units (Menu Code 8130) (Calibration MENU -> Calibration -> Capacity & Units) Set scale’s Weighing unit, capacity, Interval, Cal Unit. Caution: Span calibration must take place after “Capacity & Units” setting. Do not change setting after Span calibration. No Capacity Middle weight in Hysteresis Cal. 0 6 kg, dual 2 kg 1(default) 15 kg, dual 5 kg 2 30 kg, dual 10 kg 3 60 kg, dual 20 kg 4 150 kg, dual 50 kg 5 300 kg, dual 100 kg 6 600 kg, dual 200 kg 7 1,500 kg, dual 500 kg 8 3,000 kg, dual 1,000 kg 9 6,000 kg, dual 2,000 kg 8130 CALib CAPA 24 1 4.1.4 Gravity Constant (Menu Code 8140) (Calibration MENU -> 1. Calibration -> 4. Gravity Constant) CL-5000Jr scale enables to calibrate in any country. You can set according to country standard gravity constant data. For case of full recalibration set the factory gravity first and then local area gravity code. (For span calibration Local gravity value is automatically matches with Factory gravity value) First, Enter the gravity value in calibration area (Factory) 8140 Grvty G-CAL 9.7994 Second, Enter the gravity value in using area (local) 8140 Grvty 9.7799 G-USE Use the following table to determine the proper G-Constant for your area. Country City G-Constant Country City G-Constant Argentina Buenos Aires 9.7979 Mexico Mexico City 9.7799 Australia Sydney 9.7979 Morocco Rabat 9.7964 Austria Vienna 9.8099 Netherlands Amsterdam 9.8129 Belgium Brussels 9.8114 New Zealand Wellington 9.8039 Belize Manamah 9.7904 Norway Oslo 9.8189 Bolivia La Paz 9.7844 Panama Panama City 9.7814 Brazil Brasilia 9.7889 Peru Lima 9.7829 Canada Montreal 9.8069 Philippines Manila 9.7844 Ottawa 9.8069 Poland Swider 9.8159 Toronto 9.8054 Portugal Lisbon 9.8009 Vancouver 9.8099 Rumania Bucharest 9.8054 Check Republic Prague 9.8114 Saudi Arabia Riyad 9.7904 Chile Santiago 9.7979 Scotland Stockholm 9.8189 China Hong Kong 9.8099 Singapore Singapore 9.7814 Colombia Bogota 9.7799 South Africa Johannesburg 9.7919 Costa Rica San Jose 9.7829 Spain Madrid 9.8024 Cypress Nicosia 9.7979 Switzerland Bern 9.8084 Denmark Copenhagen 9.8159 Taiwan Taipei 9.7904 25 Ecuador Quito 9.7724 Tunisia Tunis 9.7799 Finland Helsinki 9.8189 Turley Ankara 9.8024 Germany Dusseldorf 9.8129 Uruguay Montevideo 9.7964 Great Britain London 9.8144 USA Anchorage 9.8189 Greece Athens 9.8009 Atlanta 9.7964 Guatemala Guatemala 9.7844 Boston 9.8039 Hungary Budapest 9.8069 Chicago 9.8024 Indonesia Djakarta 9.7814 Dallas 9.7949 Iraq Baghdad 9.7964 Detroit 9.8039 Japan Mishima 9.7979 Los Angeles 9.7979 Korea Seoul 9.7994 New York 9.8024 Kuwait Kuwait 9.7919 Philadelphia 9.8024 Lebanon Beirut 9.7964 San Francisco 9.7994 Mauritius Port Louis 9.7859 Caracas 9.7829 NOTE: Venezuela The G-Constant is the acceleration of gravity in meters per second per second. 26 4.1.5 Hysteresis Calibration (Menu Code 8160) (Calibration MENU -> Calibration -> Hysteresis Calibration ) You can re-adjust the med-range weight level for precise calibration. 8160 CALib HySt Hysteresis Calibration for example 15 kg, middle value is 5 kg ① Press “print”. 8160 HySt UnLoAd 10329 ② Clear the tray and press “PRINT”, then “Wait4” ~ “Wait0” will display. 8160 HySt middLE 40329 ③ Put middle weight (5kg) on the tray and press “PRINT”, then “Wait4” ~ “Wait0” will display. 8160 HySt LoAd 70329 ④ Put 15kg on the tray and press “PRINT”, then “Wait4” ~ “Wait0” will display. 8160 HySt middLE 40329 ⑤ Put Clear middle weight (5kg) on the tray and press “PRINT”, then “Wait4” ~ “Wait0” will display. 8160 CALib HySt 27 4.1.6 A/D Set (Menu Code 8180) (Calibration MENU -> Calibration -> A/D Set) 4.1.6.1 A/D Initialize (Menu Code 8183) (Calibration MENU -> Calibration -> A/D Set -> A/D Init ) 8183 Ad-Se init Wait for a moment after pressing “PRINT” ,and while display shows following message 8183 Ad-Se init wAit CAUTION: Must record setting values before Executing menu . This will set the scale first default setting 4.1.6.2 A/D FirmWare Update (Menu Code 8187) (Calibration MENU -> Calibration -> A/D Set -> Update ) 8187 Ad-Se UPdAtE You can change the A/D firmware with your PC in this mode. 28 ConnEct 4.2 System Options (Calibration MENU -> System Options) 4.2.1 System Clear (Calibration MENU -> System Options -> System Clear) 8210 SyStE CLEAr You can clear memory depends on options below. 4.2.1.1 Clear PLU (Menu Code 8211) (Calibration MENU -> System Options -> System Clear -> Clear PLU) Clear all PLU data. 8211 CLEAr PLU 4.2.1.2 Clear Table (Menu Code 8212) (Calibration MENU -> System Options -> System Clear -> Clear Table1) Clear all Table1 data. 8212 CLEAr tAbLE1 4.2.1.2 Clear Table (Menu Code 8213) (Calibration MENU -> System Options -> System Clear -> Clear Table2) Clear all Table2 data. 8213 CLEAr tAbLE2 4.2.1.3 Clear All (Menu Code 8214) (Calibration MENU -> System Options -> System Clear -> Clear All ) 29 8214 CLEAr ALL Clear PLU, Table1, Table2 and Shop data Symbols and Speed key is initialized 4.2.2 Set Scale Type (Calibration MENU -> System Options -> Set Scale Type) 8220 SyStE StyPE This mode was setted by manufacturer. See the following table, and set value in order. 1 – Bench type, 2 – Pole type, 3 - Hanging, 4 – Self service 30 1 4.3 Printer Hardware No. 1 Sub-menus Label Size Description Lable mode “Height(40) * ( ) are default value. 2 Sensor You can mearsure “Gap” & “Peel” . And print out them. Calibration Also you can test Sensor & Motor. 3 Sensor Setting Peel-off sensor. 4 Print Intensity Set the extent of intensity of label printed. 5 Adjust Feed Set adjusting values of feed length. Length This value can be from “0” to “400” 6 Label Pre-print You can set preprint length. 7 Printer Initialize You can reset printer. 4.3.1 Label Size (Menu Code 8320) (Calibration MENU -> Printer Hardware -> Height) You can input “Height” of label manually. (30 ~ 80mm) 4.3.2 Sensor Calibration (Menu Code 8330) (Calibration MENU -> Printer Hardware -> Sensor Calibration) This mode will automatically feed the label several times to calculate the measurement. The average data of “Gap” & “Peel” are pronted out, and displayed on screen. 4.3.3 Sensor & Motor <<Peel >> (Menu Code 8340) (Calibration MENU -> Printer Hardware -> Peel ) You can select [Y], [N] for “ACTIVE PEEL-OFF” 4.3.4 Print Intensity (Menu Code 8350) (Calibration MENU -> Printer Hardware -> Print Intensity) You can enter any value from “0” to “4” set the tension of label. The 2 is default value. 31 4.3.5 Adjust Feed Length (Menu Code 8360) (Calibration MENU -> Printer Hardware -> Adjust Feed Length) User may enter any value of the feed alignment from “0” to “400”. You can adjust the printing position detail with this menu. * 1pixel = 0.125mm , 8pixel = 1mm Ex) Value “+80” will feed 10mm more Value “-40” will feed 5mm less 4.3.6 Label Pre-print (Menu Code 8370) (Calibration MENU -> Printer Hardware -> Label Pre-print) User may select Preprint mode and any value of the preprint length from “0” to “10”. It controls the length that label is pushed out. 4.3.7 Printer Initialize (Menu Code 8380) (Calibration MENU -> Printer Hardware -> Printer Initialize) Initialize printer setting. 32 4.7 Self Test 4.7.1 Display Test (Menu Code 8510) (Calibration MENU -> Self Test -> Display Test) Selecting 1 will start Display test, press any key to stop and exit. 4.7.2 A/D Test (Menu Code 8520) (Calibration MENU -> Self Test -> A/D Test) 8520 tESt Ad 4.7.3 Keyboard Test (Menu Code 8530) (Calibration MENU -> Self Test -> Keyboard Test) 8530 tESt KEy You can test keyboard by pressing. Press any keys to test Row Code. * Raw Code is location of key. (Upper left Connor is 1) * Press ESC will exit the test or display Row Code. - ESC + ESC : End of test 33 4.7.4 Chess Print (Menu Code 8540) (Calibration MENU -> 5. Self Test -> 4. Chess Print) Select Printer Test (Chess). The scale will then print a TPH (Thermal Print Head) test label. This label print checker pattern helps to find problems with the TPH. You should clean the TPH before you try this procedure. Follow the maintenance procedure for cleaning the TPH. The following examples shows that some of problems that can occur. 1 2 There are several things that this printout sample can reveal: 1. The rubber roller may be dirty or have something stuck to it. Also, the roller may be perforated. 2. This is a clear indication that the TPH has been damaged or burned out. If you need to replace the TPH, please contact the CAS Service Department. 4.7.5 Print Sensor (Menu Code 8550) (Calibration MENU -> 5. Self Test ->5. Printer Sensor) 8550 SEnSo 11 G128 34 P128H0 5. Parameter 8600 CAL 11 8600 PArAm PArAm 100 nO You can input Parameter number (“ Fuction Code: [ ]” ) for predefine settings. If You need to Initial Parameter settings, Enter the number “ 999” If You need to Initial Parameter settings and clear all data (include report), Enter the number “ 998” No MODE VALUE DESCRIPTION 201 CAL 0~3 (3) Weight Decimal Position 202 CAL 0~3 (2) Price Decimal Position 204 0~1 (1) Display scale version at the initial time (0-No, 1-Yes) 205 0~1 (0) Test display at the initial time (0-No, 1-Yes) 301 0~10 (3) Key count threshold for confirming key value REMARK (unit : 23.8 ms) 302 0~10 (5) Key time-out value for confirming continuous input If this time is over, unit price will be cleared when next key is entered. (unit : 1.7 sec) 304 1~4 Key type : 1-bench, 2-pole, 3-hanging, 4-self service 305 1~5 (1) Speed key table number 401 1~99 (1) Scale current department number 402 0~1 (1) Allow fixed price sale (0-No, 1-Yes) 403 0~2 (0) Change Unit Price : 0-No, 1-Temporary, 2-permanently 414 0~1 (0) Always Use global label number 417 0~1 (1) Allow printing multi label (using X key) 35 no default 418 0~1000 (50) Threshold weight for auto printing (unit : weight) ex) 50 -> 0.050g 419 420 0~1 (1) CAL 0~20 (20) Automatically clear PLU after printing (0-No, 1-Yes) Minimun weight digit for printing (unit : division) Ex) 20d -> 40g (15kg) 421 CAL 0~1 (0) 422 1~1000 (1000) 423 0~100 (0) Allow printing when weight is under min. weight Unit weight for unit price Unit for price round (unit price) Ex) 10 -> 0.10 $ 424 ------ 425 1~100 (30) 426 0~1 (0) password Time for waiting stable when printing (unit : 90 ms) Automatically clear sale information after printing without tare and weight (0-No, 1-Yes) 427 0~1 (0) Use double speed key 430 0~1 (1) Automatically clear sale information after printing with no weight (0-No, 1-Yes) 431 0~1 (1) Allow printing without checking previous sale (0-No, 1-Yes) 432 0~1 (0) Change sale type from weight to fixed price When print key is pressed without weight (0-No, 1-Yes) 434 0~1 (0) Allow warning account over (0-No, 1-Yes) 435 0~1 (0) Allow printing only weight (0-No, 1-Yes) 436 1~10 (1) Current shop number 437 0~1 (0) Automatically misc. PLU sale when no PLU is called 501 1~255 (1) 502 0~4 (3) 503 0~999 (300) Current scale address 3 – 57,600 bps Time threshold for checking communication is running (unit : 10 ms) 505 0~99 (20) Continuously interpreting time in sale mode when communication is running (unit : 10 ms) 509 0~1 (0) Use DHCP (0-No, 1-Yes) 510 0~0xFF MAC address 0 HEX mode 511 0~0xFF MAC address 1 HEX mode 512 0~0xFF MAC address 2 HEX mode 513 0~0xFF MAC address 3 HEX mode 514 0~0xFF MAC address 4 HEX mode 36 515 0~0xFF 516 ---- MAC address 5 HEX mode IP address (Do not modify in parameter menu, use program menu) 517 ---- Subnet mask (Do not modify in parameter menu, use program menu) 518 ---- Gateway address (Do not modify in parameter menu, use program menu) 519 0~99999(20304) TCP server port 601 240~640 (320) Label length (unit : dot / 8 dot = 1 mm) 602 448 Label width (unit : dot / 8 dot = 1 mm) 603 0 Label adjust value (Do not modify in parameter menu, use program menu) 604 0~40 (16) Gap length (unit : dot / 8 dot = 1 mm) 605 0~12 (6) Printer intensity (Do not modify in parameter menu, use program menu) 606 0~1 (1) Use Peel off sensor (0-No, 1-Yes) 607 80 (64) Pre-print length (unit : dot / 8 dot = 1 mm) 608 0~255 (128) Gap sensor threshold 609 0~255 (128) Peel off sensor threshold 701 0~1 (0) Year digit length ( 0-2 digit , 1-4 digit ) Ex) 0-07, 1-2007 702 0~9999 (2000) Year text for 4 digit year (last 2 digit must be 00) Ex) if this year is 2017, year text is 2000 703 0~1 (0) Use month text (0-number, 1-text) 704 0~1 (0) Use 12 hour(AM/PM) (0-24, 1-12) 705 0~3 (1) Date type (0:YY MM DD, 1:DD MM YY, 2:MM DD YY 3:MM YY) 706 0~1 (1) Time type (0:HH MM SS, 1:HH MM) 707 0~255(.) Date division symbol (see ASC-II table) 708 0~255(:) Time division symbol (see ASC-II table) 709 0~1 (1) Enable printing serial number (0-No, 1-Yes) 710 0~1 (1) Enable printing packed date (0-No, 1-Yes) 711 0~1 (1) Enable printing packed time (0-No, 1-Yes) 712 0~1 (1) Enable printing sell-by date (0-No, 1-Yes) 713 0~1 (0) Enable printing sell-by time (0-No, 1-Yes) 714 0~1 (1) Enable printing shop data (0-No, 1-Yes) 37 715 0~1 (1) Enable printing PLU number (0-No, 1-Yes) 716 0~1 (0) Enable printing week (0-No, 1-Yes) 717 0~100 (0) Weight Cut-off in barcode data Ex) value = 10, 718 0~100 (0) 1,000 ->100 Price Cut-off in barcode data Ex) value = 10, 1,000 ->100 719 0~1 (0) Print Weight in by-count sale mode 720 0~1 (0) Print Group number instead of department number in barcode data 721 0~3 (2) Print Origin in name field instead of Origin field (0-origin, 1-name1, 2-name2, 3-name3) 722 0~1 (1) Print All date/time enable (0-No, 1-Yes) 724 0~1 (0) Print Weight in fixed price sale mode 725 0~1 (0) Enable Korea E-Mart week (only korea version) 726 1~99 (1) Global label number 727 1~99 (1) Total label number 728 1~20 (1) Global barcode number 801 - (Caption) Weight 802 - (Caption) Price 803 - (Caption) Packed On Date 804 - (Caption) Sell By Date 805 - (Caption) Produced Date 901 0~1 (0) 998 --- Init parameter, clear all data and report 999 --- Init parameter Expand PLU item (0-No, 1-Yes) 38