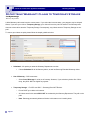
1
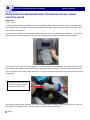
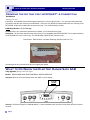
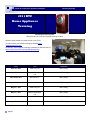
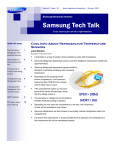
Volume 5, Issue 4 Home Appliances Newsletter April 2011 Samsung Electronics America Samsung Tech Talk Your source for service information SPSN and SPSTV— Growing Your Way! Inside this issue: SPSN and SPSTV— Growing Your Way! 1 Washer’s Dead. Is it 2 the Main or Sub PCB? GSPN Updates 3 Dishwasher Performance Complaints 4 Refrigerator Dis5 penser Drip Troubleshooting: Some Helpful Hints Diagnosing a Defrost Circuit Failure 7 Ordering the Correct Ice Tray for the RFG297*: A Correction 9 What to do when the Electric Range says SAB 9 Karen Tillery Service Marketing, Senior Staff SPSN, the Samsung Product Support Network, is happy to be a growing part of the Samsung CSD team! Last year, SPSN created 345 instructional How To videos for consumers and 104 weekly Live Shows for SPSTV. These shows provided indepth knowledge about Samsung products with LIVE customer feedback and support. SPSN also produced 78 live training episodes and 38 internal How To videos, all aimed at helping you resolve support issues quickly and effectively. 2011 will be even busier. In March, SPSN developed consumer videos for Smart Hub TV, the Q10 HD Camcorder, SH100 Digital Camera, and several smartphone videos. Also, on March 17th, we debuted season 2 of our live show, Keep It Simple! We look forward to providing you with the on-line video content you need to handle customer product problems and concerns. Check out our library of videos at www.samsung.com/spsn and send your suggestions, requests, and feedback to [email protected]. Make sure to log on to www.samsung.com/spsn on Thursdays at 4:30 pm EST to watch live episodes of Keep It Simple! How to Order Correct 10 Parts for Refrigerators Do Not Save Warranty 11 Claims to Temporary Storage Cleaning, Cookware, and Glass Top Ranges 12 Samsung Opens Four 14 Regional Training Centers 2011 RTC Home Appliance Training 15 Still from an SPSN production Volume 5, Issue 4 Home Appliances Newsletter Samsung Tech Talk Washer’s Dead. Is It The Main or Sub PCB? Nicholas Webert Manager HA Tech Support If the washing machine you’ve been called in to fix will not turn on or has no power, how do you find out if it’s the sub PCB or main PCB that is causing the problem? For first time completion, it’s important to bring both boards to the customer’s home, but to keep your costs down, you need to take the right steps in the right order to uncover which board is causing the problem. Pin Test Sites To isolate the PCB that has failed, follow the steps below: 1. Begin by reviewing the Fast track troubleshooting manual (easily located under tech tips on GSPN). Page two shows the colors of the wires to help you locate them. Now jump to page three, locate CN8, and then follow the steps below. 2. On pin 5, check for 5 VDC from the White wire to ground. This voltage should be coming from the main board constantly and going to the sub. If this voltage is not present, the main board is bad. 3. On pin 6, check for +15 VDC (Red) when you press the power button. If the voltage is not present, check the T comm. signal and the R Comm. If the T and R comm. are good, replace the main board. 4. Test pin 1, the Transmit Communication Port (Blu), by unplugging the unit, putting your meter leads on the blue wire and ground, and then plugging the unit in. You should get a 2.5 VDC frequency signal for about a second. The signal also appears when you press the power button. If the signal is not present, replace the sub-board. 5. Test pin 2, the Receiving Communication Port (Org), by unplugging the unit, putting your meter leads on the orange wire and ground, and then plugging in the unit. You should get a 2.5 VDC frequency signal for about a second. If the signal is not present, replace the main board. 6. Test pin 3, the Rest Signal (Yel), by unplugging the unit, putting your meter leads on the yellow wire and ground, and then plugging in the unit. This signal comes and goes at different times, but it’s best to test for it when you plug the unit in. You should get a 2.5 VDC frequency signal for about second. If the signal is not present, replace the main board. Page 2 Volume 5, Issue 4 Home Appliances Newsletter Samsung Tech Talk GSPN Updates Jim Foster Manager, Training /Publications We encourage you to use our GSPN site to find the latest service bulletins to aid you with your repairs. http://service.samsungportal.com HA Service Bulletins uploaded to GSPN March, 2011 Bulletin Number Subject Applicable Models ASC20110303001 Refrigerator door handle change RSG257AARS/XAA RS261MDBP/XAA RS261MDPN/XAA RS261MDRS/XAA RS261MDWP/XAA RS263TDBP/XAA RS263TDPN/XAA RS263TDRS/XAA ASC20110303002 Refrigerator door handle change RS263TDWP/XAA RS265TDBP/XAA RS265TDPN/XAA RS265TDRS/XAA RS265TDWP/XAA RS267TDBP/XAA RS267TDPN/XAA RS267TDRS/XAA To access service bulletins on GSPN, first visit http://service.samsungportal.com. Login using your User ID and Password. Click on “Documents” at the top, then “Product Information” in the left column. The Product Information menu will appear. Click on “Service Bulletin (Local) to bring up the Service Bulletins. To search for a bulletin, enter the bulletin number in the search window at the upper left. If for some reason the bulletin does not appear, it can still be searched using the “Select Depth 1, 2, and 3” drop-down menus. Page 3 Volume 5, Issue 4 Home Appliances Newsletter Samsung Tech Talk Dishwasher Performance Complaints Wes Sirois Assistant Manager, Triage Lead Over the past year, the number of service calls generated by dishwashers cleaning poorly has increased dramatically. This is true for all brands of domestic dishwashers, not only Samsung’s. Common complaints include the new dishwasher not cleaning as well as the old one and the dishes and glasses on the top rack having a white film on them after the cycle is complete. Why are we seeing this upswing in dishwasher performance issues? The main reason is that there are now at least 17 states that have banned phosphates, so dishwasher detergent manufacturers are now producing only P-Free detergents. While these new products are designed to perform as well as detergents with phosphates, customers may need to take some extra steps to get dishes as clean as before. This is why It is important that you understand the impact of the detergent modifications and can explain to your customers how to get the best results from their dishwasher. Going on a Call When you go on a “dishwasher isn’t cleaning as well” service call, you should check the “usual suspects” first. These include: Incoming water temperature The water level Water hardness Use of Rinse Aid The operation of detergent and Rinse Aid dispensers If all mechanical functions are normal, then you should make one or more of the following recommendations, based on conditions in the home: Explain to the customer that they should run hot water in the sink until it becomes very hot to the touch before turning on the dishwasher. This ensures that the first fill contains a good supply of hot water. If the water has a high level of mineral content, explain to the customer how to use performance enhancing additives. Some examples are Glass Magic® and Lemi Shine®. For best results, these products should be put in the pre-wash cup instead of detergent. As with any additive, the customer should follow the instructions that came with the product. Explain to the customer that they must use a Rinse Aid and that they must adjust the amount of Rinse Aid depending on the hardness of the water. All modern dishwashers are designed to work with a Rinse Aid for proper washing and drying results. Suggest to the customer that they use a Dishwashing cleaner to remove mineral content from the interior of the dishwasher and keep it off their dishes. Products such as Dishwasher Magic® and Affresh® for Dishwashers can keep the interior of the appliance clean. Dishwasher detergent manufacturers offer web sites and literature with additional information on how to get the best performance from a dishwasher. You should become familiar with this information and we encourage you to pass this information along to your customers. Page 4 Volume 5, Issue 4 Home Appliances Newsletter Samsung Tech Talk Refrigerator Dispenser Drip Troubleshooting: Some Helpful Hints Paul Pieri Trainer—RTSC A common problem with new refrigerators is the annoying drip of water from the dispenser. What can cause this dripping and how can it be stopped? We know that air getting into the water system of the refrigerator is the culprit…But where is the air coming from? Air can be left in the water line if the installers failed to purge the air from the system during installation. If you suspect that the line has not been purged, you can purge it by dispensing about a gallon of water through the dispenser. Air can also enter the water line if the refrigerator doors were removed during installation. When installers remove the door containing the dispenser, they must disconnect the water coupling. If the water hose is damaged during this process or re-inserted into the water coupler incorrectly, it can cause a bad seal in the water coupler that can allow air to enter the system. Damage to the water line can occur if you remove or insert the water tube incorrectly If the water line shows signs of damage, you must cut it back to where the tubing is good or replace the line. After you have cutback or replaced the line, you need to purge the system as described above. Page 5 Volume 5, Issue 4 Home Appliances Newsletter Samsung Tech Talk Refrigerator Dispenser Drip Troubleshooting Hints continued Additionally, air can get into the water system if the installers don’t install the water coupling locking clip. This clip is located under the hinge cap on top of the refrigerator. The locking clip is intentionally left off the water line so installers can easily remove the water line from the coupling if the door must be removed. Some installers do not know what these clips are or what to do with them. Sometimes, if the door does not have to be removed (which requires installers to remove the hinge cap), the locking clip is never installed. Hinge cap Locking clips Instructions for installing the clip The locking clips insure an airtight seal If everything is connected properly, low water pressure may be the cause of the drip. In cases where water pressure is too low, such as with well water, installing a water coupling that contains a built-in check valve often stops the dripping. See the illustrations below. Check Valve Type Water valve side Non-Check Valve Type Dispenser Side Water flow direction DA62-01628A Page 6 DA62-20111B Volume 5, Issue 4 Home Appliances Newsletter Samsung Tech Talk Diagnosing a Defrost Circuit Failure Jim Swift, HA Product Senior Manager Steve Polzin, Technical Instructor, Appliance Tech Support Specialist Samsung refrigerators are designed to be frost-free. This is accomplished by using a unique defrost program, often referred to as “adaptive defrost”, that identifies the optimum defrost start time and duration. A problem with the defrost circuit can cause the compressor to stay on longer, the temperature to vary outside the programmed parameters, or in some cases, the fans to work incorrectly. Accurately diagnosing a defrost failure in any Samsung refrigerator is a relatively easy process. The defrost circuits for the refrigerator and freezer compartment are virtually the same. If you follow the procedure and use the diagram provided as a reference, you will be able to apply the diagnostic procedure to all models. Once your diagnostic procedure has led you to a potential defrost failure, we recommend you remove the evaporator cover so you can visually confirm your findings and then make the appropriate measurements. Always be sure to make the distinction between a frozen defrost drain (clear ice extending down to the drain trough) and an evaporator that is not defrosting (heavy frost from top to bottom of the evaporator) before diagnosing defrost operation. Clear Ice indicates the defrost circuit is working but not draining. Also, make your measurements before manually defrosting the evaporator coil because the defrost sensor needs to remain frozen for reliable testing. To diagnose a defrost failure, follow these steps: 1. Remove the evaporator cover. 2. Locate the three Molex connectors present on all models. The wire colors may vary, but the placement will be the same on all models. 3. The top plug is the thermal fuse or bimetal depending on the model. Every defrost circuit will incorporate one or the other and both parts serve the same purpose and are wired in series with the defrost heater. This thermal protection is necessary to provide a thermal break for the heater circuit in the event the relay on the main PCB fails in the closed position. The thermal fuse/ bimetal will open the heater circuit if the evaporator temperature rises to approximately 130 degrees F. The Thermal fuse or Bimetal should always be in the closed position. If you find that it is open, replace the failed component and also replace the defrost thermistor. The defrost thermistor should be replaced because the sensor is feeding back incorrect information causing the defrost heater to stay on too long. 4. The middle plug is the defrost heater (brown wires). When you check the refrigerator defrost heater, the range of resistance will vary between 80 -150 ohms depending on the size and design of the cooling system. The lower the resistance, the hotter the heater. Expect to see 80 -100 ohms for SXS units and 100 -150 for French door and bottom mount models. When checking freezer defrost heaters, expect to see 45 - 65 ohms of resistance. Page 7 Volume 5, Issue 4 Home Appliances Newsletter Samsung Tech Talk Diagnosing a Defrost Circuit Failure continued 5. The bottom plug is the thermistor (usually yellow wires). You should measure it before you manually defrost the unit. This will allow you to see the same resistance the micro processor is seeing when the unit goes into defrost. An average reading should be between 20k-40k ohms which converts to a temp range between +14 and -14 degrees, indicating a good sensor. Accurately evaluate your measurements. If the thermal fuse/bimetal and heater checks good, your problem is caused by either the sensor or the main PCB. If the sensor checks good, your diagnostic procedure indicates main PCB failure. Replace the main PCB and the sensor. If the sensor checks bad, just replace the sensor. Generally, the defrost sensors fail more often than the defrost heaters because they are required to work at a wider temperature range than the other sensors. When testing these sensors, it is important that they be tested in circuit. We also recommend you replace the defrost sensor whenever you service a defrost failure, regardless of the diagnosis. For example, if you find an open thermal fuse, open heater, etc., also replace the sensor. Samsung uses two defrost heater designs, one that is weaved into the evaporator (glass type) and one that is around the perimeter of the evaporator ( Calrod type). The Calrod heater is easier to change, but not as efficient. In contrast, the glass heater is harder to change, but more efficient. If you need instructions on how to change the Glass heater, contact [email protected] and request the detailed replacement procedure via email. Page 8 Volume 5, Issue 4 Home Appliances Newsletter Samsung Tech Talk Ordering the Ice tray for the RFG297*: A Correction The Editors Samsung Tech Talk Last month, we published a short article about ordering the ice tray for the RFG297*. In it, we erroneously stated that you should order the nine cube tray for all RFG297s. In fact, the only RFG297 model that takes the nine cube tray is the RFG297AB. All the other models take the seven cube tray. The corrected article is below. BOM Model Number: RFG297AB only. Problem: When you ordered the replacement Ice Maker, you received the wrong part. Resolution: The ice maker with the seven cube ice tray is not compatible with the RFG297AB. The ice maker assembly for RFG297AB has a nine cube ice tray. The Part Number is DA97-07365. Order this tray. Part Number: DA97-07365A. Ice Maker Assembly with Nine Cube Ice Tray. We apologize for any inconvenience this error might have caused. What to Do When the Electric Range Says SAB Tony Ippolito, Manager HA Tech Support Models: RESF3330DW/XAA, RESF3330DB/XAA, RESF3330DW/XAA Symptom: None of the oven functions work and "SAB" is on the display. SAB Solution: The Electric Range is in Sabbath Mode. To exit the Sabbath mode, press the clock button and hold for three seconds. Page 9 Volume 5, Issue 4 Home Appliances Newsletter Samsung Tech Talk How to Order the Right Parts for Refrigerators Tony Ippolito Manager HA Technical Support To order the right parts for a refrigerator, you need to use either the Model Code or the BOM name (and not the Basic Model Number). For example. to find the French Door refrigerator Model Code or BOM name, first locate the labels attached to the refrigerator. The outside label is located on the bottom left side of the refrigerator. The inside label is located in the left internal cavity of the refrigerator. On the outside label, the Model Code is the fourth item from the top, above the serial number. On the inside label, the BOM name is the fourth and last item on the label, below the compressor number. See the illustration below. Use the Model Code or the BOM Name only for all parts ordering, Tech Support, and Warranty Claim processing needs. Remember this simple rule: The correct Model Code or BOM Name ends with XAA. Please Send Us Your Comments! Something you’d like to see in the Samsung Tech Talk Newsletter? If there a topic/issue we haven’t covered that you’d like us to write about, LET US KNOW! Please send your comments to: [email protected] Page 10 Volume 5, Issue 4 Home Appliances Newsletter Samsung Tech Talk Do Not Save Warranty Claims to Temporary Storage Jet Nyamwange Warranty Department A billed Warranty claim must have the correct status. If you select the incorrect status, your payment may be delayed. Worse, if you save your claim to Temporary Storage, your claim will never be paid. Be warned: The Warranty team does not review claims saved to Temporary Storage. Consequently, any claims saved to Temporary Storage are not paid. To ensure your claims are paid, please follow the simple guidelines below: Submitted – All repairs you want the Warranty Department to review. Out of Warranty – COD consumers Page 11 Choose Submitted for all In-Warranty claims, as well as Samsung Extended Warranty claims. Select Out of Warranty for units out of warranty. However, if you submit any claims Out of Warranty, they WILL NOT be eligible for payment. Temporary Storage – For ASC use ONLY – Samsung Does NOT Review. Do not SAVE your claims to this status. All claims saved in this status WILL NOT be reviewed by the Warranty Department. They will not be paid. Note: Samsung permanently deletes all claims in this status on a bi-weekly basis. Volume 5, Issue 4 Home Appliances Newsletter Samsung Tech Talk Cleaning, Cookware, and Glass Top Ranges Kurt Schuster Product Specialist Anyone who remembers the futility of wrapping aluminum foil around the drip ring pans on their gas or electric ranges in an effort to keep them clean cannot help but be intrigued by a glass top range. Surely the colorful, smooth, and solid surface would make any clean up a breeze and last a lifetime to boot. But, just as with anything else new, these cooktops come with new challenges which, unless you keep them in mind, can turn clean up and maintenance into a real chore. The two most important things about glass cooktops are easily remembered: First, they are made of glass. Second, they get hot. Almost everything else we need to know stems from these two basic points. While your new cooktop may look like your countertop, it isn’t and it should not be treated as an extension of that area. Do not use it for storage or keep cooking utensils on it because anything on the stove is likely to become hot enough to become a safety hazard. Nor should you use it as a cutting board or food preparation surface. Further, anything that falls or is dropped onto the glass top can potentially chip or crack it. Keep this in mind, if you store items in a cabinet located over the range or when you are removing something from your over‑the‑range microwave oven. It’s also important to keep the cooktop clean. Before using the cooktop for the first time, cleaning it with a ceramic cooktop cleaner or the Cerama Bryte brand cleaner included with the range will help to protect the top and make daily cleanups easier. We recommend using a few drops of the cleaner daily after cooking once the cooktop has cooled to help maintain its appearance, especially if there was a spill or there is any residue from a spill. Sugary spills or melted plastic should not be allowed to burn or cool in place. Turn off all of the cooking elements and then, using an oven mitt along with a spatula or razor, gently scrape as much of the material as possible off the surface and either discard it or move it to a cooler area of the cooktop. Wait until the cooktop has cooled to remove any of the remaining residue using the cleaner as directed. Remove any excess cleaner by polishing with a dry cloth or paper towel. We do not recommend rinsing. Any cooking or cleaner residue could get under the cooktop seal. Be sure to use the cleaning products as directed and check the Cerama Bryte web site, www.ceramabryte.com, for the other products that are available for more specialized cleaning and maintenance. Now, let’s turn our attention to the cookware. You can use most types of conventional cookware on the radiant elements of your range, but you can only use steel, cast iron, and some kinds of stainless steel on the induction elements. Use only quality cookware with flat, smooth heavy bottoms that make good contact with the cooking zone of the selected cooking element. You can check for flatness by rotating a ruler across the bottom of the cookware. In addition, select cookware whose finish is easy to keep clean, especially on the bottom. Keeping the bottoms of the cookware clean prevents baked on foods from scratching, marring, or fusing with the glass surface which could lead to breakage or pitting. Also, using the right size cookware for the food you are preparing and matching it to the right size cooking element, Page 12 Volume 5, Issue 4 Home Appliances Newsletter Samsung Tech Talk Cleaning, Cookware, and Glass Top Ranges continued whether radiant or induction, will improve the efficiency of your range. Using undersized cookware not only wastes energy, but also leaves exposed part of the radiant element. This increases the risk of burns and the possibility of igniting your clothing or the potholder you use to handle the cookware. Keep in mind too, that certain types of glass, ceramic, earthenware, or other glazed cookware should not be used on any range. There are also some additional materials you should avoid using with your glass top range. Cookware with copper or aluminum surfaces can leave metal marks that resemble scratches, particularly if moved while both the pan and glass top are hot. You can remove these marks with the polish supplied with your range as soon as the surface has cooled. Porcelain enamels, glass, and cast iron can actually scratch the glass top. Most of these scratches can be buffed, polished, or filled if attended to quickly. More severe scratches are not only unsightly, but can lead to the failure of the glass top, an event that is not covered under warranty. Also avoid cookware with warped or curved bottoms. Pans whose bases are smaller than the cooking zone of the smallest heating element not only waste energy and can be dangerous, but may not have enough mass to work properly with some induction elements. Unbalanced cookware with heavy handles that do not allow the pan to rest flat on the glass top will not allow either radiant heat or induction energy to heat the pan or cook the food in it properly. In addition, remember that aluminum, copper, brass, glass, ceramic, and porcelain cookware will not work at all on induction elements, and that some stainless steel cookware may not work properly or consistently. Finally, see the “Care and Cleaning of the Glass Cooktop,” section of the owner’s manual for additional information specific to your model, or call 1‑800‑SAMSUNG if you have any doubts regarding the use or maintenance of your range. When you care for it properly, cook with quality cookware, and follow good cooking practices, your glass top range will provide years of dependable service. Samsung Electronics America 85 Challenger Road Ridgefield Park, NJ 07660 Phone: 201-229-4251 The information in this bulletin is published for experienced repair technicians only and is not intended for use by the public. It does not contain warnings to advise non-technical individuals of possible dangers in attempting to service a product. Only experienced professional technicians should repair products powered by electricity. Any attempt to service or repair the product or products dealt with in this information by anyone else could result in serious injury or death. Information provided in this bulletin is subject to change or update without notice. Page 13 Volume 5, Issue 4 Home Appliances Newsletter Samsung Tech Talk Samsung Opens Four Regional Training Centers Jim Foster Manager, Training Samsung’s Training Department is pleased to announce that all four of its RTCs (Regional Training Centers) are open and ready for business. These centers are located in the following areas: New Jersey – 210 Riser Rd., Little Ferry, NJ 07673 Chicago - 1130 N. Ellis, Bensenville, IL 60106 Los Angeles – 18511 Broadwick St., Rancho Dominquez, CA 90220 Atlanta – 8110 Troon Circle, Austell, GA 30168 These RTCs are being utilized to train our FE/ME network, SSDs (self-servicing dealers), as well as our ASCs. The purpose behind these centers is to provide an increased and more detailed, hands-on level of training for our service network, resulting in expert level techs. Samsung’s goal with these centers is to have the best trained tech in the business. We look forward to your attendance at a training center soon! Meet the Trainers JUAN MORALES NJ TRAINER Page 14 ANTHONY PERKINS CHICAGO TRAINER ROBERT SHOEMAKER LA TRAINER NICHOLAS WEBERT ATLANTA TRAINER Volume 5, Issue 4 Home Appliances Newsletter Samsung Tech Talk 2011 RTC Home Appliance Training Samsung HA Training 2011 Being held at one of our four Regional Training Centers! Attend in depth, hands-on training at one of our RTCs. You can reserve your seat for training by emailing [email protected]. Additionally, Home Appliance training is available on-demand 24/7 at https://my.plus1solutions.net/clientPortals/samsung/ Date City Comments April 5-7, 2011 Little Ferry, NJ ME Training April 5-7, 2011 Rancho Dominquez, CA ME Training April 26-28, 2011 Bensenville, IL ME Training April 26-28, 2011 Austell, GA ME Training May 3-5, 2011 Little Ferry, NJ ME Training May 3-5, 2011 Rancho Dominquez, CA ME Training May 24-26, 2011 Bensenville, IL ME Training May 24-26, 2011 Austell, GA ME Training Page 15