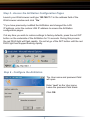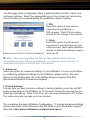
1
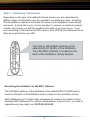
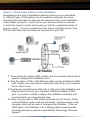
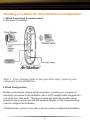
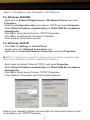
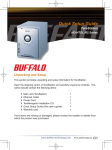
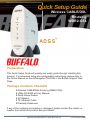
Quick Setup Guide
Wireless CABLE/DSL
Router-g
WBR2-G54
Preparation
This Quick Setup Guide will quickly and easily guide through installing this
product. For advanced setup and configuration instructions, please refer to
the Online Manual on the AirNavigator CD-ROM or the Buffalo Support Web
Page.
Package Contents Checklist
◗ Wireless CABLE/DSL Router-g (WBR2-G54)
◗ Utility CD-ROM w/ User Manual
◗ Quick Setup Guides
◗ AC Adapter
◗ 7ft. Ethernet Cable
◗ Warranty Statement
If any of the contents are missing or damaged, please contact the retailer or
reseller from which this product was purchased.
www.buffalotech.com/wireless
PY00-29012-DM20
Step 1 - Gathering Information
Depending on the type of broadband internet service you are subscribed to,
different types of information may be needed to complete the setup. Acquiring
this information in advance will make the setup of your AirStation router simple
and quick. A quick call to your service provider’s customer or technical support
number will provide you with the needed information if you are unsure. If you
are connecting to the internet via DSL service, then PPPoE information will most
likely be required from your ISP.
The LAN or Wired MAC address is the
default ESS-ID (SSID) of the AirStation.
The LAN MAC address is located on the
back of the AirStation clearly labeled.
Recording the AirStation’s LAN MAC Address
The LAN MAC address of the AirStation is the default ESS-ID (SSID) and is
found on the back of the AirStation body as shown in the illustration above.
MAC Addresses are 12-digit codes comprised of numbers and letters. When
inputting MAC Addresses for custom configurations, a semi-colon (:) is used to
separate every two digits. ex: 00:07:40:00:00:00
2
Step 2 - Connecting Cables to the AirStation
Depending on the type of broadband internet service you are subscribed
to, different types of information may be needed to complete the setup.
Acquiring this information in advance will make the setup of your AirStation
router simple and quick. A quick call to your service provider’s customer
or technical support number will provide you with the needed information if
you are unsure. If you are connecting to the internet via DSL service, then
PPPoE information will most likely be required from your ISP.
1. Power down the cable or DSL modem and the computer which will be
used to configure the AirStation router.
2. Plug the cable or DSL’s LAN Ethernet cable into the AirStation’s WAN
port. Initially, you may need to unplug this cable from your computer,
hub or other router.
3. Plug the provided Ethernet cable into a LAN port on the AirStation and
plug the other end into your computer’s Ethernet adapter’s (NIC)
port. If you plan to initially configure the AirStation wirelessly (not
recommended), you may skip this step.
4. Power on your cable or DSL modem and wait one full minute, Power
on the AirStation router, wait one full minute, and then power on the
computer which will be used to configure the AirStation. If the red
DIAG light on the AirStation is lit or flashing after several minutes
of being powered on, please consult Buffalo Technology Technical
Support.
3
Deciding on a Mode for Initial AirStation Configuration
◗ Wired Connection (recommended)
◗ Wireless Connection
Step 3 - If not already done in the previous step, connect your
computer to the AirStation
◗ Wired Configuration
Buffalo recommends using a wired connection, meaning your computer is
physically connected to the AirStation with a CAT5 straight cable plugged into
one of the four LAN ports. This type of setup will eliminate possible setup
problems due to any issues with the wireless adapter on the computer being
used to configure the AirStation.
A Web browser version 4.5 or later is can be used to configure the AirStation.
4
◗ Wireless Configuration
■ NOTE: If configuring via a Wired Configuration, please skip to the next page!
Windows 2000/XP
If there is no Ethernet adapter available on the computer being used to configure
the AirStation, a wireless configuration may be performed using a correctly
installed 802.11b or 802.11g wireless adapter.
To configure the AirStation via a wireless connection, establish a connection to
the AirStation using the setup instructions that came with the wireless client card
or adapter that you are using.
Windows 98SE/ME
If there is no Ethernet adapter available on the computer being used to configure
the AirStation, a wireless configuration may be performed using a correctly
installed 802.11b or 802.11g wireless adapter.
To configure the AirStation via a wireless connection, establish a connection to
the AirStation using the setup instructions that came with the wireless client card
or adapter that you are using.
Identifying the Proper AirStation
The default SSID of the AirStation is its LAN MAC Address which was addressed
on Page 2 of this Quick Setup Guide. Using your wireless card’s software or
Windows XP’s Wireless Zero Config, connect to the Wireless Network that
broadcasts the LAN MAC Address of your AirStation as its SSID. Please consult
the documentation that came with your wireless client card or adapter for further
assistance.
5
Step 4 - Configure your Computer’s IP Address
For Windows 98SE/ME
- Right-click on Network Neighborhood or My Network Places and select
Properties.
- Select the Configuration tab, scroll down to TCP/IP and press Properties.
- Select Obtain IP address automatically and Obtain DNS Server address
automatically.
- Click OK to close Internet Protocol (TCP/IP) Properties
- Click OK to close Network Connection Properties
- Close Network Connections window
For Windows 2000/XP
- Click Start => Settings => Control Panel
- Double click on the Network Connections icon.
- Right-click on Local Area Network Connection and select Properties.
■ NOTE: If a wireless connection is being used, you will be required to rightclick on the Wireless Connection and select Properties.
- Scroll down to Internet Protocol (TCP/IP ) and press Properties.
- Select Obtain IP address automatically and Obtain DNS Server address
automatically.
- Click OK to close Internet Protocol (TCP/IP) Properties
- Close Network Connections and Control Panel windows
Refer to your Operating System documentation for further instructions on how
to navigate to your TCP/IP Properties.
6
Step 5 - Access the AirStation Configuration Pages
Launch your Web browser and type 192.168.11.1 in the address field of the
Web browser window and click “Go.”
*If you have previously modified the AirStation and changed the LAN
IP address, enter the custom LAN IP address to access the AirStation
configuration pages.
If at any time you wish to restore settings to factory defaults, press the red INIT
button on the underside of the AirStation for 15 seconds. During this process
the red DIAG light will flash rapidly. Do not let go of the INIT button until the red
DIAG light has stopped flashing rapidly.
Step 6 - Configure the AirStation
The User name and password field
will open.
Enter “root” as the User name
Leave the password field blank.
Click OK.
7
The first page of the configuration offers 3 distinct buttons for DSL, Cable, and
Advanced settings. Select the appropriate type of internet service, referencing
the information you collected during the preparation steps if needed.
◗ DSL
Select this option if your internet
connection is provided by a
DSL provider. Most DSL providers
require PPoE settings to be entered.
◗ Cable
Select this option if your internet
connection is provided through your
cable provider. Most cable providers
require no aditional settings except to
obtain an IP.
■ NOTE: After selecting either the DSL or Cable wizard, please choose
the proper selections that are applicable to your internet service provider. A
verification test will be run at the end of the wizard.
◗ Advanced
Select this option for advanced settings of your AirStation. For more information
on configuring advanced settings of your AirStation, please refer to the User
Manual on the AirNavigator CD or the Buffalo Wireless Support Web Site:
http://www.buffalotech.com/wireless/support
◗ Default Settings
If at any time you wish to restore settings to factory defaults, press the red INIT
button on the back of the AirStation for 15 seconds. During this process the red
DIAG light will light up. Once it has lit up, you can stop pressing the INIT button.
The restore process can take up to two minutes.
This completes the basic AirStation Configuration. To change advanced settings,
please consult the Online Manual on the CD-ROM or go to the Buffalo Support
Web Site: http://www.buffalotech.com/wireless/support
8
The AirStation can be re-configured anytime via a Web browser using a wired
or wireless connection by entering 192.168.11.1 in the URL address field of the
Web browser and pressing the Enter key on the keyboard.
Additional Information:
AOSS (AirStation One-Touch Secure System)
The WBR2-G54 supports Buffalo’s AOSS system for connecting AOSS
compatible wireless clients to the WBR2-G54. For information about AOSS,
please refer to the AOSS Supplement which is included in the WBR2-G54
package contents.
IP Addressing
To verify your IP settings for static or automatic addressing, click Start, select
Settings (if present) and click Control Panel. Within Control Panel, doubleclick Network or Network Connections depending on your Operating System.
You can then right-click and select Properties for your wired or wireless
connections. Within the properties, you can view the properties of your TCP/IP
protocol.
Generally, you will want to be sure that “Obtain an IP address automatically”
is selected to allow easier connections. To manually renew IP addressing
configurations for your connection, follow these steps:
◗ Click Start and Run. A dialog box will appear where you can type
COMMAND into the field provided and click OK.
◗ An MS-DOS prompt will launch. Enter IPCONFIG /RELEASE and
press the Enter key on the keyboard to release your current IP
configuration. Next, enter IPCONFIG /RENEW and press the Enter
key to seek new settings from a DHCP server. (This may take a few
moments).
◗ Type IPCONFIG /ALL. This will display all the IP configurations for your
wired or wireless connection.
◗ The Default Gateway address listed in the results is usually the IP
address of the AirStation. If no IP addresses are listed or your wireless
adapter displays a 169.254.XXX.XXX address, retrace the setup steps
to verify correct installation.
◗ Type EXIT to close out the DOS window.
9
Buffalo Technology
Technical Support
Buffalo Technology offers Toll-Free Technical Support 24 hours a day, 7 days a
week for this product. Customers in the United States and Canada can obtain
technical support using the following information:
◗ Online Help:
◗ Web
◗ E-mail
◗ Telephone
Available on the AirNavigator CD enclosed with your
purchase.
www.buffalotech.com/wireless
[email protected]
866-752-6210 (USA & Canada only)
The constantly evolving state of wireless products and operating systems
requires Buffalo Technology to occasionally release updated software to take
advantage of new technologies and to comply with industry standards. For
the most recent software, firmware, driver, and technical whitepaper releases
available, please visit the Buffalo Technology website.
FCC Compliance Statement - See owners manual for complete statement.
This device complies with Part 15 of the FCC Rules. Operation is subject to the
following two conditions: (1) This device may not cause harmful interference,
and (2) this device must accept any interference received, including interference
that may cause undesired operation.
R&TTE Compliance Statement - See owners manual for complete statement
This equipment complies with all the requirements of the DIRECTIVE 1999/5/
EC OF THE EUROPEAN PARLIAMENT AND THE COUNCIL of 9 March 1999
on radio equipment and telecommunication terminal Equipment and the mutual
recognition of their conformity (R&TTE).
Copyright © 2004 Buffalo Technology, Inc. All Rights Reserved. - Buffalo Technology (USA) Inc.,
is part of MELCO INC., the global manufacturers of IT peripherals, including memory, networking,
and multimedia products, inside many of the world’s computers. All trademarks are property of their
respective owners.
10