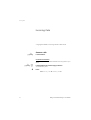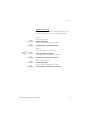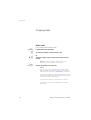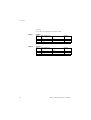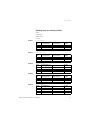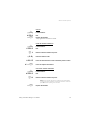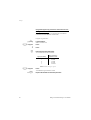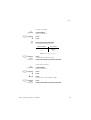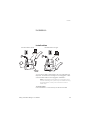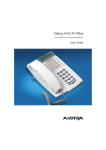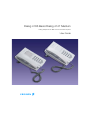
1
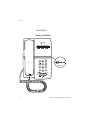
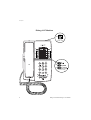
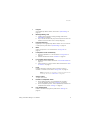
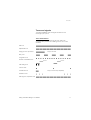
Dialog 4106 Basic/Dialog 4147 Medium Analog Telephones for MD110 Communication System User Guide Cover Page Graphic Place the graphic directly on the page, do not care about putting it in the text flow. Select Graphics > Properties and make the following settings: • Width: 15,4 cm (Important!) • Height: 11,2 cm (May be smaller) • Top: 5,3 cm (Important!) • Left: -0,3 cm (Important!) This text should then be hidden. ? Title EN/LZT 103 69 R1A © Ericsson Enterprise AB 2004 Table of Contents Table of Contents page Welcome .......................................................... 4 Description ....................................................... 6 Free Seating (optional) .................................... 13 Incoming Calls ............................................... 14 Outgoing Calls ............................................... 16 During Calls .................................................... 32 Call Forwarding .............................................. 37 Absence Information (optional) ....................... 48 Messages ...................................................... 50 Group Features .............................................. 55 Other Useful Features ..................................... 57 Settings .......................................................... 62 Installation ...................................................... 69 Troubleshooting .............................................. 74 Glossary ......................................................... 75 Index .............................................................. 76 Dialog 4106 Basic/Dialog 4147 Medium 3 Welcome Welcome Welcome to the user guide for the Ericsson Dialog 4106 Basic phone and Ericsson Dialog 4147 Medium phone in the Ericsson MD110 Communication System from Ericsson. Its alliance of features and facilities effectively improves communications for virtually any kind of organization. There is a line of telephones designed for easy use in every situation to take full advantage of these advanced features and facilities. Some markets use differing codes for some functions. In this guide, all functions are described using the most common code. The markets and their differing code is shown as a side note. The user guide describes the facilities of the Ericsson analog phones as they are programmed at delivery from the factory. There may be some differences in the way your phone is programmed. Please consult your system administrator if you need further information. The latest version of this user guide can be downloaded from: http://www.ericsson.com/enterprise/ 4 Dialog 4106 Basic/Dialog 4147 Medium Welcome Copyright All rights reserved. No parts of this publication may be reproduced, stored in retrieval systems, or transmitted in any form or by any means, electronic, mechanical, photocopying, recording or otherwise, without prior written permission of the publisher except in accordance with the following terms. If this publication is made available on Ericsson media, Ericsson gives its consent to downloading and printing copies of the content provided in this file only for private use and not for redistribution. No parts of this publication may be subject to alteration, modification or commercial use. Ericsson will not be liable for any damages arising from use of an illegal modified or altered publication. Warranty ERICSSON MAKES NO WARRANTY OF ANY KIND WITH REGARD TO THIS MATERIAL, INCLUDING, BUT NOT LIMITED TO, THE IMPLIED WARRANTIES OF MERCHANTABILITY AND FITNESS FOR A PARTICULAR PURPOSE. Ericsson shall not be liable for errors contained herein nor for incidental or consequential damages in connection with the furnishing, performance or use of this material. Declaration of Conformity Hereby, Ericsson Enterprise AB, S-131 89 Stockholm, declares that this telephone is in conformity with the essential requirements and other relevant provisions of the R&TTE directive 1999/5/EC. Details to be found at: http://www.ericsson.com/sdoc Dialog 4106 Basic/Dialog 4147 Medium 5 Description Description Dialog 4106 Basic 1 8 7 9 (bottom side) 2 6 3 5 4 6 Dialog 4106 Basic/Dialog 4147 Medium Description 1 Programmable keys Three keys for storing frequently called numbers. You can store one number per key, see section “Dial By a Function Key” on page 25. Note: If you unplug the telephone, stored numbers will remain for about 24 hours. 2 Mute / Prog a. Switch microphone on or off. See section “During Calls” on page 32. b. Enter programming mode. See section “Settings” on page 62. 3 Message Waiting key a. A flashing light indicates a waiting message. See section “Messages” on page 50. b. Programmable key for storing of one frequently called number. See section “Dial By a Function Key” on page 25 4 Last number redial / Pause key a. Redial last number dialed. See section “Last Number Redial” on page 19. b. Insert a pause if you have to wait for dial tone when programming a number into the memory. See section “Wait for dial tone” on page 17. 5 R-key Used for example to make an inquiry, to transfer a call or to establish a conference, see section “During Calls” on page 32. 6 Volume control To adjust the volume. 7 Message Waiting switch Switch Message Waiting indication on or off. Also used to reverse the polarity in case of crossed line cables. See section “Settings” on page 62. 8 Loudspeaker (beneath handset) 9 Handset with hearing aid function Please note: The handset may attract and retain small metal objects in the earcap region. Dialog 4106 Basic/Dialog 4147 Medium 7 Description Dialog 4147 Medium 12 (upper side) 1 2 3 3 13 9 14 10 11 (bottom side) 4 8 5 7 6 8 Dialog 4106 Basic/Dialog 4147 Medium Description 1 Program Store frequently called numbers, see section “Speed Dialing” on page 23. 2 Message Waiting / 2nd a. A flashing light indicates a waiting message. See section “Messages” on page 50. b. Key for access to secondary key functions (these functions are stated on the second line of the corresponding key). 3 Programmable keys Eight keys for storing frequently called numbers. You can store two numbers per key, see section “Speed Dialing” on page 23. 4 Mute Switch microphone on or off. See section “During Calls” on page 32. 5 Loudspeaker on/off / Headset key a. Switch loudspeaker on or off. See section “During Calls” on page 32. b. Activate headset. See section “Headset” on page 67. 6 Last number redial / Pause key a. Redial last number dialed. See section “Last Number Redial” on page 19. b. Insert a pause if you have to wait for dial tone. See section “Wait for dial tone” on page 17. 7 R-key Used for example to make an inquiry, to transfer a call or to establish a conference, see section “During Calls” on page 32. Note: Sometimes it is required to change the flash time for the R-key, see section “Flash time” on page 68. 8 Volume control To adjust the volume. 9 Headset / Loudspeaker switch a. At the headset position, the loudspeaker key activates a connected headset. See section “Settings” on page 62. b. At the loudspeaker position, the loudspeaker key activates the loudspaker. See section “Settings” on page 62. 10 Prog On/Off switch Enable or disable the program key. See section “Settings” on page 62. Dialog 4106 Basic/Dialog 4147 Medium 9 Description 11 Message Waiting switch Switch Message Waiting indication on or off. Also used to reverse the polarity in case of crossed line cables. See section “Settings” on page 62. 12 Data port Data port for connection of a modem, PC or other telephone equipment. 13 Loudspeaker (beneath handset) 14 Handset with hearing aid function Please note: The handset may attract and retain small metal objects in the earcap region. 10 Dialog 4106 Basic/Dialog 4147 Medium Description Tones and signals The following different tones and signals are sent from the exchange to your phone. Tone characteristics The tones shown in this section are the most used tones worldwide. Many markets use a differing tone for one or more situations. Dial tone Special dial tone Ringing tone or queue tone every 4 seconds Busy tone Congestion tone Number unobtainable tone Call waiting tone Intrusion tone Conference tone every 15 seconds (to all parties) Verification tone Warning tone, expensive route Dialog 4106 Basic/Dialog 4147 Medium 11 Description Ring signals Three different ring signals inform you about the type of the incoming call. The signals shown in this section are the most used signals worldwide. Many markets use signals that are adapted for the local standards. If you get a signal that is not described or you cannot identify, ask your system administrator. Internal ring signal External ring signal Recall signal (Callback reminder) 12 Dialog 4106 Basic/Dialog 4147 Medium Free Seating (optional) Free Seating (optional) The Free Seating function is used for persons who have an office extension number but no phone set of their own. For example, flexible office workers, persons mostly working outside the office, etc. As a Free Seating user and working from the office, you logon to any free phone set that temporarily will be assigned with your extension number and your system authorities. u *11* z* z# d To log on Lift the handset. Dial. Enter the authorization code and press. Enter your phone number and press. Replace the handset to finish the procedure. The display shows your phone number. *10* Note: An earlier version of the Free Seating function uses another procedure: To log on, dial extension No. u #11# d #. To log off Lift the handset. Dial. Replace the handset to finish the procedure. Dialog 4106 Basic/Dialog 4147 Medium #10# Note: An earlier version of the Free Seating function uses another procedure: To log off, dial . 13 Incoming Calls Incoming Calls A ring signal indicates an incoming internal or external call. u Answer calls Lift the handset. On another extension uz 8 14 You can answer a call to another extension from any phone in your office. Lift the handset and call the ringing extension. You receive busy tone. Press. 4 Note: France, press ; Sweden, press 6 Dialog 4106 Basic/Dialog 4147 Medium Incoming Calls Answer a second call A call waiting tone will inform you, during a conversation, that a second call is waiting on your phone. You have two options. Option 1: d u Finish the ongoing call: Replace the handset. The new call will be signalled on your phone. Lift the handset to receive the new call. Option 2: ¸d u d u Ask your conversation partner to wait: Press and replace the handset. The waiting call will be signalled on your phone. Lift the handset to receive the new call. After finishing the new call: Replace the handset. Your first call will be signalled on your phone. Lift the handset to receive the first call again. Dialog 4106 Basic/Dialog 4147 Medium 15 Outgoing Calls Outgoing Calls Make calls u z 0z d How to make internal and external calls. Lift the handset and dial either: An extension number to make an internal call. Or: The digit or digits to get an external line and the external number. Note: Which digit to press for external call access, depends on the configuration of the system. Replace the handset to end the call. Notes: You can make your calls faster, using Common Speed Dialing numbers and by programming your own Speed Dialing numbers, see section “Speed Dialing” on page 23. If you receive a queue tone when the digit or digits to get an external line are dialed (optional function Least Cost Routing is used in the system), keep waiting. Once a line becomes free, you will receive a dial tone. If a warning tone is heard, the selected line is marked “Expensive”. 16 Dialog 4106 Basic/Dialog 4147 Medium Outgoing Calls Wait for dial tone © Sometimes it is required to wait for a new dial tone after dialing the prefix digit when making an external call. In such situations, you must store the pause for a new dial tone into the number: Press. Manual dial pause control: You can control the length of a dial pause manually if you store the pause after the fifth digit or later. This function is very useful, if you are connected to a PBX that requires a new dial tone for extension numbers. Example: © © You want to talk to Steven. Steven’s company has the number 12345678, and his extension is 1234, so the complete number is 12345678-1234. To wait for a new dial tone, you have to store a pause before the extension number. Press. The phone number is dialed without the extension, in this example 12345678. Press when the new dial tone is received. Now the extension number is dialed. Dialog 4106 Basic/Dialog 4147 Medium 17 Outgoing Calls Number presentation restriction If you do not want your name and number to be displayed to the person you are calling, you can use the following procedure. Notes: This function is only available in newer versions of the exchange, and it might be blocked for use on your extension (programmed by your system administrator). u *42# z The number presentation restriction is only valid for the ongoing call, i.e. the procedure has to be repeated the next time you want to use it. Lift the handset. Dial and wait for a new dial tone. Dial the number. Your name and number is not indicated on the called person´s display. Individual External Line u *0* z# z 18 To make a call on a specific external line: Lift the handset. Dial. Dial the individual external line number and press. Dial the digit or digits to get an external line and the external number. Dialog 4106 Basic/Dialog 4147 Medium Outgoing Calls Last Number Redial When you initiate a call (internal or external) the phone automatically stores all the dialed digits, irrespective of whether the call was successful or not. Stored numbers can consist of maximum 32 digits. u © Note: To redial a number that incorporates a wait for a new dial tone, you must indicate to the telephone where in the number it must pause and wait for the new dial tone. To do this, press the Redial/Pause key at the proper place in the number. See section “Wait for dial tone” on page 17. Lift the handset. Press to redial the last dialed number. Last External Number Redial When you initiate an external call the system automatically stores all the dialed digits, irrespective of whether the call was successful or not. u *** Note: To redial a number that incorporates a wait for a new dial tone, you must indicate to the telephone where in the number it must pause and wait for the new dial tone. To do this, press the Redial/Pause key at the proper place in the number. See section “Wait for dial tone” on page 17. Lift the handset. Press to redial the last dialed external number. Dialog 4106 Basic/Dialog 4147 Medium Note: Finland and Sweden, dial **0 19 Outgoing Calls When you receive a busy tone If you call an extension and receive a busy tone or get no answer or all external lines are busy you can use these methods: Callback 6 d u If a called extension is busy or there is no answer: Press. Note: France, Finland and Sweden, press 5 Replace the handset to finish procedure. You are called back (recall ring signal) when the ongoing call is finished or the next time a new call is finished. You have to answer within eight seconds, otherwise the Callback service is cancelled. Lift the handset when you are called back. The system calls the extension. Note: Callbacks can be activated on several extensions at the same time. 6 z# d u If all external lines are busy (after dialing the digit or digits to get a line): Press. Note: France, Finland and Sweden, press 5 Dial the external number and press. Replace the handset to finish procedure. When an external line becomes free, you will be called back (recall ring signal). You have to answer within eight seconds, otherwise the Callback service is cancelled. Lift the handset when you are called back. The system calls the external number. Note: Only one Callback can be activated on a busy external line. 20 Dialog 4106 Basic/Dialog 4147 Medium Outgoing Calls u #37* z #d u #37# d Cancel any single Callback Lift the handset. Dial and enter the extension number. Note: To cancel a single Callback on a specific external line, dial the digit or digits to get a line instead of the extension number. Press and replace the handset. Cancel all Callbacks Lift the handset. Dial. Replace the handset. Activate Call Waiting 5 If you urgently wish to contact a busy extension or external line, you can notify it by a Call Waiting signal. Press. 6 Note: France and Finland, press ; Sweden, press 4 Keep handset off hook. When the called extension or the external line becomes free, it will be called automatically. Notes: The Call Waiting function might be blocked for use on your extension (programmed by your system administrator). If Call Waiting is not allowed you will continue to receive a busy tone. Dialog 4106 Basic/Dialog 4147 Medium 21 Outgoing Calls Intrusion on a busy extension 4 You can intrude on an ongoing call on a busy extension. Press. Note: France and Sweden, press 8 Before the Intrusion is executed, a warning tone is sent to the parties in the ongoing call. A three party call is established and a warning tone is heard. Notes: The warning tone might be disabled for your system. The Intrusion function might be blocked for use on your extension (programmed by your system administrator). If Intrusion is not allowed, you will continue to receive a busy tone. Intrusion on a busy external line *44* z #z 4 You can intrude on an ongoing call on a busy external line. Dial and enter the individual external line number. Press and dial the digit or digits to get an external line. Busy tone. Press. Note: France and Sweden, press 8 Before the Intrusion is executed, a warning tone is sent to the parties in the ongoing call. A three party call is established and a warning tone is heard. Notes: The warning tone might be disabled for your system. The Intrusion function might be blocked for use on your extension (programmed by your system administrator). If Intrusion is not allowed you will continue to receive a busy tone. 22 Dialog 4106 Basic/Dialog 4147 Medium Outgoing Calls Bypass u *60* z # If this function is allowed from your extension, you can bypass an; activated Diversion, activated Follow-me or activated Absence information on a specific extension. Lift the handset. Dial and enter the extension number. Press and wait for answer. Speed Dialing Common Speed Dialing numbers uz By using common Speed Dialing numbers, you can make calls simply by pressing a few keys. The common Speed Dialing numbers consist of 1–5 digits and are stored in the exchange (by your system administrator). Lift the handset and dial the common Speed Dialing number. Individual Speed Dialing numbers You can program up to ten frequently used phone numbers on the digit keys 0–9 and use them as individual Speed Dialing numbers (if this function is allowed). Note: In Finland, up to nine numbers, keys 1–9. u ** ( 0 – 9 ) To use: Lift the handset. Dial and press the relevant digit. Dialog 4106 Basic/Dialog 4147 Medium Note: Finland, dial * * ( 1 – 9 ); Sweden, dial ( 0 – 9 ) #. 23 Outgoing Calls u *51* ( 0 – 9 ) *z #d u #51* ( 0 – 9 ) #d u #51# d 24 To program and alter individual Speed Dialing numbers: Lift the handset. Dial and press the selected digit. Note: Finland, dial * 5 1 * ( 1 – 9 ). Press and dial the phone number. The digit or digits to get an external line, must be added before external phone numbers. Press and replace the handset. * Note: The programmed number may consist of a maximum of 20 digits plus , which indicates the second dial tone from the public network. To erase one programmed number: Lift the handset. Dial and press the selected digit. Note: Finland, dial #51*(1–9) Press and replace the handset. To erase all programmed numbers: Lift the handset. Dial. Replace the handset. Dialog 4106 Basic/Dialog 4147 Medium Outgoing Calls Dial By a Function Key Note: For for the Dialog 4147 phone, make sure that the programming slide switch is set to the “Prog On” position. See section “Enable/Disable Program key” on page 66. u î Head Office You can program and activate directory numbers (extensions and Common Abbreviated Numbers) on the programmable keys. On the Dialog 4106 you can also store one number on the Message key. Stored numbers can consist of maximum 21 digits. Lift the handset. Wait for dial tone. Press to make a call (pre-programmed). Dialog 4106 Basic/Dialog 4147 Medium Note: To dial a number that is stored on the second level, press the Message Waiting/2nd key before pressing the pre-programmed key. 25 Outgoing Calls Program How to program a directory number on the programmable keys. On the Dialog 4106 Basic phone: The Dialog 4106 has four keys for programming; the three programmable keys and the Message key. u ¥ î z ¥ d Note: To store a number on the Message key, just press the key during the following procedure like a normal programmable key. Lift the handset. Wait for dial tone. Press. Press a programmable key. If a number is already stored, it will be erased automatically. If you would like to erase a number, store a 0 instead of the telephone number. Dial the number. You can use any directory number, e.g. a Common Abbreviated Number or a colleague’s extension number. You can also store a pause (multiple pauses possible), the R-key function or any code that contains or . To store a number that incorporates a wait for a new dial tone, see section “Wait for dial tone” on page 17. * # Press. Replace the handset. Notes: You can write the names above the keys on the selfadhesive label. Because of the special label material, you can also erase and re-write any key name. If you press an invalid key during programming, the programming mode will be terminated automatically and you will hear a special rejection tone. 26 Dialog 4106 Basic/Dialog 4147 Medium Outgoing Calls u î î Program z î d Program On the Dialog 4147 Medium phone: Lift the handset. Wait for dial tone. Press. Press a programmable key. Note: To store a number on the second level, press the Message Waiting/2nd key before pressing the programmable key. If a number is already stored, it will be erased automatically. If you would like to erase a number, store a 0 instead of the telephone number. Dial the number. You can use any directory number, e.g. a Common Abbreviated Number or a colleague’s extension number. You can also store a pause (multiple pauses possible), the R-key function or any code that contains or . To store a number that incorporates a wait for a new dial tone, see section “Wait for dial tone” on page 17. * # Press. Replace the handset. Notes: You can remove the transparent cover in order to write the names beside the keys. If you press an invalid key during programming, the programming mode will be terminated automatically and you will hear a special rejection tone. Dialog 4106 Basic/Dialog 4147 Medium 27 Outgoing Calls Authority Data privacy Data privacy allows you to make a call without any disturbances, i.e. Intrusion. This function is automatically cancelled when the call is finished. u *41# z To order: Lift the handset. Dial and enter the number. Do not disturb, DND *27# #27# d 28 When you activate DND, calls to your extension are not indicated. Outgoing calls can be made as usual. Dial to activate. Special dial tone. or Dial to deactivate. Replace the handset to finish activation/deactivation. Dialog 4106 Basic/Dialog 4147 Medium Outgoing Calls Authorization code, common (optional) If you are assigned to use a common authorization code (1 to 7 digits) you can temporarily change any used phone within the exchange to the authority level connected to this code. You can use the code for one call only or you can open the phone to some calls and lock it when leaving the phone. u *72* z# z To use for a single call: u #73* z# To open an extension for some calls: u *73* z# To lock an extension: Lift the handset. Dial. Enter authorization code and press. Verification tone. Dial the digit or digits to get an external line and the external number. Lift the handset. Dial. Enter authorization code and press. Verification tone. Lift the handset. Dial. Enter authorization code and press. Verification tone. Dialog 4106 Basic/Dialog 4147 Medium 29 Outgoing Calls Authorization code, individual (optional) If you are assigned to an individual authorization code (1 to 7 digits, affiliated to your own extension) you can lock your own extension to a common authority level, e.g. when out of the office. You can also temporarily change any other used phone within the exchange to the same authority level as you have on your own phone. The individual code can be changed from your own extension. u *76* z# 30 To lock your phone: Lift the handset. Dial. Enter authorization code and press. Verification tone. u *75* z# z To make calls with your authority level when your phone is locked: u #76* z# To open your phone: Lift the handset. Dial. Enter authorization code and press. Verification tone. Dial the digit or digits to get an external line and the external number. Lift the handset. Dial. Enter authorization code and press. Verification tone. Dialog 4106 Basic/Dialog 4147 Medium Outgoing Calls u *75* z* z# z To assign your own authority level to another phone: u *74* z* z# To change your individual authorization code: Lift the handset. Dial. Enter authorization code and press. Verification tone. Dial your own extension number and press. Verification tone. Dial the digit or digits to get an external line and the external number. Lift the handset. Dial. Enter old authorization code and press. Enter new authorization code and press. Verification tone. Dialog 4106 Basic/Dialog 4147 Medium 31 During Calls During Calls Group listening (loudspeaking) Note: This function is only supported for the Dialog 4147 phone. This function lets other people in your room listen to your phone conversation. You speak in the handset while the other party´s voice is heard on the loudspeaker.  During an ongoing conversation: Press to switch between loudspeaker and handset. When the key lamp is lit, the other party´s voice is heard on the loudspeaker. Note: You can adjust the volume, see section “Settings” on page 62. 32 Dialog 4106 Basic/Dialog 4147 Medium During Calls Monitoring Note: This function is only supported for the Dialog 4147 phone.  d Ä u You have an ongoing conversation via the handset. Press to switch the loudspeaker on. Replace the handset. The loudspeaker monitors the call. Note: When the loudspeaker is on, the microphone is automatically switched off in the handset. You can adjust the volume, see section “Settings” on page 62. Press to end the call. From Monitoring to handset Lift the handset. Continue your conversation via the handset. Dialog 4106 Basic/Dialog 4147 Medium 33 During Calls Mute ¥ You have an ongoing conversation. Press to switch the microphone on or off. When the lamp lights, the caller will not be able to hear the conversation in your room. Note: Mute key looks slightly different on the Dialog 4147 phone. Inquiry ¸ z 2 2 You have an ongoing conversation and you would like to make an Inquiry to an internal or external party. Press. Dial tone. The first call is put on hold. Call the third party. When the other party answers, you can switch between the calls (Refer back), Transfer the call, create a Conference or end one of the calls. Press to return to the first call. Note: Sweden, press Refer Back Press to Refer back to the other party. The party you talk to is put on hold, the other party is connected. Note: Sweden, press 34 R R Dialog 4106 Basic/Dialog 4147 Medium During Calls Transfer ¸ z d You want to transfer an ongoing call. Press. Dial tone. Call the third party. You can transfer the call before answer or wait for answer. Replace the handset. The ongoing call is transferred. Note: If you have put more than one call on hold, the last call that was put on hold will be transferred. If the dialed extension is busy or Transfer is not allowed, your phone will ring again. Call Waiting If you hear the Call Waiting tone during an ongoing conversation, another person is trying to contact you. d u To terminate the ongoing call and answer the waiting call: Replace the handset to finish the ongoing call. The waiting call is signalled on your phone. Lift the handset to answer the new call. Dialog 4106 Basic/Dialog 4147 Medium Note: The Call Waiting function might be blocked for use on your extension (programmed by your system administrator). 35 During Calls Conference With this procedure you can include up to seven parties in a conference. Only the conference leader can admit participants. During the conference, a tone will be heard every 15 seconds. Note: The conference tone might be disabled for your system. ¸ z 3 d You have an ongoing conversation and want to establish a phone conference. You will become the conference leader. Press. Call the third party. Wait for answer. Press to establish a conference. Repeat the procedure to include other persons to the conference. Replace the handset to leave the conference. On hold ¸d 36 You can temporarily put the ongoing call on hold. Calls put on hold can be resumed on your own or another phone. Press and replace the handset. u To resume the call on your own extension: u z 8 To resume the call on another extension: Lift the handset. Lift the handset. Call the extension where the call was put on hold. Press. 4 Note: France, press ; Sweden, press 6 Dialog 4106 Basic/Dialog 4147 Medium Call Forwarding Call Forwarding Diversion If you do not want to be disturbed or will be out of the office, you can have all calls to your extension diverted to a preprogrammed answering position. During Diversion you will hear a special dial tone. You can still make calls as usual. Diversion can be direct, on no answer, on busy or to another information service facility. Order Direct Diversion from your own extension u *21# d The call is diverted to an individual position or up to three predetermined common answering positions (depending on the type of the incoming call). Programmed by your system administrator. Lift the handset. Dial. Note: U.K., dial *2# Replace the handset. Dialog 4106 Basic/Dialog 4147 Medium Note: Diversion can also be ordered and cancelled from the answering position, use the same procedure as in section “Internal Follow-me” on page 40. 37 Call Forwarding u #21# d u *211# d u #211# d 38 Cancel Direct Diversion from your own extension Lift the handset. Dial. Note: U.K., dial #2# Replace the handset. Note: Diversion can also be ordered and cancelled from the answering position, use the same procedure as in section “Internal Follow-me” on page 40. Diversion when there is no answer Lift the handset. Dial to order. Note: Finland and Norway, dial *61# Replace the handset. The incoming call is diverted after 3 signals. To cancel: Lift the handset. Dial to cancel. Note: Finland and Norway, dial #61# Replace the handset. Dialog 4106 Basic/Dialog 4147 Medium Call Forwarding u *212# d u #212# d Diversion when caller receives a busy tone Lift the handset. Dial to order. Note: Finland and Norway, dial *67# Replace the handset. To cancel: Lift the handset. Dial to cancel. Note: Finland and Norway, dial #67# Replace the handset. u *218# d Diversion to another information service facility u #218# d To cancel: Lift the handset. Dial to order. Replace the handset. Lift the handset. Dial to cancel. Replace the handset. Dialog 4106 Basic/Dialog 4147 Medium 39 Call Forwarding Internal Follow-me All calls to your extension are diverted to another extension of your choice (within the private network). During Follow-me you will hear a special dial tone. You can still make calls as usual. u *21* z #d u #21# d Order from your own extension Lift the handset. Dial and enter the answering position number. Note: U.K., dial * 2 * No. Press and replace the handset. Cancel from your own extension Lift the handset. Dial. Note: U.K., dial #2# Replace the handset. Redirect from answering position u *21* z *z #d If you are in another room, you can still answer your calls by forwarding them to where you are. Lift the handset. Dial and enter your own extension number. Note: U.K., dial * 2 * No. Press and enter the Diversion number. Press and replace the handset. Calls are diverted to the answering position. Note: Internal Follow-me must be ordered from your own extension before you can redirect from answering position. 40 Dialog 4106 Basic/Dialog 4147 Medium Call Forwarding u #21* z #d Cancel from answering position Lift the handset. Dial and enter your own extension number. Note: U.K., dial # 2 * No. Press and replace the handset. External Follow-me If external Follow-me is allowed, you can have all calls to your extension diverted to an external number of your choice. A special dial tone will be heard. You can still make calls as usual. u *22# z #d u #22# d Order Lift the handset. Dial and enter the digit or digits to get an external line and enter the external number. Press and replace the handset. Cancel Lift the handset. Dial. Replace the handset. Dialog 4106 Basic/Dialog 4147 Medium 41 Call Forwarding Personal Number (optional) With this function you can be reached on your normal office phone number even if you are in another room, out of the office or at home, etc. Depending on the functionality of your office exchange, you can have either one individual single search profile or you can choose between five individual search profiles (optional). A search profile can be designed to fit the situation, i.e. in the office, traveling, at home, etc. Both internal or external phone numbers can be used in a profile. At your request, the search profiles are programmed or modified by your system administrator. See section “To design and order your search profiles” on page 44. When the function is activated, incoming calls are transferred to different phones or to back-up services in the order you choose. If an answering position in the profile is busy, the call can be transferred to another predefined position in the profile, i.e. voice mail or a colleague. You can activate the function from your own office phone or when out of the office, by using the Direct Inward System Access function (DISA). u *10* (1–5) #d 42 To activate or change to another profile from your office phone Lift the handset. Dial. Press the search profile digit. Press and replace the handset. Note: When another party is included in the activated profile, a colleague or an operator, etc., always remember to inform about your absence. If voice mail is included in the activated profile, always update your greeting with absence information. Dialog 4106 Basic/Dialog 4147 Medium Call Forwarding u #10# d To cancel from your office phone Lift the handset. Dial. Replace the handset. To activate or change to another profile from an external phone z *75* z* z# *10* z* (1–5) #d # * The external phone must be of push button type provided with pound key ( ) and star key ( ) or a mobile phone adapted for dial tone pulses (DTMF). Call the DISA function at your office. Dial tone. Dial. Enter the authorization code and press. Dial your own extension number and press. Dial tone. Dial. Dial your own extension number and press. Press the search profile digit. Press and replace the handset. Dialog 4106 Basic/Dialog 4147 Medium Note: When another party is included in the activated profile, a colleague or an operator, etc., always remember to inform about your absence. If voice mail is included in the activated profile, always update your greeting with absence information. 43 Call Forwarding To cancel from an external phone z *75* z* z# #10* z# d # * The external phone must be of push button type provided with pound key ( ) and star key ( ) or a mobile phone adapted for dial tone pulses (DTMF). Call the DISA function at your office. Dial tone. Dial. Dial the authorization code and press. Dial your own extension number and press. Dial tone. Dial. Dial your own extension number and press. Replace the handset. To design and order your search profiles The search profiles are installed or changed by your system administrator. In order to set up your profiles, copy the setting form, fill in your new or changed profiles and give it to your system administrator. Note: If a profile handling application is connected to your system, you can edit profiles via your Intranet. See separate instructions for the application. 44 Dialog 4106 Basic/Dialog 4147 Medium Call Forwarding Important notes when designing your search profiles: • Avoid ring times longer than 45 seconds for your profiles. Usually the caller hangs up after 3-6 ring signals. If you need a longer ring time, the maximum time is 60 sec. • Consider the time you need to react and answer on each answering position in your profile. You might need up to 15 seconds to react and answer a call on a desk or cordless phone and 20–25 seconds for a mobile phone. • There must be an answering position at the end of every profile (Voice mail or operator/secretary). If not, calls might end up unanswered. • Consider what should happen while you are busy on a phone. The available options are: • – Diversion to voice mail – Diversion to the operator If an answering machine, a fax or other answering device is used as an early answering position, it might interrupt the searching. Disconnect the answering device, or design the ring times so they do not affect the searching. • If your system admits just one single personal profile, design the profile only with your 2–3 most frequently used positions. If you add more numbers, there is a risk that the caller hangs up before a latter position is called. • If your system admits 1–5 personal profiles, design the different profiles to fit your most frequently used positions. Make sure you use as few answering positions as possible for each profile. Profile examples: – In office – At home – Traveling – Absent/not reachable Dialog 4106 Basic/Dialog 4147 Medium 45 Call Forwarding Example: How to fill in your setting form for search profiles: Profile 1 In office Search order Type of telephone or Answering position* 1 Desk 1234 10 2 Cordless 5234 15 3 Voice mail Telephone number Ring time (seconds) * Examples: Desk, Cordless, Mobile, External, Voice mail, Operator, etc. Profile 2 46 At home Search order Type of telephone or Answering position* 1 External 222222 20 2 Mobile 0706666666 25 3 Voice mail Telephone number Ring time (seconds) Dialog 4106 Basic/Dialog 4147 Medium Call Forwarding Setting form for search profiles Name: Department: Telephone No: Account: Profile 1 .......................... Search order Type of telephone or Answering position* Telephone number Ring time (seconds) 1 2 3 4 * Examples: Desk, Cordless, Mobile, External, Voice mail, Operator, etc. Profile 2 .......................... Search order Type of telephone or Answering position* Telephone number Ring time (seconds) Telephone number Ring time (seconds) Telephone number Ring time (seconds) Telephone number Ring time (seconds) 1 2 3 4 Profile 3 .......................... Search order Type of telephone or Answering position* 1 2 3 4 Profile 4 .......................... Search order Type of telephone or Answering position* 1 2 3 4 Profile 5 .......................... Search order Type of telephone or Answering position* 1 2 3 4 Dialog 4106 Basic/Dialog 4147 Medium 47 Absence Information (optional) Absence Information (optional) The absence information is used to inform callers why you are absent and when you return. If you are authorized, you can also enter absence information for another extension from your own extension. Order u *23* (0–9) *0915 Example: Back on September 15 (=0915). Lift the handset. Dial. Enter the absence code. Note: The absence codes consist of one digit which depends on the system connected to the exchange. Contact your system administrator regarding the available absence codes. Press and enter the date (MMDD) or time (HHMM) of your return. Notes: If no return time or date is needed, this step can be skipped. #d 48 The order in which the date is stated is system dependent. Press and replace the handset. Dialog 4106 Basic/Dialog 4147 Medium Absence Information (optional) u #23# d u *230* z* (0–9) *0915 #d u #230* z# d Cancel Lift the handset. Dial. Replace the handset. The programmed information is erased. Order for another extension Lift the handset. Dial. Dial the extension number and press. Enter the absence code. Press and enter the date or time of the other person's return. Press and replace the handset. Cancel for another extension Lift the handset. Dial. Dial the extension number and press. Note: If the special dial tone is received, the authorization code for the other extension is required. Add the code and press before replacing the handset. # Replace the handset. Dialog 4106 Basic/Dialog 4147 Medium 49 Messages Messages Manual Message Waiting (MMW) If the called extension does not answer, you can send a message waiting signal to that extension (if this feature is allowed). Received messages are indicated with a flashing Message Waiting key. u Answer u #31# d Cancel MMW at your own extension u *31* z #d 50 Lift the handset. A call is initiated to the extension that requested Message Waiting. Lift the handset. Dial. Replace the handset. Order MMW to another extension Lift the handset. Dial. Dial the extension number. Press and replace the handset. Dialog 4106 Basic/Dialog 4147 Medium Messages u #31* z #d Cancel MMW to another extension Lift the handset. Dial. Dial the extension number. Press and replace the handset. Voice mail (optional) This integrated function allows you to leave a voice message to the caller when you are unable to answer calls, e.g. when out of office, in a meeting, etc. The caller can then leave a message in your mailbox. When back in office, you can enter your mailbox and listen to the messages received. Received messages are indicated with a flashing Message Waiting key. You can choose to divert all incoming calls to your mailbox, or calls when there is no answer, or calls when your phone is busy. When you enter your mailbox, you will hear recorded instructions on how to handle listening, recording, storing and deleting messages, and how to change your security code. To activate and deactivate your mailbox For all incoming calls: See “Diversion” on page 37 (function code 21). Use the number to the voice mail system as the “answering position number”. When incoming calls get no answer: See “Diversion” on page 37 when there is no answer (function code 211). When incoming calls get a busy tone: See “Diversion” on page 37 when caller receives a busy tone (function code 212). Dialog 4106 Basic/Dialog 4147 Medium 51 Messages To enter your mailbox u z z From your office phone: Lift the handset. Dial the number to the voice mail system. If you are asked to enter your security code: Enter your security code. Code at delivery = your extension number. Follow the recorded instructions. u z # z z 52 From another phone: Lift the handset. Dial the number to the voice mail system. If you are asked to enter your security code (the used phone has a mailbox of its own): Press. Dial your mailbox number. (normally your office extension number) Enter your security code (if required). Follow the recorded instructions. Dialog 4106 Basic/Dialog 4147 Medium Messages u z # z z To enter someone else´s mailbox Lift the handset. Dial the number to the voice mail system. If you are asked to enter your security code (the used phone has a mailbox of its own): Press. Dial the mailbox number. (normally the office extension number of the other person) Enter the security code of the other person (if required). Follow the recorded instructions. Dialog 4106 Basic/Dialog 4147 Medium 53 Messages To handle the mailbox Recorded information on the line tells you the number of new and stored messages. If you have too many messages stored, you will first be asked to delete saved messages. Recorded instructions ask you to press different digits in order to listen to callers’ messages, record your own greetings, change your password or exit your mailbox, etc. The following diagram gives an overview of the mailbox system and the digits to be used. 54 Dialog 4106 Basic/Dialog 4147 Medium Group Features Group Features Group Call-pick-up People working in a team can have their phones programmed by their system administrator to form Call-pick-up groups. u 8 In a Call-pick-up group, any member can answer any individual call to group members. Lift the handset. Press to answer. Notes: One Call-pick-up group can serve as an alternative to another group. Calls to the alternative group can only be answered when there are no calls to your own group. Finland and Sweden, press 0 Common bell group u 8 Calls are signalled on a common bell. Lift the handset. Press to answer. Dialog 4106 Basic/Dialog 4147 Medium Note: Finland and Sweden, press 0 55 Group Features Group Hunting u *21* z #d u #21# d u *24* z* z #d u #24* z #d 56 As a member of a group of extensions that is called by a common number, you can temporarily leave the group. Lift the handset. Dial and enter your own extension number. Note: U.K., dial * 2 * No. Press and replace the handset. To re-enter the group Lift the handset. Dial. Note: U.K., dial #2# Replace the handset. If you are authorized, you can divert all calls to a group, to another extension or to another group: Lift the handset. Dial. Dial the number of the group to be diverted and press. Dial the extension number of the new anwering position. Press and replace the handset. To cancel the Diversion: Lift the handset. Dial. Dial the number of the group that has been diverted. Press and replace the handset. Dialog 4106 Basic/Dialog 4147 Medium Other Useful Features Other Useful Features Account code (optional) u *61* z# z This function is used to charge a call to an account number or to prevent unauthorised calls from your phone. The account code can have 1 to 15 digits. Lift the handset. Dial. Note: Finland and Norway, dial *71* Dial the account code and press. Dial tone. Dial the digit or digits to get an external line and the external number. Ongoing external call ¸d *61* z# u When used to charge a call it is also possible to connect an ongoing external call to an account code. During the call: Press and replace the handset to put the call on hold. Dial. Note: Finland and Norway, dial *71* Dial the account code and press. Dial tone. Lift the handset to resume the call put on hold. Dialog 4106 Basic/Dialog 4147 Medium 57 Other Useful Features General Deactivation The following features can be simultaneously cancelled: u #001# d • Callback (all Callbacks are cancelled). • Diversion/Internal and External Follow-me. • Manual Message Waiting/Message Diversion. • Do not disturb. Order Lift the handset. Dial. Replace the handset. Night Service When the exchange is in Night Service mode, all your incoming calls to the operator are transferred to a selected extension or group of extensions. The exchange is equipped with three different Night Service modes: Common Night Service All incoming calls to the operator are transferred to one specific extension. Answer the call in the normal way. Individual Night Service Selected external calls to the operator are transferred to one specific extension. Answer the call in the normal way. Universal Night Service All incoming calls to the operator are transferred to a universal signalling device, e.g. the common bell. Answer the call as descibed in section “Common bell group” on page 55. 58 Dialog 4106 Basic/Dialog 4147 Medium Other Useful Features Hot line Ask your system administrator if you require this function. Delayed Hot line When the handset of the delayed Hot line phone is lifted or when the Line key is pressed, a Call Duration is started. If no digit is pressed before time out, a call is automatically generated to a specific extension or external line. If a digit is pressed before Time out the phone works as an ordinary phone. Note: This function is only available in newer versions of the telephone exchange. Direct Hot line The same function as described above, but no delay. Only Hot line calls can be placed from this line. To be used e.g. as alarm phone, door phone etc. Alarm extension An extension can be programmed by your system administrator as an Alarm extension. A call to an Alarm extension obtains automatic Intrusion if the extension is busy. Up to seven calling parties may be connected at the same time. Emergency mode In the event of an emergency, the operator can set the exchange into Emergency mode, during which only preprogrammed extensions are permitted to make calls. Dialog 4106 Basic/Dialog 4147 Medium 59 Other Useful Features Data communication Your phone can be used together with a PC as an integrated voice and data terminal. Contact your system administrator if you require this function. DISA = Direct Inward System Access (optional) If you are assigned to use this function and you are working externally, you can call your office and get access to an external line in order to make business calls. The business call will be charged your office extension number or an account number. You will just be charged for the call to the office. # * The external phone must be of push button type provided with pound key ( ) and star key ( ) or a mobile phone adapted for dial tone pulses (DTMF). After a completed DISA call you must hang up before a new DISA call can be made. Depending on the type of authorization code and if an account code is used, different procedures must be used: z *72* z# z 60 With common authorization code Call the DISA function at your office. Dial tone. Dial. Dial the authorization code and press. Dial tone. Dial the external number. Dialog 4106 Basic/Dialog 4147 Medium Other Useful Features z *75* z* z# z With individual authorization code Call the DISA function at your office. Dial tone. Dial. Dial the authorization code and press. Dial your own extension number and press. Dial tone. Dial the external number. Dialog 4106 Basic/Dialog 4147 Medium 61 Settings Settings The Dialog 4106 and Dialog 4147 phones are equipped with a couple of setting options, you can for instance set and adjust a personal volume and ring signal. Handset, headset and loudspeaker volume There are two separate volume settings, one for the loudspeaker and one for the handset/headset. Use the Volume keys to change the volume of the handset/headset or loudspeaker during a call. ì 62 • Adjust the handset listening volume when the handset is off hook. • Adjust the headset listening volume when the headset is activated. • Adjust the loudspeaker volume when dial tone is heard via the loudspeaker. Press to change the volume. Dialog 4106 Basic/Dialog 4147 Medium Settings Programming of ring signal By programming, you can adjust the ring character and ring volume. To change the ring character and volume, you have to enter the programming mode. Programming the ring character and volume for the Dialog 4106 Basic u ¥ # z The ring signal character can be adjusted with three different characters, each with another three volume levels. Lift the handset. Wait for the dial tone. Press. Press. Enter digit from the table below. Digit (character) 1 2 3 4 5 6 (default) 7 8 9 0 Ring character Repetition rate 1 time 1 time 1 time 4 times 4 times 4 times 10 times 10 times 10 times None Ring volume Soft Medium Loud Soft Medium Loud Soft Medium Loud Off Notes: Default setting is digit 6. If you choose 0, the ring signal will be turned off until the next time you go off hook. ¥ d Please note also that you will not hear the ring signal during programming. Press. The selected ring signal is stored. Replace the handset to finish the procedure. Dialog 4106 Basic/Dialog 4147 Medium 63 Settings Programming the ring character and volume for the Dialog 4147 Medium The ring signal character can be adjusted with five different characters and three different volume levels. u î 7 z Program Program ring character: Lift the handset. Wait for the dial tone. Press. Press. Enter digit from the table below. You can hear the chosen character. Digit (character) 0 1 2 3 4 î d Program 64 Ring character Repetition rate 1 time 2 times 4 times 6 times 10 times Note: Default setting is digit 0. Press. The selected ring character is stored. Replace the handset to finish the procedure. Dialog 4106 Basic/Dialog 4147 Medium Settings u î 6 z Program Program ring volume: Lift the handset. Wait for the dial tone. Press. Press. Enter digit from the table below. You can hear the chosen volume. Digit (character) 1 2 3 î d Program u î 9 0 1 î d Program or Program Ring volume Soft Medium Loud Note: Default setting is digit 3. Press. The selected ring volume is stored. Replace the handset to finish the procedure. Switch off/on ring signal: Lift the handset. Wait for the dial tone. Press. Press. Press. 0=Off and 1=On. Default setting is digit 1. Press. Replace the handset to finish the procedure. Dialog 4106 Basic/Dialog 4147 Medium 65 Settings Hearing aid compatibility Since your telephone has a built-in inductive coupler for the hardof-hearing, anyone so desiring can use the telecoil in his/her hearing aid while telephoning. To do so, simply switch the hearing aid in the T position. Message Waiting indication Your incoming messages can be indicated by a rapidly flashing Message key. It is well known that the line leads could be twisted after installation (the Message Waiting LED will be on when there is no Message Waiting signal and will go off when there is a Message Waiting signal). To solve this problem there are three possible settings for the Message Waiting indication: • STD This setting should be used when no Message Waiting indication is required. This is also the default setting upon delivery. • MW+. Use this position when Message Waiting indication is required and the line cabling is straight. • MW-. Use this position when Message Waiting indication is required and the line cabling is twisted. At the bottom side of your phone: Slide the switch to the required position. Enable/Disable Program key Note: This function is only supported for the Dialog 4147 phone. Via a switch it is possible to enable or disable the program key. When the switch is set in the Off position, no programming is possible (i.e. the memory content is locked). At the bottom side of your phone: Slide the switch to the required position. 66 Dialog 4106 Basic/Dialog 4147 Medium Settings Headset Notes: This function is only supported for the Dialog 4147 phone. To install the Headset, see section “Installation” on page 70. You can adjust the volume of the headset, see section “Handset, headset and loudspeaker volume” on page 62. Headset calls are handled via the Loudspeaker/Headset key. To enable the Headset functionality, you have to change the Loudspeaker/Headset switch into the Headset position. At the bottom side of your phone: Slide the switch to the required position.  Ä Answer calls Press to answer. Press to end the call. Make calls  z Ä With the handset on hook. Press. Dial the number. Press to end the call. Dialog 4106 Basic/Dialog 4147 Medium 67 Settings Flash time Note: This function is only supported for the Dialog 4147 phone. u z u î 2 0 1 î d Program or Program 68 Some systems require a different flash time for the R-key. You can set two different flash times (timed breaks). To find out if you have to change the flash time, proceed as follows: Lift the handset. Make a call using any of the services that require R. If you cannot use the service, you need to change the flash time. Change flash time: Lift the handset. Wait for the dial tone. Press. Press. Press. 0=100 ms and 1=600 ms. Default setting is digit 0. Press. Replace the handset to finish the procedure. Dialog 4106 Basic/Dialog 4147 Medium Installation Installation Install cables Handset cable to the left Handset cable to the right You can put the cable to the handset in the notch underneath the telephone. The cable to the exchange has to be plugged in “LINE” and the handset cable has to be plugged in “HANDSET”. Note: The headset and the data port connections are for use with the Dialog 4147 phone only. For headset servicing and replacement, contact your local service centre or retailer shop. To change cables: Use a screwdriver to unlock the stop, and remove the cable. Dialog 4106 Basic/Dialog 4147 Medium 69 Installation Install stands and adapt telephone Position high Press to fasten stand 70 Position low Release to remove stand Dialog 4106 Basic/Dialog 4147 Medium Installation Install card Note: This section only applies to the Dialog 4147 phone. Use the Designation Card Manager to make and print your own designation cards. The Designation Card Manager is included on the Telephone Toolbox CD for MD110 Communication System. For more information, please contact your Ericsson Enterprise certified sales partner. Dialog 4106 Basic/Dialog 4147 Medium 71 Installation Wall mounting The phone can be wall mounted without using a special console. Useful for instance in conference rooms or public areas. 72 1 Use a screwdriver to remove the handset hook. 2 Turn the hook upside down and insert. 3 Use a screwdriver to remove the two plastic covers. 4 Drill wall holes according to measure. 5 Mount screws according to measures and attach the phone. Dialog 4106 Basic/Dialog 4147 Medium Installation Placing the telephone • Do not place your telephone on sensitive surfaces. Use a non-slippery pad to protect your furniture from possible damage. • Do not place your telephone near sources of extreme heat, e.g. near the radiator. • Make sure that the line cable isn´t creased. Cleaning the telephone Use a slightly moistened (not wet) soft cloth or an anti-static cloth and wipe off the telephone carefully. Do not use rough cloth, solvents or aggressive cleaning fluids. Any damages of the telephone, that are caused by non-observance of these instructions, are not part of the liability given by the manufacturer. Dialog 4106 Basic/Dialog 4147 Medium 73 Troubleshooting Troubleshooting This section contains information on how to solve common operational problems. Go through the following steps if you encounter any problems. If this does not solve the problem, contact your system administrator. If others have similar problems, there may be a system error. Fault check list 1. Make sure your telephone is connected to an analog line. 2. Read the Installation chapter. Make sure that you have done everything correctly and that everything is properly connected. 3. Disconnect all extra equipment. If your telephone is working properly when done, the problem lies in the extra equipment. 4. Connect a functioning telephone instead of the faulty one. If that telephone is working properly, the problem is probably in your telephone, contact your system administrator. 5. Check for operational problems. If operational problems are found, the problem is in the telephone network, contact the local telephone service or the local telephone company. 74 Dialog 4106 Basic/Dialog 4147 Medium Glossary Glossary Exchange Switch. Your telephone switching system, e.g. MD110 Communication System. Idle mode The state your phone is in when nothing is activated; not calling, not ringing, not diverted etc. Least Cost Routing A function that automatically selects the cheapest way to connect your external call (not necessarily the shortest distance). Speed Dialing number Abbreviated number or short number, used for making frequently used numbers faster to dial. Third party A third connection (person), which can be included in an ongoing two person conversation. The connection can be internal or external. Dialog 4106 Basic/Dialog 4147 Medium 75 Index Index A Absence Information 48 Account code 57 Alarm extension 59 Answer calls 14 Authority 28 Authorization code, common 29 Authorization code, individual 30 B Bypass 23 C Call Forwarding 37 Diversion 37 External Follow-me 41 Internal Follow-me 40 Personal Number 42 Call Waiting 21, 35 Callback 20 Cleaning the telephone 73 Common bell group 55 Common Speed Dialing numbers 23 Conference 36 Copyright 5 D Data communication 60 Data privacy 28 Declaration of Conformity 5 Description 6 Dialog 4106 Basic 6 Dialog 4147 Medium 8 Tones 11 Dial By a Function Key 25 DISA = Direct Inward System Access 60 Diversion 37 76 Do not disturb, DND 28 During Calls 32 Call Waiting 35 Conference 36 Inquiry 34 Monitoring 33 Mute 34 On hold 36 Refer Back 34 During calls Group listening (loudspeaking) 32 Transfer 35 E Emergency mode 59 External Follow-me 41 F Fault check list 74 Flash time 68 Free Seating 13 G General Deactivation 58 Glossary 75 Group Call-pick-up 55 Group Features 55 Group Hunting 56 Group listening (loudspeaking) 32 H Handset, headset and loudspeaker volume 62 Headset 67 Hearing aid compatibility 66 Hold 36 Hot line 59 Dialog 4106 Basic/Dialog 4147 Medium Index I Incoming Calls 14 Answer calls 14 Individual External Line 18 Individual Speed Dialing numbers 23 Inquiry 34 Install cables 69 Install card 71 Install stands and adapt telephone 70 Installation 69 Cleaning the telephone 73 Install cables 69 Install card 71 Install stands and adapt telephone 70 Placing the telephone 73 Wall mounting 72 Internal Follow-me 40 Intrusion 22 L Last External Number Redial 19 Last Number Redial 19 M Mailbox 54 Make calls 16 Manual Message Waiting (MMW) 50 Message Waiting indication 66 Messages 50 Manual Message Waiting (MMW) 50 Voice mail 51 Monitoring 33 Mute 34 N Night Service 58 Number presentation restriction 18 O On hold 36 Other Useful Features 57 Outgoing Calls 16 Dial By a Function Key 25 Last External Number Redial 19 Last Number Redial 19 Make calls 16 Outgoing calls Dialog 4106 Basic/Dialog 4147 Medium Authority 28 Bypass 23 Call Waiting 21 Callback 20 Individual External Line 18 Intrusion 22 Number presentation restriction 18 Speed Dialing 23 When you receive a busy tone 20 P Personal Number 42 Placing the telephone 73 Programming of ring signal 63 R Refer Back 34 Ring signals 12 S Setting form for search profiles 47 Settings 62 Flash time 68 Handset, headset and loudspeaker volume 62 Headset 67 Hearing aid compatibility 66 Message Waiting indication 66 Programming of ring signal 63 Short numbers 23 Speed Dialing 23 T Tones 11 Transfer 35 Troubleshooting 74 Fault check list 74 V Voice mail 51 W Wall mounting 72 Warranty 5 Welcome 4 When you receive a busy tone 20 77 Ericsson Enterprise AB All rights reserved. For questions regarding the product, please contact your Ericsson Enterprise Certified Sales Partner. Also visit us on http://www.ericsson.com/enterprise © Ericsson Enterprise AB 2004 EN/LZT 103 69 R1A Subject to alteration without prior notice. Ericsson is shaping the future of Mobile and Broadband Internet communications through its continuous technology leadership. Providing innovative solutions in more than 140 countries, Ericsson is helping to create the most powerful communication companies in the world.