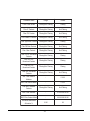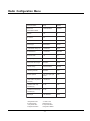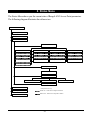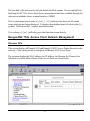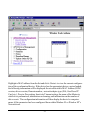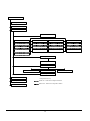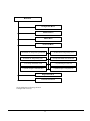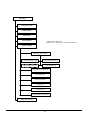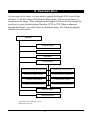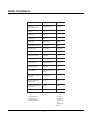
1
2
RANGELAN2 Access Point
Models 7510 and 752x
User’s Guide
Copyright
© 1999 Proxim, Inc., Sunnyvale, CA. All rights reserved. This manual and the software described in it are
copyrighted with all rights reserved. No part of this publication may be reproduced, transmitted, transcribed,
stored in a retrieval system or translated into any language in any form by any means without the written
permission of Proxim, Incorporated.
Trademarks
RangeLAN, the RangeLAN logo, RangeLAN2, RangeLAN802, ProxLink, and Proxim are trademarks of
Proxim, Inc. All other trademarks are the property of their respective owners.
Limited Warranty, Disclaimer, Limitation Of Liability
For a period of one (1) year from the date of purchase by the retail customer, Proxim warrants the
RangeLAN2 Access Point against defects in materials and workmanship. Proxim will not honor this
warranty if there has been any attempt to tamper with or remove the Adapter's external foil label.
This warranty does not cover and Proxim will not be liable for any damage or failure caused by misuse,
abuse, acts of God, accidents, or other causes beyond Proxim's control, or claim by other than the original
purchaser.
If, after inspection, Proxim determines there is a defect, Proxim will repair or replace the Access Point at
no cost to you. To return defective merchandise to Proxim please call Proxim Technical Support 1-408731-2640 to obtain a Return Merchandise Authorization (RMA) Number.
In no event shall Proxim, Incorporated be responsible or liable for any damages arising:
❑ From the use of the product;
❑ From the loss of use, revenue or profit of the product; or
❑ As a result of any event, circumstance, action, or abuse beyond the control of Proxim, Incorporated.;
Whether such damages be direct, indirect, consequential, special or otherwise and whether such damages
are incurred by the person to whom this warranty extends or a third party.
Part # 7630.0081
Rev. F
i
Warranty Return Policy
If you have a problem with your RangeLAN2 product, please call Proxim Technical Support at 1-408-7312640. Proxim Technical Support will assist with resolving any technical difficulties you may have with your
Proxim product.
After calling Proxim Technical Support, if your product is found to be defective, you may return the product
to Proxim after obtaining an RMA (Return Materials Authorization) number. The product must be returned
in its original packaging. The RMA number should be clearly marked on the outside of the box. Proxim
cannot be held responsible for any product returned without an RMA number, and no product will be
accepted without an RMA number.
FCC WARNING
This equipment has been tested and found to comply with the limits for a Class B digital device, pursuant
to Part 15 of the FCC Rules. These limits are designed to provide reasonable protection against harmful
interference in a residential installation. This equipment generates, uses, and can radiate radio frequency
energy and, if not installed and used in accordance with the instructions, may cause harmful interference
to radio communications. However, there is no guarantee that interference will not occur in a particular
installation. If this equipment does cause harmful interference to radio or television reception, which can
be determined by turning the equipment off and on, the user is encouraged to try to correct the interference
by one or more of the following measures:
❑
❑
❑
❑
Reorient or relocate the receiving antenna.
Increase the separation between the equipment and the receiver.
Connect the equipment into an outlet on a circuit different from that which the receiver is
connected.
Consult the dealer or an experienced radio/TV technician for help.
EUROPEAN TELECOMMUNICATIONS STANDARDS INSTITUTE
Statement of Compliance
Information to User
This equipment has been tested and found to comply with the European Telecommunication Standard ETS
300.328. This standard covers Wideband Data Transmission Systems referred to in the CEPT recommendation T/R 10.01. This type of accepted equipment is designed to provide reasonable protection against
harmful interference when the equipment is operated in a commercial environment. This equipment
generates, uses and can radiate radio frequency energy and, if not installed and used in accordance with
the instruction manual, may cause harmful interference to radio communications.
ii
Contents
1. Introduction .................................................................. 1
The RangeLAN2 Family .......................................................................... 2
System Requirements ............................................................................... 4
The Product Package ................................................................................ 4
2. Quick Installation ......................................................... 7
3. Installation .................................................................... 9
Ethernet Installation ................................................................................. 9
10BaseT Cabling ................................................................................... 9
10Base2 Cabling ................................................................................... 9
Antenna Options ...................................................................................... 9
Mounting Options .................................................................................... 9
4. Wireless Topologies .................................................. 13
Ad Hoc .................................................................................................... 13
Infrastructure .......................................................................................... 14
Guidelines for Roaming ...................................................................... 18
Repeating ............................................................................................... 18
Building to Building Configuration ..................................................... 19
5. Configuration ............................................................. 21
Locally (Out-of-band) ............................................................................ 21
Remotely (In-band) ................................................................................ 22
Modem Support (RangeLAN2 752x Only) ........................................... 22
Main Menu ............................................................................................. 23
SNMP Management (RangeLAN2 752x Only) ..................................... 24
Remotely via a Web Browser (RangeLAN2 752x Only) ....................... 24
6. Configuration Parameters......................................... 25
TCP/IP Configuration Menu .................................................................. 27
Filter Configuration Menu ..................................................................... 28
Bridge Configuration Menu .................................................................. 31
Ethernet Configuration Menu ................................................................ 31
Radio Configuration Menu ................................................................... 33
iii
Authorization Table ............................................................................... 38
SNMP Management ............................................................................... 38
Upload Configuration to FTP Server ..................................................... 38
Reset Access Point to Factory Defaults ................................................. 38
Dump Configuration to Screen .............................................................. 38
7. Statistics Menu .......................................................... 39
Radio Statistics Menu ......................................................................... 40
Ethernet Statistics Menu ...................................................................... 40
Bridge Statistics Menu ........................................................................ 40
Filter Statistics Menu ........................................................................... 40
Reset Statistics ..................................................................................... 40
8. Status Menu ............................................................... 41
Radio Status Menu .............................................................................. 42
Bridge Status Menu ............................................................................. 43
TCP/IP Status Menu ............................................................................ 43
Forwarding Database Table ................................................................. 43
9. SNMP Management ................................................... 45
SNMP Supported Traps ....................................................................... 47
10. Web Browser Management ..................................... 49
Supported Web Browsers ....................................................................... 49
Establishing a Connection ..................................................................... 49
Main Display .......................................................................................... 50
RangeLAN2 752x Access Point Network Management ........................ 51
Discover APs ........................................................................................ 51
Network Map ....................................................................................... 52
Traffic Monitor .................................................................................... 52
RangeLAN2 752x Access Point Device Management .......................... 54
Wireless Node Management .................................................................. 54
11. Authorization Table ................................................. 57
12. Performance Hints ................................................... 59
Microwave Ovens .................................................................................. 59
Range ..................................................................................................... 59
iv
13. Site Survey and Master Search Tool ...................... 61
14. Troubleshooting ...................................................... 67
How to Obtain Help with Your LAN Installation .................................. 67
Diagnostics Menu .................................................................................. 67
Versions ............................................................................................... 69
Technical Support Parameters ............................................................. 69
Ping IP Host ......................................................................................... 69
Discover APs ........................................................................................ 69
Display Wireless Network Tree ........................................................... 70
Commonly Asked Technical Support Questions .................................. 72
LED Indicators ....................................................................................... 73
A. Menu Structure.......................................................... 75
B. Download Menu ........................................................ 81
C. Glossary .................................................................... 83
D. Parameters ................................................................ 85
TCP/IP Parameters .................................................................................. 85
Filter Parameters ..................................................................................... 86
Radio Parameters .................................................................................... 87
Bridge Parameters .................................................................................. 88
Ethernet Parameters ................................................................................ 88
E. U.S. Specifications .................................................... 89
F. How to Reach Technical Support ............................ 90
Index ............................................................................... 91
v
vi
1. Introduction
Congratulations on your purchase of the RangeLAN2 7510 or the RangeLAN2 752x
Access Point, members of the RangeLAN2 family. As with all members of the
RangeLAN2 family, RangeLAN2 Access Point is a long range, high performance LAN
product that allows networked computers to communicate wirelessly.
RangeLAN2 Access Point was designed to be a “plug-and-play” product. In many
cases, you will not even need to run any software to configure it. If you need to use it,
you will find it easy to use. In no time, you will have a wireless connection to your
network's application software, printing, e-mail, and other network services!
This wireless access point allows for easy expandability of your wireless network,
increasing range and facilitating mobility applications. It operates at the Data Link level
(layer 2) of the OSI model, providing protocol-independent access for RangeLAN2
computer users into an existing wired Ethernet LAN.
Today, Proxim is the leading supplier of spread spectrum radio networking technology
for local area environments. Proxim's unmatched spread spectrum networking expertise,
combined with the company's extensive experience serving the communications needs of
the mobile computing user, have kept Proxim at the forefront of the emerging wireless
LAN market.
Proxim also manufactures the RangeLAN802 product line, a family of 802.11compatible wireless LAN products. If you would like more information on
RangeLAN802, please contact Proxim's Sales Department at 800-229-1630 or visit the
Proxim web site at http://www.proxim.com.
1
The RangeLAN2 Family
RangeLAN2 Access Point is part of a family of high-performance products that provides
a complete wireless networking solution.
❑ RangeLAN2 7100 is a wireless LAN adapter that fits into a standard PC/AT
ISA bus slot.
❑ RangeLAN2 7400 is a wireless LAN adapter which fits into a PCMCIA Type
II slot on a portable notebook, laptop or pen-based computer.
❑ RangeLAN2 753xToken Ring Access Point is a wireless-to-Token Ring
MAC layer bridge.
❑ RangeLAN2 754x Extension Point extends the coverage area of an existing
RangeLAN2 network.
❑ RangeLAN2 791x Serial Adapter is a wireless serial device which acts as a
replacement for an RS-232 cable.
❑ RangeLAN2 792x Ethernet Adapter converts any Ethernet-ready device into
a wireless node on a RangeLAN2 network.
❑ There are three choices of the RangeLAN2 Ethernet Access Point -- the 7510,
the 7520, and the 7521. The 7520 and 7521 are identical units, except that the
7521 has 500 mW of output power and the 7520 has 100 mW of output power.
Since the 7520 and the 7521 have an identical feature set, the two models are
collectively referred to as 752x within this manual. The feature differences
between the 7510 and the 752x are described in the following table:
2
Feature
7510
752x
Small, lightweight,
mountable
Yes
Yes
Filtering at full Ethernet
S peeds
Yes
Yes
Configurable via Telnet or
Null Modem
Yes
Yes
SNMP Manageable
No
Yes
Web Browser
Management
No
Yes
Remote Configuration via
Dial-Up Modem
No
Yes
Discovery of other Access
Points
No
Yes
Download Images to all
Access Points
No
Yes
Site Survey Tool
No
Yes
Upload Configuration to
FTP Server
No
Yes
Note
All features described in this manual apply to both the RangeLAN2 7510 and
the RangeLAN2 752x unless specifically indicated.
3
System Requirements
To begin using your RangeLAN2 Access Point, you need the following minimum
system requirements:
❑ An Ethernet cable drop (10BaseT or 10Base2)
❑ A terminal or PC with a terminal emulation software package and a null modem
cable
OR
a computer running a TCP/IP telnet client AND a BOOTP server
❑ At least one other RangeLAN2 LAN adapter product installed on the network
The Product Package
Each RangeLAN2 Access Point comes with:
❑ One RangeLAN2 Access Point
❑ One antenna
❑ One RangeLAN2 Access Point User’s Guide
❑ One power adapter
If any of these items are missing or damaged, please contact your reseller or Proxim
Technical Support.
4
Figure 1
RangeLAN2 Access Point components
5
6
2. Quick Installation
You may follow the quick installation steps if the following conditions are true:
❑
❑
❑
❑
There will only be one Access Point on this network
You will use all the software default values
You do not need to configure an IP address for the Access Point and do not
intend to manage it via telnet or a Web browser
You will not be setting security IDs on your network
If the above conditions are not true, more detailed configuration information is described
in Chapter 5.
If your installation meets the preceding criteria, proceed with the following instructions:
1. Firmly screw in clockwise the antenna onto the antenna connector on the back
panel of the Access Point.
Note
Government regulatory agencies mandate that the antenna not be alterable.
Therefore, RangeLAN2 Access Point uses a custom antenna connector. Do
not attempt to use a different antenna or you may damage the connector and
the Access Point unit.
7
Figure 2
Attachment of the RangeLAN2 Access Point Antenna
2. Attach an Ethernet cable to the Ethernet port on the back of the RangeLAN2
Access Point.
3. Plug the power cable into the back of the RangeLAN2 Access Point and into
an AC power outlet. Since there is no On/Off switch on the Access Point box,
the unit will turn on as soon as power is applied.
8
3. Installation
Ethernet Installation
The RangeLAN2 Access Point is attached to the wired LAN backbone via an Ethernet
cable. Two types of Ethernet connection are supported: 10BaseT and 10Base2.
10BaseT Cabling
The RangeLAN2 Access Point 10BaseT cable is typically connected between the
device and a 10BaseT hub or wiring rack. It will use the same cable that would otherwise be plugged into a 10BaseT workstation on the Ethernet LAN. If you are using a
functional cable, the LED nearest the connector will light. Standard 10BaseT specifications apply to the 10BaseT interface of the RangeLAN2 Access Point. No segment can
exceed 100 meters.
10Base2 Cabling
When using 10Base2 cabling with the RangeLAN2 Access Point, the cable must be
properly terminated on each end. Standard 10Base2 specifications apply to the 10Base2
interface of the RangeLAN2 Access Point. Each coax cable segment can support up to
30 devices and the cable itself cannot exceed 185 meters.
Antenna Options
The RangeLAN2 Access Point is shipped with a standard directly-connected antenna.
To install the antenna, screw it clockwise onto the antenna connector. Proxim sells
several antenna alternatives including higher gain and directional antennas. Each of
these antennas ships with installation and mounting instructions. For information on
additional antenna options, please contact your Proxim Sales Representative.
Mounting Options
The RangeLAN2 Access Point may be placed on a desktop or mounted to a wall. An
optional mounting hardware bracket is available for purchase in order to attach the unit
to a cubicle or a wall. Figure 3 and Figure 4, below, display these different mounting
options.
9
The Access Point's rugged case has been developed to operate in harsh environments.
Also, Proxim recommends that the Access Point be mounted vertically in installations
with extreme ambient temperatures. In addition, Proxim offers an optional Outdoor
Enclosure (shown without the lid attached in Figure 5, below) for installations which
afford little or no protection against the elements and where the ambient temperature
exceeds the operating temperature specification of the Access Point, as described in
Appendix E.
Figure 3
Wall Mount
10
Figure 4
Cubicle Mount
11
10BA
SE2
10BA
SET
Figure 5
Outdoor Enclosure
12
4. Wireless Topologies
RangeLAN2 products look and operate similar to Ethernet products. The only difference is
that a radio replaces the wire between various nodes. This means that all of your existing
applications that operate over Ethernet will work with RangeLAN2 without any special
wireless networking software. Wireless products are typically used in several network
topologies described in this chapter.
Ad Hoc
With wireless LANs, one or more computers easily establish an ad hoc network when the
units are in range of each other. Each computer can dynamically connect and reconnect to
the others with no additional configuration, using off-the-shelf peer-to-peer network operating systems. With this capability, many companies are developing applications optimized for
ad hoc networks.
)))
)))
(
))
))))
(((
((((
(
))
(((
(((
)))
(((
)(
((
)))
((
(
(((
)))
Figure 5
Ad Hoc
13
(((
(((((((((((((((((((
)))
))))))))))))))))))
)))))))) (((((((((
))
Infrastructure
Many companies have an existing Ethernet or wired LAN infrastructure and want to be able
to extend that capability to wireless nodes. This is accomplished by attaching an Access
Point to the wired LAN. This allows the wireless clients to access the network resources.
PC
PC
))))))))))
RangeLAN2
7510/7520
RangeLAN2 7400
((
)))))) ((((
Server
(
((((((((((
))))
))))
))
((((
((
RangeLAN2 7100
RangeLAN2 7400
Figure 6
Single AP
For larger environments, RangeLAN2 products support the ability to roam from one wireless
cell to another while maintaining the same network connection. The Access Points establish
coverage areas or cells similar in concept to those of a cellular phone network. The mobile
clients will connect with any Access Point that is within range.
14
RangeLAN2
7510/7520
RangeLAN2
7510/7520
(((
(((
)
)))
)))
)))
(
(((
)))
(((
(
(((
(((
)
)
)))
)
(((
)))
)))
)))
(((
(
(
RangeLAN2
7510/7520
RangeLAN2 7400
RangeLAN2 7400
Figure 7
Roaming - Light Overlap
With RangeLAN2's multi-channel architecture, Access Points can be placed within the same
cell area to increase the aggregate throughput supported by the network. In addition, the
overlapping cells offer redundancy of coverage required in networks where downtime is not
tolerated.
15
RangeLAN2 7400
(
(((
)))
(((
)))
)
)
)))
(((
)))
(((
(
RangeLAN2 7400
RangeLAN2
7510/7520
RangeLAN2
7510/7520
RangeLAN2
7510/7520
(
)))
(((
)))
(((
)
)
(((
)))
(((
)))
(
RangeLAN2
7510/7520
RangeLAN2 7400
RangeLAN2 7400
Figure 8
Roaming - Heavy Overlap
Each RangeLAN2 Access Point within a roaming network must be configured as a Master
on a unique Channel/Subchannel pair, but all must have the same Domain number and
Security ID. The portable PCs are equipped with RangeLAN2 7400 cards which are
also set to the same Domain and Security ID. As the portable PC seamlessly switches
from cell to cell, its network connectivity is preserved.
16
The user can move freely between the RangeLAN2 Access Points in the network. When
the roaming PC leaves the transmission range of one RangeLAN2 Access Point, the
software automatically polls the other RangeLAN2 Access Point in the same Domain to
continue the network connection.
See the previous illustrations for examples of networks set up with RangeLAN2 roaming
domains. Many more network configurations exist. Proxim’s diverse line of
RangeLAN2 products allows you to customize your wireless configuration to meet your
specific networking needs.
Note that the cells must overlap to ensure that there are no gaps in coverage, and
that the roaming PC will always have a connection available.
Note:
Roaming stations will only roam among RangeLAN2 Access Points and
Extension Points with the same Domain and Security ID.
17
Guidelines for Roaming
❑ Roaming occurs between RangeLAN2 Access Points and Extension Points. It
does not occur between RangeLAN2 Ethernet Adapters or RangeLAN2 7100
ISA cards that are installed in network file servers.
❑ All RangeLAN2 Access Points must have the same Domain and Security ID.
❑ All RangeLAN2 Access Points have a unique Channel/Subchannel pair.
Preferably, they should have unique Channels. Use the Subchannel only when
you have used all 15 Channels in the same coverage area.
❑ All workstations with RangeLAN2 7100, RangeLAN2 7200, or RangeLAN2
7400 cards or with RangeLAN2 Ethernet Adapters are configured as Stations
with Domain and Security ID matching the RangeLAN2 Access Points they
will roam between.
❑ The cells created by RangeLAN2 Access Points must overlap.
❑ Roaming will not occur across routers unless using a third party software utility
like Mobile IP.
Repeating
You have the option to enable or disable repeating. When repeating is enabled, the
RangeLAN2 Access Point will repeat any signal coming from one Station and destined for
another Station, when the two Stations are both within range of the Master but not within
range of one another. The advantage of repeating is the ability to double the effective range
of the RangeLAN2 network. However, be aware that by enabling the repeating feature, the
network throughput will drop by as much as half while repeating occurs. When repeating is
disabled, the RangeLAN2 Access Point will not repeat the signals of Stations synchronized to
it. By default, repeating is disabled.
18
)))
)))
((
)(
(((
(
(((
(((
(
)
)))
)))
Master
(repeating)
Figure 9
Repeating
Building to Building Configuration
Two Access Points can be used to connect LANs in separate buildings. Here are some
guidelines:
❑ The antennas should be placed so they are line of sight for best range. In many
cases, they will be placed on rooftops.
❑ One Access Point will be a Master; the other will be a Station. The two devices
must be on the same Domain and Security ID.
❑ Disable the Fixed Nodes Filter on both of the Access Points.
❑ On a Novell NetWare LAN, disable the IPX RIP Broadcast Packets Filter, the
IPX SAP Broadcast Packets Filter, and IPX LSP Broadcast Packets Filter.
Diagnostic tools are available in the RangeLAN2 752x Access Point. See Chapter 13.
19
20
5. Configuration
You need to configure the RangeLAN2 Access Point if:
❑ There is more than one RangeLAN2 Access Point on this network, for example
in a roaming environment
❑ You need to change the software default values, including IP addresses
❑ You want to set security IDs on your network
There are five ways to configure the RangeLAN2 Access Point:
❑ Locally via a null modem cable and a terminal or terminal emulation package
❑ Remotely across the network using a telnet session
❑ Remotely across dial-up modems
❑ Remotely across the network using an SNMP management package
❑ Remotely across the network via a Web browser
Locally (Out-of-band)
You may use the DB-9 Local Management Port on the back of the Access Point to
configure the unit. To locally configure the RangeLAN2 Access Point, you need a null
modem RS-232 cable with a nine pine female connector on the Access Point side and a
terminal or PC with an available serial port running a terminal application package.
Note:
If you use a terminal application that has the option to check for the CD signal
before establishing a connection, configure the software to ignore CD.
Alternatively, verify that your null modem cable is a full handshake cable and
pulls CD high.
21
1. Connect the null modem RS-232 cable between the RangeLAN2 Access Point
Local Management Port and a free serial port on your terminal or PC.
2. Configure the terminal or terminal emulation package for 9600 bps N81 operation. If you are using a terminal emulation package, choose TTY as the terminal type.
3. Apply power to the RangeLAN2 Access Point. During the boot process messages will be displayed on the terminal screen. When they are completed and
you see the “Initialization Complete” message, press <Enter> to enter the
software configuration menu. If the unit was already turned on, you can press
<Enter> to display the menu.
Remotely (In-band)
The second configuration option is remote configuration across the wired network.
Note:
The RangeLAN2 Access Point is not manufactured with a default IP address.
In order to telnet to the RangeLAN2 Access Point, you must first assign it a
valid IP address for your network using null modem cable configuration or a
BOOTP server.
1. From a wired client on your network, open a telnet session to the RangeLAN2
Access Point.
2. You will be prompted for a password if you enabled this option through the
TCP/IP Configuration Menu.
3. You will enter the configuration menu.
22
Modem Support (RangeLAN2 752x Only)
The RangeLAN2 752x Access Point may be remotely configured via a dial-up modem.
To allow for this type of configuration:
1. Configure the modem from a terminal or terminal emulation program at 9600
bps.
2. Issue the following commands to the modem:
ATS0=1
AT&D0
ATE0
ATQ1
AT&W0
(Auto-answer after 1 ring)
(Ignore DTR)
(No local echo)
(Suppress result codes)
(Store configuration in non-volatile memory)
3. Attach a modem via a straight-through cable to the RangeLAN2 752x Access
Point.
4. From a remote modem, dial the phone number of the modem connected to the
RangeLAN2 752x Access Point.
5. After the RangeLAN2 752x Access Point's modem has answered the phone,
press <Enter> on the terminal connected to the remote modem until you see the
configuration menu tree .
Main Menu
After using one of the above three methods, you will see the following software menu
whose choices will be described in the next chapters:
23
Main Menu
Configuration Menu
Statistics Menu
Status Menu
Dow nload Menu
Diagnostics Menu
Reset Access Point
Note:
Depending on the current settings of the RangeLAN2 Access Point, the order
of the options in the menu tree may change slightly.
SNMP Management (RangeLAN2 752x Only)
You may configure and monitor the RangeLAN2 752x Access Point using an SNMP
management package. SNMP Management of the RangeLAN2 752x Access Point is
described in Chapter 9.
Remotely via a Web Browser (RangeLAN2 752x Only)
You may configure and monitor the RangeLAN2 752x Access Point via a Web
browser. Web browser management is described in Chapter 10.
24
6. Configuration Parameters
To configure the RangeLAN2 Access Point, choose the Configuration option from the
Main Menu. The following two diagrams illustrate the software tree:
C onfiguration Menu
TC P /IP C onfiguration Menu
IP A ddres s
S ubnet M ask
D efault Gateway A ddress
S end B O OTP at B oot Tim e
B OO TP S e rver (0.0.0.0 for B roadc ast)
Telnet A cces s
Telnet P assword
** B rows er M ana gem ent
** B ro ws er Us er Nam e
** B rowser P ass word
F ilter IP X P ac kets
F ilter NetB E UI P ac kets
Filter C onfigura tion Menu
F ilter F ixed Nodes
F ilter IP P ac kets
F ilter A ppleTalk P ack ets
F ilter D E C Net P ack ets
F ilter Other P ac kets
F ilter IP X RIP B ro adcast P ac kets
F ilter IP X S A P B roadcas t P ackets
F ilter IP X LS P B roadcas t P ackets
F ilter A RP B roa dcast P ac kets
A RP F ilter Network A ddres s
A RP F ilter S ubnet M as k
F ilter M A C M ultic ast P ack ets
M A C F ilter A ddress
M A C F ilte r S ubnet M ask
B roadca st B andwidth A lloc ation %
B ridge C onfiguration Menu
A ging P eriod (s econd s)
** F orwarding D B Usage Trap Thres hold (% )
R adio C onfiguration Menu
Radio P ort A dm inistrative S tatus
C onfigured D om ain
C onfigured C ha nnel
C onfig ured S ubc hannel
C onfigured S tation Typ e
C onfigured First M a ster To S ync To
C onfigured M aster Nam e
C onfig ured E rror D om ain
Repeating E nabled
D elay Radio Rec onfig ure
Roam C onfig
Roam ing E nabled
M A C Optim ize
** No Traffic Trap P eriod (sec onds)
** Radio Traffic Trap Threshold (% )
** Radio B roadca st Trap Threshold (% )
S et S ecurity ID
Res et Radio
Ethernet C onfiguration Menu
10B aseT Link M onitor
E thernet P ort A d m inis trative S tatus
** Authoriz ation Ta ble C onfiguration Menu
** S N M P C onfiguration M enu
** U pload C onfiguration Menu
+ R ese t Acce ss P oint to Factory D efaults
D ump C onfiguration to S cree n
S tatistics M enu
** RangeLA N2 752x only
+ Not Accessible via T elnet
S tatus Menu
Dotted Line - Visible w hen configured as M aster
D ow nloa d Menu
Dashed Line - V isible w hen configured as Station
D iagnostics Menu
R e set Ac cess P oint
25
Configuration Menu
TC P/IP Configuration Menu
Filter Configuration Menu
Bridge C onfiguration Menu
Radio Configuration Menu
Ethernet C onfiguration Menu
** Authoriz ation Table Configuration Menu
A utho riza tio n Ta b le
A utho riza tio n Ta b le U sa g e O p tio n
E na b le /D is a b le U na utho rize d A d d r. Tra p
A P A utho riza tio n C o nfig . D o w nlo a d Ta b le
U p d a te A utho riza tio n C o nfig . o f A ll A P s
** SN MP Configuration Menu
E na b le /D is a b le S N M P
R e a d -O nly S NM P C o m m unity
R e a d -O nly S N M P M a na g e r IP A d d re s s
R e a d /W rite S N M P C o m m unity
R e a d /W rite S N M P M a na g e r IP A d d re s s
S N M P Tra p C o m m unity
Tra p Ta rg e t A d d re s s
E na b le /D is a b le A uthe ntic a tio n Tra p s
** U pload C onfiguration Menu
U p lo a d A P C o nfig ura tio n D a ta us ing F TP
A c ce p t U p lo a d R e q ue s ts fro m O the r A P s
+ R eset Access Point to Factory D efaults
** R angeLA
N2 752x only
Dump C onfiguration to Screen
+ Not Accessible via Telnet
Statistics Menu
Status Menu
** R angeLAN2 752x only
+ Not A ccessible via Telnet
Dow nload Menu
Diagnostics Menu
Reset Access Point
26
TCP/IP Configuration Menu
Use this option to change the TCP/IP parameters of the RangeLAN2 Access Point.
Parameter Name
Range
Default
IP Address
-
0.0.0.0
Subnet Mask
-
0.0.0.0
Default Gateway
Address
-
0.0.0.0
Send BOOTP at Boot
Time
True/False
True
BOOTP Server
Address
-
0.0.0.0 *
Telnet Access
Enabled/Disabled
Enabled
Telnet Password
10 characters
-
^ Browser Management
Enabled/Disabled
Enabled
^ Browser User Name
10 characters
-
^ Browser Password
10 characters
-
^ RangeLAN2 752x
Access Point only
* 0.0.0.0 is used to
send a broadcast
IP Address indicates the IP address that will be assigned to the RangeLAN2 Access
Point. It must be a unique number on the network. This parameter will not change until
the Access Point is reset.
Subnet Mask indicates the mask that will be used to determine what network the
RangeLAN2 Access Point is on. This parameter will not change until the Access Point
is reset.
27
If a packet is destined for an IP host or node belongs to a different IP subnet, the
RangeLAN2 Access Point will send IP packets to the Default Gateway (usually a
router) for the packets to be routed to the proper destination. This parameter will not
change until the Access Point is reset.
You can enable or disable the RangeLAN2 Access Point's ability to request its IP address from a BOOTP server at boot time, and you can supply the IP address of that
server.
You can enable or disable the ability to open a telnet session to the RangeLAN2 Access
Point and set a password to control telnet access.
You can enable or disable the ability to manage the RangeLAN2 752x Access Point
via a Web browser, and set a user name and password to control the Web browser
access.
Filter Configuration Menu
The filter configuration allows you to customize the type of traffic which is forwarded
from the Ethernet network to the RangeLAN2 network. None of these filters affect
traffic flowing from the wireless clients to the wired backbone.
28
Parame te r Name
Rang e
De fault
Filte r Fixe d No d e s
Filte ring /No t Filte ring
Filte ring
Filte r IP Packe ts
Filte ring /No t Filte ring
No t Filte ring
Filte r IPX Packe ts
Filte ring /No t Filte ring
No t Filte ring
Filte r Ne tBEUI Packe ts
Filte ring /No t Filte ring
No t Filte ring
Filte r Ap p le Talk Packe ts
Filte ring /No t Filte ring
Filte ring
Filte r DECNe t Packe ts
Filte ring /No t Filte ring
No t Filte ring
Filte r Othe r Packe ts
Filte ring /No t Filte ring
No t Filte ring
Filte r IPX RIP Bro ad cast
Packe ts
Filte ring /No t Filte ring
Filte ring
Filte r IPX SAP
Bro ad cast Packe ts
Filte ring /No t Filte ring
Filte ring
Filte r IPX LSP
Bro ad cast Packe ts
Filte ring /No t Filte ring
Filte ring
Filte r ARP Bro ad cast
Packe ts
Filte ring /No t Filte ring
No t Filte ring
ARP Filte r Ne two rk
Ad d re ss
-
0.0.0.0
ARP Filte r Sub ne t Mask
-
0.0.0.0
Filte r MAC Multicast
Packe ts
Filte ring /No t Filte ring
No t Filte ring
MAC Filte r Ad d re ss
-
01:00:00:00:00:00
MAC Filte r Sub ne t Mask
-
00:00:00:00:00:00
Bro ad cast Band wid th
Allo catio n %
0-100
80
29
The Fixed Nodes Filter will prevent traffic which is destined to a non-broadcast, nonmulticast, non-RangeLAN2 address from being forwarded from Ethernet to wireless.
DO NOT use this filter when using the node address overwrite feature on RangeLAN2
stations.
The Protocol Type Filters prevent traffic of a particular protocol type from being
forwarded from Ethernet to RangeLAN2. When “Other Types” is enabled, all types
other than those listed will be filtered out. DO NOT filter out the types of packets you
know RangeLAN2 nodes will need to receive. For example, if you use TCP/IP as a
protocol on your wireless nodes, do not filter IP traffic. If you have Macintosh computers on your Ethernet network that send AppleTalk traffic only to each other, you may
want to filter those packets from RangeLAN2 stations. The Protocol Type Filters
include IP, IPX, NetBEUI, AppleTalk, DECNet, and Other (none of the above).
The IPX Broadcast Filters prevent IPX broadcasts of the specified types from being
forwarded from Ethernet to RangeLAN2. Since RIP, SAP, and LSP broadcasts are of
interest to routers and not end stations, these filters can typically be turned on, saving
valuable bandwidth.
The ARP Filter Network Address and ARP Filter Subnet Mask enable IP ARP
broadcast filtering. When these filters are configured, ARP broadcasts will be forwarded
from Ethernet to RangeLAN2 only if the destination IP address is on the IP network
defined by the ARP Filter Network Address and ARP Filter Subnet Mask fields.
If you enable Filter MAC Multicast Packets, you must also configure the MAC Filter
Address and MAC Filter Subnet Mask to specify the range of multicast packets which
will be forwarded to the RangeLAN2 network. When these parameters are configured,
the Access Point will forward from the Ethernet to the RangeLAN2 network only those
hardware multicast packets whose multicast address is within the range of addresses
defined by the MAC Filter Address and MAC Filter Subnet Mask.
Broadcast Bandwidth Allocation allows you to specify the maximum percentage of
RangeLAN2 bandwidth that may be allocated for broadcast traffic. There may be cases
when you want to limit broadcast traffic. As an example, to prioritize directed packets,
you might want to reserve radio bandwidth for directed packets by setting this limit to
less than 100%.
30
Bridge Configuration Menu
Parameter Name
Range
Default
Aging Period (seconds)
10-1,000,000
300
* Forwarding DB Usage Trap Threshold
0-100 (%)
100
* RangeLAN2 752x Access Point Only
The Aging Period parameter specifies the time after which the learned physical address
of the network node, which is stored in the Forwarding Database, is discarded. This data
is dynamically acquired by the RangeLAN2 Access Point so that it can forward packets
properly.
The Forwarding DB Usage Trap Threshold parameter specifies the percentage of
learned database entries after which an SNMP trap will be sent. This parameter is only
supported on the RangeLAN2 752x Access Point which has the capability of holding
2048 entries.
Ethernet Configuration Menu
Parameter Name
Range
Default
10BaseT Link Monitor
Enabled/Disabled
Disabled
Ethernet Port Administrative Status
Enabled/Disabled
Enabled
When enabled, the 10BaseT Link Monitor will automatically detect whether or not the
Access Point has an operational 10BaseT connection to the Ethernet. A 10BaseT link
will be unavailable if no 10BaseT patch cable has been plugged into the Access Point, if
the length of the patch cable exceeds 100 meter, or if a damaged patch cable is used.
When a link is not detected, the Access Point will switch from its current Domain to the
31
Error Domain, which is Domain 13 by default, and the Status LED will blink yellow.
This Domain change will force all RangeLAN2 Stations to lose synchronization to the
Access Point, allowing the Stations to seek out another Access Point still configured to
the appropriate Domain and reestablish network connectivity. This parameter is set to
disabled by default.
Note:
Do NOT enable this parameter if you are using a 10Base2 Ethernet cable to
provide network connectivity to the Access Point. If the 10BaseT Link Monitor
is enabled at any time when a 10BaseT Ethernet connection does not exist, the
Access Point will switch to the Error Domain and will NOT operate as
intended.
Ethernet Port Administrative Status, when disabled, temporarily prohibits the Access
Point from sending or receiving any packets over the Ethernet. This parameter is automatically returned to Enabled when the Access Point is reset. This parameter is primarily
included for customer who intend to manage the Access Point using SNMP. This
parameter corresponds to the SNMP MIB-II Administrative status parameter and can be
used to bring the Ethernet interface back up after it has been disabled by an SNMP
manager.
32
Radio Configuration Menu
Parameter Name
Range
Default
Radio Port
Administrative Status
Enabled/Disabled
Enabled
Domain
0-15
0
& Channel
1-15
1
& Subchannel
1-15
1
Station Type
Master/Station
Master
^ First Master To Sync To
11 characters
blank
& Master Name
11 characters
MASTER
& Error Domain
0-15
13
& Repeating Enabled
True/False
False
Delay Radio Reconfigure
True/False
False
^ Roam Config
Slow/Normal/Fast
Normal
^ Roaming Enabled
True/False
True
& MAC Optimize
Auto, Very Light, Light,
Normal
Auto
+& No Traffic Trap Period
(seconds)
0-10,000,000
0
+& Radio Traffic Trap
Threshold (%)
10-100
100 *
+& Radio Broadcast Trap
Threshold (%)
10-100
100 *
Security ID
0-20 characters
blank
+ RangeLAN2 752x
AccessPoint Only
^ Only visible when
configured as Station
* a value of 100
disables this trap
& Only visible when
configured as Master
33
This option allows you to change the various wireless parameters.
Radio Port Administrative Status, when disabled, temporarily prohibits the Access
Point from sending or receiving any packets over its radio. This parameter is automatically returned to Enabled when either the radio or the Access Point is reset. This parameter is primarily included for customer who intend to manage the Access Point using
SNMP. This parameter corresponds to the SNMP MIB-II Administrative status parameter and can be used to bring the radio interface back up after it has been disabled by an
SNMP manager.
In order for this system to work, in each subnetwork there must be one unit that coordinates the hops. This unit has the Station Type setting of Master. It might help you to
think of the Master as the conductor of a frequency hopping orchestra. The Master
keeps time so all units know when to hop and what frequency to hop to.
Units classified as Stations synchronize to the Master and follow its signal to learn what
frequency in the pattern the Master is currently using.
There must be at least one station on the network designated the Master. For most
network operating systems, the RangeLAN2 Access Point should be the Master and all
clients are defined as Stations. In a roaming environment, all RangeLAN2 Access
Points will be configured as Masters. The RangeLAN2 7100, RangeLAN2 7400, and
RangeLAN2 792x clients are all configured as Stations and roam from one Master to
another.
Each Master can select one of 15 Channels to establish communications with Stations.
Each Channel number sets a unique frequency hopping sequence allowing for multiple
subnetworks with higher data rate transmission capability in the same air space. You
may think of the Channel as a pipe. In order to communicate, radios must be on the
same Channel and there must be one (and only one) Master that provides the timing for
that Channel.
There are 15 independent Channels. This means that there are 15 different sequences of
frequency hops. Each Channel is at a different frequency at a different time. For networks with multiple Masters (such as in a roaming environment), set each Master to a
different channel. All Stations will determine their channel by the Master to which they
are synchronized.
34
The Subchannel is just a software code that is appended to each radio packet. It does
not affect the frequency hopping sequence like a Channel does. Use a Subchannel if
you need more than 15 Masters in the same coverage area and, therefore, all the Channels are used.
For example, you can use Channel 1, Subchannel 1 for Network A and Channel 1,
Subchannel 2 for Network B. The two networks will not communicate with one another. They are, however, still sharing the 1.6 Mbps pipe since they are both using
Channel 1.
In order to establish communications, all communicating stations must be configured
with the same Domain number. Radios on different Domains cannot communicate with
each other. The Domain is a software filter which does not affect the actual radio frequency or the frequency hop sequence.
You may want to set everyone on your network to the same Domain. For larger wireless
networks, use the Domain to establish roaming subnetworks throughout your building.
For example, the Engineering Department may use Domain 2 and the Sales Department
may use Domain 5. Then engineers can only roam within the geographical area mapped
out by RangeLAN2 Access Points with a Domain setting of 2.
When the RangeLAN2 Access Point is configured as a Station, the First Master To
Sync To parameter names the Master with which this unit will synchronize. If this field
is filled in, there will be another choice, Second Master To Sync To. If the first Master
is unavailable to the RangeLAN2 Access Point, it will look to the second Master. Similarly, if the second choice is filled in, a Third Master To Sync To field will be visible.
If no list is configured, the radio will continually look for the best Master. These parameters are case-sensitive.
The optional Master Name parameter specifies an alphanumeric name to simplify the
identification of each Master in your network.
If the 10BaseT Link Monitor is enabled and does not detect an Ethernet connection, the
Access Point will automatically switch from the configured Domain to the Error Domain, and any wireless clients will lose synchronization to it. This allows the wireless
clients to roam to other Access Points on the wired backbone that have maintained
Ethernet connectivity. By default, the Error Domain is set to 13. If your wireless net35
work is configured to operate on Domain 13, change the Error Domain parameter to
another Domain number between 0 and 15 that is not in use.
You may enable or disable the ability for the RangeLAN2 Access Point to repeat signals
coming from one Station and destined for another Station. These two Stations must be
out of range of one another but both in range of the RangeLAN2 Access Point for
repeating to occur.
The Delay Radio Reconfigure parameter allows you to delay radio parameter changes
from taking effect. You might want to enable this feature if you were wirelessly configuring the RangeLAN2 Access Point, so that you did not lose communication when the
parameters changed. For example, suppose you were changing a RangeLAN2 Access
Point's Domain from 0 to 1. If you did not use the Delay Radio Reconfigure parameter, when the Domain changed, the wireless client would no longer be able to communicate with the RangeLAN2 Access Point.
The Roam Config parameter allows you to determine how quickly this Access Point,
when configured as a Station, will roam from one Master RangeLAN2 Access Point to
another. In areas with many RangeLAN2 Access Points that provide heavy overlapping
coverage, set this parameter to Fast to maintain high throughput for each of the wireless
nodes.
In most networks, set the Roam Config parameter to Normal. Wireless node throughput
will not change noticeably, and an overabundance of Master RangeLAN2 Access Points
is not required.
If the wireless coverage area provided by Master RangeLAN2 Access Points is sparse,
set the Roam Config parameter to Slow. Wireless nodes will not roam until they are
nearly out of range of the Master RangeLAN2 Access Point.
When the RangeLAN2 Access Point is configured as a Station, you may enable or
disable its ability to roam when it loses synchronize with its Master Access Point. When
enabled, the radio will only search through its list of First Master To Sync To, Second
Master To Sync To, and Third Master To Sync To. When disabled, the radio will
never roam.
36
The MAC Optimize parameter can help improve throughput for small networks. The
default setting of Auto causes the RangeLAN2 Access Point to determine the number of
units synchronized to it and adjust this parameter accordingly. If you have 0 or 1 wireless node communicating with a RangeLAN2 Access Point, set this parameter to Very
Light. If you have between 2 and 7 wireless nodes communicating with a RangeLAN2
Access Point at the same time, set this parameter to Light. (You can have more than 7
nodes synchronized to a RangeLAN2 Access Point but between 2 and 7 communicating
at the same time for the Light parameter setting.) In networks with more than 7 concurrent wireless users, set the parameter to Normal.
To further improve the security of a wireless subnetwork, each unit requires the same
Security ID to establish communication. The Security ID is used on all RangeLAN2
products and all Station Types. This ID is encrypted and stored in the RangeLAN2
Access Point itself, not in software. It cannot be accessed but you may change it. If you
do change it, however, you will need to change the Security ID on all other radios with
which this one was communicating. The Security ID parameter can be up to 20 characters and is an empty string by default. It is case sensitive.
The No Traffic Trap Period specifies the number of seconds after which a No Traffic
trap is sent via SNMP. This parameter is only available on the RangeLAN2 752x
Access Point.
The Radio Traffic Trap Threshold specifies a percentage of radio traffic after which a
Radio High Usage trap is sent via SNMP. This parameter is only available on the
RangeLAN2 752x Access Point.
The Radio Broadcast Trap Threshold specifies a percentage of radio broadcast traffic
after which a Radio High Usage trap is sent via SNMP. This parameter is only available
on the RangeLAN2 752x Access Point.
Reset Radio allows you to reset the radio contained in the RangeLAN2 Access Point
without resetting the entire unit. This will cause any changes to the radio parameters
which haven't yet taken effect (because the Delay Radio Reconfigure parameter is set)
to take effect.
37
Authorization Table
The Authorization Table is described in Chapter 11.
SNMP Management
SNMP Management is described in Chapter 9.
Upload Configuration to FTP Server
This menu is only visible on the 752x Access Point. This feature allows you to upload
the current configuration of each Access Point on the network to a file on an FTP server.
A member of the Proxim Technical Support Department may ask you to create this file
for troubleshooting purposes.
When the Upload AP Configuration Data using FTP option is selected, you will be
prompted to enter the name of the directory to which the file will be uploaded, the IP
Address of the FTP server, the FTP User Name, and FTP Password. This menu also
allows you to enable or disable an Access Point's ability to respond to an upload request
from another Access Point. By default, the Access Point is configured to respond to
upload requests.
Reset Access Point to Factory Defaults
Use this option to reset all the parameters to default values. This option is only visible
when configuring the Access Point via a terminal, not via telnet.
Dump Configuration to Screen
This parameter displays the current configuration of the RangeLAN2 Access Point to the
screen. Using a screen snapshot program you can save these settings. A member of the
Proxim Technical Support Department may ask you to print out this snapshot for troubleshooting purposes.
38
7. Statistics Menu
You can view statistics about the RangeLAN2 Access Point from the Statistics Menu.
The following diagram illustrates the software tree:
Main Menu
Configuration Menu
Statistics Menu
Radio Statistics Menu
S uc ce ss ful Rx D a ta P a c k e ts
S uc c e s s ful Tx D a ta P a c k e ts
Ethernet Statistics Menu
R x S uc c e s sful P a c ke ts
R x S uc c e s s ful B yte s
R x E rro r P a c ke ts
R x A lig nm e nt E rro r P a c k e ts
R x C R C E rro r P a ck e ts
R x F ra m e To o L o ng P a c k e ts
R x B a d P a c ke ts
R x Inte rna l M A C E rro rs
Tx S ucc e s s ful P a c k e ts
Tx S uc ce s s ful B yte s
Tx E rro r P a c k e ts
Tx S ing le C o llis io n P a c ke ts
Tx M ultip le C o llis io n P a c ke ts
Tx L a te C o llis io n P a c k e ts
Tx E xc e s sive C o llisio n P a c ke ts
Tx D e fe rre d P a c ke ts
Tx C a rrie r S e ns e E rro rs
Tx Inte rna l M A C E rro rs
Bridge Statistics Menu
E the rne t C a c he F ilte r C o unt
W ire le s s C a che F ilte r C o unt
C urre nt F o rw a rd ing D a ta b a s e U s a g e (% )
Filter Statistics Menu
IP P a c k e t F ilte r C o unt
IP X P a c k e t F ilte r C o unt
N e tB E U I P a c k e t F ilte r C o unt
A p p le Ta lk P a ck e t F ilte r C o unt
D E C N e t P a c ke t F ilte r C o unt
O the r P a c ke ts F ilte r C o unt
IP X R IP B ro a d c a s t P a c k e t F ilte r C o unt
IP X S A P B ro a d c a s t P a c k e t F ilte r C o unt
IP X L S P B ro a d c a s t P a c k e t F ilte r C o unt
A R P B ro a d c a s t F ilte r C o unt
B ro a d c a st B a nd w id th F ilte r C o unt
M A C M ultic a s t F ilte r C o unt
F ixe d N o d e A d d re s s F ilte r C o unt
Reset Statistics
Status Menu
Download Menu
Diagnostics Menu
Reset Access Point
39
Radio Statistics Menu
This menu displays the number of successfully transmitted and received packets through
the radio interface of the RangeLAN2 Access Point.
Ethernet Statistics Menu
This menu displays various statistics about Ethernet traffic to and from the RangeLAN2
Access Point.
Bridge Statistics Menu
This menu displays information regarding packets that were filtered due to the bridge's
learning about the location of nodes. It also shows the percentage of the bridge's forwarding table that is used up already by learned node addresses. You can view this table
through the Status Menu, discussed in the following pages.
Filter Statistics Menu
This menu displays the count of packets that were filtered out due to the various filter
options.
Reset Statistics
You may reset the RangeLAN2 Access Point statistics from this menu option.
40
8. Status Menu
The Status Menu shows you the current state of RangeLAN2 Access Point parameters.
The following diagram illustrates the software tree:
Main Menu
C onfiguration Menu
Statistics Menu
Status Menu
R adio Status Menu
C urrent D om ain
C urrent C hannel
C urrent S ubchannel
C urrent S tation Type
C urrent M aster Nam e
C urrent S ynced-To M aster Nam e
C urrent F irst S ync-To M aster
C urrent Roam C onfig
C urrent Roam ing E nabled
C urrent Repeating S tatus
C urrent M A C Optim ize
** Radio Traffic Level (% )
** Radio B roadcast Level (% )
Radio ROM V ersion
Reset Required for Reconfiguration
** Last Unauthorized A ddress
Num ber of Radio S tations C onnected
B ridge Status Menu
B ridge A ddress
TCP/IP Status Menu
C urrent IP A ddress
C urrent S ubnet M ask
C urrent D efault Gateway A ddress
Forw arding Database Table
D ow nload Menu
** RangeLAN2 752x only
D iagnostics Menu
Dotted Line - Visible w hen configured as M aster
R eset Access Point
Dashed Line - Visible w hen configured as Station
41
Radio Status Menu
The current RangeLAN2 Access Point radio parameters are displayed in this menu
option. These will match those in the Configuration Menu with the exception of MAC
Optimize and Roaming Enabled.
If MAC Optimize is configured as Auto, it will still appear in the Status Menu as Very
Light, Light, or Normal, depending on the current number of synchronized radios.
The Roaming Enabled parameter can differ from its configured value if any Sync To
parameters are set. The Roaming Enabled parameter is set to “false” if one or more of
these are programmed, even if the Configuration Menu indicates it is “true.”
When the Access Point is configured as a Station, the Channel and Subchannel refer to
those of the Master to which it is synchronized.
Synced-To Master Name is the name of the Master to which the RangeLAN2 Access
Point is currently synchronized.
The First Sync-To parameter lists the name of the Master to which this RangeLAN2
Access Point will first look to synchronize. If programmed, there will also be parameters
for Second Sync-To and Third Sync-To.
The Radio Traffic Level and Radio Broadcast Level parameters show the current
values of these parameters which may cause an SNMP trap. Similarly, the Last Unauthorized Address shows the MAC address of the last wireless client who tried to attach
to the wired network via this Access Point, but was prevented because of the Authorization Table. These three parameters are available on the RangeLAN2 752x Access Point
only.
The Radio ROM version of the radio contained inside the RangeLAN2 Access Point is
available for viewing.
If there is a parameter that will not take effect until the RangeLAN2 Access Point or
radio is reset, the Reset Required for Reconfiguration parameter will be set to “true.”
For example, after changing the radio Channel through the Configuration Menu, this
parameter would be set to “true.”
42
The Number of Radio Stations Connected parameter displays a count of the current
RangeLAN2 devices configured as Stations that are synchronized to this RangeLAN2
Access Point and have communicated within a specified time period. This time period is
defined by the Aging Period parameter, which can be configured under the Bridge
Configuration Menu.
Bridge Status Menu
The Bridge Address is the MAC address of this RangeLAN2 Access Point.
TCP/IP Status Menu
The current IP Address, Subnet Mask and Default Gateway are displayed.
Forwarding Database Table
The RangeLAN2 Access Point is a learning bridge. Over time, from watching the
packets on the network, the Access Point determines where the nodes on the network are
-- on the wire or the wireless side of the Access Point. You can view the table of nodes
known to the RangeLAN2 Access Point. This table can hold a maximum of 2048
entries on a RangeLAN2 752x Access Point, and a maximum of 1024 entries on a
RangeLAN2 7510 Access Point. If the Fixed Nodes filter is set to on, this table will
only contain MAC addresses of RangeLAN2 nodes which will change as those nodes
roam.
43
44
9. SNMP Management
You may configure and monitor the RangeLAN2 752x (not 7510) Access Point using
an SNMP management package. The following illustrates the software menu:
Main Menu
C onfiguration Menu
TC P/IP C onfiguration Menu
Filter Configuration Menu
B ridge Configuration Menu
Ethernet C onfiguration Menu
R adio C onfiguration Menu
** Authoriz ation Table C onfiguration Menu
** S NMP C onfiguration Menu
E nab le/D isa ble S NM P
Re ad -Only S N M P C o m m unity
Re ad -Only S NM P M a na ge r IP A dd ress
R ea d/W rite S NM P C om m unity
R ea d/W rite S NM P M a na ge r IP A d dre ss
S NM P Trap C o m m unity
Tra p Ta rge t A d dre ss
E nab le/D isa ble A uthenticatio n Trap s
** U pload C onfiguration Menu
R eset Access P oint to Factory D efaults
D ump Configuration to Screen
Statistics Menu
Status Menu
** RangeLAN2 752x only
D ow nload Menu
D iagnostics Menu
R eset Access Point
45
The RangeLAN2 752x Access Point supports the following MIBs:
❑ MIB-II (RFC 1213)
❑ IEEE 802.1d Bridge MIB (RFC 1493)
❑ Extended Ethernet MIB (RFC 1643)
❑ Proxim Enterprise MIB
The Proxim Enterprise MIB is supplied in ASN.1 format. It is available on the
Proxim BBS and Web site. The filename is AP7520.MIB. Follow the instructions in your SNMP management package for incorporating enterprise-specific
MIBs.
Note:
The RangeLAN2 Access Point is not manufactured with a default IP address.
In order to SNMP manage the RangeLAN2 Access Point, you must first assign
it a valid IP address for your network using null modem cable configuration
or a BOOTP server.
You may choose to configure the RangeLAN2 752x Access Point through the menu
trees (in-band or out-of-band) to set SNMP parameters before using an SNMP manager.
Enable/Disable SNMP allows you to enable or disable SNMP management of
the RangeLAN2 752x Access Point.
The Read-Only SNMP Community parameter specifies a community supported by the RangeLAN2 752x Access Point. Actions permitted by this
community are “read-only” (GET and GET-NEXT). SET attempts using this
community will result in rejection of the attempt with a general error response
and the generation of an authentication trap (if so enabled).
The Read-Only SNMP Manager IP Address specifies the IP address of the
SNMP manager which is permitted to use the Read-Only SNMP Community.
An address of 0.0.0.0 indicates any manager may use this community.
46
The Read/Write SNMP Community parameter specifies the a community
supported by the RangeLAN2 Access Point. Actions permitted by this community are “read-write” (GET, GET-NEXT, and SET).
The Read/Write SNMP Manager IP Address specifies the IP address of the
SNMP manager which is permitted to use the Read/Write SNMP Community.
An address of 0.0.0.0 indicates any manager may use the community.
The SNMP Trap Community parameter specifies the community that will be
used by the RangeLAN2 752x Access Point when generating TRAP PDUs to
remote managers.
The Trap Target Address specifies the IP address of the device to which
generated TRAP PDUs will be sent. A value of 0.0.0.0 disables trap generation.
Authentication Traps are sent to the Trap Target Address whenever anyone
attempts to SNMP manage the RangeLAN2 Access Point with an invalid
community or from an invalid community. You may enable or disable the
sending of these traps.
SNMP Supported Traps
The following traps are supported by the RangeLAN2 752x Access Point and
are sent to the SNMP manager defined by the Trap Target Address when they
occur.
MIB II Traps
Cold Start - Sent when the RangeLAN2 752x Access Point powers on or
reboots.
Link Up - Sent by each interface at start-up or after coming back up.
Link Down - Sent when the RangeLAN2 752x Access Point software cannot
initialize or communicate with either interface.
47
Authorization - Sent to the network manager when someone tries to manage a
RangeLAN2 752x Access Point with an invalid community.
Enterprise Specific Traps
No Traffic - Sent when set to a non-zero value and when the RangeLAN2
752x Access Point does not receive any traffic from other radios for the configured period of time. The time may be configured in the Radio Configuration
Menu.
Broadcast Threshold - Sent if the radio broadcast traffic exceeds the limit set
by the Radio Configuration parameter, Radio Broadcast Trap Threshold.
Cache Table High Usage - Sent when the cache table usage percentage has
exceeded the limit set by the Bridge Configuration parameter Forwarding DB
Usage Trap Threshold. For example, if this limit were set to 50%, when the
RangeLAN2 752x Access Point knows 1024 (out of the 2048 possible) entries,
it will send this trap message.
Radio High Usage - Sent if the radio traffic has crossed the limit set by the
Radio Configuration parameter Radio Traffic Threshold.
Serial Port Down - Sent when the serial port of the RangeLAN2 752x Access
Point is not working. The status of this port is checked only at boot time.
Unauthorized Usage Trap - Sent when an unauthorized wireless user tries to
attach to the network through the RangeLAN2 752x Access Point.
48
10. Web Browser Management
You may configure and monitor the RangeLAN2 752x Access Point using a Web
browser.
Supported Web Browsers
❑ Netscape Navigator 3.01 or above for Win95/WinNT
❑ Netscape Navigator 3.01 or above for Macintosh
❑ Netscape Navigator 3.01 or above for SUN
❑ Microsoft Internet Explorer 3.01 or above for Win95/WinNT
Establishing a Connection
Note:
The RangeLAN2 752x Access Point is not manufactured with a default IP
address. In order to manage the RangeLAN2 752x Access Point with a Web
browser, you must first assign it a valid IP address for your network using null
modem cable configuration or a BOOTP server.
Start a supported Web browser on a network computer, connected to the network either
via a wired or wireless connection. Highlight and replace the existing URL path with
the IP address of the RangeLAN2 752x Access Point. For example, the starting URL
may be similar to ‘http://www.proxim.com.’ Highlight and replace the
‘www.proxim.com’ with the IP address of the RangeLAN2 752x Access Point. A final
result would appear similar in form to ‘http://100.25.200.1.’
The browser will display the Proxim screen for the RangeLAN2 752x Access Point
Web management. A password may be required at this point if the RangeLAN2 752x
Access Point has had Browser User Name and Browser Password set. After 5
minutes or more the user is re-prompted for the password.
49
Main Display
On the right side of the screen, there is a picture of the RangeLAN2 752x Access Point
along with the text “Web Manager For Wireless Networks,” as shown below. Proxim
Technical Support contact information is listed underneath the picture.
50
The first half of the menu on the left side details the Web options. The second half lists
the RangeLAN2 752x Access Point device management functions available through the
other access methods (telnet, terminal interface, SNMP).
Next to each menu item is either a [+] or [-]. A [+] indicates that there are sub-menu
items which are not being displayed. To display these hidden items left-click on the [+]
symbol. Clicking on the [-] symbol shrinks the menu.
Text without a [+] or [-] will take you to that function screen directly.
RangeLAN2 752x Access Point Network Management
Discover APs
This screen displays all RangeLAN2 and RangeLAN802 Access Points detected on the
network. Click on the picture to configure the RangeLAN2 Access Point.
The columns display the MAC address, the IP address, the Domain, the Channel, the
Subchannel, and the Master Name of the Access Point, as shown below.
51
Network Map
This display shows all Proxim network components which have been detected.
Clicking on the picture of an Access Point will redirect the browser to that Access
Point’s configuration page. The leftmost column is the unit being currently browsed.
Displayed under each RangeLAN2 Access Point is a list of MAC addresses of the
Proxim devices currently synchronized to that Access Point. Clicking on the MAC
address of a Proxim device will redirect the browser to that unit's Wireless Node Management page (if one is available).
Press the Update button of your Web browser to see the latest view of the network map.
Traffic Monitor
This page displays a real-time graph of the traffic being processed by each RangeLAN2
752x Access Point on the network.
52
53
Each RangeLAN2 752x Access Point, is displayed with its Master Name and MAC
address. Each has a graph showing the following types and volume of traffic:
❑ Transmitted unicast packets
❑ Transmitted broadcast packets
❑ Received unicast packets
❑ Received broadcast packets
Unicast packets are transmissions in which the destination is a single, known node and is
specified in the packet.
The broadcast packets indicator also includes multicast packets. Both types are packets
in which the destination is two or more nodes.
RangeLAN2 752x Access Point Device Management
This menu offers configuration options for the RangeLAN2 752x Access Point as
described in Chapter 6.
Wireless Node Management
This page displays the MAC address of the RangeLAN2 devices currently synchronized
to the RangeLAN2 Access Point, as shown below.
Management information is available only for nodes that have the Windows 95 or
Windows NT driver, version 1.3 or greater, installed. Management information is not
available for wireless clients running earlier versions of the Windows 95 or NT driver,
running the DOS NDIS or ODI driver, or running Windows CE. Management information is also unavailable for nodes connected to an Ethernet Adapter.
54
Highlight a MAC address from the list and click <Status> to view the current configuration of the synchronized device. If the device has the appropriate driver version loaded,
the following information will be displayed: the wireless node's MAC Address, ROM
version, driver version, Domain number, network adapter type (ISA, One Piece PC
Card, etc.), Peer-to-Peer setting, Inactivity Timeout setting, the name of the Master to
which it is synchronized, information on roaming, and information on the number of
driver resets. The configuration information will also display the device’s computer
name, if this parameter has been configured from within Window 95 or Window NT’s
Network icon.
55
Highlight a MAC address from the list and click <Statistics> to view statistical information about the wireless node's radio activity over a specified period of time. These
statistics provide additional information for advanced users who understand how data is
exchanged between RangeLAN2 radios.
Displayed statistics include total number of packets transmitted, number of successful
packets transmitted and received, number of BFSK and QFSK packets transmitted,
number of fragmented packets transmitted and received, number of CTS errors, number
of ACK errors, and number of duplicate packets received.
If you would like to learn more about the methods RangeLAN2 radios use to exchange
data, you should consider signing up for a RangeLAN2 Technical Training class in your
area. Go to Proxim’s web site at http://www.proxim.com/support for more information.
56
11. Authorization Table
For added security, you can use the Authorization Table to hold the MAC addresses
of the wireless nodes that will be allowed or disallowed to connect to the Ethernet LAN
through the RangeLAN2 752x Access Point. These addresses are manually added and
deleted. This is in addition to the Security ID already supported by the RangeLAN2
hardware. For example, if a RangeLAN2 client card is missing, you can specifically
disallow it access to the network.
The Authorization Table Usage Option determines if this table will include or exclude
wireless users and if the table will be used at all. If you have not recently updated the
table, you may want to disable usage until you can add all the proper entries. By default,
it is disabled. The table can hold a maximum of 256 nodes.
You can also enable or disable an SNMP trap that will tell the SNMP manager an
unauthorized user has tried to use the RangeLAN2 752x Access Point.
The Update Authorization Config. of All APs parameter distributes the Authorization
Table from this Access Point to all other RangeLAN2 752x Access Points on the network. This feature is useful in that you do not have to set the Authorization Table
individually on all RangeLAN2 752x Access Points in the same network. Choose the
AP Authorization Config. Download Table to watch progress of the distribution. In
most cases, the distribution will take place so quickly that you will only see the final
status of the distribution.
The Authorization Table configuration options can be found under the Configuration
Menu.
57
Main Menu
Configuration Menu
TCP/IP Configuration Menu
Filter Configuration Menu
Bridge Configuration Menu
Ethernet Configuration Menu
Radio Configuration Menu
** Authoriz ation Table Configuration Menu
A utho riza tio n Tab le
A utho riza tio n Ta b le U sa g e Op tio n
E na b le /D isa b le U na utho rize d A dd r. Tra p
** SNMP Configuration Menu
** Upload Configuration Menu
Reset Access Point to Factory Defaults
Dump Configuration to Screen
Statistics Menu
Status Menu
** RangeLAN2 752x only
Dow nload Menu
Diagnostics Menu
Reset Access Point
58
A P A uthoriza tio n C o nfig . D o w nlo a d Ta b le
U p d ate A uthoriza tio n C o nfig . of A ll A P s
12. Performance Hints
This section provides the user with ideas as to how to increase performance and network
satisfaction on a wireless network.
Microwave Ovens
Microwave ovens operate in the same frequency band as RangeLAN2. Therefore, if you use
a microwave within range of RangeLAN2 you may notice network performance degradation.
However, both your microwave and your RangeLAN2 network will continue to function.
Range
Every environment is unique with different obstacles, barriers, materials, etc. and therefore, it
is difficult to determine the exact range that will be achieved without testing. The site
survey tool was developed to aid in this process. Additionally, Proxim has developed
some guidelines to estimate the range that users will see when the product is installed in
their facility, but there are no hard and fast specifications. Note that the RangeLAN2
7521 Access Point will have a longer range than the 7510 or the 7520.
Radio signals may reflect off of some obstacles or be absorbed by others depending on
their construction. For example, with two RangeLAN2 radios, using the standard
antennas shipped with the units, you may achieve up to 1000' in open space outdoors
where the two antennas are line of sight, meaning they see each other with no obstacles.
However, the same two units will only achieve up to 500' of range when they have to
travel through the cubicles usually used in modern offices. If there are office walls to
penetrate, the signal range may decrease even further to up to 300'.
There are many antenna options available for the RangeLAN2 Access Point. These
optional antennas offer additional range and different radiating patterns in order to
accommodate each user’s wireless coverage needs. If you are interested in antenna
options, contact your Proxim Sales Representative about antenna kits. Note that due to
U.S. regulatory laws, antennas whose gain is rated higher than 9 dBi may not be used
with the RangeLAN2 7521 Access Point within the United States. Contact your Proxim
Sales Representative to obtain regulatory information for regions outside of the United
States.
59
Proper antenna placement can help improve range. Here are some guidelines:
❑ The antenna should be placed so that it emits its signal in the appropriate direction. For example, the standard antenna shipped with the unit should be
mounted vertically. Higher gain omnidirectional antennas may be mounted
upside down to the ceiling or a beam. The omnidirectional antenna emits its
signal from all sides of the antenna, but not from the top or bottom. The directional antenna typically emits a beam only from a front face plate in a horizontal
direction; this type of antenna should be mounted against a wall.
❑ Place the antenna as high as possible. In an office environment, try to place it
above cubicle walls.
❑ Do not place a sheet of metal (like a filing cabinet) between two antennas.
❑ Two antennas that are communicating should be in the same plane. For example, do not lie one antenna on its side and have its partner standing upright.
60
13. Site Survey and Master Search Tool
The RangeLAN2 752x Access Point has two mechanisms to determine proper placement of radios and antennas: a site survey tool which displays the quality of the wireless
link between the Access Points and wireless clients (or other Access Points); and a
Master search tool which displays information on all visible Masters.
A network administrator might want to use these tools when diagnosing user performance
problems. A network installer might use them to aid in determining placement of the Access
Point and wireless client antennas.
These tools are accessible from the Radio Diagnostics Menu. The site survey tool shows
the MAC addresses, Link Quality and RSSI of each node that the RangeLAN2 752x
Access Point can find wirelessly. It also can be used to measure throughput between the
two Access Points, one configured as a Master and one configured as a Station. The
Master Search Tool displays configuration information on all Masters within range of
the RangeLAN2 752x Access Point.
To perform a site survey, first choose the Run Broadcast Site Survey option and let the
RangeLAN2 752x Access Point sit for a period of time that you specify. Then look at the list
of MAC addresses found, Link Quality and RSSI data. The results will show an average
value for each parameter over the time period for which the site survey was run. If you check
the data before the full time has elapsed, you will see values that are an average of the time
thus far elapsed.
61
Figure 10
Broadcast Site Survey
62
The higher the Link Quality number from a particular node, the greater the link. A Link
Quality number of 0 indicates that the node is no longer responding at all. This is the
most important parameter to watch to verify that you will be able to maintain a reliable
wireless connection. Note that the Link Quality number of RangeLAN2 7200 and
7400 adapters may be low if those adapters are in their doze mode when being
surveyed. As these adapters wake up, the Link Quality number may change, so
this number may not always be accurate.
Received signal strength (RSSI) indicates how strong a signal was received from a particular
node.
After using the Broadcast Site Survey, you can choose the Run Directed Site Survey to
check the packets per second and bytes per second measurements between the
RangeLAN2 752x Access Point and the node you select.
63
Figure 11
Directed Site Survey
64
You may also use the Broadcast Site Survey and Directed Site Survey to determine the
strength of a wireless connection in building to building applications. Run the Broadcast
Site Survey tool from one of the Access Points to confirm that the other Access Point is
within communication range. Then run the Directed Site Survey to determine the packet
per second rate between the two Access Points. Change the position of one of the
antennas and run the Directed Site Survey again. Using this method, you can experiment with the position and location of each antenna to determine the optimum placement
that results in the highest packet per second rate.
The Master Search Tool searches for Master units within range of the RangeLAN2 Access
Point, when it is configured as a Station. After running, a directed site survey is immediately
launched. The Master Search Tool prompts for both length of time to run the tool and
length of time to run the site survey.
The Master Search Tool displays the MAC address, Master Name, Channel, and
Subchannel of all Masters it finds. The site survey displays the Kbytes/sec and RSSI
values between the RangeLAN2 Access Point and the Master.
65
Figure 12
Master Search Tool
66
14. Troubleshooting
The RangeLAN2 Access Point is designed to be very easy to install and operate. If you
do experience difficulties, however, use the information in this chapter to help diagnose
and solve the problem. If you cannot resolve the problem, contact Proxim, as described
in Appendix F, “How to Reach Technical Support.”
How to Obtain Help with Your LAN Installation
If you require assistance to install your LAN, Proxim can put you in contact with a
RangeLAN2 reseller in your area. The reseller is an expert in the design, installation, and
maintenance of LANs and will be able to examine your needs and recommend the most costeffective solution for your LAN whether you are installing a new LAN or adding on to an
existing one. For the location of the RangeLAN2 reseller nearest you, contact Proxim at
800-229-1630 and ask for the Sales Department.
Diagnostics Menu
There are diagnostic tools built into the RangeLAN2 Access Point that will assist you and
your reseller or Proxim Technical Support in solving problems. The following diagram
illustrates the software tree:
67
Main Menu
Configuration Menu
Statistics Menu
Status Menu
Dow nload Menu
** R ange LAN 2 75 2x only
D ashed L ine - Visible w he n configured as S tation
Diagnostics Menu
R a d io D ia g no stics M e nu
** R un B ro a d ca st S ite S urve y
** R un D ire cte d S ite S urve y
** R un M a ste r S e a rch To o l
R a d io R O M V e rsio n
Te chnica l S up p o rt P a ra m e te rs
B o o t R O M V e rsio n
F la sh C o d e V e rsio n
P ing IP H o st
** D isco ve r A P s
** D isp la y W ire le ss N e tw o rk Tre e
Reset Access Point
68
Versions
You can read the ROM version of the radio in the RangeLAN2 Access Point. You
can also read the Boot ROM version and Flash Code version.
Technical Support Parameters
If you call Proxim Technical Support, they may ask you to enable the Technical Support Parameters to perform more detailed diagnostics on the unit.
Ping IP Host
From the Diagnostics Menu, you can cause the RangeLAN2 Access Point to Ping any IP
Host on the network.
Discover APs
The RangeLAN2 Access Point will display all RangeLAN2 7510/752x/753x Access
Points, RangeLAN2 754x Extension Points, and all RangeLAN802 Access Points that it
is able to discover and will display configuration information for each discovered unit.
69
Figure 13
Discover APs
Display Wireless Network Tree
The RangeLAN2 Access Point will display the tree of all 7510/752x/753x Access Points
and 754x Extension Points that it is able to discover along with their relationship to one
another, i.e. who is synchronized to whom. Each indentation indicates a hop.
70
The RangeLAN2 Access Point from which the tree is being built will be listed with
asterisks (***) next to its name.
Figure 14
Display Wireless Network Tree
71
Commonly Asked Technical Support Questions
Problem/Symptom/Question
Possible Solution/Answer
Chapter in
User's Guide
Is Access Point fully booted?
The status LED changes from steady yellow to steady green
14
I can't connect to the network from
wireless client.
1. Verify wireless connection using the Site Survey Tool of the
RangeLAN2 752x Access Point or using the client site survey
tool.
2 . Check the Ethernet Statistics to verify there is Ethernet
traffic that the Access Point can detect. If you are using
10BASE-T Ethernet cable, you can also view the Ethernet
LINK light to verify the cable is functional.
3. Verify you are not filtering out the kind of traffic you are
trying to pass.
# 1 - 13
#2-7
#3-6
Are the wrong filters set?
Turn on one of the filters through the Configuration Menu.
Then check the Filter Statistics. If the count is increasing on
the filter you set, that kind of traffic is on the network. If
wireless clients cannot attach to the network after setting this
filter, turn that filter off.
6, 7
I can't ping, telnet, or Web browse
my brand new RangeLAN2 Access
Point.
There is no default IP address. The first time you use it, you
should set an IP address using a terminal and null modem
cable or a BOOTP server.
5
How can I tell which clients are
synchronized to my Access Point?
View the Forwarding Database in the Status Menu. Units on
the wireless side of the Access Point are synchronized to it.
8
I can't configure the Access Point
locally via the serial port.
Verify you are using a null modem cable and that the terminal
is set to 9600 N81.
5
I can't establish a wireless
connection with the Access Point.
Verify that the client is set to the same Domain and Security
ID and that the client is configured as a Station.
6
The throughput seems slow.
1. To achieve maximum throughput, verify your antennas are
well-placed, not behind metal, and there are not too many
obstacles. If you move the antenna closer to the client and
throughput increases, you may want to consider adding a
second Access Point and implementing roaming.
2. Also, you may be able to set filters to filter out Ethernet
traffic from the wireless side of the network.
# 1- 12
#2-6
I am using 2 Access Points to
create a building-to-building
connection. It's not working.
Configure one Access Point as a Master, and the other as a
Station. Disable the Fixed Nodes Filter.
4
The status LED on the Access
Point is steady red.
Call Technical Support
F
72
LED Indicators
There are three LEDs on the front of the RangeLAN2 Access Point:
❑ The cornermost LED, called the Status LED, changes from yellow to green to indicate
it is forwarding packets and functional. It changes from yellow to red if there is a
hardware problem with the unit. If this LED does turn red, contact Proxim Technical Support. The LED will blink yellow if the Access Point has switched to the
Error Domain because the 10BaseT Link Monitor is enabled and cannot detect a
10BaseT Ethernet connection.
❑ The center LED, called the Radio LED, flashes yellow when the Access Point
transmits wirelessly.
❑ The third LED, called the Backbone LED, flashes green when the Access Point
transmits over the Ethernet.
Status LED
Radio LED
Backbone LED
Figure 15
Front Panel LEDs
73
The following table illustrates the state of the LEDs during power-up:
State
Status LED
Radi o LED
Backbone LED
Uni t off
Off
Off
Off
Power-On
D i agnosti cs
Yellow
Off
Off
D i agnosti cs
Fai led
Red
Off
Off
No 10BaseT
Li nk D etected
Bli nk Yellow
Off
Off
Normal
Green
Bli nki ng Yellow
Bli nki ng Green
There are three functional LEDs on the back panel of the RangeLAN2 Access Point:
❑
The cornermost green LED should be on steady when the Access Point is a Master.
❑
The green LED nearest the 10BaseT connector is on steady when a functional
10BaseT cable is plugged in. It will not light if you are using 10Base2 cable.
❑
The third LED is on steady when an Access Point configured as a Station is synchronized to a Master.
10BaseT Link Indicator
Master LED
Synchronized to Master LED
Figure 16
Back Panel LEDs
74
A. Menu Structure
C onfiguration Menu
TC P/IP C onfiguration Menu
IP A d d re s s
S ub ne t M a s k
D e fa ult G a te w a y A d d re s s
S e nd B O O TP a t B o o t Tim e
B O O TP S e rve r (0 .0 .0 .0 fo r B ro a d c a s t)
Te lne t A cc e ss
Te lne t P a s s w o rd
** B ro w s e r M a na g e m e nt
** B ro w se r Us e r N a m e
** B ro w s e r P a s s w o rd
F ilte r IP X P a c k e ts
F ilte r N e tB E U I P a c k e ts
Filter C onfiguration Men u
F ilte r F ixe d N o d e s
F ilte r IP P a c ke ts
F ilte r A p p le Ta lk P a ck e ts
F ilte r D E C N e t P a cke ts
F ilte r O the r P a c k e ts
F ilte r IP X R IP B ro a d c a s t P a c k e ts
F ilte r IP X S A P B ro a d c a s t P a c k e ts
F ilte r IP X L S P B ro a d c a s t P a c k e ts
F ilte r A R P B ro a d c a s t P a c k e ts
A R P F ilte r N e two rk A d d re s s
A R P F ilte r S ub ne t M a s k
F ilte r M A C M ultic a s t P a c k e ts
M A C F ilte r A d d re s s
M A C F ilte r S ub ne t M a s k
B ro a d ca st B a nd w id th A llo ca tio n %
B ridge C onfiguration Menu
A g ing P e rio d (se c o nd s)
** F o rw a rd ing D B U s a g e Tra p Thre s ho ld (% )
R adio C onfiguration Menu
R a d io P o rt A d m inistra tive S ta tus
C o nfig ure d D o m a in
C o nfig ure d C ha nne l
C o nfig ure d S ub cha nne l
C o nfig ure d S ta tio n Typ e
C o nfig ure d F irst M a s te r T o S ync To
C o nfig ure d M a s te r N a m e
C o nfig ure d E rro r D o m a in
R e p e a ting E na b le d
D e la y R a d io R e co nfig ure
Ro a m C o nfig
R o a m ing E na b le d
M A C O p tim ize
** N o Tra ffic Tra p P e rio d (s e co nd s)
** R a d io Tra ffic Tra p Thre s ho ld (% )
** R a d io B ro a d c a s t Tra p T hre s ho ld (% )
S e t S e c urity ID
R e s e t R a d io
Ethernet Configuration Menu
1 0 B a se T L ink M o nito r
E the rne t P o rt A d m inistra tive S ta tus
** Authoriz ation Tab le C onfiguration Menu
** SNMP C onfiguration Menu
** U pload C onfiguration Menu
+ R eset Access Point to Factory D efaults
D ump C onfiguration to Screen
Statistics Menu
** R angeLAN2 752x only
+ Not Accessible via Telnet
Status Menu
Dotted Line - Visible w hen configured as M aster
D ow nload Menu
Dashed Line - Visible w hen configured as Station
D iagnostics Menu
R eset Access Poin t
75
Configuration Menu
TC P/IP C onfiguration Menu
Filter Configuration Menu
B ridge Configuration Menu
R adio C onfiguration Menu
E thernet C onfiguration Menu
** Authoriz ation Table C onfiguration Menu
A uthorizatio n Tab le
A uthorizatio n Tab le Usa ge Op tion
E na ble /D isab le Una uthorize d A d dr. Trap
A P A uthorizatio n C o nfig. D o wnlo ad Tab le
Up da te A utho rization C o nfig . of A ll A P s
** SN MP C onfiguration Menu
E na ble/D isab le S N M P
Re ad -Only S N M P C o m m unity
Rea d-O nly S NM P M anag er IP A dd ress
Rea d/W rite S NM P C om m unity
Re ad /W rite S NM P M ana ge r IP A dd ress
S N M P Trap C o m m unity
Trap Ta rg et A dd ress
E nab le /D is ab le A uthenticatio n Trap s
** Upload Configuration Menu
Up lo ad A P C onfigura tion D ata using F TP
A cce pt Up lo ad Re quests from O the r A P s
+ R eset Access P oint to Factory D efaults
** R ange
LA N2 752x only
D ump C onfiguration to Screen
+ No t A ccessible via Te lnet
Statistics Menu
Status Menu
* * R a ngeLA N2 75 2x only
+ Not A ccessible via T elnet
Dow nload Menu
Diagnostics Menu
Reset Access Point
76
Main Menu
Configuration Menu
Statistics Menu
Radio Statistics Menu
S uc ce ss ful Rx D a ta P a c k e ts
S uc c e s s ful Tx D a ta P a c k e ts
Ethernet Statistics Menu
R x S uc c e s sful P a c ke ts
R x S uc c e s s ful B yte s
R x E rro r P a c ke ts
R x A lig nm e nt E rro r P a c k e ts
R x C R C E rro r P a ck e ts
R x F ra m e To o L o ng P a c k e ts
R x B a d P a c ke ts
R x Inte rna l M A C E rro rs
Tx S ucc e s s ful P a c k e ts
Tx S uc ce s s ful B yte s
Tx E rro r P a c k e ts
Tx S ing le C o llis io n P a c ke ts
Tx M ultip le C o llis io n P a c ke ts
Tx L a te C o llis io n P a c k e ts
Tx E xc e s sive C o llisio n P a c ke ts
Tx D e fe rre d P a c ke ts
Tx C a rrie r S e ns e E rro rs
Tx Inte rna l M A C E rro rs
Bridge Statistics Menu
E the rne t C a c he F ilte r C o unt
W ire le s s C a che F ilte r C o unt
C urre nt F o rw a rd ing D a ta b a s e U s a g e (% )
Filter Statistics Menu
IP P a c k e t F ilte r C o unt
IP X P a c k e t F ilte r C o unt
N e tB E U I P a c k e t F ilte r C o unt
A p p le Ta lk P a ck e t F ilte r C o unt
D E C N e t P a c ke t F ilte r C o unt
O the r P a c ke ts F ilte r C o unt
IP X R IP B ro a d c a s t P a c k e t F ilte r C o unt
IP X S A P B ro a d c a s t P a c k e t F ilte r C o unt
IP X L S P B ro a d c a s t P a c k e t F ilte r C o unt
A R P B ro a d c a s t F ilte r C o unt
B ro a d c a st B a nd w id th F ilte r C o unt
M A C M ultic a s t F ilte r C o unt
F ixe d N o d e A d d re s s F ilte r C o unt
Reset Statistics
Status Menu
Download Menu
Diagnostics Menu
Reset Access Point
77
Main Menu
C onfiguration Menu
Statistics Menu
Status Menu
R adio Status Menu
C urrent D om ain
C urrent C hannel
C urrent S ubchannel
C urrent S tation Type
C urrent M aster Nam e
C urrent S ynced-To M aster Nam e
C urrent F irst S ync-To M aster
C urrent Roam C onfig
C urrent Roam ing E nabled
C urrent Repeating S tatus
C urrent M A C Optim ize
** Radio Traffic Level (% )
** Radio B roadcast Level (% )
Radio ROM V ersion
Reset Required for Reconfiguration
** Last Unauthorized A ddress
Num ber of Radio S tations C onnected
B ridge Status Menu
B ridge A ddress
TCP/IP Status Menu
C urrent IP A ddress
C urrent S ubnet M ask
C urrent D efault Gateway A ddress
Forw arding Database Table
D ow nload Menu
D iagnostics Menu
R eset Access Point
** RangeLAN2 752x only
Dotted Line - Visible w hen configured as M aster
Dashed Line - Visible w hen configured as Station
78
Main Menu
Configuration Menu
Statistics Menu
Status Menu
Dow nload Menu
** D o wnlo a d A P Im a g e U sing X -M o d e m
^^ D o wnlo a d A P Im a g e U sing TF TP
D o wnlo a d A P Im a g e U sing F TP
A cce p t D o w nlo a d s fro m O the r A P s
^^ A P Im a g e D o wnlo a d Ta b le
^^ Up d a te Im a g e s o f A ll A P s
^^ U p d a te Im a g e s o f S e le cte d A P s
^^U p d a te Im a g e o f a S p e cific A P
Diagnostics Menu
Reset Access Point
** O nly visib le whe n co nfig uring via se ria l
^^ R a ng e L A N2 7 5 2 x o nly
79
Main Menu
Configuration Menu
Statistics Menu
Status Menu
Dow nload Menu
** R angeLAN 2 752x only
D ashed Line - Visible w hen configured as S tation
Diagnostics Menu
R a d io D ia g no stics M e nu
** Run B ro a d ca st S ite S urve y
** R un D ire cte d S ite S urve y
** Run M a ste r S e a rch To o l
Ra d io RO M V e rsio n
Te chnica l S up p o rt P a ra m e te rs
B o o t RO M V e rsio n
F la sh C o d e V e rsio n
P ing IP Ho st
** D isco ve r A P s
** D isp la y W ire le ss Ne two rk Tre e
Reset Access Point
80
B. Download Menu
At some point in the future, you may need to upgrade the RangeLAN2 Access Point
software. To do this, choose the Download Menu option. Then you can choose to
download a new image. When configuring the RangeLAN2 Access Point through the
serial port you may download using Xmodem, TFTP, or FTP. When configuring
through the Ethernet, you will not have the Xmodem option. The following diagram
illustrates the software tree:
Main Menu
Configuration Menu
Statistics Menu
Status Menu
Dow nload Menu
** D ow nlo a d A P Im a g e Using X -M od e m
^^ D o w nlo a d A P Im a g e Using TF TP
D o wnlo a d A P Im a g e Using F TP
A cce pt D o w nlo a ds fro m O ther A P s
^^ A P Im a g e D o wnlo ad Ta b le
^^ U pd a te Im a g es of A ll A P s
^^ Up d a te Im a g es of S ele cte d A P s
^^Up d ate Im a g e o f a S pe cific A P
Diagnostics Menu
Reset Access Point
** O nly visib le w hen config uring via se rial
^^ Ra nge L A N 2 7 52 x only
81
The steps for downloading a new image are:
1. Choose a method of download (Xmodem, TFTP, FTP) and place the image file
on that hard drive, floppy diskette, server, etc.
When performing an Xmodem download, use the Xmodem or Xmodem CRC
protocols.
2. Bring up the menu on the Access Point via a terminal with a null modem cable
or a telnet session.
3. Choose the Download Menu off the Main Menu.
4. Choose the Download type, i.e. Download AP Image Using Xmodem, etc.
5. If you are downloading the image from an FTP or TFTP server, answer the onscreen prompts for server IP address, username, etc. If you are downloading the
image via a terminal with a null modem cable, select the terminal program's
Transfer Menu and send the new image to the Access Point using Xmodem or
Xmodem CRC when a series of "C"s begins to appear on the bottom of the
session screen.
6. When download is successful, the Access Point will automatically reboot and
load the new image.
The RangeLAN2 725x Access Point also has the ability to update other Access Points'
software on the Ethernet segment. You can choose to Update Images of All APs or
Update Images of Selected APs. In these two cases, the Access Point will first discover other Access Points on the Ethernet segment. The difference between these two
options is the ability to exclude certain units from receiving the new image. If you know
the IP address of a specific Access Point that you would like to update, choose the
Update Image of a Specific AP option and provide the IP address when prompted. If
you do not want an Access Point to receive an updated image, disable the Accept
Downloads from Other APs parameter.
To view the status of downloads on other Access Points, see the Access Point Download
Table.
82
C. Glossary
Access Point — An internetworking device that seamlessly connects wired and wireless
networks together.
Bandwidth — The size (in Hertz) of the frequency range that a signal transmission occupies.
Typical narrow band signals occupy a 25 KHz bandwidth. The RangeLAN2 signal occupies
a 1 MHz bandwidth.
BOOTP (Bootstrap Protocol) — A protocol used to assign IP addresses.
Channel — In RangeLAN2 networks, the channel refers to the frequency hopping sequence
the radio follows.
CSMA/CA — (Carrier Sense Multiple Access/Collision Avoidance) — CSMA is a protocol in which each node senses whether or not a channel is in use before attempting to transmit
information. CA is an optimization by which channel time is reserved to avoid collisions.
Download Image — A software file that is used to upgrade the software code running on
the RangeLAN2 Access Point.
Frequency Hopping — A spread spectrum technique by which the band is divided into
a number of channels and the transmissions hop from channel to channel in a pre-specified sequence.
Interference — A situation that occurs when an unwanted RF signal occupies the same
frequency band as a desired signal.
IP Address (Internet protocol address) — A 32-bit address assigned to TCP/IP hosts.
Narrow Band — A channel of about 25 KHz bandwidth in the RF spectrum. The
FCC allocates Narrow Band channels and issues a license to the user. Each user of a
specific narrow band frequency range must obtain a site license from the FCC.
83
Spread Spectrum — A radio data transmission modulation technique by which the
transmitted signal is spread over a bandwidth wider than the information bandwidth.
Spread Spectrum bands are designated by the FCC and require no user license.
SNMP ( Simple Network Management Protocol) — A protocol used to manage
network nodes.
TCP/IP — Transmission Control Protocol / Internet Protocol. A suite of protocols developed under DARPA sponsorship for internetworking.
84
D. Parameters
TCP/IP Parameters
Parameter Name
Range
Default
IP Address
-
0.0.0.0
Subnet Mask
-
0.0.0.0
Default Gateway
Address
-
0.0.0.0
Send BOOTP at Boot
Time
True/False
True
BOOTP Server
Address
-
0.0.0.0 *
Telnet Access
Enabled/Disabled
Enabled
Telnet Password
10 characters
-
^ Browser Management
Enabled/Disabled
Enabled
^ Browser User Name
10 characters
-
^ Browser Password
10 characters
-
^ RangeLAN2 752x
Access Point only
* 0.0.0.0 is used to
send a broadcast
85
Filter Parameters
Parame te r Name
Rang e
De fault
Filte r Fixe d No d e s
Filte ring /No t Filte ring
Filte ring
Filte r IP Packe ts
Filte ring /No t Filte ring
No t Filte ring
Filte r IPX Packe ts
Filte ring /No t Filte ring
No t Filte ring
Filte r Ne tBEUI Packe ts
Filte ring /No t Filte ring
No t Filte ring
Filte r Ap p le Talk Packe ts
Filte ring /No t Filte ring
Filte ring
Filte r DECNe t Packe ts
Filte ring /No t Filte ring
No t Filte ring
Filte r Othe r Packe ts
Filte ring /No t Filte ring
No t Filte ring
Filte r IPX RIP Bro ad cast
Packe ts
Filte ring /No t Filte ring
Filte ring
Filte r IPX SAP
Bro ad cast Packe ts
Filte ring /No t Filte ring
Filte ring
Filte r IPX LSP
Bro ad cast Packe ts
Filte ring /No t Filte ring
Filte ring
Filte r ARP Bro ad cast
Packe ts
Filte ring /No t Filte ring
No t Filte ring
ARP Filte r Ne two rk
Ad d re ss
-
0.0.0.0
ARP Filte r Sub ne t Mask
-
0.0.0.0
Filte r MAC Multicast
Packe ts
Filte ring /No t Filte ring
No t Filte ring
MAC Filte r Ad d re ss
-
01:00:00:00:00:00
MAC Filte r Sub ne t Mask
-
00:00:00:00:00:00
Bro ad cast Band wid th
Allo catio n %
0-100
80
86
Radio Parameters
Parameter Name
Range
Default
Radio Port
Administrative Status
Enabled/Disabled
Enabled
Domain
0-15
0
& Channel
1-15
1
& Subchannel
1-15
1
Station Type
Master/Station
Master
^ First Master To Sync To
11 characters
blank
& Master Name
11 characters
MASTER
& Error Domain
0-15
13
& Repeating Enabled
True/False
False
Delay Radio Reconfigure
True/False
False
^ Roam Config
Slow/Normal/Fast
Normal
^ Roaming Enabled
True/False
True
& MAC Optimize
Auto, Very Light, Light,
Normal
Auto
+& No Traffic Trap Period
(seconds)
0-10,000,000
0
+& Radio Traffic Trap
Threshold (%)
10-100
100 *
+& Radio Broadcast Trap
Threshold (%)
10-100
100 *
Security ID
0-20 characters
blank
+ RangeLAN2 752x
AccessPoint Only
^ Only visible when
configured as Station
* a value of
100 disables
this trap
& Only visible
when
configured as
Master
87
Bridge Parameters
Parameter Name
Range
Default
Aging Period (seconds)
10-1,000,000
300
* Forwarding DB Usage Trap Threshold
0-100 (%)
100
* RangeLAN2 752x Access Point Only
Ethernet Parameters
Parameter Name
Range
Default
10BaseT Link Monitor
Enabled/Disabled
Disabled
Ethernet Port Administrative Status
Enabled/Disabled
Enabled
88
E. U.S. Specifications
The following technical specification is for reference purposes only. Actual
product's performance and compliance with local telecommunications regulations
may vary from country to country. Proxim, Inc. will only ship products that are
type approved in the destination country.
Network Interfaces
Ethernet 10Base2 (Thin) BNC
Ethernet 10BaseT (Twisted-Pair)
Data Rate
1.6 Mbps —RangeLAN2
10 Mbps — Ethernet
Media Access Protocol
RangeLAN2 CSMA/CA
Ethernet compatibility
Ethernet packet types and Ethernet Addressing
Frequency Band
2.4-2.5 GHz Worldwide (Depends on country)
(spread spectrum frequency hopping)
Independent Channels
15
Output Power
100 mW or 500 mW (Depends on country)
ETSI Testing
For purposes of ETS 300 328 type testing, the
RangeLAN2 Access Point was tested over a temperature
range of -20 C to +55 C.
Operating Temperature
-20 C to +60 C
UL Listed Power Supply
The RangeLAN2 Access Point requires an external power
supply. If you have elected not to purchase the external
power supply from Proxim or need a replacement, you must
use only a UL listed, Class 2 power supply, rated min. 1A at
12VDC.
89
F. How to Reach Technical Support
If you’re having a problem using RangeLAN2 Access Point and can’t resolve it with the
information in Chapter 14, gather the following information and contact Proxim
Technical Support:
❑ What kind of network are you using?
❑ What were you doing when the error occurred?
❑ What error message did you see?
❑ Can you reproduce the problem?
❑ What version of the RangeLAN2 Access Point firmware and software are you
using?
You can reach Proxim Technical Support by voice, fax, email, or mail:
Tel:
Fax:
Web:
Email:
800-477-6946 or 408-731-2640
408-731-3676
http://www.proxim.com
[email protected]
Proxim, Inc.
Attn: Technical Support
510 DeGuigne Drive
Sunnyvale, CA 94086
90
Index
10BaseT Link Monitor 31–32, 35, 73
A
Accept Downloads from Other APs 82
Access Point Download Table 82
Ad Hoc 13
Aging Period 31, 43
Antenna
Installation 7
AP Authorization Config. Download Table 57
ARP Filter Network Address. See Filter: ARP Network Address
ARP Filter Subnet Mask. See Filter: ARP Subnet Mask
Authentication Traps 47
Authorization 48
Authorization Table 38, 57
Authorization Table Usage Option 57
B
Boot ROM
Version 69
BOOTP 28, 49, 83
Bridge Address 43
Broadcast Bandwidth Allocation 30
Broadcast Threshold 48
Browser
Management 28, 49
Password 28, 49
User Name 28, 49
C
Cache Table High Usage 48
Channel 34, 42
Cold Start 47
Community
Read-Only SNMP 46
Read/Write SNMP 47
SNMP Trap 47
Components 4
91
Configuration 21
Local 21, 22
Modem 22
Remote 22
Telnet 4, 22
Terminal 4, 21
D
Default Gateway 28, 43
Delay Radio Reconfigure 36, 37
Discover APs/WBAPs 69
Display Wireless Network Tree 70
Domain 35
Download Table. See Access Point Download Table
Dump Configuration to Screen 38
E
Enable/Disable SNMP 46
Error Domain 32, 35, 73
F
Filter
ARP Network Address 30
ARP Subnet Mask 30
Fixed Nodes 30
IPX Broadcast 30
MAC Multicast Packets 30
Protocol Type 30
First Master To Sync To 35, 36
First Sync-To 42
Fixed Nodes Filter. See Filter: Fixed Nodes
Flash Code
Version 69
Forwarding Database Table 43
Forwarding DB Usage Trap Threshold 31
I
Infrastructure 14
Installation
Ethernet 9
IP Address 27, 43
IPX Broadcast Filters. See Filter: IPX Broadcast
92
L
Last Unauthorized Address 42
LEDs 73
Link Down 47
Link Quality 61
Link Up 47
M
MAC
Address 61
MAC Filter Address. See Filter: MAC Multicast Packets
MAC Filter Subnet Mask. See Filter: MAC Multicast Packets
MAC Optimize 37, 42
Manager IP Address
Read-Only SNMP 46
Read/Write SNMP 47
Master 34, 42
Name 35
Master Search Tool 65
Menu
Bridge Configuration 31
Bridge Statistics 40
Bridge Status 43
Configuration 75
Diagnostics 67, 80
Download 79, 81
Ethernet Configuration 31
Ethernet Statistics 40
Filter Configuration 28
Filter Statistics 40
Main 23, 25
Radio Configuration 33
Radio Diagnostics 61
Radio Statistics 40
Radio Status 42
Statistics 39
Status 41
MIB 24, 32, 34, 46
Microsoft Internet Explorer 49
Microwave Oven 59
Mount
Cubicle 11–12
Wall 9–10
93
N
Netscape
Navigator 49
Network Map 52
No Traffic 48
No Traffic Trap Period. See Trap: No Traffic Period
Null modem 21
Number of Radio Stations Connected 43
P
Ping
IP Host 69
Protocol Type Filters. See Filter: Protocol Type
R
Radio Broadcast Level 42
Radio Broadcast Trap Threshold 48. See Trap: Radio Broadcast Threshold
Radio High Usage 48
Radio ROM version 42
Radio Traffic Level 42
Radio Traffic Trap Threshold 48. See Trap: Radio Traffic Threshold
Range 59–60
RangeLAN2
7100 2
7400 2
753x 2
Access Point 18
Ethernet Adapter 2
Extension Point 2, 18
Family 2
Serial Adapter 2
Read-Only SNMP Community. See Community: Read-Only SNMP
Read-Only SNMP Manager IP Address. See Manager IP Address: Read-Only SNMP
Read/Write SNMP Community. See Community: Read/Write SNMP
Read/Write SNMP Manager IP Address. See Manager IP Address: Read/Write SNMP
Repeating 18–19
Requirements 4
Reset Access Point to Factory Defaults 38
Reset Radio 37
Reset Required for Reconfiguration 42
Reset Statistics 40
Roam Config 36–37
94
Roaming 14–18, 36, 42
ROM
Version 69
Run Broadcast Site Survey 61
Run Directed Site Survey 63
S
Second Master To Sync To 35, 36
Second Sync-To 42
Security ID 37
Serial Port Down 48
Site Survey 61
SNMP 24, 38, 42, 45, 84
SNMP Trap Community. See Community: SNMP Trap
Station 34, 42
Station Type 34
Subchannel 35, 42
Subnet Mask 27, 43
Synced-To Master Name 42
T
Technical Support 4, 69, 90
Telnet. See Configuration: Telnet
Access 28
Password 28
Terminal. See Configuration: Terminal
Third Master To Sync To 35, 36
Third Sync-To 42
Token Ring 2
Traffic Monitor 52
Trap
Enterprise Specific 48
MIB II 47
No Traffic Period 37
Radio Broadcast Threshold 37
Radio Traffic Threshold 37
Trap Target Address 47
U
Unauthorized Usage Trap 48
Update Authorization Config. of All APs
57
95
Update Image of a Specific AP 82
Update Images of All APs 82
Update Images of Selected APs 82
Upload Configuration to FTP Server
38
W
Web
Browser 28
Wireless Node Management 54–57
96