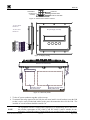
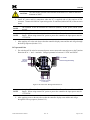
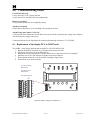
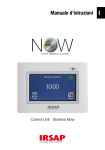
1
Model X40-08-N4X, Model X40-32-N4X Model X40-32-N1P, Model X40-32-N7 Integrated Alarm and Control System In tegrate d Alarm & C ontrol Sys te m Operator’s Installation and Instruction Manual Covers all Model X40 Control Systems DETCON, Inc. 4055 Technology Forest Blvd., The Woodlands, Texas 77381 Ph.713.559.9200 / Fax 281.298.2868 www.detcon.com January 5, 2015• Document #3672 • Revision 3.4 Model X40 This page left intentionally blank Shipping Address: 4055 Technology Forest Blvd., The Woodlands Texas 77381 Mailing Address: P.O. Box 8067, The Woodlands Texas 77387-8067 Phone: 713.559.9200 • Fax: 281.292.2860 • www.detcon.com • [email protected] Model X40 Instruction Manual Rev. 3.4 ii Model X40 Table of Contents 1.0 Introduction........................................................................................................................................1 1.1 1.2 1.3 1.4 1.5 1.6 1.7 1.8 1.9 Features .......................................................................................................................................................... 1 LCD Main Display Function .......................................................................................................................... 2 Modbus™ Communication ............................................................................................................................ 2 Secure Digital Card (SD Card)....................................................................................................................... 2 I/O Modules and Connections ........................................................................................................................ 2 Enclosure Types ............................................................................................................................................. 4 Alarms and Fault Condition ........................................................................................................................... 5 System Operation ........................................................................................................................................... 6 Operator Interface........................................................................................................................................... 7 1.9.1 1.9.2 1.10 Magnetic Programming Tool...................................................................................................8 Front Panel User Interface......................................................................................................8 Main Display Functions ................................................................................................................................. 9 1.10.1 1.10.2 1.10.3 1.10.4 1.11 1.12 1.13 2.0 Sensor Group ...........................................................................................................................9 Transceiver Group...................................................................................................................9 RL4/Alarm Stations Group ....................................................................................................10 AO-4 Group ...........................................................................................................................10 Menu Function ............................................................................................................................................. 10 Optional Remote Alarm Reset/Acknowledge Switch .................................................................................. 11 Wireless Option............................................................................................................................................ 12 Installation........................................................................................................................................13 2.1 2.2 2.3 2.4 Safety Guidelines ......................................................................................................................................... 13 N1P and N1R Enclosure Installation............................................................................................................ 13 N4X Enclosure Installation .......................................................................................................................... 16 N7 Enclosure Installation ............................................................................................................................. 21 2.4.1 NEMA7 units with RXT-320 Transceiver ..............................................................................24 3.0 I/O Connections ...............................................................................................................................28 3.1 3.2 3.3 3.4 3.5 3.6 3.7 3.8 3.9 3.10 3.11 3.12 4.0 5.0 I/O Module Installation ................................................................................................................................ 28 Analog 4-20mA Sensor Inputs (DA-4) ........................................................................................................ 29 Dry Contact Inputs (DI-4) ............................................................................................................................ 30 Analog 4-20mA Outputs (AO-4).................................................................................................................. 31 Alarm Relay Outputs (RL-4)........................................................................................................................ 33 RS-485 Serial Gas Sensors........................................................................................................................... 34 Wireless RXT-320 Modbus™ Devices and CXT-320 Sensors.................................................................... 35 RXT-320 Wireless transceiver Analog Inputs.............................................................................................. 35 SmartWireless® CXT Sentinel Slave Controller ......................................................................................... 36 SmartWireless® CX Sentinel Sensor Station............................................................................................... 38 General Installation Wiring Notes................................................................................................................ 39 Initial Start-Up.............................................................................................................................................. 39 Secure Digital Card .........................................................................................................................40 System Configuration......................................................................................................................41 5.1 5.2 5.2.1 5.2.2 5.2.3 5.2.4 5.2.5 5.2.6 5.2.7 5.2.8 X40 Controller Setup.................................................................................................................................... 41 Menu Functions............................................................................................................................................ 41 Auto Configure System...........................................................................................................41 Setup Channel Data...............................................................................................................42 Set Channel Alarms ...............................................................................................................43 Set Relay (Alarm) Functions..................................................................................................44 Inhibit and Alarm Test Mode .................................................................................................45 System Diagnostics ................................................................................................................45 Time and Date........................................................................................................................46 View TWA and Peak ..............................................................................................................47 Model X40 Instruction Manual Rev. 3.4 iii Model X40 6.0 Modbus™ Slave Communications Port.........................................................................................48 6.1 7.0 8.0 Modbus™ Register Map............................................................................................................................... 48 Remote Alarm Reset/Acknowledge Switch Installation ...............................................................50 Troubleshooting Guide....................................................................................................................51 8.1 8.2 9.0 10.0 11.0 Replacement of the display PCA in NEM7 units ......................................................................................... 51 Replacement of the NEMA 4 Drop-In Display Assembly............................................................................ 52 Customer Support and Service Policy ...........................................................................................53 Warranty Notice ..............................................................................................................................54 Appendix...........................................................................................................................................55 11.1 11.2 11.3 Specifications................................................................................................................................................ 55 Hexadecimal Table ....................................................................................................................................... 56 Utilities ......................................................................................................................................................... 57 11.3.1 11.3.2 11.3.3 11.3.4 11.3.5 11.3.6 11.3.7 11.3.8 11.3.9 11.4 11.5 Set Channel Data ...................................................................................................................57 Set RF Silence and RF Sleep (Wireless Function Only) ........................................................59 Set Low Battery Alarms .........................................................................................................59 Set Modbus™ Address...........................................................................................................60 CXT Low Battery Threshold ..................................................................................................60 Module Update Interval.........................................................................................................60 Set COMM Baud Rates ..........................................................................................................60 Set Modbus™ Timeouts .........................................................................................................61 Display Settings .....................................................................................................................61 Spare Parts and Wireless Accessories........................................................................................................... 63 Revision Log................................................................................................................................................. 64 Table of Figures Figure 1 Model X40-N4X Controller ..............................................................................................................1 Figure 2 Menu Flow Chart...............................................................................................................................7 Figure 3 Magnetic Programming Tool ............................................................................................................8 Figure 4 Front Panel User Interface.................................................................................................................8 Figure 5 Radio Module..................................................................................................................................12 Figure 6 N1P Controller Mounting and Dimensional View..........................................................................14 Figure 7 N1P RS-485 Port Connections ........................................................................................................15 Figure 8 X40-08-N4X Controller Mounting and Dimensional View............................................................16 Figure 9 X40-32-N4X Controller Mounting and Dimensional View............................................................17 Figure 10 N4X Protective Earth Connector...................................................................................................18 Figure 11 Display Wiring ..............................................................................................................................18 Figure 12 Cable Entry Points.........................................................................................................................18 Figure 13 N4X AC/DC Inputs .......................................................................................................................19 Figure 14 N4X RS-485 Master Port Connections .........................................................................................19 Figure 15 N4X RS-485 Slave Port Connections............................................................................................20 Figure 16 N4X Antenna Connector ...............................................................................................................20 Figure 17 N7 Controller Mounting and Dimensional View ..........................................................................21 Figure 18 N7 Controller PCA........................................................................................................................22 Figure 19 N7 Controller Assembly w/Mounting Plate ..................................................................................22 Figure 20 N7 AC/DC Converter Board Wiring.............................................................................................23 Figure 21 N7 DC Power Wiring ....................................................................................................................24 Figure 22 Typical NEMA7 with Transceiver ................................................................................................25 Figure 23 Model 100 Terminal Board ...........................................................................................................25 Model X40 Instruction Manual Rev. 3.4 iv Model X40 Figure 24 Model 100 Terminal Board Rotary Switches................................................................................26 Figure 25 N7 AC/DC Converter Board Wiring with Transceiver.................................................................26 Figure 26 N7 DC Power Wiring with Transceiver ........................................................................................27 Figure 27 I/O Module Installation .................................................................................................................28 Figure 28 Model DA-4 4-20mA Input Module and 4-20mA Gas Sensor Connections ................................29 Figure 29 Model DA-4 4-20mA Input Module and 4-20mA Gas Sensors....................................................30 Figure 30 Model DI-4 Contact Input Module................................................................................................31 Figure 31 Model AO-4 4-20mA Output Module...........................................................................................32 Figure 32 Model RL-4 Relay Output Module ...............................................................................................33 Figure 33 Modbus™ Gas Sensor Connections..............................................................................................35 Figure 34 CXT Wireless Transceiver ............................................................................................................37 Figure 35 CXT Relay Output PCA................................................................................................................37 Figure 36 CXT Analog Input PCA ................................................................................................................37 Figure 34 N1P & N4X Remote Switch Input ................................................................................................50 Figure 35 N7 Remote Switch Input ...............................................................................................................50 Figure 36 Detcon C1D1 Switch Connections................................................................................................50 Figure 37 NEMA 7 Display Assembly PCA .................................................................................................51 Figure 38 NEMA 4 Drop-In Display Assembly............................................................................................52 List of Tables Table 1 X40 Model 100 Terminal Board Connector Plugs ...........................................................................25 Table 2 AO-4 Modbus™ Addresses..............................................................................................................32 Table 3 RL-4 Relay Modbus™ Addresses ....................................................................................................34 Table 4 X40 Register Map.............................................................................................................................48 Model X40 Instruction Manual Rev. 3.4 v Model X40 This page left intentionally blank Shipping Address: 4055 Technology Forest Blvd., The Woodlands Texas 77381 Mailing Address: P.O. Box 8067, The Woodlands Texas 77387-8067 Phone: 713.559.9200 • Fax: 281.292.2860 • www.detcon.com • [email protected] Model X40 Instruction Manual Rev. 3.4 vi Model X40 1.0 Introduction 1.1 Features The Detcon X40 controller (Figure 1) is a multi-channel gas detection control system. The X40 serves as a host monitor/controller for a network of gas detection sensors and various other field devices. The controller offers a non-intrusive magnetic interface with backlit LCD display and Modbus™ technology that supports either wireless or a hard wire sensor connection. The X40 is equipped with an auto configure feature to automatically search the Modbus™ addresses for various Detcon equipment associated with the controller and adds the equipment to the controller without user intervention. Remote mounted gas detection sensors include any analog 4-20mA or RS-485 (Modbus™) serial devices such as; toxic gas, combustible gas, or oxygen deficiency sensors. Remote field devices include contact closure inputs such as: liquid level, temperature, pressure, or smoke detection devices. Integrated Alarm & Control System Figure 1 Model X40-N4X Controller Model X40 Instruction Manual Rev. 3.4 Page 1 of 65 Model X40 1.2 LCD Main Display Function The main display is an 11/4" x 6" backlit LCD that is four lines by forty characters and displays up to eight configured channels at one time. The four internal magnetic switches are located above the backlit LCD display and offer basic navigation for a complete configuration of the controller (Section 5.1). Real time sensor status includes: channel number gas concentration, device tag (gas type) alarm/fault status. Each channel displays the current status of three alarm levels and a fault condition on the front panel LED indicators. 1.3 Modbus™ Communication The controller uses the RS-485 Modbus™ RTU protocol to communicate with RS-485 serial sensors and I/O modules. A secondary Modbus™ port is addressable by a PLC, PC/HMI, DCS or other Modbus™ RTU master-polling devices. Primary Modbus™ Interface (COMM1 Master) Uses two-wire half duplex RS-485, 9600 baud, 8 data bits, 1 stop bit, no parity. Communicates directly with Modbus™ capable sensors and Detconꞌs independently addressable I/O modules that operate on 11.530VDC. Secondary Modbus™ Interface (COMM2 Slave) The Modbus™ slave interface communicates with the remote display or an additional controller. 1.4 Secure Digital Card (SD Card) The X40 controller allows data logging when an SD memory card is installed. The card must be installed on the back of the PCA (printed circuit assembly) before the controller is powered up. The controller will automatically format the card (Section 4.0) and create the necessary files for data logging. NOTE Data logging does not occur during the first 10 minutes after power-up of the unit. This delay allows the sensors time to stabilize, so that inaccurate or faulty readings will not be logged during this stabilization period. 1.5 I/O Modules and Connections A maximum of 32 sensor channels are configurable for the X40 models and are customizable using Detconꞌs I/O modules. Accommodation for the I/O modules relies on the type of enclosure utilized. Seamless system expansion is accomplished through DIN rail mounted and stackable modules. The modules communicate with the controller using Modbus™ technology and are available in four types; 4-20mA inputs dry contact inputs 4-20mA outputs relay outputs. Model X40 Instruction Manual Rev. 3.4 Page 2 of 65 Model X40 The analog sensors and analog field devices interfaced to the I/O modules communicate with the COMM1 Modbus™ master port on the X40 controller via the I/O Module. Serial sensors interface directly with the COMM1 port and do not require I/O modules. The types of sensors/field devices interfaced will dictate the I/O modules required for the X40 controller. Configuration inputs are completely field-configurable providing a distinctive combination of flexibility and expansion for the customer. I/O modules are factory installed unless specifically instructed otherwise. The number of I/O modules that can be installed in the X40 enclosure is dictated by the enclosure due to physical space limitations. Additional I/O modules in excess of the maximum allowed for each enclosure must be mounted in a separate enclosure by the customer. The module limits for each enclosure varies dependent on the type of enclosure, and the set-up of the particular unit. The typical limitations are as follows: • X40-32-N1P enclosure - maximum of two I/O modules (Mounted on the back, outside) • X40-08-N4X enclosure - maximum of six I/O modules inside • X40-32-N4X enclosure - maximum of twelve I/O modules inside • X40-32-N7 enclosure - does not accommodate module installations The X40 controller can be configured for various I/O module combinations at the Detcon factory. Customer application/site specific information must be provided on the Configuration Form. Information provided is verified for correct quantity and type of I/O modules to support application/site requirements. The customer should supply the following site specific information: 1. 2. 3. 4. 5. 6. 7. NOTE Number of gas/sensor channels. Detcon sensor model number and I/O type (Modbus™ or 4-20mA) for each channel. Range, units, and gas type for each channel. Alarm level(s) for each gas channel. Device Tag for each channel. Assignment and set-up information for each relay contact. Analog output requirements for each channel. The set-up configuration is executed by the user in the field (Section 5.0). Modifications to are expected to take place on site due to requirement changes and/or system expansions. Detcon I/O Modules (Purchased Separately) Analog 4-20mA Sensor Inputs (DA-4) • Provides power to any two or three wire field sensors • Receives standard 4-20mA signal outputs from the sensors • Four 4-20mA inputs to support up to four sensors • Uses RS-485 Modbus™ RTU protocol to communicate with the controller and must have a unique Modbus™ address set between 01 and 7Fh. Dry Contact Inputs (DI-4) • Relay contact outputs from field devices can be connected • Four relay contact inputs • Can be installed on the DIN rail of the controller • Uses RS-485 Modbus™ RTU protocol to communicate the state of the contact outputs from field devices and must have a unique Modbus™ address set between 01 and 7Fh. Analog 4-20mA Outputs (AO-4) • Provide a 4-20mA output equal to the current concentration reading reported to the controller for the associated channel. • Uses RS-485 Modbus™ RTU protocol to receive the 4-20mA output levels. AO-4 modules must have a unique Modbus™ address set between A0 and AFh. Model X40 Instruction Manual Rev. 3.4 Page 3 of 65 Model X40 Alarm Relay Outputs (RL-4) • Alarms can be used to control (fire) annunciating devices or signal inputs to other control devices. • Four Form C, Single Pole Double Throw (SPDT), 5 Amp relay contacts each assigned specifically to one alarm. • Uses RS-485 Modbus™ RTU protocol to communicate the outputs and must have a unique Modbus™ address set between 80 and 8Fh. • The X40 controller is configured with a maximum of eight separate relay banks each holding up to two RL-4 modules. • Anytime a specific alarm (e.g. Alarm 3) is fired for a particular module in a bank (e.g. Bank2), all corresponding alarms (e.g. Alarm 3’s) for all modules in that particular bank (e.g. Bank2) are also triggered. RS-485 Serial Gas Sensors (Modbus™) RS-485 Serial gas sensors can be interfaced directly with the X40 controller without the use of I/O modules by connecting the sensors in a series to the primary RS-485 Modbus™ interface (RS-485 Master Port). 1.6 Enclosure Types The X40 controller is available in three enclosure types to accommodate various customer needs and configurations. The number of I/O modules varies depending on the enclosure type and configuration. N1P Enclosure The Model X40-32-N1P controller is housed in a NEMA 1 panel mount enclosure for indoor use. The internal power supply of the N1P controller converts 100-120/220-240VAC to 24VDC and can power a maximum of 32 sensors and associated I/O modules. A maximum of two I/O modules can be installed on the outside of the controller. Additional modules must be mounted separately by the customer. The power supply for the N1P is capable of handling AC inputs from 100-120/220-240VAC, 50-60Hz without degradation. The X40 controller can be powered by an external DC source that meets the input requirements (11.5-30VDC) of the unit if AC power is not preferred or available. DC power can be used for primary or back-up power in the event of an AC power failure. RS-485 and power out are provided for connection to sensors attached to the unit. N4X Enclosure The X40 controller is available in two different size models for the N4X enclosure type. Both the X40-08N4X and X40-32-N4X controllers are housed in a NEMA 4X water/corrosion proof enclosure for indoor/outdoor use. The power supplies for both enclosure types are capable of handling AC inputs from 100-120/220-240VAC, 50-60Hz without degradation. The X40-N4X can be powered by an external DC source that meets the input requirements (11.5-30VDC) of the X40 if AC power is not preferred or available. This input can be used for primary power or back-up power in the event of an AC power failure. The DC output voltage is capable of delivering a maximum of 2 Amps of current to the sensors attached to the X40 controller. RS-485 master port and power out are provided for connection to serial sensors attached to the unit. The X40-08-N4X enclosure houses a maximum of six I/O modules inside of the controller and is capable of communicating with a maximum of 32 devices. The enclosure can incorporate integral alarms such as an 8" strobe mounted on the top of the enclosure, horn, or both. The X40-32-N4X enclosure houses a maximum of twelve I/O modules inside of the controller and communicates with up to 32 devices. Model X40 Instruction Manual Rev. 3.4 Page 4 of 65 Model X40 N7 Enclosure The X40-32-N7 controller is housed in an explosion proof NEMA 7 enclosure for indoor/outdoor use. The N7 enclosure does not accommodate module installations. Modules must be mounted externally by the customer. Any sensors and associated I/O modules will need to be powered separately by the customer. The X40 controller can be powered directly by an external DC source provided by the customer, which meets the input requirements (11.5-30VDC) of the unit. A plug-in male connector is provided for input wiring terminations. A plug-in male connector provides quick disconnect convenience during replacement or servicing. An optional AC/DC converter board inside a condulet/J-Box is available from Detcon to only power the N7 controller with an AC voltage source. The converter uses AC inputs between 100-240VAC and provides a 24VDC (up to 167mA) output. Power to I/O modules or sensors must be provided by the customer. Detcon offers an optional mounting plate for mounting the X40-32-N7 controller to a pole. 1.7 Alarms and Fault Condition The alarms (Alarm 1, Alarm 2, Alarm 3, and Fault) can be used to control annunciating devices or as signal inputs to other control devices. The field configurable magnetic user interface permits alarm values and fault condition to cause an assigned relay or bank of relay outputs to fire, triggering external alarm devices. The assigned relay outputs will return to normal state when a gas alarm or a fault condition clears. Additionally, an external manual switch can be wired to the X40, acting as an acknowledge/reset switch (Section 1.12). When the X40 is in alarm, the display will remain on the channel group with the alarm. When there is more than one alarm/fault, the controller will cycle through group pages with alarms/faults including the transceiver, RL-4/alarm station, and AO-4 group pages. The user can manually cycle to any group page that exists using the arrow switches. After a time out period, the X40 will resume page cycle protocols based upon the existence of alarms/faults. Four LED indicators on the front panel show alarm/fault alarm output status and are labeled respectively as ALM 1 (yellow), ALM 2 (yellow), ALM 3 (red), and FAULT (blue). All alarms can be configured Energized/De-Energized, Latching/Non-Latching and Silenceable/NonSilenceable for the relays. Energized Mode The normally open contact is closed if the alarm level has not been reached or if the sensor is not in fault. Energized mode provides for fail-safe operation since a loss of power or cable failure will cause the contact to be open. De-Energized Mode The normally open contact is open if the alarm level has not been reached or if the sensor is not in fault. Silenceable The corresponding alarm LED and relay can be deactivated by acknowledging the Alarm Silence function on the front panel of the X40 controller or by activating the external acknowledge switch if installed (Section 7.0). Model X40 Instruction Manual Rev. 3.4 Page 5 of 65 Model X40 Non-Silenceable The corresponding alarm LED and relay will remain activated until the cause of the alarm or fault is clear. Latching Mode The relay can be deactivated after the alarm condition has cleared by acknowledging the Alarm Reset function on the front panel of the X40 controller or by activating the external reset switch if installed (Section 7.0). Non-Latching Mode The relay is deactivated as soon as the sensor alarm or fault condition is clear. 1.8 System Operation The setup of the controller is critical for proper operation. Modbus™ addresses must be correct on all the devices connected to the controller before the controller will acknowledge the devices. Each wireless sensor must have a unique Modbus address (refer to sensor manual for details). The number of sensors is determined during auto configure if the addresses on the sensors and modules are set correctly. The operator interface of the X40 utilizes four internal magnetic switches located above the controller’s backlit LCD display. The four switches provide a non-intrusive interface and allow for complete configuration of the controller and are labeled as follows: • PROG, • (Up Arrow), • (Down Arrow) and • ENTER. The ENTER switch also doubles as a RESET/ACK switch from the Main Display only (not in Menu Mode). Model X40 Instruction Manual Rev. 3.4 Page 6 of 65 Model X40 1.9 Operator Interface Reference the Menu Flow Chart (Figure 2) to learn how to easily navigate the menus and make changes. MAIN DISPLAY UTILITY MENU NORMAL OPERATION MAIN MENU AUTO CONFIGURE SYSTEM CHANNELS: ## AO4S: # RXT-320S:## RL4/ALM BANK 1: # RL4/ALM BANK 2: # Multiple Channels UTILITY MENU SETUP CHANNEL DATA Multiple Channels MAIN MENU SETUP CHANNEL DATA MENU SLAVE ID: ## DEVICE TYPE: ANALOG INPUT: # DECIMAL POINT: # RANGE: ### TYPE: RL4 BANK CNT: # UTILITY MENU SET RF SILENCE AND RF SLEEP Multiple Channels MAIN MENU SET CHANNEL ALARMS ALM1 LEVEL: ## ALM1 ASCENDING: Y/N ALM2 LEVEL: ## ALM2 ASCENDING: Y/N ALM3 LEVEL: ## ALM3 ASCENDING: Y/N UTILITY MENU SET LOW BATTERY ALARMS UTILITY MENU Multiple Relays (Fault, Alm1, Alm2, Alm3) MAIN MENU SET RELAY FUNCTION LATCHING (Bank1): Y/N ENERGIZED (Bank1): Y/N SILENCEABLE (Bank1): Y/N LATCHING (Bank2): Y/N ENERGIZED (Bank2): Y/N SILENCEABLE (Bank2): Y/N SLAVE ID: ## in hex DEVICE TYPE: XXXXXX ANALOG INPUT: # DECIMAL POINT: # RANGE: ##### TYPE: XXXXXXXXX RL4 BANK: XXX RF SILENCE: ON/OFF RF SLEEP: ##:## RF SLEEP: ON/OFF TTE(DD:HH:MM): ##:##:## SOC(%): ###% MODBUS ADDRESS: ### SET MODBUS ADDRESS UTILITY MENU SET CXT LOW BATTERY THRESHOLD THRESHOLD: 5-7 VDC UTILITY MENU UPDATE INTERVAL: 0-5 mins SET MODBUS UPDATE INTERVAL MAIN MENU INHIBIT & ALARM TEST MODE MAIN MENU SYSTEM DIAGNOSTICS INHIBIT MODE: #:## INHIBIT MODE: START/STOP ALARM TEST MODE: ON/OFF LCD DISPLAY TEST LED DRIVER TEST EXT RESET SWITCH TEST RELAY DRIVER TEST MODBUS DRIVER TEST UTILITY MENU SET COMM BAUD RATES UTILITY MENU SET MODBUS TIMEOUTS UTILITY MENU MAIN MENU TIME AND DATE MAIN MENU VIEW TWA & PEAK DISPLAY SETTINGS TIME: HH:MM:SS DATE: MM/DD/YY COMM1 BAUD RATE: #### COMM2 BAUD RATE: #### RESPONSE TIMEOUT: #### INTERPOLL DELAY: #### BRIGHTNESS: ### BACKLIGHT TIMEOUT: #:## CONTRAST: ### DATE,TIME,CHANNEL, TWA:######,PEAK: ###### Figure 2 Menu Flow Chart Model X40 Instruction Manual Rev. 3.4 Page 7 of 65 Model X40 1.9.1 Magnetic Programming Tool The magnetic programming tool (Figure 3) is used to operate the magnetic switches. For switch activation, the programming magnet is briefly held on the switch marker () and then removed. This action will be referred to as a "swipe" for the remainder of this manual. Figure 3 Magnetic Programming Tool 1.9.2 Front Panel User Interface The front panel user interface (Figure 4) contains four switches necessary to configure the X40 controller. Integrated Alarm & Control System Figure 4 Front Panel User Interface PROG Switch From the Main Display, the PROG switch enters into the Main Menu. Once inside the Main Menu, the PROG switch acts as an "Escape" switch that moves backwards in the menu flow chart. NOTE While in Main Menu mode there are no updates to gas readings and hence no alarms will take place. Up Arrow Switch This switch moves the user up the Main Menu flow chart. It is also used to change selected entries in the menu selections in the upward direction. Down Arrow Switch This switch moves the user down the Main Menu flow chart. It is also used to change selected entries in the menu selections in the downward direction. ENTER and RESET/ACK Switch This switch has multi-purpose use: Model X40 Instruction Manual Rev. 3.4 Page 8 of 65 Model X40 The ENTER function is used to accept selections in all menu screens and to execute the Reset and Acknowledge functions. The Reset function releases all latched relays once the alarm/fault condition has cleared. The Acknowledge function will disengage any silenceable relays that are in an active state. This is used to silence alarms once the end-user has assessed the alarm condition. The RESET/ACKNOWLEDGE function of the switch is only applicable from the Main Display and not while in Main Menu mode. 1.10 Main Display Functions When the X40 is in alarm, the LCD display will stay on the channel group with the channel in alarm. If more than one alarm/fault exists, the X40 will cycle through group pages with alarms/faults including the transceiver, RL-4/alarm station, and AO-4 group pages. At any time the user can manually cycle to any group page using the arrow switches. After a time out period (15 seconds), the X40 will resume page cycle protocols based upon the existence of alarms/faults. Four LED indicators on the front panel show alarm and fault alarm output status. The LEDs represent ALM 1 (yellow), ALM 2 (yellow), ALM 3 (red) and FAULT (blue). NOTE The X40 only cycles through sensor group pages when no alarms/faults exist. 1.10.1 Sensor Group XX> YYY "Device Tag" XX – represents the corresponding channel number YYY – the gas concentration value "Device Tag" – Either user enter tag or: IN ALARM# = If any channel is in any gas alarm condition, # is the alarm level. IN FAULT = If any gas channel is in fault. COMM ERR = If any channel is not appropriately communicating with the device. 1.10.2 Transceiver Group WTXX ‘Status’ YYY% XX – represents the transceiver Modbus™ slave address. ‘Status’ – Status message of the alarm station. OFFLINE = Not communicating. DC POWER = Communicating; line powered. BATT ERR = Communicating; cannot read smart battery pack. LOW BATT = Communicating; battery life is below the set threshold. 45+ DAYS = Communicating; smart battery pack has more than 45 days before empty. 0-45 DAYS = Communicating; the number of days until smart battery pack is empty. x.xxV = Communicating; the voltage of the installed non-rechargeable battery YYY% - represents the link quality of the transceiver. Model X40 Instruction Manual Rev. 3.4 Page 9 of 65 Model X40 1.10.3 RL4/Alarm Stations Group Hardwired RL4 Module RMXX> ‘Status’ XX – represents the RL4 Modbus slave address. ‘Status’ – Status message of the RL4 module. COMM ERR = Not communicating with module. RL4 MODULE = Communicating with module. Wireless Alarm Stations ASXX ‘Status’ YYY% XX – represents the alarm station Modbus slave address. ‘Status’ – Status message of the alarm station. OFFLINE = Not communicating. DC POWER = Communicating; line powered. BATT ERR = Communicating; cannot read smart battery pack. LOW BATT = Communicating; smart battery state of charge below the set threshold. 0 – 100% = Communicating; current state of charge of the smart battery pack. YYY% - represents the link quality of the alarm station. 1.10.4 AO-4 Group AMXX> ‘Status’ XX – represents the AO-4 module Modbus slave address ‘Status’ – Status message of the AO - 4 module COMM ERR = Not communicating with module AO-4 MODULE = Communicating with module 1.11 Menu Function The X40 controller setup is accomplished through the Main Menu and consists of seven menu items: 1. Auto Configure System 2. Setup Channel Data 3. Set Channel Alarms 4. Set Relay Function 5. Inhibit & Alarm Test Mode 6. System Diagnostics 7. Time and Date 8. View TWA & Peak Auto Configure System The Auto Configure System automatically configures the X40 controller when other Detcon devices are installed as part of the control system. When activated, the controller searches for Detcon serial sensors, RL-4 modules/alarm stations, AO-4 modules and wireless radio modules. Setup Channel Data Setup Channel Data displays the Modbus ID, device type, range, and gas type for each channel. The assigned RL4 bank and number of analog inputs (for channels using an RXT-320) is also displayed. Only the gas type can be changed by the user. No other values on this screen can be changed. Model X40 Instruction Manual Rev. 3.4 Page 10 of 65 Model X40 Set Channel Alarms All sensors have three alarm settings ALM1 (Alarm 1), ALM2 (Alarm 2) and ALM3 (Alarm 3). The user establishes the alarm levels for each sensor depending on the range. The values represent the alarm level set points and entered in 5% increments of the full-scale range selected for that channel. In ascending mode the relay is activated when the concentration is above the alarm threshold. In descending mode, the alarm relay is activated when the concentration is below the alarm threshold. Alarms are usually ascending, with the exception of oxygen sensors. The alarm ascending level can be either Y (Yes) or N (No). Set Relay (Alarm) Functions The Set Relay Functions menu enables configuration (Latching, Energized and Silenceable) of the relays in Bank1-8. Each relay bank has three relay outputs for ALM1, ALM2 and ALM3 and a fourth relay output for the Fault condition. All relays in the bank must be configured for the following three settings: Latching or Non-Latching Energized or De-Energized, Silenceable or Non-Silenceable Inhibit and Alarm Test Mode The Inhibit and Alarm Test Mode permits the user to inhibit functionality of alarms in the network, simulate alarm conditions and verify relay contacts. The Inhibit mode disables alarm outputs while sensor are being calibrated or tested. The Alarm Test Mode simulates alarm conditions by increasing the gas readings from zero for all active gas channels at increments of 5% full scale then decrease back to zero and exit the test mode. System Diagnostics The System Diagnostics menu performs complete functionality tests for: LCD display Panel LEDꞌs External reset switch Relays Modbus™ interface Time and Date The Time and Date menu enables the user to effortlessly establish the time and date. The time will be displayed as military time (24hrs) in hours, minutes and seconds. The date will be displayed as the month, day and two digit year. If the time and/or date are not correct, they can be updated. View TWA and Peak The View TWA and Peak menu permits viewing the recorded time weighted average (TWA) and peak readings for each channel represented by its assigned gas sensor. The data is recorded on the SD card with the date, time, channel number, TWA and peak readings each time the controller polls a sensor. Data on the SD card is viewed by using the Detcon Log File Viewer application on a computer. 1.12 Optional Remote Alarm Reset/Acknowledge Switch An optional remote Alarm Reset/Acknowledge switch enables the user to reset or acknowledge alarms without having to open the X40 enclosure. The switch is a normally open push button mounted on the bottom or side of the NEMA 4X enclosure. For the N1P and N7 enclosures, the switch must be mounted externally (e.g. bottom of the J-Box). Model X40 Instruction Manual Rev. 3.4 Page 11 of 65 Model X40 1.13 Wireless Option The Model X40 controller offers a wireless option that uses Modbus™ technology to connect the controller and other devices to a wireless platform. The local Modbus™ communication uses a wireless grid of transceivers to broadcast information throughout the wireless network, creating a seamless network of Modbus™ devices that are not physically connected. The transceiver operates at 2.4GHz and conforms to non-licensed radio frequency usage worldwide. Spread spectrum technology supports integrity and security for the wireless network. Wireless applications can be a single field device communicating with a host controller or multiple field devices forming a network of subscribers. Each device in the network is assigned a Network ID and a Modbus™ address. If radio communication is impossible due to distance or obstruction, each slave device is capable of locating an alternate route using an additional radio to communicate with the designated device. This innovative technology is designed to create a robust network that automatically routes around congestion and line-of-sight obstacles while improving throughput as subscriber device density increases. Refer to the Wireless Radio Module instruction manual for detailed information. Wireless Radio Module Mounting Detcon’s wireless radio modules are factory installed. The radio module has a rotary dial for setting the RF channel. The radio module, wireless sensors, and wireless alarm stations must all be set to the same RF channel to operate correctly. NOTE The radio module, wireless sensors, and wireless alarm stations must all be set to the same RF channel to operate correctly. Figure 5 Radio Module For NEMA 1 or NEMA 12 units the antenna is typically mounted separately, using Detcon’s remote antenna mounting kit. On NEMA 4 units the antenna can be installed on the top of the enclosure or separated up to 50m using Detcon’s remote antenna mounting kit (Section 2.3). On N7 units the antenna is mounted on the Transceiver, and is part of the unit (Section 2.4). Detcon’s antennas are vertically polarized. This means that there is an RF ‘Dead-Zone’ directly above and below any transmitting antenna. Because of this, any device with an antenna that is located near an elevated antenna should be placed at least as far from the elevated antenna as the antenna is high. For example, if an antenna is 20ft. off the ground, the nearest antenna should be at least 20 ft. away. Model X40 Instruction Manual Rev. 3.4 Page 12 of 65 Model X40 2.0 Installation 2.1 Safety Guidelines If equipment is used in a manner not specified by Detcon, the protection provided by the equipment may be impaired. CAUTION The user must consult this manual for more information about any location marked with this symbol. DANGER Danger of electrical shock. User must ensure that power has been disconnected prior to installation or servicing of the equipment. PROTECTIVE This symbol identifies a terminal that is the connection point for a protective earth conductor. Only the protective earth conductor should be connected EARTH here. TERMINAL FUNCTIONAL This symbol identifies a terminal that provides an earth ground reference EARTH point. These terminals are not for safety earthing purposes. TERMINAL 2.2 N1P and N1R Enclosure Installation CAUTION The X40-32-N1P and X40-32-N1R units can power a maximum of 32 sensors. Damage to the power supply may result if the maximum number of sensors is exceeded. 1. Provide a panel opening that is 9.25" wide by 7.5" high for the N1P controller. The N1R controller is meant to be mounted in a 19” Rack. 2. Securely mount the X40-32-N1P or X40-32-N1R controller at an indoor location using the mounting dimensions provided in Figure 6 and Figure 7. The N1R is made to fit a 19” Rack. 10.5" 1.687" 9.75" 11.825" 7" 3.5" 8" 6.94" I/O Modules (Qty. of 2 Max) 0.375" R0.109" Slot Detail 0.218" Model X40 Instruction Manual Rev. 3.4 Page 13 of 65 Model X40 Figure 6 N1P Controller Mounting and Dimensional View 19" 1.7" 12" 7.5" 18.25" 5.75" 8.7" 6.94" 0.375" R0.109" Slot Detail 0.218" Figure 7 N1R Controller Mounting and Dimensional View NOTE If the AC and DC wiring are run in conduit, ensure that the AC wiring is not housed in the same conduit as the DC signal/wiring NOTE The power supply for the X40-32-N1P and X40-32-N1R is capable of handling AC inputs between 100-120/220-240VAC, 50-60Hz without degradation. 3. Install AC or DC power as follows: (Refer to Figure 8.) a. Install AC power by connecting the 100-120/220-240VAC input wiring to the terminals labeled VAC (L1), NEU (L2), and GROUND. b. Install DC power by connecting the 11.5-30VDC to the terminals of the DIN rail mounted terminal block labeled 24VDC and DC Comm. CAUTION Equipment and equipment to be electrically connected shall use safety approved wire/cable in conjunction with appropriate and compatible protective cable gland, all of which meet the requirements of the max equipment rating (250VAC, 5A) and any local electrical codes, regulations and standards. The cable used to connect to the terminals of the X40-32-N1P and X40-32-N1R must be rated for a minimum of 105ºC. NOTE The DC input voltage should be capable of delivering at least 4.2 Amps of current to the load (100 Watts @ 24VDC). NOTE The supply of power should be from an isolated source with over-current protection and an input voltage range between 11.5-30VDC. 4. Connect the external Modbus™ sensors at the RS-485 connections labeled RS-485 Master: ‘A’, ‘B’, and ‘Shld’ (Figure 8). Model X40 Instruction Manual Rev. 3.4 Page 14 of 65 Model X40 A B RS-485 VDC RS-485 Out SLAVE RESET + A B DC Comm 24VDC Disconnect Terminal Blocks Figure 8 N1P and N1R Connections 5. If 24VDC is required to power external sensors, connect the sensors to the power terminals labeled VDC Out, ‘+’ and ‘–‘. 6. If linking the X40 enclosure to an RD-64X remote display unit, connect the unit to the terminals labeled RS-485 Slave: ‘A’, ‘B’, and ‘Shld’. Model X40 Instruction Manual Rev. 3.4 Page 15 of 65 Model X40 2.3 N4X Enclosure Installation The power supply for the X40-08-N4X controller can power a maximum of eight sensors even though the controller is capable of communicating with 32 devices. An additional power supply will be required if powering more than eight sensors or an upgrade to Model X40-32-N4X is needed which can power CAUTION a maximum of 32 sensors. Damage to the power supply may result if the maximum number of sensors is exceeded. The wall attachments must be able to withstand a force four times the weight of the equipment. CAUTION CAUTION The X40 must be mounted in a location that does not impair the operation of the external disconnection device. Internal Disconnect Terminal Blocks are provided for the removal of power at the unit when needed. 1. Securely mount the enclosure in accordance with the dimensions provided in Figure 9 (X40-08N4X) or Figure 10 (X40-32-N4X). 11.85" 8" Ø0.31" 6.79" 6.5" Mounting Bracket 12.75" 13.75" Figure 9 X40-08-N4X Controller Mounting and Dimensional View Model X40 Instruction Manual Rev. 3.4 Page 16 of 65 Model X40 16" 12" Ø0.31" 8.80" 8.5" Mounting Bracket 16.75" 17.85" Figure 10 X40-32-N4X Controller Mounting and Dimensional View NOTE If the AC and DC wiring are run in conduit, ensure that the AC wiring is not housed in the same conduit as the DC signal/wiring NOTE The internal power supply in the X40-08-N4X and X40-32-N4X converts 100-120/220240VAC to 24VDC. Up to 2A @ 24VDC is available to power sensors attached to the X40. If more than 2A @ 24VDC is required, then the user must supply an additional power supply. NOTE The power supply for the X40-08-N4X and the X40-32-N4X are capable of handling AC inputs from 100-120/220-240VAC, 50-60Hz without degradation. 2. Install AC power as follows (Figure 14): a. Install AC power by connecting the 100-120/220-240VAC input wiring to the terminals labeled VAC (L1), and NEU (L2). NOTE The cable penetration for the AC power must be made in the bottom of the enclosure (See Figure 13). All penetrations must use a NEMA4 rated cable gland (Appleton p/n CG-2575 or equivalent) to prevent water ingress and restrict access to the internal circuits of the X40. b. Locate the ground terminal on the back plate of the N4X enclosure (Figure 11). c. Remove both nuts and the internal ground conductor d. Connect the protective earth conductor to the ground terminal with one lock washer, the protective earth conductor, a second lock washer on top of the conductor, a nut on top of the conductor, the circuit ground connector, and then a nut. NOTE Ensure that the protective earth conductor is connected directly to the ground terminal. Model X40 Instruction Manual Rev. 3.4 Page 17 of 65 Model X40 Circuit Ground Conductor Lock Washer (Toothed if on Paint) Protective Earth Conductor from Main Chassis Figure 11 N4X Protective Earth Connector A1, B1 are Master RS-485 Port Drop-In Display Assembly A2, B2 are Slave RS-485 Port PWR GND A2 B2 A1 B1 SW SW PCA Connector Figure 12 Display Wiring Bottom View of Enclosure AC Cable Entry Point Drill Hole in Area for AC Cable Access Drill Hole in Area for Sensor, Relay Cable Access Figure 13 Cable Entry Points 3. Tie the AC power conductors together with a tie-wrap. 4. To maintain the safety approval for the X40, the user must install a circuit breaker(s) near the X40 so that it can be easily reached and labeled as the power disconnection device for the X40. The installed AC circuit breakers should be rated for 3A. NOTE The equipment switch or circuit-breaker employed as a disconnecting device shall meet the relevant requirements of IEC 60947-1 and IEC 60947-3 and be suitable for the application. Internal Disconnect Terminal Blocks are provided for the removal of power Model X40 Instruction Manual Rev. 3.4 Page 18 of 65 Model X40 at the unit when needed. CAUTION Equipment and equipment to be electrically connected shall use safety approved wire/cable in conjunction with appropriate and compatible protective cable gland, all of which meet the requirements of the max equipment rating (250VAC, 5A) and any local electrical codes, regulations and standards. The cable used to connect to the terminals of the X40-32-N4X must be rated for a minimum of 105ºC. 5. Install the DC power as follows: a. Install external DC power by connecting the 11.5-30VDC to the terminals of the TB1 DIN rail mounted terminal block labeled 24VDC and DC Comm (Figure 14). The equipment supply wiring must be safety approved and rated for at least 7.5A. NOTE The cable penetration for the DC power must be made in the bottom of the enclosure (See Figure 13). All penetrations must use a NEMA4 rated cable gland (Appleton P/N CG-2575 or equivalent) to prevent water ingress and restrict access to the internal circuits of the X40. b. To maintain the safety approval for the X40, the user must install an external disconnect switch or circuit breaker near the X40 so that it can be easily reached and labeled as the disconnection device for the X40. The installed DC circuit breaker should be rated for 5A. c. The unit does come equipped with Disconnect Terminal Blocks on the input power lines. These can be used to connect or disconnect power at the unit. 24VDC DC Comm Disconnect Terminal Blocks NEU (L2) VAC (L1) Figure 14 N4X AC/DC Inputs + A B 6. Connect the external Modbus™ sensors at the RS-485 connections labeled RS-485 Master and ‘A’, ‘B’, and ‘Shld’ (Figure 15). RS-485 VDC Out Figure 15 N4X RS-485 Master Port Connections 7. If 24VDC is required to power external sensors, connect the sensors to the power out labeled VDC Out: ‘+’ and ‘–‘. Model X40 Instruction Manual Rev. 3.4 Page 19 of 65 Model X40 A B 8. If linking the X40 enclosure to an RD-64X remote display unit, connect the unit to the slave port terminals labeled RS-485 Slave: ‘A’, ‘B’, and ‘Shld’ (Figure 16). RS-485 SLAVE Figure 16 N4X RS-485 Slave Port Connections 9. If the X40-N4X was ordered with the wireless option, the radio module is installed in the enclosure and an antenna connector is provided on the top of the enclosure (Figure 17). Mount the external antenna in an appropriate location with an unobstructed line-of-sight to the wireless devices. Connect the RF cable from the connector on top of the X40 to the antenna. Antenna Connection X40 Enclosure Figure 17 N4X Antenna Connector Any slave device near an elevated or remote mounted antenna needs to be at least as far from the antenna as the antenna is high. For example, if the antenna is 20ft. high, then the nearest slave device should be at least 20 ft. away. Model X40 Instruction Manual Rev. 3.4 Page 20 of 65 Model X40 2.4 N7 Enclosure Installation The X40-32-N7 controller can support up to a maximum of 32 sensors and any associated I/O modules, but no I/O modules can be installed in the controller. All I/O modules must be mounted separately by the customer. The N7 version does not supply power to sensors. Power must be supplied by the customer for sensors and any I/O modules. Damage to the controller may result if the maximum number of sensors is exceeded. CAUTION 1. Securely mount the X40-32-N7 controller in accordance with the mounting dimensions provided in Figure 18. MODEL X40-32-N7 Controller 9.15" 11" 3.25" Figure 18 N7 Controller Mounting and Dimensional View 2. Verify that appropriate cable glands are used to maintain the enclosure rating. 3. If the N7 enclosure is not provided with a J-Box from the factory, remove the faceplate from the controller enclosure to access the PCA (Figure 19). All appropriate wiring must be connected directly to the PCA J7 in this configuration. NOTE J7 Connections are as follows: PWR/GND DC power connection to power X40-32-N7 controller A2/B2 Secondary Modbus™ connection (COMM2 Slave) A1/B1 Primary Modbus™ connection (COMM1 Master) SW External switch connection for RESET/ACK function (Normally Open) Model X40 Instruction Manual Rev. 3.4 Page 21 of 65 Model X40 1 SW4 SW3 SW2 SW1 R8 J5 J7 1 PWR J7 D3 D4 D5 D6 MAIN GND PWR A2 GND J2 SECONDARY 1 A2 B2 B2 A1 B1 A1 SW J6 B1 SW Figure 19 N7 Controller PCA CAUTION The cable used to connect to the terminals of the X40-32-N7 must be rated for a minimum of 105ºC. 4. If the unit comes with the optional mounting plate and a Condulet, attach the mounting plate assembly to a pole with two U-Bolts secured through the 7/16" rectangle holes of the mounting plate base (Figure 20). Pole U-bolt J-Box w/ Transient Protection Module Figure 20 N7 Controller Assembly w/Mounting Plate NOTE It is highly recommended to install the cable inside rigid metal conduit to eliminate potential EMI and RFI interference and to maintain a Class I Division I rating. NOTE A 6-32 or 8-32 threaded exterior ground point is provided on most junction boxes for an external ground. If the transceiver assembly is not mechanically grounded, an external ground strap must be used to ensure that the transceiver is electrically grounded. Model X40 Instruction Manual Rev. 3.4 Page 22 of 65 Model X40 NOTE Proper electrical installation of the wireless radio module assembly is critical for conformance to Electrical Codes and to avoid damage due to water leakage. A conduit seal is typically required to be located within 18" of the transceiver assembly if a conduit run is required. Crouse Hinds type EYS2, EYD2 or equivalent are suitable for this purpose. NOTE Any unused ports should be blocked with suitable 3/4" male NPT plugs. Detcon supplies one 3 /4" NPT male plug with each J-box enclosure. If connections are other than 3/4" NPT, use an appropriate male plug of like construction material. NOTE Use suitable cord connectors (cable glands) for cable entry to the X40 controller or the connecting Junction Box. NOTE The Detcon Warranty does not cover water damage resulting from water leaking into the enclosure. 5. If the unit comes with an AC/DC Adapter, ensure that the AC signal/wiring is not housed in the same conduit as the DC signal/wiring. Wiring to X40-32-N7 Controller J7 Connector Customer Supplied Modbus Wiring to I/O Modules and Sensors U1 PWR(+) GND(-) A1(+) B1(-) A2(+) B2(-) +24V D GND C A B B A C GND D +24V J1 B2(-) A2(+) B1(-) A1(+) Not Used Not Used J2 N L A1 and B1 are the RS-485 Master Port E J3 A2 and B2 are the Slave RS-485 Port VAC(N) Wht VAC(L) Blk GND Grn AC IN Power to I/O Modules and Sensors must be provided separately. AC Power from External Voltage Source Customer Supplied Wiring (In) Figure 21 N7 AC/DC Converter Board Wiring CAUTION The cable used to connect to the terminals of the X40-32-N7 must be rated for a minimum of 105ºC. 6. Install AC power and I/O connections when the N7 is supplied with a J-Box and an AC/DC converter as follows: a. Connect 100-240VAC input wiring to the J3 connector (labeled AC IN) of the converter board. Model X40 Instruction Manual Rev. 3.4 Page 23 of 65 Model X40 b. J1 should come wired and connected to the controller from the factory. Ensure that J1 is properly connected to the AC/DC Converter. c. Interface the I/O modules and sensors to the X40 controller through the J2 connector of the AC/DC converter board (Figure 21). NOTE The terminals on the J3 connector are labeled N (neutral), L (line power) and E (earth ground). NOTE An optional Transient Protection board is available from Detcon for use with external DC Supply. When using external DC power to power the controller the input power must be 11.5-30VDC. 7. For units that will be wired to an external power source connect the external power and Modbus™ as follows: a. Connect the 11.5-30VDC to the terminals Labeled “+” and “-“ on the transient Protection PCA. b. Connect the RS-485 Master Port to the terminals labeled “A” and “B” on the Transient Protection PCA. VDC(+) VDC(-) Wiring to X40-32-N7 Controller J7 Connector VDC(+) 11.5~30VDC VDC(-) Customer Supplied Wiring A B A B RS-485 Master Port Figure 22 N7 DC Power Wiring 8. After applying power to the unit observe that the controller display starts and the unit will go through the boot-up sequence (Section 3.12). 2.4.1 NEMA7 units with RXT-320 Transceiver NEMA 7 units can come pre-configured with a RTX-320 Transceiver. assembled on a mounting plate that can be mounted on a 2~3” pole. These units will come pre- Battery Operated Units Battery operated units come prewired and set up for installation: 1. Attach the mounting plate assembly to a pole with two U-Bolts secured through the 7/16" rectangle holes of the mounting plate base (Figure 23). 2. The wireless radio module connected to the Modbus™ master port is to be used with a Detcon Smart Wireless battery pack. These units come with the Model 100 Terminal Board will be mounted in the condulet/J-Box (Figure 24). Refer to Table 1 for descriptions of the connector plugs. come as battery operated, DC or AC operated. Model X40 Instruction Manual Rev. 3.4 Page 24 of 65 Model X40 Pole U-bolts Figure 23 Typical NEMA7 with Transceiver Table 1 X40 Model 100 Terminal Board Connector Plugs J1 4-Pin Connector Modbus™ Out (Wireless Transceiver Option) J2 6-Pin Header Wireless Transceiver Programming Header J3 6-Beau Connector Battery operation or display interface dependent on sensor configuration J4 4-Pin Connector Modbus™ In – Connects to X40 J5 Not used J6 Not used J7 4-Pin Connector Connection to solar panel J8 6-Pin Connector Wireless Transceiver J9 5-Pin Header Terminal Board Programming MA GND PWR B J6 SW1 24V B A J4 24V A AIN2 J7 J1 GND POWER IN ( SOLAR) GND W/V W/BU W/GN W/BN J2 SW2 24V A GND WIRELESS PROGRAM J8 MODBUS OUT ( WIRELESS) B W/BK AIN1 WIRELESS SENSOR MODBUS IN L9 SP2 SP1 SDA SCL PWR TERM PROGRAM GND J5 JP1 DISPLAY Figure 24 Model 100 Terminal Board Model X40 Instruction Manual Rev. 3.4 Page 25 of 65 Model X40 3. Ensure that the two rotary switches on the Model 100 Terminal Board are set to the Modbus™ address (F0h) for the wireless radio module of the X40 controller. The Model 100 Terminal Board should come set from the Detcon factory and should be set to the address to F0h. Access the terminal board and locate the switches shown in Figure 25. The MSD (most significant digit) "F" is represented by the top rotary switch (closest to the J1 connector) and the LSD (least significant digit) "0" is represented by the bottom rotary switch (closest to the J2 connector). Figure 25 Model 100 Terminal Board Rotary Switches 4. Install the battery in the condulet and observe that the controller display starts and the unit will go through the boot-up sequence (Section 3.12). AC Operated Units Units that have a Transceiver, and come supplied with the AC/DC Converter need only have AC voltage applied to operate properly 1. Attach the mounting plate assembly to a pole with two U-Bolts secured through the 7/16" rectangle holes of the mounting plate base (Figure 23). U1 Wiring to X40 Controller Wiring to Transceiver PWR(+) GND(-) A1(+) B1(-) +24V D GND C A B B A C GND D +24V J1 Not Used Not Used B1(-) A1(+) GND 24VDC J2 N L E J3 VAC(N) Wht VAC(L) Blk GND Grn AC IN AC Power from External Voltage Source Customer Supplied Wiring (In) Figure 26 N7 AC/DC Converter Board Wiring with Transceiver Model X40 Instruction Manual Rev. 3.4 Page 26 of 65 Model X40 CAUTION The cable used to connect to the terminals of the X40-32-N7 must be rated for a minimum of 105ºC. 2. Install AC power and I/O connections when the N7 is supplied with a J-Box and an AC/DC converter. Connect 100-240VAC input wiring to the J3 connector (labeled AC IN) of the converter board. NOTE The terminals on the J3 connector are labeled N (neutral), L (line power) and E (earth ground). NOTE An optional Transient Protection board is available from Detcon for use with external DC Supply. When using external DC power to power the controller the input power must be 11.5-30VDC. 3. After applying AC to the unit observe that the controller display starts and the unit will go through the boot-up sequence (Section 3.12). DC Operated Units 1. For units that will be wired to an external power source connect the external power to the Transient Protection PCA ‘+’ and ‘-‘ terminals. Voltage input must be between 11.5VDC and 30VDC. VDC(+) VDC(-) Customer Supplied Wiring A B A B VDC(+) VDC(-) Wiring to RXT-320 Transceiver VDC(+) 11.5~30VDC VDC(-) Wiring to X40-32-N7 Controller J7 Connector Figure 27 N7 DC Power Wiring with Transceiver NOTE An optional Transient Protection board is available from Detcon for use with external DC Supply. When using external DC power to power the controller the input power must be 11.5-30VDC. 2. After applying power to the unit observe that the controller display starts and the unit will go through the boot-up sequence (Section 3.12). Model X40 Instruction Manual Rev. 3.4 Page 27 of 65 Model X40 3.0 I/O Connections 3.1 I/O Module Installation Module installation limits are as follows: • A maximum of two I/O modules may be installed on the N1P enclosure. • The quantity of I/O modules supported by the X40 NEMA 4 enclosures is dependent on the configuration of the controller. • The X40-32-N7 enclosure does not accommodate module installations. NOTE Modules for the N7 enclosure or any additional modules for the other enclosure types must be mounted in a separate enclosure by the customer. The X40-N4X enclosures with alarm strobe and or horn have a minimum of one RL-4 module installed to power the alarms. This RL-4 should not be removed. NOTE Add additional modules as needed. Female Connector RS-485 and Power Cable from Output Terminal Blocks. COMM COMM COMM M S D M S D M S D L S D L S D L S D L S D 4-20mA INPUT 4-20mA INPUT 4-20mA INPUT 4-20mA INPUT End Stop + COMM M S D -SBA - + S + A B Male Connector - S B A RS-485 and Power Cable End Stop Figure 28 I/O Module Installation I/O modules are mounted on an industry-standard 37.5 x 7.5 mm DIN rail (See Figure 28). Install the first I/O module at the end of the DIN rail nearest the male connector. Plug the male connector into the side of the module. Slide it all the way to the end stop. Add additional modules next to the first module. When installing additional I/O modules, make sure there is about 0.5 inch clearance on either side of the module and snap the module onto the DIN rail (the 0.5” spacing is to allow for connector clearance). Once the I/O module is snapped onto the DIN rail, slide it towards the adjacent module and assure that it firmly plugs into it. Connect the RS-485 and power female connector to the last module installed on the DIN rail. Secure the modules with an end stop. NOTE The male and female connectors must be plugged into modules on opposite ends of the DIN rail. If these connectors are not properly installed, communication with other RS-485 devices will not be possible. NOTE If no I/O modules are installed in the controller, the male connector must be plugged into the female connector for the RS-485 to communicate. NOTE For addressable I/O modules or Modbus™ sensors that are located remotely from the controller, General Cable Commodore (P/N ZO16P0022189) is recommended for serial and power connections. Model X40 Instruction Manual Rev. 3.4 Page 28 of 65 Model X40 3.2 Analog 4-20mA Sensor Inputs (DA-4) Connect the 4-20mA gas sensors to DA-4 4-20mA input modules. The DA-4 modules provide power to any 2-wire or 3-wire field sensors, and receive standard 4-20mA signal inputs from the sensors Figure 29. NOTE The terminals on the DA-4 module are rated for a maximum of 30VDC. They are designed to accept solid or stranded wire between 12AWG and 24AWG. NOTE Analog sensors used with the X40 must supply 4mA for a zero reading and 20mA for a full scale reading. The sensors current output should be linear for readings between zero and full scale. Sensors that do not meet this requirement must not be used with the X40. NOTE External devices attached to the equipment must require a tool to access their wiring terminals to prevent unauthorized access. NOTE Hazardous live voltages of external devices attached to the DA4 must be isolated or disconnected prior to accessing the terminals of the external devices NOTE All cable penetrations for analog sensor cables must be made in the bottom of the enclosure (See Figure 13). All penetrations must use a NEMA4 rated cable gland (Appleton P/N CG2575 or equivalent) to prevent water ingress and restrict access to the internal circuits of the X40. 2-Wire 4-20mA Sensor Sensor 4 Sensor 3 mA _ + mA _ + COMM M S D L S D 4-20mA INPUT Sensor 1 Sensor 2 + _ mA + _ mA 3-Wire 4-20mA Sensor Figure 29 Model DA-4 4-20mA Input Module and 4-20mA Gas Sensor Connections There are four 4-20mA inputs with each DA-4 module to support up to four sensors (See Figure 30). DA-4 modules can be installed on the DIN rail of the controller. Model X40 Instruction Manual Rev. 3.4 Page 29 of 65 Model X40 Sensor 4 Sensor 3 COMM M S D L S D 4-20mA INPUT Sensor 1 Sensor 2 Figure 30 Model DA-4 4-20mA Input Module and 4-20mA Gas Sensors Serially address each DA-4 module in hex using the two rotary switches on the front of the module labeled MSD (most significant digit) and LSD (least significant digit). Ensure that each DA-4 module has a unique Modbus™ address and is addressed within the range 01h-7Fh. NOTE DA-4 modules must be connected to the RS-485 Master Port, they must be addressed correctly within the range of 01h-7fh. NOTE The sensors must be powered on and outputting at least 1.8mA to be detected by the auto configure. If a sensor is in fault, its output will be 0mA and it will not be detected by the auto configure. A DA-4 module connected properly to the controller will have a flashing DATA COMM LED to indicate a valid communication status and will provide the controller with a continuous reading of the sensor attached. All other information will need to be modified on the Channel Details screen for each channel corresponding to the appropriate DA-4 module. 3.3 Dry Contact Inputs (DI-4) Relay contact outputs from field devices can be connected to Model DI-4 input modules. There are four relay contact inputs in each Model DI-4 module (See Figure 31). DI-4 modules can be installed on the DIN rail of the controller. DI-4 modules must be connected to the RS-485 Master Port. Model X40 Instruction Manual Rev. 3.4 Page 30 of 65 Model X40 4mA Reading NO NC Input 4 mA + Input 3 mA + There are four relay contact inputs on each DI-4 module. COM Relay Contacts COMM M S D L S D CONTACT INPUT Input 1 Input 2 + mA + mA 20mA Reading NO NC COM Relay Contacts Figure 31 Model DI-4 Contact Input Module NOTE The terminals on the DI-4 module are rated for a maximum of 30VDC. They are designed to accept solid or stranded wire between 12AWG and 24AWG. NOTE External devices attached to the equipment must require a tool to access their wiring terminals to prevent unauthorized access. NOTE Hazardous live voltages of external devices attached to the equipment must be isolated or disconnected prior to accessing the terminals of the external devices NOTE The cable penetrations for the dry contact inputs must be made in the bottom of the enclosure (See Figure 13). All penetrations must use a NEMA4 rated cable gland (Appleton p/n CG-2575 or equivalent) to prevent water ingress and restrict access to the internal circuits of the X40. Serially address the module in hex using the two rotary switches on the front panel labeled MSD (most significant digit) and LSD (least significant digit). Ensure that each DI-4 module has a unique Modbus™ address and is addressed within the range 01h-7Fh. NOTE DI-4 modules must be connected to the RS-485 Master port, they must be addressed correctly in the range of 01h-7fh. A DI-4 module connected properly to the controller will have a flashing DATA COMM LED to indicate a valid communication status and will provide the controller with a 4mA reading when the contact from the field device is open and a 20mA reading when the contact is closed for the corresponding channels. All other information will need to be modified on the Channel Details screen for each channel corresponding to the appropriate DA-4 module. 3.4 Analog 4-20mA Outputs (AO-4) There are four 4-20mA outputs in each Model AO-4 module (See Figure 32). These can be used as signal inputs to other control devices. AO-4 modules can be installed on the DIN rail of the controller. Model X40 Instruction Manual Rev. 3.4 Page 31 of 65 Model X40 4-20 mA Signal Output 4 mA _ Output 3 mA _ There are four 4-20mA outputs on each AO-4 module. 4-20mA Input Control System COMM M S D L S D 4-20mA Output Output 1 _ mA Output 2 _ mA Figure 32 Model AO-4 4-20mA Output Module NOTE The terminals on the AO-4 module are rated for a maximum of 30VDC. They are designed to accept solid or stranded wire between 12AWG and 24AWG. NOTE External devices attached to the equipment must require a tool to access their wiring terminals to prevent unauthorized access. NOTE Hazardous live voltages of external devices attached to the AO4 must be isolated or disconnected prior to accessing the terminals of the external devices NOTE The cable penetration for the analog outputs must be made in the bottom of the enclosure (See Figure 13). All penetrations must use a NEMA4 rated cable gland (Appleton p/n CG2575 or equivalent) to prevent water ingress and restrict access to the internal circuits of the X40. AO-4 modules provide a 4-20mA output equal to the current concentration reading reported to the controller for the associated channel. These concentration readings are communicated by the controller to the AO-4 modules using RS-485 Modbus™ RTU protocol. Therefore, each AO-4 module must have a unique Modbus™ address. Modules are serially addressed in hex using the two rotary switches on the module’s front panel labeled MSD (most significant digit) and LSD (least significant digit). AO-4 modules must be connected to the RS-485 Master Port. The AO-4 modules must be addressed according to Table 2 AO-4 Modbus™ Addresses. Table 2 AO-4 Modbus™ Addresses Module 1 2 3 Channel # 1 2 3 4 5 6 7 8 9 10 11 12 Model X40 Instruction Manual Decimal Hex Module 161 A1 5 162 A2 6 163 A3 7 Rev. 3.4 Channel # 17 18 19 20 21 22 23 24 25 26 27 28 Decimal Hex 165 A5 166 A6 167 A7 Page 32 of 65 Model X40 Module 4 NOTE Channel # 13 14 15 16 Decimal Hex Module 164 A4 8 Channel # 29 30 31 32 Decimal Hex 168 A8 The AO-4 modules must be connected to the RS-485 Master Port and addressed correctly in the range of A1h-A8h. An AO-4 module connected properly to the controller will have a flashing DATA COMM LED to indicate a valid communication status and will provide a continuous output mA reading that corresponds directly to the sensor attached. If the controller does not detect an AO-4 module, the blue LED (Fault) will start flashing and COMM ERROR will be displayed on the AO-4 group page. 3.5 Alarm Relay Outputs (RL-4) There are four (4) Form C Single Pole Double Throw (SPDT), 5 Amp relays in each Model RL-4 module. Each relay in the module is assigned specifically to one alarm. Relay 1 is assigned to Alarm 1, relay 2 is assign to Alarm 2, relay 3 is assigned to Alarm 3, and relay 4 is assigned to Fault. These can be used to control (fire) annunciating devices or as signal inputs to other control devices. Connections to the relay contacts of the RL-4 module are shown in Figure 33 and are labeled C (Common), NO (Normally Open) and NC (Normally Closed). Note that the 5 Amp rating of the relay contact should not be exceeded. RL-4 modules are installed on the DIN rail of the controller. NOTE There are four Form C, Single Pole Double Throw (SPDT), 5 Amp relay contacts in each RL-4 module. Each relay in the module is assigned to one alarm as follows: Relay 1 is assigned to Alarm 1 Relay 2 is assign to Alarm 2 Relay 3 is assigned to Alarm 3 Relay 4 is assigned to Fault Relay 4 NC NO C Fault Relay 3 NC NO C Alarm 3 There are four relay contact outputs on each RL-4 module. Fault Device COMM M S D L S D RELAY Relay 1 Relay 2 C NO NC Alarm 1 C NO NC Alarm 2 Alarm 2 Device Figure 33 Model RL-4 Relay Output Module NOTE The current ratings of the relay contacts, 5A @ 30VDC, 5A @ 250VAC and 5Amp rating should not be exceeded. Wire attached to the RL4 terminals must be safety approved and rated for at least 5A. Model X40 Instruction Manual Rev. 3.4 Page 33 of 65 Model X40 NOTE External devices attached to the RL4 outputs must require a tool to access their wiring terminals to prevent unauthorized access. NOTE Hazardous live voltages of external devices attached to the equipment must be isolated or disconnected prior to accessing the terminals of the external devices NOTE The cable penetration for the relay outputs must be made in the bottom of the enclosure (See Figure 13). All penetrations must use a NEMA4 rated cable gland (Appleton p/n CG2575 or equivalent) to prevent water ingress and restrict access to the internal circuits of the X40. Serially address the module in hex using the two rotary switches on the front panel labeled MSD (most significant digit) and LSD (least significant digit). Ensure that each RL-4 module has a unique Modbus™ address. Set the relay Modbus™ address for each RL-4 module in accordance with Table 3. Table 3 RL-4 Relay Modbus™ Addresses Bank Module Decimal Hex Bank1 1 128-129 80-81 Bank2 2 130-131 82-83 Bank3 3 132-133 84-85 Bank4 4 134-135 86-87 Bank5 5 136-137 88-89 Bank6 6 138-139 8A-8B Bank7 7 140-141 8C-8D Bank8 8 142-143 8E-8F If the N4X unit is ordered with an integral alarm strobe, it will be connected to the Alarm 1 connector of the first RL-4 installed in the enclosure. The RL-4 is configured to Bank1, Alarm1, but can be reconfigured by the user (refer to Section 5.2.4). NOTE The RL-4 modules must be connected to the RS-485 Master Port, and must be addressed correctly in the range of 80h-8Fh. A RL-4 module connected properly to the controller will have a flashing DATA COMM LED to indicate a valid communication status and will provide the controller with 4 user assignable relay outputs that can be used to drive external annunciator devices. If the controller does not detect a configured and assigned RL-4 module, the blue LED (Fault) will start flashing and a comm error will be displayed on the RL-4 group page. 3.6 RS-485 Serial Gas Sensors RS-485 Serial Sensors will communicate directly with the X40 via Modbus™. Connect the five wires of the Modbus™ capable sensor to the Modbus™ DIN rail mounted terminal blocks labeled RS-485 MASTER and VDC Out (Figure 34). Model X40 Instruction Manual Rev. 3.4 Page 34 of 65 Model X40 RS-485 VDC Out The only Modbus™ capable Detcon sensors that may be used with the X40 are Model 100, Model 600 and Model 700 series. + NOTE B A Figure 34 Modbus™ Gas Sensor Connections NOTE Each sensor and DIN rail module must have a unique Modbus™ address. No two devices on the Modbus™ network can have the same address. Ensure that each serial sensor is assigned a unique Modbus™ address and within the range 01h-7Fh. Connect the sensors in a daisy-chained series to the other RS-485 sensors. NOTE A serial sensor connected properly to the controller will provide the controller with a continuous reading of the sensor attached. Serial sensors must be connected in series to the RS-485 Master port and must be addressed correctly. 3.7 Wireless RXT-320 Modbus™ Devices and CXT-320 Sensors Detcon offers a wide range of wireless sensors and field devices for use with the X40 wireless option if selected. Devices such as alarm stations, remote displays and various sensor types are available and able to communicate wirelessly using transceivers that operate at 2.4GHz and conform to non-licensed radio frequency appliance usage around the world. Refer to these devices specific manuals for more detailed information. For proper communication, wireless devices must have a unique Modbus™ address and must reside on the same RF channel/Network ID as the wireless transceiver of the X40 Master Ports Transceiver. The assigned Modbus address for the serial sensor does not necessarily correspond to the channel number in the controller. The Modbus address assigned for wireless sensors does not necessarily determine the channel number the controller will assign it to. (Modbus™ addresses are hexadecimal. Channels numbers are decimal. A conversion chart can be found in Section 11.2 Hexadecimal Table.) The controller will acknowledge Wireless sensors addressed between 01h and 7Fh. The controller will acknowledge alarm stations with addresses of 80 through 8Fh. NOTE: Each wireless device in the network must have a unique Modbus address. All wireless devices in the network must reside on the same RF channel/Network ID. 3.8 RXT-320 Wireless transceiver Analog Inputs The RXT-320 wireless transceiver provides two 4-20mA inputs that can be used to monitor 4-20mA devices. The input values are continuously read and stored in two separate registers accessible through Model X40 Instruction Manual Rev. 3.4 Page 35 of 65 Model X40 Modbus at the Modbus address assigned to the transceiver enabling analog inputs to be configured automatically with the Auto Configure function of the MCX-32. The two 4-20mA inputs are accessible when an RXT-320 transceiver is connected to Detcon’s optional Model 100 Terminal Board. ‘AIN1’ on connector J8 corresponds to analog input one and ‘AIN2’ on connecter J7 corresponds to analog input two. During an Auto Configure, a 4-20mA signal must be active on these inputs in order for the controller to recognize them NOTE: If the RXT-320 is used for Analog inputs the Device Type in the configuration must be set properly for the X40 Controller to recognize the RXT as an analog input device. NOTE: If only one analog input is to be used, it is recommended to interface the mA output of the sensor to AIN1. MA GND PWR B J6 SW1 24V B A J4 24V A AIN2 J7 J1 GND POWER IN ( SOLAR) GND W/V W/BU W/GN W/BN J2 SW2 24V A GND WIRELESS PROGRAM J8 MODBUS OUT ( WIRELESS) B W/BK AIN1 WIRELESS SENSOR MODBUS IN L9 SP1 SP2 SDA SCL PWR TERM PROGRAM GND J5 JP1 DISPLAY Figure 35 Model 100 Terminal Board The 4-20mA signals from the RXT-320 transceivers are communicated wirelessly to the controller using RS-485 Modbus™ RTU protocol therefore each wireless transceiver must have a unique Modbus™ address. Wireless transceivers are serially addressed in hex using the two rotary switches on the transceiver’s smart terminal board (Figure 35). SW2 corresponds to the most significant digit (MSD) and SW1 corresponds to the least significant digit (LSD). Each analog input has a specific channel assigned in the controller and is dependent on the Modbus address set from the smart term board. All other information will need to be modified on the Channel Details screen for each channel corresponding to the appropriate RXT-320 analog input. 3.9 SmartWireless® CXT Sentinel Slave Controller Detcon offers a SmartWireless® CXT Site Sentinel Slave Controller which can be configured to the X40 controller if the wireless option is selected. The CXT Sentinel Slave Controller is a wireless RXT320 device that transmits data from up to four wired analog sensors back to the X40 wirelessly using radios that operate at 2.4GHz and conform to non-licensed radio frequency appliance usage around the world. Refer to the SmartWireless® CXT manual for more detailed information. The CXT Slave Controller’s wireless transceiver must reside on the same RF channel/Network ID as the wireless transceiver of the X40. RF channel/Network ID selection is accomplished using the SW1 rotary switch. The CXT Slave Controller address must be unique, and should be set between 01h and 7Fh. Model X40 Instruction Manual Rev. 3.4 Page 36 of 65 Model X40 RF Channel Modbus Address SW1 SW3 LSD SW2 MSD Figure 36 CX/CXT Wireless Transceiver The CXT Slave Controller has the option of employing a Relay Output PCA. The relay output PCA of the CXT Slave Controller is controlled by the CXT Slave Controller, and is not, and should not be considered as part of the X40 Alarms. The X40 has no control over the CXT Slave Controller‘s relay output PCA. This Relay Output PCA can only be set according to the Slave Controller, and can only be used to control alarms that are set up by, and attached to the Slave Controller. Modbus Address SW1 0x8+LSD Figure 37 CX/CXT Relay Output PCA The analog input card of the CXT Slave Controller functions similar to a DA4 module. It is found mounted under the relay output PCA. Modbus Address SW2 MSD SW1 LSD Figure 38 CX/CXT Analog Input PCA Model X40 Instruction Manual Rev. 3.4 Page 37 of 65 Model X40 The 4-20mA signals from the sensors are communicated by the CXT Slave Controller to the X40 controller using RS-485 Modbus™ RTU protocol. The analog input PCA is serially addressed to the CXT Slave Controller in hex using the two rotary switches labeled SW2 MSD (most significant digit) and SW1 LSD (least significant digit). The analog input PCA should have an address of 01h to interface properly with the CXT Slave Controller. The CXT Slave Controller then communicates with the X40 Controller, and the CXT Slave Controller then acts as the controlling device to the analog input PCA. . NOTE: During Auto Configure, only CXT Slave Controller inputs with an active 4-20mA signal will be recognized. 3.10 SmartWireless® CX Sentinel Sensor Station Detcon offers a SmartWireless® CX Sensor Station which can be configured to the X-40 controller if the wireless option is selected. The CX Sensor Station is a wireless RXT320 device that transmits data from up to four wired analog sensors back to the X-40 using radios that operate at 2.4GHz and conform to nonlicensed radio frequency appliance usage around the world. Refer to the CX Sensor Station manual for more detailed information. The CX Sensor Station’s wireless transceiver must reside on the same RF channel/Network ID as the wireless transceiver of the MCX-32 corresponding to the correct port for the controller. RF channel/Network ID selection is accomplished using the SW1 rotary switch. The CX Sensor Station also consists of three different Modbus components that must be addressed accordingly for proper communication. These three Modbus components are located in the CX wireless transceiver, the CX relay output PCA and the CX analog input PCA, each requiring unique Modbus addressing as follows: The wireless transceiver of the CX Sensor Station should be addressed between 01h and 20h when configured to the RS-485 Master Port. Wireless transceivers are serially addressed in hex using the two rotary switches on the transceiver (Figure 36). The SW2 rotary switch corresponds to the most significant digit (MSD) and the SW3 rotary switch corresponds to the least significant digit (LSD). The relay output PCA of the CX Sensor Station functions similar to an RL4 module and needs to be addressed and configured as such. The most significant digit (MSD) for the relay output PCA is hard coded to a hex value of 8 so only the least significant digit (LSD) must be set using the SW1 rotary switch (Figure 37). NOTE: The MSD for the relay output PCA is hard coded to a hex value of 8 so only the LSD must be set. Addressing criteria is the same as RL4’s and Alarm Stations and will be seen as an RL4 by the Controller. The analog input card of the CX Sensor Station functions similar to a DA4 module. It is found mounted under the relay output PCA. The 4-20mA signals from the sensors are communicated by the CX Sensor Station to the controller using RS-485 Modbus™ RTU protocol. The analog input PCA is serially addressed in hex using the two rotary switches labeled SW2 MSD (most significant digit) and SW1 LSD (least significant digit). Refer to Figure 38. Each CX Site Sentinel will have four channels reserved based on its Modbus address with each channel corresponding to each of its four inputs. The Modbus Addresses should be set between 01h and 7Fh. NOTE: During Auto Configure only CX Sensor Station inputs with an active 4-20mA signal will be recognized. Model X40 Instruction Manual Rev. 3.4 Page 38 of 65 Model X40 3.11 General Installation Wiring Notes Follow generally accepted guidelines for RS-485 serial networks. Do not wire I/O Modules and/or Modbus™ gas sensors in long-distance ‘T-Tap’ configurations. Instead, use a “daisy-chain” wiring scheme. Use Detcon Recommended cabling whenever possible. General Cable Commodore P/N ZO16P0022189 is recommended for a single cable providing serial communications and power. Ground the cable shielding at the Model MCX-32 controller only. Other points of grounding may cause a ground loop, and induce unwanted noise on the RS-485 line, which in turn may disrupt communications. For wireless installations, verify that all devices in the wireless network reside on the same RF channel as transceivers will only respond to other transceivers with the same RF channel. If multiple wireless networks are implemented, each wireless network must exist on a separate RF channel in order to avoid cross talk and interference between networks. Any slave device near an elevated antenna needs to be at least as far from the antenna as the antenna is high. For example, if the antenna is 20ft. high, then the nearest slave device should be at least 20 ft. away. 3.12 Initial Start-Up Applying power with devices hooked up incorrectly may cause damage to the equipment. CAUTION 1. Verify that all the wiring connections and external devices are installed correctly before applying power to the controller. 2. Verify that all Modbus™ devices have unique Modbus™ address, and are addressed correctly. 3. Apply the desired power option to the X40. For N1 and N4 units, ensure that the Disconnect Terminal Blocks are closed. The controller will power up once power is applied. 4. Verify normal operation once power is applied to the unit. The unit will cycle through the following: • Boot up and display the company name, model, firmware version and COMM ports available. • Proceed to poll Modbus™ addresses of any attached devices. • The LCD will then refresh and display the next eight channels and so on until the LCD cycles back to the first eight channels and repeats the process. NOTE: If a previous configuration does not exist, the user must either manually configure the network or run Auto Configure from the user-interface. The unit will display the current status of the connected devices if the unit has been configured properly. 5. Apply test gas to each sensor connected to the X40. Verify that the correct alarm outputs are activated when gas is applied. If AO-4 modules are installed, the current output for each channel should also be verified. Model X40 Instruction Manual Rev. 3.4 Page 39 of 65 Model X40 4.0 Secure Digital Card NOTE Ensure that power is turned off to the X40 before installing or removing the SD card. 1. Install the SD card in the SD slot (J9) on the back of the controllerꞌs PCA before the controller is powered up. 2. The controller will notify the user if a successful installation of the card was achieved upon power up. 3. The controller will automatically format the card and create the necessary files for data logging. Refer to Section 5.2.8 for more information regarding the data logging feature. NOTE Data logging does not occur during the first 10 minutes after power-up of the unit. This delay allows the sensors time to stabilize, so that inaccurate or faulty readings will not be logged during this stabilization period. Model X40 Instruction Manual Rev. 3.4 Page 40 of 65 Model X40 5.0 System Configuration 5.1 X40 Controller Setup 1. The PROG switch is used to enter the menu mode of the unit by swiping a programming magnet over the corresponding marker (). Upon entering the menus, all Modbus™ polling stops, sensor values are not read and alarm outputs are not updated. NOTE If the X40 is in alarm when the user enters the menu, it will stay in alarm until they exit the menu. 2. Upon entering the MAIN MENU, the LCD will display the following: MAIN MENU AUTO CONFIGURE SYSTEM 3. Use the down arrow "" switch to move to the next menu item or use the up arrow "" switch to move to the previous menu item by swiping the programming magnet over the corresponding markers. Swiping the PROG switch again will return the unit to normal operation. 4. Swipe the ENTER marker when the appropriate menu item is located to enter the menu. 5.2 Menu Functions The Main Menu and consists of seven menu items: 1. Auto Configure System 2. Setup Channel Data 3. Set Channel Alarms 4. Set Relay Function 5. Inhibit & Alarm Test Mode 6. System Diagnostics 7. Time and Date 8. View TWA & Peak 5.2.1 Auto Configure System 1. Ensure that the addresses on all modules and sensors are correctly set (Section 3.0). 2. Verify that all 4-20mA inputs are turned on. (Note: Only currents above 1.8mA will be detected.) 3. Upon entering Auto Configure menu, the LCD will display: CHANNELS:## Model X40 Instruction Manual CONFIGURATION SUMMARY AO4S:## WIRELESS TRANSCEIVER WTS:## RL4/ALARM STATION COUNT:## [RUN SYSTEM AUTO CONFIGURE] Rev. 3.4 Page 41 of 65 Model X40 4. Swipe the ENTER marker to initiate the search. The X40 controller will perform an incremental search for available 700/100 and 600 serial sensors starting with Modbus™ address 01h and analog inputs with a minimum current of 1.80mA. NOTE All sensors and modules must be powered on to be detected correctly. NOTE The channel tags for the analog inputs will be set to "PPM H2S" by default. These can be changed in the Utilities menu. NOTE The channel tags for detected serial sensors will be set to gas type and units of the sensor detected by default. These can be changed through the Utilities menu. NOTE A swipe of the PROG marker while in search mode will abort the search and restore the previous configuration. Any devices found up to that point will not be saved. 5. The search will continue until Modbus™ address 7Fh is reached or the search is terminated by swiping the ‘ENTER’ marker which will save the current found configuration. When all of the connected sensors are identified, swipe ‘ENTER’ to begin detecting RL4 modules beginning with Modbus™ address 80h. NOTE Once all of the attached sensors are identified, swipe the ENTER marker to move on to the next stage (RL4 search). Each address that is not responding will take an additional two seconds to time out. 6. The search will continue until Modbus™ address 8Fh is reached or the search is terminated by swiping the ‘ENTER’ marker which will save the RL4 modules. When all of the connected RL4s are identified, swipe ‘ENTER’ to begin detecting AO-4s with Modbus™ address A1h. 7. The search will continue until Modbus™ address A8h is reached or the search is terminated by swiping the ENTER marker which will save the AO-4 modules. When all of the connected AO-4s are identified, swipe ‘ENTER’ to begin detecting wireless radio modules starting with Modbus™ address 01h. 8. The search will continue until Modbus™ address 7Fh is reached or the search is terminated by swiping the ENTER marker which will save the wireless radio modules found. NOTE 5.2.2 A swipe of the PROG marker while in search mode will abort the search and restore the previous configuration. Any devices found up to that point will not be saved. Setup Channel Data 1. Upon entering this menu, the LCD will display: CHANNEL 1 DATA: SLAVE ID: DEVICE TYPE: ANALOG INPUT: DECIMAL POINT: RANGE: TYPE: RL4 BANK CNT: 2. A flashing cursor will appear on SLAVE ID. Swiping the magnet over: The markers of the up or down arrows will move the flashing cursor to the desired function. The ENTER marker will select the function indicated by the flashing cursor The markers of the up or down arrows will change the value. Model X40 Instruction Manual Rev. 3.4 Page 42 of 65 Model X40 The ENTER marker will save the selected value and return to the flashing cursor. 3. If there is more than one channel, a swipe of the down arrow marker while the flashing cursor is on RL4 BANK CNT will scroll the display to the next channel allowing for its configuration. To return to the previous channel, a swipe of the up arrow marker should be performed while the flashing cursor is on SLAVE ID. 4. SLAVE ID is detected during the X40 auto-configuration process and cannot be changed by the user. 5. DEVICE TYPE is detected during the X40 auto-configuration process and cannot be changed by the user. 6. If the device type is “DA4”, then ANALOG INPUT indicates the DA4 input associated with the channel. If the device type is something other than “DA4”, this field will read “—“. 7. DECIMAL POINT indicates the number of places in the gas reading to the right of the decimal point. This value cannot be changed by the user. 8. RANGE is the range of the sensor attached to the channel. If the device type is “DA4”, this value can be changed by the user. If the device type is something other than “DA4”, this value is detected during auto-configuration and cannot be changed by the user. 9. TYPE is the user entered name for the channel. It can be up to 9 characters long. 10. The RL4 banks assigned to the channel can be set using RL4 BANK CNT. Swiping ENTER on this field will show the RL4 banks assigned to this channel. If a number is displayed, then the bank is assigned to the channel. If “-” is displayed, then the bank is not assigned to the channel. The user can move between RL4 banks using down arrow marker. Swiping the up arrow marker on a bank will allow the user to toggle the bank on and off. Swiping ENTER marker will save the values and return to the Setup Channel Data menu. 5.2.3 Set Channel Alarms The Set Channel Alarms menu allows configuration of each channelꞌs alarms. The information to be configured is the; ALM1 LEVEL, ALM1 ASCENDING, ALM2 LEVEL, ALM2 ASCENDING, ALM3 LEVEL, and ALM3 ASCENDING. 1. Upon entering this menu, the LCD will display: CHANNEL 1 ALARMS: ALM2 LEVEL: ## ALM2 ASCENDING: X ALM3 LEVEL: ## ALM3 ASCENDING: X ALM1 LEVEL: ## ALM1 ASCENDING: X 2. A flashing cursor will appear on ALM1 LEVEL. Swiping the magnet over: The markers of the up or down arrows will move the flashing cursor to the desired function. Model X40 Instruction Manual Rev. 3.4 Page 43 of 65 Model X40 The ENTER marker will select the function indicated by the flashing cursor The markers of the up or down arrows will change the value. The ENTER marker will save the selected value and return to the flashing cursor. 3. If there is more than one channel, a swipe of the down arrow marker while the flashing cursor is on ALM3 ASCENDING will scroll the display to the next channel allowing for its configuration. To return to the previous channel, a swipe of the up arrow marker should be performed while the flashing cursor is on ALM1 LEVEL. 4. Ensure that the gas alarm relay (if not being used) has a setting of 0 to make it inactive. NOTE Any channels that are in alarm or fault will not display the device tag on the main display. NOTE If the channel range is changed, then the alarm set points must be re-entered. 5.2.4 Set Relay (Alarm) Functions 1. Upon entering this menu, the LCD will display: FAULT RELAY SETUP: BANK 1 LATCHING:X ENERGIZED:X SILENCEABLE:X Relays are displayed in the following order: • FAULT • ALARM1 • ALARM2 • ALARM3 NOTE 2. A flashing cursor will appear on LATCHING for Bank1. Swiping the magnet over: The markers of the up or down arrows will move the flashing cursor to the desired function. The ENTER marker will select the function indicated by the flashing cursor. The markers of the up or down arrows will change the value. The ENTER marker will save the selected value and return to the flashing cursor. The down arrow marker while the flashing cursor is on SILENCEABLE for Bank1 will scroll the display to the next relay allowing for its configuration. The up arrow marker to return to the previous relay while the flashing cursor is on LATCHING for Bank1. By default, each sensor found during the auto configuration will be assigned to all eight relay banks. This setting can be changed through the utilities menu. NOTE 3. Repeat Step 2 for the remaining banks containing three alarms and a fault. 4. Ensure that all four relay outputs in all eight banks are set-up to account for the following three settings (Section 1.7). The values selected can be either Y (Yes) or N (No). Latching or Non-Latching Energized or De-Energized Model X40 Instruction Manual Rev. 3.4 Page 44 of 65 Model X40 Silenceable or Non-Silenceable NOTE It is generally recommended to set the FAULT relay as energized so that it will trip upon loss of power. NOTE The FAULT condition is assigned to the FAULT relay as a standard. It cannot be disengaged in the configuration of the controller. The Main Display will show IN FAULT for any channel that is in fault. 5.2.5 Inhibit and Alarm Test Mode Inhibit mode permits testing of sensors while preventing alarms from being activated. Alarm test mode permits testing of the attached alarm devices without applying gas to the sensors 1. Upon entering this menu, the LCD will display: INHIBIT & ALARM TEST MODE INHIBIT MODE: | ALARM TEST MODE: #:## | START | OFF 2. These values can be changed by swiping the magnet over the markers of the up or down arrows to move the arrow prompt "→" to the desired function. A swipe over: The ENTER marker will select the function indicated by the arrow prompt "→". The markers of the up or down arrows will change the value. The ENTER marker will save the selected value. 3. Activate inhibit mode by entering the timer value in minutes and seconds (0-60 minutes). 4. Select START and all relay outputs on the network will be disabled until the timer reaches 0 or is manually stopped by the user by turning off the inhibit mode. 5. Activate alarm test mode to verify that connected alarm devices are functioning properly by swiping the magnet over the markers. All channels will simultaneous go from 0 to full scale in 5% increments. When they reach full scale they will return to 0 in 5% increments. This will continue indefinitely until alarm test mode is turned off. 6. Verify that the relays fire according to their configuration as the readings cross their respective alarm set points. 5.2.6 System Diagnostics The System Diagnostics menu performs function tests for the following: LCD display, Panel LEDꞌs, External reset switch, Relays, and Modbus™ interface. Upon entering this menu, the X40 controller will automatically initiate a function test that displays every pixel LCD display. The controller then performs a function test of the LED drivers by activating all four Model X40 Instruction Manual Rev. 3.4 Page 45 of 65 Model X40 LEDꞌs. After the LED test, the controller initiates a test for the external reset switch which lets the user know when the reset switch is pressed. The user will be prompted: 1. To "press (swipe) enter key (marker) to continue" which will initiate the relay driver test and the controller will then reset all the relays and turn on the alarm 1 relay. 2. To "press (swipe) any key (marker)" which will turn on the alarm 2 relay. 3. To "press any key" and the alarm 3 relay will be turned on. 4. To "press any key" and the fault relay will be turned on. 5. To "press any key" and all the relays will be reset. 6. Connect COMM1 (master) to COMM2 (slave) for a Modbus™ loop back test at different baud rates and “press any key” to continue or swipe any marker to stop the test. NOTE 5.2.7 When performing the Modbus™ loop back test, the loop back cable should be installed between the COMM1 (Master) port and the COMM2 (Slave) port. Disconnect all other external Modbus™ interfaces from the loop and bypass any installed modules. Time and Date 1. Upon entering this menu, the LCD will display: TIME AND DATE: ##:##:## | ##:##:## | [TIME] [DATE] 2. Verify that [TIME] is selected and swipe the magnet over the ENTER marker to enter the SET TIME menu. 3. Swipe the magnet over the markers of the up or down arrows to move the arrow prompt "→"to the desired field. 4. A swipe over the ENTER marker will select the field indicated by the arrow prompt "→" and the value can be changed by swiping over the markers of the up or down arrows. 5. Another swipe over the ENTER marker will save the selected value. 6. Once the desired values have been set, move the arrow prompt to "Update Time" and swipe the ENTER marker to update the time with the changes entered. 7. Swipe the magnet over the marker of the down arrow and verify [DATE] is selected. 8. Swipe the magnet over the ENTER marker to enter the SET DATE menu. 9. Swipe the magnet over the markers of the up or down arrows to move the arrow prompt to the desired field. Model X40 Instruction Manual Rev. 3.4 Page 46 of 65 Model X40 10. A swipe over the ENTER marker will select the field indicated by the arrow prompt and the value can be changed by swiping over the markers of the up or down arrows. 11. Another swipe over the ENTER marker will save the selected value. 12. Once the desired values have been set, move the arrow prompt to "Change Date" and swipe the ENTER marker to update the date with the changes entered. 13. A swipe of the PROG marker at any time while setting the time or date will escape out of the current menu with no changes saved. 5.2.8 View TWA and Peak 1. Verify that a secure digital (SD) memory card is installed in the SD slot of the X40 controller board (J9). 2. Upon entering this menu, the user can view the data recorded from the SD card and is displayed as: <File Name>: MM/DD/YY, HH:MM:SS, Channel #, TWA #, PEAK # Example: TWA_P08.CSV: 05/17/11,23:00:09,17, 51, 100 The sensor readings are continuously logged to the SD card. This data can also be viewed by removing the SD card and inserting it in a laptop using the Detcon Log File Viewer application. Refer to the Detcon Log File Viewer instruction manual for detailed information. Model X40 Instruction Manual Rev. 3.4 Page 47 of 65 Model X40 6.0 Modbus™ Slave Communications Port A Modbus™ RTU master can poll the slave port on the X40 allowing the Modbus master to remotely monitor the status of the X40. If multiple X40s are being used on a single Modbus™ network, each controller must be set to a different device address. 6.1 Modbus™ Register Map Table 4 X40 Register Map Channel # Channel 1 Channel 2 Channel 3 Channel 4 Channel 5 Channel 6 Channel 7 Channel 8 Channel 9 Channel 10 Channel 11 Channel 12 Channel 13 Channel 14 Channel 15 Channel 16 Model X40 Instruction Manual Register Description 40000 Reading 40001 Status 40002 Reading 40003 Status 40004 Reading 40005 Status 40006 Reading 40007 Status 40008 Reading 40009 Status 40010 Reading 40011 Status 40012 Reading 40013 Status 40014 Reading 40015 Status 40016 Reading 40017 Status 40018 Reading 40019 Status 40020 Reading 40021 Status 40022 Reading 40023 Status 40024 Reading 40025 Status 40026 Reading 40027 Status 40028 Reading 40029 Status 40030 Reading 40031 Status Rev. 3.4 Channel # Channel 17 Channel 18 Channel 19 Channel 20 Channel 21 Channel 22 Channel 23 Channel 24 Channel 25 Channel 26 Channel 27 Channel 28 Channel 29 Channel 30 Channel 31 Channel 32 Register Description 40032 Reading 40033 Status 40034 Reading 40035 Status 40036 Reading 40037 Status 40038 Reading 40039 Status 40040 Reading 40041 Status 40042 Reading 40043 Status 40044 Reading 40045 Status 40046 Reading 40047 Status 40048 Reading 40049 Status 40050 Reading 40051 Status 40052 Reading 40053 Status 40054 Reading 40055 Status 40056 Reading 40057 Status 40058 Reading 40059 Status 40060 Reading 40061 Status 40062 Reading 40063 Status Page 48 of 65 Model X40 Reading Register Current gas reading of the channel assigned to the register. Status Register Bit 0 Alarm 1 0 = No Alarm 1 = In alarm 1 Bit 1 Alarm 2 0 = No Alarm 1 = In alarm 2 Bit 2 Alarm 3 0 = No Alarm 1 = In alarm 3 Fault 0 = No Fault 1 = Sensor/Alarm Fault Cal 0 = Normal Operation 1 = In Cal Comm Error 0 = Normal Operation 01 = 1 Decimal Point ( Divisor of 10) 1 = Communication Error 10 = 2 Decimal Point (Divisor of 100) 11 = Undefined (Default to No Decimal Point) Bit 3 Bit 4 1 Bit 5 Bit 6 & Decimal Point Bit71 Bit 8 Smart Battery Pack 0 = No Smart Battery Pack 1 = Smart Battery Pack Bit 9 Battery Error 0 = No Battery Error 1 = Battery Error Bit 10 Low Battery 0 = No Low Battery 1 = Low Battery Bit 11 Not Used Wireless Network Type 0 = 320 1 = 300 000 = Channel Disabled 100 = Repeater5 001 = CXT Sensor 101 = Sensor 010 = Alarm Station 110 = Undefined (Sensor) Bit 12 Bits 13-15 1 00 = No Decimal Point(No Divisor) Type 011 = SmartHMI These bits are only active for sensor devices Model X40 Instruction Manual 5 Rev. 3.4 111 = Undefined (Sensor) Page 49 of 65 Model X40 7.0 Remote Alarm Reset/Acknowledge Switch Installation 1. Mount the reset switch on the bottom or side of the NEMA 4X enclosure. For the other enclosure types, the switch must be mounted externally such as in the bottom of a J-Box. 2. Standard Momentary Pushbutton Switch a. The standard reset switch should be a Normally Open, Momentary Closed switch that is rated for the area of installation. b. Connect the Remote Alarm Reset/Acknowledge switch to the terminals of the terminal block labeled "REMOTE RESET" for the N1P and N4X controllers (Figure 39). For the N7 controller, connect the switch to the terminals "SW" on connector J7 (Figure 40) Once installed, pushing the switch will execute the reset/acknowledge function. RESET Figure 39 N1P & N4X Remote Switch Input J7 D3 D4 D5 PWR MOMENTARY GND A2 B2 A1 RESET SWITCH B1 SW Figure 40 N7 Remote Switch Input 3. Detcon Class I Division I Switch a. Connect the red wire to the PWR or +24V terminal b. Connect the black wire to the GND or – terminal c. Connect the purple wire to the SW connection nearest the B1 terminal (Figure 41) J7 D3 D4 D5 PWR GND RED BLACK PURPLE A2 B2 A1 B1 SW Figure 41 Detcon C1D1 Switch Connections Model X40 Instruction Manual Rev. 3.4 Page 50 of 65 Model X40 8.0 Troubleshooting Guide Unit will not power up Verify correct AC or DC voltage selection. Verify correct VAC and VDC powering configuration. Relays are not firing Verify that the alarm relays are configured properly. Alarms on constantly Ensure that no channels are set to ascending or descending incorrectly. Alarm Firing causes unit to "Lock Up" Verify that the alarm annunciator current draw does not exceed the on-board power supply limits. Replace with external power supply if necessary. Contact the Detcon Service Department for further troubleshooting assistance at 713-559-9200. 8.1 Replacement of the display PCA in NEM7 units The NEMA 7 units come with the display assembly PCA P/N 500-005142-100. 1. Remove the NEMA7 enclosure cover from the enclosure and set aside. 4. Unplug the connector to J7 of the Display PCA. 5. Remove the screws holding the PCA to the enclosure base, and remove the PCA completely. 6. Install the new PCA in the enclosure using the screws removed above 7. Ensure that the connector is wired correctly according to figure below. 8. Re-install the cove on the enclosure. A1, B1 are Master RS-485 Port 1 SW4 SW3 SW2 SW1 R8 J5 A2, B2 are Slave RS-485 Port SW - Reset Switch J7 D3 D4 D6 PWR GND A2 B2 D5 MAIN J7 J2 1 A2 SECONDARY GND 1 PWR B2 A1 B1 A1 SW J6 B1 SW Connector PCA Figure 42 NEMA 7 Display Assembly PCA Model X40 Instruction Manual Rev. 3.4 Page 51 of 65 Model X40 8.2 Replacement of the NEMA 4 Drop-In Display Assembly The NEMA4 enclosures come with a ‘Drop-In’ Display Assembly (P/N 949-005142-200) 1. Unplug the connector from J7 on the Display Assembly. 2. Remove the 10 Hex-Head bolts holding the Display Assembly to the cover of the enclosure 3. Replace the Drop-In Display Assembly on the enclosure cover, and replace the 10 Hex-Head Bolts. 4. Ensure that gasket is placed between the Drop-In Display Assembly and the cover. 5. Tighten the bolts to secure the Drop-In Display Assembly in place. 6. Reconnect the connector to J7 on the display. 7. Check the wiring going to the Drop-In Assembly. The correct wiring is shown in figure below. Note: some older units may have different wiring, and it is important to ensure the wiring is correct. A1, B1 are Master RS-485 Port Drop-In Display Assembly A2, B2 are Slave RS-485 Port SW - Reset Switch PWR GND A2 B2 A1 B1 SW SW PCA Connector Figure 43 NEMA 4 Drop-In Display Assembly Model X40 Instruction Manual Rev. 3.4 Page 52 of 65 Model X40 9.0 Customer Support and Service Policy Detcon Headquarters Shipping Address: 4055 Technology Forest Blvd, The Woodlands, Texas 77381 Mailing Address: P.O. Box 8067, The Woodlands Texas 77387-8067 Phone: 713.559.9200 Fax: 281.298.2868 • www.detcon.com • [email protected] • [email protected] All Technical Service and Repair activities should be handled by the Detcon Service Department via phone, fax or email (contact information given above). RMA numbers should be obtained from the Detcon Service Department prior to equipment being returned. For on-line technical service, have the model number, part number, and serial number of product(s) in question available. All Sales activities (including spare parts purchase) should be handled by the Detcon Sales Department via phone, fax or email (contact information given above). NOTE All additional parts must be supplied by Detcon. Use of parts from a third party will void warranty and safety approvals. NOTE X40 should only be repaired by Detcon personnel or a Detcon trained representative. Model X40 Instruction Manual Rev. 3.4 Page 53 of 65 Model X40 10.0 Warranty Notice Detcon Inc. warrants the X-40 Integrated Alarm and Control System to be free from defects in workmanship of material under normal use and service for two years from the date of shipment on the transceiver electronics. Detcon Inc. will repair or replace without charge any such equipment found to be defective during the warranty period. Full determination of the nature of, and responsibility for, defective or damaged equipment will be made by Detcon Inc. personnel. Defective or damaged equipment must be shipped to the Detcon Inc. factory or representative from which the original shipment was made. In all cases, this warranty is limited to the cost of the equipment supplied by Detcon Inc. The customer will assume all liability for the misuse of this equipment by its employees or other contracted personnel. All warranties are contingent upon the proper use in the application for which the product was intended and does not cover products which have been modified or repaired without Detcon Inc. approval, or which have been subjected to neglect, accident, improper installation or application, or on which the original identification marks have been removed or altered. Except for the express warranty stated above, Detcon Inc. disclaims all warranties with regard to the products sold. Including all implied warranties of merchantability and fitness and the express warranties stated herein are in lieu of all obligations or liabilities on the part of Detcon Inc. for damages including, but not limited to, consequential damages arising out of, or in connection with, the performance of the product. Detcon, Inc. reserves the right to refund the original purchase price in lieu of ITM replacement. Model X40 Instruction Manual Rev. 3.4 Page 54 of 65 Model X40 11.0 Appendix 11.1 Specifications System Specifications Capacity: Sensor Inputs: Outputs: Warranty: 32 I/O Channels Analog 4-20mA or RS-485 Modbus™ RTU Analog 4-20mA or RS-485 Modbus™ RTU One year Environmental Specifications Operating Temperature: -10ºC to +64ºC Storage Temperature: -40ºC to +85ºC Humidity: 0-99%RH, non-condensing Altitude: 0 -2000m Electrical Specifications N1P, N4X Input Voltage: N7 Input Voltage: Max AC Current Rating: Max DC Current Rating: Power Consumption: Power Consumption: Power Consumption: RFI/EMI Protection: Electrical Classification: Mechanical Specifications Display: Dimensions: Wireless Specifications Frequency: Range: Spread Spectrum: Modulation: Sensitivity: Model X40 Instruction Manual 100-120/220-240VAC, 50-60Hz 11.5-30VDC 11.5-30VDC 2.1A/1A (110-120VAC/220-240VAC) 7.5A X40-08-N4X - Total Power consumption is dependent on number of I/O modules, number of gas sensors, and the type of gas sensors. Total power of controller with I/O modules and gas sensors not to exceed 100 Watts. X40-32-N1P, X40-32-N4X - Total Power consumption is dependent on number of I/O modules, number of gas sensors, and the type of gas sensors. Total power of controller with I/O modules and gas sensors not to exceed 100 Watts. X40-32-N7 – Less than 0.5W (with alarm LEDs and backlight inactive, controller only) Complies with EN61326 NEMA 1 (X40-32-N1P), NEMA 4X (X40-08-N4X, X40-32-N4X) NEMA 7 (X40-32-N7) 11/4" x 6" Backlit LCD X40-32-N1P – 10.5" W x 8" H x 12" D X40-08-N4X – 11.85" W x 13.75" H x 6.5" D X40-32-N4X – 16" W x 17.85" H x 8.5" D X40-32-N7 – 11.05" W x 9.15" H x 2.78" D ISM 2.4GHz Indoor/No Line of Sight – 1,000ft Outdoor RF Line of Sight (with directional antenna) – 1.5 Miles Digital-Sequence Spread Spectrum (DSSS) 0-QPSK -102dBm (1% PER) Rev. 3.4 Page 55 of 65 Model X40 11.2 Hexadecimal Table Table 5 Hexadecimal Conversion Table ID# MSD LSD ID# MSD LSD 0 0 0 43 2 B 1 0 1 44 2 C 2 0 2 45 2 D 3 0 3 46 2 E 4 0 4 47 2 F 5 0 5 48 3 0 6 0 6 49 3 1 7 0 7 50 3 2 8 0 8 51 3 3 9 0 9 52 3 4 10 0 A 53 3 5 11 0 B 54 3 6 12 0 C 55 3 7 13 0 D 56 3 8 14 0 E 57 3 9 15 0 F 58 3 A 16 1 0 59 3 B 17 1 1 60 3 C 18 1 2 61 3 D 19 1 3 62 3 E 20 1 4 63 3 F 21 1 5 64 4 0 22 1 6 65 4 1 23 1 7 66 4 2 24 1 8 67 4 3 25 1 9 68 4 4 26 1 A 69 4 5 27 1 B 70 4 6 28 1 C 71 4 7 29 1 D 72 4 8 30 1 E 73 4 9 31 1 F 74 4 A 32 2 0 75 4 B 33 2 1 76 4 C 34 2 2 77 4 D 35 2 3 78 4 E 36 2 4 79 4 F 37 2 5 80 5 0 38 2 6 81 5 1 39 2 7 82 5 2 40 2 8 83 5 3 41 2 9 84 5 4 42 2 A 85 5 5 Model X40 Instruction Manual ID# MSD LSD 86 5 6 87 5 7 88 5 8 89 5 9 90 5 A 91 5 B 92 5 C 93 5 D 94 5 E 95 5 F 96 6 0 97 6 1 98 6 2 99 6 3 100 6 4 101 6 5 102 6 6 103 6 7 104 6 8 105 6 9 106 6 A 107 6 B 108 6 C 109 6 D 110 6 E 111 6 F 112 7 0 113 7 1 114 7 2 115 7 3 116 7 4 117 7 5 118 7 6 119 7 7 120 7 8 121 7 9 122 7 A 123 7 B 124 7 C 125 7 D 126 7 E 127 7 F 128 8 0 Rev. 3.4 ID# MSD LSD 129 8 1 130 8 2 131 8 3 132 8 4 133 8 5 134 8 6 135 8 7 136 8 8 137 8 9 138 8 A 139 8 B 140 8 C 141 8 D 142 8 E 143 8 F 144 9 0 145 9 1 146 9 2 147 9 3 148 9 4 149 9 5 150 9 6 151 9 7 152 9 8 153 9 9 154 9 A 155 9 B 156 9 C 157 9 D 158 9 E 159 9 F 160 A 0 161 A 1 162 A 2 163 A 3 164 A 4 165 A 5 166 A 6 167 A 7 168 A 8 169 A 9 170 A A 171 A B ID# MSD LSD 172 A C 173 A D 174 A E 175 A F 176 B 0 177 B 1 178 B 2 179 B 3 180 B 4 181 B 5 182 B 6 183 B 7 184 B 8 185 B 9 186 B A 187 B B 188 B C 189 B D 190 B E 191 B F 192 C 0 193 C 1 194 C 2 195 C 3 196 C 4 197 C 5 198 C 6 199 C 7 200 C 8 201 C 9 202 C A 203 C B 204 C C 205 C D 206 C E 207 C F 208 D 0 209 D 1 210 D 2 211 D 3 212 D 4 213 D 5 214 D 6 ID# MSD LSD 215 D 7 216 D 8 217 D 9 218 D A 219 D B 220 D C 221 D D 222 D E 223 E F 224 E 0 225 E 1 226 E 2 227 E 3 228 E 4 229 E 5 230 E 6 231 E 7 232 E 8 233 E 9 234 E A 235 E B 236 E C 237 E D 238 E E 239 F F 240 F 0 241 F 1 242 F 2 243 F 3 244 F 4 245 F 5 246 F 6 247 F 7 248 F 8 249 F 9 250 F A 251 F B 252 F C 253 F D 254 F E 255 F F Page 56 of 65 Model X40 11.3 Utilities Contact a Detcon representative prior to changing any settings in this section. Default settings are functional for the majority of applications. Any adjustments made to other items may cause the controller or various components to not work properly. CAUTION X40 controller setup is accomplished through the Main Menu and consists of 9 menu items: 1. Setup Channel Data 2. Set RF Silence and RF Sleep 3. Set Low Battery Alarms 4. Set Modbus Address 5. CXT Low Battery Threshold 6. Module update rates 7. Set COMM Baud Rates 8. Set Modbus™ Timeouts 9. Display Settings NOTE To access the Utilities Menu, advance to the View TWA and Peak menu. Hold the magnet over the ENTER marker for 20 seconds without removing it. 11.3.1 Set Channel Data The Setup Channel Data menu configures each channel represented by its assigned sensor or device. When a sensor or device is added to the controller, the information can be added and/or modified in this menu. Information to be configured is as follows: 1. Slave ID 2. Device Type 3. Analog Input 4. Decimal Point 5. Range 6. Type 7. RL4 Bank 1. Upon entering this menu, the LCD will display: CHANNEL 1 DATA: SLAVE ID:## DEVICE TYPE:XXX ANALOG INPUT:# DECIMAL POINT:# RANGE:##### TYPE:XXXXXXXXX RL4 BANK:XXX 2. A flashing cursor will appear on SLAVE ID. Swipe the magnet over the markers of the up or down arrows to move the flashing cursor to the desired function. A swipe over: The ENTER marker will select the function indicated by the flashing cursor. The markers of the up or down arrows will change the value. The ENTER marker will save the selected value and return to the flashing cursor. NOTE The SLAVE ID is the Modbus™ address in hex of the sensor or device being assigned to a specific channel. This will be a Modbus™ slave device to the X-40 controller. Model X40 Instruction Manual Rev. 3.4 Page 57 of 65 Model X40 Device Type Value The Device Type values available are 100, 700, 600 (Detcon serial sensor models), DA4/DI4 (analog sensors) or radio module (when analog inputs are in use). Ensure that the appropriate value corresponding to the sensor or device is assigned to the indicated channel. Analog Input Value The Analog Input is only available for analog sensors and devices. Analog sensors (DA4/DI4), the available value is 1, 2, 3 or 4 corresponding to the input position on the DA-4/DI-4 module. For a SmartWireless® CX Sensor Station or a SmartWireless® CXT Slave Controller, the available value is 1, 2, 3, or 4. A wireless radio module (RXT-320 with a Model 100 Terminal Board), the available value is 1 or 2 corresponding to the input position of the connected sensor. Decimal Point Value The Decimal Point value is set to 0, 1 or 2. The number of digits displayed to the right of the decimal point of the gas concentration value is as follows: Sensor range is less than 10, this value will be 2. Sensor range is between 10 and 25, this value will usually be 1. Sensor range is greater than 25, the value should be 0. Range Value The Range value is 1-10,000 and corresponds to the gas range value of the sensor. NOTE If the range is changed, the alarm levels will have to be reset. The range value must match the range on the sensor for proper operation. CAUTION Type Value The Type value is an alphanumeric string of nine characters and corresponds to the tag that is displayed with the gas concentration value. This field is used to define the gas concentration units and the gas type. 1. Swipe the magnet over the markers of the up or down arrows to modify the first alphanumeric character indicated by an underscore. 2. A swipe over the ENTER marker will select the displayed value and the next character to be changed will be indicated by an underscore. 3. Repeat Steps 1 and 2 to update all nine characters. 4. Swipe over the ENTER marker to return to the flashing cursor. RL4 Bank Value The RL4 Bank value can be 1, 2, 3, 4, 5, 6, 7, 8, or ALL and defines the total number of banks that the channels have been assigned. When selected, a new page allows the user to toggle the channelꞌs relay bank assignments for all eight banks. 1. Swipe the down arrow marker while the flashing cursor is on RL4 BANK to scroll the display to the next channel allowing for its configuration. 2. A swipe of the up arrow marker while the flashing cursor is on SENSOR TYPE will return to the previous channel. Model X40 Instruction Manual Rev. 3.4 Page 58 of 65 Model X40 11.3.2 Set RF Silence and RF Sleep (Wireless Function Only) The Set RF Silence and RF Sleep menu allows the user to initiate radio silence for a predetermined amount of time, over the entire network. RF Sleep terminates communication (sleep command) between all of the wireless radio modules in the network as a power saving feature. A longer sleep time will increase delay between alarm conditions occurring and the alarms being activated. RF Silence prevents radios from interfering with other RF devices on site (remote detonators). This feature will stay on until the user turns it off. The sensors are not monitored and no alarms can be activated while RF Silence is active. 1. Upon entering this menu, the LCD will display: RF SILENCE AND SLEEP RF SILENCE: | RF SLEEP: | ##:## XX | SLEEP:XXX 2. Swipe the magnet over the markers of the up or down arrows to move the arrow prompt "→" to the desired location. A swipe over: The ENTER marker for RF SILENCE and SLEEP will toggle the value between ON and OFF. The ENTER marker for RF SLEEP will select the function indicated by the arrow prompt "→". The markers of the up or down arrows will change the value. The ENTER marker will save the selected value. The sleep timer has a range from zero to five minutes and is set in minutes and seconds. 11.3.3 Set Low Battery Alarms The Set Low Battery Alarms menu establishes low battery alarm thresholds for wireless radio modules using Detconꞌs Smart Battery Pack interfaced to the controller. 1. Upon entering this menu, the LCD will display: LOW BATTERY ALARM: TTE(DD:HH:MM): | SOC(%): ##:##:## | ##% | ALARM STATIONS ONLY 2. To change the TTE (time to empty in days, hours and minutes) and/or SOC (state of charge in percentage) values, swipe the magnet over the markers of the up or down arrows to move the cursor to the desired field. A swipe over: The ENTER marker will select the field indicated by the cursor and enclose the value in brackets. While in brackets, the markers of the up or down arrows will change the value. Another swipe over the ENTER marker will save the selected value. A swipe of the PROG marker at any time while setting the TTE or SOC will escape out of the current field with no changes saved. The recommended value for the TTE should be five days and applies to all battery powered wireless radio modules transceivers other than alarm stations. The SOC value applies to alarm stations only and the Model X40 Instruction Manual Rev. 3.4 Page 59 of 65 Model X40 recommended value should be 25%. The blue LED on the controller will be activated and begin flashing when any battery in the network falls below the set thresholds. 11.3.4 Set Modbus™ Address The SET Modbus™ Address menu establishes the serial address of the X-40 controller when being polled by another master device through the RS-485 Modbus™ RTU slave port (COMM2). 1. Upon entering this menu, the LCD will display: MODBUS ADDRESS: ### 2. This value can be changed by performing a swipe: Over the ENTER marker and then swiping Over the markers of the up or down arrows. Another swipe over the ENTER marker will save the selected value. 3. Ensure that the range of values for the Modbus™ address is 1-127 in decimal value. 11.3.5 CXT Low Battery Threshold CXT sensors offer the option to use non-rechargeable batteries. If this option is used, the low battery alarm is determined by the voltage of the batteries. When the battery voltage falls below the threshold, the low battery fault will be activated. This value can be changed by performing a swipe: Over the ENTER marker and then swiping Over the markers of the up or down arrows. Another swipe over the ENTER marker will save the selected value. 11.3.6 Module Update Interval The AO-4 outputs and battery life readings from the wireless radio modules on the X40 are updated periodically. This menu setting controls the rate at which these updates occur. The default rate is 60 seconds. This value can be changed by performing a swipe: Over the ENTER marker and then swiping Over the markers of the up or down arrows. Another swipe over the ENTER marker will save the selected value. 11.3.7 Set COMM Baud Rates Model X40 Instruction Manual Rev. 3.4 Page 60 of 65 Model X40 The Set COMM Baud Rates menu displays the current baud rate settings for COMM1 (master) and COMM2 (slave). Upon entering this menu, the LCD will display: SET COMM BAUD RATES: COMM1 BAUD RATE:9600 COMM2 BAUD RATE:9600 NOTE The value shown is pre-configured to 9600 and should not be altered unless directed to do so by Detcon factory personnel. 11.3.8 Set Modbus™ Timeouts The Set Modbus™ Timeouts menu establishes the response timeout for Modbus™ communications and the inter-poll delay. Response timeout is the amount of time in milliseconds the X40 controller will wait for a sensor to respond to a poll request. Inter-poll delay is the amount of time in milliseconds the X40 will wait after receiving a poll response from one sensor before it polls the next sensor. Ten missed poll responses will result in the sensor being declared in COMM ERR. The range of values for the response timeout is 100-1000 milliseconds and 10-255 milliseconds for the inter-poll delay. The recommended value for the response timeout is 1000 and 250 for the inter-poll delay. 1. Upon entering this menu, the LCD will display: SET MODBUS TIMEOUTS: RESPONSE TIMEOUT:### INTERPOLL DELAY:### 2. Values can be changed by swiping the magnet over the markers of the up or down arrows to move the arrow prompt "→" to the desired function. A swipe over: The ENTER marker will select the function indicated by the arrow prompt "→". The markers of the up or down arrows will change the value. The ENTER marker will save the selected value. 11.3.9 Display Settings The Display Settings menu customizes the brightness, contrast and backlight duration of the display. Values for brightness and contrast range between 0 and 100. Available values for the backlight timeout function (turn off due to inactivity) are OFF, 10 seconds, 30 seconds and 1 to 5 minutes. 1. Upon entering this menu, the LCD will display: DISPLAY SETTINGS BRIGHTNESS: ### BACKLIGHT TIMEOUT: #:## CONTRAST: ### Model X40 Instruction Manual Rev. 3.4 Page 61 of 65 Model X40 2. These values can be changed by swiping the magnet over the markers of the up or down arrows to move the arrow prompt "→" to the desired function. A swipe over: The ENTER marker will select the function indicated by the arrow prompt "→". The markers of the up or down arrows will change the value. The ENTER marker will save the selected value. Model X40 Instruction Manual Rev. 3.4 Page 62 of 65 Model X40 11.4 Spare Parts and Wireless Accessories Part Number 360-ML1000-024 975-041402-000 976-041400-000 975-041401-000 975-041400-000 327-000000-000 500-003087-100 500-005156-000 500-005142-100 500-005142-200 949-005142-200 Part Number 976-00132D-000 976-0003A4-200 976-000320-316 500-005168-100 897-850000-010 897-850901-010 897-850902-010 960-202200-000 8522-750 899-07550 899-150750-316 301-58205 Model X40 Instruction Manual Spare Parts Power Supply 4.2A DI-4 Input Module DA-4 Input Module AO-4 Output Module RL-4 Output Module Programming Magnet Transient Protection Module AC/DC Converter 4W NEMA 7 X40 Display Control PCA N1P / N1R Display Control PCA NEMA 4 X40 Drop-In Display Control Assembly Wireless Accessories RXT-320 Transceiver Din-Rail Mounted 2.4Ghz NEMA4 8" Antenna, 8" cable Wireless 320 Transceiver (NEMA 7 Radio Module) Model 100 Terminal Board NEMA 7 Aluminum Condulet w Solid Cover NEMA 7 Aluminum Condulet w window Cover NEMA 7 Aluminum Condulet w Extended Cover Condensation prevention packet (For condulet, replace annually) 3 /4" NPT Plug 3 /4" NPT to 1/2" NPT Adapter 3 /4" NPT x 1.5" Nipple 3 /4" NPT Cord Connector Rev. 3.4 Page 63 of 65 Model X40 11.5 Revision Log Revision 0.0 0.1 Date 02/07/2011 03/18/2011 1.0 07/29/2011 1.1 08/10/2011 2.0 2.1 2.2 3.0 3.1 3.2 3.3 3.4 11/14/11 04/02/12 07/10/12 12/07/12 09/10/13 11/22/13 05/16/14 01/05/15 Model X40 Instruction Manual Changes made Initial Release. Corrected AO-4 modbus address range. Corrected enclosure dimensions for 32 channel enclosure and added drawing for 8 channel enclosure. Revised DC input voltage specs. Updates and modifications made relating to addition of different enclosure types for the X40. Added 4 new menus: Auto Configure, Low Battery Alarms, Time and Date and TWA and Peak. Added section relating to SD card. Made minor clarifications to sections 5.4.2, 5.5, 7.3.4, 7.3.7, 7.3.13 and 7.3.15. Modified RL-4 Table 2. Changed N4X enclosure to include the Drop-In Assembly Updates to terminal boards used, verbiage on units with alarm Updated cable recommendation to General Cable Commodore Updated to cover Auto Configure and Utilities Changes for CE Approvals Add replacement of Control Assembly (NEMA 4 and 7) Add information to interface with Site Sentinel CX and CXT’s Corrected Section 3.5 Rev. 3.4 Approval LU LU LU LU LU LU LU LU LU LU LU LU Page 64 of 65 Model X40 This page left intentionally blank Model X40 Instruction Manual Shipping Address: 4055 Technology Forest Blvd., The Woodlands Texas 77381 Mailing Address: P.O. Box 8067, The Woodlands Texas 77387-8067 Phone: 713.559.9200 • Fax: 281.292.2860 • www.detcon.com • [email protected] Rev. 3.4 Page 65 of 65