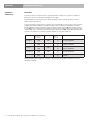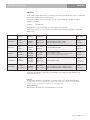
1
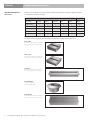
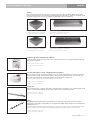
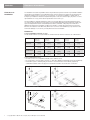
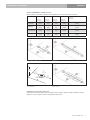
INSTALLATION, OPERATION
AND MAINTENANCE MANUAL
Please read these instructions completely
before operating the EcoSmart™ Fire.
Burner Kits
Burner One
Burner Two
XL Burner
Around Burner
Triple Burner
ENGLISH
Testing and Compliance Statement
The EcoSmart™ Fire Collection has achieved Swedish Institute for Technical Approval in Construction
(SITAC) approval.
EcoSmart Fire is TÜV certified in Germany when using Burner Two within a Firebox setting.
For further information, please contact your distributor.
Instructions and specifications for the EcoSmart™ Fire were tested as far as practicable to a selection of
clauses from AS4553/AG103 – Australian Standard for Gas Space Heaters (closest comparable product at
the time of invention).
DANGEROUS GOODS
Denatured Ethanol is classified as a Flammable Liquid Class 3, PG II and is regulated by various standards
around the world. You must familiarise yourself and comply with these regulations in order to safely and
legally store, handle, decant and use this fuel. Refer to our website for commercially available fuel names
around the world.
Reproduction of this manual in any manner, in any language, in whole or in part without prior written permission is prohibited. The Fire Company
Pty Ltd reserves the right to correct any errors or misprints. We also reserve the right to alter information without notification. The information
provided herein is believed to be correct but is not guaranteed.
International Patent Pending – Trademarks Pending – All Designs Registered.
1
© Copyright 2004 - 2009 The Fire Company Pty Ltd. All rights reserved. V5 0709.
Contents
ENGLISH
Contents
Conditions of Use
2
3
Warnings
3
4
Standard Equipment Received
Clearances & Installation 5-4
6
Ventilation & Efficiency
7 - 10
11 - 12
9
How to operate the EcoSmart™ Fire
10
13
Purchasing your Denatured Ethanol*
13
Decanting your Denatured Ethanol* into the Jerry Can
13
Volume markings on the EcoSmart™ Burner
– Slider position markings
14
X
Decanting the fuel from the Jerry Can into the EcoSmart™ Burner
15
Lighting the EcoSmart™ Burner
16
X
Regulating the flame
16
X
Turning your EcoSmart™ Fire Off - Extinguishing the flame
16
X
Re-igniting the EcoSmart™ Fire
17
X
Maintenance Instructions
18
X
Troubleshooting
19
X
Your Warranty
20
X
After Sales Service
21
X
www.ecosmartfire.com
2
ENGLISH
Conditions of Use
Conditions of Use
Congratulations on your purchase of the EcoSmart™ Fire.
The Fire Company Pty Ltd is very safety conscious. We have taken every care in designing, manufacturing
and assembling your EcoSmart™ Fire to ensure it operates effectively, efficiently, and safely. In return, we ask
that you exercise care when using this product and follow the instructions below:
1.Before using your EcoSmart™ Fire please read all the information contained in this Installation, Operation
and Maintenance Manual very carefully. It explains exactly what you need to do in order to use the product
safely and effectively.
Failure to follow these instructions could result in property damage, bodily injury or even death.
2.Children do not recognize the dangers that can arise when handling Dangerous Goods, nor do they
recognize the volatility of flammable liquids when ignited. Please ensure you keep children at a safe
distance and supervised at all times when operating the fire.
3.For the purposes of this manual we refer to the fuel used in the EcoSmart™ Fire as Denatured Ethanol*.
*There are many different names for this fuel around the world. Please refer to
www.ecosmartfire.com for a list of commercially available fuel names in your country.
Denatured Ethanol* is classified as a Dangerous Goods Flammable Liquid Class 3, PGII and is regulated by specific standards and rules. You must familiarise yourself with the appropriate regulations of your country in order to safely and legally store, handle, decant and use this fuel.
The customer warrants to The Fire Company Pty Ltd that after delivery of their EcoSmart™ Fire and whilst The Fire Company Pty Ltd retains any interest in the goods or consigned goods (as the case may be) the customer shall comply with all applicable Acts, Regulations and Laws dealing with the transport, unloading and storage of Dangerous Goods.
4.Approval from building authorities may be required. Please ensure you contact the appropriate parties
before installing your EcoSmart™ Fire.
5.It is a condition of purchase that you obtain a fire extinguisher Ammonium Phosphate AB:E type. These
can be purchased from your distributor or independently.
6.A smoke alarm is a valuable and necessary building code requirement and an element that is compulsory
in some countries for your insurance coverage. For protection against any form of fire, not just your
EcoSmart™ Fire, ensure you install a smoke alarm.
7.Pebbles or other refractory decorative fire accessories should not be placed directly over the EcoSmart™ Burner mouth or in a manner that they interfere with the flame.
If using decorative fire accessories you must:
- Ensure the decorative fire accessories do not interfere with the sliding mechanism.
- Confirm quality and suitability of these fire accessories to ensure they will not explode, emit carbon monoxide or fumes when exposed to extreme temperature variations.
- The fire accessories must have a minimum overall size of 70mm [2.75in] so they cannot fall in the EcoSmart™ Burner at any time.
If you have any questions about your EcoSmart™ Fire or anything in this manual please contact your local
distributor or retailer or visit www.ecosmartfire.com
3
© Copyright 2004 - 2009 The Fire Company Pty Ltd. All rights reserved. V5 0709.
Warnings
Warnings
ENGLISH
1. Risk of explosion:
a) Never use any fuel other than the fuels specifically identified for use in the appliance. Never use gasoline.
b) Never fill the fuel reservoir when it is operating or still hot.
c) Never fill fuel reservoir in areas where flammable vapours or gas may be present.
d) Never store or transport the fuel in other than a metal or plastic container that is:
1. Acceptable for use with the specific fuel.
2. Is in the original container for the alcohol fuel.
2. Never store fuel in the living space where the fire is situated.
3. Due to high surface temperatures, keep children, pets, clothing, and furniture away. The unit is hot while in operation, contact with the EcoSmart™ Fire may cause skin burns.
4. Risk of indoor air pollution – use EcoSmart™ Fires only in well-ventilated areas. People with breathing problems should consult a physician before using the appliance.
5. Do not use the EcoSmart™ Fire to heat or boil water or as a cooking appliance. Do not throw
waste materials or paper into the EcoSmart™ Fire.
6. EcoSmart™ Fires have not been tested with an unvented gas log set. To reduce the risk of fire or injury, do not install an unvented gas log set into this appliance.
7. The EcoSmart™ Fire has not been tested for use with doors. To reduce the risk of fire or injury, do not install doors.
8. It is recommended that the EcoSmart™ Fire be fixed into position to avoid displacement as per instruction provided with each model.
9. Do not dismantle the EcoSmart™ Burner.
10. Do not attach any other tank to the EcoSmart™ Burner.
11. EcoSmart™ Fires must only be operated using authorised accessories & equipment.
12. Do not obstruct the open/close sliding mechanism of the EcoSmart™ Burner in any way as this
could result in the jamming/non functionality of the shut off mechanism.
13. The EcoSmart™ Burner should not be started if a fault is suspected or when there appears to be
any damage to the burner or its housing.
14. The use of any fitting other than those available from or recommended by The Fire Company Pty Ltd for the EcoSmart™ Firebox and Burner is not permitted.
15. The Fire Company Pty Ltd does not accept responsibility for any damage which occurs if the EcoSmart™ Fire is used for purposes other than those for which it is intended, or if it is incorrectly
operated or repaired by unqualified persons.
16. The EcoSmart™ Fire is not intended to operate continuously. To avoid heat expansion and
potential splitting of the timber framework in Designer Range models please ensure that the model
is allowed to cool down completely on a regular basis.
If you have any questions regarding any of the above important safety information please contact your
distributor or The Fire Company Pty Ltd.
Please store these warnings in a safe place for future reference.
www.ecosmartfire.com
4
ENGLISH
Standard Equipment
Received
Standard Equipment Received
Please ensure that all items have been received. The Burner Kit includes the minimum equipment required
to operate the EcoSmart™ Fire safely.
Accompanying Compulsory Accessories
Burner Kits
Top Tray
Manual
Jerry Can
Lighting
Rod
Lighter
Clip-on
Baffles
1 x Burner One
1
1
1
1
1
NA
1 x Burner Two
1
1
1
1
1
NA
1 x XL Burner
1
1
1
1
1
NA
NA
1
1
1
1
4
1
1
3
1
1
NA
1 x Around Burner
1 x Triple Burner
Burner
The Burner is the core product of the EcoSmart™ Fire being the chamber that houses the fuel.
Burner One
h 112mm x w 290mm x d 290mm
h [4.4in] x w [11.4in] x d [11.4in]
Burner Two
h 78mm x w 290mm x d 290mm
h [3.1in] x w [11.4in] x d [11.4in]
XL Burner
h 133mm x w 908mm x d 193mm
h [5.2in] x w [35.7in] x d [7.6in]
Around Burner
h 156mm x ∅ 366
h [6.2in] x ∅ [14.4in]
Triple Burner
h 114mm x w 901mm x d 320mm
h [4.5in] x w [35.7in] x d [12.6in]
5
© Copyright 2004 - 2009 The Fire Company Pty Ltd. All rights reserved. V5 0709.
Standard Equipment Received
ENGLISH
Top Tray
All EcoSmart™ Burners must incorporate a protective “Twin Skin” into their setting. Off the shelf models
from the Designer Range, Renovator Range and Grate Range include a built in “Twin Skin” and therefore will
not include a Top Tray as an accessory. (NOTE: Not applicable for the Around Burner.)
INSTALLATION, OPERATION
AND MAINTENANCE MANUAL
Burner Kits
Burner One Top Tray
h 114mm x w 320mm x d 320mm
h [4.5in] x w [12.6in] x d [12.6in]
XL Burner Top Tray
h 118.8mm x w 899mm x d 184mm
h [4.7in] x w [35.4in] x d [7.2in]
Burner Two Top Tray
h 114mm x w 320mm x d 320mm
h [4.5in] x w [12.6in] x d [12.6in]
Triple Top Tray
h 114.2mm x w 901mm x d 320mm
h [4.5in] x w [35.5in] x d [12.6in]
Installation, Operation and Maintenance Manual
In order to obtain optimal and safe results from your EcoSmart™ Fire, we recommend carefully reading the
entire instruction manual.
h 297mm x w 210mm x d 8mm
h [11.7in] x w [8.3in] x d [0.3in]
Jerry Can with Spill Proof Spout – (CARB Regulation Compliant)
This 4.75 Litres [11⁄4 Gal] Jerry Can has been chosen for its unique safety features. It provides an automatic
stop flow, a fast flow rate, a locking thumb button control, and a self-venting system. The Jerry Can will
allow safe storing/decanting of the Denatured Ethanol* used for the EcoSmart™ Fire.
Due to safety regulations the Jerry Can provided with this package comes without fuel.
h 220mm x w 185mm x d 235mm
h [8.7in] x w [7.3in] x d [9.3in]
Lighting Rod
This long slender piece of stainless steel with a small return at the end enables you to safely adjust the slider
position on the EcoSmart™ Burner at any time. It is also used for the ignition procedure.
h 657mm x w 28mm x d 23mm
h [25.9in] x w [1.1in] x d [0.9in]
Lighter*
This refillable butane lighter perfectly compliments the modern style of the EcoSmart™ Fire as well as
supporting the safe ignition of the lighting rod. The length of the lighter further enhances the management of
the lighting process.
* Due to safety regulations the butane lighter provided with this package comes without fuel. Small re-charge cans of butane gas with the necessary
connections can be purchased from your hardware store. Lighter image is indicative only, the model included may vary from time to time.
h 185mm x w 15mm x d 15mm
h [7.3in] x w [0.6in] x d [0.6in]
www.ecosmartfire.com
6
ENGLISH
Clearances &
Installation
Clearances & Installation
The installation & clearances guidelines below are provided as a general overview only. Detailed installation
specifications are available for each individual model of the EcoSmart™ Fire range and should have been
referred to and taken into account prior to your purchase. To ensure the installation complies with our
Compulsory Installation & Clearance Requirements please contact The Fire Company Pty Ltd or one of its
representatives for a copy of the relevant specification to be sent to you.
The Around Burner is primarily intended for outdoor use. All other Burners are primarily intended for indoor
use, however when any Burner is used outdoors, it is important that the Burner be positioned in a large open
space ensuring that the nearest combustible (trees, branches, umbrellas, ceilings etc) are a minimum of
2000mm [78.74in] away in all weather conditions (for example, on windy days where there is movement in
branches, the clearance must still be met). When not in use it is recommended that you protect the model
from water damage or corrosion by covering. Burner Covers are available.
Clearances
INSERTING Within a firebox setting
The EcoSmart™ Burner can only be fitted into a firebox that has minimum clearances as outlined below.
Burner Kits
Firebox Width
Metric mm
Imperial [in]
Firebox Depth
Metric mm
Imperial [in]
Overhead
Metric mm
Imperial [in]
Rear
Metric mm
Imperial [in]
Front
Metric mm
Imperial [in]
Burner One &
Burner Two
650
[25.6]
365
[14.4]
650
[25.6]
30
[1.2]
45
[1.8]
XL Burner
1100
[43.3]
500
[19.7]
500
[19.7]
40
[1.6]
50
[2.0]
Around Burner
650
[25.6]
365
[14.4]
650
[25.6]
30
[1.2]
45
[1.8]
Triple Burner
1200
[49.6]
500
[19.7]
750
[29.5]
40
[1.6]
65
[2.6]
Custom made fireboxes must:
- be made out of a non-combustible material such as stainless steel;
- be constructed to accommodate a Top Tray or “Twin Skin” (NOTE: Not applicable for the Around Burner);
- have built in spacers of 20mm [0.8in] on all sides to ensure that it does not sit directly against any combustible materials and an air gap is incorporated for insulation around the box construction.
Burner One & Burner Two
min
[0.8in]
20mm
spacers
min
[25.6in]
650mm
XL Burner
min
[14.4in]
365mm
min
[1.2in]
30mm
min
[1.8in]
45mm
min
[25.6in]
650mm
Around Burner
7
© Copyright 2004 - 2009 The Fire Company Pty Ltd. All rights reserved. V5 0709.
Triple Burner
Clearances & Installation
ENGLISH
INSERTING WITHOUT A FIREBOX SETTING:
When creating a custom built setting the following dimensions must be adhered to at all times.
Burner Kits
Overhead
Rear
Front
Sides
Metric mm
Imperial [in]
Metric mm
Imperial [in]
Metric mm
Imperial [in]
Metric mm
Imperial [in]
Nearest Combustible Radius
Metric mm
Imperial [in]
Burner One &
Burner Two
1500
[59.1]
30
[1.2]
45
[1.8]
600
[23.6]
600
[23.6]
XL Burner
1500
[59.1]
40
[1.6]
65
[2.6]
600
[23.6]
600
[23.6]
Around Burner
600
[23.6]
30
[1.2]
45
[1.8]
600
[23.6]
600
[23.6]
Triple Burner
1800
[70.9]
40
[1.6]
65
[2.6]
600
[23.6]
600
[23.6]
Burner One & Burner Two
min
[23.6]
600mm
min
[23.6]
600mm
min
[1.8]
45mm
Around Burner
XL Burner
min
[1.2]
30mm
min
[23.6]
600mm
Triple Burner
CONVERTING AN EXISTING FIREPLACE:
If inserting an EcoSmart™ Burner into an existing masonry fireplace, utilise the damper within the existing
fireplace in order to keep the heat from escaping through the flue.
www.ecosmartfire.com
8
ENGLISH
Clearances & Installation
Installation Requirements
There are many different variations available for installing the EcoSmart™ Burner. In all cases, the
EcoSmart™ Burner must:
- be installed into non-combustible material ONLY – for example stainless steel, concrete, brick, stone;
- only be installed after all gas connections or pipelines in the area are disconnected and made safe by an
appropriately qualified and licensed professional;
- be installed into a fixed and secure position before filling, lighting and operating;
- be installed in a position that limits relocation requirements to eliminate the risk of accidents caused by
fuel spillage – they are not designed to be relocated frequently;
- be installed into a level platform;
- not be installed directly beside wallpaper or laminate or any surface that has not been fire rated (the heat
will impact the material);
- be installed into a setting that has a square back – the incorporation of angled backs alters the
aerodynamics of the flame environment and could lead to an unstable flame behaviour.
- be fitted within a “Twin Skin”, such as a Top Tray (NOTE: Not applicable for the Around Burner).
- be positioned so the mouth of the flame is a minimum of 1000mm [39.36in] away from curtains,
flammable materials and other sources of ignition. Be aware of drafts.
As a general guide we recommend that:
- any furniture items or fittings directly above or beside the EcoSmart™ Fire installation be deemed
suitable for heat tolerances by their manufacturer e.g Plasma Screens;
- a heat reflective panel made of non combustible material (ideally stainless steel) be installed as the
surround and top of the fireplace setting to assist in heat distribution;
- any reconstituted materials you wish to use be checked in terms of strength and suitability around such
high temperature variations as some materials will crack – call The Fire Company Pty Ltd for more
information about specific surfaces;
- glass or mirrored surfaces near the EcoSmart™ Fire installation must be toughened.
SPACERS: When the Burner is in position, there is usually an air gap around it. Do not pack with insulation
or other materials, as the air spacers are required for ventilation.
A fire extinguisher is a compulsory accessory.
9
© Copyright 2004 - 2009 The Fire Company Pty Ltd. All rights reserved. V5 0709.
Clearances & Installation
ENGLISH
Top Tray
The incorporation of a Top Tray (“Twin Skin”) into your setting protects against heat transference and aids
in the collection of any accidental spillage. If utilising one that is not supplied by The Fire Company Pty Ltd
then it must undergo a “water tight” test prior to inserting the EcoSmart™ Burner into place.
When installing multiple Burners a maximum of three (3) Burners may be installed into the one “Twin Skin”
(excluding the XL Burner which can only have one (1) Burner per Top Tray). It is imperative that when installing
multiple burners you consider strongly the impact of any accident and minimise it wherever possible.
The Top Tray (“Twin Skin”) when included with the Burner Kits are to be fitted directly into the burner shelf
from above. The Burner is then inserted into the Top Tray setting and sits flush - as illustrated below.
The size of the cut-out should not give more than 5mm [0.196in] clearance.
XL Burner
Triple Burner
Top Tray
[6.8]
173mm
Top Tray
[11.7]
298mm
Cut Out
Cut Out
[35]
888mm
[34.6]
880mm
[4.7]
120mm
[4.8]
123mm
Burner
min
[12.6]
320mm
Around Burner: A Top Tray is not required. The Around Burner tray is “formed” which eliminates the need
for welding and therefore the risk of leaks.
Cut Out
min
[6.3]
160mm
Burner Kits
Cut Out Dimensions
(supplied Top Tray)
Cut Out Dimensions
(Excluding SUPPLIED Top Tray)
Height x Width x Depth
Metric mm, Imperial [in]
Height x Width x Depth
Metric mm, Imperial [in]
Burner One
120 x 298 x 298
[4.7 x 11.7 x 11.7]
120 x 275 x 275
[4.7 x 10.8 x 10.8]
Burner Two
120 x 298 x 298
[4.7 x 11.7 x 11.7]
120 x 275 x 275
[4.7 x 10.8 x 10.8]
123 x 888 x 173
[4.8 x 35 x 6.8]
120 x 885 x 166
[4.7 x 33.6 x 6.5]
NA
160 x 320 x 320
[6.3 x 12.6 x 12.6]
120 x 880 x 298
[4.7 x 34.6 x 11.7]
All setting must incorporate
the supplied Triple Tray
XL Burner
Around Burner
Triple Burner
www.ecosmartfire.com
10
ENGLISH
Ventilation
& Efficiency
Ventilation & Efficiency
Ventilation
EcoSmart™ Fires do not require any form of permanent fixture or fitting, such as a flue for ventilation, a
permanent connection or any kind of fixed utility for fuel supply.
Denatured Ethanol* is safe to burn indoors without venting, because its main by-products are carbon
dioxide, water steam and heat.
In a house of typical construction, that is, one that is not of unusually tight construction due to heavy insulation
and tight seals against air infiltration, an adequate supply of air for combustion and ventilation is provided
through infiltration. However, if the heater is used in a small room where less than (A) of air space is provided
for each (B) per hour of heater rating (considering the maximum burner setting), the door(s) to adjacent room(s)
should be kept open or a window to the outside should be opened at least (C) to guard against potential build
up of indoor air pollution. Do not install or operate in a bathroom or any other small room.
Burner Kits
(A)
Cubic Meter m3
Cubic Feet [ft3]
(B)
(C)
BTU
Metric mm
Imperial [in]
Minimum room size
Burner One
5.7
[200]
1000
25.4
[1]
The room cannot be less than 70m3
[2472ft3] per burner.
Burner Two
5.7
[200]
1000
25.4
[1]
The room cannot be less than 25m3
[1000ft3] per burner.
XL Burner
5.7
[200]
1000
25.4
[1]
The room cannot be less than 80m3
[2825ft3] per burner.
Around Burner
5.7
[200]
1000
25.4
[1]
The room cannot be less than 70m3
[2472ft3] per burner.
Triple Burner
17.1
[604]
3000
76.2
[3]
The room cannot be less than 210m3
[7416ft3].
Multiple Burners may be installed into a fireplace setting however the ventilation requirements must be
adhered to at all times.
11
© Copyright 2004 - 2009 The Fire Company Pty Ltd. All rights reserved. V5 0709.
Ventilation & Efficiency
ENGLISH
Efficiency
The EcoSmart™ Fire is efficient because it is flueless which means all the heat stays in the room rather than
most of it being flued outside as residual emissions.
You can turn the Burner on and off as desired. You can control the intensity of the flame through its
regulatory mechanism.
XL Burner:
Not applicable.
Around Burner: Four (4) clip-on baffles are included with the Around Burner.
These features allow you to control the amount of heat being generated and the quantity of Denatured
Ethanol* used.
Burner Kits
Volume
Capacity
Thermal
Output Net
Heats
on Average
5 Litres
11⁄4 Gallons
14 Mj/h
13,000 BTU
3.5 Kw/h
Over 35m2
OR 376.74ft2
0.64 Ltr/hr OR 0.17 Gal/hr on MAX
0.49 Ltr/hr OR 0.13 Gal/hr on MED
0.28 Ltr/hr OR 0.074 Gal/hr on MIN
7 hours
25 minutes
2 Litres
⁄2 Gallon
10.09 Mj/h
9,570 BTU
2.8 Kw/h
Over 25m2
OR 269ft2
0.49 Ltr/hr OR 0.13 Gal/hr
3 hours
30 minutes
XL Burner
10 Litres
2 3⁄5 Gallons
15.72 Mj/h
14,877 BTU
4.36 Kw/hr
Over 40m2
OR 430ft2
When the XL Burner reaches 2 Litres OR 1⁄2 Gal of fuel, the flame
becomes progressively smaller and burns for longer.
Around Burner
5 Litres
11⁄4 Gallons
19.65 Mj/h
18,576 BTU
5.45 Kw/h
Over 50m2
OR 538.2ft2
1 Ltr/hr OR 0.26 Gal/hr
3 x 5 Litres
3 x 11⁄4 Gallons
42 Mj/h
39,000 BTU
2.87 Kw/h
Burner One
Burner Two
Triple Burner
1
Fuel Consumption
0.8 Ltr/hr OR 0.21 Gal/hr
When used indoors.
Over 105m2
OR 1130.22ft2
Burning Time
MAX setting
0.64 Ltr/hr OR 0.17 Gal/hr on MAX per burner
0.49 Ltr/hr OR 0.13 Gal/hr on MED per burner
0.28 Ltr/hr OR 0.074 Gal/hr on MIN per burner
12 hours
30 minutes
5 hours
Excluding clip-on
baffle optimisation.
7 hours
25 minutes
These values are indicative only and may vary depending on the model purchased, installation and
denatured ethanol used.
Fuel Type
The EcoSmart™ Fire Burners are fuelled by a renewable energy source called Denatured Ethanol.
Some fuels are better than others, it’s important to source information on the best fuel in your area from your local retailer/distributor.
Visit www.ecosmartfire.com to find out what Denatured Ethanol is called around the world.
Thermal Efficiency
All EcoSmart™ Fire Burners have a Thermal Efficiency of over 90%.
www.ecosmartfire.com
12
ENGLISH
How to operate the
EcoSmart™ Fire
How to operate the EcoSmart™ Fire
It is important that you follow the procedures outlined below to ensure that you are operating and
utilising the EcoSmart™ Fire safely.
Purchasing your Denatured Ethanol*
Again for the purposes of this manual we refer to the fuel used in the EcoSmart™ Fire as Denatured
Ethanol*.
*There are many different names for this fuel around the world. Please refer to www.ecosmartfire.
com for a list of commercially available fuel names in your country.
Denatured Ethanol* is classified as a Dangerous Goods Flammable Liquid Class 3, PGII and is regulated by
specific standards and rules. You must familiarise yourself with the appropriate regulations of your country
in order to safely and legally store, handle, decant and use this fuel.
Denatured Ethanol* is commercially available in various volume packaging including 1, 2, and 4 litres [1⁄2
and 1 Gal] from your local Distributor, Supermarket, Petrol Station, Hardware Store, and Corner Shop
depending on which country you live in.
Decanting your Denatured Ethanol* into the Jerry Can
Decanting must be performed in a well-ventilated area to ensure that any spillage is easily contained and
away from any ignition source.
1.Remove the nozzle from your Jerry Can.
2.Carefully decant the fuel from the bottle into the Jerry Can through its opening, avoiding spillage (you
may need to decant multiple bottles depending on the packaging volume purchased). If spillage occurs,
clean thoroughly before proceeding.
3.Re-screw the cap tightly back onto the Jerry Can to contain fuel and avoid accidental spillage.
4.Test that it is closed securely before moving away from your decanting area.
5.You are ready to approach the EcoSmart™ Burner.
Denatured Ethanol containers are usually recyclable and should be disposed of accordingly.
OR
13
© Copyright 2004 - 2009 The Fire Company Pty Ltd. All rights reserved. V5 0709.
How to operate the EcoSmart™ Fire
ENGLISH
Volume Markings – Slider Position Markings
The Fire Company Pty Ltd recommends that the quantity of Denatured Ethanol poured into the burner be
burnt until empty rather than extinguishing the fire early. Extinguishing the fire early will result in a larger
amount of residual fumes in the EcoSmart™ Burner and a more volatile re-ignition.
XL Burner: For optimum flame visibility the XL Burner should be filled to the max 10Lt point each time the
burner is operated.
When fumes are combined with excess fuel it could be hazardous to people who are unaware of the
EcoSmart™ Fire operation and its condition of use (e.g smokers). Ensure only those who have read the
instructions operate the Burner.
Volume markings on the EcoSmart™ Burner
SECTION A-A
Burner One & Triple Burner
Inside Burner you will see fuel
level markings from:
MIN - 1 litre [1/4 Gal]
MAX - 5 litres [11/4 Gal]
Burner Two
Inside Burner you will see fuel level
markings from:
MIN - 1 litre [1/4 Gal]
MAX - 2 litres [ 1/2 Gal]
XL Burner
Inside Burner you will see fuel level
markings from:
5 litre [ 11/4 Gal]
MAX - 10 litres [2 3/5 Gal]
Around Burner
Inside Burner you will see fuel
level markings from:
MIN - 1 litre [1/4 Gal]
MAX - 5 litres [11/4 Gal]
Burner Two
The markings on the top of the
Burner illustrate the on and off
positions of the burner sliding
mechanism.
XL Burner & Around Burner
Feature not available.
Slider position markings
Burner One & Triple Burner
The markings on the top of Burner
illustrate the maximum, medium,
minimum, and off positions of the
burner sliding mechanism.
www.ecosmartfire.com
14
ENGLISH
How to operate the EcoSmart™ Fire
Decanting the fuel from the Jerry Can into the EcoSmart™ Burner.
When filling the EcoSmart™ Burner, only fill through the designated filling point.
The EcoSmart™ Burner must be at room temperature.
1.Position the slider mechanism setting so the chamber is fully open.
2
2.Inspect burner to ensure it is clean and clear of any foreign
particles.
1
3
3.Access the filling point by swivelling the small round plate which is
located in the bottom right corner of the burner.
XL Burner:
The XL Burner features a Spring Loading Cap. It
is engineered so that the Jerry Can spout is fully
enclosed prior to releasing the fuel supply, thus
allowing filling at a high rate, whilst eliminating
splashing as the fuel is being decanted.
Around Burner: To fill the Around Burner, position the Jerry Can
Spout in the middle of the Burner mouth.
4.Re-position the burner slider ensuring the grid work of the burner
is visible through the filling point. This will clear the filling point
for the insertion of the Jerry Can Spout as well as allowing visual
monitoring of the amount of fuel being added, according to the
volume markings on the EcoSmart™ Burner.
4
5.Once ready, carefully place the Jerry Can Spout inside the filling
point. NEVER fill over the maximum level as indicated on the
burner vent inside the EcoSmart™ Burner and only fill to the level
that you require for burning time.
5
6.Use both hands to pour. Place the palm of one hand on the top of
the nozzle with your thumb on the green button.
Use your other hand to tip the can vertically and hold it steady.
Press down on the green button to release the fuel. To stop the
flow, simply release the green button.
6
7.When filling is complete, swivel the plate that covers the filling
point so it closes the filling point.
8
7
15
8.Re-position the slider to the fully open position. Check surrounding
area for any spillage.
© Copyright 2004 - 2009 The Fire Company Pty Ltd. All rights reserved. V5 0709.
How to operate the EcoSmart™ Fire
ENGLISH
Lighting the EcoSmart™ Burner
2
1
Keep hands and face well away from the EcoSmart™ Fire at all times, particularly when igniting.
Before lighting, ensure that the EcoSmart™ Burner is clear and ready for use. When lighting the
EcoSmart™ Burner the slider must be positioned at max to allow for correct ventilation.
1.Dip the lighting rod tip into the chamber opening “Burner zone” to wet the end.
2.Lift the lighting rod away from the Burner (do not drip fuel on the floor).
3. Ignite the lighter and make contact with the lighting rod as if lighting a candle.
3
4.Dip the ignited lighting rod back into the Burner zone to ignite the contained fuel.
NOTE: The XL Burner is best ignited from the right hand side of the ignition zone.
Once lit there will be a residual flame on the lighting rod that must burn out before putting the rod away. If the
flame on the lighting rod dies before reaching the burner, repeat the procedure until successful.
Due to the natural oils in the fibres we use in the EcoSmart™ Burner there is a stronger than usual smell when
first operating. It will decrease substantially after the first few times you use the Burner, and even more so over
time.
4
Regulating the flame
Wait until the fire is established (approx 10 minutes) before regulating.
To decrease the flame intensity insert the lighting rod tip through the circular ring and push forward gently
to desired setting.
To increase the flame intensity insert the lighting rod tip through the circular ring and pull back gently to
desired setting.
XL Burner:
Feature not available in XL Burner.
Around Burner: Four (4) clip-on baffles are included with the Around Burner. The clip-on baffles allow you
to control the amount of heat being generated and the quantity of Denatured Ethanol*
used. (NOTE: Clip-on baffles must be positioned before operating the Burner)
Turning your EcoSmart™ Fire Off - Extinguishing the flame
Insert the lighting rod tip through the circular ring and push forward firmly until completely closed and
in the OFF position. If you do not burn the Denatured Ethanol* until empty then you must not add more
Denatured Ethanol* to the Burner OR re-ignite the burner until it has cooled to room temperature. When
there is no more fuel, the fire will go out with nothing to clear or clean ready to be re-started when cooled.
XL Burner:
The XL Burner has a Flip Lid shut off system. The lid flips across the ignition zone which
extinguishes the flame.
Around Burner: The Around Burner Lid is used to extinguish the flame.
www.ecosmartfire.com
16
ENGLISH
How to operate the EcoSmart™ Fire
Re-igniting the EcoSmart™ Fire
1.Check that the Burner is at room temperature. If not, wait until the Burner has cooled. As a guide, it will
take approximately 15 to 30 minutes depending on when and for how long it was last operated.
2.Move the slider/hinge so Burner opening is fully open.
3.Allow for any residual fumes to evaporate (this will take a few minutes – please be aware that if this time is not respected the ignition will be pressurized and therefore stronger).
4.Re-ignite as described in “Lighting the EcoSmart™ Burner”.
WARNING!
• Never leave a fire unguarded.
• Only use Denatured Ethanol* in the EcoSmart™ Burner.
• Ignition of the lighting rod should only be performed above and beside the Burner to avoid dripping the fuel at any stage of the lighting process out of the firebox onto the floor.
• The EcoSmart™ Burner must not be filled at any time with additional Denatured Ethanol* when the flame is going or when the Burner is hot.
• An inherent danger with Denatured Ethanol* is that the flame produced is almost invisible in normal daylight conditions or first lit. Being difficult to see, an inexperienced person can easily assume the Burner is empty and needs filling.
It is potentially lethal to attempt to refill the EcoSmart™ Burner when it is still lit. The result could easily be an explosion. If it is necessary to refill the Burner, assume it is still burning and go through the normal procedure of extinguishing the flame. Wait until the burner is at room temperature before refilling and follow all instructions carefully.
17
© Copyright 2004 - 2009 The Fire Company Pty Ltd. All rights reserved. V5 0709.
Maintenance Instructions
Maintenance
Instructions
ENGLISH
Maintenance and cleaning must only be performed when the EcoSmart™ Burner is OFF, COMPLETELY
EMPTY & DRY and at ROOM TEMPERATURE.
Over time, a film of black residue will apear on the 2 vents inside the burner and around the burning zone
on the burner top. If service is required, there are two specific areas to check for cleaning. These are the
EcoSmart™ Burner and the Firebox or immediate surrounds in cases where a firebox has not been installed.
These areas should be inspected periodically to ensure that the product is operating at its optimum safety
level, providing excellent heat and burning cleanly.
General surrounds are maintained as you would a standard piece of furniture by dusting and polishing the
surfaces on a regular basis during your general cleaning routine.
EcoSmart™ Burner
The surface of the burner will change colour on very hot spots.
In addition, over time a film of black residue will appear on the 2 vents of the burner, usually starting from the
MAX 5 Ltr [11⁄4 Gal] line within the burner on the slider, and around the burning zone of the burner top.
Remove with care - the black residue is a carbon left over from the combustion. It stains.
1. When the fire is off and empty, use a vacuum cleaner for general cleaning on visible surface.
2. Brush/Scrape the black material gently from the vents and the slider towards the bottom inside of the
burner.
3. Use a vacuum cleaner to remove residue inside the burner, around the slider rails and around the top
opening of the burning zone.
4. To finish cleaning use a damp disposable cloth and wipe until no residue remains.
5. Never use detergent in your burner.
Cleaning should be conducted routinely. The frequency of cleaning will depend on your usage. It is
recommended that the unit be vacuumed after every 50 litres [13.20 Gal.] of fuel burnt or as soon as you
notice fine black deposits on or around the burner.
Black marks can be removed from the stone, solid surfaces or stainless steel with a mild abrasive washing
product such as JIF® or similar. It is recommended to test a small area first to ensure the cleaning product
chosen is appropriate and will not mark or damage the surface.
After extensive use, if your burner smells unusually strong when empty and cold, remove the burner from its
setting and simply rinse generously under running hot water for 15 min and allow it to dry thoroughly before
being placed back in its original setting. Do not use detergent.
Important:
All burner parts will age over the course of time through natural processes associated with use, heat and
flame.
Please also note that new stainless steel has an oil coating that will burn off during the first few uses. You will
notice an accumulation of carbon around the top opening of the burner zone and its vents. This will appear
quickly and is normal. You will need to perform your first maintenance after approximately 20 litres [5.28 Gal]
of Denatured Ethanol* burnt.
After this, the accumulation will be far slower and maintenance can then occur every 50 litres [13.20 Gal] of
Denatured Ethanol* burnt.
If anything abnormal appears, do not operate the unit. If the fire is running, turn it off immediately and contact
your distributor before using again.
EcoSmart™ Firebox
As the stainless steel is exposed to flame and heat for a long period of time, its colour will eventually change.
To clean:
1. Use a disposable damp cloth to wipe the surface that needs cleaning (go with the grain) using a mild abrasive product such as JIF®. Rinse well with a wet cloth.
2. After cleaning do not light the fire until all surfaces are completely dry. You can enhance the shine by using
a stainless steel cleaner and polish. Spray it on a disposable cloth and wipe the surface until you achieve an
even shine.
Any stainless steel cleaner and polish leaves a residual film on surfaces. This film will burn off and appear
black when directly exposed to the flame, so be careful not to apply too much and rinse away thoroughly.
www.ecosmartfire.com
18
ENGLISH
Troubleshooting
Troubleshooting
Some troubleshooting procedures should only be carried out by qualified technicians.
1. There is smoke or a foreign smell coming from the burner when burning
a. There may be waste burning that should not be in the burner.
b. You are using the wrong fuel (It is imperative that you ONLY use Denatured Ethanol*).
c. You have placed something around/above the flame that has not been approved or recommended.
d. If the burner is empty (the flame is dying) or you have just turned the fire off - this is normal
- just like when you blow out candles.
Solution
Shut the Burner to the off position and wait until it cools down. Clean/service the Burner and remove objects/
waste.
2. When I attempt to light the Burner, it does not start
a. You have not put enough fuel in the Burner.
b. You have not used the right fuel (It is imperative that you ONLY use Denatured Ethanol*).
c. The Burner opening is obstructed, there needs to be adequate ventilation for the flame to start.
d. The Denatured Ethanol* is cold and takes time to ignite.
e. If used outdoor under non approved setting, the Burner might have been filled with water from rain
and other debris.
Solution
Check fuel level, it must be above the 1 litre [1/4 Gal] line, check type of fuel used, and open the slider/hinge.
Repeat starting procedure until the Burner warms up and remains ignited. If filled with water, empty Burner,
clean and clear Burner and re set up ready for re-filling.
3. The flame is not extinguishing when turned off
a. It may be that the momentum used to close the Burner opening was too slow.
b. There are particles obstructing the Shut Off Mechanism.
c. The Burner has been filled with fuel well over the MAX mark and the fuel is burning as well from the groove on the edge of the Burner.
Solution
Ensure that there is nothing obstructing the Shut Off Mechanism. Attempt to extinguish again smoothly with
the Shut Off Mechanism. If it does not extinguish, burn the fuel until empty and the flame dies out naturally
and contact your distributor. Do not use again until it has been serviced.
If you have overfilled the Burner and the flame is burning strong, prepare your extinguisher just in case, and
monitor the flame till the situation goes back to normal as you will not be able to turn it off. Do not blow or
throw a blanket on it.
4. The slider/hinge cannot be pushed/pulled/flipped into position when hot/cold
a. The Burner slider/hinge is dirty or filled up with debris left after combustion.
b. There may be something stuck or obstructing the Shut Off Mechanism e.g. something may have fallen into the Burner.
c. The Burner has been physically damaged internally (e.g. if it has been dropped).
Solution
Clean/Service the Burner and see if you find the obstruction. If you do not find anything, contact your
distributor. Do not use again until it has been serviced.
5. I have spilt some fuel, what do I do before lighting?
Remove all ignition sources. Keep people away from the area. Wipe up spilt liquid thoroughly using a dry
cloth, wipe again with a cloth dampened with water. Avoid breathing vapours. Ventilate enclosed space by
opening windows and doors.
ONLY ignite when the area is completely dry and you are 100% sure that all spilt fuel has been removed.
Please refer to MSDS for Denatured Ethanol*.
6. The flame is unusually volatile and high
This is likely to be caused by a strong draft blowing on the flame. Locate and remove the source of the
draft (it may be that you have a window/door open or fan operating that is directly pushing air towards the
fire). If you cannot remove the source of the draft and the flame is too volatile, turn the fire OFF. You will
need to rethink the positioning of your unit before operating again or install a firescreen to minimize the
draft effect. Contact your distributor.
7. The Jerry Can doesn’t work properly
Please contact your distributor for further instructions. Do not attempt to fill the EcoSmart™ Burner with an
unapproved alternative fuel can.
19
© Copyright 2004 - 2009 The Fire Company Pty Ltd. All rights reserved. V5 0709.
Your Warranty
Your Warranty
ENGLISH
Your EcoSmart™ Fire is covered by a transferable limited warranty and a solid service and support network
should you need it. At The Fire Company Pty Ltd, we believe in supplying you with the best, most user friendly
fireplace and providing you with the means to keep it that way. Many aspects of the EcoSmart™ Fire are handproduced, hand-finished and use natural materials, which makes them subject to minor variations in finish
and size. All of our pieces will mature and age over the course of time, through natural processes associated
with use and with heat and flame. These changes are an essential part of the dynamic of the piece. The Fire
Company Pty Ltd reserves the right to make minor amendments without prior notice.
Length of Warranty
The Fire Company Pty Ltd
undertakes to
The express Warranties do not include:
FULL TWO YEARS
WARRANTY FROM
DATE OF PURCHASE
ON ALL STAINLESS
STEEL PARTS
Repair or, at our option,
replace without cost
to owner either for
materials or labour, any
part that is found to be
defective.
A. Service calls to:
1. Correct the installation of the EcoSmart™ Fire.
2. Instruct you how to use the EcoSmart™ Fire.
(Stone chipping,
painting scratches and
general scratches are
not covered by Warranty)
B. Repairs when the EcoSmart™ Fire has been used in
other than normal domestic/commercial use or when
not used in accordance with the Installation, Operating
and Maintenance Manual.
C. Repairs when the EcoSmart™ Fire parts or models
have been modified or altered in any way that has not
been approved in writing by The Fire Company Pty Ltd.
D. Repairs when the EcoSmart™ Fire has been
dismantled, repaired or serviced by anyone other than an
authorized representative of The Fire Company Pty Ltd.
E. Pick up and delivery.
F. Normal maintenance as required in the Installation,
Operating and Maintenance Manual supplied with the
EcoSmart™ Fire.
G. Transportation or traveling costs involved in the
repair when the appliance is installed outside The
Fire Company Pty Ltd’s AUTHORISED CUSTOMER
SERVICE CENTRES’s normal service area.
H. Damage to the EcoSmart™ Fire caused by accident,
misuse or Act of God.
I. Any incidental shipping or holding costs to deliver
your EcoSmart™ Fire or parts to an Authorized
Service Centre.
The Warranties set out above are express Warranties given by The Fire Company Pty Ltd and are in addition
to the rights and remedies which are conferred upon consumers by Trade Practices Act 1974 of the
Commonwealth and other Commonwealth, State or Territory legislation.
Service under the warranties set out above must be provided by The Fire Company Pty Ltd authorised
customer service centre who shall provide service during their normal working hours.
This warranty certificate along with proof of date of purchase must be produced when making any claim.
MODEL NO. PURCHASER
SERIAL NO.
PURCHASED FROM
DATE OF PURCHASE
For warranty claims please contact your local distributor. If there is not a local distributor in your country please
visit www.ecosmartfire.com to source the details of the country closest to you.
*Do not return this form to The Fire Company Pty Ltd, please retain for your own reference.
www.ecosmartfire.com
20
ENGLISH
After Sales Service
After Sales Service
It is our aim for you to be totally satisfied with your EcoSmart™ Fire product. If you need service or
assistance, we suggest you follow these steps.
After Sales Service for your EcoSmart™ Fire
The Fire Company Pty Ltd offers an international network of authorised service agents. The use of other
than approved EcoSmart™ Fire parts and accessories may damage or reduce the performance of your
EcoSmart™ Fire and may also endanger the user. The Terms and Conditions of Warranty may also be
affected. A full list of contacts can be found on www.ecosmartfire.com
Please note
Charges will apply for services performed outside the Warranty period. If you are asked to send your
EcoSmart™ Fire into a service centre please ensure that it is securely packed in materials equivalent to how
you received your EcoSmart™ Fire to avoid possible damage that will not be covered by The Fire Company
Pty Ltd. Freight must be pre-paid. Include a covering letter outlining the defect and your contact details.
1. Before calling for assistance
Check the things you can do yourself. Refer to the Installation, Operating and Maintenance Manual supplied
with your EcoSmart™ Fire to ensure that it is correctly installed and that you are familiar with its normal
operation.
2. If You Need Service*
The Fire Company Pty Ltd has a network of independent EcoSmart™ Fire Authorised Customer Service
Centres whose fully trained technicians can carry out any service necessary on your appliance.
Contact the dealer from whom your purchased the appliance, who can advise you where to obtain service.
3. If you need assistance or have a problem*
If you need assistance or have a problem please contact your local retailer or distributor,
or visit www.ecosmartfire.com for Head Office details.
Talk to one of our Customer Service Representatives. They can instruct you in how to obtain satisfactory
operation from your appliance or, if necessary, recommend an Authorised Customer Service Centre in your area.
*If you must call or write, please provide: Name and Address, Model Number, Serial Number, Date of Purchase, venue and a complete description
of the problem. This information is needed in order to better respond to your request for assistance.
21
© Copyright 2004 - 2009 The Fire Company Pty Ltd. All rights reserved. V5 0709.
www.ecosmartfire.com
22
The EcoSmart™ Fire is designed and manufactured by The
Fire Company Pty Ltd whose quality management system is
certified as being in conformity with ISO 9001:2000.
REV0709
Visit www.ecosmartfire.com to find a complete list of
distributors and retail stores.
DNV Certification Pty Ltd
10 Apollo Street, Warriewood NSW 2102, Australia
T: +61 2 9997 3050 F: +61 2 9997 6050
E: [email protected]
QUALITY
ASSURED
ISO9001:2000