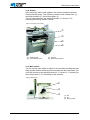
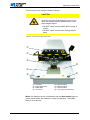
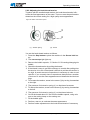
1
806N Operating Manual Operating manual 806N Version 00.0 - 12/2012 Table of contents Table of contents 1 About this operating manual ......................................................5 1.1 Scope of application of the operating manual ..........................5 1.2 For whom is this operating manual?.........................................5 1.3 Representational conventions – Symbols and characters........5 1.4 Other documents ......................................................................6 1.5 Liability......................................................................................6 1.5.1 Transportation ..........................................................................7 1.5.2 Intended use .............................................................................7 2 Performance description .............................................................8 2.1 Features ...................................................................................8 2.2 Declaration of conformity ..........................................................8 2.3 Technical data ..........................................................................9 2.4 Additional equipment ..............................................................10 3 Safety instructions.....................................................................12 3.1 Basic safety instructions .........................................................12 3.2 Signal words and symbols used in warnings ..........................15 4 806N device description ............................................................17 4.1 806N sewing unit ....................................................................17 4.1.1 4.1.2 4.1.3 4.1.4 4.1.5 Operating terminal ..................................................................18 Edge folding station ................................................................19 Sewing unit .............................................................................21 Stacker ...................................................................................22 Main switch .............................................................................22 4.2 Software description ...............................................................23 4.2.1 Structure of the operating software ........................................23 4.2.2 Operating software functions ..................................................24 4.2.3 Operating software version.....................................................30 5 Operating instructions...............................................................31 5.1 Switching on the machine.......................................................32 5.2 Preparing the machine for operation ......................................33 5.2.1 5.2.2 5.2.3 5.2.4 5.2.5 5.2.6 Making the basic settings .......................................................34 Inserting the thread reel..........................................................37 Checking the needle ...............................................................38 Threading in the needle thread...............................................39 Inserting/changing the bobbin ................................................40 Inserting/changing the shaping assembly ..............................42 5.3 Carrying out a test run ............................................................54 5.4 Sewing with default settings ...................................................55 Operating manual 806N Version 00.0 - 12/2012 1 Table of contents 5.5 Sewing in two-pocket mode....................................................58 5.6 Setting options in User interface 1..........................................61 5.6.1 5.6.2 5.6.3 5.6.4 5.6.5 5.6.6 Resetting piece counter ..........................................................61 Setting the bobbin counter......................................................62 Enabling bundle removal ........................................................64 Automatically activating the slide at the front .........................64 Activating the alignment of strips ............................................65 Initiating a change of shape....................................................66 5.7 Setting options on user interface 2 .........................................66 5.7.1 5.7.2 5.7.3 5.7.4 5.7.5 5.7.6 5.7.7 5.7.8 5.7.9 5.7.10 Working step-by-step..............................................................66 Activating Sewing without edge folding ..................................67 Switching the stroke position on/off ........................................67 Activating needle cooling ........................................................68 Activating the thread monitor ..................................................68 Activating automatic air suction ..............................................69 Selecting/deselecting stacker variants ...................................70 Setting the outfeed roller path ................................................71 Activating the advance roller ..................................................72 Setting the motor speed .........................................................73 5.8 Activities on the machine ........................................................74 5.8.1 5.8.2 5.8.3 5.8.4 5.8.5 5.8.6 5.8.7 Winding the hook thread.........................................................74 Adjusting the needle thread tension .......................................75 Adjusting the hook thread tension ..........................................76 Inserting/changing the needle ................................................77 Changing the shaping assembly ............................................78 Changing the bobbin ..............................................................78 Sewing after thread breakage ................................................78 5.9 Switching off the machine.......................................................80 5.10 How to act in the case of an emergency (EMERGENCY STOP) ...........................................................82 5.11 Maintenance (daily) ................................................................84 5.11.1 Cleaning .................................................................................84 5.11.2 Lubricating ..............................................................................85 5.11.3 Customer service....................................................................87 5.12 Troubleshooting table .............................................................87 6 Set-up instructions ....................................................................90 6.1 Unpacking the machine ..........................................................90 6.2 Delivery scope ........................................................................90 6.3 Removing/mounting covers ....................................................91 6.3.1 Removing the covers ..............................................................91 6.3.2 Installing covers ......................................................................93 2 6.4 Removing the transport locks .................................................95 6.5 Setting up/connecting the sewing unit ....................................97 Operating manual 806N Version 00.0 - 12/2012 Table of contents 6.5.1 6.5.2 6.5.3 6.5.4 6.5.5 Setting up ...............................................................................97 Installing the thread reel holder ..............................................98 Electrical connection...............................................................99 Pneumatic connection ............................................................99 Topping up the oil .................................................................100 6.6 Commissioning .....................................................................102 7 Decommissioning ....................................................................103 8 Packing, transportation ...........................................................104 8.1 Fitting the transport locks .....................................................104 8.2 Packing the machine ............................................................105 8.3 Transporting the machine .....................................................106 9 Disposal ....................................................................................107 10 Glossary....................................................................................108 Operating manual 806N Version 00.0 - 12/2012 3 Table of contents 4 Operating manual 806N Version 00.0 - 12/2012 About this operating manual 1 About this operating manual The operating manual for the 806N sewing unit was compiled with the utmost care. It contains information and notes in order to make long-term and reliable operation possible. Should you notice any discrepancies or if you have improvement requests, then we would be glad to receive your feedback, Section 5.11.3 Customer service. Please regard the operating manual as part of the product and keep it in a safe place where it can be easily accessed. Read the operating manual completely prior to using the unit for the first time. Only pass the product on to third parties together with the operating manual. 1.1 Scope of application of the operating manual This operating manual describes the set-up and intended use of the 806N sewing unit. 1.2 For whom is this operating manual? The operating manual is intended for: • Operating personnel: This group of employees has been trained in operating the machine and can access the operating manual. Specifically Section 5 Operating manual is important for this group of employees. • Specialized staff: This group of employees has the appropriate technical training allowing them to perform maintenance on the sewing unit or to repair faults. Specifically Section 6 Set-up instructions is important for this specialized staff. Service instructions are supplied separately. With regard to minimum qualification and other requirements to be met by the personnel, please also observe Section 3 Safety instructions. 1.3 Representational conventions – Symbols and characters Different information is depicted or highlighted in this operating manual by the following characters for easier and quicker understanding: Symbol/character • 1. 2. Operating manual 806N Version 00.0 - 12/2012 Meaning Lists are identified by bullet points. Instructions are numbered and have to be performed in the specified order. 5 About this operating manual Symbol/character The result will be a correct seam. Highlighting Meaning After you have performed the step, the result is written in italics. Designations of surfaces, selection windows, or buttons used in the software and keys on the machine are highlighted in bold type. References to further information in this operating manual or other documents are identified by this symbol. Information notes Content of information notes Information notes are identified by a black line above or below the reference text. Information notes provide you with information on facilitating the operating procedure and about the accessories or similar. There are no negative effects if these notes are not read. Safety Important warnings for the user of the machine are specifically marked. Because safety constitutes an area of major importance, hazard symbols, levels of risk, and their signal words are described separately in Section 3 Safety instructions. Location information Information on where something is positioned using the terms "right" or "left" must always be regarded from the operator's point of view if the figure gives no other obvious indication for determining the location. 1.4 Other documents The device contains built-in components from other manufacturers. The respective manufacturers have carried out hazard assessments for these purchased parts and confirmed compliance of the design with the applicable European and national regulations. The intended use of the built-in components is described in the corresponding manuals of the manufacturers. 1.5 Liability All information and notes in this operating manual have been compiled in accordance with the latest technology and the applicable standards and regulations. The manufacturer cannot be held liable for any damage due to: • Damage during transport • Failure to observe the operating manual • Improper use • Unauthorized modifications to the machine 6 Operating manual 806N Version 00.0 - 12/2012 About this operating manual • The deployment of untrained personnel • Using spare parts not approved 1.5.1 Transportation Dürkopp Adler cannot be held liable for any damage during transport. Check the delivered product immediately after receiving it. Report any damage to the last transport manager. This also applies if the packaging is not damaged. Keep the machines, devices and packaging material in the condition they were at the time when the damage was identified. That secures any claims towards the transport company. Report all other complaints to Dürkopp Adler immediately after receiving the product. 1.5.2 Intended use The Dürkopp Adler 806N is for sewing light to moderately heavy material. Light to moderately heavy material requires a needle strength of 70-100 Nm. The machine is only intended for processing dry material. The material must contain no hard objects. The seam is produced using core spun threads, polyester fibers, or cotton threads. The sewing machine is intended for industrial use. The machine may only be set up and operated in dry conditions on wellmaintained premises. If the machine is operated on premises that are not dry and well-maintained, then further measures may be required which must be compatible with EN 60204-31:1999. Only authorized/trained persons may work on the machine. The manufacturer will not be held liable for damage resulting from improper use. WARNING Danger due to high voltage, crushing and sharp objects. Improper use can result in injuries. Please follow all instructions in the manual. ATTENTION Improper use could result in material damage. Please follow all instructions in the manual. Operating manual 806N Version 00.0 - 12/2012 7 Performance description 2 Performance description The Dürkopp Adler 806N is a CNC-controlled sewing unit for automatically sewing pockets onto shirts, blouses, and similar material. It is a flatbed sewing machine for a double lockstitch. The material to be sewn is constantly moved by means of bottom feed. 2.1 Features • Stepper motors for short running times and exact needle guidance, which means particularly high pocket quality • DAC III controller (Dürkopp Adler Control) • In-house software for operating the system • Software symbols adopted from the previous control system, which means easy handling and fast familiarization • Additional equipment offers many variations, Section 2.4 Additional equipment • Air suction device (vacuum) in the ergonomically inclined (10 degrees) sewing material support, for fastening the material to be sewn • Constant feed of material to be sewn during the sewing process • Up to 4,000 stitches/min. with 2.5 mm stitch length • 2,500 pockets in 8 hours (standard shirt pockets) 2.2 Declaration of conformity The machine complies with the European regulations specified in the declaration of conformity or in the installation declaration. 8 Operating manual 806N Version 00.0 - 12/2012 Performance description 2.3 Technical data Technical data Stitch type 301 (double lockstitch) Sewing head Horizontal hook / vertical hook 806N-121 270 Horizontal hook Needle stroke [mm] 38 Needle system 134 Needle size, according to sewing equipment [Nm] Number of stitches, max. Stitch length, programmable [mm] Thread size, according to sewing equipment; e. g. core spun thread 70 - 100 4,000 min-1 0.1 - 3.0 120 Positive operating pressure [bar] 6 Air consumption / pocket [NL] 20 Sewing field size (X - Y) [mm] 220 x 250 Transfer distance (X) [mm] 610 Type of drive constant Controller DAC III Control panel Memory capacity of seam programs Storage media Touchpanel PC 15" any HD/stick via USB interface Max. dimensions of sewing unit (W x H x D) [mm] 2,000 x 1,800 x 1,300 Max. dimensions of packaging (W x H x D) [mm] 2,000 x 2,000 x 1,600 Weight including packaging [kg] 950 Net weight [kg] 645 Nominal voltage [V] Connected load [kVA] Operating manual 806N Version 00.0 - 12/2012 1 x 230 0.5 9 Performance description 2.4 Additional equipment The following additional equipment is available for the 806N-121: Additional equipment Order number Parts set: Shape-ready edge folding set Basic pocket shape F1000/1500 0805 929901 Basic pocket shape F2000/2500 0805 929902 Basic pocket shape F3000/3500 0805 929903 Basic pocket shape F4000/4500 0805 929904 For single-piece pockets (with transfer plate - single seam) 10 Basic pocket shape F1000/1500 0806 929914 Basic pocket shape F2000/2500 0806 929915 Basic pocket shape F3000/3500 0806 929916 Basic pocket shape F4000/4500 0806 929917 Parts set: Shape-ready transfer plate for single seam, underwear and jeans 0806 929901 Parts set: Shape-ready transfer plate for parallel double seam with inner slide, underwear 0806 929902 Conversion set for processing single-piece pockets 0806 590034 Parts set: Additional seam (pencil pocket) Either as a straight stitch seam of any length with a reverse bar at both ends or a zigzag seam with a maximum length of 12.5 mm. The width of the zigzag seam corresponds to the stitch length. One parts set must be ordered for each additional seam. 0805 417609 Parts set: Outfeed roller For sewn products that are LONGER than 310 mm from the seam of the attached pocket to the lower edge of the basic part. 0806 428009 Parts set: Outfeed roller with advance roller For sewn products that are SHORTER than 310 mm from the seam of the attached pocket to the lower edge of the basic part. 0806 428039 Parts set: Semi-finished parts for self-production of the shapedependent parts of an edge folding set 0805 417514 Parts set: Semi-finished parts for self-production of the transfer plate for a single seam 0806 417544 Parts set: Semi-finished parts for self-production of the transfer plate for a double seam with inner slider 0806 417554 Parts set: Adapter To allow attachment of a class 805 transfer plate to a class 806N transfer lever. 0806 417514 Operating manual 806N Version 00.0 - 12/2012 Performance description Additional equipment Order number Parts set: Controlled 2-way needle thread tension For especially flexible stitches in the bar area Parts set: Pressure foot for underwear For critical materials The following conditions must be satisfied in order to use the pressure foot: – Transfer plate without inner slider – For double seams, a minimum clearance of 2.5 mm between the outer pocket edge and the 1st seam 0396 222654 Parts set: Finished parts for underwear, required in addition to the form-dependent parts used for self-production of an edge folding set. Basic pocket shapes F1000 and F1500 0805 417544 Basic pocket shapes F2000 and F2500 0805 417554 Basic pocket shapes F3000 and F3500 0805 417564 Basic pocket shapes F4000 and F4500 0805 417574 Parts set for pockets > 200 x 220 mm (up to 220 x 230 mm) Low-temperature needle cooling (eddy current cooler) 0804 357509 Pressure hose, pneumatic connection 0797 003031 Parts set: Marking light Laser marking light for positioning parts. 9880 806008 Parts set: Automatic vacuum For automatically switching on a vacuum via a light barrier for holding the material to be sewn on the table plate. 0805 402904 Operating manual 806N Version 00.0 - 12/2012 11 Safety instructions 3 Safety instructions This section contains basic instructions for your safety. Read the instructions carefully before setting up or operating the machine. Make sure to follow the information included in the safety instructions. Failure to do this can result in serious injury and damage to the machine. 3.1 Basic safety instructions The machine may only be used as described in this operating manual. The operating manual must be available at the machine's location at all times. Work on live components and equipment is prohibited. Exceptions are defined in the specifications in DIN VDE 0105. For the following work, the machine must be disconnected from the power supply using the main switch or by disconnecting the power plug: • Replacing the needle or other sewing tools • Leaving the workplace • Performing maintenance work and repairs Missing or faulty spare parts could impair safety and damage the machine. Therefore only use original spare parts from the manufacturer. Transportation Set-up Operator's obligations Use a sturdy lifting carriage for transporting the machine. If a longer lifting carriage is not available, then use a small lifting carriage under the right side of the machine. Raise the machine max. 20 mm and secure it against slipping off. The connecting cable must have a power plug approved in the specific country. The power plug may only be connected to the power cable by a qualified specialist. Observe the country specific safety and accident prevention regulations and the legal regulations concerning industrial safety and the protection of the environment. All warnings and safety signs on the machine must always be in legible condition and may not be removed. Missing or damaged labels must be replaced immediately. Requirements to be met by the personnel 12 The machine may only be set up by qualified specialists. Maintenance work and repairs may only be carried out by qualified specialists. Operating manual 806N Version 00.0 - 12/2012 Safety instructions Work on electrical equipment may only be carried out by qualified specialists. Only authorized persons may work on the machine. Every person who works on the machine must have read the operating manual first. Operation Inspect the machine while in use for any externally visible damage. Interrupt your work if you notice any changes to the machine. Report any changes to your supervisor. A damaged machine may not be used any more. Safety equipment Safety equipment may not be removed or put out of service. If this cannot be avoided for a repair operation, the safety equipment must be refitted and put back into service immediately afterwards. The safety equipment is located at the illustrated positions on the machine: (1) - Safety hood (2) - EMERGENCY STOP button Operating manual 806N Version 00.0 - 12/2012 (3) - Integrated EMERGENCY STOP (4) - Metal bar 13 Safety instructions The following safety devices are mounted on the machine: Figure 14 Designation Purpose EMERGENCY STOP button The machine is immediately placed in the EMERGENCY STOP state: – The motors are braked and then disconnected from the power. – The cylinders are depressurized. – The sewing head moves to the upper position and is locked in place. Integrated EMERGENCY STOP The machine is immediately placed in the EMERGENCY STOP state: – The motors are disconnected from the power. – The cylinders are depressurized. – The sewing head moves to the upper position and is locked in place. Metal bar Defines limits for the operator to provide protection from injury. Protective hood Protects the operator from injury and protects the electrical and mechanical elements of the machine from soiling. Operating manual 806N Version 00.0 - 12/2012 Safety instructions 3.2 Signal words and symbols used in warnings Warnings in the text are distinguished by color bars. The color scheme is oriented towards the severity of the danger. Signal words specify the severity of a danger: Signal words Signal words and the endangerment that they describe: Signal word DANGER Resulting in death or serious injury. WARNING Death or serious injury possible. CAUTION Moderate to minor injuries possible. ATTENTION Symbols Endangerment Damage possible. In the case of dangers to personnel, the following symbols indicate the type of hazard: Symbol Type of danger General danger Danger due to electric shock Danger due to sharp objects Danger due to crushing Examples Examples of the layout of the warnings in the text: DANGER Type and source of the danger Consequences in the event of noncompliance Measures for avoiding the danger This is what a warning looks like for a hazard that will result in serious injury or even death if not complied with. Operating manual 806N Version 00.0 - 12/2012 15 Safety instructions WARNING Type and source of the danger Consequences in the event of noncompliance Measures for avoiding the danger This is what a warning looks like for a hazard that could result in serious injury or even death if not complied with. CAUTION Type and source of the danger Consequences in the event of noncompliance Measures for avoiding the danger This is what a warning looks like for a hazard that could result in moderate or minor injury if the warning is not complied with. ATTENTION Type and source of the danger Consequences in the event of noncompliance Measures for avoiding the danger This is what a warning looks like for a hazard that could result in material damage if not complied with. 16 Operating manual 806N Version 00.0 - 12/2012 806N device description 4 806N device description The 806N sewing unit is system for automatically sewing on pockets. The correct operating principle involves a sequence of different steps and requires precise knowledge of all operating controls. 4.1 806N sewing unit The 806N sewing unit is illustrated in the figure below. The location of its individual components and its operating principle are described here. Figure 1: General overview of the 806N (1) - Operating terminal (2) - Edge folding station (3) - Sewing unit (4) - Foot switch (not illustrated) (5) - Main switch (6) - Stacker Operating principle of the 806N The machine must first be switched on by the main switch (5) in order to start up the operating terminal (1). The basic settings are then made by means of the software. The fabric parts to be sewn, the base part and the pocket blank are then aligned on the edge folding station (2). The automatic sequence is then started. The pocket blank (edge) is folded at the edge folding station (2) and then transported to the sewing unit (3), where the folded pocket blank is sewn onto the base part. Finally, the finished sewn product is deposited on the stacker (6) from where it can be removed whenever necessary. Operating manual 806N Version 00.0 - 12/2012 17 806N device description Components of the 806N An illustration with a detailed description can be found for each component of the 806N further on. These illustrations cover the main terms and elements of the components required for work on the 806N. 4.1.1 Operating terminal You can use the operating software to set the sewing unit on the touch screen (1) of the operating terminal. You can import new pocket seam programs or other software via the USB port (2) or network interface in the housing. Figure 2: Overview of the operating terminal (1) - Touch screen (2) - USB port 18 Operating manual 806N Version 00.0 - 12/2012 806N device description 4.1.2 Edge folding station Place the fabric parts to be sewn on the edge folding station: The base part on the sewn material support (6) with integrated hose insert for the 806N-121 (4) and the pocket blank on the middle slide (3). The edge folding frame (2) is used to fold the (edge) of the pocket blanks. Furthermore, two manual keys (5, 7) and the foot switch (8) used to start the sewing cycle can be found here. The key panel (1) is used for operating the mechanical aspects and displays the operating status. Figure 3: Overview of the edge folding station (1) - Key panel (2) - Edge folding frame (3) - Middle slide (4) - Hose insert Operating manual 806N Version 00.0 - 12/2012 (5) - Manual switch 1 (6) - Material support (7) - Manual switch 2 (8) - Foot switch (not illustrated) 19 806N device description Detailed description of the key panel The individual elements of the key panel always have two components: The button and a label field. A description of the function can be found in the table below in addition to the illustration and designation of the keys. Key 20 Designation Function Stop key The stop key does not light up. If you press the stop key, the machine ends the current work step and comes to a safe stop. The activities described in Section 5.8 Activities on the machine can be performed safely. Start key The start key can light up or flash in green. If the start key lights up, you can start a procedure on the machine by pressing manual key 1. If the start key flashes, an error has to be eliminated or a requirement met. Then press manual key 1 in order to resume the procedure. Cancel key The cancel key does not light up. The current edge folding procedure is stopped by pressing the cancel key. The sewing procedure is resumed. Safe stop Safe stop is not a key, but a lamp which lights up in white. The safe stop lamp indicates that no working procedure is active. The activities described in Section 5.8 Activities on the machine can be performed safely. EMERGENCY STOP The EMERGENCY STOP button does not light up. The machine stops all procedures and is disconnected from the power supply if you press the EMERGENCY STOP button. The EMERGENCY STOP button must be reactivated after actuation in order to resume work, Section 5.10, Emergency procedure. Operating manual 806N Version 00.0 - 12/2012 806N device description Detailed description of the keys The manual keys and the foot switch are used to operate the machine. A description of the function can be found in the table below in addition to the illustration and designation of the keys. Key Designation Function Manual key 1 Manual key 1 (on the left side): – Starts a sewing cycle – Activates the air suction for the basic part and pushes the middle slide into the front position – Navigates stitch by stitch to the correct point after a thread breakage Manual key 2 Manual key 2 (on the right side): – Lowers the middle slide into the front position – Raises the middle slide into the front position Foot switch Foot switch: – Activates the air suction for the basic part – Moves the middle slide into the front position 4.1.3 Sewing unit If everything is performed correctly on the edge-folding station, the transfer frame (3) of the sewing unit moves to the edge folding station. The fabric parts are transported from the edge folding station to the sewing unit by means of the transfer plate (4). The sewing head (1) lowers here and the fabric parts are sewn together. You do not need to do anything on the sewing unit, since the machine works fully automatically here. Figure 4: Overview of the sewing unit (1) - Sewing head (2) - Transfer frame Operating manual 806N Version 00.0 - 12/2012 (3) - Transfer plate 21 806N device description 4.1.4 Stacker After sewing the fabric parts together, the machine stacks the product cleanly and tidily away. This is done by means of the outfeed roller (1), the clamp brackets (2, 4) and the support (3). You can select between two stacking variants, Section 5.7.4, Selecting/deselecting stacker variants. Figure 5: Overview of the stacker (1) - Outfeed roller (2) - Inner clamp bracket (3) - Support (4) - Outer clamp bracket 4.1.5 Main switch You can use the main switch to switch on the machine including the operating terminal. Before switching off the machine with the main switch, you must first shut down the operating terminal, Section 5.1, Switching on the machine and 5.9, Switching off the machine. Figure 6: Main switch (1) - Off (2) - On (3) - Rotary switch 22 Operating manual 806N Version 00.0 - 12/2012 806N device description 4.2 Software description The operating terminal is used to control the machine. You can operate the operating software on the touch screen of the operating terminal. The following is described below: • Structure of the operating software • Operating software functions 4.2.1 Structure of the operating software The operating software is set up on different user interfaces. The structure ranges from the start screen to the technician's user interface. Designation Initial screen Pocket mode selection window Seam program selection window User interface 1 User interface 2 Technician's user interface Meaning in the work sequence Basic view of the operating software These two selection windows are used to prepare the machine for sewing work, Section 5.2.1, Making basic settings. The operator mainly works on these user interfaces when sewing. Various machine settings can be made here. Password required, for technicians only An overview of the operating software is displayed here. The arrows indicate the navigation options between the user interfaces: Figure 7: Overview of the operating software structure. Technician's user interface Initial screen Pocket mode selection window Seam program selection window User interface 1 User interface 2 Operating manual 806N Version 00.0 - 12/2012 23 806N device description 4.2.2 Operating software functions The functions of the individual user interfaces are described in this section. The technician's user interface is not included, since a password is required for access. The technician's user interface is described in the Service manual for the 806N. Initial screen When you switch on the machine, Section 5.1, Switching on the machine, the Start screen appears. On this user interface you can: • Reference the machine (diagnostic run for reading the code of the transfer plate and finding the home position) and, in this way, access the pocket mode selection window • Access the technician's user interface by entering a password • Exit the operating software or shut down the operating terminal Section 5.9, Switching off the machine. Figure 8: Overview of the start screen (1) - Display of the current date and time (2) - Access the technician's user interface (with password) (3) - Reference machine (4) - Exit operating software or shut down operating terminal 24 Operating manual 806N Version 00.0 - 12/2012 806N device description Pocket mode selection window On the Start screen, you use the Reference machine button , to access this selection window after performing a successful reference run. You can select the pocket mode here – to specify whether only the right or left pocket is to be sewn or whether the right and left pocket are to be sewn alternately. Figure 9: Overview of the Pocket mode selection window (1) - Select one-pocket mode (2) - Select two-pocket mode (3) - Exit the Pocket mode selection window (go to the Start screen) Seam program selection window You automatically go to this selection window by selecting a pocket mode. The identification code of the transfer plate is displayed here, see also Section 5.2.6. All pocket seam programs are listed correspondingly. You can select here the seam program to be used for sewing. Figure 10: Overview of the Seam program selection window (1) - Selection area with list of selectable pocket seam programs (2) - Display of the selected seam program (3) - Confirm selection (4) - Display of the transfer plate identification code (5) - Exit selection window (to go to pocket mode selection window) Operating manual 806N Version 00.0 - 12/2012 25 806N device description User interface 1 You go to this user interface by selecting the seam program. You can view here the seam shape and how the pocket is to be sewed on and make various settings. Figure 11: Overview of user interface 1 (1) - Display of the seam shape of the pocket seam program (2) - Set global parameters (in User interface 2) (3) - The designation contains the version number of the software (4) - Select setting options (see table below) (5) - Exit user interface 1 (go to start screen) Setting options on user interface 1 The respective section of the operating manual, where you can find further information on the buttons, is also specified. Button Function Reset piece counter, Section 5.6.1 It indicates the number of sewn-on pockets. Set bobbin counter, Section 5.6.2 It indicates the amount of thread still on the bobbin and opens the bobbin change menu. 26 Operating manual 806N Version 00.0 - 12/2012 806N device description Button Function Enable bundle removal, Section 5.6.3 Allows the finished sewn parts to be removed from the stacker. Automatically activate slide at front, Section 5.6.4 The middle slide immediately moves to the front position. It does not have to be brought to the front by manual key 1. Activate strip alignment, Section 5.6.5 After the edge folding process, the machine stops in order to check the alignment of the pocket blank. Initiate shape change, Section 5.6.6 The change of a shape assembly is initiated. User interface 2 From User interface 1, you use the Global parameters button access User interface 2. You can make further settings here. to Figure 12: Overview of user interface 2 (1) - Select setting options (see table below) (2) - Access the technician's user interface (with password) (3) - Exit User interface 2 (go to User interface 1) Operating manual 806N Version 00.0 - 12/2012 27 806N device description Setting options on user interface 2 The respective section of the operating manual, where you can find further information on the buttons, is also specified. Button Function Work step by step, Section 5.7.1 The machine advances only step by step, which is useful for sewing-in operations or a test run. Activate sewing without edge folding, Section 5.7.2 Useful for testing the sewing head settings. Switch on/off stroke position, Section 5.7.3 The stroke position is the clearance between the foot and the sewing material support. Activate needle cooling, Section 5.7.4 Cools the needle, which is heated by the friction on the fabric. Standard equipment, which can be enhanced. Activate thread monitor, Section 5.7.5 It notices when the needle thread tears and issues a corresponding error message. Activate automatic air suction, Section 5.7.6 Additional equipment; air intake is automatically activated by a light barrier. Select/deselect stacker variant 1, Section 5.7.7 Selection of one of the two stacking variants. Select/deselect stacker variant 2, Section 5.7.7 Selection of one of the two stacking variants. Set outfeed roller path, Section 5.7.8 Distance the fabric is to be rolled out of the sewing field before it is ejected. Activate advance roller, Section 5.7.9 Additional equipment, required for very short seam material, e.g shorts. 28 Operating manual 806N Version 00.0 - 12/2012 806N device description Button Function Set sewing motor speed, Section 5.7.10 The speed of the sewing motor can be set between 100 and 4000 rpm. Exit selection window From the Start screen, you use the Exit button selection window. From here, you can: to reach the Exit • Go to Windows desktop • Shut down the operating terminal • Return to the start screen Figure 13: Overview of the Exit selection window Selection options in this window: Button Objective Function Desktop You can use this button to go to the desktop of the PC. A password is required for this purpose. Shut down You can use this button to shut down the operating terminal. The color of the LED status indicator switches from green to orange when the operating terminal is off. Exit You can use this button to return to the start screen of the operating software. Operating manual 806N Version 00.0 - 12/2012 29 806N device description 4.2.3 Operating software version The operating software version is important for the technicians. It must be easy to find when requested. User interface 1, Section 5.2.1 Making basic settings, specifies the designation of the machine, Section 4.2.2 Operating software functions. Pressing the designation displays the following window: Figure 14: Version window (1) - Machine designation (2) - Operating terminal software version (3) - DAC software version (4) - Exit the Version window (go to User interface 1) Designation not present 30 The version of the operating software is not accessible from the Start screen. You must first navigate to User interface 1 and perform basic settings, Section 5.2.1 Making basic settings. Operating manual 806N Version 00.0 - 12/2012 Operating instructions 5 Operating instructions The 806N sewing unit is system for automatically sewing on pockets. The operating sequence on the 806N consists of several different steps. Faultfree operation is necessary in order to achieve a good sewing result. In the following, the steps are listed in chronological order. The structure of the section is oriented towards this sequence. Operating sequence for the 806N: • Switching on the machine • Preparing the machine for operation • Making the basic settings • Inserting the thread reel • Checking the needle • Check the needle thread • Check the bobbin • Checking the shaping assembly • Optional: Carrying out a test run • Running through a sewing cycle (diverse settings for the operating software and on the machine are possible) • Insert the basic part and pocket blank • Edge folding process • Transfer process • Sewing process • Rolling out and stacking of the material to be sewn • Remove the material to be sewn • Cleaning • Switching off the machine Operating manual 806N Version 00.0 - 12/2012 31 Operating instructions 5.1 Switching on the machine The machine is switched on through the compressed air shut-off valve and the main switch, which are both located centrally under the material support. This is how you switch on the machine: CAUTION Risk of crushing due to pneumatic parts. The use of compressed air produces strong forces on the moving parts. If your fingers or hands get in between the parts, this could result in minor to moderate injuries. NEVER reach into the area of moving parts. 1. Turn the shut-off valve to the right into the vertical position. Figure 15: Opening the shut-off valve Shut-off valve closed Shut-off valve open The compressed air flows into the hoses. 32 Operating manual 806N Version 00.0 - 12/2012 Operating instructions 2. Turn the main switch from the "O" position (1) to the right into the "I" position (2). Figure 16: Switching on the main switch (1) - Off (2) - On (3) - Rotary switch The controller for the machine starts up and clicks once. You hear the air being released onto the moving parts. The secure stop light lights up. The operation display starts up and the initial screen appears. The operation display does not need to be switched on separately - it is activated through the power supply. 5.2 Preparing the machine for operation Some preparations are required before the machine can be used to start sewing. The table below shows which aspects have to be checked or met. Aspect Reason Making the basic settings The basic settings must be performed using the software, otherwise not all subsequent steps can be carried out Section 5.2.1. Inserting the thread reel The thread reel must be inserted since otherwise a thread will not be available for sewing, Section 5.2.2. Checking the needle The needle must be present, since sewing cannot take place without a needle. The needle must be aligned correctly, otherwise the hook cannot form a loop and therefore not be used in sewing, Section 5.2.3. Threading in the needle thread The thread must be threaded, since sewing cannot take place without the thread, Section 5.2.4. Inserting the bobbin The bobbin must be inserted, since otherwise a hook thread will not be available. Sewing cannot take place without the hook thread, Section 5.2.5. Checking the shaping assembly The shaping assembly must be inserted, since sewing cannot take place without it. If the wrong shaping assembly is inserted, then the desired sewing program cannot be selected, Section 5.2.6. Optional: Carrying out a test run The test run (in a step-by-step phase) can be used for checking the settings, but is not mandatory, Section 5.3. Operating manual 806N Version 00.0 - 12/2012 33 Operating instructions 5.2.1 Making the basic settings Without making the basic settings via the software, the prerequisite conditions for smooth operation cannot be created. When the machine is switched on, Section 5.1 Switching on the machine, the operation display also starts up. The operating program starts automatically and you will see the initial screen: Figure 17: Initial screen To be able to sew pockets on using the machine, you first have to select the pocket mode and the pocket seam program. You will then find yourself in menu 1 and you will be able to work on the machine without any further settings. 34 Operating manual 806N Version 00.0 - 12/2012 Operating instructions This is how you access menu 1: 1. At the bottom left of the initial screen, press the Reference machine button . The button changes and indicates that the machine is operating; the Start key is flashing in green. The machine scans the numeric code on the transfer plate in order to identify it. It then moves to the basic position. The selection window for the pocket mode appears on the touchscreen. Figure 18: Selecting the pocket mode 1-pocket mode 2-pocket mode 2. Press the button for 1-pocket mode . For two-pocket mode: Section 5.5 Sewing in two-pocket mode. The selection window for the seam program appears on the touchscreen. Figure 19: Selecting the seam program The available pocket seam programs are listed on the left side. The code for identifying the transfer plate is shown on the right side. The Start key is flashing. Operating manual 806N Version 00.0 - 12/2012 35 Operating instructions Seam program cannot be selected If no pocket seam program can be selected in the selection window for the seam program, then this could be due to several reasons. Remedial action: • Clean the light sensor on the machine. In the event of contamination, the code cannot be read correctly. • Check the code on the rear side of the transfer plate. Are the reflector strips still complete and in good order? • Replace the transfer plate or the entire shaping assembly Section 5.2.6 Fitting/replacing the shaping assembly if the coding of the sewing programs and the transfer plate do not match. • Load a new pocket sewing program, Service instructions for the 806N, if the sewing program is not compatible with the transfer plate. 3. Select a pocket sewing program. Figure 20: Seam program selected The selected seam program is highlighted in blue and appears in the option field. 4. Press the Confirm button to confirm the choice of seam program. Menu 1 appears after a delay that depends on the size of the selected seam program: 36 Operating manual 806N Version 00.0 - 12/2012 Operating instructions Figure 21: Menu 1 The Start key lights up green. 5.2.2 Inserting the thread reel The thread reel contains the thread for sewing. The thread reel can be used for winding thread onto the bobbin and is also used for threading the sewing thread into the machine - the needle thread. Figure 22: Alignment of the thread reel holder Fit the thread reel as follows: 1. Unpack the thread reel. 2. Fit the thread reel on the thread reel holder. The thread reel now sits loosely on the thread reel holder. It can turn freely. Operating manual 806N Version 00.0 - 12/2012 37 Operating instructions 3. Pull the thread to the machine through the thread reel holder thread guides. 4. Position the thread reel holder thread guide vertically above the thread reel. 5. Proceed as described in Section 5.2.4 Threading the needle thread.. 5.2.3 Checking the needle A needle is usually already fitted in the machine during the set-up procedure. Despite this, always check that the needle is correctly fitted and aligned to ensure correct sewing. A needle strength of 70 - 100 NM is recommended. Check the needle as follows: 1. Check that the needle (2) is aligned with the groove facing the hook (3), i.e. to the right from the point of view of the operator. 2. Check that the needle (2) is inserted fully upwards and firmly fastened in the needle bar (3), Section 5.8.4 Inserting/changing the needle. Figure 23: Correct alignment of the needle (1) - Needle bar (2) - Needle (3) - Groove 3. Correct the needle alignment if necessary, Section 5.8.4 Inserting/ changing the needle. A needle must be fitted if this has not yet been done. Detailed instructions are provided in Section 5.8.4 Inserting/changing the needle. 38 Operating manual 806N Version 00.0 - 12/2012 Operating instructions 5.2.4 Threading in the needle thread After a thread reel and needle have been fitted the needle thread can be threaded as illustrated on the sticker attached to the machine. Thread the needle thread as follows: WARNING Risk of being stabbed by moving machine parts. Serious injuries to any part of the body may occur if you come into contact with needle or other sharpedged and pointed objects. ONLY work on the machine if the secure stop light is lit up. NEVER reach into the area of sharp-edged parts Figure 24: Threading in the needle thread (1) - Thread lever (2) - Thread guide (3) - Thread monitor (4) - Thread guide (5) - Needle eye (6) - Thread guide (7) - Pre-tensioner with thread guide (8) - Thread regulator (9) - Main tensioner (10) - Thread guide 1. Press the Stop button to place the machine in the Secure hold status. The secure stop light lights up. 2. Insert the thread from the right to the left through the rear part of the thread guide (6). 3. Insert the thread from the right to the left through the front part of the thread guide (6). 4. Feed the thread downwards from above, then upwards and again downwards through the pre-tensioner thread guide (7). 5. Guide the thread counterclockwise around the pre-tensioner (7). Operating manual 806N Version 00.0 - 12/2012 39 Operating instructions 6. Guide the thread clockwise around the main tensioner (9). 7. Feed the thread around the guide (10) from below. 8. Feed the thread from below through the thread guide (2) and then to the right to the thread regulator (8). 9. Feed the thread through the thread regulator (8) from below. 10. Feed the thread from the right to the left through the thread lever (1). 11. Feed the thread through the thread guide (2) from above. 12. Feed the thread through the thread monitor (2) and associated thread guide from above. 13. Feed the thread to the needle bar through the thread guide (4) from the right. 14. Feed the thread from left to right through the needle eye (5) and leave an overlap of about 3 - 5 cm. Faster thread change If a thread is already threaded it is very easy to change to another thread of a different color or with different characteristics. Cut off the old thread at the thread reel. Tie the new thread to the old thread. Carefully pull the old thread out of the machine until the new thread reaches the needle. Information on adjusting the needle thread tension is provided in Section 5.8.2 Setting the needle thread tension. The procedure for dealing with a thread breakage is described in Section 5.8.7 Sewing after thread breakage. 5.2.5 Inserting/changing the bobbin The bobbin is fitted under the sewing material support. The hook thread is wound onto this, Section 5.8.1 Winding the hook thread. You use the Bobbin menu to fit or replace a bobbin. The Bobbin menu opens automatically when the bobbin counter has decremented to zero. You have two possible courses of action when the Bobbin menu automatically opens: • The bobbin is almost empty - you must replace the bobbin. • The bobbin is not yet empty - you enter a new number of stitches into the bobbin counter and continue sewing until the Bobbin menu automatically opens again. The number of stitches to be entered depends on the characteristics of the thread and the material being sewn. More information on this is provided below and in Section 5.6.2 Setting the bobbin counter. 40 Operating manual 806N Version 00.0 - 12/2012 Operating instructions Figure 25: Bobbin and bobbin capsule (1) - Spring Removing the bobbin (2) - Lever (3) - Slot Remove the bobbin as follows: 1. Ensure that the machine is in the Safe stop mode - if not: Press the Stop button. 2. Grasp the bobbin capsule, located far to the rear and centrally under the sewing material support, with your left hand. 3. Lift the lever (2) on the bobbin capsule. The bobbin capsule is no longer locked in place and can be removed. 4. Remove the bobbin capsule from the hook. Inserting the bobbin Fit the bobbin as follows: 1. Ensure that the machine is in the Safe stop mode - if not: Press the Stop button. 2. Press the full bobbin into the bobbin capsule so that it moves against the thread direction when the thread is pulled. 3. Pull the thread through the slot (3) under the spring (1). The bobbin is correctly fitted in the bobbin capsule when pulling the thread to the left causes the bobbin to rotate clockwise. 4. Pull out about 3-5 cm of thread. 5. Grasp the bobbin capsule by the lever (2) and insert it into the hook under the sewing material support. The bobbin is correctly fitted when it clearly latches into place. 6. Enter the number of stitches into the Bobbin menu and accept this value for the stitch counter, Section 5.6.2 Setting the bobbin counter. 7. Press the Exit button to exit the Bobbin menu. You are returned to Menu 1. 8. Continue working with the machine. Operating manual 806N Version 00.0 - 12/2012 41 Operating instructions Running the bobbin empty If too many stitches have been entered it is possible for the bobbin to run empty before the machine generates a warning. If this occurs, the normal result is that the needle thread no longer has opposing tension from the hook thread and the thread monitor then provides an indirect indication of this problem. If the thread monitor indicates a thread breakage but the thread is not broken then check if the bobbin is empty. This indirect indication from the thread monitor is not absolutely reliable. You should therefore attempt to enter the bobbin capacity as accurately as possible. You should preferably enter a somewhat lower number of stitches and then work up to the actual capacity. 5.2.6 Inserting/changing the shaping assembly In most cases, a shaping assembly is inserted when the machine is first put into operation. If this is not the case, or you need a different shaping assembly, then you will have to insert or change it. If you perform the basic settings via the software, the machine will identify the inserted shape in its reference run. In the selection window for the seam program, you will be able to see the numeric code for the shape and then initiate a change of shape, if necessary. A shaping assembly consists of the following components: Component Name and purpose Edge folding frame – consisting of an outer frame with inner frame, this component folds the pocket blank Middle slide – the pocket blank is positioned here 42 Operating manual 806N Version 00.0 - 12/2012 Operating instructions Component Name and purpose Hose insert – only for 806N-121, so that the pocket fold remains in the shape when the middle slide is withdrawn Front view Rear view Transfer plate – holds the material to be sewn on the table plate and feeds it to the sewing unit – a numeric code is applied to the rear of the metal lug, which the machine uses to detect which seam program is suitable for the transfer plate Front view Rear view Operating manual 806N Version 00.0 - 12/2012 43 Operating instructions Initiating a change of shape This is how you initiate a change of shape: WARNING Risk of crushing due to pneumatic parts. The use of compressed air produces strong forces on the moving parts. If your fingers or hands get in between the parts, this could result in minor to moderate injuries. NEVER reach into the area of moving parts. 1. Navigate to Menu 1, Section 4.2.1 Structure of the operating software and Section 5.2.1 Making the basic settings. Navigation not possible Navigation to menu 1 is not possible If you are currently at the Initial screen then you must navigate through the basic settings until reaching Menu 1, Section 5.2.1. If this is not possible because a seam program cannot be selected then you must "trick" the machine into accepting the current configuration. Manipulate the code on the transfer plate used by masking the numbers such that a suitable seam program can be selected. In this way, you can access menu 1 and will be able to initiate the change of shape. After that, do not forget to move the manipulated transfer plate back to its initial condition. 2. In Menu 1 press the Change shape button . This interface appears: Figure 26: Interface for changing the shape 44 Operating manual 806N Version 00.0 - 12/2012 Operating instructions The transfer plate moves into the basic position. Middle slide and edge folding frame are lowered towards the front at the bottom and become unpressurized; at the same time, the locking mechanisms are automatically released. The secure stop light lights up. You have now initiated the change of shape. You can now: • Change the shaping assembly; continue with step 1, removing the shaping assembly. • Insert the shaping assembly; continue with step 2, inserting the shaping assembly. Step 1: Removing the shaping assembly Edge folding frame Remove the shaping assembly components in the order specified here. You will then achieve a correct change of shape. This is how you remove the edge folding frame: Figure 27: Removing the edge folding frame (1) - Edge folding frame carriage (2) - Screw handle (3) - Edge folding frame pins Operating manual 806N Version 00.0 - 12/2012 (4) - Coupling strip (5) - Hose connecting piece 45 Operating instructions 1. Pull off the hose from the hose connecting piece (5) in an upwards direction. 2. Unscrew the screw handle (2) to the left until the coupling strip (4) can be released from the edge folding frame. The coupling strip (4) can be lifted from the edge folding frame. 3. Raise the rear carriage (1) on the right and left side such that the pins (3) on the edge folding frame stand free. 4. Pull out the edge folding frame towards you. The edge folding frame has now been removed. 5. Now remove the middle slide. Middle slide This is how you remove the middle slide: Figure 28: Removing the middle slide (6) - Carriage for the middle slide (7) - Middle slide pins 1. Remove the edge folding frame. The middle slide can now be easily reached. 2. Raise the carriage (6) to the rear such that the pins (7) on the middle slide stand free. 3. Pull out the middle slide towards you. The middle slide has now been removed. 4. Now remove the hose insert. 46 Operating manual 806N Version 00.0 - 12/2012 Operating instructions Hose insert Remove the hose insert (806N-121 only) as follows: ATTENTION Material damage due to incorrect decoupling. The compressed air connection could become damaged through improper decoupling. Release the compressed air connection according to the manual. NEVER remove the compressed air connection by force. Figure 29: Removing the hose insert (1) - Hand valve (2) - Hose coupling 1. Remove the edge folding frame and middle slide. The hose insert can now be easily reached. 2. Press the hand valve (1) under the table plate using your right hand and hold it there. The hose insert is pushed up on the left side. 3. Raise the hose insert using your left hand and then release the hand valve (1). 4. Disconnect the hose insert from the compressed air connection. To do this, push the outer ring of the quick coupling to the rear. The compressed air connection is disconnected and the hose insert can be completely removed. 5. Now remove the transfer plate. Operating manual 806N Version 00.0 - 12/2012 47 Operating instructions Transfer plate This is how you remove the transfer plate: Figure 30: Removing the transfer plate (1) - Right side of the transfer plate (2) - Left side of the transfer plate 1. Briefly and firmly press the right side of the transfer plate (1) until the connection is released. On the right side (1), the transfer plate is no longer connected to the transfer frame. 2. Proceed in exactly the same way on the left side (2). The transfer plate is no longer connected to the transfer frame. 3. Remove the transfer plate by pulling it out at the front so that it passes underneath the outfeed roller. The transfer plate has now been removed. 48 Operating manual 806N Version 00.0 - 12/2012 Operating instructions Step 2: Inserting the shaping assembly Insert the shaping assembly components in the order specified here. This is how you achieve a correctly inserted shaping assembly. ATTENTION Material damage due to incorrect installation. If the shaping assembly components are not inserted correctly, there is a danger that the parts or the machine could get damaged. Check that all components in the shaping assembly are securely fixed. If needed, rectify any incorrect seating of the parts. Transfer plate This is how you insert the transfer plate: Figure 31: Aligning the transfer plate 1. Push through the transfer plate, with the metallic lug aligned upwards to the right (as shown in figure 26), underneath the outfeed roller and position it underneath the transfer frame. 2. Firmly press the connecting piece (1) on the right side of the transfer plate and the connecting piece (2) on the right side of the transfer frame into one another. Figure 32: Connecting pieces between the transfer frame and transfer plate (1) - Connecting piece on the transfer frame (2) - Connecting piece on the transfer plate They click into place and the transfer plate is fixed on the right side. 3. Position the peg (1) at the rear right of the transfer plate in the forked plastic holder (2) to the right, under the transfer frame. Operating manual 806N Version 00.0 - 12/2012 49 Operating instructions Figure 33: Peg and plastic holder (1) - Peg on the transfer plate (2) - Forked plastic holder 4. Firmly press the connecting piece (1) on the left side of the transfer plate and the connecting piece (2) on the left side of the transfer frame into one another. They click into place and the transfer plate is connected to the transfer frame on both sides. 5. Move the transfer plate up and down. If the plate is wobbling conspicuously, then the peg is not fixed in the plastic holder; continue then with step 6. If it is not wobbling, then the transfer plate is inserted. 6. Use the right thumb or index finger at the rear right corner of the transfer frame to press the flexible plastic holder downwards until the peg slides in. 7. Move the transfer plate up and down again to check. The transfer plate is correctly inserted if it is no longer wobbling. If it is still wobbling: Repeat steps 6 and 7. 8. Now insert the hose insert. 50 Operating manual 806N Version 00.0 - 12/2012 Operating instructions Hose insert Fit the hose insert (806N-121 only) as follows: Figure 34: Fitting the hose insert (1) - Hand valve (2) - Hose coupling 1. Align the hose insert such that the hole line is open and facing upwards. 2. Push the compressed air hose into the port for the quick coupling until it engages. The hose insert is now connected to the compressed air. 3. Insert the hose insert into the table plate so that it is flush with it. The hose insert is now inserted. 4. Now insert the middle slide. Operating manual 806N Version 00.0 - 12/2012 51 Operating instructions Middle slide This is how you insert the middle slide: Figure 35: Inserting the middle slide (1) - Carriage for the middle slide (2) - Middle slide pins 1. Lift the carriage (1). 2. Position the middle slide underneath the carriage (1). 3. Insert the pins (2) on the middle slide into the front locating holes in the center of the carriage (1). 4. Firmly press the carriage (1) once onto the middle slide to ensure a proper connection. The middle slide is now inserted. 5. Now insert the edge folding frame. 52 Operating manual 806N Version 00.0 - 12/2012 Operating instructions Edge folding frame This is how you insert the edge folding frame: ATTENTION Material damage due to crushing. The air hoses could get crushed between the parts when changing the shape. This could impair their correct functioning completely. Remove hoses out of the area of the pins and the coupling strip. Figure 36: Inserting the edge folding frame (1) - Edge folding frame carriage (2) - Screw handle (3) - Edge folding frame pins (4) - Coupling strip (5) - Hose connecting piece 1. 2. 3. 4. Insert the middle slide. Lift the carriage (1). Position the edge folding frame underneath the carriage (1). Insert the pins (3) on the edge folding frame into the front locating holes on the right and left of the carriage (1). 5. Firmly press the carriage (1) once onto the edge folding frame to produce a proper connection. 6. Firmly push the hose onto the hose connecting piece (5) in the center. 7. Place the coupling strip (4) onto the horizontal hole strip. Operating manual 806N Version 00.0 - 12/2012 53 Operating instructions 8. Turn the screw handle (2) to the right until the coupling strip (4) is securely connected to the edge folding frame. The edge folding frame is now inserted. Step 3: To menu 1 This is how you get to menu 1 again: WARNING Risk of crushing due to pneumatic parts. The use of compressed air produces strong forces on the moving parts. If your fingers or hands get in between the parts, this could result in minor to moderate injuries. NEVER reach into the area of moving parts. 1. Press the Confirm button on the shape change screen. You will hear a short clicking sound. The parts in the edge folding station are secure and rigid again. The machine is in secure hold; the initial screen appears on the touchscreen. 2. In order to access the sewing cycle, proceed as described in Section 5.2.1 Making the basic settings. 5.3 Carrying out a test run You can perform the sewing cycle once, step-by-step, to check that everything is correctly fitted and adjusted. You can perform a step-by-step sewing cycle as follows: 1. Navigate to Menu 1, Section 4.2.1 Structure of the operating software and Section 5.2.1 Making the basic settings. 2. In Menu 1 press the Global parameters button . 3. In Menu 2 press the Work step by step button . The button is now highlighted in green. The button is also displayed in Menu 1. 4. Press Manual button 1 to move one step forwards. 5. Press Manual key 2 to move one step backwards. Each step is executed individually in this manner. You must deactivate the Work step by step button ation. 54 in Menu 2 in order to return to normal oper- Operating manual 806N Version 00.0 - 12/2012 Operating instructions 5.4 Sewing with default settings If all aspects in the checklist from section 5.2 Preparing the machine for operation are met, then you can begin sewing with the 806N without making any further settings. The sewing cycle comprises the following steps: • Applying the basic part and pocket blank • Edge folding (folding) the pocket blank • Transfer of the material to be sewn • Sewing the material to be sewn • Rolling out and stacking of the material to be sewn The operator only has to carry out the first step. The other steps are run through by the 806N independently. WARNING Risk of crushing due to pneumatic parts. The use of compressed air produces strong forces on the moving parts. If your fingers or hands get in between the parts, this could result in minor to moderate injuries. NEVER reach into the area of moving parts. WARNING Risk of being cut and stabbed by moving machine parts. Serious injuries to any part of the body may occur if you come into contact with the middle slide, needle, or other sharp-edged and pointed objects. ONLY work on the machine if the secure stop light is lit up. NEVER reach into the area of sharp-edged parts during operation. ATTENTION Material damage due to pieces of used fabric and threads. If pieces of used fabric and threads get into the machine, they may result in damage or defects. Immediately remove any obvious contamination during the course of working. Clean the machine after each shift. Operating manual 806N Version 00.0 - 12/2012 55 Operating instructions This is how you sew using the default settings: CAUTION Risk of being cut by sharp edges. Injuries to any part of the body may occur if you come into contact with the middle slide or other sharp-edged objects. DO NOT reach into the middle slide's range of motion. DO NOT reach into the area of sharp-edged parts. Figure 37: Overview of the edge folding station (1) - Key panel (2) - Edge folding frame (3) - Middle slide (4) - Hose insert (5) - Manual switch 1 (6) - Material support (7) - Manual switch 2 (8) - Foot switch (not illustrated) Menu 1 is displayed on the touchscreen and the Start button lights up green, which means the machine is ready for operation. The middle slide (3) is at the rear. 56 Operating manual 806N Version 00.0 - 12/2012 Operating instructions WARNING Risk of crushing due to pneumatic parts. The use of compressed air produces strong forces on the moving parts. If your fingers or hands get in between the parts, this could result in minor to moderate injuries. NEVER reach into the area of moving parts. WARNING Risk of being stabbed by moving machine parts. Serious injuries to any part of the body may occur if you come into contact with needle or other sharpedged and pointed objects. NEVER reach into the needle's range of motion. NEVER reach into the area of sharp-edged 1. Place the basic part onto the sewing material support (4) and align it. 2. Press Manual button 1 (5). The air suction is switched on, which fixes the basic part into place. The middle slide (3) advances. 3. Place the pocket blank onto the middle slide (3) and align it. Optional intermediate step: Align the pocket blank Press Manual button 2 (7). The middle slide (3) is lowered. Align the material according to the sample. Press Manual button 2 (7). The middle slide (3) is raised. 4. Press Manual button 1 (5). The edge folding process starts; the material being sewn is then fed to the sewing unit, sewn, and deposited on the stacker using the outfeed roller. If the transfer of the material to the sewing unit expires, then a new sewing cycle can commence. A light signaling the machine's renewed readiness for use is not available. If the machine is not yet ready, then nothing will happen when manual switch 1 (5) is pressed. Operating manual 806N Version 00.0 - 12/2012 57 Operating instructions Stacker inactive Additional equipment If the machine is not stacking the material to be sewn, then a stacker is probably not activated. You can activate a stacker in menu 2, Section 5.7.4 Selecting/deselecting stacker variants. Laser positioning aid A laser positioning aid for the 806N is available as an optional extra. It facilitates exact alignment on the material support when the basic part is being applied. 5.5 Sewing in two-pocket mode In addition to the 1-pocket mode, Section 5.2.1 Making the basic settings, the 806N can also work in 2-pocket mode. This allows you to use different seam programs to alternately sew right and left pockets on a shirt or trousers. You can access the 2-pocket mode as follows: 1. At the bottom left of the initial screen, press the Reference machine button . The button changes and indicates that the machine is operating; the Start key is flashing in green. The machine scans the numeric code on the transfer plate in order to identify it. It then moves to the basic position. The selection window for the pocket mode appears on the touchscreen. Figure 38: Selecting the pocket mode 1-pocket mode 2-pocket mode 58 Operating manual 806N Version 00.0 - 12/2012 Operating instructions 2. Press the 2-pocket mode button . The selection window for the seam program appears on the touchscreen. Figure 39: Selecting the seam program The available pocket seam programs are listed on the left side. The code for identifying the transfer plate is shown on the right side. The Start key is flashing. Seam program cannot be selected If no pocket seam program can be selected in the selection window for the seam program, then this could be due to several reasons. Remedial action: • Clean the light sensor on the machine. In the event of contamination, the code cannot be read correctly. • Check the code on the rear side of the transfer plate. Are the reflector strips still complete and in good order? • Replace the transfer plate or the entire shaping assembly Section 5.2.6 Fitting/replacing the shaping assembly if the coding of the sewing programs and the transfer plate do not match. • Load a new pocket sewing program, Service instructions for the 806N, if the sewing program is not compatible with the transfer plate. Operating manual 806N Version 00.0 - 12/2012 59 Operating instructions 3. Select a pocket seam program for the left pocket. Figure 40: Seam program selected The selected seam program is highlighted in blue and appears in the option field. 4. Press the Confirm button to confirm the choice of seam program. After confirmation, the seam program under the selection field is displayed in green text. Figure 41: Seam program confirmed 5. Select a second pocket seam program for the right pocket. 6. Press the Confirm button to confirm the choice of seam program. Menu 1 appears after a delay that depends on the size of the selected seam program: 60 Operating manual 806N Version 00.0 - 12/2012 Operating instructions Figure 42: Menu 1 in 2-pocket mode The Start key lights up green. You are asked to specify the first pocket to be sewn in the next sewing cycle. 7. Select the first pocket to be sewn by pressing the desired pocket. The pocket is highlighted or framed. 8. Start the sewing process by pressing the Start button. The machine starts a normal sewing cycle. It automatically alternates between the two pockets while sewing. 9. To sew the pocket that is not currently highlighted: Manually select the desired pocket by pressing it after a sewing cycle. 5.6 Setting options in User interface 1 Settings in Menu 1 can only be performed between two sewing cycles. The buttons are greyed-out and cannot be pressed when the machine is active. Activated buttons are highlighted in green. 5.6.1 Resetting piece counter The piece counter counts the number of sewn pockets (or the number of sewing cycles performed). It can be reset at any time between two sewing cycles. You reset the piece counter as follows: 1. Press the Reset piece counter button . The piece counter is reset to "0". It starts counting again after the next sewing cycle. Operating manual 806N Version 00.0 - 12/2012 61 Operating instructions 5.6.2 Setting the bobbin counter The bobbin counter indicates the amount of thread remaining on the bobbin. The menu for changing the bobbin is also displayed here. You access the bobbin counter and bobbin change menu as follows: 1. Press the Set bobbin counter button . The machine enters the Safe stop mode, the inner stacker bar opens and the following dialog is displayed: Figure 43: Bobbin menu dialog This dialog opens automatically when the stitch counter reaches "0". The machine enters the Safe stop mode and you have two possible courses of action: • Enter a new number of stitches if the bobbin is not yet empty (see below) • Change the bobbin if it is actually empty Section 5.2.5 Inserting/changing the bobbin. 62 Operating manual 806N Version 00.0 - 12/2012 Operating instructions Bobbin counter You set the bobbin counter in the Bobbin menu screen as follows: 1. Press the Number of stitches button . The following window appears: Figure 44: Selection window for number of stitches 2. Press the buttons to enter the (estimated) number of stitches available on the bobbin. The entered value appears in the input field above. Bobbin capacity The capacity of the bobbin varies depending on the type of thread and material to be sewn. The number of stitches to be entered must therefore be estimated. The experience gained by sewing a given product will allow you to gradually approach a more accurate estimate of the bobbin capacity. 3. Press the Confirm button to confirm the entered value. The selection window closes and the entered value is displayed in the field above the Number of stitches button. The button is not highlighted in green. 4. Press the Exit button to correct the entered value. The entered value is deleted. 5. Press the Exit button again to exit the selection window. The selection window closes and you are returned to the Bobbin menu screen. 6. Press the Stitch counter button . The stitch counter adopts the entered stitch value. The number is displayed in the field above the button. The stitch counter counts down, i.e. it displays the number of stitches remaining. Operating manual 806N Version 00.0 - 12/2012 63 Operating instructions 7. Press the Exit button to exit the Bobbin menu. You are returned to Menu 1. Changing the bobbin You change the bobbin as follows: You can change the bobbin from the Bobbin menu screen. This procedure is described in Section 5.2.5 Inserting/changing the bobbin. 5.6.3 Enabling bundle removal You must enable the bundle removal when you want to remove the sewn parts. The stacker opens and allows the parts to be removed. You enable bundle removal as follows: 1. Press the Enable bundle removal button . The button is now highlighted in green. The stacker bar opens. 2. Remove the finished products. 3. Press the Enable bundle removal button again. The stacker bar closes again. The button is no longer highlighted in green. 5.6.4 Automatically activating the slide at the front The middle slide is directly forward at the start of a new sewing cycle. It does not need to be brought forward with Manual button 1. Activating You activate the Slide automatically forward mode as follows: 1. Press the Slide automatically forward button . The button is now highlighted in green and the Slide automatically forward mode is activated. 2. Press the Slide automatically forward button mode. again to exit this This exits the mode. The button is no longer highlighted in green. This setting is deleted after switching off the machine, after loading a different seam program or after an EMERGENCY STOP. 64 Operating manual 806N Version 00.0 - 12/2012 Operating instructions Operating You operate the Slide automatically forward mode as follows: The Start button lights up green and the middle slide is forward. Be careful to avoid being cut by the sharp edges of the middle slide. 1. Place the pocket blank on the middle slide. 2. Place and align the basic part on the edge folding station. 3. Fasten the basic part by pressing Manual button 1 or the Foot switch. The air suction is now switched on. 4. Press Manual button 1 to start the normal sewing process. Be careful to avoid being cut or crushed by the slide moving quickly forwards. 5.6.5 Activating the alignment of strips After folding the pocket blank the machine pulls the middle slide out of the pocket and stops. The alignment of the pocket blank can now be checked. Activating You activate the Strip alignment mode as follows: 1. Press the Strip alignment button . The button is now highlighted in green. In the next sewing cycle the machine stops after folding and the alignment of the pocket can be checked. 2. Press the Strip alignment button again to deactivate this mode. The button is no longer highlighted in green. The machine no longer stops after folding in the next sewing cycle. This setting remains stored after switching off the machine, after loading a different seam program or after an EMERGENCY STOP. Operating You operate the Strip alignment mode as follows: The machine stops after folding. The finished folded pocket lies on the basic part. 1. Check the alignment of the pocket on the basic part. 2. If the alignment is correct: Press Manual button 1. The sewing procedure is resumed normally. 3. If the alignment is not correct: Press the Cancel button. The sewing procedure is cancelled. The basic part and pocket must be placed again. Operating manual 806N Version 00.0 - 12/2012 65 Operating instructions 5.6.6 Initiating a change of shape Different shaping assemblies are required for each seam program. A shaping assembly consists of: • Edge folding frame • Middle slide • Hose insert (806N-121 only) • Transfer plate The procedure for fitting or replacing the individual parts is described in Section 5.2.6 Fitting/changing the shaping assembly. 5.7 Setting options on user interface 2 Settings in Menu 2 can only be performed between two sewing cycles. Menu 2 cannot be accessed when the machine is active. Activated buttons are highlighted in green. Some of the settings available in Menu 2 are optional extras. These buttons are still present when the optional extras are not present but these have no function and do not change their appearance. You access Menu 2 as follows: 1. Navigate to Menu 1, Section 4.2.1 Structure of the operating software and Section 5.2.1 Making the basic settings. 2. In Menu 1 press the Global parameters button . Menu 2 opens. 5.7.1 Working step-by-step The machine stops after each working sub-step. This setting is useful for checking modified machine settings. You activate the Work step-by-step mode as follows: 1. Navigate to Menu 2. 2. Press the Work step-by-step button . The button is now highlighted in green. In the next sewing cycle the machine stops after the first working sub-step. The button is displayed in Menu 1. 3. Press the Work step-by-step button mode. again to deactivate this The button is no longer highlighted in green. The machine does not stop in the next sewing cycle. 66 Operating manual 806N Version 00.0 - 12/2012 Operating instructions The operation of the Work step-by-step mode is described in detail in Section 5.3 Carrying out a test run. This setting is deleted after switching off the machine, after loading a different seam program or after an EMERGENCY STOP. 5.7.2 Activating Sewing without edge folding In the Sewing without edge folding mode the machine only sews – the folding procedure is not performed. This mode can be used for (e.g.) testing a new seam program or performing a seam quality check. The speed is also often reduced when using this mode, but this setting must be specially performed Section 5.7.10 Setting the motor speed. You activate Sewing without edge folding as follows: 1. Navigate to Menu 2. 2. Press the Sew without edge folding button . The button is now highlighted in green. In the next sewing cycle the machine only sews and does not fold. The button is also displayed in Menu 1. 3. Press the Sew without edge folding button this mode. again to deactivate The button is no longer highlighted in green. The machine once more performs folding in the next sewing cycle. This setting is deleted after switching off the machine, after loading a different seam program or after an EMERGENCY STOP. 5.7.3 Switching the stroke position on/off The stroke position is the clearance between the sewing foot and the seam material. This clearance should be set to the optimum value so that the seam material is held on the sewing material support when the thread is tightened. This results in a high quality seam. Stroke position OFF The foot always remains at the same distance above the seam material. An adjustment to suit multi-layered material is not possible. Stroke position ON The foot adjusts to suit the thickness of multi-layered seam material. A prerequisite for this is that the necessary information for this is stored in the respective seam program. You switch the Stroke position on/off as follows: 1. Navigate to Menu 2. 2. Press the Stroke position button . The button is now highlighted in green. When sewing, the machine automatically adjusts the stroke position according to the information in the seam program. Operating manual 806N Version 00.0 - 12/2012 67 Operating instructions 3. Press the Stroke position button again to deactivate this mode. The button is no longer highlighted in green. The stroke position is no longer adjusted when sewing and remains unchanged. This setting remains stored after switching off the machine, after loading a different seam program or after an EMERGENCY STOP. 5.7.4 Activating needle cooling The needle is cooled with air to prevent it from becoming too hot from the friction with the material. You activate the Needle cooling as follows: 1. Navigate to Menu 2. 2. Press the Needle cooling button . The button is now highlighted in green. The needle is cooled with air in the next sewing cycle. 3. Press the Needle cooling button again to deactivate this mode. The button is no longer highlighted in green. The machine does not cool the needle in the next sewing cycle. This setting remains stored after switching off the machine, after loading a different seam program or after an EMERGENCY STOP. Additional equipment The needle cooling can be enhanced with an optional extra package. This package cools the air to provide better needle cooling. The installation and operation of this system is described in Additional manual for needle cooling. 5.7.5 Activating the thread monitor The thread monitor signals an error when the needle thread breaks. Sewing cannot continue when the thread is broken. You activate the Thread monitor as follows: 1. Navigate to Menu 2. 2. Press the Thread monitor button 68 . Operating manual 806N Version 00.0 - 12/2012 Operating instructions The button is now highlighted in green. The following message is displayed if the thread breaks while sewing: Figure 45: Thread breakage error message If the machine displays this error message then pleas proceed as described in Section 5.8.7 Sewing after thread breakage. 3. Press the Thread monitor button again to deactivate this mode. The button is no longer highlighted in green. A thread breakage while sewing is NOT displayed. This setting remains stored after switching off the machine, after loading a different seam program or after an EMERGENCY STOP. 5.7.6 Activating automatic air suction The automatic air suction is an optional extra that does not need to be additionally activated with Manual button 1. It is automatically activated via a light barrier when this is interrupted by the seam material. Area of application The automatic air suction is more suited for use with heavy material. This allows the position to be corrected after fastening with the air suction. This is difficult with light material because it pulls out of shape when correcting the position under active air suction. A correctly sewn pocket is then no longer possible. You activate the automatic air suction as follows: 1. Navigate to Menu 2. Operating manual 806N Version 00.0 - 12/2012 69 Operating instructions 2. Press the Automatic air suction button . The button is now highlighted in green. The air suction is now automatically activated by interruption of the light barrier when the basic part is laid in position. 3. Press the Automatic air suction button mode. again to deactivate this The button is no longer highlighted in green. The air suction is no longer automatically activated, even when a light barrier is installed. This setting remains stored after switching off the machine, after loading a different seam program or after an EMERGENCY STOP. 5.7.7 Selecting/deselecting stacker variants The stacker cleanly stores the finished sewn products. Two stacker variants can be selected: Variant 1 In this variant the stack pivots towards the machine when stacking. This variant is used in most cases. Variant 2 is recommended for use with very slippery material. Variant 2 With this variant the stack remains in the original position during stacking. This variant is recommended when the material is very slippery. The static loading reduces the danger of the sewn products slipping down after stacking. The stackers are switched off by default when the machine is supplied. You select/deselect a stacker variant as follows: 1. Navigate to Menu 2. 2. Press button Stacker 1 or Stacker 2 . The button is now highlighted in green. After the next sewing cycle the machine stores the finished sewn product using the stacker. 3. Press button Stacker 1 mode. or Stacker 2 again to deactivate this The button is no longer highlighted in green. After the next sewing cycle the machine does not store the finished sewn product using the stacker. 70 Operating manual 806N Version 00.0 - 12/2012 Operating instructions No stacking Note that sewn products can only be stacked when a stacker is actually present. If you have only deactivated a stacker this does not automatically activate the other stacker. This setting remains stored after switching off the machine, after loading a different seam program or after an EMERGENCY STOP. 5.7.8 Setting the outfeed roller path This allows you to set the path over which the finished sewn product is to be rolled before being ejected from the sewing area. Three outfeed roller variants can be set: Value Function 0 The outfeed roller is switched off and does not roll. 1 The outfeed roller is switched on and only rolls the finished sewn products for ejection from the sewing area. 2-10 The outfeed roller is switched on and first slowly rolls the finished sewn products a specific distance out of the sewing area. After this it ejects the product by rolling it quickly out of the sewing area. You set the roller path as follows: 1. Navigate to Menu 2. 2. Press the Outfeed roller path button . The following window appears: Figure 46: Outfeed roller path selection window 3. Enter the roller path to be used for rolling out the finished sewn products by pressing the buttons (value between 0 and 10). The entered value appears in the input field above. With a value of "0" the button in Menu 2 is not highlighted in green, with values between "1" and "10" the button is highlighted in green. Operating manual 806N Version 00.0 - 12/2012 71 Operating instructions 4. Press the Confirm button to confirm the entered value. The selection window closes and the entered value is displayed in the field above the Outfeed roller path button. 5. Press the Exit button to correct the entered value. The entered value is deleted. 6. Press the Exit button again to exit the selection window. The selection window closes and you are returned to the Menu 2 screen. This setting remains stored after switching off the machine, after loading a different seam program or after an EMERGENCY STOP. Suitable value With settings 2-10 it is not possible to specify a concrete distance or rotation value for the outfeed roller. The correct value must be tested depending on the requirements and material used. 5.7.9 Activating the advance roller The advance roller is an optional extra. It is required when the sewn products are so short that the standard outfeed roller cannot reach them in the sewing area. The advance roller path cannot be set. It rolls the finished product forward until it can be reached by the outfeed roller. This interplay is made possible through the use of a light barrier. You activate the advance roller as follows: 1. Navigate to Menu 2. 2. Press the Advance roller button . The button is now highlighted in green. In the next sewing cycle the advance roller transports the finished product to the outfeed roller. 3. Press the Advance roller button again to deactivate this mode. The button is no longer highlighted in green. The advance roller is no longer active in the next sewing cycle. This setting remains stored after switching off the machine, after loading a different seam program or after an EMERGENCY STOP. 72 Operating manual 806N Version 00.0 - 12/2012 Operating instructions 5.7.10 Setting the motor speed The speed of the sewing motor can be set between 100 and 4000 rpm. A speed reduction is useful when (e.g.) you want to sew stepwise or without folding. You set the motor speed as follows: 1. Navigate to Menu 2. 2. Press the Motor speed button . The following window appears: Figure 47: Speed selection window 3. Press the buttons to set the sewing motor speed (value between 100 and 4000). The entered value appears in the input field above. 4. Press the Confirm button to confirm the entered value. The selection window closes and the entered value is displayed in the field above the Motor speed button. The button is not highlighted in green. 5. Press the Exit button to correct the entered value. The entered value is deleted. 6. Press the Exit button again to exit the selection window. The selection window closes and you are returned to the Menu 2 screen. This setting remains stored after switching off the machine, after loading a different seam program or after an EMERGENCY STOP. Operating manual 806N Version 00.0 - 12/2012 73 Operating instructions 5.8 Activities on the machine This section describes activities that do not relate to the operating software. These are mechanical settings performed at specific places in the machine. 5.8.1 Winding the hook thread Winding the hook thread is performed during the normal sewing process. The winding process stops automatically when the bobbin is full. Figure 48: Winding the hook thread (1) - Bobbin lever (2) - Cutting clamp You wind the hook thread as follows: 1. Press the Stop button to place the machine in the Secure hold status. The secure stop light lights up. 2. Insert an empty bobbin onto the pin below the winding lever (1). 3. Feed the thread from above, downwards through the right hole of the thread guide. 4. Feed the thread clockwise around the thread tensioner. 5. Feed the thread from below, upwards through the middle hole of the thread guide. 6. Feed the thread from above, downwards through the left hole of the thread guide. 7. Manually wind the thread several times clockwise around the bobbin. The thread is now fastened to the bobbin. 8. Press the winding lever (1) downwards against the bobbin. The machine can now be used normally and winding takes place while using the machine. Winding is automatically stopped by the winding lever when the bobbin is full. 9. When the bobbin is full, cut the thread using the cutting clamp (2) and remove the bobbin. 74 Operating manual 806N Version 00.0 - 12/2012 Operating instructions The number of stitches you can make with the hook thread depends on the type of thread and the material to be sewn. The procedure for estimating the approximate capacity is described in Section 5.6.2 Setting the bobbin counter. 5.8.2 Adjusting the needle thread tension Together with the hook thread tension, the needle thread tension influences the final appearance of the seam. It should be set so that the desired seam appearance is achieved with the lowest possible tension. Reliable operation of the thread cutter can also only be achieved with the lowest possible pretension. Figure 49: Adjusting the needle thread tension (1) - Pre-tensioner (2) - Main tensioner (X) - Length of the needle thread end You set the needle thread tension as follows: 1. Set the pretension so that the thread cutting functions reliably. Perform a test run after making the setting and repeat the adjustment until the desired result is achieved. The pretension also affects the length of the needle thread end. This is changed by turning the pre-tensioner: • Turning the pre-tensioner clockwise: Reduces the length of the needle thread end X. • Turning the pre-tensioner counterclockwise: Increases the length of the needle thread end X. 2. Adjust the pretension so that sewing is reliably performed and the thread is also cut reliably. Perform a test run after making the setting and repeat the adjustment until the desired result is achieved. 3. Adjust the main tension so that the desired seam appearance is achieve with the lowest possible tension. Perform a test run after making the setting and repeat the adjustment until the desired result is achieved. Operating manual 806N Version 00.0 - 12/2012 75 Operating instructions 5.8.3 Adjusting the hook thread tension Together with the needle thread tension, the hook thread tension influences the final appearance of the seam. Test runs must be performed to determine the correct setting for a high quality seam appearance. Figure 50: Bobbin with bobbin capsule (1) - Tension spring (2) - Screw You set the hook thread tension as follows: 1. Press the Stop button to place the machine in the Secure hold status. The secure stop light lights up. 2. Remove the bobbin capsule, Section 5.2.5 Inserting/changing the bobbin. 3. Check the thread tension by pulling the thread. If the thread is easy to pull and continues to unwind after pulling then the tension is too low. If the thread is difficult to pull then the tension is too high. A certain amount of experience is necessary in order to evaluate this. If you currently have no experience then perform a number of test runs to see the seam appearance and determine the ideal settings. 4. To increase the tension, screw in the screw (2) by turning it somewhat to the right. The pressure of the tension spring (1) on the thread increases. 5. To reduce the tension, screw out the screw (2) by turning it somewhat to the left. The pressure of the tension spring (1) on the thread reduces. 6. Cut off the thread about 3-5 cm from the bobbin capsule, using scissors or the cutting clamp on the sewing arm. 7. Fit the bobbin again. 8. Perform a test run to evaluate the seam appearance. 9. Perform further adjustments to the hook thread tension if necessary. 76 Operating manual 806N Version 00.0 - 12/2012 Operating instructions 5.8.4 Inserting/changing the needle A needle must be present for sewing. The needle must be correctly inserted to avoid damage to the machine and the seam appearance. A needle strength of 70 - 100 NM is recommended. WARNING Risk of being cut and stabbed by moving machine parts. Serious injuries to any part of the body may occur if you come into contact with the middle slide, needle, or other sharp-edged and pointed objects. ONLY work on the machine if the secure stop light is lit up. NEVER reach into the area of sharp-edged parts during operation. Figure 51: Needle illustration and alignment of the groove (1) - Needle bar (2) - Screw Removing the needle (3) - Needle You remove the needle as follows: 1. Press the Stop button to place the machine in the Secure hold status. The secure stop light lights up. 2. Release the screw (2) on the needle bar (1) using an SW 1.5 hex key. 3. Remove the needle (3) downwards. Fitting the needle Fit the needle as follows: 1. Press the Stop button to place the machine in the Secure hold status. The secure stop light lights up. 2. Remove the old needle if present. Operating manual 806N Version 00.0 - 12/2012 77 Operating instructions 3. If necessary, release the screw (1) on the needle bar using an SW 1.5 hex key. 4. Slide the new needle into the guide as far as it will go, with the groove facing to the right of the operator as illustrated above. 5. Tighten the screw (1) on the needle bar. Proceed in the reverse sequence to remove a needle. The procedure for threading the needle thread is described in Section 5.2.4 Threading the needle thread. 5.8.5 Changing the shaping assembly Different shaping assemblies are required for each seam program. A shaping assembly consists of: • Edge folding frame • Middle slide • Hose insert (806N-121 only) • Transfer plate The procedure for fitting or replacing the individual parts is described in Section 5.2.6 Fitting/changing the shaping assembly. 5.8.6 Changing the bobbin The procedure for replacing the bobbin is described in Section 5.2.5 Inserting/changing the bobbin. 5.8.7 Sewing after thread breakage As already described in Section 5.7.5 , the machine generates an error message when the needle thread breaks. The following process is performed when the thread monitor detects a thread breakage: • This message is displayed on the operating terminal: Figure 52: Thread breakage message • The Start button flashes green. 78 Operating manual 806N Version 00.0 - 12/2012 Operating instructions • The machine enters the Safe stop mode. • The sewing head is raised. Proceed as follows to continue sewing after a thread breakage: 1. Thread the needle thread again, Section 5.2.4 Threading the needle thread.. 2. Press the Start button. The Start button flashes green and the Safe stop mode is switched off. The machine automatically moves somewhat before the position of the thread breakage. The sewing head lowers in this position. The following message is displayed on the operating terminal: Figure 53: Message after thread breakage 3. Use Manual button 1 to move stitch-by-stitch, or press it longer, to move to the thread breakage position. 4. Press the Start button. The sewing cycle is started anew at the position of the thread breakage and the seam is then sewn normally to the end. 5. If the product has been moved too far beyond the thread breakage position: Keep pressing so that the machine moves completely around once OR proceed as described below under "do not continue sewing". If you do not wish to continue sewing after a thread breakage: 1. Press the Cancel button. The machine moves into the basic position. 2. Pull the material to be sewn a short distance out of the sewing area and cut the hook thread. 3. Completely remove the material to be sewn. 4. Start a new sewing cycle. Operating manual 806N Version 00.0 - 12/2012 79 Operating instructions 5.9 Switching off the machine Switching off the machine needs two steps: • Shutting down the operation display • Switching off the machine ATTENTION Material damage due to incorrect sequence If the operation display is not shut down first, this could result in the malfunctioning or even the destruction of the operation display. ALWAYS shut down the operation display first. Do not flip the main switch on the machine until you have done this. Step 1: Shutting down the operation display This is how you shut down the operation display: 1. Press the Exit button on the initial screen. The selection window appears on the touchscreen: Figure 54: Exit selection window 2. Press the button for shutting down . The operation display shuts down. The screen becomes black. The LED light on the screen changes its color from green to orange. Other options The other two buttons are explained in Section 4.2.2 Operating software functions. Step 2: Switching off the machine This is how you switch off the machine: 1. Check that the operating display has been shut down, see Step 1: Shutting down the operating terminal. 2. Turn the main switch from the "I" position (2) to the left into the "O" position (1). You will hear the residual air escaping. The middle slide, edge folding frame, and transfer plate are lowered slightly and become unpressurized. 80 Operating manual 806N Version 00.0 - 12/2012 Operating instructions Figure 55: Switching off the main switch (1) - Off (2) - On (3) - Rotary switch 3. Turn the shut-off valve to the right into the horizontal position. Figure 56: Closing the shut-off valve Shut-off valve open Shut-off valve closed After the shut-off valve is closed, the residual air may be emptied using the compressed air gun (figure below). This is located under the table plate. Figure 57: Compressed air gun Operating manual 806N Version 00.0 - 12/2012 81 Operating instructions 5.10 How to act in the case of an emergency (EMERGENCY STOP) In emergency situations presenting a danger to persons or the machine, the 806N can be brought to a standstill via two EMERGENCY STOP devices. The EMERGENCY STOP devices are located on the edge folding station (button) and the transfer frame (integrated). Figure 58: EMERGENCY STOP devices Transfer frame Button Emergency procedure: Firmly press the EMERGENCY STOP button or the integrated EMERGENCY STOP device in the left side of the transfer frame automatically triggers if resistance is detected. The following occurs: • The motors are immediately braked. • The cylinders are depressurized. • The sewing head stops in the current position. • The operating terminal continues to be supplied with power. • The following message is displayed on the operating terminal: Figure 59: EMERGENCY STOP message 82 Operating manual 806N Version 00.0 - 12/2012 Operating instructions When the danger situation has passed and you can continue working the safety devices must first be deactivated. The machine can only be operated normally after this has been performed. Button The red EMERGENCY STOP button is located in the upper part of the edge folding station, Section 4.1.2 Edge folding station. In an emergency it can be triggered by pressing it. You deactivate the EMERGENCY STOP button as follows: 1. Correct any fault or danger that may be present. 2. Turn the EMERGENCY STOP button counterclockwise until it jumps back to the starting position. The controller for the machine starts up and clicks once. You hear the air being released onto the moving parts. The secure stop light lights up. The EMERGENCY STOP message is still displayed on the operating terminal. 3. Press the Confirm button to acknowledge the message. The Initial screen is displayed on the operating terminal. The machine remains in the Safe stop mode. 4. Repeat the settings in User interface 1 and User interface 2 that were deleted by the EMERGENCY STOP. 5. Start a new sewing cycle as described in Section 5.4 Sewing with default settings. Transfer frame An EMERGENCY STOP switch is integrated into the left side of the transfer frame. Excessive resistance on this side moves the transfer frame to the right and triggers an EMERGENCY STOP. You deactivate the integrated EMERGENCY STOP switch as follows: 1. Correct any fault or danger that may be present. 2. Pull the left side of the transfer frame to the left until it latches into the initial position with an audible click. The controller for the machine starts up and clicks once. You hear the air being released onto the moving parts. The secure stop light lights up. The EMERGENCY STOP message is still displayed on the operating terminal. 3. Press the Confirm button to acknowledge the message. The Initial screen is displayed on the operating terminal. The machine remains in the Safe stop mode. 4. Repeat the settings in User interface 1 and User interface 2 that were deleted by the EMERGENCY STOP. 5. Start a new sewing cycle as described in Section 5.4 Sewing with default settings. Operating manual 806N Version 00.0 - 12/2012 83 Operating instructions 5.11 Maintenance (daily) The machine must be thoroughly cleaned after each shift. If this is not done then faults caused by soiling can occur during operation. Oiling must also be performed at regular intervals to maintain the service life of the machine and achieve the desired seam quality. WARNING Risk of being cut and stabbed by moving machine parts. Serious injuries to any part of the body may occur if you come into contact with the middle slide, needle, or other sharp-edged and pointed objects. ONLY work on the machine if the secure stop light is lit up. NEVER reach into the area of sharp-edged parts during operation. WARNING Risk of injury due to flying particles. Cleaning with compressed air can cause injuries to the eyes or respiratory organs. NEVER blow particles towards other persons. 5.11.1 Cleaning Dust and thread residue must be cleaned from the machine each day to prevent faults during operation. A clean machine provides protection from faults. ATTENTION Material damage due to incorrect cleaning. Blowing material or thread residues under the covers can damage or destroy the machine motors. NEVER blow material or thread residues under the covers but rather forwards or to the side. 84 Operating manual 806N Version 00.0 - 12/2012 Operating instructions ATTENTION Material damage due to incorrect cleaning. If the throat plate is not lifted carefully the equipotential bonding connected to the plate can be damaged or ripped off. ALWAYS lift the throat plate carefully. Pay attention to the equipotential bonding when lifting. Clean the machine as follows: 1. Shut down the machine by shutting down the operating terminal and then switching off the main power switch, Section 5.9 Switching off the machine. 2. Do not close the compressed air shut-off valve because compressed air for cleaning will then no longer be available. 3. Use the compressed air pistol to blow off the areas listed below to the front or sideways - DO NOT blow under the protective covers. Areas to be cleaned: • Sewing material support • Bobbin area • Hook and surrounding area • Thread cutter 4. Clean the oil pan with a cloth. 5.11.2 Lubricating The 806N has two oil reservoirs, see figure below. Oil reservoir 1 located in the arm supplies oil to the sewing machine head. Oil flows from oil reservoir 2 to the hook oil reservoir via a wick connection. Oil exceeding the MAX mark in oil reservoir 2 is fed back into the upper oil reservoir 1 by a pump. Figure 60: Oil supply in the 806N (1) - Oil reservoir 1 Operating manual 806N Version 00.0 - 12/2012 (2) - Oil reservoir 2 85 Operating instructions Use only DA10 sewing machine oil or an equivalent oil conforming to the following specifications: • Viscosity at 40°C: 10 mm2/s • Flash point: >160°C DA10 sewing machine oil can be obtained from Dürkopp Adler sales offices under the following part numbers: • 9047 000013 - 2 liters • 9047 000014 - 5 liters WARNING Risk of injuries due to contact with oil. Contact with oil can cause irritation, rashes, allergies or skin injuries. ALWAYS avoid long-term contact with oil. ALWAYS thoroughly wash the affected areas if contact with oil occurs. ATTENTION Risk of environmental damage from old oil. Incorrect handling of old oil can result in severe environmental damage. ALWAYS observe the legally prescribed regulations for handling and disposal of mineral oil. Take care to ensure that oil is NEVER spilt. Figure 61: Oil reservoirs in the 806N Oil reservoir 1 - on the sewing arm 86 Oil reservoir 2 - under the sewing material support Operating manual 806N Version 00.0 - 12/2012 Operating instructions Check the oil levels WEEKLY: Checking the oil levels Topping up with oil 1. Perform at least 20 sewing cycles to evenly distribute the oil in the machine. 2. Check the oil level in oil reservoir 1. 3. If the oil level lies between MIN and MAX then no further action must be taken. 4. If the oil level is at MIN or lower: Check the oil level in oil reservoir 2. 5. If the oil level in oil reservoir 2 is above MAX do not top up with oil perform an additional 20 sewing cycles instead and then check the oil level again. 6. If the oil level in reservoir 2 is at MIN then the oil must be topped up. 7. Top up the oil via the oil filling neck on oil reservoir 1 until MAX is reached. 8. Remove any overflow oil from the oil pan. 9. Check the oil feed in reservoir 1 - bubbles must be visible when the machine is running. 5.11.3 Customer service If you have any questions regarding the machine, damage occurring, or wear, please contact Dürkopp Adler AG Potsdamer Str. 190 33719 Bielefeld Tel.: +49 (0) 180 5 383 756 Fax.: +49 (0) 521 925 2594 E-mail: [email protected] Internet: www.duerkopp-adler.com 5.12 Troubleshooting table The table below lists typical error displays or problems. These are usually quickly rectified. To allow restoration of normal operation, the possible causes of error messages and problems are listed and information on correcting the errors is provided. Two types of error messages are displayed on the operating terminal: • Error messages that can be acknowledged by pressing the Confirm button, which then allows sewing to continue. • Error messages that can be acknowledged by pressing the Confirm but which require the machine to be referenced anew, Section 5.2.1, before sewing can continue. Operating manual 806N Version 00.0 - 12/2012 87 Operating instructions Possible malfunctions: Fault 88 Removal/remedial action Broken thread Thread the needle thread, Section 5.2.4, then continue sewing, Section 5.8.7 Bobbin is empty Insert a new bobbin, Section 5.2.5, wind thread onto a bobbin, Section 5.8.1 A sewing program cannot be selected - Are the reflector strips on the rear side of the transfer plate all present and intact? Re-attach if necessary - Code code on the transfer plate is incompatible, see Section 5.2.6, change the shape assembly or load a new program - Light sensor on the machine is dirty and the code on the transfer plate cannot be read, clean the light sensor and perform referencing again Thread monitor signals a fault The needle thread is probably broken, check and re-thread if necessary, see Section 5.2.4, then continue sewing, Section 5.8.7 The stacker is not stacking Reference to menu 2, is a stacker really activated?, Section 5.7.7 Pocket blanks are not folded Deactivate sewing without edge folding, Section 5.7.2 Machine proceeds forwards only step-bystep Deactivate Work step by step, Section 5.7.1 Transmission to DAC failed Connection to the control system cannot be established. Deactivate the EMERGENCY STOP devices, otherwise contact a service technician Error 3121 Error text: Compressed air pressure too low or not connected; check the compressed air connection and pressure Error 5302 Error text: Seam program contour data too large; Select a different seam program or load a new seam program Error 9116 Error text: Unknown pocket form; Select a different seam program or load a new seam program Error 9170 Error text: No transfer plate; Fit a compatible transfer plate, Section 5.2.6, then perform referencing on the machine anew Error 9180 No technology point for switching the transfer plate; Select a different seam program Error 9221 Error text: Pushbutton pressed too long; Operator information Error 9222 Error text: Pushbutton pressed too long; Operator information Error 9223 Error text: Pushbutton pressed too long; Operator information Error 9224 Error text: Pushbutton pressed too long; Operator information Operating manual 806N Version 00.0 - 12/2012 Operating instructions Fault Removal/remedial action Error 9225 Error text: Pushbutton pressed too long; Operator information Error 9226 Error text: Pushbutton pressed too long; Operator information A technician must be consulted for correcting errors that are not listed here. Operating manual 806N Version 00.0 - 12/2012 89 Set-up instructions 6 Set-up instructions The aspects relating to set-up are explained below. Keep to the procedure described here to ensure fault-free operation of the machine. WARNING Risk of injury due to a lack of specialist knowledge Inadequate specialist knowledge can result in serious injuries when setting up the machine. Allow ONLY trained personnel to set up the machine. 6.1 Unpacking the machine WARNING Risk of injury due to own weight and packaging materials. Contact with the packaging materials without wearing appropriate protective clothing can result in serious injuries. ALWAYS wear gloves and safety shoes when unpacking the machine. ALWAYS watch out for sharp edges on clamps, paper and packing straps. Unpack the machine with due care to avoid personal injury or damage to the machine. Dispose of the packaging material in the correct manner according to the national regulations. 6.2 Delivery scope The scope of delivery depends on your specific order. Check that all parts required are present before setting up the machine: • Basic equipment • Additional equipment • Small parts in an accessory pack 90 Operating manual 806N Version 00.0 - 12/2012 Set-up instructions 6.3 Removing/mounting covers The covers are divided into covers above and below the table level. The covers above the table level must be removed in order to remove the transport locks. 6.3.1 Removing the covers ATTENTION Material damage due to incorrect sequence. The covers above the table level can be damaged when removed/ installed in the incorrect sequence. ALWAYS remove/mount the covers above the table level in the specified sequence. ATTENTION Material damage due to incorrect removal. The covers above the table level are fastened with ball-heads that can also damage the protective covers when incorrectly removed. NEVER use force to remove the covers above the table level. Figure 62: Covers on the front side of the machine (1) - Edge folding station cover (2) - Left side cover (3) - Retaining bar (4) - Front left cover Operating manual 806N Version 00.0 - 12/2012 (5) - Carriage cover (6) - Sewing head cover (7) - Front right cover (8) - Stacker cover 91 Set-up instructions Figure 63: Covers on the rear side of the machine (9) - Right side cover Above the table level (10) - Left and right rear covers The correct sequence for removing the covers above the table level is as follows: Cover (6) - Sewing head 1. Unlock the cover lock using the associated key. 2. Release the clamping lever on the thread reel holder by reaching under the cover. 3. Pull out the thread reel holder upwards. 4. Slide the thread regulator clockwise. 5. Lift the cover upwards. Cover (5) - Carriage 1. Remove the cover upwards. Cover (1) - Edge folding station 1. Remove the cover upwards while paying attention to the key panel guide. Below the table level The correct sequence for removing the covers below the table level is as follows: Cover (10) - Left and right rear 1. Pull the cover upwards. 2. Remove the cover forwards. Cover (4) - Front left 1. Pull the cover upwards. 1. Remove the cover forwards. 92 Operating manual 806N Version 00.0 - 12/2012 Set-up instructions Cover (7) - Front right 1. Release the screw using a hey key through the hole. 2. Pull the cover upwards. 3. Remove the cover forwards. Cover (2) - Left side This cover does not normally need to be removed. Everything inside the machine is accessible when the rear covers below the table level are removed. 1. 2. 3. 4. Release the screws on the retaining bar. Pull put the retaining bar. Pull the cover upwards. Remove the cover forwards. Cover (9) - Right side 1. Release the screws. 2. Remove the plate. 3. Pull the cover upwards. 4. Remove the cover forwards. Cover (8) - Stacker 1. Pivot the stacker towards the machine. 2. Remove the inner earthing cable from the cover. 3. Release the hex screw at the outer right of the cover. 4. Release the hex screw at the outer left of the cover. 5. Remove the cover forwards. 6.3.2 Installing covers ATTENTION Material damage due to incorrect sequence. The covers above the table level can be damaged when removed/ installed in the incorrect sequence. ALWAYS remove/mount the covers above the table level in the specified sequence. ATTENTION Material damage due to incorrect sequence. The covers below the table level can be damaged when the snaplocks/springs are not correctly fastened. The snap-locks/springs for the covers below the table level must ALWAYS be correctly latched in place. Operating manual 806N Version 00.0 - 12/2012 93 Set-up instructions Above the table level The correct sequence for removing the covers above the table level is as follows: Cover (1) - Edge folding station 1. Remove the cover upwards while paying attention to the key panel guide. Cover (5) - Carriage 1. Place the cover on the carriage from above. 2. Fit the cover so that it lies on the edge folding station cover (1). Cover (6) - Sewing head 1. Fit the cover into the guide at the upper right of the carriage (5) cover. 2. Fit the thread reel holder from above. 3. Tighten the clamping lever on the thread reel holder by reaching under the cover. 4. Lock the cover lock using the associated key. Below the table level The correct sequence for installing the covers below the table level is as follows: Cover (9) - Right side 1. Fit the cover downwards into the guide hooks. 2. Pull the cover upwards. 3. Fit the cover upwards into the guide hooks. The cover is locked in place by the springs on the lower guide hooks. 4. Fit the plate. 5. Fasten the plate with the screws. Cover (2) - Left side 1. Fit the cover downwards into the guide hooks. 2. Pull the cover upwards. 3. Fit the cover upwards into the guide hooks. The cover is locked in place by the springs on the guide hooks. 4. Slide the retaining bar into the guide. 5. Fasten the screws on the retaining bar. Cover (10) - Left and right rear 1. Fit the cover downwards into the guide hooks. 2. Pull the cover upwards. 3. Fit the cover upwards into the guide hooks. The cover is locked in place by the springs on the guide hooks. 94 Operating manual 806N Version 00.0 - 12/2012 Set-up instructions Cover (4) - Front left 1. Simply hang the cover in place. Cover (7) - Front right 1. Fit the cover downwards into the guide hooks. 2. Pull the cover upwards. 3. Fit the cover upwards into the guide hooks. 1. Release the screw using a hex key through the front middle hole. Cover (8) - Stacker 1. Pivot the stacker away from the machine. 2. Fit the cover from above. 3. Tighten the hex screw at the outer left of the cover. 4. Tighten the hex screw at the outer right of the cover. 5. Attach the earthing cable at the inner right. 6. Pivot the stacker towards the machine. 6.4 Removing the transport locks Transport locks and fasteners for preventing transport damage are located at the following positions on the machine: • Sewing head • Edge folding station • Stacker • Transfer carriage ATTENTION Material damage if transport locks are not removed. Incomplete removal of the transport locks can damage or destroy the machine. Remove ALL listed transport locks. The correct procedure for removing all transport locks is as follows: 1. Remove all covers above the table top, Section 6.3 Removing/ installing covers. Sewing head 2. Release the screws (2) on the metal ring (1). 3. Remove the metal ring (1) from the sewing head pressure cylinder. The sewing head transport lock has now been removed. The sewing head can be moved freely. Operating manual 806N Version 00.0 - 12/2012 95 Set-up instructions Figure 64: Sewing head transport lock (1) - Metal ring Edge folding station (2) - Screw The edge folding station is delivered in shape changing mode, even when no shapes are supplied with the machine. 4. Remove the polystyrene foam from between the protective bar and edge folding frame at the front of the edge folding station. 5. Remove any fastening tape or cable ties from the carriage of the middle slide and edge folding frame. The edge folding station transport lock has now been removed. Stacker 6. Remove the fastening tape used for fastening the stacker to the machine. 7. If necessary, remove the tape from the stacker and pivot the stacker away from the machine. The stacker transport lock has now been removed. The stacker can now move freely. Transfer carriage 8. Remove the fastening tape fastening the transfer carriage to the edge folding frame and the machine frame. 9. Deactivate the EMERGENCY STOP switch by pulling it out to the left, Section 5.10 Emergency procedure. The transfer carriage transport lock has now been removed. The transfer carriage can now move freely. Power cable/ foot switch 96 The power cable and foot switch are already fitted to the machine. Remove both items from the machinery space behind the controller. Remove the rear cover below the table level to make this easier. Operating manual 806N Version 00.0 - 12/2012 Set-up instructions 6.5 Setting up/connecting the sewing unit Follow the steps described here for setting up and connecting the unit. Damage to the machine and personal injury can only be avoided by following the correct set-up procedure. WARNING Risk of injury due to a lack of specialist knowledge Inadequate specialist knowledge can result in serious injuries when setting up the machine. Allow ONLY trained personnel to set up the machine. 6.5.1 Setting up To prevent accidents the weight of the sewing unit must be evenly distributed over the 4 adjustable feet. Correctly align the sewing unit as follows: 1. Place a spirit level on the frame (e.g. at the rear after first removing the rear lower covers) in order to align the machine level. 2. Release the counternut (1). Figure 65: (1) - Counternut (2) - Adjustable 3. Turn the adjustable foot (2) until it reaches the correct height. 4. Tighten the counternut (1) again. 5. Repeat steps 2 to 4 for the other feet. The machine is now aligned level. Operating manual 806N Version 00.0 - 12/2012 97 Set-up instructions 6.5.2 Installing the thread reel holder Due to the height the thread reel holder is not installed when the machine is delivered. The thread reel holder must be installed with the covers in place because the covers can no longer be fitted when the thread reel holder is installed. Install the thread reel holder as follows: Figure 66: Installing the thread reel holder (1) - Thread reel holder (2) - Clamping lever (3) - Thread reel holder bracket 1. Insert the thread reel holder (1) into the hole in the thread reel holder bracket (3). 2. Align the thread guide at right angles to the sewing arm. Figure 67: Thread guide alignment 3. Clamp the thread reel holder (1) using the clamping lever by grasping the clamping lever (2) at the left of the stacker cover. The thread reel holder is now installed. 98 Operating manual 806N Version 00.0 - 12/2012 Set-up instructions 6.5.3 Electrical connection DANGER Risk of injury from electricity. Unprotected contact with electricity can result in serious injuries or death. Work on the electrical system must ONLY be performed by qualified electricians or appropriately trained and authorized personnel. ALWAYS unplug the power plug before working on the electrical equipment. The power cable is already installed on the machine. On delivery it lies inside the machine. It is advisable to remove at least one of the rear covers below the table level in order to access the power cable. A country-specific plug must be fitted to the cable. Rated voltage The rated voltage is specified on a second plate below the sewing unit type plate, which is located below the main power switch. The rated voltage must agree with the mains voltage or major material damage to the machine may occur. ATTENTION Material damage due to incorrect mains voltage. The machine can be significantly damaged or destroy by contact with the incorrect mains voltage. ONLY connect the machine to the specified mains voltage. The machine is ONLY to be connected by qualified specialized 6.5.4 Pneumatic connection The pneumatic system for the sewing unit must satisfy the following requirements: • It must be supplied with moisture-free compressed air • The supply pressure must lie between 8 and 10 bar • Even at the moment of maximum air consumption, the supply pressure must never drop below the minimum operating pressure of 5 bar (or the machine will not function) The connection hose for the pneumatic system is not included in the scope of delivery of the sewing unit. It must be ordered separately. Operating manual 806N Version 00.0 - 12/2012 99 Set-up instructions Figure 68: Connection to the pneumatic system (1) - Pressure gage (2) - Twist grip Connect the compressed air as follows: 1. Connect the connection hose with the hose coupling to the compressed air supply. 2. Plug the connection hose onto the hose neck of the pressure gage and fasten with a hose clamp. 3. Open the shut-off valve by turning it to the right into the horizontal position. Setting the operating pressure The operating pressure is 6 bar. This can be read on the pressure gage (1). To increase pressure Pull the twist grip (2) down and turn it clockwise until reaching a pressure of 6 bar. To reduce pressure Pull the rotary handle (2) down and turn it counter-clockwise until reaching a pressure of 6 bar. 6.5.5 Topping up the oil The procedure for topping up the oil in the sewing unit is described in Section 5.11.2 Lubrication. The specifications for the oil to be used are also listed below. Use only DA10 sewing machine oil or an equivalent oil conforming to the following specifications: • Viscosity at 40°C: 10 mm2/s • Flash point: >160°C DA10 sewing machine oil can be obtained from Dürkopp Adler sales offices under the following part numbers: 100 Operating manual 806N Version 00.0 - 12/2012 Set-up instructions • 9047 000013 - 2 liters • 9047 000014 - 5 liters WARNING Risk of injuries due to contact with oil. Contact with oil can cause irritation, rashes, allergies or skin injuries. ALWAYS avoid long-term contact with oil. ALWAYS thoroughly wash the affected areas if contact with oil occurs. ATTENTION Risk of environmental damage from old oil. Incorrect handling of old oil can result in severe environmental damage. ALWAYS observe the legally prescribed regulations for handling and disposal of mineral oil. Take care to ensure that oil is NEVER spilt. Oiling the wicks and felt The wicks and felt in the sewing head must be soaked with a small amount of oil when setting up the machine, and especially after longer standstill periods. Oil the wicks and felt as follows: Figure 69: Sewing head with open cover (1) - Wick (2) - Felt Operating manual 806N Version 00.0 - 12/2012 101 Set-up instructions 1. Release the screws on the head cover. 2. Remove the head cover. 3. Oil the wick and felt at positions (1) and (2) by applying a small amount of oil directly from the oil can to the marked positions. 4. Fit the head cover. 5. Tighten the screws on the head cover. 6.6 Commissioning The machine is delivered almost completely ready for operation. A test run can be performed after performing the listed steps for set-up and connection of the machine. More detailed information is proved in Section 5.2 Preparing the machine for operation and Section 5.3 Carrying out a test run. Inserting the needle 102 A needle is already fitted if the machine is delivered without a shaping assembly. A needle is not fitted if the machine is delivered with a shaping assembly. Check that a needle is fitted before starting the machine. If a needle is not fitted on delivery, a sewing thread is still threaded in the machine and the needle is attached to this. Operating manual 806N Version 00.0 - 12/2012 Decommissioning 7 Decommissioning A number of activities must be performed if the machine is to be shut down for a longer period of time or completely decommissioned. WARNING Risk of injury due to a lack of care. A lack of care or a lack of sufficient technical knowledge when decommissioning the machine can result in serious injuries. ONLY clean the machine when it is switched off. Avoid contact with oil residues. Allow ONLY trained personnel to disconnect the machine. Decommission the machine as follows: 1. Switch off the main power switch under the sewing material support. 2. Turn the compressed air shut-off valve, at the right next to the main power switch, to the right in the horizontal position. 3. Unplug the power plug. 4. Disconnect the pneumatic connection. 5. Remove residual oil from the oil pan under the sewing material support using a cloth. 6. Cover the operating terminal to protect it from soiling. 7. Cover the controller at the edge folding station to protect it from soiling. 8. Cover the entire machine if possible to protect it from soiling and damage. Observe the necessary safety precautions for transport, Section 8 Packing, transportation. Operating manual 806N Version 00.0 - 12/2012 103 Packing, transportation 8 Packing, transportation The aspects relating to packing and transportation are described below. Keep to the procedure described here to ensure fault-free operation of the machine. 8.1 Fitting the transport locks Transport locks must be fitted to the following places in order to protect the machine from damage during transport: • Sewing head • Edge folding station • Stacker • Transfer carriage Fit the transport locks as follows: 1. Depressurize the machine and place it in the Safe stop mode. 2. Remove all covers above the table plate, Section 6.3 Removing/installing covers. Sewing head 3. Press down the sewing head - vent any residual compressed air if necessary. 4. Release the screws on the metal ring. 5. Fit the metal ring around the sewing head pressure cylinder. 6. Tighten the screws on the metal ring. The sewing head transport lock is now installed. Figure 70: Sewing head transport lock (1) - Metal ring Edge folding station 104 (2) - Screw 7. Place the machine in the shape changing mode, Section 5.2.6. 8. Press the EMERGENCY OFF button. 9. Acknowledge the error message and shut down the PC. 10. Switch off the machine at the main power switch. Operating manual 806N Version 00.0 - 12/2012 Packing, transportation 11. Fasten the polystyrene foam between the protective bar and edge folding frame. 12. If necessary, use tape or cable ties to fasten the middle slide carriage and edge folding frame. The edge folding station components are now fastened for transport. Stacker 13. Use tape or cable ties to fasten the stacker bar to the stacker. 14. Fold the stacker to the machine and tape it to the frame. The stacker is now fastened to the machine. Transfer carriage 15. Activate the integrated EMERGENCY STOP switch on the transfer carriage by pressing it in to the right. 16. Slide the transfer carriage all the way to the left. 17. Tape the transfer carriage to the machine frame and the edge folding frame. The transfer carriage is now secured for transport. Power cable/ foot switch The power cable and foot switch are permanently fitted to the machine. They can be stored in the area behind the controller. Remove the rear cover below the table level to store the cable more easily. 8.2 Packing the machine WARNING Risk of injury due to own weight and packaging materials. Contact with the packaging materials without wearing appropriate protective clothing can result in serious injuries. ALWAYS wear gloves and safety shoes when packing the machine. ALWAYS watch out for sharp edges on clamps, paper and packing straps. Pack the machine so that it cannot slip or fall over. Use a stable base and fasten the machine to this. Provide protection from external damage to the machine. Operating manual 806N Version 00.0 - 12/2012 105 Packing, transportation 8.3 Transporting the machine Fit the transport locks before transporting the machine. WARNING Danger of crushing due to unstable transport. Incorrect transport of the machine can result in severe crushing injuries. ALWAYS use a sturdy lifting carriage. ALWAYS wear safety shoes and gloves Lift the machine a MAXIMUM of 20 mm. ALWAYS securely fasten the machine. Ensure the highest possible degree of safety when transporting the machine. Fasten the machine and wear the prescribed safety clothing. 106 Operating manual 806N Version 00.0 - 12/2012 Disposal 9 Disposal The machine must not be disposed of in the normal household waste. The machine must be disposed of in an appropriate and correct manner according to the national regulations. ATTENTION Risk of environmental damage due to incorrect oil disposal. Incorrect disposal of old oil can result in severe environmental damage. ALWAYS observe the legally prescribed regulations for disposal of oil. When disposing of the machine, be aware that it consists of a range of different materials (steel, plastic, electronic components, etc.). Observe the applicable national regulations for disposal. Operating manual 806N Version 00.0 - 12/2012 107 Glossary 10 Glossary Term 108 Explanation Air suction The air suction is located in the sewing material support in the edge folding area. The air suction fastens the basic part to the sewing material support. Basic part The basic part is the material product onto which the pocket is to be sewn. Basic position In the basic position the middle slide is at the rear and the transfer plate is at the right. Bobbin The hook thread is wound on the bobbin. The bobbin is located under the sewing material support. Edge folding Edge folding describes the process of folding the pocket blank via the edge folding frame. Edge folding frame The edge folding frame is used to fold the (edge) of the pocket blank. Edge folding set The edge folding set is defined as the inner frame and outer frame of the edge folding frame. Edge folding station The pocket blank is edge folded in the edge folding station. Various buttons for operating the machine are also located here 4.1.2 Edge folding station. Equipotential bonding The equipotential bonding minimizes different electrical potentials resulting from friction. This protects the machine from damage and faulty behavior. FA See thread cutter Hook thread The hook thread is the thread coming from the bobbin. It is located under the sewing material support. Hose insert The hose insert is only important for the "Shirts/Underwear" variant. It ensures that the folding of the pocket blank is retained when the middle slide is removed after folding. Middle slide The middle slide is a component of the edge folding station. The pocket blank is placed on this. Needle thread The needle thread is the thread coming from the thread reel. It runs through the needle. Pocket blank The pocket blank is the piece of material that is folded in the edge folding station and then sewn as a pocket onto the basic part. Reference run In a reference run the machine senses the numeric code on the transfer plate and checks the compatibility of the seam program. The machine also searches for its starting point or basic position. Referencing The machine performs a reference run. Safe stop When the machine is in the Safe stop mode the activities listed in 5.8 Activities on the machine can be performed without danger. Power is removed from the sewing motor and the stepper motors are in the holding position. Operating manual 806N Version 00.0 - 12/2012 Glossary Term Explanation Sewing material support The sewing material support extends from the edge folding station to the sewing unit. The sewing material support supports the basic part and transports the material to the sewing unit. Shaping assembly The shaping assembly is important for the seam program. A shaping assembly consists of: Edge folding frame, middle slide, transfer plate and hose insert. Snapper The snapper functions like a spring. For example, the spring pressure ensures that the covers remain in place and do not fall down. Thread breakage A thread breakage is defined as a breakage of the needle thread. Thread cutter The thread cutter is located under the sewing material support and cuts off the hook thread and needle thread after each sewing cycle. Throat plate The throat plate is integrated into the table plate of the sewing unit. It supports the material to be sewn and the cover and the equipotential bonding is also attached to this. Transfer arm The transfer plate is attached to the transfer arm. The transfer arm moves to the edge folding station and fetches the material to be sewn to the sewing unit. An EMERGENCY STOP switch is integrated into the transfer arm. Transfer plate The transfer plate holds the material to be sewn on the table plate and transports it to the sewing unit via the transfer arm. The machine uses the numeric code on the rear side of the transfer plate to determine which seam program is compatible with the transfer plate. Vacuum See air suction Operating manual 806N Version 00.0 - 12/2012 109 Glossary 110 Operating manual 806N Version 00.0 - 12/2012 Operating manual 806N Version 00.0 - 12/2012 Subject to design changes - Printed in Germany - © Dürkopp Adler AG - Original Instructions - 0791 806011 - EN - 12/2012 DÜRKOPP ADLER AG Potsdamer Str. 190 33719 Bielefeld Germany Phone +49 (0) 521 925 00 E-Mail: [email protected] www.duerkopp-adler.com