1
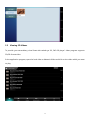
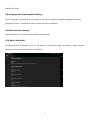
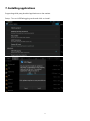
User’s Manual T3D07x (机型:T3D07-AV01/T3D07-AD01) Quick Start Guide User Guide and Safety Information To ensure safety and proper usage, please read the following information carefully prior to use: To prevent damage to the Micro SD card and device, please do not remove the Micro SD card while in use. When using headphones, please ensure that the volume is set to an appropriate level to prevent damage to hearing. Keep device and accessories away from liquids and damp environments. Avoid exposing device to extremely high or low temperatures. Avoiding dropping or throwing the device. Do not disassemble the device nor attempt to fix or repair it by yourself. Do not use parts that have not been authorized by the manufacturer. Doing so may be dangerous. Keep number of simultaneously running applications to a minimum to prevent the device from running slowly or otherwise sub-optimally. When device begins to exhibit such symptoms, promptly close applications that are not in use to prevent insufficient device memory. When installing third party software, please note: Some third party applications are incompatible with the device and may cause malfunction. Please uninstall such applications to ensure proper functioning of the device. 1 Table of Contents User Guide and Safety Information ................................................................................................................................. 1 1. Product overview .......................................................................................................................................................... 4 2. Device introduction ......................................................................................................................................................... 4 2.1 Keys: ................................................................................................................................................................... 4 2.2 Ports................................................................................................................................................................... 5 3. First-time Usage ............................................................................................................................................................... 5 3.1 Battery charging and maintenance........................................................................................................... 5 3.2 Switching the device on and off and unlocking the screen ............................................................... 7 3.3 USB port ........................................................................................................................................................... 8 3.4 Internet access ................................................................................................................................................ 9 4. Operating the Interface ................................................................................................................................................ 10 4.1 Main interface ............................................................................................................................................... 10 4.2 Functions Menu............................................................................................................................................ 11 4.3 Widgets........................................................................................................................................................... 11 4.4 Switching between tasks ............................................................................................................................ 12 5. Viewing 3D images and videos, 3DV game centre ............................................................................................... 12 5.1 Viewing 3D images ................................................................................................................................... 12 5.2 Viewing 3D Videos.................................................................................................................................... 13 5.3 3DV Game Centre ........................................................................................................................................ 14 6. Setting the interface...................................................................................................................................................... 15 6.1 Wi-Fi settings ................................................................................................................................................ 15 6.2 Bluetooth transmission .............................................................................................................................. 15 6.3 Flow settings ................................................................................................................................................. 15 2 6.4 Sound settings .............................................................................................................................................. 15 6.5 Display settings ............................................................................................................................................ 15 6.6 Application settings..................................................................................................................................... 15 6.7 Storage settings............................................................................................................................................ 15 6.8 Language and input method settings .................................................................................................... 16 6.9 Date and time settings ............................................................................................................................... 16 6.10 About the tablet ........................................................................................................................................ 16 7. Installing applications ................................................................................................................................................... 17 8. Common problems and solutions ............................................................................................................................. 18 3 1. Product overview Operating Android 4.2.2 ICS System Processor Cortex -A7 dual-core 1.2GHz Storage 1GB memory, 8GB built-in flash, supports TF card expansion (Max: 32GB) Display 7 inch HD No-glassing 3D TFT Display,800*1200 resolutio, 5-point capacitive touch screen Pic Format 3DP(3D) ,JPG(side by side),PNG,GIF,BMP etc. Video 3DV(3D) ,MKV(side by side),AVI,MP4,3GP,FLV etc. Format Music MP3,ACC,WMA,AC-3,DTS etc. Format RF GSM/GPRS/EDGE:850/900/1800/1900MHz,WCDMA:BAND1-W2100(only T3D07-AV01) frequency Camera 0.3 megapixel front camera, 2.0 megapixel rear camera Sensors Gravity acceleration sensor Standard Micro-USB, mini-HDMI, 3.5mm headphone port, Micro-SD (TF) card port, 2.5mm DC charging port, SIM ports card port Battery Lithium polymer 3000mAh battery ,5 hours Web browsing, 2.5-3 hours 3D video playing Dimensions 193.6(L)*116(W)*11(H)mm Weight Approx. 340g Firmware Local upgrade upgrade Other Built-in microphone ,WIFI and Bluetooth 4.0 * Battery performance depends on network settings and information on many other factors, actual results may be different 2. Device introduction 2.1 Keys: ①Power button Power on: Hold down the power button until the operating system appears on the main screen. Power off: Holding down the power button for approxi-mately two seconds on any screen will prompt a pop-up that asks, “Do you want to shut down your device?” Choose “Yes” to safely shut off your device. To lock the screen: quickly press and release the power button. Note: When the device’s battery is too low to power the device, it will automatically shut off. 4 ②Volume keys Press the +/- keys to control volume level. ③Touch screen Convenient 5-point capacitive touch screen. 2.2 Ports ①Headphone jack:3.5 mm headphone port. ②Mini- USB port: Connect your PC to the device via a USB for data transferring. An OTG cable may be used in the port for accessing U-disks. The port may also be used to connect expansion devices, such as a keyboard or mouse. ③Micro-SIM card slot: When you select 3G wireless service, you will need to purchase a USIM/SIM card ④HDMI output port:Mini-HDMI high-definition output; the HDMI video output connection may be connected with an HDMI display device via an HDMI cable. ⑤Micro-SD (TF) card slot: may be used to expand the external TF card, supports up to 32 GB. ⑥Power connector: Connects the power adapter to the device for battery charging. 3. First-time Usage 3.1 Battery charging and maintenance When using in the first time, please charge the battery until it is fully charged. Charging can be performed with just the power adapter. For the first two times, charge the device for 6 hours. Subsequently, simply charge the device until the battery indicator shows that the device is fully charged. The device uses a built-in polymer battery. The appropriate adapter must be used in 5 charging the device. While charging, the battery icon will move in a scrolling motion. When charging is complete, the battery icon will stop scrolling. To prolong the lifetime of the device, it is recommended to use the batteries. 【Note】 If the device will be left unused for long periods of time, charge the phone once a month and allow the power to drain to prevent damage resulting from the battery dying. When the device automatically turns off due to low battery power, connect it to the power adapter. The screen will notify you that the device cannot be powered on until it has been sufficiently charged. The device will require more time to charge when it is charging while in use. We recommend charging the device when it is not in use. Do not place the battery in the microwave or a pressure tank; do not use the battery in conjunction with other chemical batteries (such as dry cells), batteries with different capacities, or batteries of different brands. If the battery begins to emit an odor, heats up, changes in color, changes in shape, or exhibits any other abnormal signs during charging or storage, immediately remove the battery from the device and stop charging. If the battery is no longer charging, please disconnect it from the power adapter. The battery must be placed out of the reach of children. If the battery is accidentally swallowed, go to the hospital immediately. If the battery begins to leak or emits a gas-like smell, quickly remove it from the presence of any fire to prevent the battery from catching on fire. If the battery is leaking and electrolyte liquid comes into contact with the eyes, do not rub the eyes. Flush the eyes with clean water and go to the hospital immediately to prevent long-term damage. Using an incompatible replacement battery model may result in risk of explosion. Batteries should be disposed of at authorized battery recycling centers. 6 3.2 Switching the device on and off and unlocking the screen Turn on the device and unlocking the screen When the device is powered off, press and hold the power button down for approximately 3 seconds. The indicator light will become blue and the device will display the booting-up screen. Once the boot animation has ended, the system will automatically be set to the locked-screen mode. To unlock the screen, swipe in the direction of the water ripples displayed across the screen. Sleep mode and locking the screen When the device is powered on, quickly pressing and releasing the power button will activate sleep mode and lock the screen. To unlock the device, simply press and release the power button. Once the screen has lit up, unlock the screen by swiping in the direction of the water ripples displayed across the screen. Powering off While on any screen, holding down the power button for approximately 3 seconds will prompt a pop-up that asks, “Do you want to shut down your device?” Choose “Yes” to shut off your device. To force the device to shutdown, hold down the power button for 6 seconds, and the operating system will automatically power off. 7 3.3 USB port Use the USB cable to connect to your PC, the device will display the USB connecting window, click “turn on the USB storage”to connect to your PC,in this state,You can copy or delete files stored on the TF card. In host mode you can also use OTG connecting to USB disk and transfer data between devices. 8 3.4 Internet access Wi-Fi access To install Wi-Fi, select “Wi-Fi” via the “Settings” icon. After accessing “Internet settings,” turn on “Wi-Fi” and the system will automatically search for connectable Wi-Fi networks. Manually scan for Wi-Fi networks by clicking on “Scan”. If no connectable networks are found, networks can be added manually by clicking on “Add network”. 3G Internet ( only for T3D07-AV01) While the device is powered off, insert the 3G USIM/SIM card into the USIM/SIM card slot located on the back of the tablet. After turning on the device, select “More - Mobile Networks” under “Settings” to begin data usage. A different Internet connectivity icon will appear in the lower right hand corner of the tablet when the tablet is connected to a 3G network. When data roaming is necessary, select the “Data roaming” option. 9 4. Operating the Interface 4.1 Main interface After unlocking the device, the main page will appear Phone, People, Menu, Messaging, Brower, Time, Battery , WiFi, etc. You can change the Desktop Display by setting, and , you can also set your favorite applications to the main page. You can return to the main screen by no matter which panel of the screen. In different applications, you can click , to return the previous menu. 10 4.2 Functions Menu Click on to access the Functions Menu. 4.3 Widgets Select a widget, and keeping your finger down, slide it onto the main page for easy access. 11 4.4 Switching between tasks The tablet supports the operation of several tasks simultaneously. To view or switch between the active operations, click on . 5. Viewing 3D images and videos, 3DV game centre 5.1 Viewing 3D images In the application program interface, open "MD 3D Photo" browser and click on the picture which you want to view. Then left and right sliding touch screen to switch pictures and you can touch 2D/3D icon to achieve switching between 2D and 3D image. 12 5.2 Viewing 3D Videos To provide you extraordinary visual feast with naked eye 3D, "MD 3D player" video program supports 2D/3D format video. In the application program, open the local video or Network Video and click on the video which you want to play. 13 5.3 3DV Game Centre In the application program,chick on the game which you want to download and setup it. 14 6. Setting the interface 6.1 Wi-Fi settings To install Wi-Fi, select “Wi-Fi” via the “Settings” icon. After accessing “Internet settings,” turn on “Wi-Fi” and the system will automatically search for connectable Wi-Fi networks. Manually scan for Wi-Fi networks by clicking on “Scan”. If no connectable networks are found, networks can be added manually by clicking on “Add network”. 6.2 Bluetooth transmission From the “Settings” menu, select the “Turn on Bluetooth”option. After Bluetooth has been turned on, click on “Scan for networks” to search for nearby Bluetooth networks. 6.3 Flow settings Once “Traffic usage” is enabled in “Settings”, you can monitor your mobile network data usage. 6.4 Sound settings Sound settings will allow you to adjust volume, touch tones sounds, and screen locking sounds. 6.5 Display settings Brightness, wallpaper, screen auto-rotate, sleep mode, and font size can be customized in the interface. 6.6 Application settings Access “Application settings” to view stored applications, application download progress, and currently running applications. Select an application to uninstall or transfer to a TF card. 6.7 Storage settings Select “Storage” within “Settings” to access information on the internal storage space, external and internal SD storage card capacities, and classified storage capacity, as well as to install or uninstall 15 external SD cards. 6.8 Language and input method settings Set the language, keyboard, and input methods. The device supports multiple languages, including: Simplified Chinese, Traditional Chinese, English, French and Japanese. 6.9 Date and time settings Date and time can be set both automatically and manually. 6.10 About the tablet Including general information such as the status of the device, legal information, model number, firmware version, and other relevant information. 16 7. Installing applications Supporting third-party Android applications on the market . Setup:Turn on USB Debugging mode and chick on install . 17 8. Common problems and solutions The device cannot be turned on 1:Ensure that the device has sufficient battery power. 2:Connect to the power adaptor and try powering on, again. After turning on, the device displays the main page but then powers off 1:The device is low on battery. Charge and try again. There is no sound from the headphones 1:Make sure that the volume setting is not set to “0.” 2:Check whether the audio file is damaged by playing a different audio file. If the audio file is damaged, it may produce loud noises or skips File or music cannot be copied 1:Check whether the PC and the tablet are properly connected. 2:Check whether there is sufficient internal storage capacity. 3:Check whether the USB cord is damaged. Restoring default factory settings You can click the “restore default factory systems” button on the “backup and reset interface.” This will erase all current data. (Note: Please perform restoration when phone is fully charged and not connected to the power adapter.) 18 Marvel Digital (Shen Zhen) Limited Company Address: 1/F Yin He Feng Yun Bldg, No.5 Xinxi Road, Shenzhen Science & Technology North Park, Nanshan District, Shenzhen Tel no.: 0755 - 83485832 Post code: 518000 www.marveldigital.com 19