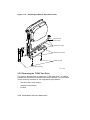
1
BA430/BA440 Enclosure Maintenance
Order Number EK–348AB–MG–002
Digital Equipment Corporation
Maynard, Massachusetts
First Printing, September 1990
The information in this document is subject to change without notice and should not be
construed as a commitment by Digital Equipment Corporation.
Digital Equipment Corporation assumes no responsibility for any errors that may appear in
this document.
The software, if any, described, in this document is furnished under a license and may be
used or copied only in accordance with the terms of such license. No responsibility is assumed
for the use or reliability of software or equipment that is not supplied by Digital Equipment
Corporation or its affiliated companies.
Restricted Rights: Use, duplication or disclosure by the U.S. Government is subject to
restrictions as set forth in subparagraph (c)(1)(ii) of the Rights in Technical Data and Computer
Software clause at DFARS 252.227–7013.
© Digital Equipment Corporation 1990, All rights reserved.
Printed in U.S.A.
The Reader’s Comments form at the end of this document requests your critical evaluation to
assist in preparing future documentation.
The following trademarks of Digital Equipment Corporation are:
The following are trademarks of Digital Equipment Corporation:
CompacTape, CX, DDCMP, DEC, DECconnect, DECdirect, DECnet, DECscan, DECserver,
DECUS, DECwindows, DELNI, DEMPR, DESQA, DESTA, DSRVB, DSSI, IVAX, KDA, KLESI,
MicroVAX, MSCP, Q-bus, Q22-bus, RA, RQDX, RRD40, SDI, ThinWire, TK, TMSCP, TQK50,
TQK70, TSV05, TU, VAX, VAX 4000, VAXcluster, VAX DOCUMENT, VAXELN, VAXlab,
VAXserver, VMS, VT, and the DIGITAL logo.
FCC NOTICE: The equipment described in this manual generates, uses, and may emit radio
frequency energy. The equipment has been type tested and found to comply with the limits for
a Class A computing device pursuant to Subpart J of Part 15 of FCC Rules, which are designed
to provide reasonable protection against such radio frequency interference when operated in
a commercial environment. Operation of this equipment in a residential area may cause
interference, in which case the user at his own expense may be required to take measures to
correct the interference.
S1467
This document was prepared using VAX DOCUMENT, Version 1.2.
Contents
Preface
ix
Chapter 1 BA430/BA440 Enclosure Description
1.1
Introduction . . . . . . . . . . . . . . . . . . . . . . . . . . . . . . . . . . . . . .
1.2
Enclosure Keylock Access . . . . . . . . . . . . . . . . . . . . . . . . . . . .
1.3
Module Handles and Covers . . . . . . . . . . . . . . . . . . . . . . . . .
1.3.1
Filler Panel Between Flush and Recessed Handles . . . . . .
1.4
Mass Storage Shelf . . . . . . . . . . . . . . . . . . . . . . . . . . . . . . . .
1.5
RF-Series ISE . . . . . . . . . . . . . . . . . . . . . . . . . . . . . . . . . . . .
1.6
RZ-Series ISE . . . . . . . . . . . . . . . . . . . . . . . . . . . . . . . . . . . .
1.7
Tape Drives . . . . . . . . . . . . . . . . . . . . . . . . . . . . . . . . . . . . . .
1.7.1
TK70 Tape Cartridge . . . . . . . . . . . . . . . . . . . . . . . . . . . . .
1.7.2
TLZ04 Cassette Tape Drive . . . . . . . . . . . . . . . . . . . . . . . .
1.8
System Control Panel (SCP) . . . . . . . . . . . . . . . . . . . . . . . . .
1.9
Enclosure Modification . . . . . . . . . . . . . . . . . . . . . . . . . . . . . .
1.9.1
Halt and Restart Switch Disable . . . . . . . . . . . . . . . . . . . .
1.10 Enclosure Card Cage . . . . . . . . . . . . . . . . . . . . . . . . . . . . . . .
1.10.1 Components Specific to the BA430 Enclosure . . . . . . . . . .
1.10.2 Components Specific to the BA440 Enclosure . . . . . . . . . .
1.11 Console Modules and I/O Panel . . . . . . . . . . . . . . . . . . . . . . .
1.11.1 H3602 Console Module (Used in BA430) . . . . . . . . . . . . . .
1.11.2 H3604 Console Module (Used in BA440) . . . . . . . . . . . . . .
1.12 Interface Module M9715–AA (Used in BA430) . . . . . . . . . . . .
1.13 Power Supply (H7874) . . . . . . . . . . . . . . . . . . . . . . . . . . . . . .
1.14 Fan Tray . . . . . . . . . . . . . . . . . . . . . . . . . . . . . . . . . . . . . . . .
1.14.1 Fan Speed Control Disable . . . . . . . . . . . . . . . . . . . . . . . . .
1.15 Backplanes . . . . . . . . . . . . . . . . . . . . . . . . . . . . . . . . . . . . . . .
1.15.1 BA430 Backplane (54–20181–01) . . . . . . . . . . . . . . . . . . . .
1.15.2 BA440 Backplane (54–19354–01) . . . . . . . . . . . . . . . . . . . .
1–1
1–2
1–3
1–4
1–6
1–7
1–9
1–10
1–10
1–11
1–11
1–13
1–14
1–15
1–15
1–15
1–16
1–16
1–16
1–19
1–19
1–22
1–24
1–26
1–26
1–26
iii
1.15.3
1.15.4
1.15.5
Configuration Guidelines . . . . . . . . . . . . . . . . . . . . . . . . . . 1–27
Module Order and Configuration . . . . . . . . . . . . . . . . . . . . 1–28
Configuration Worksheets . . . . . . . . . . . . . . . . . . . . . . . . . 1–28
Chapter 2 Installation
2.1
Site Preparation Considerations . . . . . . . . . . . . . . . . . . . . . .
2.1.1
BA430/BA440 Physical Dimensions . . . . . . . . . . . . . . . . . .
2.1.2
Additional Equipment . . . . . . . . . . . . . . . . . . . . . . . . . . . .
2.1.3
Static Electricity . . . . . . . . . . . . . . . . . . . . . . . . . . . . . . . .
2.1.4
Acoustics . . . . . . . . . . . . . . . . . . . . . . . . . . . . . . . . . . . . . .
2.1.5
Heat Dissipation . . . . . . . . . . . . . . . . . . . . . . . . . . . . . . . .
2.1.6
Temperature and Humidity Values . . . . . . . . . . . . . . . . . .
2.1.7
Electrical Requirements . . . . . . . . . . . . . . . . . . . . . . . . . . .
2.2
Unpacking the Shipment . . . . . . . . . . . . . . . . . . . . . . . . . . . .
2.3
Connecting the Console Terminal . . . . . . . . . . . . . . . . . . . . . .
2.4
Completing the Installation . . . . . . . . . . . . . . . . . . . . . . . . . .
2.4.1
Setting Controls on the System . . . . . . . . . . . . . . . . . . . . .
2.4.5
Connecting the Power Cord . . . . . . . . . . . . . . . . . . . . . . . .
2.4.3
Installing RF- and RZ-Series ISEs . . . . . . . . . . . . . . . . . . .
2.4.3.1
Inserting Bus Node ID Plugs . . . . . . . . . . . . . . . . . . . . .
2.4.3.2
Labeling RF-Series ISEs for Systems with Multiple
DSSI Busses . . . . . . . . . . . . . . . . . . . . . . . . . . . . . . . . .
2.4.8
Installing a TLZ04 Tape Drive . . . . . . . . . . . . . . . . . . . . . .
2.5.8.1
Inserting the TLZ04 Bus Node ID Plug . . . . . . . . . . . . .
2.6
Installing RF- and RZ-Series ISEs . . . . . . . . . . . . . . . . . . . . .
2.5.1
Inserting Bus Node ID Plugs . . . . . . . . . . . . . . . . . . . . . . .
2.5.2
Labeling RF-Series ISEs . . . . . . . . . . . . . . . . . . . . . . . . . .
2.6
Installing a TL-Series Tape Drive . . . . . . . . . . . . . . . . . . . . .
2–1
2–1
2–2
2–2
2–3
2–3
2–3
2–4
2–5
2–6
2–7
2–11
2–11
2–12
2–13
2–15
2–16
2–17
2–18
2–21
2–22
2–23
Chapter 3 BA430/BA440 FRU Removal and Replacement
3.1
Field Replaceable Units (FRUs) . . . . . . . . . . . . . . . .
3.2
Installing and Removing Modules . . . . . . . . . . . . . .
3.2.1
Removing Modules with Ratchet Ejector Handles
3.2.2
Removing Modules with Attached Handles . . . . .
3.2.3
Removing Modules with Covers . . . . . . . . . . . . . .
iv
.
.
.
.
.
.
.
.
.
.
.
.
.
.
.
.
.
.
.
.
.
.
.
.
.
.
.
.
.
.
.
.
.
.
.
3–2
3–3
3–4
3–5
3–5
3.3
Removing BA400-Series Enclosure Modules . . . . . . . . . . . . .
3.3.1
M9715–YA Interface Module (BA430 Enclosure Only) . . . .
3.3.2
M7638–YA I/O Module (BA430 Enclosure Only) . . . . . . . .
3.4
Replacing RF and RZ Series Integrated Storage Elements
(ISE) . . . . . . . . . . . . . . . . . . . . . . . . . . . . . . . . . . . . . . . . . . .
3.4.1
Removing an RZ or an RF-Series ISE . . . . . . . . . . . . . . . .
3.5
Replacing RZ-Series Integrated Storage Element . . . . . . . . .
3.5.1
Removing an RZ-Series ISE . . . . . . . . . . . . . . . . . . . . . . . .
3.5.1.1
Removing the ISE Upper Bracket . . . . . . . . . . . . . . . . .
3.5.1.2
Removing the Interface Card Assembly . . . . . . . . . . . . .
3.5.1.3
Replacing the Remote Front Panel Cable . . . . . . . . . . . .
3.5.1.4
Removing the ISE Lower Bracket . . . . . . . . . . . . . . . . .
3.5.1.5
Removing the Remote Front Panel Cable . . . . . . . . . . . .
3.5.2
Removing the TLZ04 Tape Drive . . . . . . . . . . . . . . . . . . . .
3.5.2.1
Replacing the ID Cable . . . . . . . . . . . . . . . . . . . . . . . . .
3.5.2.2
Replacing the TLZ04 Front Panel Module . . . . . . . . . . .
3.5.2.3
Replacing the Interface Card Assembly . . . . . . . . . . . . .
3.5.2.4
Removing the Upper Mounting Bracket . . . . . . . . . . . . .
3.5.2.5
Removing the Interface Card Assembly . . . . . . . . . . . . .
3.5.2.6
Removing the Lower Mounting Bracket . . . . . . . . . . . . .
3.6
Removing a TK-Series Tape Drive . . . . . . . . . . . . . . . . . . . . .
3.7
Removing the System Control Panel . . . . . . . . . . . . . . . . . . .
3.8
Vterm Board Removal (BA440 Enclosure Only) . . . . . . . . . . .
3.9
Removing the Power Supply . . . . . . . . . . . . . . . . . . . . . . . . .
3.10 Removing Fans . . . . . . . . . . . . . . . . . . . . . . . . . . . . . . . . . . .
3.11 Removing a Backplane . . . . . . . . . . . . . . . . . . . . . . . . . . . . . .
3.12 Installing the BA430/BA440 Backplane . . . . . . . . . . . . . . . . .
3–7
3–8
3–8
3–8
3–9
3–10
3–10
3–14
3–16
3–17
3–17
3–17
3–18
3–21
3–22
3–23
3–23
3–25
3–26
3–27
3–30
3–31
3–32
3–34
3–38
3–43
Appendix A Related Documentation
Index
v
Figures
1–1
1–2
1–3
1–4
1–5
1–6
1–7
1–7
1–9
1–10
1–11
1–12
1–13
1–14
1–22
1–16
1–17
1–18
1–19
1–20
1–21
1–22
2–1
2–2
2–3
2–4
2–5
2–6
2–7
2–8
2–9
2–10
2–11
2–12
2–13
vi
BA430/BA440 Pedestal Enclosure . . . . . . . . . . . . . . . . . .
Keylock Positions . . . . . . . . . . . . . . . . . . . . . . . . . . . . . . .
BA400-series Module Handles and Covers . . . . . . . . . . . .
BA430/BA440 Chassis and Mass Storage Area . . . . . . . .
RF-series ISE Front Panel . . . . . . . . . . . . . . . . . . . . . . . .
Bracket Slides, used on BA430/BA440 Compatible ISEs .
RZ-series ISE Front Panel . . . . . . . . . . . . . . . . . . . . . . . .
TK-series Tape Drive . . . . . . . . . . . . . . . . . . . . . . . . . . . .
TLZ04 Tape Drive . . . . . . . . . . . . . . . . . . . . . . . . . . . . . .
SCP Identification . . . . . . . . . . . . . . . . . . . . . . . . . . . . . .
SCP Enable/Disable Switch Location . . . . . . . . . . . . . . . .
H3602 CPU Cover and H3605 I/O panel (Used in BA430)
H3604 Console Module (Used in BA440) . . . . . . . . . . . . .
H3604 Rear View (Used in BA440) . . . . . . . . . . . . . . . . .
Power Supply Indicators . . . . . . . . . . . . . . . . . . . . . . . . .
BA430/BA440 Fan Tray Location . . . . . . . . . . . . . . . . . . .
Fan Tray Extended . . . . . . . . . . . . . . . . . . . . . . . . . . . . .
FSC Jumper Location . . . . . . . . . . . . . . . . . . . . . . . . . . .
BA430 Backplane . . . . . . . . . . . . . . . . . . . . . . . . . . . . . . .
BA440 Backplane . . . . . . . . . . . . . . . . . . . . . . . . . . . . . . .
BA430 Configuration Worksheet . . . . . . . . . . . . . . . . . . .
BA440 Configuration Worksheet . . . . . . . . . . . . . . . . . . .
BA430/BA440 Enclosure Dimensions . . . . . . . . . . . . . . . .
Sliding the System into Place . . . . . . . . . . . . . . . . . . . . .
Connecting the BA430 Console Terminal . . . . . . . . . . . . .
Connecting the BA440 Console Terminal . . . . . . . . . . . . .
Connecting the Power Cable . . . . . . . . . . . . . . . . . . . . . .
Installing an RF- or RZ-Series ISE . . . . . . . . . . . . . . . . .
Inserting Bus Node ID Plugs . . . . . . . . . . . . . . . . . . . . . .
Installing the TLZ04 Tape Drive . . . . . . . . . . . . . . . . . . .
Inserting the TLZ04 Tape Drive Bus Node ID Plug . . . . .
Installing an RF– or RZ–series ISE . . . . . . . . . . . . . . . . .
Unit Number Labels . . . . . . . . . . . . . . . . . . . . . . . . . . . .
ISE Unit Number Labels . . . . . . . . . . . . . . . . . . . . . . . . .
Installing a TL-series Tape Drive . . . . . . . . . . . . . . . . . . .
.
.
.
.
.
.
.
.
.
.
.
.
.
.
.
.
.
.
.
.
.
.
.
.
.
.
.
.
.
.
.
.
.
.
.
.
.
.
.
.
.
.
.
.
.
.
.
.
.
.
.
.
.
.
.
.
.
.
.
.
.
.
.
.
.
.
.
.
.
.
.
.
.
.
.
.
.
.
.
.
.
.
.
.
.
.
.
.
.
.
.
.
.
.
.
.
.
.
.
.
.
.
.
.
.
1–2
1–3
1–5
1–7
1–8
1–9
1–10
1–11
1–12
1–12
1–14
1–17
1–18
1–19
1–20
1–23
1–24
1–25
1–26
1–27
1–30
1–31
2–2
2–6
2–7
2–8
2–11
2–14
2–15
2–17
2–19
2–21
2–22
2–23
2–24
2–14
3–1
3–2
3–3
3–4
3–5
3–6
3–7
3–8
3–9
3–10
3–11
3–12
3–13
3–14
3–15
3–16
3–17
3–18
3–19
3–20
3–21
3–22
3–23
3–24
3–25
3–26
3–27
3–28
3–29
3–30
3–31
3–32
Inserting Bus Node ID Plugs for the TLZ04 Tape Drive . . .
Ratchet Ejector Handles . . . . . . . . . . . . . . . . . . . . . . . . . . .
Releasing Quarter-Turn Captive Screws . . . . . . . . . . . . . . .
Removing a Module . . . . . . . . . . . . . . . . . . . . . . . . . . . . . . .
Removing an ISE Front Panel ID Plug . . . . . . . . . . . . . . . .
Removing RZ-series ID Plug . . . . . . . . . . . . . . . . . . . . . . . .
Removing an RF–series or RZ-series ISE . . . . . . . . . . . . . . .
Removing Bracket Screws . . . . . . . . . . . . . . . . . . . . . . . . . .
Removing the ISE Upper Bracket . . . . . . . . . . . . . . . . . . . .
Removing the Interface Card Assembly . . . . . . . . . . . . . . . .
Removing the Remote Front Panel Cable . . . . . . . . . . . . . . .
Removing the TLZ04 Tape Drive . . . . . . . . . . . . . . . . . . . . .
Removing the ID Cable . . . . . . . . . . . . . . . . . . . . . . . . . . . .
Removing the TLZ04 Front Panel Module . . . . . . . . . . . . . .
Removing Bracket Screws . . . . . . . . . . . . . . . . . . . . . . . . . .
Removing the Upper Mounting Bracket . . . . . . . . . . . . . . . .
Removing the Interface Card Assembly . . . . . . . . . . . . . . . .
Removing Lower Mounting Bracket . . . . . . . . . . . . . . . . . . .
Releasing TK-Series Captive Screws . . . . . . . . . . . . . . . . . .
Removing a TK-Series Drive Unit . . . . . . . . . . . . . . . . . . . .
Removing a TK-Series Cable . . . . . . . . . . . . . . . . . . . . . . . .
Removing the System Control Panel (SCP) . . . . . . . . . . . . .
Power Supply Indicators, Connectors, and Switch Locations
Removing the Power Supply Cord . . . . . . . . . . . . . . . . . . . .
Discharging the Power Supply . . . . . . . . . . . . . . . . . . . . . . .
Power Supply Pulled Out . . . . . . . . . . . . . . . . . . . . . . . . . . .
Removing the Fan Tray . . . . . . . . . . . . . . . . . . . . . . . . . . . .
Removing the Fan Assembly . . . . . . . . . . . . . . . . . . . . . . . .
Outer Shell Removal . . . . . . . . . . . . . . . . . . . . . . . . . . . . . .
Bus Cable Locations . . . . . . . . . . . . . . . . . . . . . . . . . . . . . . .
Rear Panel Removal (BA430/BA440) . . . . . . . . . . . . . . . . . .
Removing the BA430/BA440 Backplane . . . . . . . . . . . . . . . .
Door Installation . . . . . . . . . . . . . . . . . . . . . . . . . . . . . . . . .
.
.
.
.
.
.
.
.
.
.
.
.
.
.
.
.
.
.
.
.
.
.
.
.
.
.
.
.
.
.
.
.
.
2–26
3–4
3–6
3–7
3–9
3–11
3–12
3–15
3–16
3–17
3–18
3–20
3–21
3–22
3–23
3–24
3–25
3–26
3–27
3–28
3–29
3–30
3–33
3–34
3–35
3–36
3–37
3–38
3–40
3–41
3–42
3–43
3–45
vii
Tables
1–1 BA400-Series Module Handles and Cover Types .
1–2 SCP Switches and Functions . . . . . . . . . . . . . . . .
1–3 H7874 Power Supply Switches, Controls,
and Indicators . . . . . . . . . . . . . . . . . . . . . . . . . . . . . . . .
1–4 Power Requirements . . . . . . . . . . . . . . . . . . . . . .
2–1 Temperature and Relative Humidity Values . . . .
2–2 BA430/BA440 Enclosure Electrical Requirements
2–3 Power Cords . . . . . . . . . . . . . . . . . . . . . . . . . . . . .
2–4 Module Identification Labels . . . . . . . . . . . . . . . .
2–5 Option Cables . . . . . . . . . . . . . . . . . . . . . . . . . . .
3–1 BA430/BA440 FRUs . . . . . . . . . . . . . . . . . . . . . . .
3–2 System Specific BA440 FRUs . . . . . . . . . . . . . . . .
viii
. . . . . . . . . 1–6
. . . . . . . . . 1–15
.
.
.
.
.
.
.
.
.
.
.
.
.
.
.
.
.
.
.
.
.
.
.
.
.
.
.
.
.
.
.
.
.
.
.
.
.
.
.
.
.
.
.
.
.
.
.
.
.
.
.
.
.
.
.
.
.
.
.
.
.
.
.
.
.
.
.
.
.
.
.
.
. 1–21
. 1–32
. 2–3
. 2–4
. 2–4
. 2–9
. 2–10
. 3–2
. 3–3
Preface
This manual provides reference, installation, and maintenance information
for the BA430 and BA440 enclosures.
Intended Audience
This document is intended only for Digital Customer Services personnel
and qualified self-maintenance customers.
Organization
This manual has three chapters and one appendix.
Chapter 1 provides an overview of the system enclosures, describing
controls, mass storage area and capacity, backplane, signal distribution,
power distribution, I/O connections, and configuration guidelines.
Chapter 2 lists site preparation considerations and shows how to install the
BA430/BA440 office pedestal configuration.
Chapter 3 describes how to remove and replace field replaceable units
(FRUs). This chapter contains a list of the BA430/BA440 FRUs.
Appendix A contains a list of related documentation.
Warnings, Cautions, and Notes
Warnings, cautions, and notes appear throughout this manual. They have
the following meanings:
WARNING Provides information to prevent personal injury.
CAUTION Provides information to prevent damage to equipment or software.
NOTE
Provides general information about the current topic.
The following symbols appear on the system power supply. Please review
their definitions below:
This warning symbol indicates risk of electric shock.
ix
Warning. To reduce the risk of injury, do not remove
modules, Integrated Storage Elements (ISEs), or the power
supply. No user-serviceable parts are inside. Refer servicing
questions to your Digital Customer Services representative
or to your qualified self-maintenance personnel.
This equipment has not been designed for connection to a
power system (a power system without a directly grounded
neutral conductor).
This equipment should be plugged into a properly grounded
receptacle only.
This system contains an automatic voltage select power
supply.
Voltage selection is not required prior to
installation.
x
Chapter 1
BA430/BA440 Enclosure Description
1.1 Introduction
The BA430/BA440 pedestal enclosure shown in Figure 1–1 is used in a free
standing pedestal for use in an office environment.
The BA430/BA440 consists of the following:
•
Pedestal system
•
Dual front door access
•
Mass storage shelf for tape and disk integrated storage devices
•
System control panel (SCP)
•
Enclosure card cage
•
Power supply
•
Fan tray
•
Backplane
•
Power cord
BA430/BA440 Enclosure Description
1–1
Figure 1–1: BA430/BA440 Pedestal Enclosure
MLO-004032
1.2 Enclosure Keylock Access
To gain access to the BA430/BA440 enclosure, there is a three-position lock
that determines which controls you can access (Figure 1–2). The level of
access is as follows:
1. Top position opens the upper door only.
2. Middle position locks both doors.
3. Bottom position opens both doors together.
1–2 BA430/BA440 Enclosure Maintenance
Figure 1–2: Keylock Positions
Top Key Position
MLO-004034
Bottom Key Position
MLO-004035
MLO-004207
1.3 Module Handles and Covers
The BA400-series and the BA200-series enclosures provide front access to
the CPU and memory and option modules, making it easier to access them.
The two main differences between modules used in the BA200-series and
the BA400-series enclosures and those used in other system enclosures are:
•
Modules that connect to external devices have bulkhead handles with
the I/O connector on the handle. The handles replace the insert panels
BA430/BA440 Enclosure Description
1–3
and internal cabling found in other enclosures. This design is easier to
maintain since it eliminates problems caused by faulty internal cabling.
•
Modules that do not have external I/O connections have blank bulkhead
covers.
The module handles and blank covers form an electrical noise seal that
complies with requirements for electromagnetic interference (EMI) by
(1) keeping radio frequency interference generated by the system in the
enclosure and (2) keeping external radio frequencies from entering the
enclosure. The module handles and blank covers also help guarantee proper
airflow.
Each handle or cover has two captive quarter-turn Phillips screws to hold
the module in the card cage. Module handles also use levers to help install
or remove a module from the card cage.
The five basic types of handles and covers or panels used for BA400-series
compatible modules are:
•
Single-width flush handle
•
Single-width recessed handle
•
Single-width ratchet ejector handle (BA440 CPU and memory only)
•
Single-width blank cover
•
Double-width console panel (BA430 only)
1.3.1 Filler Panel Between Flush and Recessed Handles
When you use a flush-handle module next to a recessed-handle module, you
must install a metal filler panel (Figure 1–3) between the modules. Without
the filler panel, circuitry on a flush-handle module adjacent to the recessedhandle module is exposed. The filler panel (70–24505–01) has four sets of
finger stock that provide an effective chassis ground between the handles.
Flush handles and covers have screw holes at the top and bottom of each
side for the installation of this filler panel.
Ratchet ejector handles are only used with some CPU and memory modules
(Figure 1–3). To install a module with ratchet ejector handles, insert the
module into the guide slot and position the ratchet ejector fingers into the
latching slots at the top and bottom. Press the ratchet levers in until
the module is seated in the backplane. Latch the ratchet ejectors when
a positive feel of the bottom is realized. This removes any slack that may
exist between the module fingers and the backplane. These handles are
used to ensure a positive connection of the module in the backplane.
1–4 BA430/BA440 Enclosure Maintenance
Figure 1–3: BA400-series Module Handles and Covers
Captive Screw
Filler
Panel
Single-Width
Blank Cover
Double-Width Single-Width
Blank Cover Flush Cover
with Handles
Single-Width
Recessed Cover
with Handles
Stiffner with
Ratchet Handles
MLO-005413
Some modules have special configurations, such as the BA440’s H3604
console module, which is a hinged module cover that covers the CPU and
four memory modules. The H3604 console module also provides an I/O
connector for the CPU. Table 1–1 describes the common handle variations.
BA430/BA440 Enclosure Description
1–5
Table 1–1: BA400-Series Module Handles and Cover Types
Part
Description
Single-width
blank cover
Covers a standard Q22-bus module that does not have external I/O
connectors (for example, a TQK70).
If you install this type of cover next to a module with a recessed
handle, you must add a metal filler panel to maintain FCC
compliance.
Single-width
ratchet ejector
handle
The CPU module is equipped with ratchet ejector handles to keep
the right amount of tension against the backplane connector. This
ratchet arrangement causes the CPU and memory to make a
tighter contact with the backplane bus and provides better system
reliability.
Single-width
recessed handle
The handle is riveted to the module. This style is the preferred
handle for all BA200-series and BA400-series modules with
external I/O connectors. The CXA16 and CXY08 communication
modules use this type of handle.
Single-width
flush handle
Used when a recessed handle would interfere with the module
circuitry or I/O connector. The flush handle is also riveted to the
module.
Hinged console module
(BA440 only)
with I/O (H3604)
The H3604 console module is a hinged I/O panel that covers the
CPU module and four memory modules.
NOTE: The H3604 console module interfaces with the CPU module through
a short ribbon cable that connects the CPU and the H3604 console module.
1.4 Mass Storage Shelf
The BA430/BA440 enclosure has a mass storage shelf that extends across
the top of the enclosure. See Figure 1–4. The shelf may contain:
•
RZ-series ISEs
•
RF-series ISEs
•
TK-series tape drive
•
TLZ04 tape drive
•
System Control Panel (SCP)
1–6 BA430/BA440 Enclosure Maintenance
Figure 1–4: BA430/BA440 Chassis and Mass Storage Area
Mass Storage Shelf
MLO-005362
1.5 RF-Series ISE
An RF-series Integrated Storage Element (ISE) is a Digital Storage System
Interconnect (DSSI) contains bracket/slides designed for mounting in the
BA430/BA440 enclosure. The RF-series ISE has a front panel that contains
controls and indicators Figure 1–5.
As an example, three RF71s can be installed, giving the system a total disk
capacity of 1.2 Gbytes (400 Mbytes each).
Mass storage devices are mounted from the front of the enclosure with
shock-mounting hardware. This shock-mounting hardware is different,
depending on the type of device being used.
Figure 1–6 shows the RF-series ISEs in the BA400-series where Bracket/
slides are mounted on the ISE for easier installation and removal.
BA430/BA440 Enclosure Description
1–7
Figure 1–5: RF-series ISE Front Panel
Run/Ready Button
Write-Protect Button
Bus Node
ID Plug
Fault Indicator
MLO-004044
1–8 BA430/BA440 Enclosure Maintenance
Figure 1–6: Bracket Slides, used on BA430/BA440 Compatible ISEs
Bracket Slides
MLO-004200
1.6 RZ-Series ISE
An RZ-series ISE is a Small Computer System Intergration (SCSI) drive
that is typically configured in the first three spaces on the left side of the
mass storage area (Figure 1–7).
NOTE: VAX 4000 systems do not support RZ-series ISEs.
However, an RZ-series drive can be mounted in the space to the far right
on the storage area and when a tape drive is not present in the system
enclosure a spacer is used to fill the extra space. Bracket/slides are mounted
on the ISE for easier installation and removal.
BA430/BA440 Enclosure Description
1–9
Figure 1–7: RZ-series ISE Front Panel
Bus Node
ID Plug
MLO-005185
1.7 Tape Drives
Two types of tape drives are shown here and must be installed in the space
on the far right of the storage area.
1.7.1 TK70 Tape Cartridge
The top right compartment of the BA430 enclosure can contain an ISE
(RF or RZ), a TK70 tape drive or an Rdat (TLZ04 controller) device. The
TK70 tape drive holds one removable tape cartridge. The ISA can read
data written on either a CompacTape II or CompacTape cartridge. You
may use a CompacTape II or CompacTape cartridge as an input device to
load software or data into your system. You should use a CompacTape II as
an output device to make copies or backups of software or data. Section 3.6
shows an example of a TK70 tape ISE with controls and indicator lights
labeled.
1–10 BA430/BA440 Enclosure Maintenance
Figure 1–7: TK-series Tape Drive
Orange Light
Yellow Light
Green Light
Unload Button
Handle
MLO-002292
1.7.2 TLZ04 Cassette Tape Drive
The TLZ04 cassette tape drive can store up to 1.2 Gbytes of data on a
TLZ04–CA cassette tape Figure 1–9. The TLZ04 tape drive is installed on
the far right of the storage area.
1.8 System Control Panel (SCP)
The BA430/BA440 SCP has the following indicators and buttons
(Figure 1–10):
•
Temperature warning indicator
•
DC OK indicator
•
Halt button/indicator
•
Restart button/indicator
BA430/BA440 Enclosure Description
1–11
Figure 1–9: TLZ04 Tape Drive
Unload
Button
Yellow Indicator
Green Indicator
MLO-005328
Figure 1–10: SCP Identification
Temperature
Warning Indicator
DC OK Indicator
Halt Button
Restart Button
MLO-004208
NOTE: The board behind the system’s SCP contains switches that can be
set to off to prevent accidental activation of the Halt and Restart buttons.
See Figure 1–11.
1–12 BA430/BA440 Enclosure Maintenance
The temperature warning indicator shows that the system’s internal
temperature is approaching a level that may cause system components to
overheat. If the internal temperature raises unacceptably, you will hear an
audible pulsing sound and the temperature warning indicator will flash.
The sound and visual marker are warning you of a possible temperature
condition, before the system automatically shuts down. This feature allows
you time to take corrective action. You could lower the room’s temperature,
remove airflow obstructions, or perform an orderly system shutdown to
prevent data loss.
The green DC OK indicator shows that the voltages are within the correct
operating range. If the DC OK indicator is not lit when the system power
is on, then a problem exists with the power supply.
Below the DC ok indicator are the Halt and Restart button indicators. The
Halt button is a two-position button. When pressed, the system halts and
the Halt LED is lit as the console mode prompt (>>>) is displayed on the
terminal screen. Before you can enter console commands, press the Halt
button again to return it to the out position. Now you can enter console
commands. If by mistake you press the Halt button, type C and press
Return to continue.
CAUTION: Pressing the Halt button halts the system unconditionally, in
spite of setting the Break Enable/Disable switch on the console module.
The Run/Restart button/indicator is located below the Halt button indicator.
When pressed, the system returns to a run or reboot condition. If you have
specified a device as the boot device and if the Break Enable/Disable switch
is set to Disable, the system will reboot the system software.
1.9 Enclosure Modification
A system manager may request the following modifications to the SCP and
fan speed control.
Switches located on the SCP board can be used to disable the SCP button
functions. For example, if you were going to leave the access doors open
when training new people on the system this could prevent accidental
system shutdown.
When a system is located in an area where fan noise is more tolerable
to users, the speed of the fans can be increased. This action would take
advantage of a potential increase in system reliability, because the system
components function in a cooler environment.
BA430/BA440 Enclosure Description
1–13
1.9.1 Halt and Restart Switch Disable
There are four switches located on the top of the system control panel.
These switches, when positioned off, disable the Halt and Restart button
functions on the SCP. This could be used as a safety feature. When the
upper door is open, these switches protect the system from accidentally
being halted or restarted. Figure 1–11 shows the location of the switch pack,
which allows the disabling of the SCP buttons. The factory configuration
is always set to halt and restart enabled (switches on).
1
2
3
Switch Pack
-- OPEN --
4
Figure 1–11: SCP Enable/Disable Switch Location
Factory Setting
1
2
3
4
Off
On
-- OPEN --
MLO-004203
Switch position identifications are listed in Table 1–2.
1–14 BA430/BA440 Enclosure Maintenance
Table 1–2: SCP Switches and Functions
Switch
State
Function
1
—–
Unused
2
on
Halt Switch Enable
3
on
Halt Indicator Enable
4
on
Restart Switch Enable
1.10 Enclosure Card Cage
The order of modules is different for the BA430 and the BA440 enclosures.
Open the lower access door and listed from right to left are the option
modules and other elements that make up each enclosure.
1.10.1 Components Specific to the BA430 Enclosure
The modules comprising the BA430 enclosure are listed here with their
backplane slot location:
•
Interface module (M9715–AA), slot 0
•
I/O module (M7638) slot 1
•
Hinged CPU module (slot 2)
•
Console module (H3602) covers the CPU module and one memory
module, slots 2 and 3
•
Memory slots 3 through 6 (4 slots)
•
Option slots, slots 7 - 12
1.10.2 Components Specific to the BA440 Enclosure
The module comprising the BA440 enclosure are listed here with their
backplane slot location:
•
CPU module, slot 5
•
Memory slots, slots 1 - 4
•
Hinged console module (H3604) hinged module (covers four memory
slots and one CPU slot)
•
Option slots (slots 6 - 12)
BA430/BA440 Enclosure Description
1–15
1.11 Console Modules and I/O Panel
The BA430 enclosure uses the H3602 console module which is installed
over slot 2 and slot 3 (the CPU module and one memory module). The I/O
Panel contains two SCSI I/O connectors.
The BA440 enclosure uses the hinged H3604 console module which is
installed on hinge mounted over the CPU and the four memory modules
Figure 1–13.
1.11.1 H3602 Console Module (Used in BA430)
The H3602 console module is used on the BA430 enclosure system. This
module covers two backplane slots (slot 2 and 3). Connect the console
terminal and additional devices as follows:
1.11.2 H3604 Console Module (Used in BA440)
\Figure 1–13)
The H3604 console module is a multifunction module that covers the CPU
and memory locations (4) and is shown in Figure 1–13. The four memory
modules occupy the first four slots on the right side, left of the memory
modules is the CPU, which must occupy the fifth slot.
The H3604 console module Figure 1–13 allows the CPU to interface to a
serial line console device, a DSSI device, and to the Ethernet with the
use of either a ThinWire BNC connector or a standard Ethernet 15-pin
transceiver connector. The hinged H3604 console module has the following
controls, ports, and indicators:
•
100-pin CPU module interface connector
•
Baud rate select switch
•
Language inquiry switch
•
Hexadecimal display
•
Halt/Enable switch
•
Console serial MMJ connector
•
Ethernet selector switch
•
Ethernet port features
•
Standard Ethernet connector (15-pin)
1–16 BA430/BA440 Enclosure Maintenance
Figure 1–12: H3602 CPU Cover and H3605 I/O panel (Used in BA430)
SCSI
In/Out
SCSI
In/Out
CPU Cover Panel
LED Display
Function
Switch
Operation Switch
Modified
Modular Jack
Standard
Ethernet
Connector
Ethernet
Connector Switch
ThinWire Ethernet
Connector
MLO-005356
•
ThinWire Ethernet BNC connector
•
Standard/ThinWire select with indicator LEDs and switch
•
Fused current surge protection
BA430/BA440 Enclosure Description
1–17
•
•
Ethernet serial transceiver chip (SIA)
Daisy chain DSSI port
•
Two external (50-pin) Honda connectors (X = in/out, Y = in/out)
•
Two DSSI bus node ID select plugs
•
DSSI terminator (fuse protected)
•
-9 V DC/DC converter
•
TOY clock oscillator (25.6 Khz)
•
Ethernet selection LEDs (2)
Figure 1–13: H3604 Console Module (Used in BA440)
Console Module
Power-On
Mode Switch
Baud Rate
Select Switch
Modified
Modular Jack
Baud
300___________0
600___________1
1200__________2
2400__________3
4800__________4
9600__________5
19200_________6
38400_________7
Break Enable/
Disable Switch
Bus 0
LED Display
Bus 1
Y
DSSI
Connectors
X
Bus Node
ID Plugs
Ethernet
Connector
Switch
Standard
Ethernet
Connector
ThinWire
Ethernet
Connector
MLO-004038
Figure 1–14 shows the location of the time of year (TOY) clock battery pack,
fuses and power connector.
1–18 BA430/BA440 Enclosure Maintenance
Figure 1–14: H3604 Rear View (Used in BA440)
Battery Unit
W2
W4
J6
J1
J1 = TOY Clock Battery
J5 = H3604 Power
J6 = CPU Interface
W2 = Not Used
W4 = Not Used
F2
F4
F1
J5
F3
F1 = ThinWire Ethernet Power, .5A
P/N = 12-09159-00
F2 = -12V Power, .062A
P/N = 90-09122-00
F3 = DSSI Terminator Power, 2.0A
P/N = 12-10929-06
F4 = Standard Ethernet Power, 1.5A
P/N = 12-10929-08
MLO-004230
1.12 Interface Module M9715–AA (Used in BA430)
The M9715–AA interface module is located on the extreme right, next to
the power supply (backplane slot 0). The M9715 I/O provides terminator
power for both the DSSI and SCSI busses. Slot 0 is a dedicated dual C/D
backplane slot on the Q22- bus (J24).
1.13 Power Supply (H7874)
Both the BA430 and BA440 enclosures contain a modular H7874 power
supply (Table 1–3). The power supply plugs into the backplane through
two connectors. The H7874 power supply delivers the following maximum
current:
22 amperes at +12.1 Vdc
60 amperes at +5 Vdc
7 amperes at +3.4 Vdc
4 amperes at -12.1 Vdc
BA430/BA440 Enclosure Description
1–19
Figure 1–22: Power Supply Indicators
Power Switch
AC Present Indicator
DC OK Indicator
Fan Failure
Indicator
Over Temperature
Condition Indicator
Power Bus
Connectors
Power Cable
Connector
MLO-004040
The combined maximum current at +12.1 Vdc, -12.1 Vdc, +3.4 Vdc, and +5
Vdc must not consume more than 600 watts of power. See the configuration
worksheet for details. Figure 1–22 for BA440 enclosure and Figure 1–22
for BA430 enclosure.
Each mass storage device receives power through an 80-pin connector on
the backplane located in back of each drive unit.
Also, the H7874 power supply has an ac switch and three power controller
I/O connectors for chained operation when used in a multienclosure
configuration (Figure 3–22).
1–20 BA430/BA440 Enclosure Maintenance
Table 1–3: H7874 Power Supply Switches, Controls,
and Indicators
Control/Indicator
Function
AC Present indicator (orange)
Lights when the power switch is set to on (1), and the ac
voltage is present at the input of the power supply.
The power switch is used to turn system power on and
off. The off position is indicated by a 0; the on position is
indicated by a 1.
Power switch
DC OK indicator (green)
Fan Failure indicator (amber)
Over Temperature indicator (amber)
Power bus connectors
MO
SI
SO
The power switch also functions as the system
circuit breaker. In the event of a power surge, the breaker
will trip causing the power switch to return to the off position (0). Turning the system on resets the circuit breaker.
If the circuit breaker trips, wait one minute before turning
the system back on.
When the DC OK indicator is lit, the voltages are within
the correct operating range. An unlit DC OK indicator
shows a problem with the power supply.
The Fan Failure indicator lights if either of the two cooling
fans stops working. The power supply will automatically
shut down the system as a precautionary measure when a
fan failure is detected.
The Over Temperature indicator lights if the system has
shut down due to an over temperature condition.
Three power bus connectors allow you to configure a power
bus for systems expanded with a system expander. The
power bus allows you to turn power on and off for the
system through one power supply designated as the main
power supply: this way, one power switch can control
power for an expanded system (Figure 3–22).
The main out connector sends the power control bus signal
to the expander. One end of a power bus cable is connected
here, the other end is connected to the SI (secondary in)
connector of the expander power supply.
The secondary in connector receives the power bus control
signal from the main power supply. In a power bus with
more than one expander, the power bus signal is passed
along using the secondary in and out connectors.
The secondary out connector sends the signal down the
power bus for configurations of more than one expander.
NOTE: The H7874 power supply automatically selects either 120 or 240 Vac
when power is turned on.
The power supply enters and completes a shutdown sequence whenever the
BPOK H signal is negated. When BPOK H is asserted high on the Q22bus, the power system is in a state to allow normal system operation. The
following conditions negate BPOK H:
BA430/BA440 Enclosure Description
1–21
•
Temperature sensor triggered
•
An over current condition
•
An over voltage condition
•
Loss of ac input
•
Fan failure
•
Input voltage greater than 132 Vrms or less than 88 Vrms (if in 120
Vrms mode) or input voltage greater than 264 Vrms or less than 176
Vrms (if in 240 Vrms mode)
1.14 Fan Tray
The BA430/BA440 enclosure has two 15-cm (6-in) dc fans (Figure 1–16)
and Figure 1–17 below the card cage. The air is pulled in through the
top slots of the enclosure and forced through the ISEs, power supply, and
module options, and then expelled through the vents at the bottom of the
enclosure. A temperature sensor in the power supply adjusts the volume
of air by varying the fan’s speed based on the system’s temperature. The
input voltage to the fans varies between 10 Vdc and 20 Vdc, depending on
the internal temperature of the power supply.
1–22 BA430/BA440 Enclosure Maintenance
Figure 1–16: BA430/BA440 Fan Tray Location
Fan Tray
MLO-005357
BA430/BA440 Enclosure Description
1–23
Figure 1–17: Fan Tray Extended
Captive Screws
MLO-004220
1.14.1 Fan Speed Control Disable
Some system managers request that the enclosure fans run at the
maximum rate at all times, to take advantage of a potential increase in
system reliability. The system environment must not exceed the limits
described in the site preparation document. Figure 1–18 shows the location
of the fan speed control (FSC) jumper.
1–24 BA430/BA440 Enclosure Maintenance
Figure 1–18: FSC Jumper Location
Factory
Setting
FSC
Disabled
MLO-005358
BA430/BA440 Enclosure Description
1–25
1.15 Backplanes
Different backplanes are used in the BA430/BA440 Enclosures; backplane
54–20181–01 is used in the BA430 and backplane 54–19354–01 is used in
the BA440 enclosure.
1.15.1 BA430 Backplane (54–20181–01)
The BA430 backplane contains connectors for DSSI and SCSI busses. This
40.7 cm x 52.1 cm (16.0 inch x 20.5 inch) 4-layer backplane contains two
signal layers, one power layer and one ground layer.
Figure 1–19: BA430 Backplane
Mass Storage
Connectors
Module
Connectors
Power Supply
Connectors
MLO-005359
1.15.2 BA440 Backplane (54–19354–01)
The BA440 enclosure has a 12-slot, quad-height backplane (Figure 1–20).
The backplane is a 52.5 x 40.7-cm (21 x 16-in) assembly. The space between
each backplane slot varies. The backplane’s printed circuit board is an 8
layer, 2 sided etch board.
From right to left, the first five backplane slots are for the memories and
CPU, while the other seven slots are Q22/CD bus slots.
The Q-bus can be extended using, an enclosure expander unit. The BA430/
BA440 enclosure supports 35 equivalent ac loads and 20 dc loads from
all the modules installed in the backplane. An ac load is the amount of
capacitance a module presents to a bus signal line. One ac load equals
1–26 BA430/BA440 Enclosure Maintenance
9.35 picofarads (pf). A dc load is the amount of dc leakage current a
module presents to a bus signal line. One dc load is approximately 105
microamperes (µA). The backplane presents 4.0 ac loads to the Q22-bus.
There are connectors provided for each of the following:
•
Fan tray
•
System control panel (SCP)
•
Four mass storage compartments
•
Power supply
•
Vterm regulator module
Figure 1–20: BA440 Backplane
Vterm Module
Mass Storage
Connectors
Module
Connectors
Power Supply
Connectors
MLO-004201
1.15.3 Configuration Guidelines
Before changing the configuration of the BA430/BA440 enclosure, you must
consider the following factors:
1. Module order in the backplane
2. Module configuration
3. Mass storage device configuration
BA430/BA440 Enclosure Description
1–27
When adding a device to a system, you must know the capacity of the
system enclosure in these areas:
1. Number of backplane slots
2. Power supply capacity
3. Mass storage device space
4. AC and DC loading
1.15.4 Module Order and Configuration
Module order in the backplane is specific, depending on the CPU. Refer to
the applicable CPU maintenance manual for the preferred module order of
a given system.
For information on how to configure modules, refer to Microsystems Options
(EK–192AC–MG), which includes a listing of all supported options along
with the following information for each module and device:
•
Ordering information
•
Operating system support
•
Diagnostic support
•
Option description
•
CSR addresses and interrupt vectors
•
LEDs
•
Loopback connectors
•
Self-tests
•
FRUs (if applicable)
•
Related documentation
1.15.5 Configuration Worksheets
Use Figure 1–21 or Figure 1–22 to be sure your configuration does not
exceed system limits for expansion space, power, and bus loads. If you use
standard Digital modules, you will not exceed the limits for bus loads.
When changing a configuration, choose one of the worksheets that applies
to your system.
1. On the worksheet, list all the devices already installed in the system.
2. List all the devices you plan to install in the system.
1–28 BA430/BA440 Enclosure Maintenance
3. Fill in the information for each device, using the data listed in
Table 1–4.
4. Add up the columns. Make sure the totals are within the limits for the
enclosure.
NOTE: Check the CPU documentation to determine which options are
supported for your specific system.
BA430/BA440 Enclosure Description
1–29
Figure 1–21: BA430 Configuration Worksheet
Slot
Module
0
M9715
Current (Amps)
+5 Vdc +12 Vdc
0.1
1.0
60.0 A
22.0 A
Power
-3.3 Vdc -12 Vdc
(Watts)
Bus Load
AC
DC
12.5
CPU 1
Mem 2
Mem 3
Mem 4
Mem 5
Q/CD 6
Q/CD 7
Q/CD 8
Q/CD 9
Q/CD 10
Q/CD 11
Q/CD 12
Mass Storage:
Tape
1
2
3
Total these columns:
Must not exceed:
15.0 A
3.0 A
584.0 W
22
20
Note: Total output power from +3.3 Vdc and +5 Vdc must not exceed 330 W.
MLO-005711
1–30 BA430/BA440 Enclosure Maintenance
Figure 1–22: BA440 Configuration Worksheet
SLOT
MODULE
Current (Amps)
+5 Vdc +12 Vdc -3.3 Vdc -12 Vdc
Power
(Watts)
Bus Load
AC
DC
MEM 1
MEM 2
MEM 3
MEM 4
CPU
L-4000A/B
7.40
0.35
0.27
0.04
42.6
1.7
0.5
0.0
0.25
17.5
15.0 A
3.0 A
584.0 W
4.0
1.0
31
20
MEM 6
Qbus 1
Qbus 2
Qbus 3
Qbus 4
Qbus 5
Qbus 6
Qbus 7
H3604
MASS STORAGE:
Tape
1
2
3
Total these columns:
Must not exceed:
60.0 A
22.0 A
Note: Total output power from +3.3 Vdc and +5 Vdc must not exceed 330 W.
MLO-005361
BA430/BA440 Enclosure Description
1–31
Table 1–4: Power Requirements
Current (Amps)
Max
Power
Max
Bus
Loads
Option
Module
+5 V
+12 V
Watts
AC
DC
AAV11–SA
ADQ32–SA
ADV11–SA
AXV11–SA
CXA16–M
CXB16–M
CXY08–M
DESQA–SA
DFA01–AA
DPV11–SA
DRQ3B–SA
DRV1J–SA
DRV1W–SA
DSV11
DTQNA–BC
H3602
H36041
IBQ01–SA
IEQ11–SA
KA660–AA/BA2
KA670–A/B3
KDA50–SA
—–
KFQSA–M
KLESI–SA
KMV1A–SA
KRQ50–SA
KWV11–SA
KXJ11–SF
KZQSA–SA
LPV11–SA
MRV11–D
MS670–BA
MS650–BA/BB
A1009–PA
A030
A1008–PA
A026–PA
M3118–YA
M3118–YB
M3119–YA
M3127–PA
M3121–PA
M8020–PA
M7658–PA
M8049–PA
M7651–PA
M3108
M7130
–
–
M3125–PA
M8634–PA
M7626–AA/BA
L4000–A/B
M7164
M7165
M7769
M7740–PA
M7500–PA
M7552
M4002–PA
M7616
M5976
M8086–PA
M8578
L4001–BA
M7622–BA/BB
2.10
4.45
2.00
2.00
1.60
2.00
1.64
2.40
1.97
1.20
4.50
1.80
1.80
5.43
6.00
1.70
1.70
5.00
3.50
6.0
7.40
6.93
6.57
5.50
4.00
2.60
2.70
2.20
6.00
5.7
2.80
1.603
3.25
3.25
0.00
0.00
0.00
0.00
0.20
0.00
0.395
0.22
0.04
0.30
0.00
0.00
0.00
0.69
2.00
0.50
0.50
0.30
0.00
0.14
0.35
0.00
0.03
0.00
0.00
0.20
0.00
0.013
1.40
0.4
0.00
0.00
0.00
0.00
10.50
22.25
10.00
10.00
10.40
10.00
12.94
14.64
10.30
9.60
22.50
9.00
9.00
35.43
54.00
14.50
14.50
28.60
17.50
32.88
41.20
34.65
33.21
27.50
20.00
15.40
13.50
11.156
46.80
27.0
14.00
8.00
16.25
16.25
2.5
2.5
2.3
1.2
3.0
3.0
3.0
2.2
3.0
1.0
2.0
2.0
2.0
3.9
3.9
–
–
4.6
2.0
3.5
4.0
3.0
–
4.4
0.5
3.0
2.7
1.0
2.7
4.75
1.8
3.0
–
–
0.5
0.5
0.5
0.3
0.5
0.5
0.5
0.5
1.0
1.0
0.5
1.0
1.0
1.0
0.5
–
–
1.0
1.0
1.0
1.0
0.5
–
0.5
1.0
1.0
1.0
0.3
1.0
1.4
0.5
0.5
–
–
1 Also
include -12 Vdc @ 0.25 A, 3 W.
include 3.3 Vdc @ 15 A, 0.9 W and -12 Vdc @ 3.0 A, 0.5 W.
3 Value is for the unpopulated module only.
2 Also
1–32 BA430/BA440 Enclosure Maintenance
Table 1–4 (Cont.): Power Requirements
Current (Amps)
Max
Power
Max
Bus
Loads
Option
Module
+5 V
+12 V
Watts
AC
DC
RF31E–AA
RF71E–AA
TK70E–AA
TQK70–SA
TSV05–SA
TSV05–SA
–
–
–
M7559
M7530
M7206
1.00
1.25
1.50
3.50
6.50
6.50
2.80
1.64
2.40
0.00
0.00
0.00
38.60
25.93
36.30
17.50
32.50
32.50
–
–
–
4.3
1.5
2.4
–
–
–
0.5
1.0
1.0
BA430/BA440 Enclosure Description
1–33
Chapter 2
Installation
This chapter contains the procedure for installing the BA430/BA440
pedestal enclosure.
2.1 Site Preparation Considerations
2.1.1 BA430/BA440 Physical Dimensions
Figure 2–1 shows the dimensions of the BA430/BA440 enclosure. You must
leave at least 61 cm (24 in) of clearance in front of the system to access the
doors and the system controls. You must also leave at least 5 cm (2 in) of
clearance at the sides and rear for airflow. Since the base of the enclosure
is 5 cm (2 in) wider than the cabinet in front and rear, you can place the
rear of the system against a wall or table, and the system has enough space
around it for adequate airflow.
CAUTION: Due to the weight of the equipment, Digital recommends that at
least two people to move system and terminal boxes.
Installation
2–1
Figure 2–1: BA430/BA440 Enclosure Dimensions
69 cm
(27 in)
45 cm
(17.88 in)
53 cm
(21 in)
WEIGHT: 49.9 kg to 68 kg
(110 lb to 150 lb)
MLO-004190
2.1.2 Additional Equipment
Make sure there is enough space for terminals and other peripheral
equipment.
When you plan the cable routing for multiterminal systems, consider factors
such as safety, convenience, future expansion, and cost. Cabling should be
in place and labeled after you install the system.
2.1.3 Static Electricity
Static electricity can cause system failure and loss of data. To minimize
static buildup, follow these guidelines:
•
Maintain relative humidity of at least 40%.
•
Place the system away from busy office corridors.
•
Avoid using carpeting in the computer area, if possible. If carpeting is
to be installed, recommend antistatic carpeting. If carpeting is already
in place, place an antistatic mat under the system.
•
Provide a separately fed electrical circuit for each enclosure ordered
(whether an expander or system).
2–2 BA430/BA440 Enclosure Maintenance
•
Provide as many electrical outlets as are required for each additional
device, such as any table top device and console terminal.
2.1.4 Acoustics
The BA430/BA440 pedestal is designed for use in offices and other general
working areas. The following acoustic emission and heat dissipation levels
are for the BA430/BA440 pedestal. Levels may be lower, depending on the
kind and number of mass storage devices in the system. Data is measured
in accordance with ANSI S12.10–1985 (American National Standards
Institute) and ISO/DIS 7779 (International Standards Organization).
•
LNPE (B) is the noise power emission level (A-weighted sound power
level) measured in bels re 1 pw (reference 1 picowatt). LNPE for the
BA430/BA440 enclosure is 5.8.
•
LPA is the sound pressure measured in decibels at 1.0 m from the front
edge of the unit and 1.5 m above the floor. LPA for the BA430/BA440
enclosure is 43.
2.1.5 Heat Dissipation
Heat dissipation is measured in British thermal units (Btu). Maximum
heat dissipation in the BA430/BA440 enclosure is 2978 Btu/h.
2.1.6 Temperature and Humidity Values
Table 2–1 lists temperature and relative humidity values for the BA430/
BA440 enclosure in a pedestal.
Table 2–1: Temperature and Relative Humidity Values
Parameter
Operating
Nonoperating
Temperature1
10°C to 40°C
50°F to 104°F
–40°C to 66°C
–40°F to 151°F
Temperature rate of change
11°C per hour maximum
19.8°F per hour maximum
N/A
Relative humidity
20% to 80% (noncondensing)
10% to 95%
Maximum altitude
2438 m (8000 ft)
4870 m (16,000 ft)
1 For
operation above sea level, decrease the operation temperature by 1.8°C per 1000 m (or
1°F per 1000 ft).
Installation
2–3
2.1.7 Electrical Requirements
The power source should be adequate to handle the original system and
allow for system expansion. Digital recommends a dedicated circuit from
the power source to each system. Additional power equipment may be
required to avoid power disturbances.
Table 2–2 lists the electrical requirements for systems in a BA430/BA440
pedestal. Table 2–3 lists the power cords required.
Table 2–2: BA430/BA440 Enclosure Electrical Requirements
)
Nominal AC Voltage =
Voltage range
Power source phase
Nominal frequency
Frequency range
Maximum steady state current
at nominal voltage
Maximum steady state current
at minimum voltage
Startup current (30 seconds)
Maximum inrush current
Maximum power consumption
101 Vac
120 Vac
220–240 Vac
90 to 110 Vac
Single
50 to 60 Hz
47 to 63 Hz
10.2 A
104 to 128 Vac
Single
50 to 60 Hz
47 to 63 Hz
8.6 A
176 to 264 Vac
Single
50 to 60 Hz
47 to 63 Hz
4.7 A
12 A
11.1 A
6.82 A
13.7 A
100 A
1139 W
11.5 A
100 A
1139 W
6.3 A
100 A
1139 W
Table 2–3: Power Cords
Power Cord
Countries
BN20A–2E
BN20B–2E
BN22C–2E
BN22D–2E
United States, Japan, and Canada (17–00083–43 (120 V))
United States, Japan, and Canada (17–00083–44 (240 V))
Australia and New Zealand
Central Europe, Austria, Belgium, Finland, France, West
Germany, Netherlands, Norway, Portugal, Spain, and Sweden
United Kingdom and Ireland
Switzerland
Denmark
Italy
India and South Africa
Israel
BN22E–2E
BN22F–2E
BN22H–2E
BN22J–2E
BN22K–2E
BN22L–2E
2–4 BA430/BA440 Enclosure Maintenance
2.2 Unpacking the Shipment
The shipment may include several cartons:
•
One contains the system unit.
•
One contains cables for connecting additional devices to the system.
•
Several contain components of the console terminal.
•
Another, marked software, contains software documentation, system
software, diagnostic software, and a software license.
NOTE: Save all packing materials if you plan to reship the system.
Depending on the order, the shipment may also include additional
terminals, printers, or modems.
When delivered, the system is packed in a cardboard container attached to
a shipping skid or pallet.
Before unpacking the equipment, check for external shipping damage.
Report any damage to the customer’s sales representative and contact the
customer’s delivery agent. Keep all packing material and receipts when
filing a damage claim.
When you unpack the cartons, check the contents against the shipping list
to ensure the order is complete.
Unpack the system according to the instructions on the system shipping
carton.
After unpacking the system, move it by rolling it sideways or by sliding or
walking it backward while gripping the hand holds (Figure 2–2).
WARNING: The system weighs between 50 kg (110 lb) and 68 kg (150 lb),
depending on the options installed. Use two people to move the system.
Installation
2–5
Figure 2–2: Sliding the System into Place
Hand Holds
Slides Front
to Back
Rolls Left to Right
MLO-004012
During installation, leave a few inches behind the system for routing cables
underneath the system unit. Once installation is complete, you can place
the system base against a wall.
2.3 Connecting the Console Terminal
Install the console terminal (Figure 2–3). Follow the instructions in the
system installation manual.
2–6 BA430/BA440 Enclosure Maintenance
Figure 2–3: Connecting the BA430 Console Terminal
DECconnect Office
Cable
MLO-005562
2.4 Completing the Installation
Run the factory loaded system software with only the system connected
before completing the installation by connecting other devices.
Make cable connections directly to the module handles/covers. Begin with
the module on the far right and continue toward the left.
Installation
2–7
Figure 2–4: Connecting the BA440 Console Terminal
Terminal
Cable
MLO-004014
Each module handle has a label at the top that contains the option number
and module number. Table 2–4 lists the labels for modules requiring
connections. Use the table to identify the modules as you connect additional
devices to the system.
2–8 BA430/BA440 Enclosure Maintenance
Table 2–4: Module Identification Labels
Module
Number
Option
Number
Enclosure
Used
Functional
Description
H3602–AA
BA430
CPU Cover Panel
H3604–AA
BA440
Console Module
KA660–AA/BA
M7626–AA/BA
BA430
CPU Module
KZQSA–AA
M5976–SA
BA430
C/D Rom/Rdat Controller
KN220
KN220
BA430
CPU Module
L4000–AA
KA670–AA
BA440
VAX 4000 Model 300 CPU
L4000–BA
KA670–BA
BA440
VAXserver 4000 CPU
L4001–BA
MS670–BA
BA440
VAX 4000 Model 300 memory, 32
Mb
M7857
MRV11–D
All
Programmable read-only memory
M3127–PA
DESQA
All
Ethernet adapter
M3118–YA
CXA16–SA
All
16-line asynchronous serial interface
(RS–423–A) no modem support
M3118–YB
CXB16–SA
All
16-line asynchronous serial interface
(RS–422–A noise immune)
M3119–YA
CXY08–SA
All
8-line asynchronous serial interface
(full modem support)
M3018
DSV11–SA
All
2-line synchronous serial interface
(full modem support)
M3121–PA
DFA01–AA
All
2-line asynchronous serial interface
with integral modem
M7164, M7165
KDA50
All
Intelligent board controller
M7559–PA
TQK70–SA
All
TK70 tape drive controller
M7206–PA
TSV05–SA
All
TS05 tape drive controller
M7740–PA
KLESI
All
RV20 write-once optical disk (or
TU81E tape controller)
M7552–PA
KRQ50–SA
All
RRD40/RRD50 CDROM controller
Installation
2–9
Table 2–4 (Cont.): Module Identification Labels
Module
Number
Option
Number
Enclosure
Used
M7500–PA
KMV1A–SA
All
M7626–AA/BA
KA660-AA/BA
BA430
CPU module
M7622–BA/BB
MS650-BA/BB
BA430
Memory module
BA430
I/O module
M7638–PA
Functional
Description
M7658–PA
DRQ3B–SA
All
Real-time parallel interface
M7651–PA
DRV1W–SA
All
Real-time parallel interface
M7769
KFQSA–SA
All
DSSI mass storage adapter
M8020–PA
DPV11–SA
All
Synchronous serial line interface
M8086–PA
LPV11–SA
All
Dual parallel printer interface
BA430
Interface card
M9715–PA
Table 2–5: Option Cables
Module Number
Option Number
Cable Type
M3127–PA
DESQA–SA
Ethernet cable
M3118–YA
CXA16–AA
BC16D, H3104 cable concentrator (RS–423–A, no
modem support)
M3118–YB
CXB16–AA
BC16D, H3104 cable concentrator (RS–422–A, noise
immune)
M3119–YA
CXY08–AA
BC19N–12 (full modem support)
M3121
DFA01–AA
Telephone line
M8020
DPV11–SA
BC22E or BC22F
M8086–SA
LPV11–SA
BC27L–30
M7546
TKQ70–SA
Internal
M7164, M7165
KDA50–SE
BC26V–6
M7500
KMV1A–SA
BC22E or BC22F
2–10 BA430/BA440 Enclosure Maintenance
2.4.1 Setting Controls on the System
The controls you must set to complete the installation vary, depending
on the CPU and type of disks in the enclosure. Generally, you must
set the baud rate of the console serial line to the same baud rate as the
console terminal, and be sure the fixed disk drives are ready and not write
protected.
Refer to the system’s operation manual for detailed instructions on setting
these controls for the particular system you are installing.
2.4.5 Connecting the Power Cord
Feed the power cord under the system from the rear and attach the power
cord to the connector at the base of the power supply Figure 2–5. Plug the
power cord into the wall outlet when all cabling has been installed.
Figure 2–5: Connecting the Power Cable
Feed Cable Under System
and Through Opening
MLO-004029
Installation
2–11
2.4.3 Installing RF- and RZ-Series ISEs
NOTE: Expanded systems configured at the factory already have ISEs
properly installed.
CAUTION: Static electricity can damage integrated circuits. Use the wrist
strap and antistatic mat found in the Antistatic Kit (part no. 29–26246)
when you work with the internal parts of a computer system.
Handle ISEs with care. Dropping or bumping the ISE can damage the disk
surface. Carry or hold the ISEs by their metal brackets to avoid damaging
the drive module.
Install an ISE as follows:
1. Unpack the ISE.
2. Remove the blank ISE front panel from the expander. The front panels
are each secured with one captive Phillips screw.
3. With the ISE controller module facing the right, slide the ISE along
the guide rails into a mass storage cavity (Figure 2–6A). For single
bus configurations, install ISEs in the upper mass storage area first;
then install ISEs in the lower mass storage area. Always install ISEs
working from right to left.
NOTE: The first or rightmost mass storage cavity in the upper mass
storage area is wider than the rest to accommodate a larger device. A
small filler panel is used to fill the gap space when an RF- or RZ-series
ISE is installed in this first cavity.
4. Using the upper and lower finger cutouts on the ISE bracketry, firmly
push the ISE brackets until the interface card at the rear of the ISE
plugs into its backplane connector (Figure 2–6A). Tighten the two
captive screws.
CAUTION: A small gap between the ISE mounting bracket tabs and the
R400X frame is normal. Tighten the captive screws only until they are
securely fastened. Do not try to force the tabs to fit flush against the
frame.
5. Plug the remote front panel cable into the module inside the ISE front
panel (Figure 2–6B).
NOTE: The ISE front panel for RZ-series ISEs unlike the RF-series front
panel has no buttons or indicators.
2–12 BA430/BA440 Enclosure Maintenance
6. Attach the ISE front panel to the enclosure by first fitting the panel’s
lower tabs and then fitting the panel into position. Secure the panel
with its single screw (Figure 2–6C).
2.4.3.1 Inserting Bus Node ID Plugs
Spare bus node ID plugs are supplied with your expander. The DSSI plugs
for RF-series ISEs are dark gray (PN 12-28766-19). The SCSI plugs for
RZ-series ISEs are lighter gray (PN 12–28766–28).
Bus node ID plugs have prongs on the back that identify the bus node
number (and by default, the unit number) of the ISEs to the system. Bus
node ID plugs are shipped with the system and expander.
To insert a bus node ID plug, align the two center prongs with the two
center slots on the ISE front panel as shown in Figure 2–7. To remove a
bus node ID plug, grasp it firmly and pull it straight out.
Use the rules below for numbering bus node IDs for ISEs:
•
For each DSSI or SCSI bus, do not duplicate bus node numbers for
storage elements. You can have only one storage element on bus 0
identified as bus node 0, one storage element as bus node 1, and so on;
you can have only one storage element on bus 1 identified as bus node
0, one storage element as bus node 1, and so on.
•
By convention, the ISEs are numbered in increasing order from right
to left starting with 0, and working from upper mass storage area to
lower.
Bus nodes 0–6 are typically used for storage devices, while node 7 is
reserved for the adapter, and is the default bus node ID for the KZQSA
and KFQSA adapters.
NOTE: DSSI Bus node ID plugs are also used to supply node numbers for
the two DSSI host adapters on VAX 4000 Model 300 systems.
NOTE: If you change the bus node ID plugs while the system is operating,
you must turn off the system and then turn it back on for the new plug
positions to take effect.
Installation
2–13
Figure 2–6: Installing an RF- or RZ-Series ISE
A
Captive Screws
Guide
Tabs
B
Finger Cutouts
Remote Front
Panel Cable
Velcro
C
Phillips Screw
MLO-004236
2–14 BA430/BA440 Enclosure Maintenance
Figure 2–7: Inserting Bus Node ID Plugs
Bus Node
ID Plug
MLO-004045
2.4.3.2 Labeling RF-Series ISEs for Systems with Multiple DSSI Busses
VAX 4000 Model 300 systems have two separate DSSI adapters built into
the CPU. Other systems may have more than one DSSI bus using the
KFQSA storage adapter. Using R400X expanders you can fill up to four
DSSI busses for a total of 28 RF-series ISEs. Each bus can have up to
seven ISEs (bus nodes 0–6). When there are devices on more than one bus
and the system’s allocation class is not zero, you need to program new unit
numbers for ISEs, as the unit numbers for ISEs throughout the system
must be unique. Instructions provided in a later step describe how to
program new unit numbers, overriding default values.
With devices on two or more busses and a nonzero system allocation class,
the ISE unit numbers will not match the bus node numbers on the bus
node ID plugs. Unit number labels are provided with each ISE to identify
unit numbers for the user. The labels stick onto the recessed label area on
the ISE front panel as shown in Figure 2–11.
Installation
2–15
2.4.8 Installing a TLZ04 Tape Drive
NOTE: Expanded systems configured at the factory already have storage
devices properly installed.
CAUTION: Static electricity can damage integrated circuits. Use the wrist
strap and antistatic mat found in the Antistatic Kit (part no. 29–26246)
when you work with the internal parts of a computer system.
Handle the TLZ04 tape drive with care. Dropping or bumping the drive can
damage the product. Carry or hold the drive by its metal brackets to avoid
damaging the drive.
Install the TLZ04 Tape Drive as follows:
1. Unpack the tape drive.
2. Remove the blank front panel and filler panel from the upper rightmost storage cavity of the expander. The front panel and filler panel
are each secured with one captive Phillips screw.
3. With the drive positioned so that the Unload button and indicators are
up, slide the drive along the guide rails into the upper right-most mass
storage cavity (Figure 2–8A).
4. Using the upper and lower finger cutouts on the brackets, firmly push
the drive brackets until the interface card at the rear of the drive plugs
into its backplane connector (Figure 2–8A). Tighten the two captive
screws.
CAUTION: It is normal for there to be a small gap between the drive
mounting bracket tabs and the R400X frame. Tighten the captive screws
only until they are securely fastened. Do not try to force the tabs to fit
flush against the frame.
5. Plug the ID cable into the connector inside the drive front panel
(<REFERENCE>(tinsert)B).
6. Attach the drive front panel to the enclosure by first fitting the panel’s
lower tabs and then fitting the panel into position. Secure the panel
with its single screw (Figure 2–8C).
2–16 BA430/BA440 Enclosure Maintenance
Figure 2–8: Installing the TLZ04 Tape Drive
A
Captive Screws
Guide
Tabs
B
Finger Cutouts
Remote Front
Panel Cable
Velcro
C
Phillips Screw
MLO-004236
2.5.8.1 Inserting the TLZ04 Bus Node ID Plug
Installation
2–17
The TLZ04 tape drive uses a SCSI bus node ID plug to identify the drive’s
node number to the system. Spare bus node ID plugs are supplies with
your system and expander. SCSI plugs are light gray (PN 12-28766-28).
To insert a bus node ID plug, align the two center prongs with the two
center slots on the drive front panel as shown in Figure 2–9. To remove a
bus node ID plug, grasp it firmly and pull it straight out.
Use the rules below for numbering selecting an appropriate SCSI bus node
ID for the TLZ04:
•
For each SCSI bus or KZQSA adapter, do not duplicate bus node
numbers. If you are installing multiple TLZ04 or RZ-series ISEs, the
SCSI bus node ID for each SCSI device must be unique.
•
By convention, the devices are numbered in increasing order from right
to left starting with 0, and working from upper mass storage area to
lower.
Bus nodes 0–6 are typically used for storage devices, while node 7 is
reserved for the SCSI adapter and is the default bus node ID for the KZQSA
adapter.
NOTE: If you change the bus node ID plugs while the system is operating,
you must turn off the system and then turn it back on for the new plug
positions to take effect.
2.6 Installing RF- and RZ-Series ISEs
RF- and RZ-series ISEs are installed the same way. The RF-series ISE has a
small flat cable which connects between the front panel and the CPU and a
bus ID plug. The RZ-series ISE front panel has only an ID plug connected
to it. No other controls or indicators are present on the RZ-series front
panel. The RZ-series ISE is shown in Figure 2–10.
When installing ISEs, you should first fill all of the available mass storage
compartments in the system enclosure first then install other ISEs into the
expander (if applicable).
CAUTION: Static electricity can damage integrated circuits. Use the wrist
strap and antistatic mat found in the Antistatic Kit (29–26246–00) when
you work with the internal parts of a computer system.
Handle RF-series ISEs with care. Dropping or bumping the ISE can damage
the disk surface.
2–18 BA430/BA440 Enclosure Maintenance
Figure 2–9: Inserting the TLZ04 Tape Drive Bus Node ID Plug
40%
Bus Node
ID Plug
MLO-005789
Install an ISE as follows:
1. Unpack the ISE
2. Remove the blank IXE front panel from the enclosure. The front panels
are secured with one Phillips screw.
3. With the ISE controller module facing to the right, slide the ISE along
the guide rails into a mass storage cavity Figure 2–10 Install ISEs in
the upper right mass storage area first, then install the next one to the
left of the first.
NOTE:: The first or right-most mass storage cavity is wider than the
rest to asccommodate a larger device. A small filler panel is used to fil
the gap when an RF- or RZ-series ISE is installed in the first storage
cavity.
Installation
2–19
4. Using the upper and lower finger cutouts in the ISE brackets, firmly
push the ISE brackets until the interface card at the rear of the ISE
plugs into its backplane connector Figure 2–6. Tighten the two captive
screws.
CAUTION:: It is normal for there to be a small gap between the ISE
mounting bracket tabs and the frame. Do not force the tabs to fit flush
against the frame.
5. Plug the remote front panel cable into the module inside the ISE front
panel.
NOTE:: The ISE front panel for RZ-series ISEs differ inside the ISE
front panel Figure 2–10.
6. Attach the ISE front panel to the enxlosure by first fitting the panel’s
lower tabs and then the upper tabs into position. Secure the panel with
its single screw Figure 2–10
2–20 BA430/BA440 Enclosure Maintenance
Figure 2–10: Installing an RF– or RZ–series ISE
Bus Node
ID Plug
MLO-005185
2.5.1 Inserting Bus Node ID Plugs
Spare bus node ID plugs are shipped with each system and expander. The
part number for these plugs is 12–28766–19. The SCSI plugs for RZ-series
ISEs are a light gray. The part number for these plugs is 12–28766–28.
Bus node ID plugs have prongs on the back that identify the bus node
number (and by default, the unit number) of the ISEs to the system.
To insert a bus node ID plug, align the two center prongs with the two
center slots on the ISE front panel as shown in Figure 2–14. To remove a
bus node ID plug, grasp it firmly and pull it straight out.
Use the following rules for numbering bus node IDs for RF-series ISEs:
•
For each DSSI bus, do not duplicate bus node numbers for storage
elements. You can have only one storage element on bus 0 identified
Installation
2–21
Figure 2–11: Unit Number Labels
10
Attach Unit
Number Label
0
MLO-004237
as bus node 1, one storage assembly as bus node 2, and so on; you can
have only one storage assembly on bus 1 identified as bus node 1, one
storage assembly as bus node 2, and so on.
•
By convention, the ISEs are numbered in increasing order from right
to left starting with 0.
NOTE: Bus node ID plugs are also used to supply node numbers on VAX
4000 model 200 and model 300 systems. The two DSSI host adapters.
2.5.2 Labeling RF-Series ISEs
VAX 4000 systems have two separate DSSI adapters built into the CPU.
Each bus can have up to seven ISEs (bus nodes 0–6). When devices are
added to the second bus (bus 1) and the system’s allocation class is not zero,
you need to program new unit numbers for ISEs on one of the busses, as
the unit numbers for ISEs throughout the system must be unique.
When both DSSI busses have ISEs, and the system’s allocation class is nonzero, the unit numbers for one of the busses will not match the bus node
numbers on the bus node ID plugs. Unit number labels are provided with
each ISE to identify unit numbers for the user. The labels stick onto the
recessed label area on the ISE front panel as shown in Figure 2–12.
2–22 BA430/BA440 Enclosure Maintenance
Figure 2–12: ISE Unit Number Labels
10
0
9
Attach Unit
Number Label
0
RF-Series
RZ-Series
MLO-005364
2.6 Installing a TL-Series Tape Drive
The TL-series ISEs are installed the same as the RF-series ISEs. The ISE
front panels have no cable connection to the ISE except for the ID plug. No
other controls or indicators are present on the TL-series front panel. The
TL-series ISE is shown in Figure 2–13.
When installing ISEs, you should first fill all of the available mass storage
compartments in the system enclosure first then install other ISEs into the
expander (if applicable).
CAUTION: Static electricity can damage integrated circuits. Use the wrist
strap and antistatic mat found in the Antistatic Kit (29–26246–01) when
you work with the internal parts of a computer system.
Handle TL-series ISEs with care. Dropping or bumping the ISE can damage
the disk surface.
Installation
2–23
Figure 2–13: Installing a TL-series Tape Drive
25.5%
A
Captive Screw
Finger Cutouts
Guide Tabs
B
ID Cable
C
Phillips Screw
30%
MLO-005788
2–24 BA430/BA440 Enclosure Maintenance
Install TL-series (SCSI) ISEs as follows:
1. Unpack the TL-series ISE.
2. Install the TLZ04 ISE into the upper storage slot 0 only (on the far
right side).
3. With the ISE controller module facing the right, slide the ISE along the
guide rails into a mass storage cavity (Figure 2–6).
NOTE: The first compartment is considered slot 0 or rightmost mass
storage cavity in the upper mass storage area is wider than the rest to
accommodate a larger device such as a tape ISE.
4. Using the upper and lower finger cutouts on the ISE bracketry, firmly
push the ISE brackets until the interface card at the rear of the ISE
plugs into its backplane connector (Figure 2–6). Tighten the two captive
screws.
CAUTION: It is normal for a small gap to come between the ISE
mounting bracket tabs and the frame. Tighten the captive screws only
until they are securely fastened. Do not try to force the tabs to fit flush
against the frame.
5. Plug the remote front panel cable into the module inside the ISE front
panel (Figure 2–6).
6. Attach the ISE front panel to the enclosure by first fitting the panel’s
lower tabs and then the upper tabs into position. Secure the panel with
its single screw (Figure 2–6).
Installation
2–25
Figure 2–14: Inserting Bus Node ID Plugs for the TLZ04 Tape Drive
40%
Bus Node
ID Plug
MLO-005789
2–26 BA430/BA440 Enclosure Maintenance
Chapter 3
BA430/BA440 FRU Removal and
Replacement
This chapter describes how to remove and replace the field replaceable units
(FRUs) in the BA430/BA440 enclosure.
The following sections describe the removal procedure for each FRU. Unless
otherwise specified, you can install an FRU by reversing the steps in the
removal procedure.
System-specific FRU procedures vary slightly.
As a result, some
illustrations of system-specific procedures show an example of an FRU
removal. The variations are noted in the text and in the title of the
illustration.
CAUTION:
•
Only qualified service personnel should remove or install FRUs.
•
Before you remove or install FRUs, power off the system.
•
Static electricity can damage integrated circuits. Always use a grounded
wrist strap (29–26246–00) and a grounded work surface when working
with the internal parts of a computer system.
BA430/BA440 FRU Removal and Replacement
3–1
3.1 Field Replaceable Units (FRUs)
Table 3–1 lists the BA430/BA440 enclosure FRUs and their part numbers.
Table 3–1: BA430/BA440 FRUs
FRU
Part Number
Enclosure
Assembly, Bulkhead H3602
Assembly, Console H3604
Assembly, DSSI Interface Card
Assembly, System Control
Backplane, BA430
Backplane, BA440
Battery, Pack (H3604)
Battery, Pack (H3602)
Bezel, Front (RF-ISE)
Board, Vterm Dual Regulator
Cable, H3604 Data
Cable, Remote Front Panel
Cable, DSSI Bulkhead
Cable, DSSI 50-cond.
Cable, Power Bus
Cable, SCSI (system box)
Cable, SCSI (expander box)
Cable, SCSI Data
Cable, TQK70 Data
Cable, TQK70 B/P Interface
Cable, System Control (SCP)
Cable, Power control (BA200 to BA200)/
(BC09F–01)
Cable, Power control (BA400 to BA200)
Fans, DC
Ground Wire
Harness, Fan Tray
Key
Module, Console H3604
Module, Bus Terminator
Module, Terminator SCSI
Module, Power Harness (slim)
Cover Panel, CPU H3602 (dual-height)
Plug, Address I.D. Set SCSI
Plug, Address I.D. Set DSSI
70–28083–01
70–27400–01
54–19787–01
70–27044–01
54–20181–01
54–19354–01
12–19245–01
12–19245–01
70–27049–01
54–20404–01
17–02353–01
17–02706–01
17–02502–01
17–02154–03
17–02638–01
17–02659–03
17–02659–02
17–02542–01
17–01363–01
54–20136–02
17–02493–01
17–02638–01
BA430
BA440
BA440
BA430/BA440
BA430
BA440
BA440
BA430
BA440
BA440
BA440
BA440
BA440
BA430
BA430
BA430
BA430
BA430/440
BA430/440
BA430/440
BA430/440
BA430/440
17–02637–01
12–31500–01
12–13756–A8
17–02507–01
12–17119–01
00–H3604–AA
00–M9715–01
12–30552–01
54–19789–01
74–33507–01
12–28766–28
12–28766–19
BA430/440
BA430/440
BA430/440
BA430/440
BA430/440
BA440
BA430
BA430
BA440
BA430
BA430/BA440
BA430/BA440
3–2 BA430/BA440 Enclosure Maintenance
Table 3–1 (Cont.): BA430/BA440 FRUs
FRU
Part Number
Enclosure
Power Supply, 120/240 V
Remote Front Panel Module
Tape Drive, TK70
Tape Drive, TLZ04
Terminator, SCSI (with KZQSA)
Wire, Ground
00–H7874–00
54–19791–01
00–TK70–AX
00–TLZ04–AX
12–30552–01
12–13756–A8
BA430/BA440
BA440
BA430/BA440
BA430
BA430
BA430
Several FRUs in the BA430/BA440 enclosure are system specific
(Table 3–2). Their presence depends on which CPU and mass storage
devices are installed. Several different modules, disk ISEs, and tape ISEs,
may be present. Refer to the applicable CPU maintenance manual for a
complete list of options. All such devices are also FRUs.
Table 3–2: System Specific BA440 FRUs
FRU
Part Number
Fuse, 0.5 A pico, 125 V
Fuse, 2.0 A pico, 125 V
Fuse, 1.5 A 125 V
Fuse, .062 A, 125 V
Module, Console (H3604)
12–09159–00
12–10929–06
12–10929–08
90–09122–00
70–27400–01
3.2 Installing and Removing Modules
NOTE: The illustrations in this section show the BA440 enclosure.
Duplicating the same basic illustrations for the BA430 enclosure is
unnessary. The removal procedures are the same for both enclosures.
Modules designed for BA400-series enclosures have wide handles that
provide both external I/O connections and an electrical and environmental
seal for the card cage. Standard Q22-bus modules that are also used in
other enclosures, such as the TQK70, use a blank cover instead of a handle.
There is a different removal procedure for the three types of modules.
•
Modules with ratchet ejector handles
•
Modules with attached handles
•
Modules with covers
BA430/BA440 FRU Removal and Replacement
3–3
3.2.1 Removing Modules with Ratchet Ejector Handles
Ratchet ejector handles are used on the BA440 CPU and memory modules to
ensure a snug fit against the system’s backplane (Figure 3–1). This design
ensures constant tension against the backplane for optimum connector pin
contact.
Figure 3–1: Ratchet Ejector Handles
Ejector
Handles
MLO-004227
1. Power off the system.
2. Unlock the front door and open both access doors together to reach the
power switch on the power supply. Turn off the power switch.
3. Put on the grounded wrist strap and attach the alligator clip to the
system’s chassis.
3–4 BA430/BA440 Enclosure Maintenance
4. Note the orientation of external cables connected to the H3604 console
module. Label and disconnect the cables (if applicable).
5. Release the quarter-turn captive screws that hold the H3604 console
module to the card cage (Figure 3–2).
6. Swing open the H3604 console module.
7. Note the orientation of the internal cables connected to the module.
Carefully disconnect the internal cables (if applicable).
8. Move the ratchet handles to the side to release them from the sloping
teeth, then gently pull the ratchet handles toward you and slide the
module out of the card cage (Figure 3–3) (if applicable).
3.2.2 Removing Modules with Attached Handles
CAUTION: Use the static-protective customer services kit (29–26246–01)
when working with modules.
1. Power off the system.
2. Put on the grounded wrist strap and attach the alligator clip to the
metal part of the system’s chassis.
3. Release the quarter-turn captive screws that hold the module handle
to the card cage (Figure 3–2).
4. Gently release the ejector levers; then pull the module out. Remove the
module (Figure 3–3).
3.2.3 Removing Modules with Covers
CAUTION: Use the static-protective customer services kit (29–26246–00)
when working with modules.
1. Power off the system.
2. Unlock the front door and open both access doors together to reach the
power switch on the power supply. Press off the power switch.
3. Put on the grounded wrist strap and attach the alligator clip to the
system’s chassis.
4. Note the orientation of external cables connected to the module. Label
and disconnect the cables.
BA430/BA440 FRU Removal and Replacement
3–5
Figure 3–2: Releasing Quarter-Turn Captive Screws
To Release: Push In and Turn
Counterclockwise 1/4-Turn
To Fasten: Push In and Turn
Clockwise 1/4-Turn
Attach Antistatic
Wrist Strap to
System Chassis
MLO-004259
5. Release the quarter-turn captive screws that hold the handle to the
card cage (Figure 3–2).
6. Pull the handle out at the top and bottom.
7. Note the orientation of any internal cables connected to the module.
Some connectors are not keyed. Carefully disconnect the internal
cables.
8. Gently pull the release handles at the top and bottom of the module
toward you and slide the module out of the card cage. (Figure 3–3).
3–6 BA430/BA440 Enclosure Maintenance
Figure 3–3: Removing a Module
Attach Antistatic
Wrist Strap to
System Chassis
MLO-004209
3.3 Removing BA400-Series Enclosure Modules
To gain entrance to the module area, open the lower access door. The
following, is a list of BA430/BA440 modules:
•
Option modules
•
CPU and memory
•
H3602 CPU cover panel (BA430 enclosure)
•
M9715 interface module (BA430 enclosure)
•
M7638 I/O module (BA430 enclosure)
•
H3604 console module (BA440 enclosure)
BA430/BA440 FRU Removal and Replacement
3–7
•
H3605 I/O panel
•
H7874 power supply
•
Fan tray
3.3.1 M9715–YA Interface Module (BA430 Enclosure Only)
The M9715–YA interface module, is located to the left of the H7874 power
supply. This module is positioned in a dedicated to the first backplane
slot, slot 0. To remove the M9715 module, first remove the H3605 SCSI
connector panel from slot 0. The M9715 module is installed in slot 0 under
the H3605 cover.
3.3.2 M7638–YA I/O Module (BA430 Enclosure Only)
The M7638–YA I/O module is located in slot 1 next to the M9715 two bus
slots away from the H7874 power supply. To remove the M7638 module,
first remove the H3602 CPU cover panel from over slots 1 and 2. The
M7638 I/O module is installed in slot 1 under the H3602 CPU cover panel.
3.4 Replacing RF and RZ Series Integrated Storage
Elements (ISE)
NOTE: The illustrations in this section show the BA440 enclosure.
Duplicating the same basic illustrations for the BA430 enclosure is
unnecessary. The removal procedures are the same for both enclosures.
This section describes how to replace RF and RZ-series ISE’s. In addition,
procedures are provided to replace the following individual FRUs that
comprise the integrated storage element:
•
ISE Bus I.D. plug
•
ISE front panel
•
ISE front panel module (RF-series only)
•
Interface card assembly (RF-series only)
•
Remote front panel cable (RF-series only)
For information on troubleshooting strategy, error analysis, and RZ and
RF-series diagnostics, as well as information on removal and replacement
of the drive module and head-disk assembly (HDA), refer to the appropriate
integrated storage element service guide. Replacing the drive module does
not require removal of the ISE bracketry.
3–8 BA430/BA440 Enclosure Maintenance
3.4.1 Removing an RZ or an RF-Series ISE
Use the following instructions to remove an RF-series ISE and refer to
Figure 3–6.
CAUTION: Static electricity can damage integrated circuits. Use the wrist
strap and antistatic mat found in the antistatic kit (29–26246–00) when you
work with the internal parts of a computer system.
Handle the ISEs with care. Dropping or bumping an ISE can damage the
disk surface. Carry or hold the ISEs by their metal brackets to avoid damage
to the drive module.
Figure 3–4: Removing an ISE Front Panel ID Plug
Bus Node
ID Plug
MLO-004045
1. Remove the Bus I.D.Plug Figure 3–4.
2. Loosen the single captive Phillips screw that secures the ISE front panel
(Figure 3–6A).
3. Separate the ISE front panel and unplug the cable from the enclosure
and lay it aside (RF–series only).
BA430/BA440 FRU Removal and Replacement
3–9
4. Loosen the upper and lower captive screws that hold the ISE in place
(Figure 3–6C).
5. Using the upper and lower finger cutouts on the ISE bracketry, carefully
pull the ISE out of its backplane connector and slide the drive out of
the enclosure. Support the weight of the ISE at the lower bracket as
the ISE clears the enclosure (Figure 3–6C).
CAUTION: Do not touch the drive module. The drive module contains
sensitive electronic circuitry.
3.5 Replacing RZ-Series Integrated Storage
Element
This section describes how to replace RZ-series ISEs information on
troubleshooting strategy, error analysis, and diagnostics as well as
information on removing and replacing an ISE.
3.5.1 Removing an RZ-Series ISE
Use the following instructions to remove an RZ-series ISE and refer to
Figure 3–6.
CAUTION: Static electricity can damage integrated circuits. Use the wrist
strap and antistatic mat found in the antistatic kit (29–26246–00) when you
work with the internal parts of a computer system.
Handle RZ-series ISEs with care. Dropping or bumping the ISE can damage
the disk surface. Carry or hold the ISEs by their metal brackets to avoid
damage to the drive module.
1. Loosen the single Phillips head screw that secures the RZ-series front
panel (Figure 3–6A).
2. Separate the ISE front panel from the enclosure. Set the front panel
aside.
3. Loosen the upper and lower captive screws that secure the ISE to the
chassis frame(Figure 3–6B).
4. Using the upper and lower finger cutouts on the ISE bracketry, carefully
pull the ISE out of its backplane connector and slide the drive out of
the enclosure. Support the weight of the ISE at the lower bracket as
the ISE clears the enclosure (Figure 3–6C).
3–10 BA430/BA440 Enclosure Maintenance
CAUTION: Do not touch the drive module. The drive module contains
sensitive electronic circuitry.
Figure 3–5: Removing RZ-series ID Plug
Bus Node
ID Plug
MLO-005185
BA430/BA440 FRU Removal and Replacement
3–11
Figure 3–6: Removing an RF–series or RZ-series ISE
A
Phillips Screw
B
Remote Front
Panel Cable
Velcro
C
Captive Screws
Finger Cutouts
MLO-004210
3–12 BA430/BA440 Enclosure Maintenance
NOTE: The RF–series or RZ-series ISE has no switches or indicators on it
and no external cables to install. The front panel contains a bus node ID
plug.
To install a new or replacement RZ-series ISE, follow the removal procedure
in reverse.
BA430/BA440 FRU Removal and Replacement
3–13
3.5.1.1 Removing the ISE Upper Bracket
This procedure assumes you have removed the ISE as described in
Section 3.4.1. Remove the ISE upper bracket as follows:
1. Place the ISE on an antistatic mat.
2. Remove the two Phillips screws at the rubber shock bushings that
secure the upper bracket to the head-disk assembly (Figure 3–7).
NOTE: RF72s and RF71s are secured to the brackets using the outer
bushing positions. RF31s are secured at the second and fourth (from
the front) bushing positions.
CAUTION: Early models of the RF-series ISEs use four screws of two
different lengths to secure the upper and lower brackets. The two longer
screws (by one-eighth of an inch) must only be used in the shock bushing
toward the back of the drive.
3–14 BA430/BA440 Enclosure Maintenance
Figure 3–7: Removing Bracket Screws
MLO-004213
3. Slide the interface card assembly up and lift off the upper bracket
(Figure 3–8).
BA430/BA440 FRU Removal and Replacement
3–15
Figure 3–8: Removing the ISE Upper Bracket
Upper Bracket
Interface Card
Assembly
MLO-004214
3.5.1.2 Removing the Interface Card Assembly
Remove the interface card assembly as follows:
1. Unplug the 5-pin (RF-series) or 4-pin (RZ-series) power cable, the 50pin signal cable, and the remote front panel cable from their connectors
on the controller module.
NOTE: Observe cable routing to ensure that you route the cables
properly when reassembling.
2. Lift and remove the plastic interface card assembly being careful to
guide the cables through the cutout in the metal bracket (Figure 3–9).
3. To remove the plastic assembly from the interface card, remove the two
Phillips screws that hold it in place (Figure 3–9).
3–16 BA430/BA440 Enclosure Maintenance
4. Reverse the procedure to install the interface card assembly.
Figure 3–9: Removing the Interface Card Assembly
Interface Card
Assembly
Phillips
Screws
MLO-004257
3.5.1.3 Replacing the Remote Front Panel Cable
To remove the remote front panel cable, you first remove the ISE as
described in Section 3.4.1 and the ISE upper bracket as described in
Section 3.5.1.1. After completing those steps, remove the ISE lower bracket
and remote front panel cable. See the following sections.
3.5.1.4 Removing the ISE Lower Bracket
Remove the ISE lower bracket by removing the two Phillips screws at
the rubber shock bushings that secure the lower bracket to the head-disk
assembly (Figure 3–10).
3.5.1.5 Removing the Remote Front Panel Cable
NOTE: Observe cable routing to ensure that you route the cables properly
when reassembling.
To remove the remote front panel cable, unplug the cable from its connector
on the drive module, then pull the cable free from the lower bracket at the
two points where the cable is secured by Velcro. Reverse the procedure to
install the remote front panel cable.
BA430/BA440 FRU Removal and Replacement
3–17
Figure 3–10: Removing the Remote Front Panel Cable
Remote Front
Panel Cable
Cable Velcro Pads
Bracket Velcro Pads
Bracket Screws
Interface Card Assembly
MLO-004258
3.5.2 Removing the TLZ04 Tape Drive
This section describes how to replace the TLZ04 tape drive. In addition,
procedures are provided to replace the following individual FRUs that make
up the mounting hardware for the integrated storage element:
•
Tape drive front panel module
•
Interface card assembly
•
ID cable
3–18 BA430/BA440 Enclosure Maintenance
For information on troubleshooting strategy, error analysis,
diagnostics, refer to the TLZ04 tape drive service manual.
and
Use the following instructions to a TLZ04 tape drive. Refer to Figure 3–11.
CAUTION: Static electricity can damage integrated circuits. Use the wrist
strap and antistatic mat found in the Antistatic Kit (PN 29–26246) when
you work with the internal parts of a computer system.
Handle the tape drive with care. Dropping or bumping it can damage the
drive. Carry or hold the drive by its metal brackets to avoid damaging the
drive.
1. Loosen the single captive Phillips screw that secures the TLZ04 front
panel (Figure 3–11A).
2. Separate the TLZ04 front panel from the enclosure, being careful of the
ID cable, which is connected to the TLZ04 front panel.
NOTE: If the cause of the drive failure is undetermined, inspect the
connection of the ID cable and the TLZ04 front panel. The cable may
not be connected securely, or the cable or connector is defective.
If the front panel appears to be the problem, refer to Section 3.5.2.2
for instructions on replacing the TLZ04 front panel. To replace the ID
cable, continue removing the tape drive and then refer to Section 3.5.2.1
for instructions on replacing ID cable (PN 17–01936–02).
3. Unplug the remote ID cable from the TLZ04 front panel and set the
front panel aside (Figure 3–11B).
4. Loosen the upper and lower captive screws that hold the drive in place
(Figure 3–11C).
5. Using the upper and lower finger cutouts on the drive bracketry,
carefully pull the drive out of its backplane connector and slide the
drive out of the enclosure. Support the weight of the drive at the lower
bracket as the drive clears the enclosure (Figure 3–11C).
NOTE: If the cause of the drive failure is undetermined, inspect the
condition of the interface card and its associated cables and cable
connections. Refer to Section 3.5.2.3 for instructions on replacing the
interface card assembly (PN 54–20136–03).
BA430/BA440 FRU Removal and Replacement
3–19
Figure 3–11: Removing the TLZ04 Tape Drive
A
Phillips Screw
B
ID Cable
C
Captive Screw
Finger Cutouts
MLO-005795
To install a new or replacement TLZ04, refer to Figure 3–11.
3–20 BA430/BA440 Enclosure Maintenance
3.5.2.1 Replacing the ID Cable
NOTE: Observe cable routing to ensure that you route the cables properly
when reassembling.
To remove the ID cable, you first remove the drive and unplug one end of
the ID cable as described in Figure 3–13. Unplug the opposite end of the
ID cable from the rear of the tape drive (Figure 3–12).
Figure 3–12: Removing the ID Cable
ID Cable
Connector
MLO-005796
BA430/BA440 FRU Removal and Replacement
3–21
3.5.2.2 Replacing the TLZ04 Front Panel Module
This procedure assumes you have completed steps one and two in
Figure 3–13. Use the following instructions to remove the TLZ04 front
panel module (PN 54–20438–01) and refer to Figure 3–13.
1. Unplug the ID cable from its connector on the TLZ04 panel.
2. Remove the bus node ID plug on the TLZ04 front panel by pulling it
straight out.
3. Lift the plastic tab that holds the front panel module in place and
remove the module.
4. Reverse the procedure to install a module.
Figure 3–13: Removing the TLZ04 Front Panel Module
Plastic Tab
35%
MLO-005797
3–22 BA430/BA440 Enclosure Maintenance
3.5.2.3 Replacing the Interface Card Assembly
Use the following instructions to replace the interface card assembly (PN
54–20136–03). To remove the interface card assembly, first remove the
upper mounting bracket.
3.5.2.4 Removing the Upper Mounting Bracket
This procedure assumes you have removed the drive as described in
Figure 3–13. Remove the drive upper bracket as follows:
1. Place the drive on an antistatic mat.
2. Remove the two Phillips screws at the rubber shock bushings that
secure the upper bracket to the drive (Figure 3–14).
Figure 3–14: Removing Bracket Screws
MLO-005799
3. Slide the interface card assembly up and lift off the upper bracket
(Figure 3–15).
BA430/BA440 FRU Removal and Replacement
3–23
Figure 3–15: Removing the Upper Mounting Bracket
Upper Bracket
Interface Card
Assembly
MLO-005800
3–24 BA430/BA440 Enclosure Maintenance
3.5.2.5 Removing the Interface Card Assembly
Remove the interface card assembly as follows:
1. Unplug the 4-pin power cable, the 50-pin signal cable, and the remote
front panel cable from their connectors on the controller module.
NOTE: Observe cable routing to ensure that you route the cables
properly when reassembling.
2. Lift and remove the plastic interface card assembly being careful to
guide the cables through the cutout in the metal bracket (Figure 3–16).
3. To remove the plastic assembly from the interface card, remove the two
Phillips screws that hold it in place (Figure 3–16).
4. Reverse the procedure to install the interface card assembly.
Figure 3–16: Removing the Interface Card Assembly
Interface Card
Assembly
Phillips
Screws
MLO-005801
BA430/BA440 FRU Removal and Replacement
3–25
3.5.2.6 Removing the Lower Mounting Bracket
Remove the lower mounting bracket by removing the two Phillips screws
at the rubber shock bushings that secure the lower bracket to the drive
(Figure 3–17).
Figure 3–17: Removing Lower Mounting Bracket
ID Cable
Bracket Screws
Interface Card Assembly
MLO-005802
3–26 BA430/BA440 Enclosure Maintenance
3.6 Removing a TK-Series Tape Drive
NOTE: The illustrations in this section show the BA440 enclosure.
Duplicating the same basic illustrations for the BA430 enclosure is
unnecessary. The removal procedures are the same for both enclosures.
Remove a TK-series tape drive as follows:
1. Remove the screw at the top of the TK-series drive front panel and tilt
the panel out and down.
2. Remove the tape drive front panel.
3. Release the TK-series drive from its enclosure by loosening the captive
screws above and below the drive unit (Figure 3–18).
Figure 3–18: Releasing TK-Series Captive Screws
MLO-004215
4. Slowly slide the TK-series drive unit partway out of the BA430/BA440
enclosure until you can remove the data cable from the rear of the drive
(Figure 3–20).
BA430/BA440 FRU Removal and Replacement
3–27
Figure 3–19: Removing a TK-Series Drive Unit
MLO-004216
5. Note the orientation of the data cable. Disconnect the data cable from
the TK-series drive.
6. Continue to slide the TK-series drive unit out of the BA430/BA440
enclosure (Figure 3–19) and lay it left side down.
3–28 BA430/BA440 Enclosure Maintenance
Figure 3–20: Removing a TK-Series Cable
Communication Cable
Interface Card Assembly
MLO-004228
7. Remove the cable from the rear of the TK-series drive and then remove
the sliding tracks from the defective TK-series drive. Save the tracks
and cable for the new TK-series drive.
Installation Notes
If the new TK-series tape drive unit is attached to a skid plate, you must
remove the skid plate from the new drive and install the skid plate on the
defective drive before returning the drive.
When replacing a TK-series drive, do not pinch any cabling at the rear
of the tape drive (Figure 3–20). If you feel resistance when sliding the
drive into the BA430/BA440 enclosure, remove the drive unit and check
BA430/BA440 FRU Removal and Replacement
3–29
that the cable is clear. Each module location will be identified as well as
the enclosure used. If an enclosure is not identified, then the module or
component is used in both enclosures.
3.7 Removing the System Control Panel
To remove the system control panel (Figure 3–21) follow the listed steps:
1. Open the upper access door.
2. Release the top captive screw securing the assembly.
3. Detach the interface cable.
4. Remove the system control panel.
5. Install a system control panel in the reverse order.
Figure 3–21: Removing the System Control Panel (SCP)
3
2
1
-- OPEN --
4
Switches
Switches
1
2
3
4
Off
On
-- OPEN --
MLO-004217
3–30 BA430/BA440 Enclosure Maintenance
Installation Note
The four switch pack switches when positioned ON allow the system
controls to function. If the switch pack switches are all positioned OFF,
the system controls on the panel are disabled.
3.8 Vterm Board Removal (BA440 Enclosure Only)
To remove the Vterm board from the BA440 enclosure backplane, follow
the steps below:
1. Open the upper access door.
2. Remove the third tape drive device (if any, counting from the left).
3. Remove the Vterm board from the backplane.
To install a Vterm board, follow the removal procedure in reverse.
BA430/BA440 FRU Removal and Replacement
3–31
3.9 Removing the Power Supply
NOTE: The illustrations in this section show the BA440 enclosure.
Duplicating the same basic illustrations for the BA430 enclosure is
unnecessary. The removal procedures are the same for both enclosures.
The BA430/BA440 enclosure has one power supply Figure 3–22. To remove
the power supply, follow the procedure carefully.
Danger High Voltage
.
This warning symbol indicates risk of electric shock.
WARNING: The power cord must be removed from this unit’s appliance
inlet to disconnect ac power. The circuit breaker power switch is NOT a
disconnect device.
A plate covers one fastener that secures the system to the BA430/BA440
enclosure in such a way that the power cord set must be removed before this
fastener can be disconnected. This fastener MUST BE TIGHTENED when
service is completed before replacing the power cord.
NOTE: The power supply stores an electrical charge which, if not bled
(discharged) correctly, could cause physical harm. Bleed the power supply
before removing. To bleed the power supply, remove the power cord and push
up on the metal plate on the bottom of the power supply. This sliding plate
depresses the bleed switch or button located under the power supply. Hold
the discharge plate in the up position for at least 45 seconds after removing
the ac power cord. This discharges the system and makes the power supply
safe to handle.
3–32 BA430/BA440 Enclosure Maintenance
Figure 3–22: Power Supply Indicators, Connectors, and Switch Locations
Power Switch
AC Present Indicator
DC OK Indicator
Fan Failure
Indicator
Over Temperature
Condition Indicator
Power Bus
Connectors
Power Cable
Connector
Hazardous
Warning Label
MLO-004218
1. Turn off the H7874 power supply switch and unplug the ac power cord
from the wall outlet.
2. Remove the power cord from the power supply (Figure 3–23).
3. Remove the ground strap (if any) and power control bus cables (if any).
4. Release the top power supply captive screw.
5. Release the bottom captive screw by raising the metal plate up against
the bottom of the power supply and hold for 45 seconds. The bottom
screw is exposed when the plate is held up in the bleed position
(Figure 3–24). Release the bottom screw.
6. Grasp the handle with one hand and pull the supply out from the
backplane connection (Figure 3–25).
BA430/BA440 FRU Removal and Replacement
3–33
Figure 3–23: Removing the Power Supply Cord
MLO-004219
7. Remove the power supply.
Installation Note
When installing the power supply, make sure the top and bottom edges of
the supply are aligned and mounted in the plastic guides in the enclosure.
3.10 Removing Fans
A fan tray containing two 6-inch fans provides system cooling for the BA430/
BA440 enclosure. The fans are controlled by a heat sensor that accurately
varies the fan speed according to the system’s temperature needs. The two
fans are attached to the metal tray by a single mounting bracket. The fan
tray slides under the card cage and fastens to the chassis by two thumb
screws.
NOTE: The illustrations in this section show the BA440 enclosure.
Duplicating the same basic illustrations for the BA430 enclosure is
unnecessary. The removal procedures are the same for both enclosures.
3–34 BA430/BA440 Enclosure Maintenance
Figure 3–24: Discharging the Power Supply
Discharge
Switch
Captive
Screw
Cover Plate
MLO-004229
BA430/BA440 FRU Removal and Replacement
3–35
Figure 3–25: Power Supply Pulled Out
MLO-004226
3–36 BA430/BA440 Enclosure Maintenance
Figure 3–26: Removing the Fan Tray
Captive Screws
MLO-004220
Remove the fans as follows:
1. Open the lower access door.
2. Remove or reroute any option cables away from the fan tray.
3. Unplug the power cord from the ac wall outlet.
4. Loosen the two captive screws that hold the fan tray to the chassis.
5. Pull out the fan tray (Figure 3–26) and flip it onto its back (Figure 3–27).
6. Disconnect the dc power cable connector from the fan.
7. Remove the center screw and bracket securing both fans to the tray
(Figure 3–27).
8. Remove the fans.
NOTE: It is recommended that fans be replaced in sets (or pairs).
9. To replace the fan tray, follow the removal procedure in reverse.
BA430/BA440 FRU Removal and Replacement
3–37
Figure 3–27: Removing the Fan Assembly
Continuity Clip
Mounting
Bracket
MLO-004221
3.11 Removing a Backplane
This section covers the removal procedures for both the BA440 backplane
(54–19354–01) and the BA430 backplane (54–20181–01).
The backplane is the only part of the BA430/BA440 enclosure that must
be removed from the rear. To remove the backplane, follow the steps listed
below:
1. Turn off the system power switch and unplug the ac power cord from
the wall outlet.
2. From the front of the BA430/BA440 enclosure
a. Unlock and open both doors.
b. Remove the top door by swinging it out past 90 degrees and lifting
it off the hinges.
3–38 BA430/BA440 Enclosure Maintenance
c.
Remove the bottom door by swinging it out past 90 degrees and
lifting it off the hinges.
d. To remove the right door latching bracket, remove the three selftapping screws and one 6/32 screw. Remove the bracket. Remove
the remaining self-tapping screws (Figure 3–28).
e.
To remove the left hinge bracket, remove the five self-tapping screws
(Figure 3–28).
3. Slide the enclosure’s outer shell back and off. Lay the shell and other
hardware aside.
4. Remove the power supply. See Warning Note (Section 3.9).
5. Remove the H3604 console module (BA440 enclosure) or H3602 CPU
cover panel (BA430 enclosure).
a. Release the quarter-turn captive screws (BA430/BA440).
b. Swing open console module and disconnect cables (BA440 enclosure
only).
c.
Lift the console module from its hinge pins (BA440 enclosure only).
d. Lay the console module aside (BA440 enclosure only).
e.
Disconnect the 50-pin connector cable and lay the H3602 panel
aside (BA430 enclosure only).
6. Remove all module options from the card cage .
7. Remove the SCP (System Control Panel) and its cable.
8. Remove all ISEs and tape drive units from the upper enclosure.
9. Disconnect the extended bus cables from the upper left corner of the
backplane (Figure 3–29).
10. Remove the Vterm regulator module from the backplane (BA440
enclosure only).
11. Turn the enclosure around so that you face the rear panel
(Figure 3–30).
BA430/BA440 FRU Removal and Replacement
3–39
Figure 3–28: Outer Shell Removal
Door Hinge
Outer Shell
Bracket Pin
Upper Door
Lower Door
Door Brackets
MLO-004222
12. Remove the screws that hold the rear panel. Remove the rear panel
(Figure 3–30).
13. Remove the screws and nuts that hold the backplane to the enclosure.
Remove the backplane (Figure 3–31).
3–40 BA430/BA440 Enclosure Maintenance
Figure 3–29: Bus Cable Locations
SCSI Cable
Vterm Module
DSSI Cable
MLO-004223
14. Remove the Backplane.
BA430/BA440 FRU Removal and Replacement
3–41
Figure 3–30: Rear Panel Removal (BA430/BA440)
MLO-004224
3–42 BA430/BA440 Enclosure Maintenance
Figure 3–31: Removing the BA430/BA440 Backplane
Backplane Screw
Backplane Nuts
Remove Last
Insert First
Backplane Screws
MLO-004225
3.12 Installing the BA430/BA440 Backplane
1. Align the new backplane assembly with the rear of the BA430/BA440
enclosure. Insert the two lower screws (left side first) and the upper left
screw to align the backplane against the card cage. Tighten all screws.
2. Insert and tighten the Kep nuts (if applicable).
3. Install the metal cover over the backplane, using the screws previously
removed, starting with the upper left, but do not tighten screws until
all are inserted properly, then tighten.
4. Install the power supply.
5. Insert the two bus cables in the upper left corner of the backplane
Figure 3–29.
6. Install the SCP and cable.
BA430/BA440 FRU Removal and Replacement
3–43
7. Install the ISEs.
8. Install the tape drive unit and cable (if applicable).
9. Install the modules in their correct slots.
10. Install the fan tray.
11. Install the H3602 CPU cover panel (BA430).
12. Install the H3604 console module (BA440).
13. Connect all external cables.
14. Position the outer shell on the chassis and move it forward toward the
hinge and latching bracket positions.
15. Install two of the self-tapping screws (right side second and fourth from
the bottom) to hold the shell against the chassis (BA430/BA440).
16. Install the right door latching bracket, using the three self-tapping
screws and the 6/32 screw (Figure 3–32).
17. Install the left hinge bracket with the self-tapping screws previously
removed (Figure 3–32).
18. Tighten all screws.
19. Install the upper and lower doors (Figure 3–32). Position the doors at
approximately 90 degrees (half open position) and hook the door over
the hinge bracket pin. They should drop into position.
NOTE: Check and adjust the door latching bracket alignment to ensure
the door latch clears the door latching bracket.
3–44 BA430/BA440 Enclosure Maintenance
Figure 3–32: Door Installation
Door Hinge
Outer Shell
Bracket Pin
Upper Door
Lower Door
Door Brackets
MLO-004222
BA430/BA440 FRU Removal and Replacement
3–45
Appendix A
Related Documentation
The following documents contain information relating to MicroVAX or
MicroPDP–11 systems.
Document Title
Order Number
Module Options
CXA16 Technical Manual
CXY08 Technical Manual
DEQNA Ethernet User’s Guide
DESQA Ethernet Adapter Option Inst Guide
DESQA Technical Manual
DHV11 Technical Manual
DLV11–J User’s Guide
DMV11 Synchronous Controller Technical Manual
DMV11 Synchronous Controller User’s Guide
DPV11 Synchronous Controller Technical Manual
DPV11 Synchronous Controller User’s Guide
DRV11–J Interface User’s Manual
DRV11–WA General Purpose DMA User’s Guide
DZQ11 Asynchronous Multiplexer Technical Manual
DZQ11 Asynchronous Multiplexer User’s Guide
DZV11 Asynchronous Multiplexer Technical Manual
DZV11 Asynchronous Multiplexer User’s Guide
IBQ01 BITBUS Controller Technical Manual
IBQ01 BITBUS Controller Users Guide
IBQ01 Option Installation Guide
IEU11–A/IEQ11–A User’s Guide
KA630–AA CPU Module User’s Guide
KA640–AA CPU Module User’s Guide
KA650–AA CPU Module User’s Guide
KDA50–Q CPU Module User’s Guide
KDJ11–B CPU Module User’s Guide
KDJ11–D/S CPU Module User’s Guide
KDF11–BA User’s Guide
EK–CAB16–TM
EK–CXY08–TM
EK–DEQNA–UG
EK–DEQNA–IN
EK–DEQNA–TM
EK–DHV11–TM
EK–DLV1J–UG
EK–DMV11–TM
EK–DMV11–UG
EK–DPV11–TM
EK–DPV11–UG
EK–DRV1J–UG
EK–DRVWA–UG
EK–DZQ11–TM
EK–DZQ11–UG
EK–DZV11–TM
EK–DZV11–UG
EK–IBQ01–TM
EK–IBQ01–UG
EK–IBQ01–IN
EK–IEUQ1–UG
EK–KA630–UG
EK–KA640–UG
EK–KA650–UG
EK–KDA5Q–UG
EK–KDJ1B–UG
EK–KDJ1D–UG
EK–KDFEB–UG
Related Documentation
A–1
Document Title
Order Number
Module Options
KFQSA Installation Guide
KMV11 Programmable Communications Controller User’s Guide
KMV11 Programmable Communications Controller Technical Manual
LSI–11 Analog System User’s Guide
MRV11–D Universal PROM Module Users Guide
Q-Bus DMA Analog System User’s Guide
RQDX2 Controller Module User’s Guide
RQDX3 Controller Module User’s Guide
EK–KFQSA–IN
EK–KMV11–UG
EK–KMV11–TM
EK–AXV11–UG
EK–MRV1D–UG
EK–AV11D–UG
EK–RQDX2–UG
EK–RQDX3–UG
Disk and Tape Drives
RA60 Disk Drive Service Manual
RA60 Disk Drive User Guide
RA81 Disk Drive Service Manual
RA81 Disk Drive User Guide
RA90 Disk Drive Service Manual
RA90 Disk Drive User Guide
RC25 Disk Subsystem User Guide
RC25 Disk Subsystem Pocket Service Guide
RF30 Integrated Storage Element
RF30 Integrated Storage Element Installation Guide
RF71 Integrated Storage Element Users Guide
RRD40 Subsystem Optical Disc Drive Owner’s Manual
RRD50 Subsystem Pocket Service Guide
RRD50 Digital Disc Drive User’s Guide
RX33 Technical Description Manual
RX50–D, –R Dual Flexible Disk Drive Subsystem Owner’s Manual
SA482 Storage Array Service Manual (for RA82)
SA482 Storage Array User Guide (for RA82)
TK50 Tape Drive Subsystem User’s Guide
TK70E–SF & TQK70–SF Installation Guide
TK70 Tape Drive Owner’s Manual
TS05 Tape Transport Pocket Service Guide
TS05 Tape Transport Subsystem Technical Manual
TS05 Tape Transport System User’s Guide
A–2 BA430/BA440 Enclosure Maintenance
EK–ORA60–SV
EK–ORA60–UG
EK–ORA81–SV
EK–ORA81–UG
EK–ORA90–SV
EK–ORA90–UG
EK–ORC25–UG
EK–ORC25–PS
EK–RF30D–UG
EK–RF30D–IN
EK–RF71D–UG
EK–RRD40–OM
EK–RRD50–PS
EK–RRD50–UG
EK–RX33T–TM
EK–LEP01–OM
EK–SA482–SV
EK–SA482–UG
EK–LEP05–UG
EK–TK70E–IN
EK–OTK70–OM
EK–TSV05–PS
EK–TSV05–TM
EK–TSV05–UG
Document Title
Order Number
Systems
630QB Maintenance Print Set
630QE Maintenance Print Set
630QY Maintenance Print Set
630QZ Maintenance Print Set
BA23 Enclosure Maintenance
BA123 Enclosure Maintenance
BA213 Enclosure Maintenance
BA214 Enclosure Maintenance
BA215 Enclosure Maintenance
H9642 Cabinet Maintenance
H9644 Cabinet Maintenance
KA630 CPU System Maintenance
KA640 CPU System Maintenance
KA650 CPU System Maintenance
KDF11–B CPU System Maintenance
KDJ11–D CPU System Maintenance
KDJ11–B/S CPU System Maintenance
MicroPDP–11 Hardware Information Kit (for BA23)
MicroPDP–11 Hardware Information Kit (for BA123)
MicroPDP–11 Hardware Information Kit (for H9642)
MicroPDP–11 Hardware Information Kit (for BA213)
Microsystems Options
Microsystems Site Preparation Guide
MicroVAX II Hardware Information Kit (for BA23)
MicroVAX II Hardware Information Kit (for BA123)
MicroVAX II Hardware Information Kit (for H9642)
MicroVAX 3500 Customer Hardware Information Kit
MicroVAX 3600 Customer Hardware Information Kit (for H9644)
VAXstation 3200 Owner’s Manual (BA23)
VAXstation 3500 Owner’s Manual (BA213)
VAXstation II/GPX Owner’s Manual (BA23)
VAXstation II/GPX Owner’s Manual (BA123)
MP–02071–01
MP–02219–01
MP–02065–01
MP–02068–01
EK–186AA–MG
EK–188AA–MG
EK–189AA–MG
EK–190AA–MG
EK–191AA–MG
EK–187AA–MG
EK–221AA–MG
EK–178AA–MG
EK–179AA–MG
EK–180AA–MG
EK–245AA–MG
EK–247AA–MG
EK–246AA–MG
00–ZYAAA–GZ
00–ZYAAB–GZ
00–ZYAAE–GZ
00–ZYAAS–GZ
EK–192AB–MG
EK–O67AB–PG
00–ZNAAA–GZ
00–ZNAAB–GZ
00–ZNAAE–GZ
00–ZNAES–GZ
00–ZNAEF–GZ
EK–154AA–OW
EK–171AA–OW
EK–106AA–OW
EK–105AA–OW
Related Documentation
A–3
Document Title
Order Number
Diagnostics
DEC/X11 Reference Card
DEC/X11 User’s Manual
MicroVAX Diagnostic Monitor Ethernet Server User’s Guide
MicroVAX Diagnostic Monitor Reference Card
MicroVAX Diagnostic Monitor User’s Guide
XXDP DEC/X11 Quick Reference Guide
XXDP User’s Manual
AV–F145A–MC
AC–FO53D–MC
AA–FNTAF–DN
AV–FMXAC–DN
AA–FM7AE–DN
AA–FK84A–TE
AA–FK83A–TE
Networks
Ethernet Transceiver Tester User’s Manual
VAX/VMS Networking Manual
VAX NI Exerciser User’s Guide
A–4 BA430/BA440 Enclosure Maintenance
EK–ETHTT–UG
AA–Y512C–TE
AA–HI06A–TE
Index
A
F
Acoustics, 2–3
Fans, 1–22
Fan Speed Control Disable (FSC),
1–24
removal, 3–34
Filler panel, 1–4
Fixed-disk ISE
maximum number supported,
1–10
Front door
lock positions, 1–18
FRUs, 3–1
backplane, 3–38
fans, 3–34
list, 3–2
system-specific, 3–3
modules, 3–3
power supply, 3–32
B
Backplane
BA440
BA430, 1–26
grant continuity, 1–26
removal, 3–38
Bus loads, 1–27
C
Configuration
capacity, 1–28
module order, 1–28
rules, 1–27
worksheet, 1–28
Connectors, controls, and indicators,
1–16
CPU Halt button, 1–16
Current draw
modules, 1–29
D
Disk drive
See ISE
Disk ISE
maximum number supported,
1–10
E
Electrical requirements, 2–4
G
Grant continuity, 1–26
H
H3600–SA, 1–6
H3601–SA, 1–6
H3602–SA, 1–6
H3604, 1–6
H3604 console module, 1–16
H3604 fuses, 1–18
H3604–SA, 1–18
H7874 power supply
switches
connectors
indicators, 1–21
Handles
Index–1
Handles (Cont.)
types, 1–4
Heat disipation, 2–3
Humidity values, 2–3
I
ISE
inserting bus node ID plugs for,
2–13
labeling of, 2–15
removal of, 3–18
K
Key, 1–16
L
LEDs, 1–16
M
Module covers, 1–3
Module handles, 1–3
Module order, 1–28
Modules
power, bus loads, 1–29
removal, 3–3
P
Physical dimensions
BA440 pedestal, 2–1
power supply
shutdown sequence, 1–21
Power supply, 1–19
minimum load, 1–33
removal, 3–32
R
ratchet ejectors, 1–6
RF-series ISE
See ISE
Index–2
S
Site preparation, 2–1
acoustics, 2–3
electrical requirements, 2–4
temperature and humidity, 2–3
Static electricity, 2–2
Static precaution, 3–1
System controls, 1–16
T
Tape drive
See TLZ04
maximum number supported,
1–10
Temperature values, 2–3
TLZ04
inserting bus node ID plugs for,
2–18
removal of, 3–26
TLZ04 Tape drive
removal of, 3–18
U
Unpacking the system, 2–5