1
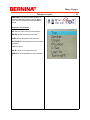
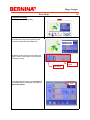
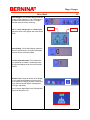
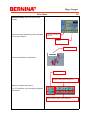
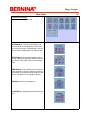
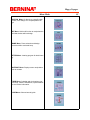
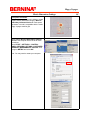
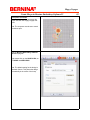
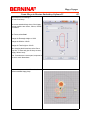
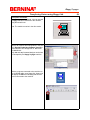
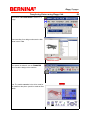
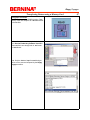
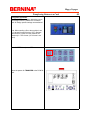
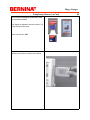
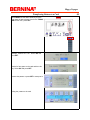
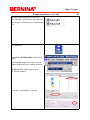
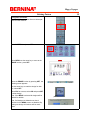
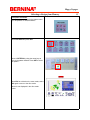
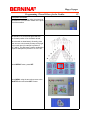
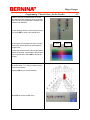
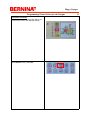
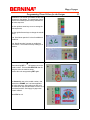
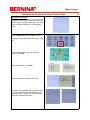
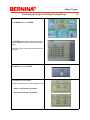
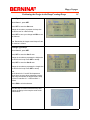
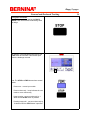
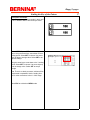
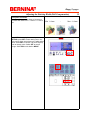
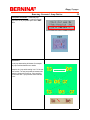
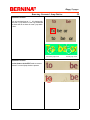
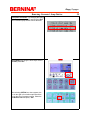
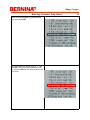
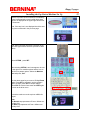
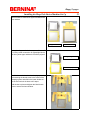
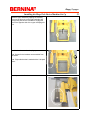
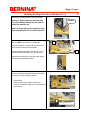
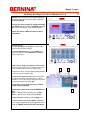
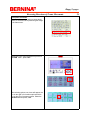
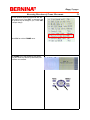
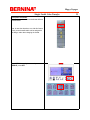
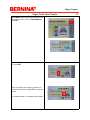
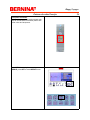
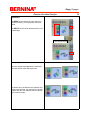
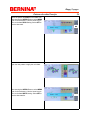
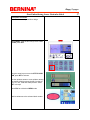
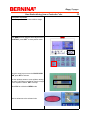
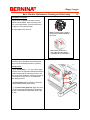
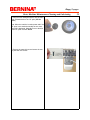
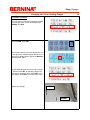
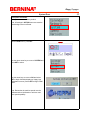
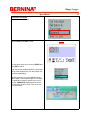
Happy Voyager
Resource Manual
Bernina Happy Voyager
Resource Manual
Addendum
SAFETY REGULATION
Please refer to the Safety Regulation of the original Happy Voyager
User/Operation Manual and as such are hereby incorporated with this
addendum.
The information contained in this Manual is designed to assist in operating
the Happy Voyager machine. This Manual is not intended to be complete
or to replace the original Happy Voyager User/Operation Manual. Its
purpose is solely to educate the Bernina Happy Voyager Machine
Operators.
This Manual is copy right protected © 2007 Bernina of America, Inc. and
subject to changes without notice. Publication, and duplication or providing
information to a third party without the written approval from Bernina of
America, Inc. is prohibited.
BERNINA OF AMERICA, INC.
3702 PRAIRIE LAKE CT.
AURORA, IL 60504
Authors: Hans Herzog
Andrew Bellendir
October 2007
Release: 1.10
Happy Voyager
Main Catagories
Contol Panel
Happy and Bernina
Embroidery SoftwareV5
Embrodiery Pattern
Management
Most Common Tasks
Design Mulipulations
Adding
Devices/Accessories
Additional Machine
Settings
Service Tasks
Index
Bernina Manual
HV Manual
Interface Control
Drive Mode
Menu Mode
01
02
03
3-8,3-9 & 3-B
3-A
none
Metric Dimension Settings
Creating Hoops for the HV
04
05
none
none
Transferring Patterns using Happy Link
Transferring Patterns using a Memory Card
Transferring Patterns from the Machine to a Card
Locking Pattern
Deleting Pattern
06
07
08
09
10
5-4
5-5,5-6 & 5-7
none
11-1
5D, 5C & 5E
Selecting a Design
Programming Thread Colors for the Needles
Programming Thread Colors for the Design
11
12
13
5-A
13-3 & 13-4
13-5 & 13-6
Positioning the Design in the Hoop/Creating Hoops
Using the Trace Function
Forward and Backward Tracking.
14
15
16
20-2 & 20-3
6-4
3-8 & 3-9
Scaling the Size of the Pattern
Rotating/Mirroring Design
Adjusting the Satin Stitch Width and Pull
Compensation
Removing Unwanted Jump Stitches
Embroidering Multiple Designs
17
18
12-2
9-5
19
20
21
12-3
19-1 to 19-9 & 19-A
12-5 & 12-6
Installing the Cap Device/Machine Set Up
Installing the Hoop Tech Device/Machine Set Up
22
23
7-1 to 7.9 & 7A, B & C,
20-4 to 20-6
none
Reversing Directions of Frame Movements
Single Needle Color Transfer
Pattern Color Transfer
Start Embroidering from a Particular Stitch
Start Embroidering from a Particular Color
24
25
26
27
28
5-1
13-2
13-5 & 13-6
9-6
9-7
Machine Maintenance, Cleaning/Lubrication
Thread Cutting Length
Machine Firmware Version
System Reset
Speed Reset
29
30
31
32
33
23-1 & 23-2
5-1
22-3
25-1
25-2
Happy Voyager
Interface Control
Description of function
Identifying and explaining the functions of the
keys/buttons on the control box.
ARROR Keys (Up, Down, Left, Right):
• In the DRIVE mode move the hoop.
• In the MENU mode used to navigate to desired item.
SET button: Select and execute a function.
MENU button: Enter the menu mode. (also enter
into submenu’s).
ESC button: Stop or cancel a selected setting.
(Used to escape out of a menu or function.)
FF button (Fast Forward): In conjunction with
the arrow keys increases frame movement speed
for faster tracking.
+/-
buttons: Plus/minus buttons increases and
decreases the machine embroidery speed.
ARROR button (Left/Right): Moves the sewing
head in the desired direction. (Moves between
needles 1 - 12.)
P FOOT button: Raises and lowers the presser
foot. (Useful in positioning the needle at a precise
point in the design. i.e. after a thread break)
Process: Lower the presser foot, then manually
pull down the needle. Perform a CUT to return to
normal embroidery position.)
TRACE button: Verify that the pattern selected
embroiders within the boundaries of the hoop.
(See: “Using the TRACE function”.)
01
Happy Voyager
Interface Control
CUT button: Cut the upper and lower thread.
START button: Start to embroider
Note: If held down while embroidering, the machine temporarily switches into a super slow
mode. When released the speed returns to the
previous embroidery speed.
STOP button: Stop the embroidery process.
Additional functions are different Back tracking
modes.
4 Modes of back tracking:
Press once: Frame moves backwards one stitch.
Press continuously: Frame moves backwards
continuously.
Keep pressing continuously: The button function locks, the frame moves backwards by 1 stitch
at a time continuously. Stop button must be
pressed to stop.
Keep pressing longer still: The button function
locks, the frame goes back in multiples of 10
stitches at a time continuously. Stop button must
be pressed to stop.
FWD button: Forward Tracking
4 Modes of moving forward in a pattern:
Press once: Frame moves forwards one stitch.
Press continuously: Frame moves forwards
continuously.
Keep pressing continuously: The button function locks, the frame moves forward by 1 stitch at
a time continuously. Stop button must be pressed
to stop.
Keep pressing longer still: The button function
locks, the frame moves forwards by multiples of
10 stitches at a time continuously. Stop button
must be pressed to stop.
01
Happy Voyager
Interface Control
FUNC button: The function button opens to a
menu with additional functions. Use the arrow
keys to move to the desire function and SET to
execute.
Explanation of Functions:
TOP: Returns frame to the top of the pattern.
CENTER: Moves the frame to the center.
ORIGIN: Moves the frame to the start point.
POSTITION: Moves the frame to the current sewing position.
O SET: Not used
LOG-IN: Log-in for LAN network set up.
TURN-OFF: Recommended to turn the machine
off.
01
Happy Voyager
Drive Mode
02
Description of function
Explaining the drive mode display.
The drive mode is the actual embroidery mode.
The embroidery design and its position is displayed in the large left hand display area.
The display shows the amounts of stitches per
pattern. And the current stitch count during the
embroidery process.
Stitch count in
progress
Total Stitches
In the upper right hand corner the location # of
the selected pattern is displayed, along with the
name of the pattern.
JEANOP
Happy Voyager
Drive Mode
02
Color Changes: The left hand display shows the
number of color changes (i.e. 20). The display in
the middle shows the current color. The right
hand side show the colors remaining.
Color stop
Note: If a color change stop or a frame out is
applied the follow Icons appear above the thread
spools
Speed Setting: The left hand display shows the
maximum speed setting. The right hand display
shows the actual embroidery speed.
Currently selected needle: The left hand display represents the machine embroidery head.
The right hand display show the current needle
selected.
Indicator Icons: Along the bottom of the display
are Icon representing additional functions that
can be applied to a design (Scaling, rotate/mirror
image, satin stitch width adjust, repeat pattern,
auto origin, and offset.)
Active functions applied/active are indicated with
a green bar above the Icon.
Frame out
Happy Voyager
Drive Mode
02
Status Icon: Depending on the machine set up,
different icons appear in the upper right hand
side.
JEANOP
4 Status Icons:
Normal cap frame: Icon appears when a cap
frame is mounted to the machine. (Automatic sensor activation)
Wide cap frame: Icon appears when the wide
cap frame is selected. The frame type is selected
in the OPTION # 17.
Top: The icon show's when the machine is ready
to embroider in the regular embroidery mode.
Frame out: The frame out icon show's when a
frame out has occurred.
Happy Voyager
Drive Mode
02
Additional Display: When the hoop is offset
manually.
Distance moved in millimeters from the start point
in the X and Y direction.
X distance moved from
start point.
Y distance moved from
start point.
Size of Pattern info
Pattern size information in millimeters.
Height & width
Distance between top and start point.
Distance between bottom and start point
Note: If the numbers are equal i.e.
37.4 / 37.4 and 29.2 / 29.2 the design is digitized
center/center.
Distance between extreme left and start point.
Distance between extreme right and start point.
Happy Voyager
Menu Mode
Description of function
Explanation of the MENU mode.
PATTERN Menu: View all stored designs, the
submenu allows to lock design data, erase a design, choose trace type, rename design, copy designs, and write designs back to a memory card.
SETTING Menu: Design manipulations such as
resizing, rotating and repeating. Addition features
such as satin stitch width, frame out and design
offset.
NEEDLE Menu: Color selection for the selected
design. Submenu allows to choose the colors for
each needle, auto needles change sequence and
transfer color data from one design to another.
READ Menu: Memory management.
OPTION Menu: Change design and machine settings.
03
Happy Voyager
Menu Mode
POSITION Menu: Go directly to a specific stitch
number, color change or to a repeat pattern design.
EDIT Menu: Stitch edit function to manipulate the
individual stitches within a design.
FRAME Menu: Frame selection and design
placement within a selected hoop.
LETTER Menu: Lettering program for basic lettering.
CONTRAST Menu: Display screen manipulation
such as contrast.
OTHER Menu: Calendar and clock settings, network setup, machine initialization, speed initialization and version information.
GUIDE Menu: Onboard tutorial guide.
03
Happy Voyager
Metric Dimension Settings
Description of function
Changing the computer to metric allows to create
hoops in metric dimensions Using the Bernina
Embroidery Software Version 5. Each square
represents 1cm and is compatible with the metric
Happy Voyager machine grid.
Before starting Bernina Embroidery Software
Version 5 the computer has to be set to metric
dimensions.
Select START > SETTINGS > CONTROL
PANEL> REGIONAL OPTIONS> CUSTOMIZE>
NUMBERS> MEASURMENTS SYSTEM... and
change to METRIC and select OK.
Note: You may need to restart your computer.
04
Happy Voyager
Create Hoops in Bernina Embroidery SoftwareV5
Description of function
Create metric hoops that represents the
hoops used with the Happy Voyager machine.
Note: The computer must be set to metric
dimensions prior.
Start the Bernina Embroidery Software
Version 5 program.
Right mouse click on the HOOP ICON, select HOOP and NEW HOOP.
Note: The default setting for the design is
Automatic Center. This places the design
automatically in the center of the hoop.
05
Happy Voyager
Create Hoops in Bernina Embroidery SoftwareV5
This example is for creating a
180 mm round hoop.
The current standard hoop sizes of the Happy
Voyager machine are: 90mm, 120mm, 150mm
and 180mm.
For Format, select Oval
Change the Rectangle height to 10.00
Change the Width to 180.00
Change the Total height to 180.00
After changing the dimensions, select “Save
Hoop As..” to save and give the hoop a name,
“Happy 180mm hoop”.
Note: If numbers are not accepted, computer is
not set to metric dimensions.
The round hoop created in V5 matches the
180mm standard Happy hoop.
05
Happy Voyager
Create Hoops in Bernina Embroidery SoftwareV5
To create a rectangle Cap hoop select the rectangle and adjust the setting for the following sizes:
Happy Standard Cap: 67X 180mm
Happy Wide Cap: 67 X 290mm
Standard cap
Wide Cap
Note: The actual sewing area is smaller to account
for the presser foot sole. Always perform a
TRACE before embroidering.
05
Happy Voyager
Transferring Pattern using Happy Link
Description of function
Once a design is in .dst format, it be can opened
in Happy Link and transferred to the machine,
using the transfer Icon.
Note: The machine must be in the drive mode.
Perform all creations and manipulation in the powerful Bernina Embroidery Software Version 5.
When satisfied, save design both in .art format
and .dst format.
Only .dst and .tap formatted designs can be sent
and accepted by the Happy Voyager machine.
With the computer connected to the machine using a USB AB cable, open Happy link. Happy link
will display an USB icon indicating that the computer is connected to the machine.
.
06
Happy Voyager
Transferring Pattern using Happy Link
Select FILE > PATTERN OPEN to search for a
design.
When searching for a design make sure the disk
format is set to .dst.
Once pattern is selected, use the TRANSFER
Icon to send the design to the machine.
Note: The machine must be in the drive mode for
the transfer to take place. (see drive mode as illustrated).
06
Happy Voyager
Transferring Pattern using a Memory Card
Description of function
The READ menu reads a PCMCIA card or Flash
memory cards with adaptors for .dst data transfer
to the machine.
Perform all creations and manipulation in the powerful Bernina Embroidery Software Version 5 .
When satisfied, save design both in .art format
and .dst format.
Note: Only the .dst and .tap formatted designs
can be can be sent and accepted by the Happy
Voyager machine.
07
Happy Voyager
Transferring Pattern using a Memory Card
Using a PCMCIA card/adaptor greater than 16Mb
(Recommended 256Mb) copy the saved .dst design to the card.
Note: Machines updated to firmware version 1.05
accept 1Meg memory cards.
Note: Card format is FAT.
Carefully insert memory card into the machine.
07
Happy Voyager
Transferring Pattern using a Memory Card
Select the READ menu using the arrow and SET
keys.
The machine displays the names of the designs
on the card. Using the arrow and SET keys, select
the design to be copied to the machine. Addition
designs can be copied by selecting READ. When
finished copying, select END to exit.
Note: Do not remove card until exited out of the
READ menu.
07
Happy Voyager
Transferring Pattern to a Card
Description of function
The TRANSFER menu option allows the user to
send designs from the machine to a PCMCIA
card. All design specific settings are transferred.
Note: When sending a file to the machine it can
be in several formats (Such as .DST). Designs
Saved back to a card from the machine are
saved only in .TAP format. (.HP1 format is not
used)
Select PATTERN and press SET.
Select the pattern for TRANSFER to the PCMCIA
card.
08
Happy Voyager
Transferring Pattern to a Card
Use a PCMCIA card/adaptor greater than 16Mb
(Recommended 256Mb)
Note: Machines updated to firmware version 1.05
accept 1Meg memory cards.
Note: Card format is FAT.
Carefully insert memory card into the machine.
08
Happy Voyager
Transferring Pattern to a Card
Select MENU use the down arrow key to move
down pass the last submenu icon for the TRANSFER function icon, press SET.
Message, “Make a HP1 File?” Select YES and
press SET.
Checks for free space on the card and then display. Select OK and press SET.
Rename the pattern or press SET to accept as is.
Writing the pattern to the card.
08
Happy Voyager
Transferring Pattern to a Card
The design saved creates 2 files, one with a
“HP1” extension, and one with a .TAP extension.
Note: Only the .TAP extension is a valid file extension.
Open Happy link.
Select FILE > PATTERN OPEN to search for a
design.
Saved machine design on the card can only be
displayed and retrieved as a .TAB file extension.
The V5 embroidery software can not read
the .TAB file extension.
Select “Ok” to open design in Happy link.
08
Happy Voyager
Locking Pattern
Description of function
The LOCK pattern data menu option prevents
accidental changes or deletions.
Select PATTERN menu, press SET.
Using the arrow keys select a design and select
SET.
Select MENU again use the down arrow key to
move to the LOCK function.
By pressing set a LOCK appears above the design. To remove the lock repeat the process.
09
Happy Voyager
Deleting Pattern
Description of function
The ERASING menu option allows to delete patterns from the machine.
Select PATTERN and press SET.
Select MENU use the arrow key to move to the
ERASE function, press SET.
Select the ERASE function by pressing SET, the
following screen appears.
Use the arrow keys to mark the design for deletion, select SET.
Select ESC to execute, select OK and press SET
to delete design.
Note: If the MENU is selected all designs will be
marked for deletion.
Note: If all designs are deleted most Icons/
Functions in the MENU screen are disabled. By
loading one design all functions will be reactivated.
10
Happy Voyager
Selecting a Design from Memory
Description of function
Pattern (designs) are stored in the pattern menu.
Up to 99 patterns or 250,000 stitches.
Select PATTERN and press SET.
Select a PATTERN by using the arrow keys to
move to the pattern desired. Press SET to select
that pattern.
Select ESC to exit back to the menu mode, select
ESC again to return to the drive mode.
Pattern is now displayed in the drive mode
screen.
11
Happy Voyager
Programming Thread Colors for the Needles
Description of function
With the thread color option select the colors that
represents the colors that are loaded on the spool
pins of the machine.
The needle # 1 is on the front right hand side.
The far back position is for the bobbin thread.
Place threads on thread stand. Generally, place
most common color threads (Primary colors) right
next to each other (for example in position #
5,6,7 and 8). This eliminates lengthy needle/color
jumps for example from position 1 to 12 to 5 etc.
Select NEEDLE menu, press SET.
Select MENU, using the arrow keys move to the
PALETTE menu and select SET to enter.
12
Happy Voyager
Programming Thread Colors for the Needles
12
Needles 1 through 12 should be set up so that
they represents and match the colors on the machine. The last icon represents the contrast color
for better color definition.
Use the up/down arrows to move among the needles. Select SET to enter color change area.
The first spool Icon represent the color currently
selected, the second spool Icon represents the
changed color.
By using the arrow keys move among the palette
to locate a color that represents the actual spool
color on the machine. Select SET to accept the
changes.
Continue to select the colors for each needle until
the needle colors 1-12 match up with the spool
colors on the machine.
Press the ESC key to exit the submenu.
Select ESC to exit the needle menu.
1st spool
2nd spool
Happy Voyager
Programming Thread Colors for the Designs
Description of function
In the needle menu, select the color and the sequence for the color in the displayed design.
Select NEEDLE menu, press SET.
13
Happy Voyager
Programming Thread Colors for the Designs
Explanation: The first set of numbers are the color
sequences in the pattern. The second set of numbers are the needles (thread colors) allocated for
that color sequence.
Use the up/down arrow keys to move among the
color sequences.
Use the right/left arrow keys to change the needle
(color)
Note: Scroll down past the 5 colors for additional
allocations.
Note: Needle number 0 means no needle has
been chosen. The machine will stop waiting for a
selection.
When selecting SET a
*
will appear next to the
needle number. This is a COLOR STOP after finishing this color the machine stops.
Remove the color stop pressing SET again.
If a diamond is next to the needle number, that
means that a FRAME out has been applied to
that color sequence. After sewing out that color
the machine will stop and the frame will move to a
determined position. See Happy Voyager user/
operator manual.
Select ESC to exit.
13
Happy Voyager
Positioning the Design in the Hoop/Creating Hoops
Description of function
The FRAME menu allows the user to select a representation of the hoop placed on the machine to
visually position the design within the hoop. It also
allows to create customized round and square
hoops.
Select FRAME menu and press SET to enter.
If Message “Check the top of pattern data” select
OK.
Select the appropriate hoop type (Round or
Square) , press SET.
Select the hoop size, press SET.
Design is placed in the center of the hoop.
The most outer ting presents the boundary of the
hoop. The red inner outline represents the safe
embroidery area. The pattern is by default in the
center and is represented in blue.
14
Happy Voyager
Positioning the Design in the Hoop/Creating Hoops
Use the arrow keys with the FF (Fast Forward) key
to move the pattern to the desired embroidery location, select SET to accept.
Only place the pattern within the red boundary
area.
Select ESC to exit the frame menu, and ESC again
to return to the drive menu.
Always perform a TRACE before starting to embroider to make sure the presser foot stays within
the inside parameter of the hoop.
14
Happy Voyager
Positioning the Design in the Hoop/Creating Hoops
Creating Custom Hoops
In the FRAME Menu select USER
In the USER section there is the ability to custom
create 5 additional hoops to use for positioning a
design.
Select one of the 5 hoops using the up/down blue
arrow keys.
Select Menu to get to the sub menu area. Select
the HAND icon by pressing SET.
Select Class by pressing SET.
Use the blue arrow keys to choose between 1 and
2.
•
Class 1 is for Round Type Hoops
•
Class 2 for Rectangle Type Hoops
14
Happy Voyager
Positioning the Design in the Hoop/Creating Hoops
Round Type Hoops
Select Class 1 , press SET.
Press, SET to enter the Size area.
Change the number to represent the hoop size
you wish to use for a Round Hoop.
Press, SET to save your change and ESC to exit
the submenu.
Note: Remember the largest round hoop to fit the
HV machine is 210mm.
Rectangle Type Hoops
Select Class 2 , press SET.
Press, SET to enter the Size Y area.
Change the numbers to represent the height size
you wish for the hoop. Press SET to accept.
Press, SET to enter the Size X area.
Change the numbers to represent the Length size
you wish for the hoop. Press SET to accep
Note:
Equal values in the Y and X filed represent a
square hoop, uneven values represent a rectangular hoop. Remember the largest Square hoop
to fit the HV machine is Y = 320mm and X =
320mm
Select ESC to exit the submenu.
Once the hoop is created. Select the hoop and
position the design in the hoop the same as described earlier.
14
Happy Voyager
Using the Trace Function
15
Description of function
The trace function is used to verify that the pattern
selected embroiders within the boundaries of the
attached hoop.
It is Very important to perform a TRACE before
sewing out a pattern !!!
Perform a trace by pressing the TRACE button.
The frame (Hoop) begins tracing the pattern
(Design) within the hoop.
Visually observe the hoop and the front/back of
presser foot and check to make sure the presser
foot is within the perimeter of the attached hoop.
1024
Once the trace is done, the stitches count of 1024
stitches is displayed.
To perform a 2nd trace, select FUNCTION, Top
and select TRACE.
Happy Voyager
Forward and Backward Tracking
Description of function
The STOP button is also used as the BACK
TRACK button which allows backtracking within
the design.
For example, if a thread break occurred use the
STOP button to back track a few stitches past
where the breakage occurred.
Note: The STOP and FWD buttons have several
modes.
•
Press once – moves by one stitch
•
Press continuously - beep indicates the new
mode to move continuously
•
Keep pressing - moves continuously by 1
stitch until the STOP button is pressed.
•
Pressing longer still - moves continuously by
10 stitches until the STOP button is pressed.
16
Happy Voyager
Scaling the Size of the Pattern
Description of function
The scaling options allows to rescale in the X and
in the Y direction down to 50% and up to 200%.
Select SETTING press SET to enter setting
menu. Using the arrow keys, arrow down to the X
scaling option. Select SET to choose. Use arrow
keys up down to change value. Select SET to accept the change.
Using the arrow keys, arrow down to the Y scaling
option. Select SET to choose. Use arrow keys up
down to change value. Select SET to accept
change.
Note: There is no stitch processor, stitches will be
compressed or expanded. Use the scaling function for minor corrections in the + - 20% range.
Select ESC to exit back to MENU mode.
17
Happy Voyager
Rotating /Mirroring the Design
Description of function
Rotate a design in single 1degree increments, 90
degree increments or in mirror image motions.
.
Select SETTING press SET to enter setting
menu.
To rotate by degrees: Using the arrow keys, arrow down to the angle option. Select SET to
choose. Use arrow keys up down to change
value. Select SET to accept change.
To rotate by 90 degrees or to mirror: Using the
arrow keys, arrow down to the Convert design
option. Select SET to choose. Use arrow keys up
down to change position of design. Select SET to
accept change.
Select ESC to exit back to MENU mode and Select ESC again to return to drive mode.
18
Happy Voyager
Adjusting the Stitching Width (Pull Compensation)
Description of function
The width adjusting option allows to increase or
decrease satin stitch from + 1.0mm to -1.0 mm in
size.
Select MENU then using the arrow keys move to
SETTING, press SET to enter setting menu. Using the arrow keys, arrow down to the width adjust
option. Select SET to choose. Use arrow keys up
down to change value. Select SET to accept
change. Select ESC to exit back to MENU.
Min -1.0mm
-
19
Max +1.0mm
Happy Voyager
Removing Unwanted Jump Stitches
Description of function: Unwanted jump
stitches can be eliminated by changing the settings of the cut at jump data option in the EDIT
menu.
Explanation:
Cut at jump data setting eliminates for example
the jumps stitches between two words.
Example, the jump stitch setting is at 7. If the machine counts 7 or less jump stitches between the
letters the jumps will not be cut. If the machine
counts more than 7 jump stitches the thread will
be cut.
20
Happy Voyager
Removing Unwanted Jump Stitches
Explanation of Issue:
If cut at jump data is set to “0” , no stitches will be
cut . (The thread cuts between the different color
changes is not effected.)
Note: While jumping between to————-be the
needle bar is disengage and causes a loud clanking noise!
Explanation of Issue:
If cut at jump data is set to “3” , which is the default setting. All stitches with more then 3 jumps
will be cut, those with less then 3 will not be cut.
Jump stitch
20
Happy Voyager
Removing Unwanted Jump Stitches
20
Explanation of Issue:
If cut at jump data is set to “1”. All stitches with
more then 1 jump will be cut, the only threads left
are those that do not have an actual jump stitch
in them.
No actual jump stitch
Explanation of Issue:
Use the features in the EDIT mode to remove
stitches if no actual jump stitch are present.
Actual jump stitch
Happy Voyager
Removing Unwanted Jump Stitches
Description of function: By changing the setting
of the cut at jump data option and using the EDIT
menu unwanted jump stitches can be eliminate
.
Select MENU then using the arrow keys move to
OPTION, press SET.
After selecting OPTION, two Icons appear, the
one on the right is for machine options and the
one on the left is for pattern options. Select the
left Machine Icon and press, “Set”.
20
Happy Voyager
Removing Unwanted Jump Stitches
Select “6 Cut at jump data” by using the arrow
keys and pressing SET .
Using the arrow keys, change value to “1”. and
select SET. Now all actual jump stitches will be
cut. Select the ESC key two times to return to the
drive mode.
20
Happy Voyager
Removing Unwanted Jump Stitches
Description of function: In the EDIT mode by
changing the setting of the cut at jump data option
unwanted jump stitches can be eliminate.
Select MENU then using the arrow keys move to
EDIT press SET to enter Edit menu.
20
Happy Voyager
Removing Unwanted Jump Stitches
Select MENU for the submenus. Use up or down
arrow keys to select “Zooming rate”. Select SET
to change. (Suggest change to 200 % or 400 %
magnification.)
Select MENU for the submenus, use up or down
arrow keys to select “Zoom in for the display”.
Select SET to apply magnification that was selected.
20
Happy Voyager
Removing Unwanted Jump Stitches
Use up or down arrow keys to select the move by
features.
Move by:
•
Color
•
1000 stitches
•
100 stitches
•
10 stitches
•
Single stitch
•
Function (moving by function, select MENU
in the submenu, choose the eyeglasses, then
chose the function to move by. Move by 0
stitch, 0 jump, jump, speed, cut, stop and end.
Use the right arrow key to move forward in the
pattern and the left arrow key to move back in the
pattern. Move to the stitch just before the thread
to be trimmed, press SET the F section becomes
active, then use the up and down arrows select
CUT, then press SET to apply.
Additional function can be applied, such as:
End end point
Chg color change
Stp stop
Cut cut
Spm speed limit medium (300rpm)
Sp2 speed limit medium (800rpm)
Sp1 speed limit high (1000rpm)
Sph release speed limit
20
Happy Voyager
Removing Unwanted Jump Stitches
Once a cut is applied (red “+”), the next stitch is
market with an blue “X”. (The one before the unwanted thread trail.) Continue process until all
unwanted thread trails are removed.
When finished, Select ESC, “ Finish editing
mode?” Use the arrow key to move to Yes and
select SET.X
+
X
The unwanted thread is cut.
Thread Removed
20
Happy Voyager
Embroidering Multiple Designs
Description of function
In the repeat sewing option patterns can be arranged and repeated a number of times
Note: This allows for multiple copies of the same
design embroidered in one hoop.
Select the pattern, be aware of the size of the pattern in respect to the hoop size and whether the
multiplied pattern will be able to fit within the
hoop.
Select MENU then using the arrow keys move to
SETTING, press SET to enter setting menu.
21
Happy Voyager
Embroidering Multiple Designs
Use the right arrow key to move to the REPEAT
SEWING ICON area.
Explanation of settings:
Number of pattern repeat in the X direction
Number of pattern repeat in the Y direction
Distance between start point of each pattern
in the X direction. (Patterns spread out in X
direction.)
Distance between start point of each pattern
in the Y direction. (Patterns spread out in Y
direction.)
Priority of embroidery directions:
X - left/right priority
Y - up/down priority
21
Happy Voyager
Embroidering Multiple Designs
The arrow up and down keys moves to the different settings, select SET to activate the setting.
Use the up and down arrow keys to change the
value. Select SET to accept that setting.
To view the multiple patterns select MENU and
select the Magnifying glass by pressing SET Select ESC to return to the Setting menu.
Select ESC again to exit the SETTING menu.
21
Happy Voyager
Installing the Cap Device/Machine Set Up
22
Install the cap frame driver to the machine according to manual.
.
Note: Important the machine has to be in the off
position when installing the cap frame device.
Warning: When installing the cab frame be careful not to damage the actuating lever underneath
the right hand side of the X carrier. (see arrow)
Note: Important, prior to turning on the machine,
manually rotate the cap frame ring to line up the
marked dotted line (see picture) in respect the
needle plate. Move the entire arm to line up the
marked arrows in respect to the needle plate.
Turn on the machine.
=
=
=
=
Happy Voyager
Installing the Cap Device/Machine Set Up
With the cap frame driver mounted, the embroidery
design is automatically turned upside down and a
cap icon is displayed in the upper right hand corner
of the screen.
Note: If the cap icon is not displayed check the actuating lever mentioned in the previous page.
Note: When using the cap frame a selection of the
cap frame type must be selected. (Normal or Wide
frame)
Select OPTION , press SET.
After selecting OPTION , two Icons appear, the one
on the right is for machine options and the one on
the left is for pattern options. Select the Machine
Icon and press, “Set”.
Use the down arrow key to move to 17 Cap Frame
Type. Press SET to activated, use the up/down
keys to change, press SET to accept change.
Select ESC to exit the frame menu and ESC again
to return to the drive menu.
In the drive mode next to the cap Icon a W is displayed.
Note:
The Normal cap represents a 67mm x 180mm embroidery field
The Wide cap represents a 67mm x 290mm embroidery field
22
Happy Voyager
Installing the Cap Device/Machine Set Up
To position pattern inside the cap frame, select
FRAME press SET.
Press SET to accept cap.
Use the up/down arrows to chose between the
111S-Cap (Standard) and the 112W-Cap (Wide).
Press SET to accept.
Standard Cap Frame
Wide Cap Frame
22
Happy Voyager
Installing the Cap Device/Machine Set Up
Explanation: The outer outline (red) represents
the safe embroidery area of the hoop. The pattern
is represented in the inside the frame (blue).
Only place the pattern within the red boundary
area.
Note: Always perform a TRACE prior to embroidering.
Use the arrow keys with the FF (Fast Forward)
key to move the pattern to position the design and
select SET.
Select ESC to exit the frame menu, and ESC
again to return to the drive menu.
Always perform a TRACE before starting to embroider to make sure the presser foot stays within
the inside parameter of the hoop.
22
Happy Voyager
Installing the Hoop Tech Device/Machine Set Up
Description of function
Interchangeable Tubular Clamping System (ITCS)
The clamping capability of the ITCS allows embroidering with many, otherwise "un-hoop-able or difficult
to hoop" items, such as suit cases, leather etc. The
ITCS are available in a large (ITCS2) or small
(ITCS1) chassis size, each with an assortment of
window sizes that are quickly and easily exchangeable without the use of tools.
Warning: Extra precaution must me taken when using this device:
• Never turn on the machine with the Interchangeable Tubular Clamping System installed.
• Only install the ITCS after the machine has calibrated its X & Y position.
• Do not performing power fail recovery with
ITCS installed.
• Only move the X & Y position or TRACE with
the Clamping System closed
• Just in case, be prepared to hit the red panic
button during the TRACE and any X & Y OFFSET executions.
The ITCS is a effective device to efficiently embroider - bags - CD cases - jackets - leather - canvas quilted goods - computer bags - back of caps, etc.
Basic clamping system requires 3 items:
1. Interchangeable Tubular Clamping System
(Either ITCS 1 small or ITCS 2 Larger )
2. Set of Tubular arms (Brackets)
Arm ITCS 2 , model 1201
3. Window insert to fit the clamping system and
most appropriate for the embroidery task.
Note: Additional window insert for each
Tubular Clamping System are available.
23
Happy Voyager
Installing the Hoop Tech Device/Machine Set Up
23
Some window kit contains two upper windows and a
lower window.
Upper window
Lower window
Two styles of upper window inserts, one of these will
be of shiny metal construction for lightweight fabrics,
the other yellow upper window is for bulkier projects.
For Lightweight fabrics
For bulkier projects
Install the lower window into the clamping system by
first loosening the thumb screw in the center of the
clamping system and slide-in the lower window under the two hooks in the base until it stops.
Hold window in place and tighten the black thumb
screw to secure the lower window.
Happy Voyager
Installing the Hoop Tech Device/Machine Set Up
Install the upper window by slipping the retaining
hole over the pivot pin on the right hand side and
gently pulling the left arm outwards to engage the
hole on the opposite side of the upper clamping window.
Install the brackets on the clamping system.
Note: Screws for the brackets are accessible from
the bottom.
Note: Right side bracket is marked with a U-shaped
cutout.
Correctly assembled bracket
23
Happy Voyager
Installing the Hoop Tech Device/Machine Set Up
23
Installing the Clamping system onto the machine.
WARNING
Warning !! Never power up machine with
ITCS unit installed. Always remove prior to
turning the machine on.
Failure to do so may result in physical interference between the ITCS and the machine!!
To install, turn on machine, select set to initialize the
machine. (ESC if tutorial menu is displayed.)
1
Move the pentagram, using the FF and arrow function all the way to the rear most position.
Slide the clamping system in from behind (1) and
then clamp into frame holders. (2) (See picture)
2
Make sure the locking pins of the arm snap cleanly
into the holes of the clamp bracket.
Adjust the Tubular Clamping System height using the
two nuts on both the right and left side of the clamping system so that the clamping system:
•
•
•
Is horizontal
Does not touch the machine cylinder arm
Does not exceed the height of 1/16 inches above
cylinder arm.
Does not exceed 1/16”
Happy Voyager
Installing the Hoop Tech Device/Machine Set Up
23
Warning: Any movement of the Tubular Clamping
System must only be carried out with the clamp in
the closed position.
Move the arm to true center (if not there already).
Press FUNC and arrow down to CENTER and press
SET. The arm moves if it is not already centered.
Notice: The center is NOT the center of the installed hoop.
Set Up the Design:
1. Transfer the design into Voyager via either USB or
Compact Flash and select a design.
2. Go to the SETTING menu by pressing MENU, then
using the arrow keys to select SETTING. Press SET to
enter the setting menu.
3. Make sure the design was digitized “center-center”.
Check in window marked 3 if the Y-distances from center
and the X-distances from center are matching pairs.
3
4
If not adjust the center using the digitizing/editing software
or ignore the instructions given below.
4. Press the blue right-arrow key in the control panel to
navigate to the third tab in the setting screen as shown
(See picture - box 4) and using the down arrow key 2 time
to access box marked 5 and select SET.
5. Program the correct offset value for the installed
Tubular Clamping System.
Important the values must be in the MINUS numbers!
MINUS — 60.3 for smaller clamping system (ITCS1)
MINUS — 75.5 for larger clamping system (ITCS2)
6. Return to the main screen by pressing ESC twice.
7. Trace the design by pressing TRACE. Important:
Just in case, be prepared to hit the red panic button
during the TRACE and any OFF-SET executions.
5
Happy Voyager
Reversing Directions of Frame Movements
Description of function
The reverse frame move option reverses the direction of movement when positioning the design
in the frame menu.
Select Menu then using the arrow keys move to
“OPTION menu”, press “SET” .
After selecting options, two Icons will appear, the
one on the right is for machine options and the
one on the left is for pattern options. Select the
Machine Icon and press, “Set”.
24
Happy Voyager
Reversing Directions of Frame Movements
Use the up/down arrow key to move to “18”. Reverse frame move” Press “SET” to activated, Use
the up/down keys to change to “yes”, Press “SET”
to accept change.
Select ESC to exit the FRAME menu.
The FRAME menu and positioning the pattern
using the arrow keys and FF (Fast forward) the
directions are reversed.
24
Happy Voyager
Single Needle Color Transfer
Description of function
Change the needle number and allocate different
colors/needles.
Note: In case the thread ran out, with this feature
quickly a new thread/needle can be assigned to
the design, rather than changing the thread.
Select MENU then using the arrow keys move to
NEEDLE, press SET.
25
Happy Voyager
Single Needle Color Transfer
Select MENU again to get to the submenus. Use
the arrow keys to move to the TWO NEEDLES,
select SET.
Select the up/down arrow keys to chose the needle, select SET
Select the up/down arrow keys to select the replacement needle/color. Select SET to accept the
change.
For example needle # 1 is replaced with needle #
7.
25
Happy Voyager
Pattern color data Transfer
Description of function
With the color change data options saved color
data can be transferred to another pattern with
similar colors and sequences.
Select MENU then using the arrow keys move to
NEEDLE, press SET to enter NEEDLE menu.
26
Happy Voyager
Pattern color data Transfer
Explanation:
The READ function stores the color data into a
temporary memory. Color stops are also transferred.
The WRITE function writes the data back to a selected design.
Color change stop
Example of practical uses:
The color change data application is useful patterns with similar colors and sequences.
If a pattern has to be altered in the software and
resent to the machine, the colors have to be reallocated. With the color transfer feature reallocating the data is simple.
26
Happy Voyager
Pattern color data Transfer
Select the pattern to READ the color data from.
After entering the NEEDLE menu, select MENU
again for the submenus. Use the arrow keys to
move to the data READ Setting. Select SET to
start the data read.
Open the new pattern to apply the color data.
After entering the NEEDLE menu, select MENU
again for the submenus. Use the arrow keys to
move to the data WRITE setting. Select SET to
start the data transfer.
26
Happy Voyager
Start Embroidering from a Particular Stitch
Description of function
Direct stitch number input within a design.
Select MENU, using the arrow keys move to POSITION, press SET.
.
Using the arrow keys move to the STITCH ICON
TAB, press SET to activate.
Use the up/down arrows to count up/down among
the stitches Left/right moves the bar from the single to 10, 100, 1000 and 10000 position. Select
SET to accept.
Select ESC to exit back to MENU mode
Machine advances to the selected stitch number.
27
Happy Voyager
Start Embroidering from a Particular Color
Description of function
Move to a specific color number within a design.
From MENU screen using the arrow keys move to
“POSITION”, press “SET” to enter position menu.
Using the arrow keys move to the COLOR ICON
TAB, press SET to activate.
Use the up/down arrows to count up/down among
the colors. Left/right moves the bar from the single
to the 10 position. Select SET to accept.
Select ESC to exit back to MENU mode
Machine advances to the selected color.
28
Happy Voyager
Basic Machine Maintenance-Cleaning and Lubricating
Description of function
Daily Maintenance
Every 8 hours of operation the hook must be
cleaned and lubricated. Open the rotary hook
door, remove the bobbin, clean the entire area
and apply oil in the places shown.
Use light weight rotary hook oil.
Rotary hook (3/4 view): apply 1
drop of oil to channel shown by
the arrow.
Rotary hook (front view):
Also apply oil to the surface
exposed by the two half-moon
Weekly Maintenance
Every 40 hours of operation move head all the
way to the left hand side (Needle # 1 position).
3 oiling points:
(a) All needle bars (1– 12) In an steep angle
look from left to the right hand side and locate the
needle bars through the take up lever slot in the
front cover. Each needle bar receives one drop of
oil. Remember to up-count to 12 needle bars
when applying the oil.
(b) Head shaft. Apply one drop of oil into the
opening outlined with a yellow circle).
(c, d) Presser foot guide bar. Apply one drop
of oil each on the top and bottom of the presser
foot bar, located behind metal plate with the two
cut outs.
b
a
c
d
29
Happy Voyager
Basic Machine Maintenance-Cleaning and Lubricating
Weekly Cleaning
Every 40 hours of operation clean the area below
the needle plate, including the thread cutter.
1. With the machine turned off and disconnected
from the mains remove the needle plate using the
offset screwdriver.
2. In the back of the machine remove the rubber
cap. With the blue handled 3mm hexagonal Tdriver and turn the main shaft clockwise to the
“C” point, (275 degrees)
3. From the left hand side insert the manual lever
and pull down and hold it in place. The turn the
main shaft clockwise to the “L” point, ( 0 degrees) to open the thread cutter.
4. Clean out any waste thread and dust from the
thread cutter knife and surrounding area.
29
Happy Voyager
Basic Machine Maintenance-Cleaning and Lubricating
5. Using the 3mm hexagonal driver, turn the main
shaft clockwise back to the “C” point (275 degrees).
Note: When the machine is under power and if the
“C” point is not reached manually an error message 050 is displayed. Manually move to the disk
to the “C” point or select AUTO.
6. Remove the manual lever and secure the needle plate with two screws.
29
Happy Voyager
Changing the Thread Cutting Length
Description of function
If the first stitch is not being formed after a thread
cut, the length of the cut can be changed from
NORMAL to LONG
Select OPTION, press SET.
After selecting options, two Icons appear, the one
on the right is for machine options and the one on
the left is for pattern options. Select the Machine
Icon and press, “Set”.
Use the up/down arrow key to move to 9. Length
of TRD.cut Press SET to activated, Use the up/
down keys to change to Long, Press SET to accept change. Select ESC to exit the frame menu.
Different cut settings.
LONG
NORMAL
30
Happy Voyager
Firmware Version
Description of function
Checking the firmware version.
Select OTHER, press SET
Use the down arrow key to move to VERSION and
press SET to select.
The Firmware Version of the machine is the number indicated .
Press SET to return to MENU mode.
31
Happy Voyager
System Reset
Description of function
Setting the machine to factory default.
Note: All settings in OPTION menu are reset the
saved designs are not effected.
Select OTHER menu, press SET
Use the down arrow key to move to SYSTEM and
press SET to select.
Use the arrow keys to move to OK and select
SET to begin. Machine displays a Happy logo
(Initialization screen). Select SET to begin initialization.
Note: Remember the machine speed must be
calibrated after a initialization to achieve maximum speed capability.
32
Happy Voyager
Speed Reset
Description of function
Maximum speed calibration.
Select OTHER press SET to enter.
Use the down arrow key to move to SPEED and
press SET to select.
Note: Secure the needle thread in the horizontal
spring of the needle that is over the presser foot
to prevent unthreading.
Use the arrow keys to move to OK and select
SET to begin. The machine begins to run slowly
and gradually increase in speed. At the end of
process, COMPLETE displayed across screen
and returns to the drive mode. Turn off the machine and restart.
33