1
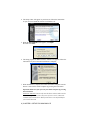
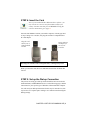
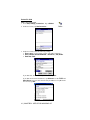
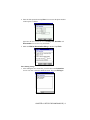
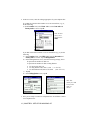
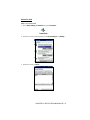
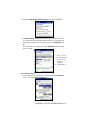
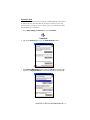
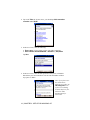
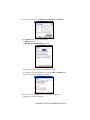
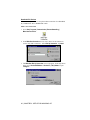
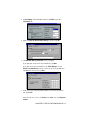
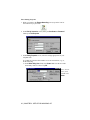
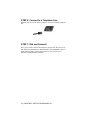
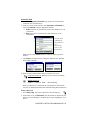
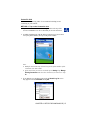
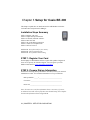
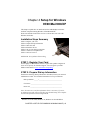
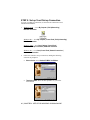
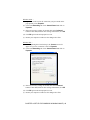
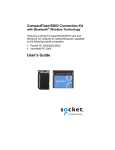
56K Modem Card
CompactFlash modem card and software for adding
connectivity to the following mobile computers:
•
•
•
•
Pocket PC 2000/2002/2003
Handheld PC, Handheld PC Pro and HPC 2000
Casio BE-300 Cassiopeia Pocket Manager
Windows 950B/98/Me/2000/XP notebook
User’s Guide
Table of Contents
CHAPTER 1 INTRODUCTION
Overview
Package Contents
Hardware Features
4
4
5
5
CHAPTER 2 SETUP FOR WINDOWS CE
6
Installation Steps Summary
STEP 1: Register Your Card
STEP 2: Prepare Dial-up Information
STEP 3: Install the Software
STEP 4: Insert the Card
STEP 5: Set up the Dial-up Connection
STEP 6: Connect to a Telephone Line
STEP 7: Dial and Connect!
OPTIONAL: Set up the Card for Your Country
OPTIONAL: Check Connection Time
6
6
6
7
9
9
24
24
32
33
CHAPTER 3 SETUP FOR CASIO BE-300
34
Installation Steps Summary
STEP 1: Register Your Card
STEP 2: Prepare Dial-up Information
STEP 3: Install the Software
STEP 4: Insert the Card
STEP 5: Set up the Dial-up Connection
STEP 6: Connect to a Telephone Line
STEP 7: Dial and Connect!
OPTIONAL: Set up the Card for Your Country
OPTIONAL: Check Connection Time
OPTIONAL: Set up Advanced Networking
34
34
34
35
37
38
39
39
41
42
42
CHAPTER 4 SETUP FOR WINDOWS
95/98/ME/2000/XP
43
Installation Steps Summary
STEP 1: Register Your Card
STEP 2: Prepare Dial-up Information
STEP 3: Insert the Card
STEP 4: Install the Drivers
STEP 5: Set up Your Dial-up Connection
STEP 6: Connect to a Telephone Line
STEP 7: Dial and Connect!
OPTIONAL: Set up Advanced Networking
43
43
43
44
45
46
47
47
48
2|
APPENDIX A SPECIFICATIONS
50
APPENDIX B NETWORK INFORMATION
51
APPENDIX C SUPPORT RESOURCES
52
Technical Support
Users’ Forum
Limited Warranty
Copyright Notice
52
53
54
56
3
Chapter 1 Introduction
Overview
Thank you for purchasing the Socket 56K Modem Card.
The Socket 56K Modem Card allows you to transform your
mobile computer into a portable data communications tool.
Now you can check email, fax, and browse the web
wherever there is an available analog telephone line.
You can use the 56K Modem Card with these mobile
computers:
• Pocket PC 2000/2002/2003
• Handheld PC, Handheld PC Pro and Handheld PC 2000
(based on Windows CE v2.11 or v3.0)
• Casio BE-300 Cassiopeia Pocket Manager
• Windows 95/98/Me/2000/XP notebook with a 3.3V Cardbus slot*
The Socket 56K Modem comes with WhereAreYou? software
for Windows CE. This optional software makes it easy to
monitor the modem’s connection activities and connection time.
Plus, you can program the modem card to work in whatever
country you choose, so you can stay connected wherever you go.
The Socket 56K Modem Card works with any Windows
95/98/Me/2000/XP notebook computer with a 3.3V CardBus slot. This
means you can use the card with virtually any notebook computer built in
the last several years. For notebook computers, no software installation is
necessary.
This User’s Guide describes how to set up and use the 56K Modem Card.
For advanced users, it also contains tips on setting up a connection to a
RAS server.
For information on using the 56K Modem Card with a Sharp Zaurus
handheld computer, visit: www.socketcom.com/ZaurusSharp.asp
For software updates, visit: www.socketcom.com/support/support_56k.asp
Register the product online at www.socketcom.com/prodreg
*
Windows 95 v4.00.950B; Windows 98; Windows 98 Second Edition
4 | CHAPTER 1: INTRODUCTION
Package Contents
The Socket 56K Modem Card package includes the following items:
•
•
•
Socket 56K Modem Card
Socket 56K Modem Installation CD
Software installation guide with warranty and copyright information
Hardware Features
Link Status LED
Indicates that the modem card is either dialing or connected to a network.
Power Status LED
Indicates that the modem card is using power.
Data Status LED
Indicates data transmission via the modem card.
.
CHAPTER 1: INTRODUCTION | 5
Chapter 2 Setup for Windows CE
This chapter explains how to install and use the 56K Modem Card with a
Pocket PC 2000/2002/2003, Handheld PC, Handheld PC Pro or Handheld
PC 2000.
Installation Steps Summary
STEP 1: Register your card.
STEP 2: Prepare dial-up information.
STEP 3: If desired, install the software.
STEP 4: Insert the card.
STEP 5: Set up the dial-up connection.
STEP 6: Connect to a telephone line.
STEP 7: Dial and connect!
OPTIONAL: Set up the card for your country.
OPTIONAL: Check connection time.
STEP 1: Register Your Card
Socket highly recommends that all users register their product. Registered
users receive priority for technical support. You can register your 56K
Modem Card online at: www.socketcom.com/prodreg
STEP 2: Prepare Dial-up Information
Find out the following dial-up information. If needed, contact your network
administrator or ISP. You need this information to set up a connection.
Dial-up number: (_____) _______________________________
User name: __________________________________________
Password: ___________________________________________
Note: For most users, only the information above is necessary. If you are
an advanced user and want to perform a more detailed setup, then complete
the Network Information Form in Appendix B.
6 | CHAPTER 2: SETUP FOR WINDOWS CE
STEP 3: Install the Software
Should I install Socket’s WhereAreYou? software?
You have two options for software installation:
Option 1: Skip software installation.
Windows CE-based mobile computers come with a generic built-in modem
driver. For basic operation of the modem card, you can use the built-in
driver and skip software installation. If you plan to use your device’s builtin drivers, then proceed to Step 4 to insert the modem card into your device.
Option 2: Install Socket’s enhanced software.
You can use the modem card with Socket’s WhereAreYou? software, which
is enhanced with the features listed below. If you do not need these
features, skip software installation.
•
•
•
A task tray icon that makes it easy to check if you have a good
connection
An applet that reports your connection time
An applet that lets you program the modem card to work in any
country
Software Installation
If you have not installed the software yet, follow the steps below. Make
sure to install the software BEFORE inserting the modem card.
1. Make an active connection between the mobile computer and a host PC.
An active connection exists if data can move between the host PC and
mobile computer via a serial/USB/Ethernet connection cable or cradle.
2. Insert the Socket 56K Modem Installation CD into the host PC.
Note: The host
PC can be a
desktop or
notebook PC.
3. Use My Computer or Windows Explorer to access your CD-ROM drive.
Click on SETUP.EXE.
CHAPTER 2: SETUP FOR WINDOWS CE | 7
4. The Setup Center will appear in your browser. Follow the instructions
on your screen to install the software for Windows CE.
5. When the File Download screen appears, click Open.
Do NOT click Save!
6. The Setup program for WhereAreYou? Software will appear. Follow the
instructions on your screen until installation is complete.
7. When installation is complete, disconnect the mobile computer from the
host PC. Soft reset the mobile computer by pressing the reset button.
Important! Make sure you soft reset your mobile computer by pressing
the reset button!
Pocket PC 2003 only: Do not soft reset the device when a Socket card is
inserted, or application errors may occur. If errors occur, remove the
card and soft reset the device. Wait for the device reset to finish before
you re-insert the card.
8 | CHAPTER 2: SETUP FOR WINDOWS CE
STEP 4: Insert the Card
Note: If you installed Socket’s WhereAreYou? software, you
may want to use it now to set up the modem card for your
country. You must start this process BEFORE inserting the
card. For instructions, go to page 32.
Insert the 56K Modem Card into your mobile computer, with the gray label
on top. If using a PC Card slot, first plug the card into a CompactFlash-toPC Card adapter.
Plug the card
directly into a
CompactFlash
I/O slot.
OR
Insert card into
an adapter for
use in a PC
Card slot.
Warning! Do NOT insert the card upside down, or damage may occur!
When you insert the card, the Power and Data Status LEDs will blink then
turn off.
STEP 5: Set up the Dial-up Connection
The process for setting up a dial-up connection differs between Pocket PC
2000/2002/2003, and Handheld PC devices. In the following pages, find the
instructions for your specific type of Windows CE-based mobile computer.
You will need your dial-up information for this step. For most devices, this
step involves two separate parts: making a new connection and entering the
dialing settings.
CHAPTER 2: SETUP FOR WINDOWS CE | 9
Pocket PC 2000
Make a New Connection
1. Go to Start | Settings | Connections. Tap on Modem.
2. In the next screen, tap New Connection…
3. In the next screen, enter the following settings.
1. Enter a name…: Enter a name, such as “My 56K Connection.”
2. Select a modem: Socket 56K Modem or Socket-CF+_ 56K_Modem.
3. Baud Rate: 57600
If you DO NOT need to enter any IP addresses, tap Next.
If you DO need to enter IP addresses, tap Advanced. Use the TCP/IP and
Name Servers screens to enter the necessary IP addresses. Tap ok. In the
next screen, tap Next.
10 | CHAPTER 2: SETUP FOR WINDOWS CE
4. Enter the dial-up number and tap Next. You can enter the phone number
without spaces or dashes.
Important! Be sure to enter the correct Country code, Area code, and
Phone number! Do not leave any field blank!
5. Make sure Wait for dial tone before dialing is checked. Tap Finish.
Enter Dialing Settings
1. After making the new connection, you will return to the Connections
screen. Your new connection should be listed. Tap on the Dialing tab.
CHAPTER 2: SETUP FOR WINDOWS CE | 11
2. In the next screen, enter the settings appropriate for your telephone line:
If you DO NOT need to dial a number to use an external line (e.g., 9),
do the following:
a) In the Location: field, select Home. Make sure the Area code and
Country code are correct. Tap ok.
Note: In most
cases, users
should select
Home.
If you DO need to dial a number to use an external line (e.g., 9), do the
following:
a) In the Location: field, select Work. Make sure the Area code and
Country code are correct. Tap on Dialing Patterns.
b) In the Dialing Patterns screen, enter the following settings, where:
X represents the number for dial-out
Y represents the number for dial-out long distance
• For local calls, dial: X,G
• For long distance calls, dial: Y,1,FG (“1” for U.S.)
• For international calls, dial: Y,011,EFG (“011” for U.S.)
c) Tap ok.
d) In the Dialing Options screen, tap ok.
Note: The
values for X and
Y may be the
same, as
shown..
3. Now you are ready to connect to a telephone line. See STEP 6: Connect
to a Telephone Line.
12 | CHAPTER 2: SETUP FOR WINDOWS CE
Pocket PC 2002
Make a New Connection
1. Go to Start | Settings | Connections. Tap on Connections.
2. In the next screen, in the top field, select Internet Settings. Tap Modify…
3. In the next screen, tap New…
CHAPTER 2: SETUP FOR WINDOWS CE | 13
4. In the next screen, enter the following settings.
1. Enter a name…: Enter a name, such as “My 56K Connection.”
2. Select a modem: Select Socket 56K Modem or Socket-CF+_
56K_Modem.
3. Baud Rate: 57600
If you DO NOT need to enter any IP addresses, tap Next.
If you DO need to enter IP addresses, tap Advanced. Use the TCP/IP and
Name Servers screens to enter the necessary IP addresses. Tap ok. In the
next screen, tap Next.
5. Enter the dial-up number and tap Next. You can enter the phone number
without spaces or dashes.
Important! Be sure to enter the correct Country code, Area code and
Phone number! Do not leave any field blank!
14 | CHAPTER 2: SETUP FOR WINDOWS CE
6. Make sure Wait for dial tone before dialing is checked. Tap Finish.
7. In Internet Settings, if multiple connections exist, you must select the
new connection to be used when dialing. In the list, tap and hold your
stylus on the connection. In the pop-up menu, select Always Dial. Tap
ok.
If you have only one connection, then the Always Dial feature will not
appear. Tap ok.
After you select
the modem card
connection for
dialing, it
should be
identified here.
Enter Dialing Settings
1. After making the new connection, you will return to the Connections
screen. Tap on the Dialing Locations tab.
CHAPTER 2: SETUP FOR WINDOWS CE | 15
In the next screen, enter the settings appropriate for your telephone line.
If you DO NOT need to dial a number to use an external line, do the following:
a) In the Location: field, select Home. Make sure the Area code and
Country code are correct. Tap ok.
Note: In most
cases, users
should select
Home.
If you DO need to dial a number to use an external line (e.g., 9), do the
following:
a) In the Location: field, select Work. Make sure the Area code and
Country code are correct. Tap on Dialing Patterns.
b) In the Dialing Patterns screen, enter the following settings, where:
X represents the number for dial-out
Y represents the number for dial-out long distance
•
•
•
c)
For local calls, dial: X,G
For long distance calls, dial: Y,1,FG (“1” for U.S.)
For international calls, dial: Y,011,EFG (“011” for U.S.)
Tap ok. In the Dialing Options screen, tap ok.
Note: The
values for X and
Y may be the
same, as
shown..
2.
Now you are ready to connect to a telephone line. See STEP 6:
Connect to a Telephone Line.
16 | CHAPTER 2: SETUP FOR WINDOWS CE
Pocket PC 2003
Note: These instructions are for setting up a standard dial-up connection to
an Internet Service Provider (ISP). If you want to connect to your work
network and/or a VPN/proxy server, please refer to your Pocket PC 2003
documentation for instructions.
1.
Go to Start | Settings | Connections. Tap on Connections.
2. Tap on the Advanced tab. Tap on the Select Networks button.
3. In the Network Management screen, make sure My ISP is selected in the
top field, and My Work Network is selected in the bottom field. Tap ok.
CHAPTER 2: SETUP FOR WINDOWS CE | 17
4. Tap on the Tasks tab. In most cases, you should tap Add a new modem
connection under My ISP.
5. In the next screen, enter the following:
• Enter a name…: Enter a name, such as “My 56K Connection”
• Select a modem: Socket 56K Modem or Socket-CF+_ 56K_Modem.
Tap Next.
6. In the next screen, enter the dial-up number exactly how it should be
dialed from your current location. You can enter the number without
any spaces or dashes.
Note: If you plan to use
the connection in
different area codes, tap
use dialing rules to set
up the correct dialing
locations. Refer to your
Pocket PC 2003
documentation for
instructions.
18 | CHAPTER 2: SETUP FOR WINDOWS CE
6. In the next screen, enter the User name and Password. Tap Advanced.
7. In the General screen, select the following:
• Baud rate: 57600.
• Wait for dial tone before dialing: Checked.
If you DO NOT need to enter any IP addresses, tap ok.
If you DO need to enter IP addresses, tap on the TCP/IP and Servers tabs
to enter any necessary IP addresses. Tap ok.
8. In the last screen, tap Finish. Now you are ready to connect to a
telephone line. Proceed to STEP 6.
CHAPTER 2: SETUP FOR WINDOWS CE | 19
Handheld PC Devices
This section explains how to set up the modem connection for a Handheld
PC, Handheld PC Pro or Handheld PC 2000.
Make a New Connection
1. Go to Start | Programs | Communication | Remote Networking |
Make New Connection.
2. In the Make New Connection screen, enter a name for the connection,
such as “My 56K Connection.” Select Dial-Up Connection. Tap Next>.
3. The Make New Dial-Up Connection screen will appear. In the drop-down
menu, select Socket 56K Modem or Socket-CF+_ 56K_Modem. Tap on
Configure…
20 | CHAPTER 2: SETUP FOR WINDOWS CE
4. In Port Settings, in the Baud Rate field, select 57600. Tap on the
Call Options tab.
5. Make sure Wait for dial tone before dialing is checked. Tap OK.
6. The Make New Dial-Up Connection screen will appear.
If you DO NOT need to enter any IP addresses, tap Next>.
If you DO need to enter IP addresses, tap TCP/IP Settings. Use the
General and Name Servers screens to enter any necessary IP addresses.
Tap OK. In the next screen, tap Next>.
7. In the next screen, enter the phone number of your office network or
ISP. Tap Finish.
Important! Be sure to enter the Country code, Area code, and Telephone
number!
CHAPTER 2: SETUP FOR WINDOWS CE | 21
Enter Dialing Properties
1. When you return to the Remote Networking screen, tap on the icon for
the connection you just made.
2. In the Dial-Up Connection screen, enter your User Name and Password.
Then tap on Dial Properties.
3. In the Dialing Properties screen, enter the settings appropriate for your
telephone line.
If you DO NOT need to dial a number to use an external line (e.g., 9),
do the following:
a) In the When dialing from: field, select Home. Make sure the area code
and country code are correct. Tap OK.
Note: In most
cases, users
should select
Home.
22 | CHAPTER 2: SETUP FOR WINDOWS CE
If you DO need to dial a number to use an external line (e.g., 9), do the
following:
a) In the When dialing from: field, select Work. Make sure the area code
and country code are correct. Tap on Dialing Patterns...
b) In the Dialing Patterns screen, enter the following settings, where:
X represents the number for dial-out
Y represents the number for dial-out long distance
9. For local calls, dial: X,G
10. For long distance calls, dial: Y,1,FG (“1” for U.S.)
11. For international calls, dial: Y,011,EFG (“011” for U.S.)
Note: The
values for X and
Y may be the
same, as shown.
c)
Tap OK. In the Dialing Properties screen, tap OK.
4. Now you are ready to connect to a telephone line. See Step 6.
CHAPTER 2: SETUP FOR WINDOWS CE | 23
STEP 6: Connect to a Telephone Line
With the card still in your mobile computer, connect to an analog telephone
line.
STEP 7: Dial and Connect!
Now you are ready to dial in and connect to your network. The process for
this differs between Pocket PC 2000/2002/2003 and Handheld PC devices.
In the following pages, find the instructions for your specific type of
Windows CE-based mobile computer.
24 | CHAPTER 2: SETUP FOR WINDOWS CE
Pocket PC 2000
1. Go to Start | Programs | Connections. Tap on the icon for the modem
connection you created in Step 5.
2. In the next screen, make sure the correct User name and Password are
entered. In Dial from: select the appropriate location:
• Home: Select this if you DO NOT need to dial a number to use an
external line.
• Work: Select this is you DO need to dial a number to use an
external line.
You may need
to modify the
dial properties.
For
instructions,
refer to your
Pocket PC’s
Make sure the correct Phone number is listed. To modify, tap on the
number.
3. Tap Connect. Call status screens will appear, and the Power and Data
Status LEDs will blink.
4. When you have connected, the task tray will show two icons:
Connection status icon: indicates an active remote networking
connection
Modem status icon:
GREEN — connected RED — data transmitting
When your Pocket PC is connected, the Link and Power Status LEDS
will stay on, and the Data Status LED will blink during data transmission.
Ending a Data Call
1. Go to Start | Today. Tap on the connection icon in the task tray.
2. In the status screen, tap Disconnect. After the Pocket PC disconnects, the
task tray icon will disappear. All LEDs may turn off, depending on your
device.
CHAPTER 2: SETUP FOR WINDOWS CE | 25
Pocket PC 2002
1. After setting up the dial-up connection, you will be in the Connections
screen. In the top field, make sure Internet Settings is selected. Tap
Connect.
To access this
screen any
time, go to:
Start –
Settings –
Connections Connections.
2. Make sure the correct User name and Password are entered.
You may need
to modify your
dial properties.
Refer to your
Pocket PC
2002’s user
manual for
instructions.
3. Tap OK. Connection status screens will appear, and the Power and Data
LEDS will blink. When the status screen reports that you have
Connected, the screen will show two icons.
Connection icon: (Navigation bar at top of screen)
Indicates an active dial-up or network connection
Modem status icon: (Task tray at bottom of screen)
GREEN — connected
RED — data transmitting
When the Pocket PC is connected, the Link and Power Status LEDS will
stay on, and the Data Status LED will blink during data transmission.
Ending a Data Call
1. Go to Start | Today. Tap on the connection icon in the navigation
bar at the top of your screen.
2. In the status screen, tap End. After the Pocket PC disconnects, the
connection icon will disappear, and the modem status icon will turn red
before disappearing. All LEDs may turn off, depending on your device.
26 | CHAPTER 2: SETUP FOR WINDOWS CE
Pocket PC 2003
Socket recommends using either of two methods for dialing in and
connecting to your network.
METHOD 1: Tap on the Connection icon
1. Tap on the Connection icon in the navigation bar at the top of the
screen. It should have an “X” to show that you are not connected.
2. A bubble should appear with the dial-up connection you just created.
Verify the phone number, then tap on the phone number.
Note:
• Multiple connections may be listed. Tap on the phone number of the
connection you want to dial.
• If the connection you want is not listed, tap on Settings. Tap Manage
Existing Connections and select the connection you want to use. Tap
ok.
3. If you did not save the dial-up password, the Network Log On screen
may appear. Enter the Password and tap OK.
CHAPTER 2: SETUP FOR WINDOWS CE | 27
4. The device will begin dialing.
When the Pocket PC tries to connect, the Power and Data LEDs will
blink.
Connection icon: (Navigation bar at top of screen)
Indicates an active dial-up or network connection
Modem status icon: (Appears if you installed Socket software)
GREEN — connected
RED — data transmitting
When the Pocket PC is connected, the Link and Power Status LEDS will
stay on, and the Data Status LED will blink during data transmission.
The Connectivity bubble will report your connection time.
28 | CHAPTER 2: SETUP FOR WINDOWS CE
METHOD 2: Dial automatically from your application
Note: After you have set up a dial-up connection, the Connection Manager
will automatically try to connect whenever you insert the card and try to
use Pocket Internet Explorer, Pocket Inbox, or any other program that uses
a dial-up connection.
1. Start the program that uses a dial-up connection. Enter a request for
receiving and/or transmitting information (e.g., in Pocket Internet
Explorer, enter a new URL and tap “Go”). The Pocket PC will
automatically try to connect.
Note: If the phone number of dialing location is wrong, tap Settings.
Tap Manage Connections and Edit the properties of your connection.
2. If you did not save the dial-up password, the Network Log On screen
may appear. Enter the Password and tap OK.
CHAPTER 2: SETUP FOR WINDOWS CE | 29
3. When the Pocket PC tries to connect, the Power and Data LEDs will
blink. After the device connects, it will receive/transmit the information
as requested (e.g., Pocket Internet Explorer will display the requested
website).
Connection icon: (Navigation bar at top of screen)
Indicates an active dial-up or network connection
Modem status icon: (Appears if you installed Socket software)
GREEN — connected
RED — data transmitting
When the Pocket PC is connected, the Link and Power Status LEDS will
stay on, and the Data Status LED will blink during data transmission.
Ending a Data Call
1. Tap on the connection icon in the navigation bar at the top of
your screen.
2. In the status screen, tap Disconnect. After the Pocket PC disconnects,
the connection icon will disappear, and the modem status icon will turn
red before disappearing. All LEDs may turn off, depending on your
device.
30 | CHAPTER 2: SETUP FOR WINDOWS CE
Handheld PC Devices
1. After setting up the dial-up connection in Step 5, you will already be in
the Dial-Up Connection screen.
To access this screen at any time, follow these steps:
• Go to Start | Programs | Communication | Remote Networking.
• Tap on the icon for the modem connection you created in Step 5.
2. In the next screen, verify the connection information.
3. For some mobile computers, you must modify the dial properties. For
instructions, refer to the mobile computer’s user manual.
4. Tap Connect. Call status screens will appear, and the Power and Data
Status LEDs will blink.
5. After the status screen reports that you have Connected, two connection
icons will appear:
Connection icon: (Task tray at bottom of screen)
Indicates an active dial-up or network connection
Modem status icon: (Task tray at bottom of screen)
GREEN — connected
RED — data transmitting
When the HPC is connected, the Link and Power Status LEDs will stay
on, and the Data Status LED will blink during data transmission.
Ending a Data Call
1. Tap on the connection icon in the task tray:
2. In the status screen, tap Disconnect. After the mobile computer disconnects,
the task tray icon will disappear from your screen. All LEDs may turn off,
depending on your device.
CHAPTER 2: SETUP FOR WINDOWS CE | 31
OPTIONAL: Set up the Card for Your Country
In order to set up the card for your country, you must first install Socket’s
WhereAreYou? software. Begin these steps to set up the card for your
country BEFORE inserting the modem card into your Pocket PC.
Note: Screens from a Pocket PC 2000 are shown.
1. Pocket PC Devices: Go to Start | Settings | System | WhereAreYou?
HPC Devices: Go to Start | Settings | Control Panel | WhereAreYou?
2. The WhereAreYou? screen will appear, similar to the one below. As
directed, close any applications that may currently be using the modem.
3. Insert the 56K Modem Card into your mobile computer.
4. After a few seconds, names of countries should appear in the drop-down
list. Select the appropriate country, then tap Save.
32 | CHAPTER 2: SETUP FOR WINDOWS CE
OPTIONAL: Check Connection Time
Pocket PC 2003
The Connection Manager reports the connection time. Tap on the
connection icon in the Navigator bar to access the Connectivity bubble.
Pocket PC 2000/2002 and HPC Devices
Socket’s software includes a status indicator applet that lets you quickly
view the modem connection’s time elapsed. This applet appears only if you
have an active connection via the 56K Modem Card.
1. Pocket PC Devices only: Go to Start | Today.
2. Tap on the modem status icon in the task tray.
3. A screen will appear, reporting the connection time.
CHAPTER 2: SETUP FOR WINDOWS CE | 33
Chapter 3 Setup for Casio BE-300
This chapter explains how to install and use the 56K Modem Card with a
Casio BE-300 Cassiopeia Pocket Manager.
Installation Steps Summary
STEP 1: Register your card.
STEP 2: Prepare dial-up information.
STEP 3: If desired, install the software.
STEP 4: Insert the card.
STEP 5: Set up the dial-up connection.
STEP 6: Connect to a telephone line.
STEP 7: Dial and connect!
OPTIONAL: Set up the card for your country.
OPTIONAL: Check connection time.
OPTIONAL: Set up advanced networking
STEP 1: Register Your Card
Socket highly recommends that all users register their product. Registered
users receive priority for technical support. You can register your 56K
Modem Card online at: www.socketcom.com/prodreg
STEP 2: Prepare Dial-up Information
Find out the following dial-up information. If needed, contact your network
administrator or ISP. You need this information to set up a connection.
Dial-up number: (_____) _______________________________
User name: __________________________________________
Password: ___________________________________________
Note: For most users, only the information above is necessary. If you are
an advanced user and want to perform a more detailed setup, then complete
the Network Information Form in Appendix B.
34 | CHAPTER 3: SETUP FOR CASIO BE-300
STEP 3: Install the Software
Should I install Socket’s WhereAreYou? software?
You have two options for software installation:
Option 1: Skip software installation.
The Casio BE-300 comes with a generic built-in modem driver. For basic
operation of the modem card, you can use the built-in driver and skip
software installation. If you plan to use your device’s built-in drivers, then
proceed to Step 4 to insert the modem card into your device.
Option 2: Install Socket’s enhanced software.
You can use the modem card with Socket’s WhereAreYou? software, which
is enhanced with the features listed below. If you do not need these
features, skip software installation.
• A task tray icon that makes it easy to check if you have a good
connection
• An applet that reports your connection time and speed
• An applet that lets you program the modem card to work in any
country
Software Installation
If you have not installed the software yet, follow the steps below. Make
sure to install the software BEFORE inserting the modem card.
1.
Use the USB/serial cable to connect the BE-300 to a host PC.
.
2.
Perform a PC Connect. For instructions, refer to the documentation that
came with your BE-300.
3.
Insert the Socket 56K Modem Installation CD into the host PC.
Note: The
host PC can
be a desktop
or notebook
PC.
4.
Use My Computer or Windows Explorer to access your CD-ROM drive.
Click on SETUP.EXE.
5.
Follow the instructions on your screen to install the software.
CHAPTER 3: SETUP FOR CASIO BE-300 | 35
6.
When installation is complete, disconnect the mobile computer from
the host PC. Soft reset the mobile computer by pressing the reset
button.
36 | CHAPTER 3: SETUP FOR CASIO BE-300
STEP 4: Insert the Card
Note: If you installed Socket’s WhereAreYou? software, you
may want to use it now to set up the modem card for your
country. You must start this process BEFORE inserting the
card. For instructions, go to page 40
Insert the 56K Modem Card into the CompactFlash I/O slot of your
BE-300. Make sure the card is right-side up, with the gray label on top.
Plug the card
directly into a
CompactFlash
I/O slot.
Warning! Do NOT insert the card upside down, or damage may occur!
When you insert the card, the Power and Data Status LEDs will blink once
then turn off.
CHAPTER 3: SETUP FOR CASIO BE-300 | 37
STEP 5: Set up the Dial-up Connection
You will need your dial-up information for this step. Unlike for other
device types, you do NOT need to enter any dialing settings for the Casio
BE-300.
1. Go to Main | Connections. Tap on New Setting…
2. In the next screen, enter the following settings:
• Connection name: Enter a name, such as “Socket 56K Modem CF.”
• A Mail/Internet application: Unchecked recommended. Otherwise
consult your BE-300 documentation.
• Dial-up: Selected
After entering these settings, tap !
3. In the next screen, enter your Phone number, Connection ID (this is the
same as your user name), and Password. Then tap !
4. In the next screen, make the following selections, then tap Finish.
• Modem: Select the Socket 56K Modem
• Speed: Select 57600 bps
• Wait for tone: Checked
38 | CHAPTER 3: SETUP FOR CASIO BE-300
STEP 6: Connect to a Telephone Line
With the card still in your mobile computer, connect to an analog telephone
line.
STEP 7: Dial and Connect!
1. After setting up your dial-up connection in Step 5, your new connection
should be listed in the Connections screen. Select your modem
connection, then tap Connect.
2. In the Dial-up Connect screen, verify the phone number. Tap Connect.
3. A series of screens will appear, reporting the status of your call. The
Power and Data Status LEDs will blink.
4. When your device has connected, it will report Connected. Two icons
will also appear at the bottom of your screen.
Connection status icon: indicates active remote networking
connection
Modem status icon:
GREEN — connected
RED — data transmitting
When your device has connected, the Link and Power Status LEDs will
stay on, and the Data Status LED will flash during data transmission.
CHAPTER 3: SETUP FOR CASIO BE-300 | 39
Ending a Data Call
1. Tap on the connection icon at the bottom of your screen.
2. In the connection status screen, tap Disconnect.
3. In the next screen, tap Disconnect Now. The connection status icon will
disappear. The modem status icon will turn red then disappear. All
LEDs will turn off.
40 | CHAPTER 3: SETUP FOR CASIO BE-300
OPTIONAL: Set up the Card for Your Country
In order to set up the card for your country, you must first install Socket’s
software. Begin these steps to set up the card for your country BEFORE
inserting the modem card into your Casio BE-300.
Pocket PC 2002 screens are shown below. Casio BE-300 screens will be
functionally equivalent.
1. Go to Main | WhereAreYou?
2. The WhereAreYou? screen will appear, similar to the one below.
As directed,
close any
applications
that may
currently be
using the
modem.
3. Insert the 56K Modem Card into your Casio BE-300.
4. After a few seconds, names of countries should appear in the drop-down
list. Select the appropriate country, then tap Save.
CHAPTER 3: SETUP FOR CASIO BE-300 | 41
OPTIONAL: Check Connection Time
Socket’s software includes a control panel applet that lets you quickly view
the modem connection’s time elapsed. This applet appears only if you have
an active connection via the 56K Modem Card.
1. Tap on the modem status icon in the task tray.
2. A screen will appear similar to the one below, reporting the connection
time.
OPTIONAL: Set up Advanced Networking
Follow these guidelines to set up a dial-up connection for a RAS server:
1. Complete the Network Information Form on the next page.
2. While making a new connection in Step 5, in the phone number screen,
tap on Advanced Settings.
3. Disregard the next screen and tap !
4. Use the next screen to enter any necessary IP addresses.
4. If using DHCP, you can probably keep the default settings.
Tap Finish.
"#
If NOT using DHCP, uncheck Auto-detect to enter any necessary
IP addresses, then tap Finish.
42 | CHAPTER 3: SETUP FOR CASIO BE-300
Chapter 4 Setup for Windows
95/98/Me/2000/XP
This chapter explains how to install and use the 56K Modem Card with a
notebook computer running Windows 95/98/Me/2000/XP.*
Please note that the Socket WhereAreYou? software does not work with
Windows notebooks.
Installation Steps Summary
STEP 1: Register your card.
STEP 2: Prepare dial-up information.
STEP 3: Insert the card.
STEP 4: Install the drivers.
STEP 5: Set up your dial-up connection.
STEP 6: Connect to a telephone line.
STEP 7: Dial and connect!
OPTIONAL: Set up advanced networking.
STEP 1: Register Your Card
Socket highly recommends that all users register their product. Registered
users receive priority for technical support. You can register your 56K
Modem Card online at: www.socketcom.com/prodreg
STEP 2: Prepare Dial-up Information
Find out the following dial-up information. If needed, contact your network
administrator or ISP. You need this information to set up a connection.
Dial-up number: (_____) _______________________________
User name: __________________________________________
Password: ___________________________________________
Note: For most users, only the information above is necessary. If you are
an advanced user and want to perform a more detailed setup, then complete
the Network Information Form in Appendix B.
*
Windows 95 v4.00.950B; Windows 98; Windows 98 Second Edition
CHAPTER 4: SETUP FOR WINDOWS 95/98/Me/2000/XP | 43
STEP 3: Insert the Card
1.
Insert the 56K Modem Card into a CompactFlash-to-PC Card adapter,
with the gray label on top.
2.
With the computer turned ON, insert the card-plus-adapter unit into the
PC Card slot of your computer.
3.
After a few seconds, a new hardware or device driver wizard will
automatically launch. Proceed to Step 4 to complete the wizard to
install the drivers.
Warning! Do NOT insert the card upside down, or damage may occur!
When you insert the card, the Power and Data Status LEDs will blink once
then turn off.
44 | CHAPTER 4: SETUP FOR WINDOWS 95/98/Me/2000/XP
STEP 4: Install the Drivers
Follow the wizard to install the modem drivers, making the appropriate
selections below as prompted. You do not need to download any software
or use an installation CD.
•
When asked what you want Windows to do, select what is Recommended.
Windows 95/98/Me — Search for the best driver for your device.
Windows 2000 — Search for a suitable driver for my device.
Windows XP — Install the software automatically.
•
When asked where you want Windows to search for a device, DO
NOT specify any location. UNCHECK ALL OPTIONS, and click
Next>.
•
After Windows has found a suitable driver, click Next>.
CHAPTER 4: SETUP FOR WINDOWS 95/98/Me/2000/XP | 45
STEP 5: Set up Your Dial-up Connection
To set up your dial-up connection, use the network connection wizard
included with Windows.
1.
Windows 95/98 — Go to My Computer | Dial-Up Networking |
Make New Connection.
Windows Me — Go to My Computer | Control Panel | Dial-Up Networking |
Make New Connection.
Windows 2000 — Go to Start | Settings | Control Panel |
Network and Dial-Up Connections | Make New Connection.
Windows XP — Go to Start | Control Panel | Network Connections |
Create a New Connection.
2.
Follow the wizard to set up a connection, making the following
selections as prompted:
•
Select a device: Select Standard PCMCIA Card Modem.
•
Telephone number: Enter the dial-up number of your office
network/ISP.
46 | CHAPTER 4: SETUP FOR WINDOWS 95/98/Me/2000/XP
STEP 6: Connect to a Telephone Line
With the card still in your computer, connect to an analog telephone line.
STEP 7: Dial and Connect!
1.
After setting up your dial-up connection in Step 5, your new
connection should be included in screen listing dial-up connections
(this is the same screen that you accessed at the beginning of Step 5).
Double-click on your new modem connection.
2.
In the Connect To screen, make sure the correct User name, Password,
and other connection information are entered. If necessary, create a
new dialing location to make sure the correct area code and/or other
dialing prefixes are used. Click Connect.
3.
A series of screens will appear, reporting the status of your call. The
Power and Data Status LEDs will blink. When the computer has
connected, the status screen will report Connected.
When your computer has connected, the Link and Power Status LEDs
will stay on, and the Data Status LED will blink during data transmission.
4.
To end a data call, in the connection status screen, tap Disconnect.
CHAPTER 4: SETUP FOR WINDOWS 95/98/Me/2000/XP | 47
OPTIONAL: Set up Advanced Networking
Follow the steps below to set up a dial-up connection for a RAS server.
Advanced setup is necessary only if your network does NOT use DHCP
(Dynamic Host Configuration Protocol).
1.
Complete the Network Information Form in Appendix B.
2.
To enter TCP/IP settings, after completing the wizard to create a new
dial-up connection in Step 5, follow these steps to modify the
connection:
Windows 95/98 —
(a) Right-click on the icon for the connection you just created.
In the pop-up menu, select Properties.
(b) Click on the Server Types tab. Click on the TCP/IP Settings button.
(c) Enter any necessary settings, then click OK.
(d) Click OK again in the main properties screen.
(e) Restart your computer to make sure the changes take effect.
Windows Me —
(a) Right-click on the icon for the connection you just created. In the
pop-up menu, select Properties.
(b) Click on the Networking tab. Click on the TCP/IP Settings button.
(c) Enter any necessary settings, then click OK.
(d) Click OK again in the main properties screen.
(e) Restart your computer to make sure the changes take effect.
48 | CHAPTER 4: SETUP FOR WINDOWS 95/98/Me/2000/XP
Windows 2000 —
(a) Right-click on the icon for the connection you just created. In the
pop-up menu, select Properties.
(b) Click on the Networking tab. Check Internet Protocol and click on
Properties.
(c) Enter any necessary settings. If needed, click on the Advanced
button to enter DNS, WNS or other settings. When done, click OK.
(d) Click OK again in the main properties screen.
(e) Restart your computer to make sure the changes take effect.
Windows XP —
(a) After completing the wizard in Step 5, the Connect screen will
appear for your new connection. Click on Properties.
(b) Click on the Networking tab. Check Internet Protocol and click on
Properties.
(c) Enter any necessary settings. If needed, click on the Advanced
button to enter DNS, WNS or other settings. When done, click OK.
(d) Click OK again in the main properties screen.
(e) Restart your computer to make sure the changes take effect.
CHAPTER 4: SETUP FOR WINDOWS 95/98/Me/2000/XP | 49
Appendix A Specifications
Physical Characteristics:
CF I/O Card Size: 88 x 42.8 x 14.8 mm
Power Consumption (DC 3.3V):
Active: 119 mA Inctive: 13 mA
Interface Standards:
CompactFlash Interface: CompactFlash I/O, Type I Extended
With CompactFlash-to-PC Card Adapter: PCMCIA, Type II
Serial Communications: TTL
Transmit Speed: Up to 33.6 Kbps
Receive Speed: Up to 56 Kbps
Data Modulation: ITU V.90, 56Kflex
Fax: Send/receive 14.4 Kbps ITU-T V.17, V.24, V.27 + err, V.21 Channel 2
Error Correction: MNP Levels 2-4 ITU V.42
Data Compression: MNP Level 5 ITU V.42
Line Requirement: Public Switched Telephone Network (PSTN)
Receiver Sensitivity: 0-43 dBm
Hardware Compatibility:
Standard Card (without PC Card adapter):
Pocket PC 2000/2002/2003, Handheld PC Pro and Handheld PC 2000
with CompactFlash I/O slot.
Casio BE-300 Cassiopeia Pocket Manager.
With CompactFlash-to-PC Card adapter:
Pocket PC 2000/2002/2003, Handheld PC Pro and Handheld PC 2000
with PC Card slot.
Windows 950B/98/98SE/Me/2000/XP notebook with Cardbus.
For information on Sharp Zaurus compatibility, please visit:
www.socketcom.com/ZaurusSharp.asp
Software Included: Socket 56K Modem Installation CD
Warranty:
CompactFlash Card: Three years
Certification:
FCC: Part 15, Class B
CE: ET91B-06-030
JATE ID: A02-00HJP
Telecom Approval: FCC: Part 68, CTR 21
50 | APPENDIX A: SPECIFICATIONS
Appendix B Network Information
Network Information Form
For Advanced Users Only
Contact your office network administrator or Internet Service
Provider (ISP) for the information below.
For a text-only form that you can email to your network
administrator or ISP, visit: www.socketcom.com/pdf/56kform.txt
1. Please provide the following dial-up information:
Dial-up number: ( ____ ) _______________
User name: _________________________
Password: _________________________
Domain: __________________________
2. Does the network support DHCP (Dynamic Host Configuration
Protocol)?
YES. If Yes, then STOP. You do NOT need to answer Question
3.
NO. If No, then continue to Question 3. You may need only some
of the IP addresses listed below.
3. Please specify any applicable IP addresses:
(a) Mobile Computer IP address: _____ . _____ . _____ . _____
(b) Subnet Mask: _____ . _____ . _____ . _____
(c) Default Gateway: _____ . _____ . _____ . _____
(d) Primary DNS: _____ . _____ . _____ . _____
(e) Secondary DNS: _____ . _____ . _____ . _____
(f) Primary WINS: _____ . _____ . _____ . _____
(g) Secondary WINS: _____ . _____ . _____ . _____
APPENDIX B: NETWORK INFORMATION | 51
Appendix C Support Resources
Technical Support
If you have trouble installing or using the 56K Modem Card, Socket has
two technical support resources you can use:
Socket On-Demand Support (SOS)
Socket On-Demand Support provides the quickest
turnaround time and is the best place to start for
technical support. Because it’s interactive, this virtual technical support
assistant focuses in on your specific problem to provide the specific
answers you need.
To access Socket On-Demand Support, please visit:
www.socketcom.com/support/default.asp and click on the SOS icon.
If SOS cannot answer your inquiry, you will have the opportunity to submit
your question(s) to a technical support engineer after the session. Your
interactive session will be saved for reference.
Please note: To help expedite live tech support, you will be asked to register
your product and provide some system configuration/environment
information.
Live Technical Support
IMPORTANT! To obtain technical support for your product, you must
first register your product online at www.socketcom.com/prodreg.
Once you have registered your product, you can contact Socket’s technical
support department by doing either of the following:
• Submit an email inquiry through the online support system. After you
register your product, you will be presented with an option to 'submit a
problem'. Click on this option to follow the online process to submit an
email request for technical support.
This is the fastest way to obtain technical support and has the quickest
turnaround time. Registered customers who submit a question online
will receive priority service. If we are unable to resolve your support
52 | APPENDIX C: SUPPORT RESOURCES
inquiry via email, we can arrange for a technical support representative
to call you at a specific time.
• Call our technical support line at 510-744-2720 to leave a message for a
technical support representative to return your call at a specific time and
number. When you call, please leave your email address that you
registered under, a phone number and time that you can be reached at,
and a detailed description of your problem.
After you register your product, you can use the product registration
webpage to submit an email inquiry directly to a technical support
specialist for priority service, view product information, register
additional products, view a complete database of FAQs and view a
history of technical support activity for previous support issues.
Users’ Forum
If you would like to discuss the Socket 56K Modem Card with other users,
visit Socket’s users’ forum at: www.socketforum.com
Important! Socket does NOT provide technical support via the Users’
forum!
Note: Socket may, but is not obligated to, monitor or review any areas on
the Site where users transmit or post Communications or communicate
solely with each other, including but not limited to the user forum, and the
content of any such Communications. Socket, however, will have no
liability related to the content of any such Communications, whether or not
arising under the laws of copyright, libel, privacy, obscenity, or otherwise.
Socket retains the right to remove messages that include any material
Socket deems abusive, defamatory, obscene or otherwise unacceptable.
Please refrain from disassembling the CompactFlash card. Disassembly of
this device will void the product warranty
APPENDIX C: SUPPORT RESOURCES | 53
Limited Warranty
Socket Communications Incorporated (Socket) warrants this product against
defects in material and workmanship, under normal use and service, for the
following periods from the date of purchase:
Plug-in card: Three years
Incompatibility is not a defect covered by Socket’s warranty. During the
warranty period, Socket will, at its option, repair or replace the defective
product at no charge when furnished with proof of retail purchase, provided that
you deliver the product to Socket or to an authorized Socket Service Center.
The returned product must be accompanied by a return material authorization
(RMA) number issued by Socket or by Socket's Authorized Service Center. If
you ship the product, you must use the original container or equivalent and you
must pay the shipping charges to Socket. Socket will pay shipping charges back
to any location in the contiguous United States. This warranty applies only to
the original retail purchaser and is not transferable.
Socket may, at its option, replace or repair the product with new or
reconditioned parts and the returned product becomes Socket's property. Socket
warrants the repaired or replaced products to be free from defects in material or
workmanship for ninety (90) days after the return shipping date, or for the
duration of the original warranty period, whichever is greater.
This warranty does not cover the replacement of products damaged by abuse,
accident, misuse or misapplication, nor as a result of service or modification
other than by Socket.
SOCKET IS NOT RESPONSIBLE FOR INCIDENTAL OR
CONSEQUENTIAL DAMAGES RESULTING FROM BREACH OF ANY
EXPRESS OR IMPLIED WARRANTY, INCLUDING DAMAGE TO
PROPERTY AND, TO THE EXTENT PERMITTED BY LAW, DAMAGES
FOR PERSONAL INJURY. THIS WARRANTY IS IN LIEU OF ALL OTHER
WARRANTIES INCLUDING IMPLIED WARRANTIES OF
MERCHANTABILITY AND FITNESS FOR A PARTICULAR PURPOSE.
Some states do not allow limitation of implied warranties, or the exclusion or
limitation of incidental or consequential damages, so that the above limitations
or exclusions may not apply to you. This warranty gives you specific legal
rights and you may also have other rights which vary from state to state.
This product may contain fully tested, recycled parts, warranted as if new.
For warranty information, phone (510) 744-2700.
54
Limited Software Warranty
LIMITED WARRANTY. SOCKET warrants that the original disk or CD ROM is
free from defects for 90 days from the date of delivery of the SOFTWARE.
CUSTOMER REMEDIES. SOCKET’S entire liability and your exclusive remedy
shall be, at SOCKET’S option, either (a) return of the price paid or (b) replacement
of the SOFTWARE which does not meet SOCKET’S Limited Warranty and which
is returned to SOCKET with a copy of your receipt. Any replacement SOFTWARE
will be warranted for the remainder of the original warranty period or 30 days,
whichever is longer. THESE REMEDIES ARE NOT AVAILABLE OUTSIDE OF
THE UNITED STATES OF AMERICA.
NO OTHER WARRANTIES. SOCKET disclaims all other warranties, either
express or implied, including but not limited to implied warranties of
merchantability and fitness for a particular purpose, with respect to the
SOFTWARE and the accompanying written materials. This limited warranty gives
you specific legal rights. You may have others which vary from state to state.
NO LIABILITY FOR CONSEQUENTIAL DAMAGES. In no event shall SOCKET
or its suppliers be liable for any damages whatsoever (including, without limitation,
damages for loss of business profits, business interruption, loss of business
information, or other pecuniary loss) arising out of the use of or inability to use the
SOFTWARE, even if SOCKET has been advised of the possibility of such
damages. Because some states do not allow the exclusion or limitation of liability
for consequential or incidental damages, the above limitation may not apply to you.
EXPORT LAW ASSURANCES. You may not use or otherwise export or reexport
the SOFTWARE except as authorized by United States law and laws of the
jurisdiction in which the SOFTWARE was obtained. In particular, but without
limitation, none of the SOFTWARE may be used or otherwise exported or
reexported (a) into (or to a national or resident of) a United States embargoed
country or (b) to anyone on the U.S. Treasury Department’s list of Specially
Designated Nationals or the U.S. Department of Commerce’s Table of Denial
Orders. By using the SOFTWARE, you represent and warrant that you are not
located in, under control of, or a national or resident of any such country or on any
such list.
GOVERNMENT END USERS. If the SOFTWARE is supplied to the U. S.
Government, the SOFTWARE is classified as “restricted computer software” as
defined in clause 52.227-19 of the FAR. The U. S. Government ‘s rights to the
SOFTWARE are as provided in clause 52.227-19 of the FAR.
CONTROLLING LAW AND SEVERABILITY. This License shall be governed by
the laws of the United States and the State of California. If for any reason a court of
competent jurisdiction finds any provision, or portion thereof, to be unenforceable,
the remainder of this License shall continue in full force and effect.
55
June 2003
Document # 6410-00168 C
Copyright Notice
Copyright © 2003 Socket Communications, Inc. All rights reserved.
Socket, the Socket logo and Mobility Friendly are registered trademarks of
Socket Communications, Inc. 56K Modem Card is a trademark of Socket
Communications, Inc. All other brand and product names are trademarks of
their respective holders.
The 56K Modem Card includes technology licensed under United States
Patent Nos. 4,543,450, 4,603,320, 4,686,506, and 4,972,470.
Reproduction of the contents of this manual without the permission of
Socket Communications is expressly prohibited. Please be aware that the
products described in this manual may change without notice.
Feel free to contact SOCKET COMMUNICATIONS at:
Socket Communications, Inc.
37400 Central Court
Newark, CA 94560
Phone: (510) 744-2700
Fax: (510) 744-2727.
Other than the above, Socket Communications can assume no responsibility
for anything resulting from the application of information contained in this
manual.
Socket Communications requests that you refrain from any applications of
the 56K Modem Card that are not described in this manual. Socket
Communications also requests that you refrain from disassembling the 56K
Modem Card. Disassembly of this device will void the product warranty.
You can track new product releases, software updates and technical
bulletins by visiting Socket’s web page at: www.socketcom.com.
Printed in U.S.A.