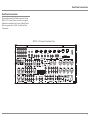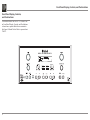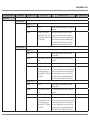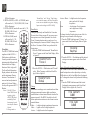
1
McIntosh Laboratory, Inc. 2 Chambers Street Binghamton, New York 13903-2699 Phone: 607-723-3512 www.mcintoshlabs.com MX151 A/V Control Center Owner’s Manual Manufactured under license from Lyngdorf Audio A/S. ROOMPERFECT is a registered trademark and the ROOMPERFECT logo is a trademark of Lyngdorf Audio A/S. (C) Lyngdorf Audio A/S 2009. HDMI, the HDMI logo and High- Definition Multimedia Interface are trademarks or registered trademarks of HDMI Licensing LLC TM HIGH-DEFINITION MULTIMEDIA INTERFACE Manufactured under license from Dolby Laboratories. Dolby, Pro Logic and the double-D symbol are trademarks of Dolby Laboratories. Manufactured under license under U.S. Patent Nos: 5,956,674; 5,974,380; 6,226,616; 6,487,535; 7,392,195; 7,272,567; 7,333,929; 7,212,872 & other U.S. and worldwide patents issued & pending. DTS-HD, the Symbol, & DTS-HD and the Symbol together are registered trademarks & DTS-HD Master Audio Essential is a trademark of DTS, Inc. © DTS, Inc. All Rights Reserved. The lightning flash with arrowhead, within an equilateral triangle, is intended to alert the user to the presence of uninsulated “dangerous voltage” within the product’s enclosure that may be of sufficient magnitude to constitute a risk of electric shock to persons. WARNING - TO REDUCE RISK OF FIRE OR ELECTRICAL SHOCK, DO NOT EXPOSE THIS EQUIPMENT TO RAIN OR MOISTURE. IMPORTANT SAFETY INSTRUCTIONS! PLEASE READ THEM BEFORE OPERATING THIS EQUIPMENT. 1. Read these instructions. 2. Keep these instructions. 3. Heed all warnings. 4. Follow all instructions. 5. Do not use this apparatus near water. 6. Clean only with a dry cloth. 7. Do not block any ventilation openings. Install in accordance with the manufacturer’s instructions. 8. Do not install near any heat sources such as radiators, heat registers, stoves, or other apparatus (including amplifiers) that produce heat. 9. Do not defeat the safety purpose of the polarized or grounding-type plug. A polarized plug has two blades with one wider than the other. A grounding type plug has two blades and a third grounding prong. The wide blade or the 2 The exclamation point within an equilateral triangle is intended to alert the user to the presence of important operating and maintenance (servicing) instructions in the literature accompanying the appliance. NO USER-SERVICEABLE PARTS INSIDE. REFER SERVICING TO QUALIFIED PERSONNEL. third prong are provided for your safety. If the provided plug does not fit into your outlet, consult an electrician for replacement of the obsolete outlet. 10. Protect the power cord from being walked on or pinched particularly at plugs, convenience receptacles, and the point where they exit from the apparatus. 11. Only use attachments/accessories specified by the manufacturer. 12. Use only with the cart, stand, tripod, bracket, or table specified by the manufacturer, or sold with the apparatus. When a cart is used, use caution when moving the cart/apparatus combination to avoid injury from tipover. 13. Unplug this apparatus during lightning storms or when unused for long periods of time. 14. Refer all servicing to qualified service personnel. Servicing is required when the apparatus has been damaged in any way, such as powersupply cord or plug is damaged, liquid has To prevent the risk of electric shock, do not remove cover or back. No user-serviceable parts inside. been spilled or objects have fallen into the apparatus, the apparatus has been exposed to rain or moisture, does not operate normally, or has been dropped. 15. Do not expose this equipment to dripping or splashing and ensure that no objects filled with liquids, such as vases, are placed on the equipment. 16. To completely disconnect this equipment from the a.c. mains, disconnect the power supply cord plug from the a.c. receptacle. 17. The mains plug of the power supply cord shall remain readily operable. 18. Do not expose batteries to excessive heat such as sunshine, fire or the like. 19. Connect mains power supply cord only to a mains socket outlet with a protective earthing connection. 20. Warning: The Ethernet connector of this equipment must not be directly connected to a public network. Connection is to be made only by way of a modem or router approved for this purpose. Thank You Customer Service Your decision to own this McIntosh MX151 A/V Control Center ranks you at the very top among discriminating music listeners. You now have “The Best.” The McIntosh dedication to “Quality,” is assurance that you will receive many years of musical enjoyment from this unit. Please take a short time to read the information in this manual. We want you to be as familiar as possible with all the features and functions of your new McIntosh. If it is determined that your McIntosh product is in need of repair, you can return it to your Dealer. You can also return it to the McIntosh Laboratory Service Department. For assistance on factory repair return procedure, contact the McIntosh Service Department at: Please Take A Moment The serial number, purchase date and McIntosh Dealer name are important to you for possible insurance claim or future service. The spaces below have been provided for you to record that information: Serial Number:________________________________ Purchase Date:_ _______________________________ Dealer Name:_ ________________________________ Technical Assistance If at any time you have questions about your McIntosh product, contact your McIntosh Dealer who is familiar with your McIntosh equipment and any other brands that may be part of your system. If you or your Dealer wish additional help concerning a suspected problem, you can receive technical assistance for all McIntosh products at: McIntosh Laboratory, Inc. 2 Chambers Street Binghamton, New York 13903 Phone: 607-723-3512 Fax: 607-724-0549 McIntosh Laboratory, Inc. 2 Chambers Street Binghamton, New York 13903 Phone: 607-723-3515 Fax: 607-723-1917 Table of Contents Safety Instructions...................................................... 2 Thank You and Please Take a Moment....................... 3 Technical Assistance and Customer Service.............. 3 Table of Contents........................................................ 3 General Information................................................... 4 Connector and Cable Information.............................. 5 Introduction................................................................. 6 Performance Features................................................. 6 Dimensions................................................................. 7 Installation.................................................................. 8 Connections: Rear Panel Connections.............................................. 9 Connections Diagram (Separate Sheet)..........Mc1A MX151 Zone A Input Connections........................... 10 Connection Diagram (Separate Sheet)............Mc2A MX151 Zone A Output Connections........................ 11 Connection Diagram (Separate Sheet)............ Mc2B MX151 Zone B Input and Output Connections........ 12 Connection Diagram (Separate Sheet)..... Mc3A, 3B Copyright 2012 © by McIntosh Laboratory, Inc. Remote Control: Remote Control Push-buttons................................... 14 How to use the Remote Control................................ 15 Front Panel: Front Panel Displays, Controls and Push-buttons..... 16 Diagram (Separate Sheet)............................... Mc1B Setup Mode: Introduction to the MX151 Setup Mode................... 17 Default settings.................................................... 18-21 Speaker Configuration.............................................. 22 RoomPerfect............................................................. 24 Additional Setup Options......................................... 28 Speaker and Room Setup.......................................... 29 Source Setup (Zone A).............................................. 29 Audio Processing Setup....................................... 29-31 Zone B Setup........................................................31-32 System Setup........................................................ 32-34 Operation: How to Operate the MX151...................................... 36 Trim Select................................................................ 38 Surround Mode......................................................... 39 Enhanced Remote Control Operation....................... 41 How to Operate Zone B............................................ 42 System Backup......................................................... 44 Reset to Factory Default Settings............................. 45 Advanced Operation: Advanced Setup and Operation........................... 46-53 Auxiliary Output and Electronic Crossover........ 54-57 Additional Information: Specifications............................................................ 46 Packing Instruction................................................... 47 3 General Information General Information 1. For additional connection information, refer to the owner’s manual(s) for any component(s) connected to the MX151 A/V Control Center. 2. The Main AC Power going to the MX151 and any other McIntosh Component(s) should not be applied until all the system components are connected together. Failure to do so could result in malfunctioning of some or all of the system’s normal operations. When the MX151 and other McIntosh Components are in their Standby Power Off Mode, the Microprocessor’s Circuitry inside each component is active and communication is occurring between them. 3. Sound Intensity is measured in units called Decibels and “dB” is the abbreviation. 4. LFE (Low Frequency Effects) refers to the Dolby Digital or DTS sound channel dedicated to sound effects (such as explosions) and is usually reproduced by the Subwoofer. 5. When discarding the unit, comply with local rules or regulations. Batteries should never be thrown away or incinerated but disposed of in accordance with the local regulations concerning battery disposal. 6. For additional information on the MX151 and other McIntosh Products please visit the McIntosh Web Site at www.mcintoshlabs.com. 7. Zone A accepts, unbalanced/balanced Analog Signals and Digital Audio Signals. Zone B only accepts Analog Signals. When connecting source devices with audio ouputs to the MX151, make sure to also connect the unbalanced/balanced outputs for each source connected to Zone A Digitally. 4 8. MX151 is a two Zone Product (Zone A and Zone B). This allows two different Audio/Video Sources to be available simultaneously for two separate rooms. Zone B may be used to provide an Audio/ Video Output Signal for recording purposes, instead of a A/V signal to a second room. For more information contact your McIntosh Dealer or McIntosh Technical Support. 9. The MX151 Input Source Name “DVD” is equivalent to “V-Aux” on some Classic McIntosh Keypads and Remote Controls. 10. Up to two McIntosh Sensors or Classic Keypads can be wired in parallel for both Zones A and B. 11. The Zone A and Zone B IR Inputs, with 1/8 inch mini phone jacks, are configured for nonMcIntosh IR sensors such as a Xantech Model HL85BK Kit. Use a Connection Block such as a Xantech Model ZC21 when two or more IR sensors need to be connected to the MX151. To avoid possible interaction, disable the MX151 Front Panel Sensor. Refer to Setup Mode on page 34. 12. Setup Mode operations should be performed in the order they appear in the first Setup Menu presented, as they are interactive. 13. In order to hear bass frequencies below 80Hz, your system must include either a Subwoofer or Large Front Loudspeakers. 14. The MX151 has built-in HDMI Digital Video Selection and Digital Video Processing Circuitry to convert any Composite Video, S-Video, and Component Video Signals to Digital Video with the same resolution. 15. When there is a connection between the ZA HDMI output and a TV/Monitor the Component Video 2 Ouput, ZA Video Outputs and ZA SVideo Outputs will be muted. 16. HDMI Cable lengths between source components and the MX151 also between the MX151 and the TV/Monitor, should not exceed 25ft (8.3meters). If there is need to use HDMI Cables longer than 25ft (8.3m) a high quality in line HDMI Buffer/Converter would be required for reliable digital signal transmission via the HDMI Connections. 17. The MX151 is designed to pass through a 3D Digital Video Signal from a source component to a 3D TV/Monitor via the HDMI Connections. It is extremely important the HDMI cables used for connections meet or exceed the HDMI High Speed Cable Standards for proper 3D Video Playback. 18. The Remote Control Supplied with the MX151 A/V Control Center is capable of operating other components. For additional information go to www.mcintoshlabs.com. 19. When the MX151 and a PC Computer are connected to the same ethernet network, the Web Interface built into the MX151 becomes available. This allows Operational Control and Setup Mode Functions, for the MX151, to be available on the PC Computer for changes and adjustments. It requires the latest version of the Internet Browser (Internet Explorer, Firefox, etc.) to be installed on the PC. For additional information refer to “Network Setup” on page 32 and “Advanced Setup and Operation” on page 46 in this Owner’s Manual. Connector and Cable Information Connector and Cable Information XLR Connectors Below is the Pin configuration for the XLR Balanced Output Connectors on the MX151. Refer to the diagrams for connections: PIN 1: Shield/Ground PIN 2: + Signal PIN 3: - Signal PIN 1 PIN 2 PIN 2 PIN 1 PIN 3 PIN 3 PC (Power Control) and Trigger Connectors The MX151 Power Control Out and Trigger Output Jacks send Power On/Off Signals when connected to other Power Control Components. An additional Meter connection on the Main Power Illumination Control Jack is for controlling Control Ground the illumination of the Power Output Meters on McIntosh Trigger Power Amplifiers. A 1/8 inch Control stereo mini phone plug is used Meter for connection to the Power Illumination Control Ground Control and Trigger Outputs on the MX151. Jack Label Voltage Meter Illumination Control ZA PC Out 5 Volts Yes ZB PC Out 5 Volts Yes Trigger Out 1 5 Volts Yes Trigger Out 2 5 Volts Yes Trigger Out 3 5 or 12 Volts 1 Yes Trigger Out 4 5 or 12 Volts1 Yes 1 For Additional Information refer to Setup Mode on page 17 Data Output and IR IN Port Connectors The MX151 Data Out Ports send Remote Control Signals to McIntosh Source Components. A 1/8 inch stereo mini phone Data Signal plug is used for connection. N/C The IR IN Port also uses a 1/8 Data Ground inch stereo mini phone plug and allows the connection of other brand IR Data IR Receivers to the MX151. Control N/C Ground Zone A and B Sensor Connectors The MX151 Zone A and B Sensor Connectors receive Control Signal Data from a McIntosh IR Sensor and also provides +5VDC “F” Connector Data Signal and +5 Volts for the Sensor Circuitry. Connections between the MX151 and the Sensor is Ground Coaxial Shielded made using a RG59U or Cable RG6 Coax Cable (300ft max.) with “F” Connectors at both ends. RS232 DB9 Connector Pin Layout 1. N/C 6. N/C 2. Data Out (TXD) 7. N/C 3. Data In (RXD) 8. N/C 4. N/C 9. N/C 5. Gnd. Microphone XLR Connectors Below is the Pin configuration for the Microphone Connector on the MX151. Refer to the diagram for connections: PIN 1: Shield/Ground PIN 2: Signal PIN 3: +8.9VDC Ethernet RJ45 Socket 1. Tranceive Data (+) 2. Tranceive Data (-) 3. Receive Data (+) 4. N/C 5. N/C 6. Receive Data (-) 7. N/C 8. N/C Ethernet Cable - Straight Thru Connections Pin Number - Wire Color Pin Number - Wire Color 1. Orange/White → 1. Orange/White 2. Orange → 2. Orange 3. Green/White → 3. Green/White 4. Blue → 4. Blue 5. Blue/White → 5. Blue/White 6. Green → 6. Green 7. Brown/White → 7. Brown/White 8. Brown → 8. Brown Pin 8 Pin 1 Pin 1 Pin 8 Ethernet Cable - Crossover Connections Pin Number - Wire Color Pin Number - Wire Color 1. Orange/White → 1. Green/White 2. Orange → 2. Green 3. Green/White → 3. Orange/White 4. Blue → 4. Blue 5. Blue/White → 5. Blue/White 6. Green → 6. Orange 7. Brown/White → 7. Brown/White 8. Brown → 8. Brown PIN 2 PIN 1 PIN 3 5 General Information, Cable Information, Introduction and Performance Features Introduction The MX151 A/V Control Center sets the standard of excellence in a Home Theater System. The MX151 provides superior multichannel reproduction, RoomPerfect correction, the latest in digital audio decoding and digital video conversion circuitry. Performance Features • HDMI Audio/Video Switching with UpConversion Processing There are five HDMI Inputs with 3D passthru. Any Composite Video, S-Video, Component Video Input (Analog Video Signals) can be converted to a Digital Video Signal with the built-in Digital Video Conversion Circuitry. • Direct Access and Phantom Input Selection There are 12 Analog (one eight channel) and 15 Digital Audio Inputs along with 9 Analog and 5 Digital Video Inputs. Using the Remote Control, the MX151 has direct access for ten inputs along with scrolling for an additional 118 phantom inputs. All 128 Inputs can be titled and matched in level, so there are no abrupt changes in volume levels between the different Inputs. Any unused input can be “turned off” so the input selector will skip over it. • Balanced Inputs and Outputs Two pairs of Balanced high level Inputs and an ten channel Balanced Output are provided, permitting long cable lengths without a loss in sound quality. • Moving Magnet Phono Input There is a Precision Phono Preamplifier for Moving Magnet Cartridges. 6 • Built-in Dolby True HD and DTS-HD Master Decoders The MX151 also provides built-in decoding of the Dolby Pro Logic IIx, Dolby Digital EX, DTS Neo6 and DTS-ES Sound Tracks. • Dual Zone The MX151 has the built-in ability to control a separate remote audio/video zone with program selection independent of Zone A, using a dedicated power amplifier and speakers. • On-Screen and Multifunction Fluorescent Displays A comprehensive On-Screen Display capability makes it easy to perform setup and operational adjustments using the Remote Control. The front panel display indicates input selection, volume levels, and other operating functions. • Fiber Optic Solid State Front Panel Illumination The Illumination of the Glass Front Panel is accomplished by the combination of custom designed Fiber Optic Light Diffusers and extra long life Light Emitting Diodes (LEDs). This provides even Front Panel Illumination and is designed to ensure the pristine beauty of the MX151 will be retained for many years. • LED Channel Status Indicators The MX151 includes twenty-five LEDs on the front panel to indicate what type of operating signals are being received, signal processing mode and the output format chosen. • Power Control, Triggers and Full Function Remote Control The Power Control and Triggers provide convenient Turn-On/Off of components connected to the MX151. The Remote Control push-buttons provides complete control of the MX151 operating functions. • RoomPerfectTM Automatic Measurement The RoomPerfect Automatic Measurement System provides precise adjustment of Loudspeaker Volume Levels, Time Delay and Equalization for all eight channels. Supplied Calibrated Microphone with stand/ boom allows for the multiple room measurements for precise adjustments. • Digitally Controlled Volume and Tone Controls A Precision Tracking Volume Control adjusts all twelve channels with tracking accuracy better than 0.5dB. The Bass and Treble circuits provide a wide range of tone shaping with no loss in traditional McIntosh sonic excellence. • Machined Side Panels The sides of the MX151 are machined from thick aluminum panels with a smooth black finish. • Special Power Supply The Power Supply has Multiple Regulators to ensure stable noise free operation even though the power line varies. Dimensions Dimensions The following dimensions can assist in determining the best location for your MX151. Front View of the MX151 17-1/2" 44.45cm 7 -1/8" 18.10cm 7 -5/8" 19.37cm Side View of the MX151 16-1/2" 41.91cm 14-1/2" 36.83cm 3/16" 0.48cm 6-9/16" 16.67cm Rear View of the MX151 17-1/8" 43.50cm 13/16" 2.06cm 6-3/8" 16.19cm 10-9/16" 26.83cm 2" 5.08cm 1-15/16" 4.92cm 13 -1/4" 33.66cm 7 Installation Installation The MX151 can be placed upright on a table or shelf, standing on its four feet. It also can be custom installed in a piece of furniture or cabinet of your choice. The four feet may be removed from the bottom of the MX151 when it is custom installed as outlined below. The four feet together with the mounting screws should be retained for possible future use if the MX151 is removed from the custom installation and used free standing. The required panel cutout, ventilation cutout and unit dimensions are shown. Always provide adequate ventilation for your MX151. Cool operation ensures the longest possible operating life for any electronic instrument. Do not install the MX151 directly above a heat generating component such as a high powered amplifier. If all the components are installed in a single cabinet, a quiet running ventilation fan can be a definite asset in maintaining all the system components at the coolest possible operating temperature. When the MX151 is placed free-standing on a flat surface, allow at least 2 inches (5.08cm) above the top and 2 inches (5.08cm) on each side, so airflow is not obstructed. Allow 19-1/2 inches (49.53cm) depth behind the front panel. Allow 1-7/16 inch (3.66cm) in front of the mounting panel for knob clearance. A custom cabinet installation should provide the minimum spacing dimensions for cool operation. Allow at least 2 inches (5.08cm) above the top, 2 inches (5.08cm) below the bottom and 2 inches (5.08cm) on each side, so airflow is not obstructed. The Custom Cabinet should be open backed and at least 12 inches (30.48cm) away from any surface such as a wall. Be sure to cut out a ventilation hole in the mounting shelf according to the dimensions in the drawing. Allow 1-7/16 inch (3.66cm) in front of the mounting panel for knob clearance. 8 17-3/16" 43.66cm MX151 Front Panel Custom Cabinet Cutout 6-9/16" 16.67cm Cutout Opening for Custom Mounting Cabinet Front Panel MX151 Side View in Custom Cabinet Cutout Opening for Ventilation Support Shelf 2-1/4" 5.72cm Chassis Spacers 9-1/8" 23.18cm MX151 Bottom View in Custom Cabinet 15" Cutout 38.10cm Opening for Ventilation 1-1/16" Note: Center the cutout Horizontally 2.70cm on the unit. For purposes of clarity, the above illustration is not drawn to scale. 12-5/16" 31.27cm 15" 38.10cm Rear Panel Connections Rear Panel Connections The identification of Rear Panel Connections for the MX151 A/V Control Center is located on a separate folded sheet contained in the Owner’s Manual Packet. Refer to separate sheet “Mc1A” for the Rear Panel Connections. MX151 A/V Control Center Rear Panel 9 MX151 Zone A Input Connections MX151 Zone A Input Connections The MX151 has the ability to automatically switch power On/Off to McIntosh Source Components via the Power Control and Trigger connections. The Data Port Connections allow for the remote operation of basic functions using the MX151 Remote Control. With an external sensor connected, remote control operation of the system is possible when the MX151 is located in a cabinet with the doors closed (Zone A). The Zone A connection instructions below, together with the MX151 Input Connection Diagram located on the separate folded sheets “Mc2A”, is an example of a typical Home Theater System. Your system may vary from this, however the actual components would be connected in a similar manner. For additional information refer to “Connector and Cable Information” on page 5. Note: The following source component and sensor connections made to the MX151 are using the default settings starting on page 18. To make changes to the default settings proceed to Setup Mode starting on page 17. Power Control Connections: 1. Connect a Control Cable from the MX151 TRIGGER OUT 1 Jack to the Power Control Remote In on the Turntable. 2. Connect a Control Cable from the Turntable Power Control Remote Out jack to the AM/FM Tuner Power Control In Jack. 3. Connect a Control Cable from the AM/FM Tuner Power Power Control Out jack to the Audio/Video Disc Player Power Control In Jack. 4. Connect a Control Cable from the Audio/Video Disc Player Control Out jack to the Music Server Power Control In Jack. 5. Connect any additional McIntosh Components in a similar manner, as outlined in steps 1 thru 4. 10 Data Control Connections: 6. Connect a Control Cable from the MX151 DATA OUTPUT 1 Jack to the AM/FM Tuner Data In Jack. 7. Connect a Control Cable from the MX151 DATA OUTPUT 3 Jack to the Audio/Video Disc Player Data In jack. 8. Connect a Control Cable from the MX151 DATA OUTPUT 7 Jack to the Music Server Data In jack. 9. Connect any additional McIntosh Components in a similar manner, as outlined in steps 6 thru 8. IR In Connections: 10. Optionally, connect the Control Cable from the Zone A External Sensor to the MX151 ZA (Zone A) jack. Note: Refer to page 4 for information on compatible Sensors and page 5 for Cable/Connection information. Analog Audio Connections: 11. Connect Balanced Cables from the MX151 BALANCED AUDIO IN 1 Jacks to the Audio/Video Disc Player Audio Output Balanced 2CH Jacks. 12. Connect an Audio Cable from the MX151 STEREO AUDIO IN 2 Jacks to the VCR Analog Output Jacks. 13. Connect Audio Cables from the MX151 STEREO AUDIO IN 9 PHONO Jacks to the Turntable Out Jacks. Digital Audio Connections: 14. Connect a Digital Coaxial Cable from the MX151 DIGITAL AUDIO IN 2 connector to the AM/FM Tuner Digital Coaxial Output Connector. 15. Connect a Digital Optical Cable from the MX151 DIGITAL AUDIO IN 7 Jacks to the Music Server Digital Audio Optical Output Connector. Analog Video Connections: 16. Connect an Cable from the MX151 COMPONENT VIDEO AUDIO IN 2 Jacks to the Music Server Component Video Output Jacks, making sure to match the “Y/G” to “Y”, “Pb/B” to “Cb” and “Pr/R” to “Cr”. HDMI Connections: 17. Connect a HDMI Cable from the MX151 HDMI IN 1 Connector to the Audio/Video Disc Player HDMI Out connector. 18. Connect a HDMI Cable from the MX151 HDMI IN 2 Connector to the Satellite Receiver. Ground Connections: 19. Connect a Ground Cable from the MX151 GND Binding Post to the Turntable GND Binding Post. Proceed to Zone A Output Connections on the next page MX151 Zone A Output Connetions MX151 Zone A Output Connections The MX151 has the ability to automatically switch power On/Off to a McIntosh Power Amplifier via the Power Control and Trigger connections. The connection instructions below, together with the MX151 Zone A Output Connection Diagram located on the separate folded sheet “Mc2B”, is an example of a typical Home Theater System. Your system may vary from this, however the actual components would be connected in a similar manner. For additional information refer to “Connector and Cable Information” on page 5. Note: The following component connections made to the MX151 are using the default settings. To make changes to the default settings proceed to Setup Mode starting on page 17. Power Control Connections: 1. Connect a Control Cable from the MX151 ZA PC (Power Control) OUT Jack to the Power Control In on Zone A Power Amplifier One. 2. Connect a Control Cable from Zone A Power Amplifier One Power Control Out to Zone A Power Amplifier Two Power Control In Jack. 3. Connect a Control Cable from Zone A Power Amplifier Two Power Control Out 1 to Zone A Power Amplifier Three Power Control In Jack. 4. Connect a Control Cable from Zone A Power Amplifier Three Power Control Out 1 to the Powered Subwoofer Power Control In Jack. 5. Connect any additional McIntosh Components in a similar manner, as outlined in steps 1 thru 4. Analog Audio Connections: 6. Connect Balanced Audio Cables from the MX151 Zone A - L (Front Left Channel), C (Front Center Channel) and R (Front Right Channel) to Zone A Power Amplifier One Inputs 1, 2 and 3 respectively. Note: Unbalanced Audio Connections may be used in place of the Balanced Connections. 7. Connect Balanced Audio Cables from the MX151 Zone A - LS (Left Surround Channel) and RS (Right Surround Channel) to Zone A Power Amplifier Two Inputs Left and Right respectively. 8. Connect Balanced Audio Cables from the MX151 Zone A - LBS (Left Back Surround Channel) and RBS (Right Back Surround Channel) to Zone A Power Amplifier Three Inputs Left and Right respectively. 9. Connect a Balanced Audio Cable from the MX151 Zone A - SUB (Subwoofer) to the Powered Subwoofer MONO Input. HDMI Connections: 10. Connect a HDMI Cable from the MX151 ZA HDMI OUT Connector to the Zone A TV/Monitor HDMI Input connector. When Zone B (Audio/Video in another room) on the MX151 will be utilized, proceed to page 12 for information on making the needed additional connections. If Zone B will not be utilized at this time proceed to step 11 below. AC Power Cords Connections: 11. Connect the MX151 and any remaining components’ AC Power Cords to a live AC outlet. 11 MX151 Zone B Input and Output Connections MX151 Zone B Input Connections In a typical MX151 two Zone Audio/Video System, Source Components can share the same Power Control (Trigger) and Data Port Connections. The two Zones in the MX151 also share the same Analog Audio and Component Video Connections. The additional Analog Audio and Video Connections below are for Source Components connected to Zone A via Digital Connections, as Zone B is Analog Audio/Video only. The MX151 Zone B Input Connection Diagram (located on the separate folded sheet “Mc3A”) is an example of a typical Zone B Second Room System. Your system may vary from this, however the actual components would be connected in a similar manner. For additional information refer to “Connector and Cable Information” on page 5. Note: The following connections made to the MX151 are using the default settings. To make changes to the default settings proceed to Setup Mode starting on page 17. Sensor Connections: 1. Connect a RG59U or RG6U Cable from the MX151 Zone B SENSOR “F” Connector to the Zone B External Sensor “F” Connector. Note: Without a Sensor connected, Zone B Control (source selection and volume adjustment) is only possible from the MX151 Front Panel. Analog Audio Connections: 2. Connect an Audio Cable from the MX151 STERERO AUDIO IN 1 Jacks to the AM/FM Tuner unbalanced Output Jacks. 3. Connect an Audio Cable from the MX151 STEREO AUDIO IN 5 Jacks to the Music Server Analog Output Jacks. 4. Connect an Audio Cable from the MX151 STEREO AUDIO IN 4 Jacks to the Satellite Analog Output Jacks. 12 Analog Video Connections: 5. Connect a Video Cable from the MX151 COMPONENT VIDEO IN 1 “Y/G” Jack to the Audio/ Video Disc Player Video Out Jack. 6. Connect Component Video Cables from the MX151 COMPONENT VIDEO IN 3 Jacks to the Satellite Component Video Output Jacks, making sure to match the “Y/G” to “Y”, “Pb/B” to “Pb/Cb” and “Pr/R” to “Pr/Cr”. MX151 Zone B Output Connections The MX151 has the ability to automatically switch power On/Off to McIntosh Power Amplifiers via the Power Control and Trigger connections. The connection instructions below, together with the MX151 Zone B Output Connection Diagram located on the separate folded sheet “Mc3B”, is an example of a typical Zone B Second Room System. Your system may vary from this, however the actual components would be connected in a similar manner. For additional information refer to “Connector and Cable Information” on page 5. Note: The following component connections made to the MX151 are using the default settings. To make changes to the default settings proceed to Setup Mode starting on page 31. Power Control Connections: 1. Connect a Control Cable from the MX151 ZB PC (Power Control) OUT Jack to the Power Control In on Zone B Power Amplifier. 2. Connect any additional McIntosh Components in a similar manner, as outlined in step 1. Analog Audio Connections: 3. Connect Audio Cables from the MX151 Zone B OUT - L (Left Channel) and R (Right Channel) to Zone B Power Amplifier Left and Right respectively. Analog Video Connections: 4. Connect a Video Cable from the MX151 VIDEO OUT RCA Jacks to the Zone B TV/Monitor Video Input Jacks, making sure to match the “Y/G1” to “Y”, “Pb/B1” to “Pb/Cb” and “Pr/R1” to “Pr/Cr”. AC Power Cords Connections: 5. Connect the MX151 and any remaining components’ AC Power Cords to a live AC outlet. Notes 13 Remote Control Push-Buttons LED illuminates during the time a remote command is sent to the MX151 Turns AC Power ON or OFF to McIntosh Components when connected to ACC Power Control Jack, refer to “How to use the Remote Control” Acc On/Off information Selects a Disc Player, Music Server or Recorder Function. Seek Stations Up or Down the AM/FM Dial. Select AM/FM Station Presets and performs various functions on a variety of McIntosh Components Displays On Screen Functions on the McIntosh Music Server and a variety of other McIntosh Components Adjusts the volume level up or down Press to Power the MX151 ON Press to Power the MX151 OFF Press to either change Bands or Review Presets Stations with an external McIntosh Tuner connected, and select certain functions on a variety of McIntosh Components Selects On Screen Functions on a variety of McIntosh Components Press TRIM and then the LEVEL Push-buttons to select and adjust various functions Press MODE to switch between Stereo and Mono Modes. Also allows exiting out of the setup mode Mutes the audio Selects AM Tuner Operating Functions and Disc Selection on certain McIntosh Disc Players Activates the Setup Mode, used to return to previous Menu and/or exit the Setup Mode Selects FM Tuner Operating Functions and Track Selection on certain McIntosh CD Players Use to select tuner presets, disc tracks or any numbered operation Use to scroll thru available inputs for Zone A and B; and phantom Inputs for Zone A Selects one of the ten available Audio Sources Use to scroll thru available inputs for Zone A and B; and phantom Inputs for Zone A Note: Push-buttons whose function is not identified above are for use with other McIntosh Products. 14 How to use the Remote Control How to use the Remote Control The supplied HR070 Remote Control is capable of directly controlling the functions of contemporary McIntosh Source Components connected to the MX151 via the Data Ports. Tuner Push-buttons Press the AM or FM Push-button to select the desired broadcast band. Press and release the SEEK 8 Up or 7 Down Push-button to seek the next available station. Press and hold a Channel SEEK 8 Up or 7 Down Push-button to seek continuously from station to station. Input Source Selection Press the appropriate Source Push-button to select the desired program source. Sources may also be selected by pressing the ◄INPUT► push-buttons. Volume Press the Upp or Downq VOLUME Push-button to raise or lower the listening volume level. Note: If at any time the MX151 seems unresponsive to HR070 Remote Control Commands press the Push-button first. Notes: The MX151 has 128 Inputs (118 Phantom) and are accessable for Zone A using the ◄INPUT► Push-buttons. Mute Press the MUTE Push-button to mute the audio in all channels. The word MUTE will appear on the Front Panel Information Display. To un-mute the audio, press the MUTE Push-button again. Disc, Server and Recorder Functions Use these push-buttons to operate a DVD Player, CD Player, CD Changer, Music Server or Recorder. Numbered Push-buttons Press Push-buttons 0 through 9 to access tuner station presets, tracks on discs or selections on a Music Server. Disc and Track Use the AM (disc) and FM (track) Push-buttons when a Disc Player or Music Server is being used. to McIntosh Components when connected to a Trigger Control Jack. Refer to page 33 (Trigger Output Setup) for additional information. Enhanced Remote Control Operation The MX151 offers an Enhanced Remote Control Operation. For additional information refer to page 41. Note: The Record Signals present at REC OUTPUTS are not affected by volume changes. Pause Press the Pause Push-button to perform various functions on a variety of McIntosh Components. It will also pause the playing of a disc or tape player. Trim Press the TRIM Push-button until the desired Trim function (Bass, Trim Levels, Treble, etc.) appears on the Front Panel Information display, then press the LEVEL Upp or Downq Push-button to adjust the Trim setting. Press and release the LEVEL + (p) or -(q) Pushbutton to recall the last Trim Function Selected and its current setting. Additional pressing of the pushbuttons will allow adjustment of the Trim Setting. Note: For additional information on the Trim Functions refer to page 38. Acc On/Off Press ACC ON Push-button to switch Power On or press the ACC OFF Push-button to switch Power Off 15 Front Panel Display, Controls, and Push-buttons Front Panel Display, Controls, and Push-buttons The identification of the MX151 A/V Control Center Front Panel Display, Controls, and Push-buttons is located on a separate folded sheet contained in the Owner’s Manual Packet. Refer to separate sheet “Mc1B”. 16 Introduction to the MX151 Setup Mode Introduction to the MX151 Setup Mode Your McIntosh MX151 has been factory configured with default operating settings allowing for immediate use. Refer to pages 18-21 for a listing of the default settings. Changes to the default settings are accomplished with the built-in Setup Feature using On Screen Menus. Follow the sequence listed in the INSTALLER MENU and the other SETUP Menus, as some of these adjustments are interactive. To assist in navigating the various On Screen Menus please refer to the set of MX151 Setup separate folded sheets contained in the Owner’s Manual Packet. Note: One of the MX151 Zone A Video OUTPUTS must be connected to the video input of a Monitor/TV for viewing the On Screen Menus. 1. Press the STANDBY/ON Push-button on the Front Panel or press the (Power) Push-button on the Remote Control to switch On the MX151. Refer to figures 1 and 7. The Front Panel Information Display will first indicate “McIntosh MX151” followed by “Initializing, Please wait...” Figure 1 and then the last source selected and volume level setting. Refer to figures 2, 3 and 4. The LED above the Front Panel McIntosh MX151 Figure 2 Initializing Please wait... Figure 3 CD 0% Figure 4 STANDBY/ON Push-button will flash during the Initialization Process and then go out during the time the MX151 is On. 2. Press and release the MX151 Front Panel SETUP Push-button to enter the Setup Mode. The words “Installer Menu” will appear on the Front Panel Information Display and the Installer Menu (main menu) will appear on the Monitor/TV Screen. Refer to figures 5 and 6. Installer Menu Figure 5 Installer Menu Speaker and Room Setup Source Setup Audio Processing Setup Zone B Setup System Setup Device Management Exit Figure 6 3. Navigating thru and making changes to the Setup Menus is performed by using the HR070 Remote Control directional Up or Down, Left or Right, SELECT and the SETUP Push-buttons. The Front Panel ADJUST (up) or (down), BACK, SELECT, and NAVIGATE (left) or (right) Push-buttons may also be used. 4. Access the desired Setup Menu or Device Management (Menu) by pressing the Up or Down directional push-buttons. The desired Menu item will be highlighted with black color text and light gray background. Pressing the SELECT Push-button will then activate the highlighted Menu Item. 5. Return to the Installer Menu by either selecting the “Back” Menu choice or by pressing the SETUP Push-button on the Remote Control. To exit the SETUP Mode press the SETUP Push-button again. 6. Proceed to page 22 to enter information about the Loudspeakers used in Zone A. Figure 7 17 MENU SELECTION SETTING ADJUSTMENT SETTING PAGE Speaker Configuration MENU SELECTION SETTING Input Name CD2 SETTING PAGE Video In HDMI 3 29 Zone A Source Size (Front and Surround) M Bass perform Size (Subwoofer) M 23 Bass cutoff 80Hz 23 Bass order 4th LiRi 23 Nat. roll-off No 23 Gain offset 0.0dB 23 Sub 80 Sub - Hi F perform Sub 80 23 Sub - Hi F cutoff 80Hz 23 Sub - Hi F order 4th LiRi 23 0.0dB 23 Gain offset Aux 1/2 and 3/4 (Output Selection) Input Name Aux - perform - 29 Aux - cutoff - 29 Aux - order - 29 Gain offset 0.0dB 29 Input Name All Loudspeakers 0.0dB 25 All Loudspeakers 0 inches 29 Zone A Source CD Input Name Balanced 1 29 Music 29 Volume Offset 0.0dB 29 Lipsync offs. 0ms 29 Data output 3 29 RC SRC button CD2 29 Video In None 29 Audio In Digital 2 Coax 29 Audio Mode Stereo 29 Volume Offset 0.0dB 29 Lipsync offs. 0ms 29 Data output 1 29 RC SRC button TUNER 29 Video In None 29 PHONO Distance Settings Input Name Audio In Audio Mode TUNER Level Offsets 18 ADJUSTMENT Audio In Phono 29 Audio Mode Stereo 29 Volume Offset 0.0dB 29 Lipsync offs. 0ms 29 Data output None 29 RC SRC button PH/AUX 29 SAT Video In None 29 Video In HDMI 1 29 Audio In Digital 1 Coax 29 Audio In HDMI 1 29 Audio Mode Stereo 29 Audio Mode Movie 29 Volume Offset 0.0dB 29 Volume Offset 0.0dB 29 Lipsync offs. 0ms 29 Lipsync offs. 0ms 29 Data output None 29 Data output None 29 RC SRC button CD 29 RC SRC button SAT 29 Default Settings MENU SELECTION SETTING ADJUSTMENT SETTING PAGE Zone A Source MENU SELECTION SETTING Input Name TV ADJUSTMENT SETTING PAGE Video In None 29 Zone A Source Input Name Input Name Input Name Input Name 1 SERVER Video In Component 2 29 Audio In Digital 7 Opt. 29 Audio In Stereo 7 29 Audio Mode Music 29 Audio Mode Movie 29 Volume Offset 0.0dB 29 Volume Offset 0.0dB 29 Lipsync offs. 0ms 29 Lipsync offs. 0ms 29 Data output 7 29 Data output None 29 RC SRC button SERVER 29 RC SRC button TV 29 Video In HDMI 3 29 DVD Blu-ray Input Name Video In HDMI 3 29 Audio In HDMI 3 29 Audio Mode Music 29 Volume Offset 0.0dB 29 Lipsync offs. 0ms 29 Data output 3 29 RC SRC button DVD 29 REC Multichannel Audio In Multichannel 29 Audio Mode Music 29 Volume Offset 0.0dB 29 Lipsync offs. 0ms 29 Data output 3 RC SRC button Input 29 29 1 Audio Processing Video In S-Video 1 29 Audio In Stereo 2 29 Use Audio M. Yes 29 Audio Mode Audio Mode Music 29 Audio Mode Movie 29 Volume Offset 0.0dB 29 Used Yes 29 Lipsync offs. 0ms 29 Preferred Voicing Neutral 29 Data output 3 29 Preferred Stereo Mode DPLIIx 29 RC SRC button REC 29 PLIIx Width 3 29 Dolby DVR Video In HDMI 4 29 PLIIx Dimensio 0 29 Audio In Digital 8 Opt. 29 PLIIx Panorama Off 29 Audio Mode Movie 29 DD&DD+ Dynamics Max 29 Volume Offset 0.0dB 29 True HD Dynamics Auto 29 Lipsync offs. 0ms 29 Data output 3 29 NEO6 0.3 29 RC SRC button REC 29 Neo6 wide Off 29 DTS The Multichannel Input is accessible by using the Front Panel Input Control (Zone A and B) or the Input (◄ ►) Push-buttons on the Remote Control (Zone A) 19 MENU SELECTION SETTING ADJUSTMENT SETTING PAGE Audio Processing MENU SELECTION SETTING Input Name PHONO SETTING PAGE Video In None 30 Zone B Setup Advanced Audio Setup Max Volume 59% 29 Use startup vol No 29 Audio In Phono 30 RP Bypass No 29 Data output None 30 Lipsync 0ms 29 RC button PH/AUX 30 HDMI Audio Out Silent 29 Mch. AD LFE Gain 0dB 29 Input Name SAT Zone B Setup Input Name Input Name Input Name 20 ADJUSTMENT Power Independent 30 Volume Mode User 30 Video Output Zone B 30 Max volume 59% 30 Startup Src Use Last 30 Input Name None 30 Audio In Stereo 8 30 Data output None 30 RC button CD 30 Input Name Video In Component 1 30 Balanced 1 30 Data output 3 30 RC button CD2 30 Input Name None 30 Audio In Stereo 1 30 Data output 1 30 RC button TUNER 30 Input Name 30 Data output None 30 RC button SAT 30 Video In Component 2 30 Audio In Stereo 5 30 Data output 7 30 RC button SERVER 30 Video In Component 1 30 Audio In Balanced 1 30 Data output 3 30 RC button DVD 30 Video In Component 4 30 REC TUNER Video In 30 Stereo 4 DVD Blu-ray CD2 Audio In Component 3 SERVER CD Video In Video In Audio In Audio In Stereo 2 30 Data output None 30 RC button REC 30 Video In Component 5 30 DVR Audio In Stereo 6 30 Data output None 30 RC button DVR 30 Default Settings, con’t MENU SELECTION SETTING ADJUSTMENT SETTING PAGE Zone B Setup MENU SELECTION SETTING ADJUSTMENT SETTING PAGE System Setup Input Name Input Name TV Trigger Output Setup Video In None 30 Triggers 1 / 4 Audio In Stereo 7 30 Voltage 12V 33 Data output None 30 Duration Level 33 RC button TV 30 Extra Dur. +0ms 33 Action Zone A/B on 33 Video In Component 1 30 Audio In Balanced 1 30 Data output 3 30 RC button Input1 30 Multichannel System Setup Triggers 2 / 4 thru 4 / 4 Voltage 12V 33 Duration Level 33 Extra Dur. +0ms 33 Action No Action 33 OSD Feedback User 34 General Setup Video System Setup Analog Out NTSC 32 OSD Position Bottom 34 Component Out YPbPr 32 OSD Background Solid 34 Component In 1 YPbPr 32 VFD Feedback User 34 Component In 2 YPbPr 32 Startup source Use Last 34 Component In 3 YPbPr 32 Front IR sens On 34 Component In 4 YPbPr 32 Power Saving Yes 34 Component In 5 YPbPr 32 Amp Lights On 34 Enhanced RC ctrl Off 34 Baudrate 9600 32 Hw Handshake No 32 Feedback 0 32 Mode Manual IP 32 IP 192.168.1.222 32 Mask 255.255.255.0 32 GW 192.168.1.1 32 Serial Setup Network Setup Trigger Input Setup Triggers 1 / 2 and 2 / 2 1 Voltage 12V 33 Action No Action 33 The Multichannel Input is accessible by using the Front Panel Input Control (Zone A and B) or the Input (◄ ►) Push-buttons on the Remote Control (Zone A) 21 Speaker Configuration Before proceeding with Speaker and Room Setup it is advisable to read “Introduction to the MX151 Setup Mode” on page 17. Also refer the MX151 Default Settings pages 18 thru 21. Follow the sequence listed in the INSTALLER MENU and the other SETUP Menus, as some of these adjustments are interactive. Note: To assist in navigating the various On Screen Menus please refer to the set of MX151 Setup separate folded sheets contained in the Owner’s Manual Packet. A Home Theater System can include a variety of Loudspeakers with various low frequency (bass) performance capabilities. These capabilities refer to the Loudspeaker’s ability for reproducing low frequencies to within -3dB of the intensity it reproduces the midrange frequencies. The MX151 has six different preset Loudspeaker Capabilities settings plus one custom setting. These settings are for the Left Front, Center Front, Right Front, Right Surround, Right Back Surround, Left Back Surround and Left Surround Loudspeakers. If you are unsure as to the low frequency performance capabilities of your Loudspeakers, contact the Loudspeaker Manufacture, McIntosh Dealer or select the XS setting. Refer to the chart below: MX151 Setting - XXL 22 Setting Description No Loudspeaker connected to this channel Loudspeaker response down to 20Hz (-3dB), reproduces Low Frequencies from all channels set to L, M, S, or XS. It also reproduces the LFE information when there is no Subwoofer XL Loudspeaker response down to 20Hz (-3dB), reproduces Low Frequencies from all channels set to L, M, S, or XS when there is no Subwoofer. It also reproduces the LFE information when there is no Subwoofer L Loudspeaker response down to 40Hz (-3dB) MX151 Setting Setting Description M Loudspeaker response down to 80Hz (-3dB) S Loudspeaker response down to 100Hz (-3dB) XS Loudspeaker response down to 120Hz (-3dB) Custom Manual setting of Low Frequency Cutoff and Curve Shape (Bass Order) 1. Press and release the SETUP Push-button on the Remote Control to enter the Setup Mode. Refer to figure 8. The words “Installer Menu” will appear on the Front Panel Information Display and the Installer Menu (main menu) will appear on the Monitor/ TV Screen. Refer to figures 9 and 10. 2. Press the SELECT Pushbutton for the “Speaker and Room Setup” Menu. Refer to figure 11. 3. Press the SELECT Pushbutton again to select the “Speaker Configuration” Menu. Refer to figure 12. 4. Using the Down Pushbutton scroll down thru the default menu settings. Refer to figures 12 thru 14. Compare these settings to the actual Loudspeaker Capabilities making up your Home Theater System. If the settings do not agree with the menu choices, then changes will Figure 8 need to be made. Installer Menu Figure 9 Installer Menu Speaker and Room Setup Source Setup Audio Processing Setup Zone B Setup System Setup Device Management Exit Figure 10 Speaker and Room Setup Speaker Configuration RoomPerfect Level Offsets Distance Settings Back Figure 11 5. To makes changes use the (up) or (down) Push-buttons to highlight the “EDIT/SELECT” menu item, then press the SELECT Push-button. In the following example the Left Front Loudspeaker setting will change from M to L. 6. Use the Up or Down Push-buttons to highlight the “L” menu item (Left Front Loudspeaker), Setup Mode Speaker Configuration L M C M R M RS M RBS M LBS M Back Figure 12 Speaker Configuration LBS M LS M SUB Sub 80 AUX1 L AUX2 R AUX3 L Back Figure 13 Speaker Configuration AUX2 R AUX3 L AUX4 R Edit/Select Verify Current Setup Back L Bass perform Bass cutoff Bass order Gain offset Back M 80Hz 4th LiRi 0.0dB L 40Hz 4th LiRi No 0.0dB Select Perf. XXL XL L M S XS Custom Back L Bass perform Bass cutoff Bass order Nat. roll-off Gain offset Back Figure 17 Figure 15 8. Return to the “Speaker Configuration” Menu by pressing the SETUP Push-button. Scroll down to “Save Changes” by using the Down Push-button and then press the SELECT Push-button to save the change. Refer to figure 18. If no changes are to be saved, press the SETUP Push-button. The “Confirm Exit” will appear On-Screen and select “Yes”. Refer to figure 19 on the next page. Note: Once changes have been saved, any additional changes will first require selecting the “Edit/ Select” again. Figure 16 Figure 14 then press the SELECT Push-button. Refer to figure 15. Press the SELECT Push-button again. Refer to figure 16. 7. The “Select Perf.” Menu will appear, then use the Up or Down Push-buttons to highlight the “L” (for large) menu item for the Left Front Loudspeaker. Then press the SELECT Push-button. Refer to figures 16 and 17. Speaker Configuration AUX1/2 (L/R) AUX3/4 (L/R) Load Config Create New Config Save Changes Abort (no changes saved) Figure 18 23 RoomPerfect Confirm Exit All unsaved changes will be lost. Really abort? Yes No Verify Configuration Output : Laker and Room Setup Volume : -39.0dB High-pass 80Hz Continue Abort Figure 19 At this time, using the procedures outlined in steps 6 thru 8, enter any changes necessary so the “Speaker Configuration” settings agree with the Loudspeakers in your Home Theater System. Then make sure to save the new settings. Note: With the exception of using Loudspeakers set to XXL or XL in the MX151 Speaker Configuration Menu, the correct setting for subwoofer is 80Hz (default setting). For additional information contact your McIntosh Dealer. 9. To verify all channels in the Home Theater System are functioning, use the (down) Push-buttons to highlight the “Verify Current Setup” option in the “Speaker Configuration” Menu. Refer to figure 14 on page 23. Then press the SELECT Push-button. Refer to figure 19A. 10. At this time a test signal should be heard from the Front Left Loudspeaker (if necessary, increase the Volume Setting). If for some reason no sound is heard, check the Loudspeaker, Power Amplifier and all cabling for the Front Left Channel until sound is heard before proceeding. Test the rest of the Loudspeakers in the system by pressing the SELECT Push-button for each Loudspeaker, one 24 Figure 19A Verify Configuration Successfully verified Speaker Configuration Ok Figure 19B at a time, until sound is heard from all channels. Refering to figure 19B press the SELECT Pushbutton. 11. Return to the “Speaker and Room Setup” Menu by pressing the SETUP Push-button. After having completed “Speaker Configuration”, it is now time to activate the RoomPerfect Mode. If for some reason RoomPerfect Mode will not be used, proceed to “Level Offsets” at this time The RoomPerfect Measure and Adjustment Process uses multiple measurement locations in the listening room to achieve the best possible acoustical results. The Focus Position (location in the room) is typically where one would be during serious viewing and listening. The Room Positions are other locations in the room where non critical viewing and listening occurs. Notes: 1. Assemble the supplied Microphone Holder/ Stand/Boom Adapter and connect the Microphone to the MX151 MICROPHONE Connector on the Rear Panel using the supplied cable. 2. Set the trim controls on the MX151 to the flat setting position and the volume control to the normal listening volume level. 3. It might be advisable to temporarily switch off the room/house heating/cooling system while the Room Perfect measurement process is occurring. If there are open windows, they should be closed. All of these steps will allow lower testing volume levels and more accurate measurements. 4. The following steps along with the various On-Screen Menus illustrated in this Owner’s Manual, are for the first time RoomPerfect is run. The next time RoomPerfect is run some of the On-Screen Menus will change to reflect the already stored settings. 1. Press the SETUP Push-button to enter the Setup Mode. Using the Up or Down Push-buttons to highlight “Speaker and Room Setup” and press the SELECT Push-button. Refer to figure 20. 2. Then using the Remote Control select “RoomPerfect”. Refer to figure 21. 3. Press the SELECT Push-button and the “RoomPerfect Guided Setup” will appear. Press the SELECT Push-button again and “Starting Guide Setup, Setup Mode, con’t Installer Menu Speaker and Room Setup Source Setup Audio Processing Setup Zone B Setup System Setup Device Management Exit Starting Guided Setup Please Wait... Figure 23 Figure 20 Speaker and Room Setup Speaker Configuration RoomPerfect Level Offsets Distance Settings Back Confirm delete Delete all data in RoomPerfect? Yes No Please Wait” will appear. Refer to figures 22 and 23. After a brief moment, Figure 24 will appear, select Yes and figure 25 appears briefly. 4. At this time place the microphone in the focus location with the front of the microphone pointing towards the loudspeakers (center location between the Left and Right Loudspeakers). The height of the microphone should be at ear level. Refer to figure 26. Note: The Microphone Stand Boom Adaptor allows the microphone to be placed over objects such as a chair or table. Connect Microphone Connect and place mic in Focus Position Ok Abort Figure 24 Figure 21 RoomPerfect Guided Setup Back Please Wait... Please Wait... Figure 22 Figure 26 5. Press the SELECT Push-button and the “Volume Calibration measuring” will appear. Refer to figure 27. The MX151 will send out to each of the loudspeakers, one at a time, a test tone to obtain a measurement level making sure it is above the backround noise level in your room. Several minutes after testing, figure 28 (on page 26) will appear on-screen. Select “Save Current” and press the SELECT Push-button. When figure 29 (on page 26) appears On-Screen, select continue and press the SELECT Push-button. Figure 25 25 RoomPerfect, con’t Volume Calibration Volume calibration measuring, please wait... Figure 27 Volume Calibration Desired maximum calibration volume -4.0db (now -20.00dB) Retry Save Current Abort Figure 28 Volume Calibration Calibration ok. Continue Abort Note: The Desired maximum calibration volume (-4.0db) level and the current (now -20.00dB) volume indications in figure 28 will probably be different in your room. The size of your room, loudspeaker distance from the microphone position and the efficiency of the loudspeakers all effect the readings. If the test signal was too loud, reduce it by using the Volume Control by 10dB (the example in figure 28 would now read -30.00dB). Select “Retry” then “Save Current”. If for some reason the volume level needs to be higher, a “Measuring Error” will appear on the screen refer to figure 30. Measuring Error Too much noise or too Low signal Volume -50.0dB Retry Abort Distance between the Loudspeakers and the Microphone Focus Position Figure 31 Figure 30 6. Measure the distance from the microphone location (Focus Position) to each of the Loudspeakers. Refer to figures 31 and 32. Using the Down Push-button, highlight the “L” Loudspeaker Position and press the SELECT Push-button. Then use the Up or Down Push-buttons to enter the distance measurement. Use the Left ◄ Direc- tional Push-button to highlight the “L” followed by the Figure 29 26 Focus Position Down Push-button to highlight the “L” Loudspeaker Position and enter the distance. When all the active Loudspeakers Distance measurements have been entered select “Continue” and press the Distance Settings Unit in Position Focus 1 L 0 in C 0 in R Distance Settings 0 in RS 0 in RBS 0 in LBS 0 in LS 0 in SUB 0 in Continue Figure 32 Setup Mode, con’t Distance Setting Distances ok. Continue Abort Figure 33 Measuring in progress Measuring focus position Please wait... 7. Figure 34 will appear On-Screen “Measuring in progress” and each of the Loudspeaker will be measured one at a time. After all of the Loudspeakers have been measured, figure 35 will appear on screen. Press the SELECT Push-button to continue. Note: The actual RoomKnowledge percentages appearing On-Screen will be different for your system and room than those illustrated in this Owner’s Manual. Place Microphone Place microphone in room position no. 1 Continue Abort Measuring in progress Measuring room position 1 Please wait... Figure 37 9. At the end of the “Measuring Room Position 1” figure 38 will appear. For the best sonic results, it is important to continue measuring additional room positions, until the RoomKnowledge Data is at least 90%. Relocate the microphone to a second room position and press SELECT to continue. Refer to figures 39 and 40 (on the next page). Depending on the room itself and the objects in the room, it might take many different room positions for the measurements to reach a RoomKnowledge score over 90%. Measuring ok RoomKnowledge 66% Continue Abort Figure 36 Figure 35 Note: The distance measurements may also be entered in centimeters. Refering to figure 32, use the Directional Push-buttons and the Select Push-button to change the “Unit” setting from inches to centimeters. 8. Relocate the microphone to another place in the room and press SELECT to continue. Refer to figures 36 and 37. Figure 34 Measuring ok RoomKnowledge 20% Continue Abort SELECT Push-button. Refer to figure 33. Note: It is advisable to change the elevation of the Microphone (relative to the floor) Up or Down by a foot (30.5cm) or more, along with changing the direction the microphone is pointing to when instructed to position the microphone in a new location. This will help to ensure better results. Figure 38 27 RoomPerfect, con’t Place Microphone Place microphone in room position no. 2 Continue Abort Figure 39 Measuring in progress Measuring room position 2 Please wait... Measuring ok RoomKnowledge 93% Continue Abort 10. When the second room position measurements have been completed, the RoomKnowledge Data is now at 93%. Refer to figure 41. 11. With the menu choice NO highlighted, press the SELECT Push-button to continue. Refer to figure 42. 12. It will take several minutes to calibrate the filters for each of the Loudspeakers in the system. Refer to figure 43. When the filters have been set, the On-Screen will indicate “RoomPerfect calibration”. Refer to figure 44. Press the SELECT Pushbutton to exit RoomPerfect. Press the SETUP Push-button to return to the previous Menu or 28 RoomPerfect RoomPerfect calibration Ok Figure 41 Measuring Complete Add more room Measurements? Yes No Abort Figure 44 Figure 43 press the SETUP Push-button several times to exit the Setup Mode. Note: When the RoomPerfect Calibration has been completed, the MX151 Front Panel “ROOMPERFECT” indicator will be illuminated. Additional Setup Options Figure 42 Calibrating filters Please wait ... e Figure 40 For the vast majority of MX151 Owners the Default Settings, Suggested Component Connections, Speaker Configuration and RoomPerfect Room Corrections are all one needs to perform for full enjoyment of your Home Theater System. The MX151 has an almost infinite number of additional options available to allow complete customization of a Home Theater System. The navigation and selection methods previously illustrated also apply to the remainder of Setup Mode Settings. Usually, your McIntosh Dealer and/or a Custom Installer uses these additional capabilities to customize your Home Theater System. When working with these additional Setup Options please refer to the set of MX151 Setup separate folded sheets contained in the Owner’s Manual Packet. Setup Mode, con’t INSTALLER MENU SUB MENU SELECTION OPTION(S) DESCRIPTION SETUP SHEET NO. Speaker and Room Setup Speaker Configuration Level Offsets Distance Setting Aux1/2 (L/R) Sub80-Sub800, Custom Rear Panel XRL Connectors, Variable High Pass Output of the Front Left and Right Channels, Link-Riley or Butterworth curves, Output Level Trim Rear Panel RCA Connectors, Variable High Pass Output of the Front Left and Right Channels, Link-Riley or Butterworth curves, Output Level Trim For manual adjustment when RoomPerfect is not used For manual adjustment when RoomPerfect is not used 2 Aux3/4 (L/R) Sub80-Sub800, Custom L, C, R, LS, RS, LBS, RBS, SUB L, C, R, LS, RS, LBS, RBS, SUB ±12dB Edit Name, Video In, Audio In, Advanced Rename a given Input, Assign analog/digital Rear Panel connections to an Input, Default Audio Mode when Input is selected, Volume Offset, Lipsync Offset, Data jack Output and Remote Control Push-button same options as in Edit Mode remove un-used inputs place frequently used inputs next to one another 3 Create New Delete Arrange Phantom Input (up to 119) Remove a Input Rearrange the Input order Use Audio Mode Yes, No Switch off the implementation of pre-assigned Audio Mode for each Input Movie, Music, Games, Stereo, Sets a global Audio Mode for all Inputs when No Processing, Custom 1-16 “Use Audio Mode” is switched Off settings Yes, No Remove the current Audio Mode from selections Neutral, Music, News, Movie, When RoomPerfect is Active, one of the five Action, Action+Movie overall frequency response curves can be activated 4 0-2168 inches or 0-5532 Centimeters 2 2 2 Source Setup Zone A Source Setup 3 3 3 Audio Processing Setup Audio Mode Setup1 Audio Mode Used Select Preferred Voicing 4 4 4 The menus in the Audio Mode Setup are interactive and are also dependent on the number of Loudspeakers selected in the Speaker Configuration Menu 1 29 INSTALLER MENU SUB MENU SELECTION OPTION(S) DESCRIPTION DPLIIx Movie, Neo:6 Cinema, Party, Pure Stereo, no Post Processing DPLIIx Movie, Dolby Digital EX, No Post Proc., Stereo When the audio input signal is two channel, select from five different choices for processing the signal When the number of output channels is greater than the number of input channels, the order of the type of signal processing used SETUP SHEET NO. Audio Processing Setup Audio Mode Setup1 Select Preferred Stereo Mode Arrange Multichannel List 4 4 Voicing Setup Location: Select Voicing Set Currently Used Set: Delete Voicing Set Internal Storage, USB The device used to store Voicing Sets choose from default or custom Overall frequency response curves default_voicing remove from storage a voicing set 4 4 4 4 PLIIx Width 0-7 4 PLIIx Dimension PLIIx Panorama -3 to +3 On, Off DD&DD+ Dynamics TrueHD Dynamic Min, Normal, Max Varies the Front Center Channel Sound Stage Width Varies the depth of the Front Sound Stage Increases the size of the Front to Surround Loudspeaker Sound Stage Used to reduce, make no-change or increase the range of sound from loud to quiet Reduces dynamic range without loss of infomation or is switched Off Neo6 Cgain 0.0-1.0 4 Neo6 wide On, Off Varies the Front Center Channel Sound Stage Width Increases the size of the Front to Surround Loudspeaker Sound Stage Max Volume Use startup vol Startup Volume 0-99% No, Yes 0-99% Zone A maximun volume Last volume setting or preset startup volume Sets Zone A startup volume 4 4 4 Dolby Setup Auto, Off 4 4 4 4 DTS Setup 4 Advanced Audio Setup The menus in the Audio Mode Setup are interactive and are also dependent on the number of Loudspeakers selected in the Speaker Configuration Menu 1 30 Setup Mode, con’t INSTALLER MENU SUB MENU SELECTION OPTION(S) DESCRIPTION SETUP SHEET NO. Audio Processing Setup Advanced Audio Setup RP Bypass No, Yes Lipsync 0-400ms HDMI Audio Out Silent, Off, On Mch. AD LFE Gain 0dB, +10dB Bypasses the audio signal around RoomPerfect Correction; Bypass is available as a Trim Function and as an option in the User Menu Delays the audio signal to be in synchronization with the video signal Silent-mode sends a zero bit audio stream to the TV/Monitor, Off-mode sends no audio bit stream, On-passes the source component’s audio bit stream to the TV/Monitor Affects the Analog Multichannel Sub Input only, corrects reduction in output level from some DVD Players 4 Zone B switches On/Off independently or switches On/Off when Zone A switches On/Off Retains the last volume setting, allows for a fixed volume setting (used to provide an output for recording purposes), Zone B wakes up to the same volume setting when switched On Used to set Zone B Output Level when Zone B Volume Mode is set to Fixed or Wakeup Zone B Input Control select video source, external control (via RS232 connection) can select a different video source than the selected audio source, same video source as selected for Zone A Zone B maximum volume Allows which input Zone B wakes up to 5 Customize the Input Source Name 5 Zone B component video input source 5 4 4 4 Zone B Setup Power Independent, Follow Zone A Volume Mode User, Fixed, Wakeup Set Volume 0-99% Video Output Zone B, Independent, Zone A Max volume Startup Screen 0-99% Use last, or any currently available Input 5 5 5 5 5 Edit Zone B Sources Name: Video In a-z, A-Z, 0-9, plus additional characters None, Component 1-5 31 INSTALLER MENU SUB MENU SELECTION OPTION(S) DESCRIPTION SETUP SHEET NO. Zone B Setup Edit Zone B Sources Audio In None, Balanced 1-2, Stereo 1-8, Phono None, Data Port 1-8 Remote Control direct access Push-buttons Zone B analog audio input source 5 Assign a data port output different from Zone A Assign a Remote Control Push-button different from Zone A 5 5 Analog Out NTSC, PAL 6 Component Out Component In 1 Component In 2 Component In 3 Component In 4 Component In 5 YPbPr, RGB YPbPr, RGB YPbPr, RGB YPbPr, RGB YPbPr, RGB YPbPr, RGB Sets the Composite and S-Video video output signal standard Sets the type of video output signal Sets the type of video input signal Sets the type of video input signal Sets the type of video input signal Sets the type of video input signal Sets the type of video input signal Baudrate Sets kilobit speed for RS232 Data Port 6 HW Handshake 9600, 19200, 38400, 57600 or 115200 No, Yes 6 Feedback 0, 1, 2 Use Hardware Handshake for the RS232 Data Port Set the degree of feedback from the control device connected to the RS232 Data Port Mode Manual IP, Automatic (DHCP), disable Data Out RC Button System Setup Video Setup 6 6 6 6 6 6 Serial Setup 6 Network Setup Enter manually (the IP address, subnet Mask 6 and Gateway), or Automatic setup with network using Dynamic Host Configuration Protcol, disable network connections IP 192.168. 1.222 IP Address 6 Mask 255.255.255. 0 Subnet Mask 6 GW 192.168. 1. 1 Gateway 6 Note: For MX151 WEB Interface perform the following; first connect MX151 to the PC Computer Ethernet Network, second enter Setup Mode, third select “System Setup” → “Network Setup”, fourth select Automatic (DHCP), fifth select save, sixth copy the IP address shown On-Screen to the address line (after http://) of the WEB Browser. 32 Setup Mode, con’t INSTALLER MENU SUB MENU SELECTION OPTION(S) DESCRIPTION SETUP SHEET NO. System Setup Trigger Input Setup Trigger 1/2, 2/2 Voltage Action 12V or 5V Sets the required input voltage level to complete an action No action, Zone A Source, No action when voltage is present; switches Zone B Source, Zone A (On/ to preselected source for Zone A; switches to Off), Zone A On, Zone B (On/ preselected source for Zone B; toggles Zone On Off), Zone B On, when voltage is present and next time voltage is present Zone Off; Zone On when voltage is present and Off when voltage is not present 6 12V Sets the required output voltage level to complete an action Level (constant voltage) or voltage for a specified time Additional specified time Take no action; when the preset source for Zone A is selected; when the preset source for Zone B is selected; when Zone A is On; when Zone B is On; when Trigger Input 1 is active; when Trigger Input 2 is active; when the Remote Control ACC On/Off is used; Zone A or Zone B is On 6 Sets the required output voltage level to complete an action Level (constant voltage) or voltage for a specified time Additional specified time Take no action; when the preset source for Zone A is selected; when the preset source for Zone B is selected; when Zone A is On; when Zone B is On; when Trigger Input 1 is active; when Trigger Input 2 is active; when the Remote Control ACC On/Off is used; Zone A or Zone B is On 6 6 Trigger Output Setup Trigger 1/4, 2/4 Voltage Duration Extra Durartion Action Trigger 3/4, 4/4 Voltage Duration Extra Dutration Action Level, 5 Seconds, 1 second, 100 ms 0 ms to 2 minutes No action, Zone A Source, Zone B Source, Zone A On, Zone On, Trigger Input 1, Trigger Input 2, ACC Power, Zone A/B On 12V or 5V Level, 5 Seconds, 1 second, 100 ms 0 ms to 2 minutes No action, Zone A Source, Zone B Source, Zone A On, Zone On, Trigger Input 1, Trigger Input 2, ACC Power, Zone A/B On 6 6 6 6 6 6 33 Setup Mode, con’t INSTALLER MENU SUB MENU SELECTION OPTION(S) DESCRIPTION SETUP SHEET NO. System Setup General Setup Device Mangement 34 OSD Feedback User, Volume, None OSD Position OSD Background Bottom, middle, top Solid, Transparent VFD Feedback User, Volume, Off, All Startup source Front IR Sensor Power Saving Use last, CD, CD2, Tuner, Phono, SAT, Server, DVD Blu-ray, REC, DVR, TV, Multichannel On, Off Yes, No Amp Lights On, Off Enhanced Remote Control Off, On Refer to page 44 for additional information User mode displays various On-Screen Information, Volume mode displays volume setting only, None displays no On-Screen Information Changes location of On-Screen Information Changes the background behind the On-Screen Information from black to transparent MX151 Front Panel Information Display Automatically indicates info when there are Input, Surround Mode and Signal changes. User setting indicates Input, Volume and Surround Mode Changes. Volume setting indicates Input and Volume changes. All setting indicates Input, Surround Mode, changes to the incoming Signal, and Volume changes. Off switches Off the Front Panel Information Display. When switched On either listen to the last source selected before the MX151 was switched Off or same selected sourced when switched On 7 Disables the Front Panel IR Sensor Reduces the startup initialization time, however MX151 will consume more power when in the standby mode Switches On or Off the meter illumination to McIntosh Power Amplifiers with the feature, requires power control connection between units When feature is Off, the Remote Control works with standard McIntosh functioning, when On more functioning is performed On-Screen with certain standard McIntosh functioning disabled 7 7 7 7 7 7 7 7 Notes 35 How to Operate the MX151 The McIntosh MX151 has been factory configured for default operating settings, allowing for immediate enjoyment of superb video and high fidelity audio without the need for further adjustments. If you wish to make changes to the factory default settings, refer to the SETUP Section of this Owner’s Manual starting on page 17. McIntosh MX151 Figure 51 Initializing Please wait... Note: It is advisable to perform “Speaker Configuration” and “RoomPerfect” starting on page 22, to ensure the best audio performance. Power On and Off Press the STANDBY/ON Push-button on the Front Panel or press the (Power On) Push-button on the Remote Control. Refer to figures 50 and 54. The LED located above the STANDBY Push-button will start to flash On/Off and the Front Panel Information Display will indicate “McIntosh MX151” followed by “Initializing Please wait ...”. Refer to figures 51 and 52. When the Initialization process is over, the display Figure 52 CD 0% CD 0% Figure 50 36 Figure 53 will indicate “CD” with a volume level of “0%”, which is the factory default setting. Refer to figure 53. The next time the MX151 is switched On, the last source selected at the desired volume will be active (unless the default setup settings have been changed). Note: If the MX151 A/V Control Center is not going to be used for an extended period of time, please remove the AC Power Cord from the AC Outlet. Input Selection The INPUT Control selects the desired source and is indicated on the top line of the Front Panel Information Display. Refer to figure 50. The selection of the sources may also be accomplished by pressing the appropriate push-button on the Remote Control. Refer to figure 54. Using the MX151 INPUT Control, any one of the ten default Inputs (CD, Tuner, DVD-Blu-ray, etc.) may be selected along with one default Phantom Input (Multichannel). The Remote Control has ten dedicated direct access pushbuttons along with ◄ INPUT ► Push-buttons. Note: The MX151 has ten direct access pre-assigned Inputs and up to 117 assignable Phantom Inputs (one input is preassigned). Each Input has its own name and other settings assigned to it. These Inputs are made from the Analog Audio Input Connections (eleven, two-channel and one, eight-channel), Figure 54 there are also 15 Digital Audio Inputs Connections. There are 9 Analog and 5 Digital Video Input Connections. How to Operate the MX151 Volume Control Adjust the VOLUME Control to select the desired listening level. The Volume Control adjusts all eight channels simultaneously, and level is indicated from 0 to 99% on the bottom line of the Front Panel Information Display. The Remote Control may also be used to adjust the listening level by using the VOL+/- Pushbutton. During the time VOLUME Control is rotated or the Remote Control VOL+/- Push-button is depressed, an On-Screen Display Overlay will appear showing the Volume Level % and a horizontal display bar. Refer to figure 55. When the MUTE Push-button is pressed, Volume: 22% Ι Ι Ι Ι Ι Ι Ι Ι Ι_ _ _ _ _ _ _ _ _ _ _ _ _ _Ι Figure 55 the Front Panel Information Display will indicate the word “Muted” in place of the volume % and the On-Screen Display will replace the word “Volume:” with “(Muted). Refer to figure 56. Pressing the MUTE Push-button a second time, the listening volume level (Muted) 22% Ι Ι Ι Ι Ι Ι Ι Ι Ι_ _ _ _ _ _ _ _ _ _ _ _ _ _Ι Figure 56 will be restored and the displays will again indicate the Volume %. Front Panel Status The three sets of front panel LEDs indicate the status of Input Format, Operating/Decoding Modes and the Output Format. Note: If a Digital Input is selected and the Digital Source Component is not producing an output signal, none of the Front Panel Status LEDs will illuminate. Input Format A. If the input signal source is Eight Channel, the front panel INPUT FORMAT LEDs L, C, R, RS, RBS, LBS, LS and LFE will illuminate. Refer to figure 57. B. If a Digital Input Signal Source is 2 Channel Surround Encoded, the front panel INPUT FORMAT LEDs L, R and Figure 57 S will illuminate. Note: The “S” indicator will only illuminate on some surround encoded program material. C. If the Analog Input Signal Source is Stereo, the INPUT FORMAT LEDs L and R will illuminate. D. If an Analog Input Signal Source is Mono, both channels will be receiving the mono signal and the INPUT FORMAT LEDs L and R will illuminate. Operating Mode Displays E. The ANALOG SIGNAL Display will illuminate when the audio input signal is analog. Refer to figure 58. F. The DIGITAL SIGNAL Display will ilFigure 58 luminate when the audio input signal is Digital. G. The HD AUDIO Display will illuminate when the audio input signal is Digital High Definition such as Dolby True HD or DTS Master HD. H. The ROOMPERFECT Display will illuminate when RoomPerfect Correction Circuitry is Active. Output Format: I. The OUTPUT FORMAT LEDs indicate the SURROUND MODE selected and the active audio channels. Refer to figure 59. Note: The following example of the illuminated LED is based upon a 7.1 channel system. If your system is configured as something other than 7.1 (e.g. no Center Loudspeaker or a single BackSurround Loudspeaker) then the number of LEDs illuminated will be different. J. NO PROCESSING mode for Figure 59 a two channel (Stereo) Input will cause the L, R and SUB 37 LEDs to illuminate. K. DPLIIx (MOVIE) or NEO: 6 (CINEMA) mode will cause the L, C, R, RS, RBS, LBS, LS and SUB to illuminate. L. DPLIIx (MUSIC) mode will cause the L, C, R, RS, RBS, LBS, LS and SUB to illuminate. M. DPLIIx (GAME) mode will cause the L, C, R, RS, RBS, LBS, LS and SUB to illuminate. Trim Select The MX151 TRIM Push-button together with the LEVEL +/Push-button on the Remote Control, provide the means for adjusting eight different Audio Functions and two Display Functions. Refer to figure 60. The Front Panel Information Display indicates the function and the adjustment. During the time a Trim function is accessed and an adjustment is made, an On-Screen Display Overlay will appear on the TV/ Monitor. Notes: 1. The MX151 Front Panel TRIM Control together with the ADJUST ▼ (Down) and ▲ (Up) Pushbuttons may be used instead of the Remote Control. 2. Changes made to 38 “RoomPerfect” and “Voicing” Trim Settings are retained in memory, all other Trim Adjustments return to default setting when changing Inputs and switching the MX151 On/Off. RoomPerfect During the previously run RoomPerfect Correction Process (refer to Setup on page 24) two room correction response curves where generated. One for the Focus 1 listening location and a second curve for a large listening area, known as Global. To change from the Focus 1 location to Global Area perform the following steps: 1. Press the TRIM Push-button until “RoomPerfect: Focus 1” appears on the Front Panel Display. Refer to figure 61. RoomPerfect: Focus 1 Figure 61 2. Press the LEVEL +/- Push-button until “RoomPerfect Global” appears on the Front Panel Display. Refer to figure 62. RoomPerfect: Global Figure 62 Figure 60 Voicing Some music recordings, movie sound tracks and other audio programs might require slight equalization modifications to restore musical balance from the flat response (neutral). The MX151 has built in five different equalization variations to select from to restore musical balance: Music - A slight reduction in midrange frequencies Movie - A gentle roll off at high frequencies Action - A slight boost in low frequencies Action + Movie - A slight boost in low frequencies and a gentle roll off in high frequencies News -A reductions of low frequencies and a slight boost of high frequencies To change from the Neutral setting to one of the five voicing curves perform the following steps: 1. Press the TRIM Push-button until “Voicing:” appears on the Front Panel Display. Refer to figure 63. Voicing: Neutral Figure 63 2. Press the LEVEL +/- Push-button until the desired voicing curve name appears on the Front Panel Display. Center, Subwoofer and Surrounds Trim Levels The Volume Levels of the Center, Subwoofer and Surround Loudspeakers can be adjusted up or down by 10dB relative to the Left and Right Front Loudspeakers. To change the volume level perform the following steps: 1. Press the TRIM Push-button until the desired Loudspeaker name appears on the Front Panel Display. Refer to figures 64, 65 and 66. Trim Center: 0.0dB Figure 64 Trim Sub: 0.0dB Figure 65 How to Operate the MX151, con’t Trim Surrounds: 0.0dB Figure 66 2. Press the LEVEL +/- Push-button until the desired increase or decrease in volume level for the Loudspeaker is achieved. Bass and Treble The MX151 allows for changing the tonal response for any of the inputs via the Bass and Treble Adjustments. The tonal response can be adjusted up or down by 10dB from the flat setting. To change the Bass and/or Treble volume level perform the following steps: 1. Press the TRIM Push-button until the “Bass:” or “Treble:” is indicated on the Front Panel Display. Refer to figures 67 and 68. Bass: 0.0dB Figure 67 Treble: 0.0dB Figure 68 2. Press the LEVEL +/- Push-button until the desired increase or decrease in tonal response is achieved. Lipsync There may be times when a particular Audio/Video Program has a synchronization difficulty between the Video and Audio infomation. This usally becomes noticable when a person is talking and the movement of their Lips is delayed from the sound you are hearing. The MX151 has the ability to add delay the sound in 10 milliseconds (ms) increments up to 400ms. To change the delay perform the following steps: Note: When the Lipsync problem is with a single source component or between several components in a system the MX151 Setup Mode allows storing the correction into memory. Refer to page 29 “Zone A Source Setup” or “Advanced Audio Setup”on page 31. McIntosh Power Amplifier(s) with Remote Meter Illumination Control Circuitry. To switch Off the Meter Illumination perform the following: 1. Press the TRIM Push-button until “Amp lights:” is indicated on the Front Panel Display. Refer to figure 71. 1. Press the TRIM Push-button until “Lipsync:” is indicated on the Front Panel Display. Refer to figure 69. Amp lights: On Lipsync: 0ms 2. Press the LEVEL +/- Push-button until the MeterIllumination is Off. Figure 69 2. Press the LEVEL + Push-button until the audio is in sync with the video. Front Panel Information Display Brightness The Front Panel Information Display has four Brightness Levels (25%, 50%, 75% and 100%) and may be changed by performing the following: 1. Press the TRIM Push-button until “VDF Level:” is indicated on the Front Panel Display. Refer to figure 70. VFD Level: 100% Figure 70 2. Press the LEVEL +/- Push-button until the brightness is at the desired level. Note: The Front Panel Information Display may also be switched Off by changing the Setup Mode “VFD Feedback” setting. Refer to page 34. Power Amplifier Meter Lights The MX151 can control the Illumination of Meters in Figure 71 Surround Mode The MX151 provides five different default Surround Modes and up to sixteen assignable Custom Surround Modes. The MX151 Signal Processing Circuitry first looks at the incoming audio signal and determines if the signal is two channel or multichannel (more than two channels). The incoming signal will be processed depending on the MX151 Surround Mode setting. When the MX151 is in the “No Processing” Surround Mode, the incoming signal format determines how the signal will be processed. For example, if the incoming signal is a Dolby Digital 5.1 signal the MX151 will decode it into 5.1 audio. The chart below shows the default processing applied: Surround Mode Name 2 Channel Input Signal Multichannel Input Signal No Post Processing No Post Processing No Post Processing Movie DLPIIx Movie No Post Processing Music DLPIIx Music No Post Processing Stereo No Post Processing Stereo Games DLPIIx Game No Post Processing 39 How to Operate the MX151, con’t In the first example, the selected Input is Tuner with a 2-Channel signal present. Pressing the Front Panel DISPLAY MODE Push-button twice, the Information Display indication is illustrated in figure 72. Chang- Proc. (Stereo): No Post Proc. Figure 72 ing the Surround Mode to “Music” and Dolby Prologic IIx will be applied to the audio signal coming from the Tuner. Refer to figure 73. Proc. (Music): DLPIIx Music Figure 73 The second example has the DVD-Blu-ray Input selected and a Multichannel signal present. Figure 74 illustrates when the Surround Mode is set to “No Proc. (No Proc.): Dolby TrueHD 7.1 Figure 74 Processing”. The incoming signal format is Dolby TrueHD 7.1 and the MX151 will decode the Dolby Digital Signal into 7.1 channels of audio. Note: Any changes made using the Surround Mode Control only apply until a different Input is selected or power is switched Off. The next time a given Input is selected, the default Surround Mode Processing will apply. In the Setup Mode, the default Surround Mode settings for each Input may be changed. Refer to “Audio Setup Mode” on starting on page 29. Up to 16 Custom Surround Mode choices can be added, and the default settings for both 2-channel and Multichannel signal types can be changed. 40 Note: The “Pure Stereo” Surround Mode, one of the additional options, bypasses RoomPerfect room correction and bass management circuitry. The Left and Right Front Loudspeakers are then expected to reproduce full range sound. Display Mode The Display Mode Function indicates the operational status of the MX151 on the Front Panel Information Display and On-Screen on a TV/Monitor. With DVD Blu-ray as the source, press the DISPLAY MODE Push-button once. The current Input Selection and Volume Setting will be indicated on the Front Panel Information Display. Refer to figure 75. At the same DVD Blu-ray 24% Figure 75 time the On-Screen display will also indicate the complete MX151 Operational Status. Refer to figSource: DVD Blu-ray Volume: 24% Ι Ι Ι Ι Ι Ι Ι Ι Ι Ι _ _ __ _ __ _ __ _ __ _ _Ι RoomPerfect: Voicing: Focus 1 Neutal Audio in: Signal: (Movie) HDMI Dolby TrueHD 7.1 No Post Proc. Video in: Signal: HDMI 3 1080p YCbCr 4:4:4 Figure 76 ure 76. When the DISPLAY MODE Push-button is pressed twice, the Front Panel Information Display will indicate the incoming audio signal type. Refer to figure 77. By pressing the DISPLAY MODE Push- Signal: Dolby TrueHD 7.1 Figure 77 button three times, the current Surround Mode will be indicated on the Front Panel Information Display. Refer to figure 78. Proc. (Movie): No Post Proc. Figure 78 Late Night The LATE NIGHT Push-button turns a volume compression circuit On and Off. This feature suppresses loud sounds or music that might disturb neighbors or others not in the immediate area of the Home Theater. Soft levels are also raised slightly so they are still listenable at reduced overall volume levels. This works only on a Dolby Digital Sound Track with encoded data that supports the compression function. Setup Pressing the SETUP Push-button activates the MX151 SETUP Mode for making changes to the System settings. Adjust ▼ ▲ The ADJUST ▼ (Down) and ▲ (Up) Push-buttons allow for adjustment of a selected Trim Function and are used when in the Setup Mode. Enhanced Remote Control Operation Enhanced Remote Control Operation Back When the MX151 is in Setup Mode it is used for returning to a previous Menu Screen. Select When the MX151 is in the Setup Mode it is used to select the highlighted option. Navigate The NAVIGATE (Left) and (Right) Push-buttons move Left or Right through Menu Options. Also used to activate the Trim Mode selecting the various Trim Functions. Reset of Microprocessors In the highly unlikely event the Controls and/or Pushbuttons on the MX151 become non-response, it may become necessary to reset the microprocessors in the MX151. Perform the following steps to take corrective action: REMOVE POWER: 1. Remove the AC Power Cord from the Rear Panel of the MX151. 2. Having waited at least 15 to 20 seconds after removing AC Power, now reattach the AC Power Cord to the Rear Panel of the MX151. 3. Press the STANDBY/ON Push-button. The McIntosh MX151 has been factory configured for operating in a standard McIntosh Home Theater System. This consists of McIntosh Source Components connected via data ports to the MX151. Using the McIntosh Remote Control supplied with the MX151 it becomes possible to operate the basic functions of the McIntosh Source Components with one remote control. In those Home Theater Systems where a nonMcIntosh Remote Control will be used controlling other types of equipment (such as a drop down projector screen, room lighting, etc.), the MX151 has an optional remote control operating mode known as Enhanced Mode. This optional mode may also be used when it is desirable to use the remote controls supplied with each of the McIntosh Source Components for complete operational functionality. Note: If the Enhanced Mode of Remote Control operation is to be used, it is advisable to disconnect any Data Control Cables between the MX151 and McIntosh Source Components to prevent any unintended operation of those components. To switch the Enhanced Remote Mode On, enter the MX151 Setup Mode, select the System Setup Menu, followed by the General Setup Menu and then “Enhanced RC ctrl” menu item. Refer to page 34 in this Owner’s Manual and page 7 of the MX151 Setup separate sheet. With the Enhanced Remote Control feature active press the MENU Push-button on the Remote Control and the User Menu will appear On-Screen. Refer to figures 80 and 81. Also refer to the MX151 “User Menu-1” separate folded sheet contained in the Owner’s Manual Packet. Note: Note during the time User Menu appears OnScreen, the Front Panel Information Display will indicate “User Menu” User Menu Source Selection Surround Mode Selection RoomPerfect Mode Voicing Selection Trims Zone B Control Figure 80 The User Menu allows for Source Selection, Surround Mode, RoomPerfect Correction Modes, Voicing Curve Selection, Trim Adjustments and Zone B Control. Press the INFO Push-button on the Remote Control and the MX151 Operational Status will appear On-Screen. Refer to figure 76 on page 40. Press the AM Push-button to select RoomPerfect Global correction, Focus 1 correction or bypass all corrections. Refer to figure 81. Pressing the FM Push-button will allow selection of Focus corrections (2 thru 8) when they are measured and stored into memory. Pressing one of the numeric (1-8) Push-buttons will directly access a specific Focus corrections and numeric 9 Push-button to access the Global correction. Pressing the numeric 0 Push-button will access the RoomPerfect Bypass Mode. Figure 81 41 How to Operate Zone B 2. The first time Zone B is switched On, the default source is CD at 0% volume. After the first time, Zone B will wake up to the last source and previous volume setting listened to (unless changed in the MX151 Setup Mode, refer to page 31). The MX151 includes the capability of being able to operate and control two audio/video zones, independently of each other. Zone A is the Primary (Home Theater Listening Area) with Surround Sound. Zone B is configured for a Secondary Remote Location providing two channel audio and video programs. Operating Zone B from the MX151 Front Panel To activate Zone B Control from the MX151 Front Panel, perform the following steps. 1. When the MX151 is Off, press the ZONE B CONTROL Push-button and the LED above the Pushbutton will illuminate. Then press the STANDBY/ ON Push-button. After the start up initialization the Front Panel Information Display will indicate the Zone B Source and volume setting. Refer to figures 82 and 83. Notes: 1. If Zone A is already On when the ZONE B Push-button is pressed the Front Information Display will indicate “Zone B: Off”. Zone B: Tuner 18% Figure 83 2. Rotate the INPUT Control to select the desired source for Zone B. 3. Rotate the VOLUME Control to the desired volume level for Zone B. 4. Return Zone A Front Panel Control at any time by pressing the ZONE B CONTROL Push-button, the LED illumination above the ZONE B CONTROL Push-button will go out and the Front Panel Information Display will indicate current Zone A Zone B: CD 0% status and return the Front Panel Controls, Displays and Push-buttons for Zone A operation. 5. To switch Zone B Off, first press the ZONE B CONTROL Push-button (unless the LED above the pushbutton is already illuminated) then press the STAND/ BY Push-button. Press the ZONE B CONTROL Pushbutton to switch Off Zone B Control. Operating Zone B from a Sensor To activate Zone B Control from a Sensor using a Remote Control perform the following: 1. Press the (Power On) Push-button on the Remote Control aimed at a Sensor located in Zone B. Note: The Front Panel Alphanumeric Display will indicate “Zone B is on”, when Zone A is not active. Refer to figure 85. 2. Select the desired Zone B Source by pressing one of Zone B is on Figure 82 42 Figure 85 Figure 84 How to Operate Zone B the ten direct access push-buttons Note: A phantom Input for Zone B may be selected using the Front Panel INPUT Control. The Remote Control ◄ INPUT ► Push-buttons are disabled for Zone B. 3. Press the VOLume +/- Push-button to adjust the volume to the desired listening level. 4. Press the MUTE Push-button to mute the sound, press the MUTE Push-button to resume listening. 5. If a McIntosh source component is connected to the MX151 via data ports, basic operating functions of the source component can be performed using the Remote Control aimed at a Sensor located in Zone B. 43 Creating a Backup The MX151 includes the capability of backing up any changes made to the factory default settings. With a backup made, to an external USB Drive (not supplied), it makes restoring those settings easier in the event reseting the MX151 becomes necessary. To create a backup perform the following steps: Note: RoomPerfect Measurements and Corrections are not saved. 1. Press the SETUP Push-button on the Remote Control. Refer to figure 86. Note: The MX151 Front Panel Push-buttons may be used instead of the Remote Control. 2. Using the (Down) Push-button scroll down thru the Installer Menu to “Device Management” and then press the SELECT Push-button. Refer to figure 87. 3. With “New Backup” highlighted press the SELECT Push-button. Refer to figure 88. 4. Change the “Backup To” option from “STORAGE” to “USB” by using the (Right) Push-button and Down Push-button. Refer to figure 89. 5. Insert into the MX151 Rear Panel USB Socket a Formated USB Drive (PC Format) with at least 1G bytes of available memory. 6. Referring to figure 89, with “Create Backup” highlighted, press the SELECT Push-button. Refer to figure 90. 7. Using the ▲ (Up) Push-button highlight “Yes” and press the SELECT Push-button. Refer to figure 91. Then press the SELECT Push-button. 8. Use the SETUP Push-button to exit from the Setup Mode. 9. Remove the USB Drive from the MX151 Rear Panel and keep it in a safe place. Installer Menu Speaker and Room Setup Source Setup Audio Processing Setup Zone B Setup System Setup Device Management Exit Create Backup Backup To Backup Name: “bkup001” Create Backup Back USB Figure 89 Figure 86 Device Management Backup and Restore Software Info Software Update Factory Defaults Back Confirm Create Backup Create backup: “bkup001”? Yes No Figure 90 Figure 87 Backup and Restore New Backup Restore Backup Delete Backup Back Backup Created 44 Press enter to continue Figure 88 Figure 91 Backup and Reset to Factory Default Settings Returning to Factory Default Settings If it should become necessary to perform a complete reset of the MX151 as a result of malfunctioning, perform the following steps: 1. Press the SETUP Push-button on the Remote Control. Refer to figure 86. Note: The MX151 Front Panel Push-buttons may be used instead of the Remote Control. 2. Using the (Down) Push-button scroll down thru the Installer Menu to “Device Management” and then press the SELECT Push-button. Refer to figure 87. 3. Scroll down to “Factory Defaults” and then press the SELECT Push-button. Refer to figure 92. 4. Using the ▲ (Up) Push-button highlight “Yes” and press the SELECT Push-button. Refer to figure 93. At this time the MX151 will switch Off, reset the microprocessors and return the MX151 to factory default settings. If a Backup of the settings was previously performed it can now be used to restored those settings by performing the following steps: 5. Insert into the MX151 Rear Panel USB Socket the USB Drive containing the Backup File. 6. Using the Remote Control, enter the Setup Mode and proceed thru the “Installer Menu”, “Device Management”and the “Backup and Restore” Menus until “Restore Backup” menu option is highlighted. Press the SELECT Push-button. Refer to figure 94. 7. Change the “Restore Backup” option from “STORAGE” to “USB” by using the (Right) Push-button and Down Push-button. Refer to figure 95. 8. Using the Down Push-button to highlight “Select Backup” and press the SELECT Push-button. Refer to figure 96. 9. Use the Down Push-button to highlight “bkup001” (default name) or name given when the backup was created and press the SELECT Pushbutton. Another On-Screen Menu will appear asking for confirmation of restoring the settings. Select “Yes” and then press the SELECT Pushbutton. The MX151 will switch Off then On to restore the settings. 10. Remove the USB Drive from the MX151 Rear Panel and keep it in a safe place. 11. Proceed to page 24 to run a RoomPerfect Calibration. Device Management Backup and Restore Software Info Software Update Factory Defaults Back Backup and Restore New Backup Restore Backup Delete Backup Back Figure 94 Restore Backup Restore From: USB Select Backup Back Figure 92 Set Factory Defaults All user settings will be deleted and device will reboot. Continue? Yes No Figure 95 Select Backup bkup001 Back Figure 93 Figure 96 45 Advanced Setup and Operation Introduction The MX151 A/V Control Center has the ability to be remotely controlled by a PC running Windows via a network connection. Remote functions include access to the MX151 built-in Installer and User Menus along with the current Operational Status. The PCs GUI (Graphical User Interface) together with a keyboard and mouse allows for quicker navigation of menus, entering settings, viewing current status and operating the MX151. This guide covers the network connection made to the MX151 along with basic operation using the PC interface. For additional information about PC Internet WEB Browser Programs, PC Network Connections and Settings, please refer to the documentation supplied with your computer and network hardware. Hardware Requirements: The hardware requirements include a functioning MX151 A/V Control Center, TV/Monitor and a computer with a RJ45 network connector running Windows with an internet browser program. Computer Network Hub, Router or Switch MX151 Rear Panel (Partial View) Figure 1 Computer Crossover Adapter/Cable (RJ45 CAT5/5E/6) Hardware Connections: With power Off to the MX151 make the following connections: 1. An Ethernet Connection between the MX151 NET RJ45 Connector (using a CAT5, CAT5E or CAT6 cable) to a Computer Network. Refer to figure 1. Note: A single computer may be connected to the MX151 NET RJ45 Connection by using a RJ45 CAT5/5E/6 Crossover Adapter/Cable and RJ45 CAT5/5E/6 cable(s). Refer to figure 2. Network Setup Mode Manual IP IP 192.168. 1.222 Mask 255.255.255. 0 GW 192.168. 1. 1. Save Refresh Figure 3 MX151 Rear Panel (Partial View) 2. A TV/Monitor connected to the MX151 (Zone A). Figure 2 46 Operation and Installer Menu: The following steps are based on having operated the MX151 A/V Control Center including using the Setup Mode. Refer to the MX151 Owner’s Manual - pages 17 thru 45 and the MX151 Installer and User Menu separate fold out sheets (supplied in the MX151 Owner’s Manual Package) for additional information. 1. Switch power On to the MX151, TV/Monitor and Computer. 2. Press the SETUP Push-Button. 3. Using the directional push-buttons (MX151 Front Panel or Remote Control) select first the “System Setup” from the Installer Menu, followed by “Network Setup”. Refer to figure 3. The default network setting of the MX151 is for manual assignment of the IP Address with the default address of 192.168.1.222. The MX151 also supports the Automatic Dynamic Host Configuration Protocol (DHCP) where the MX151 IP Address will be negotiated automatically by a Server or Computer on the network. 4. Launch the computer Internet WEB Browser and enter in the URL (Uniform Resource Locator) entry box “http://192.168.1.222/” and press return. Advanced Setup and Operation, con’t The McIntosh MX151 Home Page should now be displayed in the Internet WEB Browser Window. Refer to figure 4. 5. Press the MX151 SETUP Push-button three times to exit out of the Setup Mode. Note: Changes are not permitted to the various computer WEB based Installer Menu Functions while the MX151 is in the Setup Mode and the Front Panel indicates Installer Menu. 6. Click on “Installer Menu” followed by selecting “Speaker Setup” and then “Edit/ Select Speaker Setup” Menu items. Refer to figure 5. 7. Select the “L” Output by clicking on “Edit” on the same line. Refer to figure 6. Figure 5 Figure 4 Figure 6 47 8. By clicking on the blue color triangles (appearing in the various on screen menus) submenus with additional options and alpha-numeric entries can be made. Refer to figures 7 and figures 8 thru 12. Figure 10 Figure 7 Figure 11 Figure 8 Figure 9 48 Figure 12 Advanced Setup and Operation, con’t Refer to figures 13 thru 16 for additional Speaker & Room Menus with options. Figure 15 Figure 13 Figure 14 Figure 16 49 Refer to figures 17 thru 21 for Source, Audio Processing, Zone B, System and Device Management Menus with options. Figure 17 Figure 20 Figure 18 Figure 21 Figure 19 50 Advanced Setup and Operation, con’t Figure 22 is an example of the Status Menu item displaying the current operation status of the MX151. Figure 22 51 Figures 23 thru 25 are examples of User Menus allowing operation of the MX151. 1% Volume Steps 5% Volume Steps Figure 23 52 Advanced Setup and Operation, con’t Figure 24 Figure 25 53 Introduction The MX151 offers additional Zone A Left Front Channel and Right Front Channel Outputs, two balanced outputs and two unbalanced outputs. These Auxiliary Outputs (1 thru 4) may be used for additional subwoofer outputs or for using the MX151 built-in electronic crossover circuitry. In this guide, the example will illustrate connections along with Setup Mode Settings for using the MX151 Electronic Crossover Circuitry. Almost all Loudspeakers incorporate acoustic drivers and a passive crossover network. The passive crossover network channels the various audio frequencies to the appropriate acoustic driver taking into account the amplitude and phases of the audio signals the Loudspeaker reproduces. When an electronic crossover circuitry in the MX151 is used together with multiple Power Amplifiers and Loudspeakers, it is very important to maintain the correct amplitude and phases of the audio signals for accurate sound reproduction. McIntosh’s Acoustics Laboratory has measured McIntosh Loudspeakers (with separate Low Frequency/High Frequency connections) when used with the MX151 and has arrived at the optimum settings. There are two different settings. The first setting is for use with McIntosh Loudspeakers with a Low Frequency (Woofer) to High Frequency (Midrange/Tweeter) crossover frequency of 250Hz. The second setting is when the McIntosh Loudspeaker has a crossover of 80Hz. It is suggested to use these settings. When the MX151 is used with non-McIntosh Loudspeakers it is highly recommended to contact your Dealer for assistance. Your Dealer has the necessary measurement equipment and knowledge to properly set up the electronic crossover in the MX151 for your Loudspeakers. 54 Connecting the MX151 when using the Electronic Crossover The following connection instructions and illustration on the next page are a supplement to the MX151 Zone A Output Connection instructions on page 11 of the Owner’s Manual and the separate folded sheet “Mc2B” Diagram. It is an example of a typical Home Theater System. Your system may vary from this, however the actual components would be connected in a similar manner. For additional information refer to “Connector and Cable Information” on page 5 of the MX151 Owner’s Manual. Power Control Connections: 1. Connect a Control Cable from the MX151 ZA PC (Power Control) OUT Jack to the Power Control In on Zone A Power Amplifier One. 2. Connect a Control Cable from Zone A Power Amplifier One Power Control Out to Zone A Power Amplifier Two Power Control In Jack. Perform additional Power Control Connections starting with step 3 on page 11 of the MX151 Owner’s Manual. Analog Audio Connections: 3. Connect Balanced Audio Cables from the MX151 Zone A - L (Front Left Channel) and R (Front Right Channel) to Zone A Power Amplifier One (High Frequencies) Inputs 1 and 3 respectively. Note: Unbalanced Audio Connections may be used in place of the Balanced Connections. 4. Connect Balanced Audio Cables from the MX151 Zone A - AUX 1 (Left Front Channel) and AUX 2 (Right Front Channel) to Zone A Power Amplifier Two (Low Frequencies) Inputs Left and Right respectively. Perform additional Analog Audio Connections for the remaining channels, HDMI Connections and AC Power Cords by refering to steps (6 thru 11) on page 11 of the MX151 Owner’s Manual. Auxiliary Output and Electronic Crossover Note: Refer to the MX151 Owner’s Manual pages 10 and 11 for additional connection information. Zone A - Power Amplifier One High Frequencies Left Front and Right Front Channels; Center Channel Connection Legend: Power Control Cable* - AC Power Cords Audio Signal Cable * 2 conductor shielded with 1/8 inch stereo mini phone plug on each end. MX151 (Partial View) F15AH 125V Zone A - Power Amplifier Two Low Frequencies Left Front and Right Front Channels Connect to AC Outlet Connect to the next Power Amplifier, Power Control IN 55 Output Settings Operation and Installer Menu: In order to use the AUXiliary Audio Output in the MX151, for either additional Subwoofer Outputs or the Electronic Crossover Circuitry, the settings in the “Installer Speaker Configuration Menu” need to be changed from their default setting. The following steps are based on having operated the MX151 A/V Control Center, including the Setup Mode. Refer to the MX151 Owner’s Manual - pages 17 thru 45 and the MX151 Installer and User Menu separate fold out sheets (supplied in the MX151 Owner’s Manual Package) for additional information. In the following example, the Crossover Setting will be set up for a Bi-Amplified System using McIntosh Loudspeakers with an internal 250Hz crossover point between the Low Frequency Section and the Midrange/High Frequency Section. If your Loudspeakers are not McIntosh, contact your Dealer for assistance. The MX151 Electronic Crossover Circuitry will be activated with a crossover setting of 250Hz using the LinkwitzRiley 4th order filter. Notes: 1. It is advisable to employ a Real Time Spectrum Analyzer, with at least one third octave resolution, to verify correct levels and overall performance. RoomPerfectTM Circuitry in the MX151 is designed to correct for Room Acoustics and Room/Loudspeaker interactions. It is not intended to correct for Power Amplifiers with different amplifying gains or Loudspeakers with inherent irregular frequency responses. 2. When using the MX151 AUX Outputs to drive multiple Subwoofers instead of using the MX151 Electronic Crossover Feature for BiAmplifing a Full Range Loudspeaker, select one of the “Sub _ _ _” crossover point setting” instead of the “Custom” setting” for “AUX perform”. Refer to step 6. 56 1. Switch power On to the MX151 and TV/Monitor. 2. Press the SETUP Push-Button. 3. Select the “Speaker and Room Setup” from the Installer Menu. Then select “Speaker Configuration” from the Speaker and Room Setup Menu. Refer to figures 1 and 2. Installer Menu Speaker and Room Setup Source Setup Audio Processing Setup Zone B Setup System Setup Device Management Exit Note: The “Gain Offset” Adjustments for the LEFT and RIGHT Front Loudspeakers and AUX Outputs may be used to compensate for the differences in Power Amplifier gains. Figure 1 Speaker and Room Setup Speaker Configuration RoomPerfect Level Offsets Distance Settings Back 5. Change the “Speaker Configuration” Front Left and Right settings to either “XL” or XXL” if that is not the current setting. Refer to figures 3 and 4. Also refer to page 22 of the MX151 Owner’s Manual for additional information on the “XL” and XXL” settings. 6. Refering to figures 3, 5 and 6, select “AUX1/2 (L/R)” listed in the Speaker Configuration menu and change the settings as follows: AUX perform - Custom AUX cutoff - 250Hz AUX order - 4th LiRi Figure 2 4. To makes changes use the (up) or (down) Push-buttons to highlight the “EDIT/SELECT” menu item, then press the SELECT Push-button. 7. Select “Save Change”, followed by Confirm Selection by selecting “Yes”. Refer to MX151 separate sheet “Setup 2”. 8. Then select “Verify Current Setup” and step thru all the settings using the SELECT Push-button. Refer to figures 7 and 8. Using the previously mentioned acoustic analyzing equipment, measure and adjust if necessary the gains of the two Power Amplifiers (unless they have the same amplification gain) for the same relative levels across the broad range of frequencies in the Low and High Pass regions. Then perform RoomPerfect Room Correction procedures starting on page 24 of the MX151 Owner’s Manual. Notes: 1. The analyzing circuitry in the MX151 is designed to prevent voids in the frequency response curve. This could occur if the Low Frequency Output AUX1/2 (L/R) had a cutoff setting of 125Hz and the the High Frequency Output (Front L/R) had a cutoff setting of Auxiliary Output and Elecrtonic Crossover, con’t 500Hz. In such a case the MX151 would set the crossover point for both the Low and High Frequency Outputs to 125Hz. 2. When using both AUX1/2 (Balanced Outputs) and AUX3/4 (Unbalanced Outputs) at the same time, it is important to make sure the settings (AUX perform, AUX cutoff and AUX order) are set the same. This assures matching of the crossover curves Low Pass and High Pass, as there is only one set of Front Left and Front Right Channel Outputs. Refer to figure 6. 3. When the Electronic Crossover or Multiple Sub-woofer Mode of operation is active, the signal normally present at the Subwoofer Output is now available at the AUX Outputs only. Speaker Configuration L XL C M R XL RS M RBS M LBS M LS M SUB Sub 80 AUX1/2 (L/R) Custom AUX3/4 (L/R) Edit/Select Verify Current Setup Back AUX1/AUX2 (L/R) AUX perform Custom AUX cutoff 250Hz AUX order 4th LiRi Gain offset 0.0dB Back Figure 6 Figure 4 Figure 3 Select Perf. XXL XL L M S XS Custom Back Select Perf. Sub 80 Sub 100 Sub 125 Sub 160 Sub 200 Sub 400 Sub 800 Custom Back Verify Configuration Output : L Volume : -44.0dB High-pass 80Hz Continue Abort Figure 7 Verify Configuration Successfully verified Speaker Configuration Ok Figure 5 Figure 8 57 Specifications Audio Specifications RoomPerfect and Voicing Specifications General Specifications Unless otherwise noted, the below MX151 Specifications where taken with RoomPerfect set to Bypass Mode and Voicing Mode set to Neutral. Sensitivity for Rated Output Phono: 5mV High Level:500mV Unbalanced 1V Balanced Power Requirements 100 Volts, 50/60Hz at 75 watts 110 Volts, 50/60Hz at 75 watts 120 Volts, 50/60Hz at 75 watts 220 Volts, 50/60Hz at 75 watts 230 Volts, 50/60Hz at 75 watts 240 Volts, 50/60Hz at 75 watts Frequency Response Left, Center, Right, Left Surround, Right Surround, Left Back Surround, Right Back Surround: ±0.5dB from 20Hz-20,000Hz Subwoofer: ±0.5dB from 20Hz-8000Hz Total Harmonic Distortion 0.005% maximum from 20Hz to 20,000Hz at rated output Signal To Noise Ratio Phono: 86dB below 10mV input (A Weighted) High Level:96dB below rated output (A Weighted) Rated Output Voltage 2.5V Unbalanced Outputs (Main) 5.0V Balanced Outputs (Main) Maximum Voltage Output 6.5V Unbalanced (8.5V Subwoofer) 13V Balanced (17V Subwoofer) Output Impedance 75 ohms Unbalanced 100 ohms Balanced Input Impedance Phono: 47k Ohms, 65pf High Level:10k Ohms Unbalanced and Balanced 58 Maximum Input Signal Phono: 50mV High Level:4.5V Unbalanced and Balanced Tone Controls Bass Control: ±10dB at 30Hz Treble Control: ±10dB at 10,000Hz Standby, less than 1 watt Note: Refer to the rear panel of the MX151 for the correct voltage. Overall Dimensions Width is 17-1/2 inches (44.45cm) Height is 7-5/8 inches (19.37cm) including feet Depth is 19-1/2 inches (49.53cm) including the Front Panel, Knobs, Rear Panel Connections and USB Drive Weight 31 pounds (14.06Kg) net, 55 pounds (24.95Kg) shipping Shipping Carton Dimensions Width is 25 inches (63.5cm) Depth is 28 inches (71.12cm) Height is 18-3/8 inches (46.67cm) Packing Instructions Packing Instructions In the event it is necessary to repack the equipment for shipment, the equipment must be packed exactly as shown below. It is very important that the four plastic feet are attached to the bottom of the equipment. This will ensure the proper equipment location on the bottom pad. Failure to do this will result in shipping damage. Use the original shipping carton and interior parts only if they are all in good serviceable condition. If a shipping carton or any of the interior part(s) are needed, please call or write Customer Service Department of McIntosh Laboratory. Refer to page 4. Please see the Part List for the correct part numbers. Quantity 1 4 2 Part Number 034256 033887 034493 Description Shipping carton only End cap Spacer pad 1 1 1 2 033697 033725 034301 034446 Inside carton only Inner carton top pad Bottom pad Foam plug 4 4 4 017937 400159 404080 Plastic foot #10-32 x 3/4” screw #10 Flat washer 1 2 1 034499 034500 034501 Accessory Box Slotted foam Divider foam MICROPHONE MICROPHONE STAND MINI BOOM SLOTTED FOAM (2) ACCESSORY BOX DIVIDER FOAM MICROPHONE CABLE INPU T M TRIM SELE X1 CT 50 A/ V CO N TR OL DISPL HD AY INPUT MI MODE FORMAT L LATE CE N TE R C LS LFE NIGHT R LBS RS S SET ANALOG SIGNAL RBS UP ROOMP ERFECT VOLU DIGITAL ME SIGNAL HD OUTPUT AUDIO L BACK ADJUS LS T FORMAT C R SUB LBS SELEC RS T BS RBS SURR OUND MOD E NAVIG ATE ZONE B CONTR STAND OL BY / ON SPACER PADS 59 McIntosh Laboratory, Inc. 2 Chambers Street Binghamton, NY 13903 www.mcintoshlabs.com The continuous improvement of its products is the policy of McIntosh Laboratory Incorporated who reserve the right to improve design without notice. Printed in the U.S.A. McIntosh Part No. 04134300