1
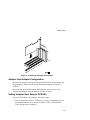
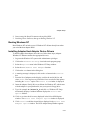
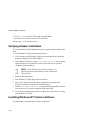
DIGITAL Server Cluster with BA356 Ultra Storage Installation Guide Part Number: ER-CLUSU-IA. A01 Digital Equipment Corporation November 1997 The information in this document is subject to change without notice and should not be construed as a commitment by Digital Equipment Corporation. Digital Equipment Corporation assumes no responsibility for any errors that might appear in this document. The software described in this document is furnished under a license and may be used or copied only in accordance with the terms of such license. No responsibility is assumed for the use or reliability of software or equipment that is not supplied by Digital Equipment Corporation or its affiliated companies. Restricted Rights: Use, duplication, or disclosure by the U.S. Government is subject to restrictions as set forth in subparagraph (c) (1) (ii) of the Rights in Technical Data and Computer Software clause at DFARS 252.227-7013. Copyright Digital Equipment Corporation. All Rights Reserved. DEC, DIGITAL, StorageWorks, ServerWORKS, Quick Launch, and the DIGITAL logo are trademarks of Digital Equipment Corporation. Adaptec and SCSISelect are trademarks of Adaptec, Inc. Intel and Pentium are registered trademarks of Intel Corporation. Windows and MS-DOS are registered trademarks of Microsoft Corporation. Windows NT and MSCS are trademarks of Microsoft Corporation. All other trademarks and registered trademarks are the property of their respective holders. Contents 1 About This Guide Introduction ...................................................................................................................1-1 Organization ..................................................................................................................1-1 Special Notices ..............................................................................................................1-2 Obtaining More Information ..........................................................................................1-2 2 Hardware Installation and Configuration Overview .......................................................................................................................2-1 UltraSCSI Single BA356 Configuration.........................................................................2-2 Configuring the Shared SCSI Bus Interconnect .......................................................2-2 UltraSCSI Dual BA356 Configuration ...........................................................................2-6 Configuring the Shared Servers/Storage Enclosure SCSI Bus Interconnect .............2-6 Configuring the Personality Module...............................................................................2-9 Adapter Setup ..............................................................................................................2-12 Installing an Adaptec Host Adapter....................................................................... 2-12 Adaptec Host Adapter Configuration ....................................................................2-13 Setting Adaptec Host Adapter SCSI IDs................................................................ 2-13 Deactivating On-Board Termination through the BIOS .........................................2-14 Disabling Power-On Reset ....................................................................................2-14 Booting Windows NT ........................................................................................... 2-15 Installing Adaptec Host Adapter Device Drivers ...................................................2-15 Verifying Adapter Installation......................................................................................2-16 Installing Windows NT Clusters Software.................................................................... 2-16 i Contents Figures 1. 2. 3. 4. 5. Single BA356 Enclosure Configuration for Windows NT Clusters ............................2-2 Dual BA356 Enclosure Configuration for Windows NT Clusters...............................2-6 Differential UltraSCSI Personality Module (Bottom view).........................................2-9 DIP Switch Location on Differential UltraSCSI Personality Module (Top view) ......2-10 Installing an Adaptec Host Adapter......................................................................... 2-13 Tables 1. 2. 3. 4. 5. 6. 7. ii FR-CK356-UP Parts List for Single BA356 Pedestal Enclosure Configuration ..........2-3 FR-CK356-UR Parts List for Single BA356 Rackmount Configuration .....................2-4 Compatible Disk Drives Parts List.............................................................................2-5 Parts List for Dual BA356 Pedestal Enclosure Configuration ....................................2-7 Parts List for Dual BA356 Rackmount Configuration................................................2-8 Compatible Disk Drives Parts List.............................................................................2-9 DIP Switch Settings for Differential UltraSCSI Personality Module ........................2-11 1 About This Guide Introduction This guide explains requirements and installation of Windows NT Clusters on DIGITAL Servers with the BA356 Ultra Storage array. NOTE: This guide applies to DIGITAL Clusters for Windows NT (DIGITAL P/N QB-53V9A-5A) and Microsoft Cluster Server (MSCS - included with Windows NT Enterprise Server Edition) on Intel platforms. Organization This guide contains the following: Chapter 1: About This Guide —Describes the purpose and organization of this installation guide. Chapter 2: Hardware Installation and Configuration—Describes how to install and/or set up the DIGITAL Cluster kit components. For instructions on installing Windows NT Clusters software, see that product's documentation. 1-1 Special Notices Special Notices Three kinds of special notices are used in this guide to emphasize specific information. WARNING: Indicates the presence of a hazard that can cause personal injury if the hazard is not avoided. CAUTION: Indicates the presence of a hazard that might cause damage to hardware or that might corrupt software. NOTES: Used to provide additional information. Obtaining More Information Check the DIGITAL web site for the latest drivers, technical tips, and documentation. This information can be found in the DIGITAL web page: http://www.digital.com/ 1-2 2 Hardware Installation and Configuration Overview This guide explains requirements and installation of Windows NT Clusters on DIGITAL Servers with the BA356 Ultra Storage array. Windows NT Clusters provides a high-availability solution for today’s client/server LANs. It enables two Windows NT systems to be coupled together, via a shared SCSI bus, to create a single system environment, or cluster. Endusers have access to all the cluster resources, such as shared disks, file shares, and database applications, without having to know the names of the individual servers in the cluster. If one server system fails, the second server in the cluster immediately assumes its workload, reconnects clients, and fails-over shared storage and file shares. The use of differential components – differential SCSI Adapters, differential converters, and differential cabling – is required for this application, as described in the following sections. Use of differential components allows the SCSI bus interconnect length to approach 25 meters, an advantage when creating a cluster configuration. 2-1 UltraSCSI Single BA356 Configuration UltraSCSI Single BA356 Configuration This section explains how to configure one StorageWorks BA356 UltraSCSI Expansion Enclosure. Configuring the Shared SCSI Bus Interconnect The components of the cluster are connected through the SCSI bus. The recommended configuration for the StorageWorks Expansion Enclosure (BA356) is shown in Figure 1. The figure shows the subsystem connected at one end of the shared differential SCSI bus. The differential end-of-bus termination is provided by the Differential UltraSCSI Personality module located in the Expansion Enclosure. DIP switches located in the Differential UltraSCSI Personality module are set to enable SCSI bus termination and to specify the enclosure device IDs. NOTE 1: Enclosure SCSI ID6 cannot be used for a disk drive because that ID is taken by the host. It may be used as a redundant power supply position. Figure 1. Single BA356 Enclosure Configuration for Windows NT Clusters 2-2 UltraSCSI Single BA356 Configuration The table below lists the parts provided in the FR-CK356-UP kit for a Single BA356 Pedestal Enclosure Configuration. Table 1. FR-CK356-UP Parts List for Single BA356 Pedestal Enclosure Configuration Key Part number Quantity 1 FR-BA356-KH 1 UltraSCSI Wide Differential Pedestal Expansion Enclosure (includes 1 Power Supply - BA35XHH, and a Differential UltraSCSI Personality module – BA35X-DA) 2 BA35X-HH 1 Optional, 2nd power supply (180 watts) – for redundancy 3 DS–BA35X–DA 1 Included with FR-BA356-KH, differential UltraSCSI Personality Module* 4 DS–BN37A–05 1 5.0 meter VHDCI male to VHDCI male** 5 DS–BN38E–0B 1 0.2 meter VHDCI female to Straight HD68 male 6 DS–BN21W–0B 2 “Y” Cable, 0.15 meter, one HD68 male to two HD68 females 7 DS–BN21K–05 1 5.0 meter HD68 male to Right HD68 male** 8 H879–AA 1 HD68 SCSI-3 Wide Differential Terminator (male) 9 2944UW 2 PCI to SCSI, Ultra Wide, Differential Host Adapter * ** Description The Differential UltraSCSI Personality module is part of the BA356-KH UltraSCSI Wide Differential Expansion Enclosure. The BA356-KH UltraSCSI Differential Enclosure will accept only one Personality module. The sum of the lengths of these cables must not exceed 24 meters. 2-3 UltraSCSI Single BA356 Configuration The table below lists the parts provided in the FR-CK356-UR kit for a single BA356 Rackmount configuration. Table 2. FR-CK356-UR Parts List for Single BA356 Rackmount Configuration Part number Description FR-BA356-JF 1 UltraSCSI Wide Differential Rack Expansion Enclosure (includes 1 Power Supply - BA35XHH, and a Differential UltraSCSI Personality module – BA35X-DA) BA35X-HH 1 Optional, 2nd power supply (180 watts) – for redundancy DS–BA35X–DA 1 Included with FR-BA356-JF, differential UltraSCSI Personality Module∗ DS–BN37A–05 1 5.0 meter VHDCI male to VHDCI male∗∗ DS–BN38E–0B 1 0.2 meter VHDCI female to Straight HD68 male DS–BN21W–0B 2 “Y” Cable, 0.15 meter, one HD68 male to two HD68 females DS–BN21K–05 1 5.0 meter HD68 male to Right HD68 male∗∗ H879–AA 1 HD68 SCSI-3 Wide Differential Terminator (male) 2944UW 2 PCI to SCSI, Ultra Wide, Differential Host Adapter BA35X-RB 1 Rack Mounting Kit FR-PCSRA-DJ 1 Chassis support rails FR-PCSRA-DP 1 19" Mounting Angle ∗ ∗∗ 2-4 Quantity The Differential UltraSCSI Personality module is part of the BA356-KH UltraSCSI Wide Differential Expansion Enclosure. The BA356-KH UltraSCSI Differential Enclosure will accept only one Personality module. The sum of the lengths of these cables must not exceed 24 meters. UltraSCSI Single BA356 Configuration Table 3 lists the number and size of UltraSCSI Wide disk drives that are compatible with the UltraSCSI BA356 StorageWorks configurations. Table 3. Compatible Disk Drives Parts List StorageWorks Part Number Description Speed Quantity FR-RZ1BB-VW 2.10 GB UltraSCSI Wide Disk Drive 7200 rpm up to 6 drives FR-RZ1CB-VW 4.29 GB UltraSCSI Wide Disk Drive 7200 rpm up to 6 drives FR-RZ1DB-VW 9.10 GB UltraSCSI Wide Disk Drive 7200 rpm up to 6 drives 2-5 UltraSCSI Dual BA356 Configuration UltraSCSI Dual BA356 Configuration This section explains how to configure two StorageWorks BA356 UltraSCSI Expansion Enclosures connected through the SCSI bus. Configuring the Shared Servers/Storage Enclosure SCSI Bus Interconnect The components of the cluster are connected through the SCSI bus. The recommended configuration for two BA356-KH StorageWorks Wide Expansion Enclosures is shown below. Figure 2 shows the storage enclosures connected at each end of the shared differential SCSI bus. NOTES: 1. Enclosure #1/SCSI ID6 may only be used for a redundant power supply. 2. Enclosure #2/SCSI ID14 may be used for a redundant power supply or a disk drive. Figure 2. Dual BA356 Enclosure Configuration for Windows NT Clusters 2-6 UltraSCSI Dual BA356 Configuration Table 1 on page 2-3 lists the parts provided in the kit for a single BA356 Pedestal configuration. Table 4 below lists the single BA356 Pedestal configuration plus the additional parts required for a dual BA356 Pedestal configuration. Table 4. Parts List for Dual BA356 Pedestal Enclosure Configuration Key Part number Quantity Description 1 FR-BA356-KH∗ 2 UltraSCSI Wide Differential Pedestal Expansion Enclosure (includes 1 Power Supply - BA35X-HH, and a Differential UltraSCSI Personality module – BA35X-DA) 2 BA35X-HH 1 Optional, 2nd power supply (180 watts) – for redundancy 3 DS–BA35X–DA 2 Included with FR-BA356-KH, differential UltraSCSI Personality Module∗∗ 4 DS–BN37A–05∗ 2 5.0 meter VHDCI male to VHDCI male∗∗∗ 5 DS–BN38E–0B∗ 2 0.2 meter VHDCI female to Straight HD68 male 6 DS–BN21W–0B 2 “Y” Cable, 0.15 meter, one HD68 male to two HD68 females 7 DS–BN21K–05 1 5.0 meter HD68 male to Right HD68 male∗∗∗ 8 SWXA3-BD 2 PCI to SCSI, Ultra Wide, Differential Host Adapter * One of each of these items must be ordered separately to upgrade from a single pedestal configuration to a dual pedestal configuration. ** The Differential UltraSCSI Personality module is part of the BA356-KH UltraSCSI Differential Expansion Enclosure. The BA356-KH UltraSCSI Differential Enclosure will accept only one Personality module. ∗∗∗ The sum of the lengths of these cables must not exceed 24 meters. 2-7 UltraSCSI Dual BA356 Configuration Table 2 on page 2-4 lists the parts provided in the kit for a single BA356 Rackmount configuration. Table 5 below lists the single BA356 Rackmount configuration plus the additional parts required for a dual BA356 Rackmount configuration. Table 5. Parts List for Dual BA356 Rackmount Configuration Part number Quantity Description FR-BA356-JF∗ 1 UltraSCSI Wide Differential Rack Expansion Enclosure (includes 1 Power Supply - BA35X-HH, and a Differential UltraSCSI Personality module – BA35X-DA) BA35X-HH 1 Optional, 2nd power supply (180 watts) – for redundancy DS–BA35X–DA 1 Included with FR-BA356-JF, differential UltraSCSI Personality Module∗∗ DS–BN37A–05∗ 1 5.0 meter VHDCI male to VHDCI male∗∗∗ DS–BN38E–0B∗ 1 0.2 meter VHDCI female to Straight HD68 male DS–BN21W–0B 2 “Y” Cable, 0.15 meter, one HD68 male to two HD68 females DS–BN21K–05 1 5.0 meter HD68 male to Right HD68 male∗∗∗ H879–AA 1 HD68 SCSI-3 Wide Differential Terminator (male) 2944UW 2 PCI to SCSI, Ultra Wide, Differential Host Adapter BA35X-RB∗ 1 Rack mounting Kit FR-PCSRA-DJ∗ 1 Chassis support rails FR-PCSRA-DP∗ 1 19" Mounting Angle * One of each of these items must be ordered separately to upgrade from a single rackmount configuration to a dual rackmount configuration. ** The Differential UltraSCSI Personality module is part of the BA356-KH UltraSCSI Differential Expansion Enclosure. The BA356-KH UltraSCSI Differential Enclosure will accept only one Personality module. ∗∗∗ The sum of the lengths of these cables must not exceed 24 meters. 2-8 Table 6 lists the number and size of UltraSCSI disk drives that are compatible with dual StorageWorks configurations. Table 6. Compatible Disk Drives Parts List StorageWorks Part Number Description Speed Quantity FR-RZ1BB-VW 2.10 GB UltraSCSI Wide Disk Drive 7200 rpm up to 13 drives FR-RZ1CB-VW 4.29 GB UltraSCSI Wide Disk Drive 7200 rpm up to 13 drives FR-RZ1DB-VW 9.10 GB UltraSCSI Wide Disk Drive 7200 rpm up to 13 drives Configuring the Personality Module The differential end-of-bus termination is provided by the Differential UltraSCSI Personality module (see Figure 3) located in the Expansion Enclosures. DIP switches located on the Differential UltraSCSI Personality module are set to enable SCSI bus termination and to specify the enclosure device IDs (see Figure 4). Figure 3. Differential UltraSCSI Personality Module (Bottom view) 2-9 Configuring the Personality Module Figure 4. DIP Switch Location on Differential UltraSCSI Personality Module (Top view) NOTE: Switch position may be described as “ON”, “OFF”, “CLOSED”, or “OPEN”. In this Guide: “ON” = “CLOSED” “OFF” = “OPEN” In all cases the SCSI bus termination switch (S4) will have all four DIP switches in the “OFF” position. The SCSI bus address switch (S3) will have all seven DIP switches in the “OFF” position for the enclosure with SCSI ID0 through SCSI ID5. The SCSI bus address switch (S3) will have DIP switches 1, 2, and 3 in the “ON” position and switches 4, 5, 6, and 7 in the “OFF” position for the enclosure with SCSI ID8 through SCSI ID14. Refer to Figure 4 and Table 7. 2-10 Configuring the Personality Module Table 7. DIP Switch Settings for Differential UltraSCSI Personality Module DIP Switch Number Switch S3 for Switch S3 for Switch S4 for SCSI IDs 0–5 SCSI IDs 8–14 Bus Termination 1 OFF ON OFF 2 OFF ON OFF 3 OFF ON OFF 4 OFF OFF OFF 5 OFF OFF N/A 6 OFF OFF N/A 7 OFF OFF N/A 2-11 Adapter Setup Adapter Setup • Differential end-of-bus termination is provided by the BA35X-DA. • Single ended end-of-bus internal shelf termination is provided by the BA35X-DA Personality module in each Expansion Enclosure. For each Adaptec 2944UW, the SCSISelect utility must be invoked (Ctrl A) from each host to: • select SCSI ID 6 or 7 (each adapter must be different) • disable Power-On Reset • set host adapter SCSI termination to Low Off/High Off Installing an Adaptec Host Adapter To install an Adaptec 2944UW host adapter into a host server, follow these steps: 1. Turn off power to the server and disconnect the power cord. 2. Consult the server documentation to remove the cover of the server case. 3. Remove the host adapter from the anti-static bag. (If you need to put the host adapter down, place it on top of the bag.) 4. Remove the bulkhead cover of an empty 5-volt PCI bus mastering slot. 5. Insert the host adapter into the slot as shown in Figure 5. 6. Press down on the host adapter firmly, so the contacts are securely seated in the slot. 7. Tighten the host adapter against the server frame with the screw shown in Figure 5. Repeat steps 1 through 7 to install a host adapter in the second host system. 2-12 Adapter Setup Figure 5. Installing an Adaptec Host Adapter Adaptec Host Adapter Configuration Run the Host Adapter Utility to set a unique SCSI ID for each host adapter. Set the host adapter in Host A to SCSI ID 6 and the host adapter in Host B to SCSI ID 7. Deactivate the on-board termination and disable the power-on reset of an Adaptec Host Adapter using the Adaptec SCSISelect Utility. Setting Adaptec Host Adapter SCSI IDs To set the SCSI ID for a host adapter, follow these steps: 1. Turn on the power to Host A. While the server boots, simultaneously press the Ctrl and A keys to invoke the SCSISelect Utility. The SCSISelect Utility option menu is displayed. 2-13 Adapter Setup 2. Highlight the Configure/View Host Adapter Settings option and press the Enter key to select. The configuration menu is displayed. 3. The Host Adapter SCSI ID option appears highlighted. Press the Enter key and a list of SCSI IDs is displayed. 4. Highlight 6 (for Host A) or 7 (for Host B) and press the Enter key. 5. Go to Deactivating On-Board Termination through the BIOS. Deactivating On-Board Termination through the BIOS To deactivate on-board termination with the SCSISelect Utility, follow these steps: 1. Highlight the Host Adapter SCSI Termination option and press the Enter key. A list of termination settings is displayed. 2. Highlight Low Off/High Off and press the Enter key. 3. Go to Disabling Power-On Reset. Disabling Power-On Reset To disable power-on reset, follow these steps: 1. Highlight Advanced Configuration Options from the SCSISelect Utility Configuration menu and press the Enter key. The Advanced configuration menu is displayed. 2. Highlight the Reset SCSI Bus at IC Initialization option. Press the Enter key. A list of reset options is displayed. 3. Highlight Disabled and press the Enter key. 4. Press the Esc key to return to the Configuration menu. 5. Press the Esc key again and save the changes that you made when prompted. 6. Press the Esc key to exit the SCSISelect Utility. Go back to the following sections: 1. Setting Adaptec Host Adapter SCSI IDs and repeat same steps on Host B. 2-14 Adapter Setup 2. Deactivating On-Board Termination through the BIOS. 3. Disabling Power-On Reset, then go to Booting Windows NT. Booting Windows NT Boot Windows NT on both servers if Windows NT did not already boot when you exited the host adapter BIOS. Installing Adaptec Host Adapter Device Drivers To install Adaptec host adapter device drivers, follow these steps (Adaptec Windows NT diskette contains the appropriate drivers): 1. Log onto the Windows NT system with Administrator privileges. 2. Click on the Windows NT Setup icon in the main program group. 3. Select the Options menu in the Windows NT Setup window. 4. Select the Add/Remove SCSI Adapter function. 5. Click on the Add button in the dialog box. 6. A warning message is displayed; click on the OK button in the Confirm box. 7. From the list of adapters on the display, scroll to the end of the list, and select Other. You may have to click on the list to reveal all of the options including the “Other” option. The Insert Disk window is displayed. 8. Insert the Adaptec Family Driver set diskette for Windows NT, which came with the adapter in your platform kit, into your system’s floppy drive. 9. Type, for example: A:\winnt\4_0 and click OK. Windows NT Setup momentarily displays a window and then displays the Select OEM Option window. 10. Click OK to select the driver entry displayed in the Select OEM Option window. The Select SCSI Adapter Option window is displayed. 11. Click Install to add the selected driver displayed in the Select SCSI Adapter Option window. The SCSI Adapter Setup Window appears. 2-15 Verifying Adapter Installation 12. Click Close to close the SCSI Adapter Setup Window. 13. Restart the server for the new driver to take effect. Repeat steps 1–13 on the other server. Verifying Adapter Installation To verify that that the 2944UW adapter has been properly installed, follow these steps: 1. Boot Windows NT Operating System for Host A. 2. Verify that the 2944UW banner is displayed signifying that the System has properly configured the 2944UW adapter. 3. After Windows NT boots, launch Disk Administrator and verify that either formatted or raw partitions exist for each of the devices you have configured on the shared bus. NOTE: See the Windows NT manual for information on partition assignments with Windows NT Disk Administrator Host A/Host B. 4. Partition and format drives. 5. Boot Windows NT Operating System for Host B. 6. Again verify that the 2944UW banner is displayed indicating that the System has properly configured the 2944UW adapter. 7. Launch Disk Administrator. Verify that formatted partitions exist for each of the devices you have configured on the shared bus. 8. Go to Cluster Management software to complete the procedures for creating your Windows NT cluster. Installing Windows NT Clusters Software See that product’s documentation for further instructions. 2-16