1
_m,_
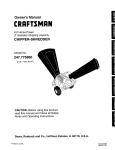
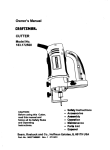
Owner's Manual
CRAFTSMAN+
6.25 HORSEPOWER
22" REAR DISCHARGE
POWER PROPELLED
ROTARY LAWN MOWER
Model No.
917.377352
CAUTION:
Read and fellow all
Safety Rules and Instructions
before operating this equipment
Sears, Roebuck and Co., Hoffman
Estates,
IL 60179
Warranty
Safety Rules
Assembly
Operation
Maintenance Schedule
Maintenance
2
2
4
6
10
10
Product Specifications
Service and Adjustments
Storage
Troubleshooting
Repair Parts
Parts Ordering
11
13
14
15
32
Back Cover
LIMITED TWO YEAR WARRANTY ON CRAFTSMAN POWER MOWER
For two years from date of purchase, when this Craftsman Lawn Mower is maintained, lubricated, and tuned up according to the operating and maintenance instructions in the owner's
manual, Sears will repair free of charge any defect in material or workmanship.
If this Craftsman Lawn Mower is used for commercial or rental purposes, this warranty applies
for only 90 days from the date of purchase.
This Warranty does not cover:
• Expendable items which become worn during normal use, such as rotary mower
blades, blade adapters, belts,
air cleaners and spark plug,
• Repairs necessary because of operator abuse or negligence, including bent crankshafts and the failure to maintain the equipment according to the instructions contained in the owner's manual,
Warranty service is available by retuming the craftsman power mower to the nearest sears
service centeddepartment in the united states. This warranty applies only while this product is in
use in the united states.
This Warranty gives you specific legal rights, and you may also have other rights which vary
from state to state.
SEARS, ROEBUCKAND CO., D/817 WA, HOFFMAN ESTATES, ILLINOIS 60179
TRAINING:
PREPARATION:
• Always thoroughly check the area to be
mowed and clear it of all stones, sticks,
wires, bones, and other foreign objects.
These objects will be thrown by the blade
and can cause severe injury.
• Always wear safety glasses or eye shields
when starting and while using your mower.
• Dress propedy, Do not operate mower
when barefoot or weadng open sandals.
Wear only solid shoes with good traction
when mowing,
• Checkfueltankbeforestartingengine.
Do
not fill gas tank indoors, when the engine is
running or when the engine is hot. Allow the
engine to cool for several minutes before
filling the gas tank. Clean off any spilled
gasoline before starting the engine.
• Always make wheel height adjustments
before starting your mower. Never attempt
to do this while the engine is running.
• Mow only in daylight or good artificial light.
• Read this operator's manual carefully
Become familiar with the controls and know
how to operate your mower properly Learn
how to quickly stop mower
• Do not allow children to use your mower
Never allow adults to use mower without
proper instructions
• Keep the area of operation clear of all
persons especially small children and pets
• Use mower only as the manufacturer
intended and as descdbed in this manual
• Do not operate mower if it has been
dropped or damaged in any manner
Always have damage repaired before using
your mower.
• Do not use accessory attachments that are
not recommended by the manufacturer.
Use of such attachments may be hazardous.
• The blade turns when the engine is running.
2
OPERATION:
• Keep your eyes and mind on your mower
and the area being cut. De not let other
interests distract you.
• Denet mowweterslipperygrass.
Never
run while operating your mower. Always be
sure of your footing -- keep a firm hold on
the handles and walk.
• De net pat hands or feet near or under
rotating parts. Keep clear of the discharge
opening at all times.
• Always stop the engine whenever you leave
or are net using your mower, or before
crossing driveways, walks, roads, and any
gravel--covered areas.
• Never direct discharge of material toward
bystanders nor allow anyone near the
mower while you are operating it.
• Before cleaning, inspecting, or repairing
your mower, stop the engine and make
absolutely sure the blade and all moving
parts have stopped. Then disconnect the
spark plug wire and keep it away from the
spark plug to prevent accidental starting.
• De net continue to run your mower if you hit
a foreign object. Follow the procedure
outlined above, then repair any damage
before restarting and operating you mower.
• Do net change the gevemer settings or
everspeed the engine. Engine damage or
personal injury may result.
• De net operate your mower if it vibrates
abnormally. Excessive vibration is an
indication of damage; stop the engine,
safely check for the cause of vibration and
repair as required.
• Do net run the engine indeers. Exhaust
fumes are dangerous.
• Never cut grass by pulling the mower
towards you. Mew across the face of
slopes, never up and down or you might
lose your footing. Do not mow excessively
steep slopes. Use caution when operating
the mower on uneven terrain or when
changing directions -- maintain good
footing.
• Never operate your mower without proper
guards, plates, grass catcher or other safety
devices in place.
MAINTENANCE AND STORAGE:
• Check the blade and the engine mounting
bolts often to be sure they are tightened
properly.
• Check all bolts, nuts and screws at frequent
intervals for proper tightness to be sure
mower is in safe working condition.
• Keep all safety devises in place and
working.
• To reduce fire hazard, keep the engine free
of grass, leaves or excessive grease and
oil.
• Check grass catcher often for deterioration
and wear and replace worn bags. Use only
replacement bags that are recommended
by and comply with specifications of the
manufacturer of your mower.
• Always keep a sharp blade on your
mower.
• Allow engine to cool before storing in any
enclosure.
• Never store mower with fuel in the tank
inside a building where fumes may reach
an open flame or an ignition source such as
a hot water heater, space heater, clothes
dryer, etc.
CAUTION: Always disconnect spark plug
wire and place wire where it cannot contact
spark plug in order to prevent accidental
starting when setting up, transporting,
adjusting or making repairs.
WARNING
The engine exhaust from this product
contains chemicals known to the State of
California to cause cancer, birth defects, or
other reproductive harm.
These
accessories
were
available
whenthislawnmower
wasproduced.
Theyarealso
available
at most Sears retail outlets and service centers. Most Sears stores can also order
repair parts for you, when you provide the model number of your lawn mower. Some of these
accessories may not apply to your lawn mower.
LAWN MOWER PERFORMANCE
CLIPPING DEFLECTOR
FOR REAR D_SCHARGE LAWN MOWERS
MULCHER
GRASS CATCHERS
FOR
KITS
GRASS
REAR DISCHARGE
LAWN MOWERS
STABILIZER
CATCHERS
FOR
SiDE DISCHARGE
LAWN MOWERS
GAS CANS
LAWN MOWER MAINTENANCE
MUFFLERS
BELTS
AIR FILTERS
BLADES
8LADE
ADAPTERS
SPARK PLUGS
WHEELS
ENGINE OIL
mower out o
carton thoroughly for additional loose
parts.
Read these instructions and thismanual in its
entirety before you attempt to assemble or
operate your new lawn mower. Your new
lawn mower has been assembled at the
factory with the exception of those parts left
unassembled for shipping purposes. All parts
such as nuts, washers, belts, etc., necessary
to complete the assembly have been placed in
the parts bag. To ensure safe and proper
operation of your lawn mower, all parts and
hardware you assemble must be tightened
securely. Use the correct tools as necessary
to ensure proper tightness.
TO REMOVE LAWN MOWER FROM
CARTON
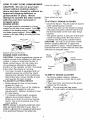
HOW TO SET UP YOUR LAWN
MOWER
TO UNFOLD HANDLE
IMPORTANT: Unfold handle carefully so
as not to pinch or damage control cables.
• Raise lower handle section to operating
position and squeeze the bottom ends of
lower handle towards each other until
the pin in handle can be inserted into
one of the three height adjustment
holes.
• Raise upper handle section to operating
position, remove protective padding and
tighten handle knobs securely.
• Remove any packing material from
around control bar.
• Your handles may be adjusted for your
mowing comfort. Refer to Service and
Adjustments section of this manual.
• Remove loose parts included with
mower.
• Cut down two end corners of carton
and lay end panel down flat.
• Remove all packing materials except
padding between upper and lower
handle and padding holding operator
presence control bar to upper handle.
4
TO PREPARE BATrERY
Operator presence control bar
Upper
Lift up
Aowing position
Lower handle/
handle pin
/
TO INSTALL
3-position
HANDLE
ADJUSTMENT
BRACKET
ATTACHMENTS
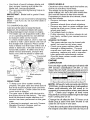
Your lawn mower was shipped ready to be
used as a mulcher. To convert to bagging or
discharging:
• Open rear door and remove mulcher
plug. Store mulcher plug in a safe
place,
• You can now install catcher or optional
clipping deflector.
• To return to mulching operation, install
mulcher plug into discharge opening of
mower.
NOTE: Your battery must be charged before
you con start your lawn mower.
• Disconnect engine battery (male) from
battery connector (female)
• Connect battery charger connector (male) to
battery connector (female).
• Plug battery charger into 110 volt A.C.
outlet.
• Leave battery charger connected for 24
hours before starting your engine for the first
time.
• After charging, connect engine connector
(male) to battery connector (female),
Your engine has an integral altemator for
partial charging. Connect your battery charger
to charge battery as required.
IMPORTANT: The engine alternaator will not
charge a discharged battery.
At the end of the mowing season the battery
hould be charged for 48 hours to protect the
battery during winter storage.
CAUTION: Always disconnect the engine
connector (male) from the battery connector (female) to prevent accidental starting
when transporting or storing your lawn
mower after the season.
Engine
connector
(male)
\
Battery
charger
J
Mulcher plug
CAUTION: Do not run your lawn mower
without mulcher plug in place or approved
clipping deflector or grass catcher in
place. Never attempt to operate the lawn
mower with the rear door removed or
propped open.
Battery
connector(female)
Battery
charger
connector(male)
KNOW
YOUR
LAWN
MOWER
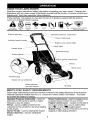
Read this owners manual and safety rules before ooperating your lawn mower, Compare the
illustrations with your lawn mower to familiadze yourself with the location of vadous controls and
adjustments. Save this manual for future reference.
These symbols may appear on your lawn mower or in literature supplied with the product.
Learn and understand their meaning.
CAUTION
OR WARNING
ENGINE
ON
ENGINE
OFF
FAST
SLOW
CHOKE
FUEL
OIL
Electric start key
DANGER, KEEP HANDS
AND FEET AWAY
control bar
Drive control lever
Auxiliary starter handle
Engine zone control cable
/Cable
clips
Handle knob
Gasoline fill cap
ngine speed control lever
/
Primer
Drive
Mulcher plug
cover
/
Engine oil cap w/dipstick
\
Wheel adjuster/
(on each wheel)
\
\\
Housing
MEETS CPSC SAFETY REQUIREMENTS
Sears rotary walk-behind power lawn mowers conform to the safety standards of the American
National Standards Institute and the U.S. Consumer Product Safety Commission. The blade
tums when the engine is running.
Operator Presence Control Bar - must be
Driver Control Lever - used to engage power*
held down to the handle to start the engine.
propelled forward motion of lawn mower.
Release to stop the engine.
Engine Control Lever - located on the side of
Primer- pumps additional fuel from the
the engine which allows you to select either
carburetor to the cylinder for use when starting fast (_) or slow ('_,) engine speed.
a cold engine.
Mulcher Plug - must be removed to convert to
Starter Handle - used for starting the engine.
bagging or discharging operation.
Electric Start Key - used for starting the
engine.
6
HOW TO USE YOUR LAWN MOWER
CAUTION: Do not run your lawn
mower without mulcher plate in
place and door closed or without an
approved clipping deflector or
grasscatcher in place. Never
attempt to operate the lawn mower
with the rear door removed or
propped open.
ENGINE SPEED
The enginespeed iscontrolledby a lever
locatedon the sideof the engine. Fast(_
positionis for startingengine,normalcutting
and bettergrassbagging. Slow (_.)
positionis for lightcutting,trimmingandfuel
economy
Engine speed control lever
ENGINE ZONE CONTROL
CAUTION: Federal regulations require an
engine control to be installed on this lawn
mower in order to minimize the risk of
blade contact injury Do not under any
circumstances attempt to defeat the
function of the operator control The blade
turns when the engine is running
• Your lawn mower is equipped with an
operator presence control bar which
requires the operator to be positioned
behind the lawn mower handle to start
and operate the lawn mower
TO ADJUST CUTTING HEIGHT
• Raise wheels for low cut and lower
wheels for high cut,
• Wheels are set in low cut for shipping
Adjust cutting height to suit your
requirements
Medium position is best
for most lawns
• To change cutting height, squeeze
adjuster lever toward wheel, Move
wheel up or down to suit your requirements Be sure all wheels are in the
same setting
NOTE: Adjuster is properly positioned when
plate tab inserts into hole in lever Also, 9position adjusters (if so equipped) allow lever
to be positioned between the plate tabs
Lower for high cut
Piate tab
Raise wheels for high
cut
TO ATTACH
GRASS CATCHER
• Close the flip lid Flip lid must be closed
while operating lawn mower
• Lift the rear door on the mower housing
and place the grass catcher frame onto
the formed tabs on the rear door hinge
bracket,
• The grass catcher is secured to the lawn
mower housing when the rear door is
lowered onto the grass catcher frame,
CAUTION: Do not run your lawn mower
without clipping deflector or approved
grass catcher in place Never attempt to
operate the lawn mower with the rear door
removed or propped open
• Reardoor
Hinge
b_ck_.
Grass
catcher frame
Formed
tabs
TO EMPTY GRASS CATCHER
• To remove grass catcher, release
operator presence control bar to stop
engine.
• Lift up rear door and remove the grass
catcher by the handle.
NOTE: Do not drag the bag when
emptying; it will cause unnecessary wear.
DRIVECONTROL
GAS
• Self-propelling
iscontrolled
byholding
the • Fill fuel tank. Use fresh, clean, regular
unleaded gasoline with a minimum of 87
operator
presence
control
bardown
tothe
handle
andpushing
thedrive
control
lever
octane, Do not mix oil with gasoline,
forward
untilitclicks;
thenrelease
thelever. Purchase fuel in quantities that can be
• Forward
motion
willstopwhen
theoperator used within 30 days to assure fuel
freshness.
presence
control
barisreleased.
Tostop
forward
motion
without
stopping
engine, WARNING: Experience indicates that
release
theoperator
presence
control
bar alcohol blended fuels (called gasohol or
slightly
untilthedrive
control
disengages. using ethanol or methanol) can attract
Holdoperator
presence
control
bardownto moisture which leads to separation and
formation of acids during storage. Acidic
handle
tocontinue
mowing
without
selfgas can damage the fuel system of an
propelling.
• Tokeepdrive
control
engaged
when
turningengine while in storage. To avoid engine
comers,
push
down
onhandle
andliftfront problems, the fuel system should be
emptied before storage of 30 days or
wheels
offground
while
turning
lawn
mower.
Drain the fuel tank, start the
Operator
presencelonger.
engine
and
let it run until fuel lines and
control
bar
carburetor are empty. Use fresh fuel next
\,
season. See Storage Instructions for
additional information. Never use engine
or carburetor cleaner products in fuel tank
or permanent
TO START
To engage drive control
ENGINE
• To start a cold engine, push primer five
(5) times before trying to start. Use a
firm push, This step is not usually
necessary when starting an engine
which has already run for a few minutes.
• Move engine speed control lever to fast
(_) position.
• Hold operator presence control bar
down to the handle.
• Turn electric start key clockwise to crank
engine.
IMPORTANT: Do not crank engine more
than five continous seconds between each
time you try to start, Wait 5 to10 secants
between each attempt.
• To start engine using the auxiliary
starter handle, follow the steps above.
Exchange the use of the start key for
starter handle, Pull starter handle
quickly. Do not allow starter rope to
snap back,
• To stop engine, release operator
presence control bar,
NOTE: In cooler weather it may be
necessary to repeat priming steps. In
warmer weather over priming may cause
flooding and engine will not start. If you do
flood engine wait a few minutes before
attempting to start and do not repeat
priming steps.
Drive control
disengaged
ENGINE
BEFORE
STARTING
OIL
Your lawn mower is shipped without oil in the
engine.
• Be sure mower is level and area around
oil fill is clean.
• Remove engine oil cap w/dipstick and fill
to the full line on the dipstick.
• Use 20 ozs. of oil. For type and grade
of oil to use, see "ENGINE" in Customer
Responsibilities section of this manual.
• Pour oil slowly. Do not overfill.
• Check oil level before each use. Add oil
if needed. Fill to full line on dipstick.
• To read proper level, tighten engine oil
cap each time.
• Reinstall engine oil cap and tighten.
• After the first two (2) hours of mowing,
change the oil, and every 25 hours
thereafter. You may need to change the
oil more often under dusty, dirty conditions.
Engine oil cap
w/dipstick
8
MOWING
TIPS
• Under certain conditions, such as very
tall grass, it may be necessary to raise
the height of cut to reduce pushing effort
and to keep from overloading the engine
and leaving clumps of grass clippings.
• For extremely heavy cutting, reduce the
width of cut by overlapping previously
cut path and mow slowly.
• For better grass bagging and most
cutting conditions, the engine speed
should be set in the fast (_#) position.
• When using a rear discharge lawn
mower in moist, heavy grass, clumps of
cut grass may not enter the grass
catcher. Reduce ground speed (pushing speed) and/or run the lawn mower
over the area a second time.
• If a trail of clippings is left on the right
side of a rear discharge mower, mow in
a clockwise direction with a small
overlap to collect the clippings on the
next pass.
• Pores in cloth grass catchers can
become filled with dirt and dust with use
and catchers will collect less grass. To
prevent this, regularly hose catcher off
with water and let dry before using.
• Keep top of engine around starter clear
and clean of grass clippings and chaff.
This will help engine air flow and extend
engine life.
MULCHING
MOWING
TIPS
IMPORTANT: For best performance, keep
mower housing free of built-up grass and
trash. See "Cleaning" in CUSTOMER
RESPONSIBILITIES section of this
manual.
• The special mulching blade will recut the
grass clippings many times and reduce
them in size so that as they fall onto the
lawn they will disperse into the grass
and not be noticed. Also, the mulched
grass will biodegrade quickly to provide
nutrients for the lawn. Always mulch
with your highest engine (blade) speed
as this will provide the best recutting
action of the blades.
• Avoid cutting your lawn when it is wet.
Wet grass tends to form clumps and
interferes with the mulching action. The
best time to mow your lawn is the early
afternoon. At this time the grass has
dried and the newly cut area will not be
exposed to the direct sun.
• For best results, adjust the lawn mower
cutting height so that the lawn mower
cuts off only the top one-third of the
grass blades (See Fig. 10). If the lawn
is overgrown it will be necessary to raise
the height of cut to reduce pushing effort
and to keep from overloading the engine
and leaving clumps of mulched grass.
For extremely heavy mulching, reduce
your width of cut by overlapping
previously cut path and mow slowly.
• Certain types of grass and grass
conditions may require that an area be
mulched a second time to completely
hide the clippings. When doing a
second cut, mow across or perpendicular to the first cut path.
• Change your cutting pattern from week
to week. Mow north to south one week
then change to east to west the next
week. This will help prevent matting and
graining of the lawn.
MAX 1/3
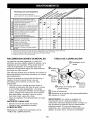
MAINTENANCE
i_
_SSERVlCE
for Loose
Fasteners
(If
Equipped) Grass Catcher
Clean/Inspect
MJClean
if
If
Lawn Mower
Under Drive Cover
Clean
wO (Power
E
_,_.f<,o_j
AS YOU COMPLETE
REGULAR SERVICE
Check
--
SCHEDULE
FILL IN DATES
Propelled
if
If
if
if
Mowers)
j_
Check drive belt/pulleys
Lubncation
G
I
J_
J_ 3
Charl
(Electnc
Star[ Mowers /
Clean BaBep//Recharge
E ICheck
N
DATES
If
R I <Power Propelled
Mowers)
Check/Sharpen/Replace
Blade
--
_"
Engine
Change
Clean
Engine
Level
0il
J_
J_4
11_1,2
if
Muffler
or Replace
j_
If
Air Filter
Inspect
N I Clean
0il
j_
if
Spark
Plug
if
E I Replace Air Filter Paper Car[ndge
t/2
1
2
3
Ch8[tge rY_oreoften when operating
u_tder a heavy Load or in high ambient
Service more often when operating
En dirB/or dusty conditions
Replace b_ades more of[en when mowing Ens_ndy soil
4
Charge
temperatures
48 hours at end of season
LUBRICATION
CHART
WHEEL
{_ADJUSTER
GENERAL RECOMMENDATIONS
The warranty on this lawn mower does not
cover items that have been subjected to
operator abuse or negligence. To receive full
value from the warranty, operator must
maintain mower as instructed in this manual.
Some adjustments will need to be made
periodically to properly maintain your unit.
All adjustments in the Service and Adjustments section of this manual should be
checked at least once each season.
• Once a year, replace the spark plug,
replace air filter element and check
blade for wear. A new spark plug and
clean/new air filter element assures
proper air-fuel mixture and helps your
engine run better and last longer.
• Follow the maintenance schedule in this
manual.
BEFORE EACH USE
• Check engine oil level.
• Check for loose fasteners.
LUBRICATION
Keep unit well lubricated (See "LUBRICATION
CHART").
(_
(_Handle
bracket
mounting
pin
(_)
(_)
(_) Rear
Brake
spring
bracket
(_) Engine oil
door
hinge
SPRAY LUBRICANT
REFERTO CUSTOMER RESPONSI
BILITIES "ENGINE" SECTION.
IMPORTANT: Do not oil or grease plastic
wheel bearings. Viscous lubricants will
attract dust and dirt that will shorten the life
of the self lubricating bearings. If you feel
they must be lubricated, use only a dry,
powdered graphite type lubricant sparingly.
10
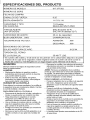
PRODUCT
SPECIFICATIONS
MODEL NUMBER
917.377352
SERIAL NUMBER
DATE OF PURCHASE
HORSEPOWER:
6,25
DISPLACEMENT:
11.5 CU. IN.
GASOLINE CAPACITY/TYPE:
1,25 QUARTS
UNLEADED REGULAR
OIL TYPE (API-SF/SG/SH):
SAE 30 (ABOVE 32°F)
SAE 5W-30 (BELOW 32°F)
OIL CAPACITY:
SPARK PLUG(GAP:
20 OZS.
.030")
CHAMPION RJ19L
VALVECLEARANCE:
INTAKE:
,008
EXHAUST:
,008
SOLID STATE IGNITION
AIR GAP:
.0125 IN.
BLADE BOLT TORQUE:
35-40 FT. LBS.
• The model and serial numbers will be found on a decal attached to the rear of the
lawn mower housing,Record both serial number and date of purchase in space
provided above.
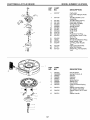
LAWN MOWER
Always observe safety rules when performing
any maintenance.
TIRES
• Remove blade bolt by turning counter-clockwise. Use a 9/16" box or open-end wrench.
• Remove blade and attaching hardware
(bolt, lock washer and hardened
washer).
NOTE: Remove the blade adapter and
check the key inside hub of blade adapter.
The key must be in good condition to work
properly. Replace adapter if damaged.
• Keep tires free of gasoline, oil, or insect
control chemicals which can harm
rubber.
• Avoid stumps, stones, deep ruts, sharp
objects and other hazards that may
cause tire damage.
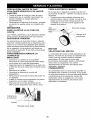
BLADE CARE
TO REPLACE BLADE
For best results, mower blade must be kept
sharp. Replace bent or damaged blades.
• Position the blade adapter on the engine
crankshaft. Be sure key in adapter and
crankshaft keyway are aligned.
• Position blade on the blade adapter
aligning the two (2) holes in the blade
with the raised lugs on the adapter.
• Be sure the trailing edge of blade
(opposite sharp edge) is up toward the
engine.
• Install the blade bolt with the lock
washer and hardened washer into blade
adapter and crankshaft.
TO REMOVE BLADE
• Disconnect spark plug wire from spark
plug and place wire where it cannot
come in contact with spark plug.
• Turn lawn mower on its side. Make sure
air filter and carburetor are up.
• Use a wood block between blade and
mower housing to prevent blade from
turning when removing blade bolt.
• Protect your hands with gloves and/or
wrap blade with heavy cloth.
11
• Useblockofwoodbetween
bladeand DRIVE WHEELS
lawnmowerhousing
andtighten
the
Check front drive wheels each time before you
bladebolt,turning
clockwise.
mow to be sure they move freely.
• Therecommended
tightening
torque
is The wheels not turning freely means trash,
3540 ft.Ibs.
grass cuttings, etc. are in the drive wheel area
IMPORTANT:
Bladeboltisgrade8 heat and must be cleaned to free drive wheels.
treated.
If necessary to clean the drive wheels, check
NOTE:Wedonotrecommend
sharpeningboth front wheels.
blade-- butifyoudo,besurethebladeis • Remove hubcaps, hairpin cotters and
washers.
balanced.
• Remove wheels from wheel adjusters.
TOSHARPEN
BLADE
• Remove any trash or grass cuttings from
Careshould
betaken
tokeep
theblade
inside the dust cover, pinion and/or drive
balanced.
Anunbalanced
blade
willcause
wheel gear teeth.
eventual
damage
tolawnmower
orengine.
• Put wheels back in place.
• The blade can be sharpened with a file
or on a grinding wheel. Do not attempt
to sharpen while on the mower.
• To check blade balance, drive a nail into
a beam or wall. Leave about one inch of
the straight nail exposed. Place center
hole of blade over the head of the nail. If
blade is balanced, it should remain in a
horizontal position. If either end of the
blade moves downward, sharpen the
heavy end until the blade is balanced.
Blade
• If after cleaning, the drive wheels do not
turn freely, contact your nearest service
center.
GRASS CATCHER
• The grass catcher may be hosed with
water, but must be dry when used.
• Check your grass catcher often for
damage or deterioration. Through
normal use it will wear. If catcher needs
replacing, replace only with a manufacturer approved replacement catcher.
Give the lawn mower model number
when ordering.
ENGINE
LUBRICATION
Use only high quality detergent oil rated with
API service classification SF,SH, or SG.
Select the oil's SAE viscosity grade accord-
Hardened
washer
GEAR CASE
Trailing
edge
• To keep your drive system working
properly, the gear case and area around
the drive should be kept clean and free
of trash build-up. Clean under the drive
cover twice a season,
• The gear case is filled with lubricant to
the proper level at the factory. The only
time the lubricant needs attention is if
service has been performed on the gear
case.
• If lubricant is required, use only Texaco
Starplex Premium Grease, part no.
750355. Do not substitute.
NOTE: Although multi-viscosity oils (5W30,
10W30etc.)improve startingin coldweather,
these multi-viscosity oils will result in increased oil consumption when used above
32°F. Check your engine oil level more
frequently to avoid possible engine damage
from running low on oil.
Change the oil alter the first 25 hours or at
least once a year if the lawn mower is not
used for 25 hours in one year.
Check the crankcase oil level before starting
the engine and alter each five (5) hours of
12
continuous use. Tighten oil plug securely
each time you check the oil level.
TO CHANGE ENGINE OIL
NOTE: Before tipping lawn mower to drain
Coll_
_'.'_-_
slot_
Turn
clockwise
Clip \
\\
o tighten
tank°i]'
drain
fuelis
empty.
fuel tankspark
by running
engine
until
Disconnect
plug wire
from
spark
plug and place wire where it cannot
come in contact with spark plug.
Remove engine oil cap; lay aside on a
clean surface.
Tip lawn moweron its side and drain oil
into a suitable container. Rock lawn
mower back and forth to remove any oil
trapped inside of engine.
Wipe offany spilled oil on lawn mower
and on side of engine.
Fillenginewith oil. Fillonlytothe "FULL"
line on the dipstick. DO NOT OVER
FILL.
Replace engine oil cap.
Reconnect spark plug wire to spark
plug.
You r engine will not runproperly and may be
damaged by using a dirty air filter.
Replace the air filter every year, more often
ifyou mow inverydusty, dirty conditions. Do
not wash air filter.
TO CHANGE AIR FILTER
Container_
Remove the air filter bytuming counterclockwise to the stop and pull away
from collar.
Remove filter from inside of cover.
Clean the inside of the cover and the
collar to remove any dirt accumulation.
Insert new filter into cover.
Put air filter cover and filter into collar
aligning the tab with the slot.
Push in on cover and tum clockwise to
tighten.
MUFFLER
13
"_
_'_\\
Air filter /
Tab
urn
c i°ukleirs e
to remove
Air filter cover
Inspect and replace corroded muffler as it
could create a
fire hazard and/or damage.
SPARK PLUG
Change your spark plug each year to make
your engine start easier and run better Set
spark plug gap at .030 inch.
CLEANING
IMPORTANT: For best performance, keep
mower housing free of built-up grass and
trash. Clean underside of mower housing
after each use.
CAUTION: Disconnect spark plug wire from
spark plug and place wire where it cannot
come in contact with the spark plug.
• Turn lawn mower on its side. Make sure air
filter and carburetor are up. Clean the
underside of your lawn mower by scraping
to remove build-up of grass and trash.
• Clean engine often to keep trash from
accumulating. A dogged engine runs hotter
and shortens engine life.
• Keepfinished surfaces and wheels free of
all gasoline, oil, etc.
• We DO NOT recommend using a garden
hose to clean lawn mower unless the
electrical system, muffler, air filter and
carburetor are covered to keep water out.
Water in engine can result in shortened
engine life.
CLEAN UNDER DRIVE COVER
Clean under drive cover at least twice a
season. Scrape underside of cover with putty
knife or similar tool to remove any build-up of
trash or grass on underside of drive cover.
CAUTION: BEFORE PERFORMING ANY
SERVICE ORADJUSTMENTS:
Release control bar,
Make sure the blade and all moving
parts have completely stopped.
Disconnect spark plug wire from
spark
plug and place where it cannot
come in contact with plug.
LAWN MOWER
TO ADJUST CUTTING HEIGHT
See "TO ADJUST CUTTING HEIGHT" in the
Operation section of this manual.
REAR DEFLECTOR
The rear deflector, attached between the rear
wheels of your lawn mower, is provided to
minimize the possibility that objects will be
thrown out the rear of the lawn mower into the
operator's mowing position. If the rear
deflector becomes damaged, it should be
replaced.
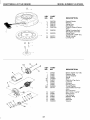
TO REMOVE/REPLACE DRIVE BELT
• Remove drive cover. Remove belt by
pushing down on gear case pulley.
• Turn lawn mower on its side with carburetor
and fuel cap up.
• Remove blade.
• Remove debris shield.
• Remove belt from engine pulley on
crankshaft.
• Install new belt by reveraing above steps.
• Alwaysusefactoryapprevedbeiftoassure
fit and long life.
Ddve
cover
TO ADJUST HANDLE
The handle on your lawn mower has three (3)
height positions - adjust to height that suits
you.
• Squeeze the bottom ends of lower handle
towards each other until the pin in handle
can be inserted into one of the three height
adjustment holes.
High _
_
Handlepin
3-Position
handle
adjustment
bracket
ENGINE
ENGINE SPEED
Your engine speed has been factory set. Do
not attempt to increase engine speed or it
may result in personal injury. If you believe
that the engine is running tee fast or too slow,
take your lawn mower to an authorized
service senter/department for repair and
adjustment.
CARBURETOR
Your carburetor has a non-adjustable fixed
main jet for mixture control. If your engine
does not operate properly due to suspected
carburetor problems, take your lawn mower to
an authorized service center/department for
repair and adjustment.
Push down
14
Immediately
prepare
yourlawnmower
for
storage
attheendoftheseason
oriftheunit
willnotbeused
for30days
or more.
LAWNMOWER
When
lawnmower
istobestored
foraperiod
oftime,
deanitthoroughly,
remove
alldirt,
grease,
leaves,
etc.Store
inadean,
dryarea.
• Clean
entire
lawnmower
(See"CLEANING"
intheCustomer
Responsibilities
section
of
ENGINE
thismanual),
• Lubdcate
asshown
intheCustomer
FUEL SYSTEM
Responsibilities
secflon
ofthismanual, IMPORTANT: It is important to prevent gum
• Besurethatallnuts,bolts,
screws,
andpins deposits from forming in essentialfuel system
aresecurelyfastened.
Inspectmoving parts such as carburetor, fuel hoses, or tank
parts
fordamage,
breakage
andwear.
during storage. Also expedence indicates that
Replace
ifnecessary.
alcohol blended fuels (celled gasohol or using
• Touch
upallrusted
orchipped
paint
ethanol or methanol) can attract moisture
surfaces;
sandlightly
before
painting.
which leads to separation and formation of
HANDLE
• You can fold your lawn mower handle for
storage.
• Loosen the two (2) handle knobs on sides of
the upper handle and allow handle to fold
down to the rear.
• Squeeze the bottom ends of lower handle
toward each other until pins in handle clear
the brackets and pivot entire handle
assembly forward and allow it to rest on
mower,
• When setflng up your handle frem the
storage position, the lower handle will
require manually locking into the mowing
position.
IMPORTANT: When folding the handle for
storage or transportation, be sure to fold the
handle as shown or you may damage the
control cables.
Operator presence co_rol
acids during storage. Acidic gas can damage
the fuel system of an engine while in storage.
• Drain the fuel tank.
• Start the engine and let it run until the fuel
lines and carburetor are empty.
• Never use engine or carburetor cleaner
products in the fuel tank or permanent
damage may occur.
• Usa fresh fuel next season.
NOTE: Fuel stabilizer is an a_.eptable
alternative in minimizing the formation of fuel
gum deposits during storage. Add stabilizer to
gasoline in fuel tank or storage container.
Always follow the mix ratio found on stabilizer
container. Run engine at least 10 minutes
after adding stabilizer to allow the stabilizer to
reach the carburetor. Do not drain the gas
tank and carburetor if using fuel stabilizer.
ENGINE OIL
Drain oil (with engine warm) and replace with
clean engine oil. (See "ENGINE" in the
Customer Responsibilities section of this
manual).
CYLINDER
• Remove spark plug.
• Pour one ounce (29 ml) of oil through spark
plug hole into cylinder.
• Pull starter handle slowly a few times to
distribute oil.
• Replace with new spark plug.
BATTERY
bar
Fold forward
for storage
I:e:Jevad
Mowing
position
Lower han(J e
Disconnect the battery from the engine connector and charge battery 48 hours.
15
OTHER
• Do not store gasoline from one season to another.
• Replace your gasoline can if your can starts to rust. Rust and/or dirt in your gasoline will
cause problems.
• If possible, store your unit indoors and cover it to give protection from dust and dirt.
• Cover your unit with a suitable protective cover that does not retain moisture. Do not use
plastic. Plastic cannot breathe which allows condensation to form and will cause your unit to
rust.
IMPORTANT: Never cover mower while engine and exhaust areas are still warm.
CAUTION: Never store the lawn mower with gasoline in the tank inside a building where fumes
may reach an open flame or spark. Allow the engine to cool before stodng in any enclosure.
TROUBLESHOOTING
PROBLEM
Does not start
CHART
CAUSE
CORRECTION
• Dirty air filter.
• Out of fuel.
• Stale fuel.
• Water in fuel.
• Spark plug wire is
disconnected.
• Bad spark plug.
• Loose blade or broken blade
adapter.
• Control bar in released
position.
• Control bar defective.
Loss of power
• Rear of lawn mower housing
or cutting blade dragging
in heavy grass.
• Cutting too much grass.
• Dirty air filter.
• Buildup of grass, leaves,
and trash under mower.
• Too much oil in engine.
• Walking speed too fast.
16
• Cleanlreplace air filter.
• Fill fuel tank.
• Drain tank and refill with
fresh dean fuel.
• Drain fuel tank and
carburetor and refill tank
with fresh gasoline.
• Connect wire to plug.
• Replace spark plug.
• Tighten blade bolt or
replace blade adapter.
• Depress control bar to
handle.
• Replace control bar.
• Set to "Higher Cut"
position.
• Set to "Higher Cut"
position,
• Clean/replace air filter.
• Clean underside of mower
housing.
• Check oil level,
• Cut at slower walking
speed.
TROUBLESHOOTING
PROBLEM
Poor cut- uneven
CHART
CAUSE
CORRECTION
Wom, bent or loose blade.
Wheel heights uneven.
Low engine speed.
Buildup of grass, leaves
and trash under mower.
Excessive
vibration
Worn, bent or loose blade.
Bent engine crankshaft.
Starter rope hard
to pull
Engine flywheel brake is on
when control bar is released.
Bent engine crankshaft.
• Replace blade. ]]ghten
blade bolt.
• Set all wheels at same
height
• Set engine speed control
infast position.
• Clean underside of
mower housing.
• Replace blade. ]]ghten
blade bolt,
• Contact an authorized
service center.
• Depress control bar to
upper handle before
pulling starter rope.
• Contact an authorized
service
center.
Blade adapter broken.
Blade dragging in grass.
• Replace blade adapter.
• Move lawn mower to cut
grass or to hard surface
to start engine.
Grass catcher
not filling (if so
equipped)
Cutting height too low.
Lift on blade worn off.
Catcher not venting air.
Low engine speed.
•
•
•
•
Hard topush
Grass is too high or wheel
height is too low.
Rear of lawn mower
• Raise cutting height.
housing or blade dragging
in grass.
Grass catcher too full.
Handle height position not
right for you.
housing one (1) setting
higher.
• Empty grass catcher.
• Adjust handle height to
suit.
17
Raise cutting height.
Replace blade.
Clean grass catcher.
Set engine speed control
infast position.
• Raise rear of lawn mower
CRAFTSMAN
Garantia
Reglas de Seguridad
Montaje
Operaci6n
Mantenimiento
Programa de Mantenimiento
Model No. 917.377352
17
17
19
20
24
24
Especificaciones del Producto
Servicio y Adjustes
Almacenamiento
Identificaci6n de probtemas
Partes de repuesto
Orden de Partes
25
27
28
30
Vea el manual
ingles del dueSo
Contratapa
GARANTIA LIMITADADE DOS ANOS PAPA LA SEGADORA A MOTOR CRAFTSMAN
Por dos (2) aSos>a partir de la fecha de compra, cuando esta Segadora Craftsman se mantenga, lubnque
y afine segt_n Ias instrucciones para la operaci6n y el mantenimiento en el manual del duefio, Sears
r'epararagratis todo defecto en el material y la mano de obra.
Si la Segadora Craftsman se usa para fines comerciales o de arriendo, esta garantia s61ose aplica FOr
noventa (90) dias a partir de la fecha de compra.
Esta Garantia no cubre:
• Ar[iculos que se desgastan durante el uso normal tales come las cuchillas segadoras rotatorias, los
adaptadores de la cuchilla, las correas, los filtros de aire y las bujias.
• Reparaciones necesarias debido al abuso o a la negligencia del operador, incluy_ndose a los
cigQefiales doblados y a la falta de mantenimiento del equiFo segQn las instrucciones que se incluyen
en el manual deI dueRo.
EL SERVICIO DE GARANTiA ESTA DISPONIBLE al devolver la segadpra a motor Craftsman al cent[o/
departmento de servicio Sears mas cercano en los estados unidos. Esta garantia se aplica solamente
mientras el producto este en uso en los estados unidos.
Esta Garantia le otorga derechos legales especificos, y puede que tambi_n tenga otros derechos que
vadan de estado a estado.
Sears, Roebuck and Co., D/817WA, Hoffman Estates, IL 60179 USA
IMPORTANTE: Esta maquina cortdora es
capaz de amputar las manes y los pies y de
lanzar objetos, si no se observan las
instrucciones de seguridad siguinetes se
pueden poducir lesiones graves o la muerte
• Mantenga el area de operaci6n despejada de
genre, especialmente de niSos pequeSos y de
animales dom6sficos.
• Use la segadora solamente para los fines
pr'opuestos For el fabricante y segt_n las
explicaciones descrf[as en este manual.
• No opere la segadora si se ha caido o dafiado en
cualquiera forma. Siempre repare los daSos
antes de usada.
Los est andares de seguridad exigen la
presencia del operador en los controles para
reducir a un minimo el riesgo de lesionarse. Su
unidad viene epuopada con dichos controles.
Por ningun motivo trate de elminar la funci6n de
los controls que exgin Ia presencia del
operador.
ENTRENAMIENTO:
• No use accesorios que no hayan sido
recomendados FOrel fabncante. El uso de
dichos accesarios puede ser peligr'oso.
• La cuchilla gira cuando el motor esta
funcionando.
• Lea este manual del oForador cuidadosamente.
Familiaricese con los controles y aprenda a
operar su segadora en forma adecuada.
Aprenda a parar su segadora rapidamente.
• No permita que los nifios usen su segadora.
Nunca permita que los adultos operen la
segadora sin contar con las instrucciones
adecuadas.
PREPARACION:
• Siempre revise cuidadosamente el area que se
va a segar y despejela de todas las piedras,
palos, alambres, huesos y otros objetos
extra_os. Estos objetos seran lanzados con la
cuchilla y pueden producir lesiones graves.
• Siempre use anteojos de seguridad o protectores
18
de ojos cuando arranque y durante el tiemFo que
use la segadora.
• Vistase en forma adecuada. No oFore la
segadora sin zapatos o con sandalias abiertas.
Use solamente zapatos s61idos con buena
tracci6n cuando siegue.
• Revise el estanque de combustible antes de
hacer arrancar el motor. No Ilene el estanque de
gasolina en recintos cerrados, ni cuando el motor
esta funcionando o cuando esta caliente. Permita
• No oFore su segadora si vibra fuera de Io normal.
La vibraci6n excesiva es una indicaci6n de daSo;
pare el motor, revise en forma segura la causa
de la vibraci6n y haga las reparaciones seg[_n
sea necesario.
• No haga funcionar el motor en recintos cerrados.
Los gases de escape son peligrosos.
• Nunca corte el c_sped tirando la segadora hacia
usted. Siegue a traves de la cara de las
Fondientes, nunca hacia an'iba o hacia abajo
Foes puede perder el equilibrio. No siegue
Fondientes demasiado empinadas. Tenga
cuidado cuando opere la segadora en terreno
disparejo o cuando cambie de direcci6n mantenga un buen equilibrio.
• Nunca opere la segadora sin las protecciones
adecuadas, las planchas, el recogedor de
c_sped y otros disFositivos de seguridad en su
Iugar.
MANTENIMIENTO
Y ALMACENAMIENTO:
que el motor se enfrie FOr varios minutos antes
de Ilenar el estanque de gasolina. Limpie toda la
gasolina derramada antes de hacer arrancar el
motor.
• Siempre haga los ajustes de altura de las r_Jedas
antes de hacer arrancar su segadora. Nunca
trate de hacer 6sto mientras que el motor esta
funcionando.
• Siegue siempre durante el dia o con buena iuz
artificial.
OPERACION:
• Mantenga sus ojos y su mente en la segadora y
en el area que se est& cortando. No permita que
otros intereses Io distraigan.
• No corte c_sped mojado o resbaloso. Nunca
corra mientras est_ oForando su segadora.
Siempre asegt_rese de mantener eI equilibrio mantenga el mango agarrado firmemente y
camine.
• No Fonga las manos o los pies cerca o debajo de
las partes rotatorias. Mant6ngase alejado de la
abertura de descarga en todo momento.
• Siempre pare el motor cuando se vaya o cuando
no est6 usando su segadora, o antes de
atravesar las entradas para autos, ]ossenderos,
caminos y _reas cubiertas de ripio.
• Nunca dirija la descarga del material hacia los
espectadores ni permita a nadie cerca de la
segadora mientras la est_ operando.
• Antes de limpiar, inspeccionar o de reparar la
segadora, pare el motor y est6 completamente
seguro de que la cuchilla y que todas las partes
que se mueven se hayan detenido. Luego,
desconecte el alambre de la bujia y mant6ngalo
alejado de _sta para evitar el arranque For
accidente.
• No contin[ie haciendo funcionar su segadora si ]e
pega a un objeto extraSo. Siga el procedimiento
descrito antefiormente, luego repare cualquier
daSo antes de vo]ver a arrancar y de operar su
segadora.
• No cambie los ajustes del regulador o haga que
eI motor ande a una velccidad excesiva. Se
pueden producir daSos en el motor y lesiones
persenales.
19
• Revise la cuchilla y los pemos de montaje del
motor a menudo, para asegurarse que est_ln
apretados en la forma adecuada.
• Revise todos los pemos, tuercas y tomillos a
intervalos frecuentes, para verificar si est&n
apretados en forma adecuada, y asegurarse que
Ia segador_ se encuentra en condiciones de
funcionamiento seguro.
• Mantenga todos los dispositivos de seguridad en
su lugar y listos para funcionar.
• Para reducir el Foligro de incendio, mantenga el
motor sin c_sped, hojas y grasa o aceite en
exceso.
• Revise el recogedor de c_sped a menudo Fora
veriflcar si hay detenoro y desgaste y cambie las
bolsas desgastadas. Use solamente las bolsas
de repuesto recomendadas FOr el fabricante de
su segadora o que cumplen con las
esFocificaciones de _ste.
• Siempre mantenga una cuchilla atilada en su
segadora.
• Siempre Formita que el motor se enfrie antes de
guardada en cualquier recinto cerrado.
• Nunca guarde la segadora con combustible en el
estanque dentro de un edificio en donde los
gases pueden alcanzar una llama expuesta o
una fuente de ignici6n, tal como el calentador de
agua, la estufa de calefacci6n, la secadora de
ropa, etc..
PRECAUCION: Siempre desconecte el alambre
de la bujia y pbngalo donde no pueda entrar en
contacto con la bujia, para evitar el arranque L
accidente, durante la preparacibn, el transporte,
el ajuste o cuando se hacen reparaciones.
PRECAUCIC)N: Es conocido por el Estado de
California clue los gases de escape del
motor de este productor contienen quirnicos
los cuales a ciertos niveles, pueden
ocasionar, c_ncer, defectos de nacirniento, y
otros daSos al sistema reproductivo.
mayoria de las tiendas de Sears y en los centros de servicio. La mayoria de las tiendas Sears tambi_n
pueden mandar a pedir partes de repuesto para usted, si les proporciona el numero del modelo de su
segadora. Algunos de estos accesorios tal vez no se apliquen a su segadora.
RENDIMIENTO
DE LA SEGADORA
DESVIADOR
PARA SEGADORAS
DE RECORTES
CON DESCARGA
MANTENIMIENTO
TRASERA
JUEGOS
PARA LA ACOLCHADORA
RECOREDOR
RECOREDOR
PARA
SEGADORAS
CON DESCARGA
TRASERA
PARA
SEGADORAS
CON DESCARGA
LATERAL
ENVASES
DE GASOLINA
DE LA SEGADORA
SILENCIADORES
FILTROS
ADAPTADORES
CORREAS
ESTADILIZADORES
CUCHILLAS
DE CUCHILLA
Lea estas instrucciones y este manual
completamente antes de tratar de montar u operar
su segador_ nueva. Su segadora nueva ha sido
montada en la fabfica con la excepci6n de aquelas
partes que se dejaron sin montar por razones de
envio. Todas las partes como las tuercas, las
arandelas, los pemos, etc., que son necesarias para
completar el montaje han sido colocadas en la
bolsa de partes. Para asegurarse que su segadora
funcione en forma segura y adecuada, todas las
partes y los articulos de ferreteria que se monten
tienen que ser apretados seguramente. Use las
heiTamientas correctas, como sea necesado, para
asegurar que se apdeten adecuadamente.
PARA REMOVER
LA SEGADORA
LA CAJA DE CARTON
DE
• Remueva las partes sueltas que se induyen con
la segadora.
• CoRe las dos esquinas de los extremos de la
caja de carton y tienda el panel del extremo
piano.
• Remueva todo el material de empaque, excepto
la cuSa entre el mango superior y 51inferior, y Ia
cuSa que sujeta Ia barra de del contr'ol que exige
la presencia del operador junto con el mango
supedor.
DE AIRE
BU JIAS
_
i
RUEDAS
ACEITE
DEL MOTOR
• Haga r'odarla segadora hacia afuera de la caja
de carton y revisela cuidadosamente para
vedficar si todavia quedan pares sueltas
adicionales.
COMO PREPARAR SU SEGADORA
PARA DESDOBLAR EL MANGO
IMPORTANTE: Desdoble el mango con cuidado
para no pinchar o daSar los cable de control.
• Levante la secci6n del mango infedor hasta la
posici6n de operaci6n y alinee el agujero en 6ste
con uno de los tres agujeros para determinar la
altura en el puntal del mango.
• Inserte el pemo del mango a traves de _ste y del
puntal y asegt_relo con la manilla.
• Repita el procedimiento para el lado opuesto del
mango.
• Levante la secci6n del mango superior hasta la
posici6n de operaci6n, remueva la cuSa
protectora y apriete las manillas del mango en
forma segura.
• Remueva el material de empaque de alrededor
de la barra de control.
• Sus mangos pueden ajustar_e para que le
acomode al segar. Refl6rase a la secci6n de
Servicio y Ajustes en este manual.
2O
PARA PREPARAR LA BATERiA
Barra de control que exige la presencia del
\
operador
Mango
AVlSO: Su bateria tiene que estar cargada antes
de que pueda hacer arrancar su segadora.
Levantar
• Desconecte el conector del motor (macho) al
conector de la bateria (hembra).
• Conecte el conector del cargador de Ia bateda
(macho) al conector de la bateria (hembra).
• Enchufe el cargador de Ia bateria dentro del
enchufe de 110 volt C.A.
• Deje el cargador de la bateria conectado FOr 24
horas antes de Racer arrancar su motor For la
primera vez.
• Despu&s de cargar, conecte el conector del
motor al conector de la bateria.
\
Mango
inferior
Posici6n para
segar
\
_
//
Pinza del mango
Mango de 3
Fosiciones
Su motor cuenta con un alternador integrado para
carga parcial. Conecte su cargador de bateria para
cargarla segOn sea necesario.
IMPORTANTE: ELALTERNADOR DEL MOTOR
NO CARGARA UNA BATERiA DESCARGADA.
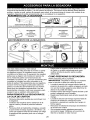
PAPA INSTALAR LOS ACCESORIOS
Su segadora fue enviada lista para usarse como
una acolchadora de capa vegetal. Para convertida
de modo que pueda ensacar o descargar:
• Abra la puerta trasera y remueva la bouchon
acolchadora. Gu_rdela en un lugar seguro.
• Ahora puede instalar eh'ecogedor o el desviador
de recortes opcional.
• Para volver a la operaci6n de acolchamiento con
capa vegetal, instale la bouchon acolchadora en
la abertura de descarga de la segadora.
PRECAUCION: No haga funcionar su segadora sin
la bouchon acolchadora aprobada en su lugar, o sin
el desviador de recortes, o sin el recogedor de
cesped, aprobados, en su luga_ Nunca trate de
oForar la segadora cuando se ha removido la
puerta trasera o cuando est_ un Foco abierta.
AI final de la temForada de siega, la bateria se debe
cargar FOr 48 horas para protegeda durante el
pefiodo de a!macenamiento en el inviemo.
PRECAUCION: Siempre desconecte el conector
del motor del conector de la bateria para evitar el
arranque FOr accidente al transFortar o guardar su
segadora despu6s de la temForada.
Conector del
__
Tap6n acoIchador
Con!!t!:'dell
,J
/
Conector de la
bateria (hembra)
21
cargador de Ia
bateria
(macho)
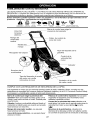
LEA ESTE MANUAL DEL DUEi_O Y LAS REGLAS DE SEGURIDAD ANTES DE OPERAR SU
SEGADORA. Compare las ilustraciones con su segadora para familiarizarse con la ubicaci6n de
los diversos controIes y ajustes. Guarde este manual para referencia en el futuro.
Estos simbolos pueden apareser
producto. Aprenda y comprenda
Ar
E_CI6t_O
ADVER[ENCIA
MO;OR
ENCEN
DO
MOTOR
APAC;ADO
sobre su segadora
sus significados.
R/_#IDO
LENO
o en Ia literatura
ES RANGU
LACI_)N
COM
BUS
IBLE
AQEIE
proporcionada
PELIGRO
GUARDE
MANOSYLOSPIESLEJOS
con el
LAS
Barra de control que exige la
presencia del operador
Llave de1
Arranque
el_ctrico
Mango del
arrancador
auxiliar
zona del motor
Manilla dellmango
Tapa deldeposito
gasolina
Recogedordelc6sped
deIa
Control de la
velocidad del
'motor
--Cebador
Bouchondela
acolchadora
Tapa del deposito de aceite
del motor con varilla
indicadora de nivel
CUMPLE
CON LOS REQUISITOS
\ Ajustador de la rueda
(en cada rueda)
DE SEGURIDAD
DE LA CPSC
Las segadoras a motor; que se conducen desde la parte de atr_s, rotatodas, Sears, cumplen con los
estandares de seguridad del American National Standards Institute y de la U.S. Consumer Product Safety
Commission. La cuchilla gira cuando el motor est& funcionando.
Barra de control que exige la presencia del
operador- tiene que sujetar-se abajo, junto con el
mango, para hacer arrancar el motor. Su_Itela para
parar el motor.
Cebador-bombea combustible adicional desde el
carburador aI cilindro para uso cuando se necesita
hacer arrancar un motor frio.
Palanca de control de la irnpulsibn-se usa para
enganchar la segadora para movimiento hacia
adelante impulsada a motor.
Control de la velocidad del motor -situada en la
parte lateral del motor que le permite seleccionar la
velocidad del motor ya sea rapida (,_) o lenta
Mango del arrancador auxiliar - se usa para
hacer arrancar el motol:
Bouchon
Nave delArranque
arrancar el moto[
(.g_).
de la acolchadora
- situada en la
abertura de la descarga y debe ser quitada cuando
se convierte la operacci6n de ensacado a descarga.
eI_ctrico -se usa para hacer
22
La operaci6n de cualquier segadora puede hacer
que salten objetos extraSos dentro de sus ojos, Io
que puede producir daSos graves en 6stos.
Siempre use anteojos de seguridad o protecci6n
para los ojos mientras opere su segadora o cuando
haga ajustes o reparaciones. Recomendamos una
mascara de seguridad de visi6n amplia, para uso
espejuelos o anteojos de seguridad estandarte.
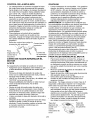
COMO USAR SU SEGADORA
Orejas de Ia
Para un c rte alto, baje las
ruedas
PRECAUCION: No haga funcionar su segadora
sin el desviador de recortes o sin el recogedor
de c_sped, aprobados, en su lugar. Nunca trate
de operar la segadora cuando se ha removido la
puerta trasera o cuando esta un poco abierta.
CONTROL DE LA VELOCIDAD
DEL
MOTOR
La velocidad del motor se controla por medio de
una palanca ubica.da en el lado del moto[ La
posici6n de alta (_) se usa para arrancar el motor,
para el corte normal y un mejor ensacamiento del
c6sped. La posici6n baja (_.)
es para corte
liviano, recorte y para economizar combustible.
Palanca de control de
la velocidad del motor
CONTROL
DE ZONA
Cebador
_
ptaca
_
Para un corte bajo, Ievante
Ias ruedas
PAPA MONTAR Y ADJUNTAR
RECOGEDOR
DE CESPED
Mango
EL
• Cierre la tapa soltable. La tapa soltable debe
estar cerrada cuando se esta operando la
segadora.
• Levante la puerta trasera de la caja de la
segadora y ponga el bastidor del recogedor de
c_sped en ias orejas formadas en el puntal de
bisagra de la pue_ta trasera.
• Eh'ecogedor de c6sped esta asegurado en la
caja de la segadora cuando se baja la puerta
trasera para descansar en el bastidor del
recogedor_de c6sped
PRECAUClON: No haga funcionar su segadora
sin el desviador de recortes o sin el recogedor de
c_sped, aprobados, en su luga£ Nunca trate de
operar la segadora cuando se ha removido la
puerta trasera o cuando esta un poco abierta.
DEL MOTOR
PRECAUCION: Las regulaciones federales
exigen que se instale un control para el motor
en esta segadora para reducir a un minimo el
riesgo de lesionarse debido al contacto con la
cuchilla. Por ning_n motivo trate de eUminar la
funcibn del control del operado_ La cuchilla
gira cuando el motor esta funcionando,
• Su segadora viene equipada con una barra de
control que exige la presencia del operadoh Io
que requiere que el operador est6 detras del
mango de la segadora para haceda arrancar y
operada.
PAPA AJUSTAR
t.A ALTUPA
DE CORTE
PAPA VACIAR
CESPED
EL RECOGEDOR
DE
• Para remover el recogedor del c_sped suelte la
barra de control del operador para poder parar el
motor.
• Levante la puerta de atras y remova el recogedor
del c_sped por el mango.
AVISO: No arrastre la bolsa cuando la vacie; se
producira un desgaste innecesado.
• Levante las ruedas para el corte bajo y baje Ias
ruedas para el corte alto.
• Ajuste la altura de coke para que se acomode a
sus requisitos. La posici6n dei medio es la mejor
para la mayoria de los cespedes.
• Para cambiar la altura de corte, empuje la
palanca del ajustador hacia la rued& Mueva la
rueda hacia arfiba o hacia abajo de modo que
se acomode a sus requisitos. Asegurese que
todas [as ruedas queden igualmente ajustadas.
ATENClON: El ajustador esta correctamente
colocado cuando las orejas de la placa est_n
insertadas en el agujero del mango. Tambi_n, los
ajustes de 9 posiciones (si equipado) permiten que
ei mango pueda set movido entre las orejas de la
ptaca.
23
CONTROL
DE LA IMPULSION
GASOLINA
• La autoimpulsi6n se controla al sujetar la barra
de control que exige la presencia del operador
hacia abajo en el mango y al empujar la palanca
de control de la impulsi6n hacia adelante hasta
que suene "clic," luego se sueita la palanca.
• El movimiento hacia adelante parara cuando la
barra de control que exige la presencia del
operador se suelta. Para parar el movimiento
hacia adelante sin parar el motor, suelte la ban_
de control que exige la presencia del operador un
poco basta que se desengancbe el control de la
impulsi6n. Sujete la barra de control que exige la
presencia del operador abajo en contra del
mango para continuar segando sin
autoimpulsi6n.
• Para mantener el control de la impulsi6n
enganchado cuando se de vuelta en las
esquinas, empuje el mango hacia abajo y levante
las ruedas delanteras fuera del suelo al girar Ia
segadora.
Barra de control que exige la Control de la
presenci_
_1operador
impulsion
Para
enganchar el
control de la
Control de
la impulsion
impulsion
ANTES DE HACERARRANCAR EL
MOTOR
• Llene el estanque de combustible. Use gasolina
regular, sin plomo, nueva y limpia con el minimo
de 87 octanos. (El uso de gasolina con pIomo
aumentara los dep6sitos de 6xido de plomo y
carbono y se reducira la duraci6n de la v_lvula).
No mezcle el aceite con la gasolina. Para
asegurar que la gasolina utilizada sea fresca
compre estanques los cuaIes puedan set
utilizados durante los primeros 30 dims.
ADVERTENClA: La experiencia ha indicado que
los combustibles mezclados con alcohol (conocidos
como gasohol, o el uso de etanol o metanol)
pueden atraer la humedad, la que conduce a la
separaci6n y formaci6n de acidos durante el
almacenamiento. La gasolina acidica puede daSar
el sistema del combustible de un motor durante el
almacenamiento. Para evitar los problemas con el
motor, se debe vaciar el sistema del combustible
antes de guardarlo por un periodo de 30 dims o
mas. Vacie el estanque deI combustible, haga
arrancar el motor y hagalo funcionar hasta que las
iineas del combustible y el carburador queden
vacios. La pr6xima temporada use combustible
nuevo. Vea las Instrucciones Para El
AImacenamiento para mQs informaci6n. Nunca use
productos de limpieza para el motor o para el
carburador en el estanque del combustible pues se
pueden producir daSc_spermanentes.
PARA HACER ARRANCAR
EL MOTOR
• Para hacer arrancar un motor frio, empuje el
cebador cinco (5) veces antes de tratarlo. Use un
empuje flnnemente. Este paso normalmente no
es necesario cuando se hace arrancar un motor
que ya ha estado funcionando por unos cuantos
minutos.
ACEITE
Su segadora rue enviada sin aceite en el motor.
• AsegOrese que la segadora est6 nivelada y que
el ar'ea alrededor del dep6sito de aceite est6
limpia.
• Remueva la tapa del dep6sito de aceite del
motor con la vadlla indicadora de nivel y rellene
hasta la linea de Ileno en _sta.
• Use 20 oz. de aceite. Para el tipo y la calidad vea
"MOTOR" en la secci6n de las
Responsabilidades del Cliente en este manual.
• Vacie el aceite lentamente. No Io Ilene
demasiado.
• Revise el nivel del aceite antes de cada uso.
Agregue aceite si es necesafio. Llene hasta la
linea de Ileno en la vafilla indicadora de nivel.
• Para leer el nivel adecuado, apriete la tapa del
dep6sito de aceite del motor cada vez.
• Vuelva a instalar la tapa del dep_Ssitodel aceite y
apdetela.
• Despu_s de las dos (2) pdmeras horas de siega,
cambie eI aceite y cada 25 horas de ahi en
adelante. Puede necesitar cambiar el aceite mas
a menudo cuando las condiciones son
polvorosas o sucias.
• Mueva la palanca de_c?ntr'ol de velocidad a la
posici6n de r_pido (_).
• Sujete la barra de control que exige la presencia
del operador abajo en el mango.
• Gire la Ilave par_ el arranque el6ctrico en el
sentido de las manillas del reloj para hacer
arrancar el motor.
importante: No haga arrancar el motor m&s de 5
segundos continuados. Espere 5 a 10 segundos
entre cada vez que trate de bacedo arrancar:
• Para bacer an_ncar el motor usando la manilla
del arrancador auxiliar, siga los pasos anteriores.
Intercambie el uso de la Ilave del arranque
el6ctrico por el cord6n arrancador: Tire la manilla
arrancadora rapidamente. No permita que el
cord6n arrancador se devuelva abruptamente.
• Para parar el motor, suelte la barra de contr_al
que exige la presencia del operador.
Tapa del
deposito de
aceite con
variIla
indicadora de
nivel
24
Tapa del
rellenador
de gasolina
CONSEJOS PARA SEGAR Y
ACOLCHAR
CONSEJOS PAPA SEGAR
• Bajo clef[as condiciones, tal como c_sped muy
alto, puede ser necesario el elevar Ia altura del
corte para reducir el esfuerzo necesario para
empujar Ia segadora y para evltar sobrecargar el
motor, dejando montones de recortes de cesped.
• Para un corte muy pesado, reduzca el ancho del
corte pasando parcialmente per encima del lugar
anteriormente cortado y siegue lentamente.
• Para un mejor ensacado del c6sped y para la
mayoria de Ias condiciones de corte, la
veIocidad del motor d_be ajustarse a la
pesici6n de r&pido (_).
• Cuando use una segadora con descarga tr_sera
en c_sped hQmedo y pesado, los montones del
c_sped cortado puede que no entren en el
recogedor de c_sped. Reduzca la velocidad del
recorrido (velocidad de empuje) y/o haga
funcionar la segadora sobre el ar'ea per segunda
vez.
• Si queda una huella de cortes en el lado derecho
de una segedora con descarga trasera, siegue
en la direcci6n en que giran las manillas del reloj,
solapando un poco para recaudar los recortes en
la pr6xima pasada.
• Los peros en los recogedores de c_sped de tela
pueden ltenarse con mugre y pelvo con el uso y
los recogedores recaudaran menos c_sped.
Para evltar _sto, rocie el recogedor con la
manguera de agua regularmente y d6jelo
secarse antes de usado.
• Mantenga la parte supeltor del motor, alrededor
del arrancador, despejeda y sin recortes de
c_sped y peja. Esto ayudar_ el flujo del aire del
motor y extendera su duraci6n.
• Los peros en los recogedores de c_sped de tela
pueden ltenarse con mugre y pelvo con el uso y
los recogedores recaudaran menos c_sped.
Para evltar _sto, rocie el recogedor con la
manguera de agua, regularmente, y d6jelo
secarse antes de usedo.
_ _:_7_i_
IMPORTANTE: PAPA OBTENER EL MEJOR
RENDIMIENTO MANTENGA LA CAJA DE LA
SEGADOPA SIN ACUMULACION DE CESPED Y
BASUPA. VEA "LIMPIEZA" EN LA SECCION DE
"RESPONSABILIDADES DEL CLIENTE" DE ESTE
MANUAL.
• La cuchilla acolchadora especial va a volver a
cortar los recortes de c_sped muchas veces, y
Ios reduce en tamaSo, de modo que si se caen
en el c_sped se van a dispesar entre _ste y no
se van a notar. Tambi6n, el c_sped acolchado se
va a deshacer rapidamente entregando
substancias nutrf[ivas para el c_sped. Siempre
acolche con la velocided del motor (cuchilla) mas
alta, pues asi se obtendra la mejor acci6n de
recorte de las cuchillas.
• Evite cortar el c_sped cuando est_ mojado. El
c_sped mojedo tiende a formar montones e
interfiere con la acci6n de acolchado. La mejor
hora para segar el cesped es temprano en la
tarde. A esa hora _ste se ha secado y el area
reci_n cortada no quedara expuesta al sol
directo.
• Para obtener los mejores resultados, ajuste la
altura del corte de la segadora de modo que _sta
corte solamente el tercio superior de las hojas de
c_sped (Vea la Fig. 10). En el caso de que el
c_sped haya crecido demasiedo, puede ser
necesario el eIevar la altura del corte para reducir
el esfuerzo necesape para empujar la segadora
y para evltar sobrecargar el motor, dejando
montones de recortes de c6sped. Para un
acolchamiento muy pesado, reduzca el ancho
del corte pesando per encima del lugar
anteriormente cortado y siegue lentamente.
• Ciertos tipos de c_sped y sus condiciones
pueden exigir que un area tenga que ser
acolchada per segunda vez para esconder
completamente los recortes. Cuando se haga el
segundo corte, siegue atravesedo o en forma
perpendicular a la pesada del primer corte.
• Cambie su petr_Snde corte de semana a
semana. Siegue de norte a sur una semana y
Iuego cambie de este a oeste la pr6xima
semana. Esto evitar'a que el c_sped se enrede y
Max 1/3
25
LLENE LAS FECHAS A MEDIDA
QUE COMPLETE
SU SERVICIO
Revlsar si hay sujetadores
_i
REGULAR
sueltos
cesped (si viene equlpado)
Umplar/inspeccionar
el recogedor de
G
Limplar deba o de la cubierta de la trans-
AI
misi6n (segadoras con poder propulsor)
Revlsar las correas y las poleas impul(segadoras con poder propulsor)
Revlsa; o/afilar/cambiar
Tabla de lubrlCaci6n
A
Limpiar la baterla/recargar
if
_
I_
I_
I_
la cuchilla
(segadoras con alranque
I_3
I_
electrlco)
I_
ll_4
I_
Revlsar el nlvel del acelte
0
CamblareJaceltedelm°t°r
_1#1, 2
m
Limpiar el filtro de aire
ill#2
O
I+lspeccionar el silenciad or
I_
I_
R I Umplar
I
DESERMIClO
if
D Isadas
0
R
I_"
--*_II_FECHAS
o/Cambiar la bujfa
eamblar el cartucho de papel del filtro
v' 2
m I de aire
1
2
3
4
Cambiar ma8 a menu(to cuando se opera bajo cart3a pesada o en am#ientes
con altas lempo_t_ras
Dar servicio mas a menudo cuar_do se opere er_ condicio_es
s_cias o poEvomsas
Cambie las cuch]llas
r_s a men.do
cuando siegue e_ terreno arenoso
Gargar pot 48 horas al fin de la temporada
RECOMENDACIONES
TABLA DE LUBRICACIC)N
GENERALES
La garantia de esta segadora no cubre los
articulos que han estado sujetos al abuso o a la
negligencia del operadot: Para recibir todo el
valor de Ia garantia, el operador tiene que
mantener la segadora segt_n las instrucciones
descritas en este manual
(D Ajustador de la
rueda
Hay algunos ajustes que se tienen que hacer en
forma peri6dica para poder mantener su unidad
adecuadamente.
Todos los ajustes en la secci6n de Servicio y
Ajustes de este manual tienen que ser
revisados por Io menos un vez por cada
temporada.
• Una vez al afio, cambie la bujia, limpie o
cambie el elemento del filtro de aire y revise
si la cuchilla est_ desgastada. Una bujia
nueva y un elemento del filtro de aire limpio/
nuevo aseguran la mezcla de aire-combustible adecuada y ayudan a que su motor
funcione mejor y que dure m_s.
• Siga el programa de mantenimiento en este
manual.
ANTES DE CADA USO
(DClavija
(_
resorte
Rocie el lubricante
(_) Refierase a +a secci6n de responsabilidades
del ctiente en "motor"
IMPORTANTE: No aceite o engrase los
rodamientos de la rueda de plastico. Los
Iubdcantes viscosos atraeran polvo y mugre, Io
que acortara la duraci6n de los rodamientos
autolubricantes. Si cree que tienen que
Iubncarse, use solamente un Iubricante tipo
grafito, de polvo seco, en forma moderada
• Revise el nivel del aceite del motor.
• Revise si hay sujetadores
LUBRICACION
de montaje del
puntal mango
sueltos.
Mantenga la unidad bien lubricada (yea ia
"TABLA DE LUBRICACION").
26
ESPECIFICACIONES
NOMERO
DE MODELO
NOMERO
DE SERIE
FECHA
DEL PRODUCTO
917.377352
DE COMPRA
CABALLOS
DE FUERZA:
6.25
DESPLAZAMIENTO:
11.5 CU. IN.
CAPACIDAD
Y TIPO
DE GASOLINA:
1.5 Cuartos
REGULAR
SIN PLOMO
TIPO DE ACEITE:
(API-SFISG/SH)
SAE 30 (sobre 32°F)
SAE 5W-30 (debajo 32°F)
CAPACIDAD
BUJiA
DE ACEITE:
(ABERTURA:
TOLERANClA
SENCENDIDO
SOLIDO
TORSION
20 oz. de capacidad
.030")
CHAMPION
DE VALVULA:
RJ19L
ADMISION:
.008
DESCARGA:
.008
DE ESTADO
ABERTURA
DE AIRE:
.0125
IN.
DEL PERNO
DE LA CUCHILLA:
35-40
FT. LBS.
• El num6ro del nodelo y el de serie se encuentran
en la calcomania
adjunta a la parte
trasera de la caja de la segadora.
Debe registrar tanto el numero de serie come la
fecha de compra y mantengalos
en un lugar seguro para refencia en el futuro.
SEGADORA
• Remueva
la cuchillay losarticulos
deferreteria
adjuntadores (el pemo, ia arandela de seguridad
y la arandela endurecida).
Siempre observe las reglas de seguridad cuando
haga el mantenimiento.
LLANTAS
• Mantenga las Ilantas sin gasolina, aceite o
substancias quimicas para contr'ol de insectos
que pueden daSar la goma.
• Evite los tocones, las piedras, ]as grietas
profundas, los objetos afilados y otros peligros
que pueden daSar alas Ilantas.
CUIDADO DE LA CUCHILLA
AVlSO: Remueva el adaptador de la cuchilla y
revise el cubo intedor de la ranura del adaptador de
ia cuchilla. La ranura tiene que estar en buenas
condiciones para que funcione en forma adecuada.
Cambie el adaptador siesta daSado.
PARA CAMBIAR LACUCHILLA
• Ponga el adaptador de la cuchilla en el ciguefial
del motor. AsegQrese que la ranura del
adaptador y que el chavetero del cigueSal est6n
alineados.
• Ponga la cuchilla en el adaptador de 6sta
alineando los dos (2) agujeros en la cuchilla con
ias salientes elevadas en eI adaptador.
• Aseg_rese de que el borde de salida de la
cuchilla (opuesto al borde afilado) est6 hacia
arriba hacia el motor.
• Instale el pemo de la cuchilla con la arandela de
seguridad y la arandela endurecida en el
adaptador de la cuchilla y el ciguefial.
• Use un bloque de madera entre la cuchilla y la
caja de la segador_ y apriete el pemo de la
cuchiIla girandolo en el sentido en que giran Ias
manilas del reloj.
• La torsi6n para apretar recomendada es de 35 40 pies libras.
Para obtener los mejores resultados, la cuchilla de
la segadora tiene que mantenerse afilada. Cambie
la cuchilla doblada o dafiada.
PAPA REMOVER LA CUCHILLA
• Desconecte el alambre de la bujia y p6ngalo en
donde no pueda entrar en contacto con 6sta.
• Haga descansar la segadora en su lado.
Asegt_rese que el filtro de aire y que el
carburador queden mirando hacia arfiba.
• Use un bloque de madera entre la cuchilla y la
caja de la segadora para evitar que la cuchilla
gire cuando se le quite el pemo.
• Proteja sus manos con guantes y/o envuelva la
cuchilla con una tela gruesa.
• Remueva el pemo de la cuchilla girandolo en el
sentido contrario en que giran las manillas del
reloj.
27
Adaptador de la
Ranura
Chavetero del
Es necesario limpiar las r_edas de impulsi6n; revise
ambas ruedas delanteras.
• Remueva los tapacubos, las davijas de horquilla
y las arandelas.
• Remueva las ruedas de los ajustadores de las
ruedas.
Arandela
de
seguddad
Arandela
endurecida
• Rernueva la basura y los recortes de c_sped de
dentro de la cubierta contra el polvo, pi56n y/o de
los dientes de los engranajes de las ruedas de
impulsi6n.
• Ponga las ruedas de vuelta en su lugar.
• Si despu6s de limpiar las ruedas de impulsi6n no
giran libremente, p6ngase en contado con su
centro de selMcio m_s cer'cano.
RECOGEDOR
DE CESPED
Borde de
salida
IMPORTANTE: El pemo de la cuchillaes calse 8
tratado a calor.
Se tiene que tenet cuidado de manteneda
balanceada. Una cuchilla que no esta balanceada
va a producir eventualmente da_o en la segadora o
en el motor.
• El recogedor de c6sped puede ser rociado con el
agua de la manguera pero tiene que estar seco
cuando se vaya a usar.
• Revise su recogedor de c_sped a menudo para
vedficar siesta daSado o detenorado. Se va a
desgastar con el uso normal. Si se necesita
cambiar el recogedor, c_mbielo solamente pot
uno que sea aprobado pot el fabdcante. D6 el
nQrner'odel modelo de ia segadora cuando Io
ordene.
• La cuchilla puede afliarse con una lima o en una
rueda rectif_cadora. No trate de afilada mientras
MOTOR
LUBRICACION
se encuentra en la segadora.
• Para revisar el balance de la cuchilla, clave un
clavo en una riga o en la pared. Deje alrededor
de una pulgada de un clavo recto expuesto.
Ponga el agujero central de la cuchilla sobre la
cabeza del clavo. Si la cuchilla esta balanceada
Use solamente aceite de detergente de alta calidad
clasificado con la clasificacidn SF o SG de serMcio
API. Seleccione la calidad de viscosidad SAE
seg[in su temperatura de operaci6n esperada.
AVISO: No recomendamos el afilar la cuchilla pero si Io hace, asegQrese de que quede
balanceada.
PARA AFILAR LA CUCHILLA
debe permanecer en la posici6n horizontal. Si
cualquiera de los extremos de la cuchilla se
mueve hacia abajo, afiie el extremo pesado
hasta que _sta quede balanceada.
CAJA DE ENGRANAJES
AVISO: A pesar de que los aceites de
multiviscosidad (5W30, 10W30, etc.) mejoran el
arranque en clima fdo, estos aceites de
multiviscosidad van ha aumentar el consumo de
aceite cuando se usan en temperaturas sobre 32_
F. Revise el nivel del aceite del motor mas a
menudo, para evitar un posible daSo en el motor,
debido a que no tiene suficiente aceite.
• Para mantener el sistema de impulsi6n
funcionando en forma adecuada, la caja de
engranajes y el area alrededor de la impulsi6n
tienen que mantenerse limpias y sin acumulaci6n
de basur_. Limpie debajo de la cubierta de la
impulsi6n dos veces por temporada.
• La caja de engranajes se ilena con lubricante
hasta el nivel adecuado en la fabdca. La unica
Cambie el aceite despu_s de 25 horas de
operaci6n o pot Io menos una vez al aSo, si Ia
segadora no se usa 25 horas en un a_o.
Revise el nivel del aceite del carter antes de
arrancar el motor y despues de cada cinco (5)
horas de uso continuado. Apdete el tap6n del aceite
en forma segura cada vez que revise el nivel del
aceite.
vez que el lubdcante necesita atenci6n es
cuando se le ha prestado servicio a la caja de
engranajes.
• Si se necesita lubdcante, use solamente Grasa
Texaco Starplex Premium 1, Parte No. 750355.
No use substitutos.
RUEDAS DE IMPULSIC)N
Revise las ruedas de impulsi6n delanteras cada vez
antes de segar, para asegurarse de que se mueven
libremente.
Si las ruedas no giran libremente quiere decir que
hay basura, recortes de c_sped, etc. en el area de
las ruedas de impulsi6n y tienen que limpiarse para
liberadas.
28
PAPA CAMBIAR EL ACEITE DEL MOTOR
SILENCIADOR
AVISO: Antes de inclinar la segadora para drenar
el aceite, drene el tanque de combustibIe haciendo
correr el motor hasta que el tanque est6 vacio.
• Desconecte el alambre de la bujia y p6ngalo de
modo que no pueda entrar en contacto con 6sta.
• Remueva la tape del dep6sito del aceite; d6jela a
un lado en una superfcie limpia.
• Incline la segadora y hagala descansar en su
lado y drene el aceite en un envase adecuado.
Mueva la segadora de atras para adelante para
remover todo el aceite que se haya quedado
atrapado dentro del motor.
• Limpie todo el aceite derramado en la segadora
yen el lado del motor.
• Uene el motor con aceite. Ll_nelo solamente
hasta la linea de "LLENO" (FULL) en la varilla
indicadora de nivel. NO LO LLENE
DEMASlADO.
• Vuelva a pener la tapa en el dep6sito del aceite.
• Vuelva a conectar el alambre de ia bujia a _sta.
Inspeccione y cambie eI silenciador si esta con_oido
pues producir un peligro de incendio y/o daRo.
BUJIA
Cambie su bujia cada aSo para hacer que su motor
arranque mas facilmente y funcione mejon Ajuste la
abertura de la bujia en 0.030 pulgada.
UMPIEZA
IMPORTANTE: Para obtener el mejor rendi-miento,
mantenga la caja de la segadora din acumulacion
de cesped y basura. Limpie la parte de abajo de su
segadora despues de cada uso.
PRECAUClON: Desconecte el alambre de la bujia
y p6ngalo en donde no pueda entrar en contacto
con 6sta.
• Haga descansar la segadora en su lado.
AsegOrese que el f_ltrode aire y que el
carburador queden mirando hacia arriba. Limpie
Ia parte inferior de su segadora raspandola para
remover la acumulaci6n de c_sped y basura.
• Limpie el motor a menudo para evitar que se
acumule la basura. Un motor tapedo funciona
mas caliente y se acorta su duraci6n.
• Mantenga las superficies acabadas y las ruedas
sin gasolina, aceite, etc.
• No recomendamos el uso de una manguera de
jar'din para limpiar la segadora a menos que el
sistema el6ctdco, el silenciador, el filtr'o de aire y
el carburador est_n tapedos par_ evitar que les
entre el agua. El agua en el motor puede acortar
ia duraci6n de 6ste.
LIMPIE DEBAJO DE LA CUBIERTA
DE LA
IMPULSION
Envase-
FILTRO DE AIRE
Su motor no funcionara en forma adecuada y
puede sufrir da_os si se usa un filtro de aire sucio.
Cambie
si siega
No lave
PAPA
el filtr_ode aire cada a_o, y m&s a menudo
en condiciones muy pelvorosas o sucias.
el flltr_ode aire.
CAMBIAR EL FILTRO DE AIRE
• Remueva el filtro de aire girandolo en el sentido
contrario en que giran Ias manillas del reloj, hasta
el tope, y retirelo del collar.
• Remueva el filtro de la parte interior de ia
cubierta.
• Limpie la parte interior de la cubierta y el collar
para remover toda acumulad6n de mugre.
• inserte el filtro nuevo en la cubier[a.
• Ponga la cubierta del fiitr_ode aire dentro del
collar alineando la oreja con la ranura.
• Empuje la cubierta hacia adentro y girela en el
sentido de las manillas del reloj para apretaria.
Gire en el
sentido de
Ias
manillas
del reloj
para
apretar
/
RaRura
Filtro de _
aire
Oreja _
Cubierta de
filtro de aire
sentido
contraric
alas
manillas
del reloj
para
remover
29
Limpie debajo de Ia cubierta de la impulsi6n per Io
menos dos veces cada temperada. Raspe debajo
de la cubierta con un cuchillo para masilla o con una
herramienta parecida, para remover toda
acumulaci6n de cesped o basura en la parte inferior
de la cubierta de la impulsi6n.
PRECAUCIC)N: ANTES DE DAR
CUALQUIER SERVICIO O DE HACER
AJUSTES:
• Suelte la barra de control y pare el motor.
• Aseg_rese que la cuchilla y que todas las
partes movibles se hayan detenido
completamente.
• Desconecte el alambre de la bujia y p6ngalo
en donde no pueda entrar en contacto con
6sta.
SEGADORA
PAPA AJUSTAR LA ALTURA DE
CORTE
PARA AJUSTAR EL MANGO
El mango de su segadora cuenta con tres (3)
posiciones de altura -aj[_stelo a la altura que le
acomode.
• Presione las extremidades inferiores del
mando inferior una en contra una de la otra
hasta que la pinza del mango pueda ser
insertada en uno de los tres agujeros del
control de Ia altura.
AIta
_
\
Pinza deI mango
Baja
f
go de 3
Yea "PARAAJUSTAR
LAALTURA DE CORTE"
en la secci6n de Operaci6n de este manual.
DESVlADOR
TPASERO
Se proporciona un desviador trasero, adjunto
entre las ruedas traseras de su segadora, para
reducir a un minimo la posibilidad que objetos
sean lanzados hacia afuera de la parte trasera
de la segadora, en la posici6n en donde se
encuentra el operador. Si se daSa el desviador
debe cambiarse.
PAPA REMOVER/CAMBIAR
LA
CORREA
DE
IMPULSION
MOTOR
VELOCIDAD DEL MOTOR
• Remueva Ia cubierta de la impulsi6n.
Remueva Ia correa empujando hacia abajo
en la polea de la caja de engranajes.
• Haga descansar la segadora en su lado con
el filtro de aire y el carburador mirando hacia
arriba.
• Remueva la cuchilla.
• Remueva la defensa en contra del
desperdicio.
• Remueva la correa de la polea del motor en
el ciguefiaL
• Instale la correa nueva siguiendo los pasos
antefiores en el orden inverso.
• Siempre use la correa aprobada por la
fabrica para asegurarse que calce y dure.
Su carburador tiene un chorro principal fijo no
ajustable para controlar la mezcla. Si su motor
no esta funcionando en forma adecuada debido
La velocidad del motor ha sido ajustada en la
fabrica. No trate de aumentar la velocidad del
motor pues se pueden producir lesiones
personales. Si cree que el motor esta
funcionando demasiado rapido o demasiado
lento, Ileve su segadora a un centro/
departamento de servicio autorizado para
repararla o ajustarla.
CARBUPADOR
a problemas que se sospecha vienen del
carburador, Ileve su segadora a un centro/
departamento de servicio autorizado para
repararla y/o ajustarla.
/
Cubierta de
la impulsion
Correa /
Empujar hacia abajo
3O
Inmediatamente
prepare
susegadora
para
el
almacenamiento
alfinal
decada
temporada
osila
unidad
nosevaausar
por30dias
omas.
SEGADORA
Cuando se va a guardar la segadora por cierto
periodo de tiempo, limpiela cuidadosamente,
remueva toda la mugre, la grasa, las hojas, etc.
Guardela en un area limpia y seca.
• Limpie toda la segadora (Vea "LIMPIEZA" en la
secci6n de Responsabilidades del Cliente de
este manual).
• Lubriquela seg_n se muestra en la secci6n de
Responsabilidades del Cliente de este manual.
• AsegOrese de que todas las tuercas y clavijas y
todos los pemos y tomillos est6n apretados en
foma segur_. Inspeccione las partes que se
mueven para verificar si estan daSadas,
quebradas o desgastadas. CQmbielas si es
necesario.
• Retoque todas las supe_cies que est6n
oxidadas o con la pintura picada; use una lija
antes de pintar.
MOTOR
SISTEMA
pefiodo de almacenamiento.
• Drene el estanque de combustible.
• Haga arrancar el motor y d_jelo funcionar hasta
que las lineas del combustible y el carburador
est_n vacios.
MANGO
• Puede doblar el mango de su segadora para el
almacenamiento.
• Suelte las dos (2) manillas del mango en cada
lado del mango supenor y permita que el mango
se doble hacia detras.
• Apfiete las extremidades del mango inferior una
en contra de la otra hasta qua la pinza en el
mando desparche los soportes y pivote el
conjunto completo del mango bacia adelante
para que se pueda reposar encima de Ia
segadora.
• Cuando prepare su mango a pa_r de la posici6n
de almacenamiento, el mango inferior necesitara
cerrado manualmente para la posid6n de sega.
IMPORTANTE: Cuando doble el mango para el
almacenamiento o el transForte, asegurese que Io
doble segun se muestra o puede danar los cables
de control.
• Nunca use los productos para limpieza del
carburador o del motor en el estanque de
combustible pues se pueden producir da5os
permanentes.
• Use combustible nuevo la pr6xima temporada.
AVISO: El estabilizador de combustible es una
alternativa aceptable para reducir a un minimo la
formaci6n de depositos de goma en el combustible
durante el pefiodo de almacenamiento. Agregue
estabilizador a la gasolina en el estanque de
combustible o en el envase para el
almacenamiento. Siempre siga la proporci6n de
mezcla que se encuentra en el envase del
estabilizador. Haga funcionar el motor pot Io menos
10 minutos despu6s de agregar el estabilizador>
para permitir que este Ilegue al carburador. No
drene la gasoIina del estanque de gasolina y el
carburador si se est& usando estabilizador de
combustible.
ACEITE DEL MOTOR
Barra de control que exige la
presencia del operador
_
Mango superior_
Bob ar hac a
adelante r_ara
j//f
_
_'ff_-7-';
_
'_
,_,
_ Z_ _ '
DE COMBUSTIBLE
IMPORTANTE: Es importante evitar que se formen
depositos de goma en parLesfundamentales del
sistemade combustible tales como el cargurador, el
filtro del combustible, lamanguera del combustible o
en el esstanque durante el almacenamiento. La
expefiencea tambien indica que los combustibles
mezclados xon alcohol (condocido come gasohol o
que tienen etanol o metanol) pueden atraer
humedad, Io que conduce a la separacion y a la
separaacion y la formacion de acidos durante el
almacenamiento. La gasolina acidica puede danar
el sistema de combustible de un motor durante el
_
Dobtar
/9
_,,hacia
_," i_
atras
l
Drene el aceite (con el motor caliente) y c_mbielo
con aceite de motor limpio. (Vea "MOTOR" en la
secci6n de Responsabilidades del Cliente de este
manual.)
CILINDRO
_, Posicion para
• Remueva la bujia.
• Vacie una onza (29 ml) de aceite a tray,s del
agujero de la bujia en el cilindro.
• Tire la manilla de arranque lentamente unas
cuantas veces para distribuir el aceite.
• Vuelva a montar la nueva bujia.
segar
/
Mango inferior
31
BATER|A
• Cubra su unidad con un forro protector adecuado
que no retenga la humedad. No use plastico. El
plastico no puede respirar, Io que permite la
formaci6n de condensaci6n, Io que pr_aducir_la
oxidaci6n de su unidad.
IMPORTANTE: Nunca cubra la segadora mientras
el motor y las areas de escape todavia estan
calientes.
PRECAUCI()N: Nunca almacene la segadora con
gasolina en el estanque dentr'o de un ediflcio en
donde los gases pueden alcanzar una llama
expuesta o una chispa. Permita que se enfrie el
motor antes de almacenada en algQn recinto
Separe la bateria del conector del motor y cargue la
bateria durante 48 horas.
OTROS
• No guarde la gasolina de una temporada a la
otra.
• Cambie el envase de la gasolina si se empieza a
oxidar. La oxidaci6n y/o la mugre en su gasolina
produciran problemas.
• Si es posible, guarde su unidad en un recinto
cerrado y ct)brala para protegerla contra el polvo
y la mugre.
Get, ado.
IDENTIFICACION
DE PROBLEMAS
PROBLEMA
CAUSA
CORRECCION
No arranca
• Filtro de aire sucio
• Limpie/cambie el filtro de aire.
• Llene el estanque de combustible.
• Sin combustible
• Combustible
rancio
• Drene el estanque y vuelva a
Ilenarlo con combustible limpio y
nuevo.
•Agua en el combustible.
• Drene el estanque de combustible y
el carburador y vuelva a Ilenar el
estanque con gasolina nueva.
•Alambre de la bujia
desconectado.
• Conecte el alambre a la bujia.
.Bujiamala.
• Apriete el perno de Ia cuchilla o
cambie el adaptador de la cuchilla.
• Presione Ia barra de control hacia el
• Cambie la bujia.
• Cuchilla suelta o adaptador
de la cuchilla quebrado.
• Barra de control en la posici6n
suelta.
Falta de fuerza
mango.
• Cambie la barra de control.
• Barra de control defectuosa.
• Ajuste a la posici6n de "Code mas
alto."
• ParLe trasera de la cajacuchilla
de la segadora arrastrandose
en el c6sped pesado.
• Ajuste a la posici6n de "Code mas
alto."
• Esta cortando mucho c6sped.
• Filtro de aire sucio.
• Limpie/cambie
•Acumulaci6n de c6sped, hojas
y basura debajo de la segadora.
• Revise el nivel del aceite.
• Demasiado
• Code a una velocidad de recorrido
m&s lenta.
aceite en el motor.
32
el filtro de aire.
• Limpie la pade inferior de Ia caja de
Ia segadora.
PROBLEMA
Mal corte _:lisparejo
CORRECCION
CAUSA
• Cuchilla desgastada, doblada o
suelta.
• AItura de las ruedas dispareja.
• Velocidad
del motor lent&
• Acumulaci6n de c6sped, hojas
basura debajo de la segadora.
Cambie la cuchilla. Apriete el
pemo de la cuchilla.
Ajuste todas las ruedas a la
misma altura.
P6ngase en contacto con su
centro de servicio autorizado
mas ceroano.
Limpie la parte inferior de la caja
de la segadora.
Vibraci6n excesiva
• Cuchilla desgastada, doblada o
suelta.
• CiguefiaI deI motor dobtado.
Cambie la cuchilla. Apriete el
pemo de la cuchilla.
P6ngase en contacto con su
centro de servicio autorizado
mas ceroano.
Cord6n arrancador
dificil de tirar
•
Presione la barra de control
hacia el mango superior antes de
tirar el cord6n arrancador.
P6ngase en contacto con su
centro de servicio autorizado
mas cercano.
Cambie el adaptador de Ia
cuchilla.
Mueva la segadora a un lugar en
donde el c_sped ha sido cortado
o a una superflcie firme para
hacer arrancar el motor.
El freno del volante del motor
esta aplicado cuando se suelta
la barra de control.
• Ciguefial deI motor doblado.
• Adaptador de la cuchilla
quebrado.
• La cuchilla se arrastra en el
c6sped.
Altura de corte demasiado
Recogedor de c_sped
no se Ilena (si viene
equipado)
baja.
Levantamiento
Dificil de empujar
El c6sped esta demasiado alto
o la altura de la rueda dema-
de la cuchilla
desgastado.
Recogedor sin ventilaci6n de
mire.
Velocidad del motor lenta.
siado baja.
Parte trasera de la caja/cuchilla
de la segadora
arrastrandose
en el c_sped.
Recogedor de c_sped demasiado Ileno.
Posici6n de la altura del mango
no adecuada para usted.
33
Eleve la altura de corte.
Cambie la cuchillas.
Limpie el recogedor de c6sped.
Ajuste el control de la velocidad
del motor a la posici6n r_pida
Eleve la altura de core.
Eleve la parte trasera de la caja d_
la segadora (1) un lugar mas alto.
Vacie el recogedor de c_sped.
Ajuste la altura del mango de
modo que le acomode.
ROTARY LAWN MOWER MODEL NUMBER 917.377352
24
•
72
co
37
47
I
I
ROTARY LAWN MOWER MODEL NUMBER 917.377352
KEY
NO.
03
O1
1
2
5
6
7
9
10
11
12
13
14
15
16
17
20
21
22
23
24
25
27
28
29
30
81
32
34
36
37
PART
NO
145640X479
158655
151517
87692
STD541425
151023
128415
150050
STD512505
144929
157258X479
700355X479
138190X479
140661X479
140540
150425
85543
87677
150181
83923
150341
142748
52335
145935X004
701037
700331X004
146630
700325X007
150078
DESCRIPTION
Upper Handle
Engine Control
Cable Clip
Handle Knob
Locknut 1/4-20
Rear Door Kit
Pop Rivet
Self Tapping Screw #10-24
Hex Tapping Screw 1/4-20 x 1/2
Hex Washer Head Screw 1/4-20 x 2/12
Back Plate
Side Baffle
Discharge Baffle
Rear Baffle
Rear Skirt
Mulcher Plug
Engine Pulley
Hi-Pro Key #505
Hubcap
Flanged Locknut
Wheel & Tire Assembly
Shoulder Bolt 3/8-16
Belleville Washer
Axle Arm Assembly
Selector Knob
Selector Spring
Spacer
Wheel Adjusting Bracket
Thread Cutting Screw 5/16-18 x 3/4
KEY
NO,
PART
NO
39
40
41
44
46
47
48
49
50
51
52
55
56
57
58
59
61
62
64
153131X479
153130X479
150406
160677
851514
157101
851074
850263
851084
700869X479
85463
751592
88652
51793
151723X479
131959
132001
134612
65
66
67
72
73
150502
STD541431
66426
155890
160671
DESCRIPTION
Handle Bracket Assembly (Left)
Handle Bracket Assembly (Right)
Hex Head Thread Rolling Screw 3/8-16 x 1-1/8
Lawn Mower Housing (lncl Key #14,15, 17, 51 &52)
Blade Adapter
Blade 22"
Hardened Washer
Helical Washer 3/8-24 x 1-3/8 Grd, 8
Hex Head Machine Screw 3/8-24 x 1-3/8 Grd, 8
Front Baffle
Danger Decal
Locknut 3/8-16
Hinge Screw
Hairpin Cotter
Lower Handle
Handle Bolt
Rope Guide
Debris Shield
Engine - (See Breakdown)Craftsman
Model 143.976252
Handle Adjustment Pin
Locknut 5/16-16
Wire Tie
See Battery Repair Parts Page
Foam Grip
Owner's Manual (English/Spanish)
ROTARY LAWN MOWER MODEL NUMBER 917.377352
11
/
co
O_
I
I
ROTARY LAWN MOWER MODEL NUMBER 917.377352
KEY
NO.
GO
1
2
4
5
6
7
8
10
11
12
13
14
15
16
18
PART
NO.
145794
148312
144929
146527
150495
145212
150182
88446
150340
12000058
137054
88080
88118
67725
701037
DESCRIPTION
Control Bar
Drive Control
Screw 1/4-20
V=Belt
Spring Retainer
Nut
Hubcap
Nylon Bushing
Wheel & Tire Assembly
E=Ring
Pinion
Dust Cover
Felt Washer
Washer 1/2 x %1/2 x 134
Selector Knob
KEY
NO.
25
27
28
81
32
35
36
37
88
40
41
53
54
55
56
PART
NO
152903
143603
154990
132010
137052
151521
702511
137090
63601
75192
151520
144747
154870
86012
144748
DESCRIPTION
Drive Cover Decal
Screw
Drive Cover
Hex Flange Nut
Drive Pulley
Wheel Adjuster Assembly (Left)
Gear Case Assembly
Spring
Hex Locknut 1/4-20
Spring
Wheel Adjuster Assembly (Right)
Grassbag Frame
Grassbag
Driveshaft Cover
Frame
ROTARY LAWN MOWER - - MODEL NO. 917.377352
I
7
KEY
NO.
PART
NO.
17490416
2
3
4
6
7
8
9
10
11
12
13
137055X004
137053
57072
48373
77881
137051
137074
57079
131484
700343
86447
KEY
NO.
DESCRIPTION
Tapping Screw 1/4-20 x
1-1/4
Engagement Bracket
Shifter
Seal
Gear Case Halves Kit
(Includes Key Nos. 4, 5,
and 7)
Bearing
Worm Shaft
Drive Shaft
Hardened Washer
Clutch Yoke
Bushing
Plug
14
15
16
17
18
19
PART
NO.
137050
750436X
750369
12000003
850848
81585X004
DESCRIPTION
Helical
Clutch
Grease
E-Ring
Hi-Pro
Spring
Gear
Jaw
Key
Bracket
NOTE:
All component dimensions given in
U.S. inches. 1 inch = 25.4 mm
38
ROTARY LAWN MOWER - - MODEL NO. 917.377352
4
_\
3\
\
KEY
NO.
PART
NO.
DESCRIPTION
86334X479
750909
17411312
Battery Box
Battery
Hex Washer Head Screw
13x.750
Connector Mounting Clip
Battery Charger
86353
11154BX
39
CRAFTSMAN
4-CYCLE ENGINE
MODEL NUMBER 143.976252
130
125
45
40
_6
CRAFTSMAN
KEY
NO.
1
2
6
7
12A
12B
14
15
16
17
18
19
26
36
46
46
46
41
41
41
PART
NO.
36478A
26727
33734
36557
36558
34695
28277
30589
32651
31335
651018
36281
32600
35801
36073
36074
36075
36070
36071
36072
42
42
42
43
45
46
48
56
52
69
76
72
73
75
86
81
82
83
86
89
96
92
93
100
101
163
36076
36077
36078
20381
32875A
32610A
27241
35992
29914
35261
34311D
30572
28833
27897
36574A
36590A
30591
36588A
650488
611004
611150
650815
650816
34443A
610118
651007
110
110A
110B
119
120
125
125
34961
36953
36954
36477
36476
36471
36472
126
126
130
135
150
151
169
172
174
178
182
184
185
29314B
29315C
6621A
35395
35991
31673
27234A
32755
30200
29752
6201
26756
36544
4-CYCLE
ENGINE
MODEL NUMBER 143.976252
KEY
NO.
186
189
191
195
206
202
203
204
205
207
209
215
223
224
238
239
241
245
256
266
261
262
263A
DESCRIPTION
Cylinder (Incl. 2,7,20 & 125)
Dowel Pin
Breather Element
Breather Ass'y. (Incl. 6 & 12A)
Breather Cover & Tube (Ind. 12B)
Breather Tube Elbow
Washer
Govemor Rod (lash 14)
Govemor Lever
Governor Lever Clamp
Screw, Torx T-15, 8-32 x 19/64"
Extension Spdng
Oil Seal
Crankshaft
Piston, Pin & Ring Set (Std.)
Piston, Pin & Ring Set (.016" OS)
Piston, Pin & Ring Set (.026" OS)
Piston & Pin Ass'y. (Std.) (Incl. 43)
Piston & Pin Ass'y.
(.010" OS) (Incl. 43)
Piston & Pin Ass'y.
(.020" OS) (incl. 43)
Ring Set (Std.)
Ring Set (.010" OS)
Ring Set (.020" OS)
Piston Pin Retaining Ring
Connecting Rod Ass'y. (Incl. 46)
Connecting Rod Bolt
Valve Lifter
Camshaft (MCR)
Oil Pump Ass'y.
* Mounting Flange Gasket
Mounting Flange (Incl. 72 thru 83)
Oil Drain Plug (Incl. 73)
Drain Plug Gasket
Oil Seal
Governor Shaft
Washer
Governor Gear Ass'y. (Incl. 81)
Governor Spool
Screw, 1/4-26 x 1-1/4"
Flywheel Key
Flywheel
Belleville Washer
Flywheel Nut
Solid State Ignition
SperkPlugC
over
Screw, Torx T-15, 10-24 x 1
5/16"
GroundWire
Ground Wire
D.C. Starter Wfte
* Cylinder Head Gasket
Cylinder Head
Exhaust Valve (Std.) (Ind. 151)
Eshaust Valve
(1/32" OS) (Incl. 151)
Intake Valve (Std.) (IncL 151)
Intake Valve (1/32" OS) (Insh 151)
Screw, 5/16-18 x 1-1/2"
Resistor Sperk Plug (RJ 19LM)
Valve Spdng
Valve Spshg Cap
* Valve Cover Gasket
Valve Cover
Screw, 10-24 x 9/16"
Nut & Lock Washer, I/4-28
Screw, 1/4-28 x 7/8"
* Carburetor To Intake Pipe Gasket
Intake Pipe
41
PART
NO.
34337
650831
36559
610973
35727
36482
31342
650549
650777
34336
30266
35511
650451
34696A
650932
34338
36919
36965
36926
36915
30266
650831
DESCRIPTION
Govemor Link
Screw, I/4-20 x 1/2"
S.E. Brake Bracket (Incl. 195)
Temlinal
ControI Bracket (Incl. 202 thrd 265)
Compression Spring
Compression Spring
Screw, 5-40 x 7/16"
Screw, 6-32 x 21/32"
Throttle Link
Screw, 10-24 x 9/16"
Control Knob
Screw, 1/4-20 x 1"
* Intake Pipe Gasket
Screw, 10-32 x 49/64"
* Air Cleaner Gasket
Air Cleaner Collar
Air Cleaner Filter
Air Cleaner Cover
Blower Housing
Screw, 10-24 x 9/16"
Screw, 1/4-20 x 1/2"
CRAFTSMAN
4-CYCLE
ENGINE
MODEL NUMBER 143.976252
KEY
NO.
PART
NO.
632747
631615
2
4
5
6
7
16
25
27
28
29
3O
631767
631184
631183
632504
650506
631807
631867
631024
632019
631028
631021
31
35
36
37
631022
36045
632735
632547
4O
44
48
632736
27110
631027
KEY
NO.
PART
NO.
m
Q
1
2
3
4
5
6
7
8
8
z
42
590702
590599A
590600
590696
590601
590697
590698
590699
590700
11
590703
12
590535
13
590701
DESCRIPTION
Carburetor
(Incl. 184 of Engine Parts
List)
Throttle Shaft & Lever
Assembly
Throttle Return Spring
Dust Seal Washer
Dust Seal (Throttle)
Throttle Shutter
Shutter Screw
Fuel Filflng
Float Bowl
Float Shaft
Float
Float 6owl "O" Ring
Inlet Needle, Seat, & Clip
(Incl. 31)
Spring Clip
Primer Bulb/Retainer Ring
Main Nozzle Tube
"O" Ring, Main Nozzle
Tube
High Speed Bowl Nut
Bowl Nut Washer
Welch Plug, Atmosphenc
Vent
DESCRIPTION
Recoil Starter
Spring Pin (Incl. 4)
Washer
Retainer
Washer
Brake Spedg
Starter Dog
Dog Spring
Pulley & Rewind Spdng
Ass'y.
Starter Housing Ass'y.
(40 degree grommet)
Starter Rope ( 98" X 9/64"
dia,)
Starter Handle
CRAFTSMAN
4-CYCLE
ENGINE
MODEL NUMBER 143.976252
KEY
NO.
116
\
PART
NO.
-3
6
7
8
590739
590740
590616
590617
590618A
11
590638
12
590535
13
14
590701
590741
DESCRIPTION
Rewind Starter
Retainer
Starter Dog
Dog Spnng
Pulley & Rewind Spring
Ass'y
Starter Housing Ass'y
(40 degree grommet)
Starter Rope
(Length 98" x 9/64" din.)
Starter Handle
Locking Tab
12
DESCRIPTION
Electric Starter (12 Volt)
Retainer Ring
Spnng Retainer
Spnng
Gear
Drive End Cap Ass'y.
Lock Nut
Armature
Housing Ass'y.
Thrust Washer
Commutator End Cap
Ass'y.
(Incl. brushes)
Bolt, 10-32 x 3-3/16"
Pinion Driver
Cup Washer
Retainer Ring
Washer
Drive Nut
Washer
43
Fortherepair
orreplacement
parts
youneed
delivered
directly
toyourhome
Call7am-7pm,7days
aweek
1-800-366-PART
(1-800-366-7278)
Para ordenar piezas con entrega a
domicilio - 1-800-659-7084
For in-house major brand repair service
Call 24 hours a day, 7 days a week
1-800-4-REPAIR
(1_800473-7274)
Para pedir servicio de reparacibn a
domicilio - 1-800-676-5811
For the location of a Sears Parts and
Repair Center inyour area
Call 24 hours a day, 7 days a week
1-800-488-1222
For information on pumhasing a Sears
Maintenance Agreement or to inquire
about an existing Agreement
Call 9 am - 5 pm, Monday_Saturday
1-800-827-6655
When requesting service or ordering
parts, always provide the following
information:
• Product Type
* Part Number
• Model Number
* Part Description
160671
04.17.97 VBL
SEeARS
Printedin U.S.A.