1
Owner's Manual
IP
R
0
F
E
S
S
I
0
N
A
L J
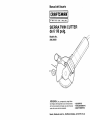
61/8-in TWIN CUTTER SAW
Model No.
286.26829
CAUTION:
Read, understand and follow
all Safety Rules and Operating Instructions
in this manual before using this product.
Sears,
Roebuck
and Co., Hoffman
Estates,
•
•
•
•
SAFETY
OPERATION
MAINTENANCE
ESPAI_IOL, PAGE25
IL 60179
U.S.A.
"--------3
RE SURE to read and understand all instructions. Failure to
follow all instructions listed below may result in electric shock, fire and/or
serious personal injury.
Warrartty .......................................................................
Page
2
Safety
Instructions
Pages
3-8
Safety
Symbols .......................................................
Page
8
Page
9
WORK AREA SAFETY
Pages
10-19
Pages
17-19
t. ALWAYS keep your work area clean and well lit. Cluttered benches and dark
areas invite accidents.
Pages
19-20
Page
21
Page
21
Description
Operation
.....................................................
...................................................................
..................................................................
Removing
and Installing
Maintenance
Troubleshooting
Accessories
Blades ...................................
.................................................................
............................................................
..................................................................
Repair Parts ..................................................................
Service Numbers ..........................................................
ONE
FULL
YEAR
PROFESSIONAL
Pages 22-23
Back Cover
WARRANTY
ON CRAFTSMAN
TWIN
CUTTER
SAW
If this product fails due to a defect in material or workmanship within one
year from the date of purchase, RETURN ITTO THE NEAREST SEARS
PARTS AND REPAIR CENTER INTHE UNITED STATES, and it will be
repaired, free of charge.
This warranty gives you specific legal rights, and you may also have other
rights which vary from stale to state.
Sears, Roebuck and Co. Dept. 817 WA, Hoffman Estates, IL 60179
SAVE THESE INSTRUCTIONS!
READ ALL INSTRUCTIONS!
WARNING:
2. DO NOT operate power tools in explosive atmospheres, such as in the
presence of flammable liquids, gases, or dust. Power tools creale sparks which
may ignite the dust or fumes.
3. ALWAYS keep bystanders, children, and visitors away while operating a
power tool. Distractions can cause you to lose control
ELECTRICAL SAFETY
1. Double insulated tools are equipped with a polarized plug (one blade is
wider than the other.) This plug will fit in a polarized outlet only one way.
If the plug does not fit fully in the outlet, reverse the plug. If it still does not
fit, contact a qualified electrician to install a polarized outlet. Do not change
the plug in atry way.
2. Double insulation []eliminates the need for the three-wire grounded power cord
and grounded power supply system, Applicable only to Class II (double insulated)
tools.
3. Before plugging in the tool, BE SURE that the outlet voltage supplied is within the
voltage marked on the tool's data plate. DO NOT use "AC only" rated tools with a
DO power supply.
4. ALWAYS avoid body contact with grounded surtaees, such as pipes,
radiators, ranges and refrigerators. There is an increased risk of electric shock
if your body is grounded.
5. If operating the power tool in damp locations is unavoidable, ALWAYS use a
Ground Fault Circuit Interrupter to supply power to your tOOl. ALWAYS wear
electrician's rubber gloves and footwear in damp conditions.
6. DO NOT expose power tools to rain or wet conditions. Water entering a power
tool will increase the risk of eleclric shock.
7. DO NOT abuse the cord. NEVER use the cord to carry the tools or pull the
plug from the outlet. Keep cord away from heat, oil, sharp edges or moving
parts. Replace damaged cords immediately. Damaged cords increase the risk
of electric shock.
8. When operating a power tool outside, ALWAYS use an outdoor extension cord
marked "W-A" or"W". These cords are rated for outdoor use and reduce the risk
of electric shock.
NOTE: The extension cord must have adequate wire size AWG (American Wire
Gauge) for safe, efficient use. Smaller gauge wires, have greater capacity (16 gauge
wire has more capacity than 18 gauge wire).
2
3
I
I
PERSONAL
SAFETY
1.ALWAYS
stayalert,watchwhatyouaredoingandusecommon
sensewhen
operating
apowertool.DONOTusetoolwhiletiredorundertheinfluence
of
drugs,alcohol,ormedication.
A moment of inattention while operating power
tools may result in serious personal injury.
2. ALWAYS dress properly. DO NOT wear loose clothing or jewelry. Pull back
long hair. Keep your hair, clothing, and gloves away from moving parts.
Loose clothes, jewelry, or long hair can be caught in moving parts.
3. ALWAYS avoid accidental starting. BE SURE switch is in the "Off" position
before plugging in. DO NOT carry tools with your finger on the switch. Carrying
tools with your finger on tire switch or plugging in tools that have the switch in the
"Orr" position invites accidents.
z_ DANGER! Keep hands away from cutting area and blades. Keep your
second hand on the auxiliary handle or motor housing. If botl_ hands are
hoIding the saw, they cannot be cat by the blades.
1. ALWAYS keep your body positioned to either side of the saw blades, but not
in line with the saw blades.
5. DO NOT overreach. ALWAYS keep proper footing and balance at all times.
Proper footing and balance enables better control of the tool in unexpected
situations.
2. DO NOT reach underneath the work. The guard cannot protect you from the
blades beneath the work.
6. ALWAYS use safety equipment. Always wear eye protection. Dust mask,
non-skid safety shoes, hardhat, or hearing protection must be used for appropriate
conditions.
3. ALWAYS check guard for proper closing BEFORE each use. DO NOT operate
the saw if the guard does not move freely and close instantly. Never clamp or
tie the blade guard in the open position. If the saw is accidentally dropped, the
guard may be bent. Raise the guard and make sure that it moves freely and does
not touch the blades or any other part.
4. ALWAYS check the operation and condition of the guard spring. If the guard
and the spring are not operating properly, they MUST be serviced before use.
The blade guard may operate sluggishly, due to damaged parts, gumrny deposits,
or a buildup of debris.
5. The guard should be retracted manually ONLY for making special cuts, such
as pocket or compound cuts, ALWAYS raise the guard by retracting the
handle. As soon as the blade enters the material, the guard MUST be
released. For all other sawing, the guard should operate automatically.
6. ALWAYS make sure that the guard is covering the blades BEFORE placing the
saw down on a work bench or floor. An unprotected moving blades will cause the
saw to walk backwards, cutting whatever is in its path. Make note of the time it takes
for the blades to stop spinning after the switch is released.
7. NEVER hold the piece being cut in your hands or across your legs. It is
important to support the work properly in order to minimize body exposure, blade
binding, or loss of control.
SAFETY
t. ALWAYS use clamps or other practical ways to secure and support the
workpiece to a stable platform. Holding the work by hand or against your body
is unstable and may lead to loss of control
2. DO NOT force the tool. Use the correct tool for your application. The correct
tool will do timejob better and safer at the rate for which it is designed.
3. DO NOT use the tool if the switch does not turn it "On" or "Off". Any tool that
cannot be controlled with the switch is dangerous and must be repaired.
4. ALWAYS disconnect the plug from the power source before making any
adjustments, changing accessories or storing the tool, Such preventive safety
measures reduce the risk of starting the tool accidentally.
5. ALWAYS store idle tools out of the reach of children and other untrained
persons. Tools are dangerous in the hands of untrained users.
6. ALWAYS maintain tools with care. Keep cutting tools sharp and clean.
Properly maintained tools with sharp cutting edges are less likely to bind and are
easier to control.
7. ALWAYS check for misalignment or binding of moving parts, breakage of
parts, and any other condition that may affect the tool's operation. If
damaged, have the tool serviced before using. Many accidents are caused by
poorly maintained tools.
I FOR
_ WARNING:
OF MAY
ACCESSORIES
ARE NOTCONDITION
RECOMMENDED
USE WITH [HISUSE
TOOL
CREATE A THAT
HAZARDOUS
8. ALWAYS use only accessories that are recommended for this tool.
Accessories that may be suitable for one tool can become hazardous when used
on another tool.
4
1. If any part of this saw is missing or should break, bend, or fail in any way; or
should any electrical component fail to perform properly: ALWAYS shut off the
power switch and remove the saw plug from tile power source and have the missing,
damaged or failed parts replaced BEFORE resuming operation.
2. Tool service must be performed only at a Sears Parts and Repair Center.
Service or maintenance performed by unqualified personnel could result in a risk of
injury.
SAFETY RULES FOR SAWS
4. ALWAYS remove adjusting keys or wrenches before turning the tool "On".
A wrench or a key that is left attached to a rotating part of the tool may result in
personal injury.
TOOL USE AND CARE
SERVICE SAFETY
I
I
8. ALWAYS hold tool by insulated gripping surfaces when performing an
operation where the cutting tool may contact hidden wiring or its own cord.
Contact with a 'live" wire will make the exposed metal parts of the tool "live" and
shock the operator,
9. DO NOT leave the saw running when carrying it in your hand.The lower blade
guard may be opened by contact with your clothing. Accidental contact with the
spinning saw blades could result in serious personal injury.
10. DO NOT use the tool if the switch does not turn "On" or "Off". Any tool that
cannot be controlled with the switch is dangerous and must be repaired.
SAFETY RULES FOR SAW cont.
1t, When _emoving the blades from the tool, ALWAYS wear protective gloves when
grasping the blades or accessory. Accessories may be hot after prolonged use.
KICKBACK..,WHAT CAUSES IT AND WAYS TO PREVENT IT
The Causes of Kickback
t. Kickback is a sudden reaction to a pinched, bound or misaligeed saw blades,
which cause the uncont_o!led saw to lift up and out of the workpiece and towards
lhe operator.
2. When tile blades are pinched or bound tightly by the kerf closing down, the blades
stall and the motor reaction drives the unit rapidly back towards the operator.
3. If the blades become twisted or misaIigned in the cut, the teeth at the back edges
of the blades can dig into the top surface of the wood. This causes the blades to
climb out of the kerf and jump back towards the operator.
4. Kickback is a result of tool misuse and/or incorrect operating procedures or
conditions. It can be avoided by taking the proper precautions, as listed below.
Ways to Prevent Kickback
f. ALWAYS maintain a firm grip with both hands on the saw and position your
body and arms to allow you to resist KICKBACK forces, KICKBACK forces can
be controlled by the operator, if the proper precautions are taken.
2. If the blades are binding, or when you are interrupting a cut for any reason,
ALWAYS turn off the saw and hold the saw motionless in the material until
the blades come to a complete stop. NEVER attempt to remove the saw from
the work or pull the saw backward while the blades are in motion or
KICKBACK may occur. ALWAYS check and be ready to take corrective action to
eliminate tile cause of blade binding.
3. When restarting the saw in the workpiece, ALWAYS center the blades in the
kerr end check to be sure that the saw teeth are not engaged into the
material. If the saw blades are binding, they may walk up or KICKBACK from the
workpiece when the saw is restarted.
4. ALWAYS support large panels to minimize the risk of blades pinching and
KICKBACK. Large panels tend to sag under their own weight. Supports MUST be
placed under tile paoeI on both sides, near the line of cut and near the edge of the
panel.
5. #O NOT use a dull or damaged blades. Unsharpened or improperly set blades
produce narrow kerf which causes excessive friction, blade binding and
KICKBACK.
6. ALWAYS use extra caution when making a "Pocket Cut" into existing walls or
other blind areas. The protruding blades may cut objects that can cause
KICKBACK.
7. ALWAYS have the saw blades at full speed before contacting workpiece
8. ALWAYS keep your body positioned to either side of the saw blades, but not in line
with ti_e saw blades. KICKBACK could cause the saw to jump backwards towards
the operator. KICKBACK forces can be controlled by the operator, if proper
precautions are taken
ALWAYS hold tool by insulated gripping surfaces when performing an
operation where the cutting tool may contact hidden wiring or its own cord.
Contact with a "live" wire will make the exposed metal parts of the tool "live" and
sbock the operator.
6
ADDITIONAL
RULES FOR SAFE OPERATION
follow all instructions listed below may result in electric shock, fire and/or serious
BE SURE to read and understand all instructions. Failure to
personal injury.
I Z_ WARNING:
I
I
1. Know your power tool. Read operator's manual carefully. Learn the
applications and limitations, as well as the specific potential hazards related
to this tool. Following this rule wil! reduce the risk of electric shock, fire or serious
injury.
2. ALWAYS wear safety glasses or eye shields when using this saw. Everyday
eyeglasses have only impact-resistant lenses; they are NOT safety glasses.
Following this rule will reduce the risk of serious personal injury.
3. ALWAYS protect your lungs. Wear a face mask or dust mask if the operation
is dusty. Following this rule will reduce the risk of serious personaI injury
4. ALWAYS protect your hearing.Wear hearing protection during extended
periods of operation. Following this rule will reduce the risk of serious personal
injury.
5. ALWAYS inspect the tool cords periodically and if damaged have them
repaired at your nearest Sears Service Center or other Authorized Service
Facility. ALWAYS be aware of the cord location. Following this rule will reduce
the risk of electric shock or fire.
6. ALWAYS check for damaged parts. Before further use of the tool, a guard or
other part that is damaged should be carefully checked to determine if it will
operate properly and perform its intended function. Check for misalignment
or binding of moving parts, breakage of parts, and any other condition that
may affect the tool's operation. A guard or other part that is damaged, should
be properly repaired or replaced at a Sears Service Center. Following this rule
will v_duce the risk of electric shock, fire or serious injury.
7. DO NOT abuse the cord. NEVER use the cord to carry the tool or pull the
plug from the outlet. Keep cord away from heat, oil, sharp edges or moving
parts. Replace damaged cords immediately. Damaged cords increase the risk
of electric shock. Following this rule wil! reduce the risk of electric shock or fire.
8. ALWAYS make sure that your extension cord is in good condition. When
using an extension cord be sure to use one that is heavy enough to carry the
current that your tool will draw. A wire gauge size (A.W.G.) of at least 16 is
recommended for an extension 100 feet or less in length. Using an extension
cord that is over 100 feet inlength is not recommended. If in doubt, use the
next heavier gauge. Smaller gauge wires, have greater capacity (16 gauge
wire has more capacity than 18 gauge wire). An undersized cord will cause a
drop in line voltage, resulting in loss of power and overheating.
9. DO NOT use the tool while tired or under the influence of drugs, alcohol or
any medication. Following this rule will reduce the risk ofelectdc shock, fire or
serious personal injury.
t0.SAVETHESE
INSTRUCTIONS. Refer to them frequently and use them to
instruct others who may use this tool. If someone borrows this tool, make
sure they have these instructions
also.
ADDITIONAL
RULES
FORSAFEOPERATION
cont.
Z_ WARNING:
Some dust particles created by power sanding, sawing,
grinding, drilling and other construction jobs contains chemicals known
to cause cancer, birth defects or other reproductive harm. Some examples
of these chemicals are:
• Lead from lead-based paints,
• Crystalline silica from bricks and cement and other masonry products.
• Arsenic and chromium from chemically-treated lumber.
Your risk from these exposures varies, depending upon how often you do this
type of work. To reduce your exposure to these chemicals:
• Work in a well-ventilated area.
• Work with approved safety equipment, such as those dust masks that are
specially designed to filter oul microscopic particles.
Before attempting to use any tool, be sure to familiarize with all the operating
features and safety instructions.
Z_ WARNING:
DO NOT let familiarity with your saw make you careless.
Remember that a careless fraction of a second is sufficient to cause severe injury.
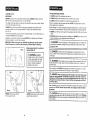
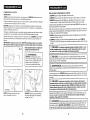
KNOWYOUR SAW (SEE Fig. 1)
Your Twin Cutter saw has many built-in convenience features for fast, efficienl cutting.
These features include a innovative 2-blade system with special blades that spin in
opposite directions to provide smooth, clean cuts. It also includes a prednstalled
blade lubricating system for use when cutting aluminum, copper, stainless steel and
cast iron. Tlle auxiliary handle mounts on the top of the saw to provide maximum
support and ease of handling.
For your convenience, there is no assembly required for your Twin Cutter Saw. The
]ecial 2-blade cutting system and the wax lubricating system are already installed.
Assist Handle _.
Z_ WARNING:
The operation of any saw can result in
foreign objects being thrown into your eyes, which can result in
severe eye damage, Before beginning power tool operation,
ALWAYS wear safety goggles or safety glasses with side shield
and a full face shield when needed. We recommend A Wide
Vision Safety Mask for use over eyeglasses or standard safety
glasses with side shield, available at Sears Retail Stores.
Lower Blade
Guard Handle
Wax
Stick
Lock Nut
Wrench _
The label on your tool may include the
V....................................................................
A ......................................................................
Hz ...................................................................
W .....................................................................
min.................................................................
"_.....................................................................
-- ...............................................................
no ...................................................................
[q ..................................................................
.../min ..............................................................
....................................................................
following symbols.
Vo_ts
Amperes
Hertz
Watts
Minutes
Alternating current
Direct calTent
No-load speed
Class II construction
Revolutions or Strokes per minute
Indicates danger, warning or caution.
It means attention! Your safety is involved.
IMPORTANT! READ ALL INSTRUCTIONS
Wax Lubricating
System Knob
.....
,
Blades
Lower Blade Guard
UNPACKING
Your Twin Cutter Saw has been shipped completely assernbled. Inspect the saw
carefully to make sure that no breakage or damage has occurred during shipping.
If any parts are damaged or missing return the saw to your nearest Sears Store to
have it replaced.
Z_ WARNING:
If any parts are missing, DO NOT operate tbis saw until the
missing parts are replaced. Failure to do So coud result in possible serious
personal injury
8
9
I
I
I
SAWBLADES
KICKBACK
Even the best saw blades will not cut efficiently if they are not kept clean, sharp and
properly set. Using dull blades will place a heavy load on your saw and increase the
danger of kickback. Keep extra blades on hand, so sharp blades are always available.
Gum and wood pitch hardened on your blades will slow your saw down. Use gum
and pitch remover, hot water or kerosene to remove these accumulations.
DO NOT use gasoline.
z_ WARNING:
This Twin Cutter saw uses specially designed 61/sqn. blades
I
and no other types or sizes of blades should ever be used_ Other types and sizes of
blades will not operate safely in this saw and cou d result in serious persona n ury.
To order extra blades or to replace the blades that came with the saw, see page 21
of this manual for ordering instructions. To install new blades onto to your saw see
the special instructions on pages 17 to 19 of this manual for proper removal and
installation of blades.
BLADE GUARD SYSTEM
The lower blade guard, attached to your saw, is there for your protection and
safety. It should NEVER be altered for any reason. If it becomes damaged or
begins to return slowly or sluggishly. DO NOT operate your saw until the
problem has been corrected or the damaged part has been replaced. ALWAYS
leave the guard in its correct operating position when using the saw.
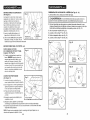
Z_ DANGER: When sawing through a
workpiece, the lower blade guard does aot
cover the blade on the underside of the
workpiece. Since the blade is exposed on the
underside of the workpiece, ALWAYS keep
your hands and fingers away from the cutting
area (see Fig. 2). Any part of your body
coming in contact with the moving blade will
result in serious injury.
\ Fig. 2
I ower Blade Guard is in UP position when
making a cut. Blades are exposed on underside
of workpiece
Z_ WARNING:
NEVER use the saw when the guard is not operating properly.
The guard should be checked for correct operation before each use. If you drop your
saw, check the lower blade guard for damage before using.
NOTE: The guard is operating properly when it moves freely and then readily
returns to the closed position. If, for any reason, your lower blade guard does not
close freely, take it to your nearest Sears Repair Center for service before using it.
Kickback occurs when the blades stall rapidly and the saw is driven back towards
you. Blade stalling is caused by any action which pinches the blade in the material
being cut.
IMPORTANT: The best guard against kickback is to avoid dangerous practices.
z_ DANGER:
ALWAYS turn OFF power to saw immediately if the blades bind
or the saw stalls. Kickback could cause you to lose control of the saw. Loss of
control can ead to serious
njury.
ALWAYS provide proper support for the workpiece and hold the saw with
both hands
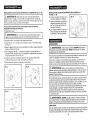
Kickback is Caused By:
1. Twisting the blades while making a cut.
2. Making a cut with a dull, gummed up, or
improperly set blades.
3. Not providing proper support for workpiece.
ALWAYS provide proper support as shown
in Fig. 3.
4. Forcing a cut.
5. Cutting warped or wet lumber.
6 Tool misuse or incorrect operating procedures.
7. Contacting the werkpiece with blades at less
than full speed.
To Lessen the Chance of Kickback
1. ALWAYS approach the workpiece with
the saw at an angle of approximately
30 ° to the workpiece. (see Fig, 4,)
2. ALWAYS make straight cuts,
This will help prevent twisting the
blade in the cut.
3. ALWAYS use clean, sharp and
properly set blades. NEVER make
cuts with dull blades.
4. ALWAYS properly support the
workpiece before beginning a cut. This will help you avoid pinching the blades
(see Fig. 3),
5. ALWAYS use steady, even pressure when making a cut. NEVER force the cut.
6. DO NOT cat wet or warped lumber.
7. ALWAYS hold the saw firmly with both hands and keep your body in a balanced
position. ALWAYS keep your body positioned to either side of the saw blades, but
not in line with the saw blades.This will help you resist the forces of kickback,
should it occur.
IMPORTANT: When using your saw, ALWAYS stay alert and exercise control,
DO NOT remove your saw from the workpiece, while the blade is moving,
10
11
J
I
STARTING
A CUT
TO HELP MAINTAIN CONTROL
IMPORTANT:
1. ALWAYS support the workpiece near the cut.
BEFORE using the Twin Cutter Saw for the first time, ALWAYS familiarize yourself
wilh the saw by making practice cuts in scrap materials.
The weight of this saw helps to make time cuts smoother. Learn how to safely handle
and contro! the weight of tile saw.
ALWAYS be sure tllat you position the blades perpendicular to the plane of the
workpiece. Make the cut at an approximate 30 ° angle to the workpiece surface.
(See Fig 5).
2. ALWAYS support the workplece so the cut will be on your right.
3. ALWAYS clamp the workpiece so it will not move during the cut.
Place ti)e workpieee with the good aide down. NOTE: The good side is the side
where appearance is important.
Practice the proper feed speed rate for the materials being cut. The blades spin at a
consistent 4600 RPM (no-lead speed).
Engage timeon/off switch to start the saw. ALWAYS let the bIades reach full speed
before you begin the cut into the workpiece.
IMPORTANT: When using your saw, ALWAYS stay alert and exercise control.
DO NOT remove your saw from the workpiece, while the blade is moving.
Blades perpendicular
Approximately 30 _
Z_ WARNING:
Before starting a cut, draw a guideline along the desired line of cut. Then place the
front edge of the saw blades on the part of the werkpiece that is solidly supported.
4. NEVER place the saw on the part of the workpiece that wil! fail off when ti_e cut is
made.
5. ALWAYS keep the cord away from the cutting area. ALWAYS place the cord so it
does not hang up on the workpiece when making a cut.
Z_ DANGER:
If the cord hangs up on the workpiece during a cut, release the q
on!off switch immediately. Unplug the saw and move the cord to prevent it from
hanging up again,
1
to workpiece
Z_ DANGER:
ALWAYS
maintain proper control of the saw
to make sawing safer and easier.
Loss of control of the saw could
cause an accident resulting in
possible serious injury.
Using the saw with a damaged cord could result in serious
injury or death. If the cord has been damaged, have it replaced before using the
saw again.
/!X WARNING:
If the blades come in contact with the workpiece before they
reach full speed, it could cause the saw to kickback towards you, resulting in
serious injury.
When making a cut, ALWAYS use steady, even pressure. Forcing the saw causes
rough cuts and could shorten the life of the saw or cause kickback.
Fig. 6
Fig. 7
Z_ DANGER: When sawing
does not cover the blades.The
workpiece. ALWAYS keep your
Any part of your body coming
m sermus Injury.
Wrong
Correct
NEVER hold the saw witil just
one hand (see Fig. 6).
ALWAYS hold saw by motor body and
assist handle (see Fig. 7).
12
through the workpiece, the lower
blades are exposed on the under
hands and fingers away from the
in contact with the moving blades
blade guard
side of the
euttirlg area.
will result
After completing your cut, release the on/off switch and allow the blades to come to a
complete stop. DO NOT remove the saw from the workpiece while the blades
are moving.
exposed on the under side of the saw until lhe lower blade guard closes. ALWAYS
SURE that the
lower blade
guard
closed
setting thethe
saw
downare
on
! MAKE
z'.'/_
Whenever
you lift
yourissaw
frombefore
the workpiece,
blades
work CAUTION:
surface.
13
I
CUTTING INSTRUCTIONS
NOTE: The life span of ihe blades on your Twin Cutter saw and the quality of the
cutting edges is dependent on keeping vibrations to a minimum.
ALWAYS securely clamp the workpiece
BEFORE beginning a cut. Then feed the
blade through the material at an angle
of approximately 30 ° (see Fig. 8).
This saw produces hot chips, not
sparks, when cutting metal.
It is recommended that you wear a
face shield over safety glasses to
protect your face.
Fig. 8
CUTTING INSTRUCTIONS cont.
CUTTING ALL MATERIALS
1, ALWAYS have the saw blades at full speed before contacting werkpiece.
2. ALWAYS hold the saw so the blades feed perpendicularly into the workpiece. Hold
the saw at an approximate 30" angle.
3. ALWAYS keep your body positioned to either side of the saw blades, but not in line
with the saw blades.
4. Feed the blades into the workpiece until the desired cut is made.
5. The kerf (width of the cut) of the twin blades is approximately 1/8th of air inch.
Always be sure to allow for this kerf width.
30°
FEED SPEED
Feed speed is how quickly you push the saw blades through the material being cut.
I he correct teed speed is totally determined by the hardness and the thickness of
the material being cut.
IMPORTANT: Feeding must ALWAYS be done with the blades perpendicular to the
plane of the workpiece (See Fig. A). Feeding at an angle can burn the blade and
damage the blade teeth (See Fig. B).
Selecting the correct feed speed is important.
If the feed speed is too slow:
1. The Mades will only press down on the material rather than cutting it.
2. The blade edges glide and wear down the material,
3, A poor cut will result and cause excessive wear on the blades
This Twin Cutter Saw with it's special blades and cutting action is a highly
versatile tool that quickly and efficiently provides smooth, efficient cuts a wide
variety of materials:
IT
Flat Iron Bar
Corner
Piece
Rectangular
Pipe
U-Section
If the feed speed is too fast:
1, There is a definite risk that the cut might split and the splintered opening of the cut
will net be sufficient to divert the wood shavings.
2. A poor cut will result with a significant discharge of wood shavings on the lower
side of the cut.
Thin Plate
Shaped Plate
pipes
Cutting other materials may require even more special handling. These include
cutting aluminum, copper, stainless steel and cast iron or shaped plates
Cutting Aluminum, Copper, Stainless
Steel and Cast Iron up to 1/8-in. thick.
(See Fig. 9).
1. ALWAYS use the wax lubricating device
(included) when cutting these materials
because they have a tendency to soften
and adhere to the blades.
Wax Lubricating
Stick
Correct
14
15
LUBRICAT|NG
INSTRUCTIONS
REMOVING BLADES FROM SAW (See Figs. 12 - 16)
(See Figure C)
rhe hlades of your Twin Cutter saw are
equipped with _dry cut teeth that under
normal cutting conditions do not need to
be lubricated. I towever, in extreme cutting
conditions, such as when you are sawing
into aluminum, copper, stainless steel and
cast iron, the wax lubricating device should
be used
1. Unplug the saw and allow blades to cool.
l causing
z:_ WARNING:
Failurepersonal
to unplug
the saw could result in accidental starting
possible serious
injury,
1. Insert wax lubricating stick into wax
lubricating device.
2. Tern feeder wheel to apply lubricant to
blade, A 1/4 tun1 should provide adequate lubrication.
CUTTING INSTRUCTIONS
8tick
2. Rotate the blades until the holes in both blades are aligned.Then place pie
attached to the wrench through holes in blades. Unscrew Lock Nut
counterclockwise and remove (see Fig. 12).
3. Open the retractable guard (see Fig. 13).
4. Lift up and remove Blade "B" (see Fig. 14).
5. Remove the arbor adapter (see Fig. 15).
6. Lift up and remove Blade "A" (see Fig. 16).
Fig. 13
cont.
Cutting Shaped Platea
up to t/8-in, thick (See Fig. tO)
1. When cntling shaped metal plate
ALWAYS support tile plate evenly on
bolh sides and in the middle with
support blocks. ]his will keep it from
flexing when cutting. This should be
done, whether you're using a clamping
table, or using adjustable clamps on a
flat wo*k table
l
Fig. t0
Blade Guard
Retracted
Fig, 15
PLUNGE CUTTING (See Figure 11)
1. Raise the retractable guard into the
open position with your left hand.
2, Use the thumb of your left hand to hold
the guard in tile open position while
gripping ft_e saw's assist handle.
3. Turn on the saw and plunge the blades
into the matedal to be cut.
4. Push the saw forward to complete
the cut.
5. rum oft saw, allow blades to stop
completely, then remove saw from
workpiece.
6. Clean out the corners of the cut with a hand saw or sabre saw, depending
Adapter
Fig. 16
on project.
NOTE: When cutting roofing materials, blades must be kept clean with a tar and pitch
blade cleaning solvent
16
17
ATTACHING REPLACEMENT
BLADESTOTHE
SAW (See Figs. 17 - 20)
Z_ WARNING:
This f_virr Cutter saw uses specially designed 61/s-in. blades
and no ether types or sizes of blades should ever be used. Other types and sizes
of blades will not operate safely in this saw and could result in serious personal
injury
See the accessories section of this manual for the proper replacement blades
that are needed for this saw.
1. Unplug lhe saw,
ATTACHING REPLACEMENT BLADESTOTHE SAW cont. (See Figs. 17 - 20)
8. Place the pin (included with the
wrench) into the lined up holes.
Fig. 20
9. Tighten the lock nut clockwise with
the wrench and then remove the pin
from the blades (see Fig. 20). This will
allow the blades to turn freely.
10. Carefully turn blades with your hand
to be sure they easily turn in
opposite directions.
Pin
Lock Nut I
WARNING:
Failure to unplug the saw could result in accidental starting
causing possible serious personal injury.
2, t.ay the saw down with the blade arbor pointing upward,
3. Place blade "A" onto the blade flange with the "PCclearly visible (see Fig, 17).
4, Align the holes on the blade with the pins on the flange and securely fit the blade
on the flange (see Fig. t 8).
5, Take tile arbor' adapter "1" and push it down onto the flange with the "1" clearly
visible. Make sure that lbe adapter is properly seated over the flat sides of the
flange.(see Fig. 18).
6. Place blade "B" onto the adapter with the "B" easily visible, then thread lock nut
onto shaft, DO NOT tighten, (see Fig. 19).
7. Turn the blades so that the holes in both blades are lined up.
Fig. 18
Fig. 17
I ,/_
power
WARNING:
source BEFORE
To avoid
cleaning
accidents,
or performing
ALWAYSany
disconnect
maintenance.
the tool from the
All parts represent an important part of the double insulation system and sllould be
serviced only at a Sears Service Center.
Avoid using solvents when cleaning plastic parts. Most pfastics are susceptible to
damage from various types of commercial solvents and may be damaged by their use.
Use clean cloths to remove dirt, carbon dust, etc.
products, penetrating oils, etc. to come in contact with plastic parts. They contain
/'N WARNING; DO NOT at any time let brake fluids, gasoline, petroleum-based
chemicals that can damage, weaken or destroy plastic.
A
\
GENERAL
It is a known fact that electric tools are subject to accelerated wear and possible
premature failure when they are used to work on fiber glass boats and sports cars,
wallboard, speckling compounds or plaster. The chips and grindings from these
materials are highly abrasive to electrical tool parts, such as bearings, brushes,
commutators, etc. Consequently, it is not recommended that this tool be used for
extended work on any fiber glass matedal, wallboard, spackling compound, or plaster.
During any use on these materials, it is extremely important that the tool is cleaned
frequently by blowing with an air jet.
\
Flange
Fig. 19
or face shield when b_owing dust from tool when cleaning it. If operation is dusty, also
ALWAYS wear safety goggles or safety glasses with side shields
I Z_ WARNING:
wear a dust mask.
LUBRICATION
Lock
All of the bearings in this tool are lubricatedwith a sufficient amount of high-grade
lubricant for the life of the tool under normal operating conditions. Therefore, no
further lubrication is required.
NUl
18
19
DOUBLE
INSULATION
Double insulation is a concept in safety in electric power tools, which eliminates the
need for lhe standard 3 wire grounded power cord. All exposed metal parts are
isolated from the internal motor components with ptotectve insulation. Double
insulated tools do not need to be grounded.
IMPORTANT
The servicing of a tool with double insulation requires extreme care and knowledge
of the system and shoutd be perton'ned only by a qualified service technician. For
service, we recommend that you return the tool to your nearest Sears Service Center
for repair. ALWAYS use original factory replacemerit parts when servicing.
EXTENSION CORDS
The use of any extension cord will cause some loss of power: To keep the loss at a
minimum and to prevent overheating, use an extension cord that is heavy enough to
carry the current that the tool will draw.
A wire gauge (AWG) of at least 16 is recommended for an extension cord 100 feet or
less in length. When working outdoors ALWAYS use an extension cord that is
suitable for outdoor use. The cord's jacket will be marked WA.
PROBLEM
CAUSE
SOLUTION
An unusually
large amount
of sparks
1. Damaged teeth
2. Feed speed is too slow
3. Blunt teeth
1. Replace blades
2. Increase feed speed
3. Replace blades
A lot of wear
in sections
1.
2.
3,
4,
1
2.
3.
4.
Blades are
breaking
1. Damaged teeth
2. Feed speed is too fast
3. Blunt teeth
4. Blades have buckled
5. Blades have burned out
Possible causes
of broken teeth
I
I_ the cord
CAUTION:
so it will not
Keep
get extension
caught on cords
lunqber,
away
tools,
from
etc.the
during
cutting
thearea,
cutting
andoperation
position
I
I
it immediately. NEVER use a tool with a damaged cord because touching the
I z_
DANGER:
Check
extension
before
each in
use.
If damaged,
damaged
area could
cause
electricalcords
shock,
resulting
serious
injury. replace
Feed speed is too fast
Damaged teeth
Blunt teeth
Not cutting perpendicular
to work surface
1. Feed speed is too fast
2. The surface being
cut is too hard
3. The teeth have been
damaged by impact
4. Blades were not
installed properly
5. Blades are burned eat
6. Not cutting perpendicular
to work surface
I
Reduce feed speed
Replace blades
Replace blades
Hold saw perpendicular
to work surface
1.Replace blades
2.
3.
4,
5,
Reduce
Replace
Replace
Replace
feed speed
blades
Mades
blades
1, Reduce feed speed
2, Replace btades
3. Replace blades
4. Replace blades and follow
the proper blade instalratfon
instructions
5. Replace blades
6, Replace blades and aFways
hotd saw perpendicular to
work sudace when cutting
Extension cords that are suitable for use with your saw are available at your nearest
Sears Store.
CLR TypF.
( _lv_rlize_d
Hollow
Pipe
MAX, 8_ZE
tCROSS _ECTION !
MATEnlAL
MS
Sh_t
Mets!
118"
]ron
AVERAGE
BLADEUFE
_3
AILrmi_l/im
MS
AVERAGE
TIME OR FEED
380 cuts
20 Sec
(_
Square charmel[_
Channel
MAX
THICKNESS
I 1/2"
1/8"
_40ct_ls
30 Sec
1 1/2"
1/8"
8000 cuts
5See
1
I/_}
120c_1s
30 Sec
70 Feet
43 _ac_Vrllln
1/_
r
MS
r
1/8"
//8"
112 Feet
102 If]ell/rain
Stud
Wood (Pine)
AIurnhllim
2"X4"
I t/2"
10000 culs
11 Sec
Pipe
Ptastio/PVC)
I 1/2'
3/16_
12000 culs
6 Sec
Ps. Aver age blade life indicates [esulls of pedurmaflce Jest in particulal type of test malerla] as pel the above table However the
result9 m_y var_ if tile r{art/e [_lscle _ ii_ed oil oombinal[ort of 1Isled rlalerials.
20
and no ether types of blades should ever be used. Other blades will net operate
Z_WARNING:
This Twin Cutter saw uses specially designed 6 %-in, blades
safely in this saw and could result in serious personal injury.
The following accessories for your Twin Cutter saw are available at your local
Sears store.
9-26677 -9 26678 --
A packaged set of 2 UniversalTwin Cutter Saw Blades
6 Packaged Wax Lubricating Sticks
Z_ WARNING:
The use of attachments or accessories that are not
recommended might be dangerous,
21
I
]
/
/"
/
/
/
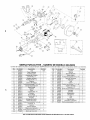
TWIN-CUTTER
SAW - MODEL NUMBER 286.26829
The ModelNumber wilIbe foundon the Nameplate,Always mention the Model Number in all correspondence regarding your tool.
Item No. Parts NO.
!
PWO01
Part Description
Blade
I
Qty.
1 Set
Guard Plate
Active Guard
!
1
1
I
2
3
PW002
PW003
4
PW004
Guard Washer
I
1
5
6
7
8
9
PW005
PW006
PW007
PW008
PW009
Screw M4 x 14
Rubber Pin
Screw SA M4 x 12
Guard
Guard Cork
I
1
1
1
1
1
10
11
12
13
14
PW010
PW011
PW012
PW013
PW014
15
16
PW015
PW016
I
Bearin_ 6000 W
Armature
1
1
18
19
20
21
PW018
PW019
PW020
PW021
_
i
!
J,
Rubber Ring
Bearing 607 VV
Lable
Cord Armor
1
1
1
1
22
-PW022
I
Cord Platen
1
23
24
25
26
27
PW023
PW024
PW025
PW026
PW027
i
I
I
Tapping Screw ST 4.2 x 12
Lead IV
Spring
Spring Washer
Switch lever
1
2
1
1
I
28
29
PW028
L PW029
Tappin 9 Screw ST 4,2 x 20
Switch Button
2
!
]
I
I
_
i
I
L
I
I
I
i
Tapping Screw ST 4,2 x 35
Gear Box SA
Side Handle
Cover
Pinion
_
4
1
1
1
1
item No. Parts No.
30
PW030
31
PW031
33
PWOS3
34
PWO34
35
PW035
36
PWO36
38
RW038
40
PW040
41
PW041
42
PW042
43
PW043
47
PW047
48
PW048
49
PW049
50
PW05O
51
PW051
52
PW052
53
PW053
54
PW054
55
PW055
56
PW056
57
PW057
SEE BACK PAGE FOR PARTS ORDERING
I
I
Part Description
Cover
i
[
[
Spring
Small Lable
Back Cover
Ii
Tapping Screw ST 4.2 x 16
Name Plate
Switch
City.
1
1
1
1
2
1
1
1
1
2
1
1
4
4
2
Housing
Stator
Tapping Screw ST 4.2 x 65
Cord and Plug
Lead VII
Tapping Screw ST 2.2 x 8.5
Washer
Brush
Brush Holder
2
Outer Clip
Clip
Wrench
Wax Tube
I
I
Lubrication Unit
Tapping Screw ST 4,8 x 10
INSTRUCTIONS
1
1
1
1
I
t
Manual del Usuario
iPR
0
FES
S I
0
HAL
i
SIERRA TWIN CUTTER
de 6 118 pulg
Modelo No.
286.26829
ATENCION:
Lea, comprenda y siga todas
las Reglas de Seguridad y las lnstrucciones
de Funcionamiento incluidas en este manual
antes de usar esta herramienta.
Sears,
Roebuck
and Co,
Hoffman
Estates,
• SEGURIDAD
• FUNCIONAMIENTO
• MANTENIMIENTO
IL 60179
USA
Garantia
......................................................................
lnstrucciones
Simbolos
de Seguridad
de Seguridad
Descripci6n
.................................................................
Funcionamiento
Desmontaje
Accesorios
Repuestos
NOmeros
..........................................................
e Instalaci6n
Mantenimiento
Localizaci6n
........................................
...............................................
de las Hojas .......................
.............................................................
y Sotuci6n
de Aver/as .............................
..................................................................
...................................................................
de Servicio. ..................................................
PagJna
26
Paginas
27-32
PAgina
32
instrucciones,El incumplimientode todas las instruccioaesindicadasa continuaci6n
I puede
_ ADVERTENClA:
comprendertodaslas
]
ocasioaar un choque ASEGURESEdeleery
el_ctdco,incendioy/o fesi6n
personalgrave.
Pagina
33
SEGURIDAD EN EL LUGAR DETRABAJO
P&ginas
34-43
P_gJnas 41-43
Peg|has
43-44
Pdgina
45
Pagina
45
Paginas
46-47
Contraportada
UN AI_IO COMPLETO
DE GARANTIA
PARA LA SIERRA
TWIN CUTTER
PROFESIONAL
CRAFTSMAN
Si esta sierra falla debido a un defecto de material o de fabricaci6n dentro
de un argo de la fecha de compra, DEVUELVALA AL CENTRO DE
REPUESTOSY
REPARACION SEARS MAS CERCANO EN LOS
ESTADOS UNIDOS y ser_ reparada gratuitamente.
Esta garantia le otorga derechos legales especificos y usted adem_.s puede
_er_er otros derechos que vat|an de un estado a otto.
Sears, Roebuck and Co., Dept. 817 WA, Hoffman Estates, IL 60179
|CONSERVE ESTAS INSTRUCCIONES!
iLEA TODAS LAS INSTRUCCIONES!
26
1. S|EMPRE mantenga el lugar de trabajo limpio y bien iluminado. Los bancos de
trabajo desordenados y real iluminados favorecen los accidentes.
2. NO utillce las herramientas eleetrfcas en una atmbsfera explosive, tal come en
presencia de liquidos inflamables, gases o polvo. Las herramientas electricas
crean chispas que pueden inflamar e! polvo o los vapores.
3. SIEMPRE mantenge a los espectadores, nlfios y visitaetes a una distancla
prudente cuando est_ utilizando una herramienta ek_ctrics. Las distracciones
pueden hacerIe perder el control.
SEGURIDAD ELECTRICA
1. Las herramientas con aislamiento doble estdn equipadas con un enchufe
polarfzado (una hoJa de contacto es rods ancha que la otra.) Este enchufe
puede colocarse en un tomacorriente polarizado en una sole direccion. Si el
enchufe no catza bien en el tomacorrlente, invierta el enchufe. Si todavia no
calza, pbngase en contaeto con un electricista ealificado pars que instals un
tomacorriente polarizado. NO modifique el enchufe de ninguna manera.
2. El_de aislamiento doble elimina la necesidad del cord6n electrico trifilar puesto a
tierra y del siatema de alimentaci6n de energia puesto a tierra. Aplicable solamente
alas herramientas de la Clase II {con aislamiento doble).
3. Antes de enchufar la herramienta, ASEGURESE de que el voltaje del tomacorriente
esle dentro de] voltaje marcado en la placa de datos de la herramienta. NO use
herramientas clasifieadas "CA solamente" con una fuente de energia CC,
4. SIEMPRE evite contacto del cuerpo con las superficies puestas a tierra tales
como tubertas, radladores, estufas y refrfgeradores. E×iste mayor riesgo de
sufrir choque et6ctrieo si su cuerpo esta a tierra.
5. Si es inevitable el uso de la herramienta en lugares hdmedos, SIEMPRE use
un interruptor de p6rdida a tierra que le suministre energia a su herramienta.
SIEMPRE use guantes y cslzado de goma de electdcista cuando trabaje en
ambientes ht_medos.
6. No exponga las herramientas el_ctricas a ta Iluvia ni a ambientes humedos.
Cuando entra agua a una herramienta el_ctrica, se aumenta el riesgo de sufrir un
choque el_ctrico.
7. NO abuse def cord6n el_ctrico, NUNCA use el corddn para transportar las
herramlentas ni tire del cord6n pare desenchufarlas. Mantenga el cord6n
ale|ado de| calor, de! aceJte, bordes af|lados o piezas mbviles. Reemplace
inmediatamente los cordones que est_n daSados. Los cordones daSados
aumentan e! riesgo de sufrir un choque electrico.
8. Cuando utilice una herramienta el#ctrica al aire libre, SIEMPRE use un eorddn de
extensi6n marcado "W-A" o "W". Estos cordones est&n aprobados para use al aire
Iibre y'reducen el desgo de choque el_,ctrico.
NOTA: El cord6n de extensi6n debe ser de calibre adecuado (AWG -American Wire
Gauge) para use eficiente y seguro. Los alambres de calibre m_s pequeflo tienen
mayor capacidad (alambre de calibre 16 tiene m&s capacidad que el alambre de t 8).
27
SEGURIDAD
SEGURIDAD
PERSONAL
1. SIEMPRE mant_ngase
alerts, observe Io que est_ haciendo y use sentido com0n
cuando est_ usando una herramtenta. NO use la herramienta cuando este
cansado o bajo le influencie de drogas, alcohol o medicamentos.
Un momento de
distracci6n cuando esta trabajando con las herramienlas el6ctricas, puede ocasionar
uoa lesion personal grave.
2. SIEMPRE vistase adecuadamente,
NO use ropes sueltas o Ioyas. Arose et cabello
largo, Mantenga st= eabelto, ropes y geantes alejados de las piezas moviles. Las
ropes sueltas, las Ioyas o el cabel!o largo pueden quedar atrapados enlas piezas
m6viles.
3. SIEMPRE evite la puesta en marcha accidental.
ASEGURESE
de que el Interrupter
est_ en la posici6n "Off" (apagado) antes de enchufar
la herramienta, NO
transporte las herramientas con su dedo en el interrupter. Se puede producir un
accidente si transporta la herramienta con so dedo en el interrupter o si eochufa la
herramienta cuando el interrupter est_ en ]a posicion "On" (encendido).
4. StEMPRE saqoe las tiaves de ainste o Ilaves inglesas antes de porter
la herramlenta.
Si se deja una Itave ing!esa ouna Ilave de ajuste en tins
de Ia herramieota, se puede producir ana lesion personal
5. NO use la herramienta a una dislancia demasiado ale|aria. Mantenga
un buen equilibrio y una poelei6n firme. Et bueo equilibrio y la posicion
perrniten on meter control de la herramienta en situaciones imprevistas.
6. SIEMPRE use equipo de seguridad. Use siempre lentes protectores.
m_scaras contra el polvo, zapatos de seguridad antirresbaladizos,
casco
o protecci6n auditiva de acuerdo con las circunstancies.
USO Y CUIDADO
DE LAS HERRAMIENTAS
en marcha
pieza m6vil
SIEMPRE
firme
Se debe user
de seguridad
DE SEGURIDAD
t, SIEMPRE use mordazas u otro metodo pr_ctico pare asegurar y apoyar la pieza
de trabajo enuna platatorma
eatable. Si so|eta el trabajo con la mane o centre su
cuerpo queda inestable y puede conducir ala p_rdida de control.
2. NO fuerce la herramienta.
Use la herramlenta
aproplada pare el trabajo. La
herramienla correcla hera el trabajo roe|or y de manors m&s segura, a Ia velocidad
pare la cual rue disef_ada.
3. NO use la herramlenta si el Interrupter
no funciona debidamente,
Es peligroso sile
h_rremi_nt_ no puede set coetrolada con e! ioterroptor y per }o tanto debe set reparada.
4. SIEMPRE desenchufe la herramlenta antes de hacer algt_n ajuste, eamblar
accesorios
o guardarla. Estas roedidas preventives de seguridad reducen el riesgo
de qee la herramienta se ponga en marcha accidentalmente.
5. SIEMPRE guards las herr_rnlerltas
teios del alcance de los ni_'_osy de otras
personas inexpertas.
Las herramientas son peligrosas en manes de personas
ine×perias.
6. SIEMPRE mantenga
hlen cuidadas las herramientas,
Las herramientas
cortantes
deben mantenerse
afiladas y limpias. Las herrarnientas que se mantienen bien
cuidadas y bien afiladas tienen menos probabilidad de atascarse y se pueden controlar
m,_s f_eilmente.
7. SIEMPRE verifique si hay plezas deaalineadas
o atascadas_ si hay piezas
quebredas
o si exists cualqnler otra sitaecion
qae pueda afectar el
funcionamiento
de la berramienta.
Si ta herram|enta est_ d_ada,
debe repararse
antes de asarla. Muchos accidentes son causados debido al real estado de las
herramientas.
Z_ ADVERTENCIA:
EL use
tJSAI3OS CON ESI'A HERRAMIEN3A
DE ACCESORIOS
NO RECOMENDADOS
PUEDEN CREAR UNA SITUACION
PARA SER
PELIGROSA
8. SIEMPRE use solamente los accesorios reeomendados por el fabricante para esta
herramienta. Los accesorios adecuades para una herramienta, pueden set peligrosos
si se alilizan en otra herramienta.
28
SOBRE LAS REPARACIONES
1. Si faita cualquier pieza de esta sierra o se rompe, dobla o fana de cualqaier
manera; o sl alguno de los componentes et_ctricos
no tuneiona en forms debida,
SIEMPRE apague e! interrupter de puesta en marcha, desenchufe la sierra y reemplace
las piezas defiadas, faltantes o falladas ANTES de volver a ponerla en funcioeamiento.
2. La reparaci6n de las herramientas debe ser efectuada solamente en un Centro de
Repuestos
y Reparaci_,n Sears. La reparack3o o mantenimieete efectaado per
personal no especializado puede causer una lesibn.
REGLAS
I
DE SEGURIDAD
PARA LAS SIERRAS
Mantenga la otra mano en la manija auxiliat o en la caia del motor. _i sujeta is
_ PELIGRO!
Manteoga
|aselmanos
areaselas
de corte
yale las hojas.
sierra
con ambas manes,
evitar&
peligro ale|arias
de que la del
sierra
lesione.
I
1. SIEMPRE mantenga su cuerpo colocado a cualqaier lade de las hojas de la
sierra, pete no en lines con las hojas de la sierra.
2. NO trate de alcanzar nada por deba|o del trabajo, El protector no paede protegedo
centre cootacto con las he|as per el lade inferior del trabejo.
3. SIEMPRE veriflque si el protector est_ bien cerrsdo ANTES de cads uso. NO use
le sierra si el protector no se mueve libremente y se cierra instant&neameete.
Nunca sujete con motdezas
ni ate el protector de la hoja en posici6e abierta. Si la
sierra se deja caer accideotalmente,
el protector puede doblarse. Levante el protector y
aseg,t_rese de que se mueve libremente y que no tocalas he|as ni ningune otre pieza.
4. SIEMPRE veritique el funeionamiento
y el estade dot resorts del protector, Si el
protector y el resorts no est_n funcionando
de manera apropiada, DEBE hacerlos
raparar antes del use, El prolector de la hoja puede funcioear en forma lenta debido a
piezas dafiadas, dop6sitos gomosos o acumulaci6n de saeiedad
5. El protector de la hola debe manipulates
manualmeete
SOLAMENTE cuaado se
hacen cortes especiales, tal como cortes de cavidades o cortes compuestos,
SIEMPRE levante el protector mediante la menija, Tan pronto como la hoja penetra
el material, se DEBE eoltar el protector. Pare todos los otros cortes, el protector
funcionar& autom_ticamente.
6. SIEMPRE asegt_lrese de que el protector est6 cubrieedo las hojes ANTES de
depositer la sierra en un banco de trabajo o en el piso. Si las he|as en movimiento
no estan prolegidas la sierra se movera hacia arras, cortando lo que encuentre a su
paso. Observe cuanto demoran las he|as en de|at de girar despu_s de que se suelta el
interrupter.
7. NUNCA sujete la pieza que est_ siendo cortada en sus manos o a travi_s de sus
plernas. Es importante apoyer la pieza de trabajo en forma debida pare reducir aun
minimo Ia exposiciSo de] cuerpo, alaseamiento de las he|as o la p6rdida de control.
8. SIEMPRE sostenga la herramienta pot las superficies de sujecibn aisladas
cuando realice operaciones en que la sierra puede tocar alambrado oculto o su
propfo cordbn electrico. Si se produce coetacto con un alambre "bajo tension" las
piezas de metal expuestas de la herramienta quedar_n bajo tensi6n y el operador
puede recibir an choqtie el6ctrico.
9. NO deje la sierra funcionando cuando te transporte en la mane, El protector de
la hoja inferior puede abrirse al tocar suropa. E[ contacto accidental con Iss hojas
rotatorias de la sierra puede causer una lesi6n personal grave.
t0. NO use Is herrsmieets st el interruptor
no funeiona debidamente. Cualquier
herramienta
reparada.
que no puede set controlada
coo el interrupter
29
es peligrosa y debe set
REGLAS
DE SEGURIDAD
PARA LAS SIERRAS
cont.
11. Cuando retire las hojas de la herramienta, SIEMPRE use guantes proteetores para
suietar las hojas o accesorios. Los accesorios pueden ester calientes despu_s de use
prolongado.
RETROCESO...SUS
CAUSAS
Causes del Retroceeo
Y COMO SE PUEDE EVITAR
1. El retroceso es una reacci6n repentina que se produce cuando las hojas de las sierras
se aprietan, atascan o desalinean, causando que la sierra sin control se tevante y se
salga de la pieza de trabajo retrocediendo haeia el operador.
2, Cuando la entalfa aprieta o atasca firmemente las hejas, _stas se detienen y el motor
reacciona impulsando r_pidamente Ia sierra hacia arras, hacia el operader.
3. Si las hojas se tuercen o desalineen en el code, los dientes en los bordee traseros de
las hoJas pueden eeterrerse en la eeperficie superior de la rnadera. Esto causa que las
hojas se salgan de la entalla y salten hacia atr_s, hacia el operador.
4. El retroceso se produce a causa deI real use yio procedimientos
o condiciones de
operacidn iecorrectas. Puede evitarse tomando las precauciones apropiadas, come se
indicaa continuaci6n.
Como
Evitar
el Retroceso
t. SIEMPRE sujete la sierra firmemente
con ambes manes y coloque su ouerpo y
brazos de manere que puedan reeistir lea fuerzas del retroceso. El operador
puede controlar las fuerzas del retroceso si se roman las precauciones apropiadas.
2. Si las hojas se est_n ataseando o si pot cualquier
razbn usted interrumpe
un
corte, SIEMPRE apague la sierra y mant_ngala
inmbvil en el material hasta que
las hojas se detengan completamente.
NUNCA intente sacer la sierra del trabajo
o tirar de ta sierra hacia atrds cuando lae hojas eat6n en movimiento
pues puede
ocurrir RETROCESO,
SIEMPRE verifique y este preparado pare tomar medidas
correctives que eliminen la causa del atascamiento de las hojas.
3. Cuando ponga en marcha nuevamente
la sierra en ta pieza de trabajo, SIEMPRE
centre las hojae en la entalle y compruebe que los dientes de la sierra no est_n
enganchados
en el material. Si las hojas de la sierra se atascan, pueden salirse
hacia arriba o RETROCEDER
de la pieza de ttabajo cuando Ia siena es puesta en
marcha nuevamente.
4. SIEMPRE apoye los panelee grandesa fin de reducir el riesgo de que las hojas
ae eprieten
y retrocedan. Los panetes grandes tienden a combarse bajo se propio
peso. Los apoyos DEBEN colocarse en ambos lades, cerca de la linea de corte y cerca
del borde deI panel.
5. NO use hojas desafiladse o da6adas. Las hojas desafiladas o incorrectamente
hiscadas producen uea entalla angosta que cause demasiada friccion, atascamieeto
de la hoia y RETROCESO.
6, SIEMPRE tenga sumo cuidado cuando hage "Cortes de Cevidades" en paredee
existentes u otrae _rees ciegee. Las hojas salientes pueden cortar ebietoe que
causen RETROCESO.
7. SIEMPRE espere basra que las hojas hayan alcanzado la velocidad plena antes de
que toquen Ia pieza de trabajo.
8. SIEMPRE mantenga su cuerpo en cualquier lade de las hojas de la sierra, pero no en
Ifnea con las hojas. El RETROCESO puede lanzar la sierra hacia arras hacia el
operado_. Las fuelzas del RETROCESO pueden ser controladas por el operador, si se
roman fas debidas precauciones.
SIEMPRE sostenga
la herramlenta per las superficies de eujecibn ateladas cuando
realice operaciones en que la sierra puede tocar alambrado oculto o su propio
cord6n el_ctrico. Sise produce contacto con un alambre "bajo tension" las piezas de
metal expuestas de la herramienta quedaran bajo tensi6n y el operador puede recibir un
choque electrico
30
REGLAS
ADICIONALES
instrucciones.
PARA FUNCIONAMIENTO
El incumplimiento
SEGURO
de redes las instrucciones
indicadas
a continuacion
i puede
_ ADVERTENCIA:
de leery/e
y comprender
redesgrave.
las
resultar en un chequeASEGURESE
el_ctrico, iecendio
lesi6n personal
1. Conozca
su herramienta
el6ctrica.
Lea ouidadosamente
el manual del usuario.
Aprenda sue aplicaciones
y limitaciones asi como tambidn los riesgos
potenciales especificos relacionados con eats herramienta. Si se cumple esta
regla se redecir& el riesgo de un choque el(_ctrico, incendio o lesi6n grave.
2. Cuando use esta sierra SIEMPRE use lentes protectores o galas de seguridad.
Los anteojos regulares tienen solamente lentes resistentes al impaeto; olios NO
son lentes protectores, Si se cumple esta regis se reducir_ et desgo de sufrir una
lesid, n personal grave.
3. SIEMPRE proteja sus pulmones. Use una m&scara contra el polvo si la operaci6n
va a despedir reecho polvo. Si se cumple esta regla se reducira el riesgo de sufrir
una lesi6n personal grave.
4. SIEMPRE protejs su audicibn. Use proteccibn pare los oidos durante periodos
prolongados
de funcionamieoto.
Si se cumple esta regla ee reducir& el riesgo de
sufrir una lesi6n personal grave.
5. SIEMPRE inspeccione
peri6dicamente
los cordones eldctricos de la herramienta
y si est_n dafiados hdgalos repsrar en su Centro de Servicio Sears m_s cercano
o en otro Centro de Servicio Autorlzedo. SIEMPRE est_ atento de la ubicaeibn
del
cordbn.
Si se cumple
esta regla se reducir#, el riesgo de ue choque el_,ctrico o incendio.
6. SIEMPRE verifique si hay piezas dafiadas. Antes de seguir utilizando le
herramienta, lnspeccione
pare determiner si algdn protector o cualquier pieza
que estd dafiada funcionarzt debidamente, Verifique el alineamiento de las piezas
mbvilos, si est_n atascadae o ai hay piezas rotes y cualquier otto estado que
pueda afectar el funcionamiento
de la herramiente. Si se dafia un protector o
cualquier otra pieza debe ser reparada o reemplazada
por un Centro de Servicio
Autorizado. Si se cumple esta regla se reducir#t el fiesgo de un cheque el_ctrico,
incendio o tesi6n grave.
7. NO abuse del cord6a el_etrico. NUNCA transporte
la herramienta pot el cord6n ni
tire del cord6n pare desehchufarla.
Mantenga el cord6n elejado del calor, del
aceite, bordes afiledoe o piezes m6vilee. Reemplaee inmediatamente
los
cordones el_ctrlcos que est_n dafiados. Los eordones daSados eumentan el riesgo
de sufrir un choque et6ctrico. Si se cumple esta regla se reducir& el desgo de un
choque el_ctrico o incendio.
8, SIEMPRE asegurese de que su cord6n de extensi(_n est_ en been estado,
Cuendo use un cordon de extensibn, aseg_rese de que sea de calibre suficiente
pare portar la corriente que necesita su herramienta. Se recomienda un cordon
de por Io menos calibre 16 (A.W.G,) para un cord6n de extensibn de 100 pies o
menos de largo. No se recomienda el uso de un cord6n de extensibn de m_s de
100 pies de largo. Si tlene duda, use el calibre sigoiente de mayor cepacidad. Los
alambres de calibre rods pequefio tienen mayor capacidad (el alambre de calibre
16 tiene mds capacidad que el alambre de calibre 18). Un cord6n de calibre inferior
causar_, una p_rdida en el voltaje de linea resultando en pZ_rdida de potencia y
sobreealentamiento.
9. SIEMPRE inspeccione
y seque todos los clavos de la madera antes de cortarla,
Si se cumple esta regla se reducir,i el riesgo de sufrir una lesi6n personal grave.
IO.NO haga funcionar este herramlenta cuando este oansado o baje la influencia
drogas, alcohol o hays tornado alguna medicine.
Si se cumple esta regla ee
reducira el riesgo de un choque et_etrico, inceedio o lesibn grave.
31
de
REGLAS ADICIONALES
PARA FUNCIONAMIENTO
SEGURO cont,
Antes de inteotar usar cualquier berramienta, es necesado familiarizarse
caractelisticas
de funcionamiento
y lae instrucciones de seguddad.
Z_ ADVERTENCIA:
Algunas partieulas
de polvo creadas pot el lijado
mecbnico, aserrado, rectificado, taladrado y otros trabejos de construcci6n
eontienen produetos
qulmieoe
que se sabe causan c_ncer, defeetos cong_nitos
u otros daSos al sistema reproductor. Algunos de estos productos quimicos son:
• Plomo proveniente de pinturas a base de plomo
• Sflice cristalizada de ladrillos y cemento y otros productos de albaOiler[a.
• Arsenico y cromo de madera tratada quimicamente.
Su desgo de exposiciOn a estos productos var a dependiendo de cuan a rnenudo
usted hace este tipo de trabajo. Para reducir su exposiciOn a estos productos qufmicos:
• Trabaje en lugares bien ventilados
• Utilice equipo de seguddad aprobado, tal come mascaras contra el polvo
especialmenfe
diseRadas pare flitter pariiculas mieroscopicas.
USE SUS
Z_ ADVERTENCIA
PARA FUNCIONAMIENTO
con la sierra to ltaga
i
es suficiente para
CONOZCA SU SIERRA (ver Fig. 1)
La sierra Twin Cutter tiene incorporadas
muchas oaracteristicas
practicas para cortes
eficientes y r&pidos. Entre elias cabe mencioear un sistema innevador de 2 hojas
especiales que giran en direccion opaesta para Iograr cortes suaves y exactos con menos
vibracion y retrocese. Tambien esta equipada con un sistema de lubdcaciOn de la hoja
preinstalado para user cuando corte aluminio, cobre, acero inoxidable y hierro [oljado. La
manija auxiliar se instala en la parte superior de la sierra ofreciendo apoyo adicional y
facilidad de manipulaciOn,
Pare mayor conveniencia, la sierra Twin Cutter no necesita ser armada Las hojas
especiales y el sistema de lubricaciOn ya ester instalado,
Protector Superior de la Hoja
Manija de! Protector
Interior de la Hoja
Contratueroa
Fig. 1
\ ,o,orru0to,
on,o.
Manija Auxiliar.._
.%
,
(EncendidolApagado)
Varilla de
i/
D/?._4"._
LubdcaciOn /"
_
a la Cera
//
_[
Perilla del
h
Sistema de
_
LubricaciOn
a la Cera
']_::[.
k& _-_
Hojas "/
<q_;_'-_'_"
Protector Inferior
de {a Hoja
DESEMPAQUE
Su sierra Twin Cutter fue embarcada compIetamente
armada. Inspeccione atentamente
sierra para asegurarse de que no ocurdo daOo oi quebradura durante el embarque. Si
alguna pieza esta daOada o falta, devuelva la sierra a su Almac_n Sears mas cercano
pare que se la cambien.
LEATODAS LAS INSTRUCCIONES
I
haste que se reemplacen las piezas faltantes. El incumplimiento
de esta advertencia
f-k ADVERTENCIA:
hay piezasgrave,
faltantes, NO haga funcionar esta sierra
puede
ocasionar una lesionSi personal
33
32
I
SEGURO cont.
La etiquota de su herramienta puede incluir los siguientes simbolos.
V...........................................................Voltios
A....................................................... Amperios
Hz...................................................... Hertz
W....................................................... Watts
rain ..................................................... Minutos
....................................................... Corriente Alterna
..................................................
Corriente Continua
no ....................................................... Velocidad sin Carga
[] ........................................................ CoestrucciOn Clase II
•_/rain .................................................. Revoluciones o Carreras pot minuto
_. ....................................................... Indica peligro, adverteecia o atenciOn.
iSignifica ateoci6n! Existe riesgo para su seguridad
ilMPORTANTE!
permita que su familiaddad
descuidado. Recuerde que uo descaido de une tracciOn de segundo
ocasionar una lesion grave.
Z_ ADVERTENCIA:
La utilizaciOe de cualquier cepiIladora
puede eausar la proyecciOn de objetos extraOos a sus ojos, Io cual
puede ocasionar da£1os oculares severos. Antes de comenzar a
usa_ la berramienta
mec_nica, StEMPRE use sus lentes
protectores o gafas de seguridad con protecciOn lateral y una
mascara complete cuando sea necesarie. Recomendamos
una
M_scara de VisiOn Amplia para usar sobre sue lentee protectores
o sus leotes de seguridad est_ndar, con protecciOn lateral,
dispoeible en los Almacenes Sears.
REGLAS ADICIONALES
1-NO
coo todas las
fa
HOJAS
DELASIERRA
Auo las mejores hojas de sierras no cortaran de manera eficiente si no se mantienen
limpias, afiladas y debidameate colocadas, Las hojas desatiladas ejercen mayor
esfuerzo en la sierras y aumentan el peligro de retroceso. Mantenga hojas
adicionales de mode que siempre tenga hojas afffadas disponibles.
La goma y resina de la madera que se endu_ece en las hojas reducir&n la velocidad
de la sierra, Use un disolvente de goma y resina, agua caliente o keros@n para quitar
estas acumulaciones. NO use gasolina.
RETROCESO
El retroceso ocurre cuando las hojas se detienen rapidamente y la sierra es laazada
hacia atrAs, hacia usted, Las hojas pueden detenerse si la hoja queda apretada en el
material que esta siendo cortado.
IMPORTANTE: La meier protecci6n contra el retroceso es evitar las przicticas
peligrosas.
atascan
_'_ ADVERTENClA:
Esta sierra Twin Cutter usa hojas especialmente
J dise5adas de 6 1/8 pulg. y nunca se debe usar ningL)n otro tipo ni tamaP_o de
I hojas. Las hojas de otro ripe y tamaSo no funcionarAn en forma segura en esta
I sierra y pueden provocar una lesi6n personal grave.
Para hacer pedidos de hojas adicionales o para reemplazar Ias hojas que venian
con la sierra, vea en la pagina 45 de este manual las instrucciones para hacer
pedidos. Para instalar las hojas nuevas en !a sierra, yea tas instrucciones especiales
ea las p_ginas 41 a 43 de este manual para el desmontaje e instalaci6n apropiada
de las hojas.
SISTEMA DE PROTECCION
DE LAS HOJAS
El protector inferior de la hoja, instalado en su sierra, tiene per objeto velar per
su proteccion y seguridad. NUNCA debe ser modificado, per ningun motive. St
se dafia o comienze e funcionar mas lentamente, NO haga funcionar su sierra
hasta que e! problema no haya side corregido o se haya reemplazado la pieza
dafiada. SIEMPRE mantenga el protector en su posici6n correcta de
funcionamiento
coando use la sierra.
Z_ PELIGRO:
Cuando corta a trav6s de
ana pieza de trabajo, el protector inferior de Is
hsja no cubre la hoia per el lade inferior de la
pieza de trabajo. Debido a que la hoja estb,
expuesta per el lade inferior dei trabajo,
SIEMPRE manfenga las manes y los dedos
alejados del Area de corte (ver Fig. 2).
Cualqaier parte de sn cuelpo que toque la
hoja en movimiealo puede sufrir aria lesi6n
personal grave.
Fig, 2
t
t
El protector inferior de la hoja esta en posici6n
HACIA ARRIBA cuaedo se hace un corte,
Las hojas est_n expuestas per el lade inferior de la pieza de trabajo
Z_ ADVERTENClA:
NUNCA use la sierra si el protector no estA funcionando
en forma debida. Se debe verificar el fancionamiento correcto del protector antes de
carla use. Si la sierra se deja caer, antes de usarIa verifique si se ha daSado el
protector inferior de la hoja. NOTA: El protector estA funcionando en forma debida
cuando se mueve Iibremente y retoma oportunamente a la posici6n cerrada. Si per
cualquier motive e! protector inferior de la hoja no se cierra libremente, antes de usar
ta sierra !l@velaa so Centre de Reparaci6n Sears mas cercano para su reparaci6n.
34
o la sierra
I z_
sierra.PELIGRO:
La perdida
se detiene. El retroceso le puede haeer perder el control de la
SIEMPRE
apague ocasionar
inmediatamente
la sierra
de
control puede
una lesi6n
grave. si las hojas se
SlEMPRE apoye en forma
ambas manes
Causas
que provocan
1. Torcedura
un corte.
aproplada
le pieza de trabajo
y sujete
1
la sierra con
el retroceso:
de las hojas cuando est& haciendo
2. Hacer un corte con hojas desafiladas,
engemadas o incorrectamente
triscadas.
3. Sin apoyo apropiado para la pieza de trabajo.
SIEMPRE proporcione apoyo apropiado coma
se muestra en la Fig. 3.
4. Forzar un corte.
5. Cortar madera eombada o homed&
6. Mal use de la herramienta e pracedimientos
funcionamiento
incorreetos.
7. Colocar
de
las hojas en la pieza de trabajo antes de que alcansen
la velecidad
plena
Para reducir la posibilidad de retroceso
1. SIEMPRE dirijase hacia la pieza de
trabajo con la sierra en an &ngulo de
aproximadamente
30 _ en relaci6n con
la pieza de trabajo. (ver Fig. 4).
Fig, 4
2. SIEMPRE haga cortes derechos, Asi
evitara que la hoja se tuerza en el carte.
3. SIEMPRE use hojas limpias, afiladas y
debidamente
triscadas. NUNCA haga
cortes con hojas desafiladas.
4. SIEMPFIE apoye en forma apropiada la
pieza de trabajo antes de comenzar un carte. Eslo le ayudara a evitar que las
hojas queden apretadas en el corte (ver Fig. 3).
5. SIEMPRE use uea presi6n
fueme el corte.
uniforme
6. NO corte madera
o ht_meda.
combada
y constante
cuando
haga an corte. NUNCA
7. SIEMPRE sostenga la sierra firmemente con ambas manes y mantenga su cuerpo en
equilibrio. SIEMPRE col6quese en cualquier lade de las hojas de la sierra, pero no en
linea con las hojas. Esto le ayudar_ a resistir Ias fuerzas del retroceso, si es que se
produjera.
IMPORTANTE: Cuando use sa sierra, SIEMPRE mant_ngase
alerts y en control,
NO levante la sierra de la pieza de trabajo cuando las hojas est6n en movimiento.
35
COMIENZO DE UN CORTE
IMPORTANTE:
PARA AYUDAR A MANTENER EL CONTROL
ANTES de usar la sierra Twin Cutter por primera vez, SIEMPRE familiaricese con la
sierra hadendo certes de pr_ctica en materiales sobrantes
El peso de esta sierra ayuda a que los cortes scan m_s suaves. Aprenda a maeipular
y centrolar en forma segura el peso de la sierra.
SIEMPRE aseg(_rese de colocar las hejae perpendiculares al piano de la pieza de
trabajo. Haga el corte a un angulo aproximado de 30 ° en relacidn con la seperficie de
la pieza de trabajo. (Ver Fig. 5).
Practique la velocidad de avance apropiada para el material que est_ siendo cortado.
s hojas giran a una velocidad coestanle de 4600 RPM (velocidad sin carga).
Oprima el interruptor 'on/off' para poner en marcha la sierra. SlEMPRE espere hasta
que las hoias alcancen la velocidad plena antes de comenzar a cortar la pieza de
trabaje.
IMPORTANTE: Cuando use le sierra, SIEMPRE mantengase alerta y en control,
NO levante la sierra de la pieza de trab_ ) cuando las hojas est_n en movimiento,
Hojas perpendiculares a la pleza de
trabajo Aproximadamente 30 °
Fig. 5
1. SIEMPRE apoye la pieza de trabajo cerca det corte.
2. SIEMPRE apoye la pieza de trabajo de modo que el corte quede a su derecha.
3. SIEMPRE sujete la pieza de trabajo con mordazas a fin de que no se mueva
duraote el corte. Coloque la pieza de trabajo con el lado bueno hacia abajo.
Coloque la pieza de trabajo con el lado bueno hacia abajo. NOTA: El tado bueeo es
aquel cuya apariencia es importante.
Antes de comenzar un eorte, trace una linea a io largo de la linea de corte deseada.
Luego coloque el borde delantero de 1as hojas de la sierra en esa parte de la pieza
de trabajo que est', firmemente apeyada.
4. NUNCA coloque la sierra en la parte de la pieza de trabajo que se desprender_
despu_s de hecho el corte.
5. SIEMPRE mantenga el cordon electrico alejado del _rea de corte. SIEMPRE
coloque el cord6n de modo que no cuelgue de la pieza de trabajo cuando se hace
el corte.
suelte inmediatamente e! interruptor 'on/off'. Desenchufe la sierra y mueva
z_cord6n
PELIGRO:
el cordbn
cuelga del
de la
pieza nuevamente
de trabajo durante un corte,
el
a fin de Si
evitar
que cuelgue
trabajo
Z_ ADVERTENCIA:
'
,
SIEMPRE mantenga buen control
de la sierra para facilitar y hacer mas
seguro su use. La p6rdida de control
puede caesar un accidente que
ocasione ena posible lesi6n grave,
J
Fig. 7
provocar una lesi6n grave o mortal. Si el cord6n se ha dafiade, hagalo reemplazar
/iX PELIGRO:
Si senuevamente.
usa la sierra con un cordon electrico dafiado se puede
antes
de usar la sierra
Z_ ADVERTENCIA:
Si las hojas tecan la pieza de trabajo antes de
alcanzar la veloeidad plena, la sierra puede retroceder hacia usted causando un
L a es 6n grave.
Cuando haga un corte, SIEMPRE aplique una presi6n firrne y uniforme. Si fuerza la
sierra se producir_.n cortes asperos y puede acorlar la vida util de la sierra o cauear
retroceso.
Z_ PEMGRO:
Incorrecto
Correeto
NUNCA sostenga la sierra con una
mano solarnente (ver Fig, 6).
SIEMPRE sujete la sierra tom&ndola
del cuerpo del motor y de la manija
auxiliar (ver Fig. 7).
Cuando esta eortando a traves de la pieza de trabajo, el
protector inferior de la hoja no cubre las hojaa. Las hojas quedan expuestas
por el lado inferior de la pieza de trabajo. SIEMPRE mantenga sue manos y
dedos alejados del &tea de corteo Cualquier parte de su cuerpo que toque
las hojas en movimiento puede sufrir una lesion grave.
Despues de completar el corte, suelte el interrupter 'on/off' y espere hasta que las
hojas se detengan completamente. NO retire la sierra de la pieza de trabajo
_uando las hojas est_n en movimiento,
/_ ATENClON: Siempre que levanta la sierra de la pieza de trabajo, lae hojas
estae expuestas por el lade inferior de la sierra basra que el protector inferior de
las hojas se cierra. SlEMPRE ASEGURESE de que el protector inferior de las
hojas se haya cerrado bien antes de depositar la sierra en la superficie de trabajo.
36
37
INSTRUCCIONES
PARA
LOS CORTES
NOTA: La vida util de las hojas de su sierra Twin Cutter y la calidad de los bordes
cortantes depende de que las vibraciones sean reducidas a [in minimo.
SIEMPRE sujete firmemerffe la pieza de
lrabajo ANTES de cornenzar un torte.
Despu_s avance la hoja a lrav6s de!
material en un angulo de
aproximadamente 30 ° (ver Fig. 8)_
Esta sierra produce astillas calientes,
no chispas, cuando corta metal. Se
recomienda que use una m_scara
facial sobre las gafas de seguridad
pera proteger su cara.
.J ",,.\
F,00
/Aproxim damen --
VELOCIDAD
DE AVANCE
INSTRUCCIONES PARA LOS CORTES cont.
CORTE DE TODO TIPO DE MATERIALES
1. SIEMPRE espere que las hojas de la sierra alcancen la velocidad plena antes de
que toquen la pieza de trabajo.
2. SIEMPRE sostenga Ia sierra de modo que las hojas avancen perpendicularmente
hacia la pieza de trabajo. Sujete la sierra en un dingulo de aproximadamente 30 °.
3. SIEMPRE col6quese a cualquier lade de las hojas de la sierra, pero no en linea
con las hojas de la sierra.
4. Avarice las hojas hacia la pieza de trabajo hasta hacer el corte deseado.
5. La entalla (ancho del corte) de las hojas gemelas mide aproximadamente 1/8 de
pulgada, Siempre tome en cuenta el ancho de la entalla al hacer un corte,
Esta sierra Twin Cutter con sus hojas y accibn de corte especial es una
herramienta muy vers_til que realiza cortes r_pidos y eflcaces en aria variedad
de materiales:
La velocidad de avance es la rapidez con que se empujan las hojas de la sierra a
trav#s de material que est_ siendo cortado. La velocidad de avance correcla es
delerminada totatmente per la dureza y grosor del material que est_ siendo cortado.
IMPORTANTE: El avance debe SIEMPRE ser hecho con las hojas perpendiculares
al piano de la pieza de trabajo (Ver Fig. A), Si avanza las hojas en Angulo puede
quemar la hoja y daSar los dientes de la hoja (Ver Fig. B).
ES importante seleccionar la velocidad de avance correcta.
Si la velocidad de avance es demasiado lenta:
/
/
/
/
/
aarra
de aierro
Plana
Esqulnera
Tuber|a Rectangular
Seccl6n en U
W
1. Las hojas solamente aplastar,_n e! material en vez de corlar!o.
2. Los bordes de las hojas se deslizan y desgastan el material.
3. El corte serif deficiente y causara desgaste excesivo de las hojas.
Si la velocidad de avarice es demaslado r_pida:
1. Existe un riesgo definido que el corte puede dividirse y que la abertura astillada
del corte no ser_ sufieiente para desviar las virutas de madera.
2. El corte ser,_ deficiente con una descarga significativa de virutas de madera per el
lado irfferior del corte.
Piancha Delgada
PItmcha
Con Forma
Tuberla$
Para cortar otros materiales puede ser necesaria manipulaci6n aun m_s
especial. Por ejemplo para cortar aluminio, cobre, acero inoxidable y hierro
forjado o placas con forma
Corte de aluminio, cobre, acero
inoxidable y hierro forjado de hasta
1/8 pulg. de grosor (Ver Fig. 9).
f. SIEMPRE use el dispositivo lubricador
(se inclaye) cuando corte estos
materiales pues tienen tendencia a
ablandarse y adherirse alas hojas.
Dispositivo de'
Lubricack_n a la Cera
38
39
Varilla de
Lubricaci6n a
la Cera
INSTRUCCIONES DE LUBRICACION
(Ver Figura C)
l as hojas de la sierra I-win Cutter est_Jn
equipadas con dientes de "corte elf seco"
que bajo condiciones norr'nales no
necesitan ser lubricados. Sin embargo,
bajo condiciones exlremas, tal corns
cuando corta aluminio, cobre, acero
inoxidable y hierro forjado se debe usar et
dispositivo de lubricaci6n a la cera.
1. Inserte In varilIa lubricadora en el
dispositivo de lubricaci6n a la cera.
Disposltivo
2. Gire la rueda distribuidora pm_ aplicar
Lubricaci6n
lubricante a ta hoja. Ur_ cuar|o (1/4) de
vuelta debe proporcionar lubricaci6n adecuada.
INSTRUCCIONES
PARA
LOS CORTES
I Z./*
ADVERTENCIA:
Si no
so desenchufa
la sierra
se personal
puede produair
puesta
en marcha accidental
causando
una posible
lesi6n
grave. la
/
de
a la Cera
/
Varilla de
Lubricaci6n
la Oela
a
6. Levante y retire la hoja "A" (ver Fig. 16).
Fig, 13
Fig. 10
Protector
de ta Hoja
Retraido
Pasador
Fig. 15
Fig. 14
Fig. 11
1. Levante el protector _etractil con su
mane izquierda hasta la posici6n abierta.
2. Use el pulgar de su mano izquierda para
sujelar el protector en posici6n abierta a
la vez que sujeta Ia maeija auxiliar.
3. Ponga en marcha la sierra y haga
penetrar las hojas en el material que va
a cortar.
4. Empuje In sierra hacia adelante para
completar el corte.
5. Apague la sierra, espere a que las hojas
se detengan completamente, luego levaete la sierra de la pieza de trabajo.
6. Limpie las esquinas del corte con una sierra de marts o con una sierra de sable,
dependiendo del proyecto.
NOTA: Cuando corte materiales de techo, mantenga las hojas timpias con un
solvente de limpieza de alquitran y brea.
40
I
2. Gire las hojas hasta que los agujeros en ambas hojas esten alineados. Luego
coloque el pasador que esta adjunto a la Ilave a tray,s de los agujeros de las hojas.
Destornille la contratuerca gir_mdola a la izquierda y retirela. (ver Fig. 12).
3. Abra el protector retractil (ver Fig. 13).
4. Levante y retire la hoja "B" (ver Fig. t4).
5. Retire el adaptador del eje (ver Fig. 15).
cont.
torte de placas con forma
(no rectangulares) de hasta !/8 pulg.
de grosor (Ver Fig. 10).
1. CLnaado corte planchas de metal con
forma, SIEMPRE apoye la placa de
manera igual en ambos lades yen el
medio con bisques de soporte. Esto
impedird= que la plancha se doble cuando
se hace el corte. Eslo se recomienda ya
sea cuando est,. usando una mesa de
fijaci6n o rnordazas ajastables en una
mesa de trabajo plana.
CORTES POR PENETRACION
(Vet Figura 11)
DESMONTAJE DE LAS HOJAS DE LA SIERRA (Vet Figs. 12 - 16)
1. Desenchufe la sierra y deje que se enfrien las hojas.
del Eje
Fig. 16
41
INSTALACION
DE LAS HOJAS DE REPUESTO EN LA SIERRA (Ver Figs. 17- 20)
Z_ ADVERTENCIA:
Esta sierra Twirl Cutter usa hejas especialmente
dise_adas de 6 1/8 pulg. y nunca se debe usar ning_n otto tipo o tama8o de
hojas. Las hojas de otre tipo y tamafio no funcionarAn en forma segura ee esta
sierra y pueden prevocar una lesion personal grave.
Vea la seccibn Aecesorios de este manual para las hojas de repuesto
spropiadas necesarias para esta sierra.
1. Desenchufe la sierra.
Z_ ADVERTENCIA:
Si no se desenchufa la sierra se puede producir la
puesta en marcha accidental causando una posible lesion personal grave.
2. Deposite la sierra con el eje de la hoia dirigido hacia arriba.
3. Coloque Ia hoja "A" el! la brida de Ia hoia dejando la Ietra "A" claramente visible
(ver Fig. 17).
4. Alinee los agujeros de la hoja con los pasadores de la brida y coloque firmemente
la hoja en Ia brida (vet Fig. 18).
5. Tome el adaptador del eje "1" y empujelo hacia abajo en la brida dejando el "1"
claramente visible. AsegL_rese de que el adaptador este debidamente asentado en
Ias earas planas de la brida (ver Fig. 18).
6. Coloque la hoja "B" en el adaptador delando la "B" claramente visible, luego
alomille la contratuerca en el eje. NO la apriete, (ver Fig. 19).
7. Gire Ias hojas para alinear los agujeros de ambas hojas.
INSTALACION DE LAS HOJAS DE REPUESTO EN LA SIERRA cont.
(Ver Figs. 17 - 20)
\
8. Coloque el pasador (se incluye con la
Fic
llave) en los agujeros ya alineados.
9. Apriete la contratuerca a la derecha y
luego retire el pasador de las hojas
(ver Fig. 20). Esto permitir& que las
hojas giren libremente.
18. Gire cuidadosamente las hojas con la
mano para asegurarse de que giran
con facilidad en direcciOn opuesta.
Contratuerca
Pasador
GENERAMDADES
!
Z_ ADVERTENCIA:
A fie de evitar accidentes, SIEMPRE desenchufe la
herramienta de la fuente de alimentaci6n ANTES de la limpieza e de reatizar
cualquier labor de manteeimiento.
I
Todas las piezas representan una parte importante del sistema de aislamiento doble
y deben ser reparadas solamente en un Centro de Servicio Sears•
Evite el use de solventes cuando limpie las piezas de plastico. La mayoda de los
plasticos son susceptibtes a diversos tipos de solventes comerciales y pueden
da£_arsecon su uso. Use paros limpios para sacar ia suciedad, polvo de carb6n, etc.
Fig. 18
Fig. 17
gasolina, pro6uctes a base de petr61eo, aceites penetrantes, etc. entren en contacto
con las piezas de pl_.stico, EIIos contienen produetos qu_mices que pueden dahar,
debilitar o destruir el plAstico
] . OW.. .C, v,teentooo ome tooo
I
Se ha comprobado que las herramientas el_ctricas se someten a desgaste acelerado
y posible falla prematura cuando se utilizan en botes de fibra de vidrio, automOviles
deportivos, madera laminada, compuestos obturadores o yeso. Las astillas y el pelvo
de la flbra de vidrio son altamente abrasivos para los cojinetes, escobillas,
conmutadores, etc. For Io tanto no se recomienda que esta herramienta se use para
lrabajo prolongado en cualquier material de fibra de vidrio, madera laminada,
compuestos obturadores o yeso. Duraete cualquier uso de estos materiales, es
extremadamente importante que la herramienta se limpie con frecuencia, soplAndola
con un chorre de aire.
\•
Brida
Fig. 19
z_ ADVERTENCIA:
SIEMPRE use gafas protectoras o lentes de seguridad
con protecciOn lateral o una m&scara facial cuando sople polvo de una herramienfa a!
limpiarla. Si la operaci6n es polvorienta tambi_n use una m&scara eontra el pelvo.
LUBRICACION
Todos los cojinetes en esta herramienta ban sido lubricados con suficiente cantidad de
lubricante de alta calidad para durar toda la vida 5til de la herramienta, bajo condiciones
normales de funcionamiento. Por Io tanto, no se requiem lubricaci6n adicional.
Contratuerca
42
43
AISLAMIENTO
DOBLE
El aislamiento doble es un conceplo relacionedo coo la seguridad de las herramientas
eleclricas, que elimina la necesidad del cordon electrico trifilar puesto a tierra y del
sistema de alimentaciOn de energia puesto a tierra. Todas las piezas met_.licas
expueslas eshin aisladas de los componentes internos del motor con aislamiento
protector. Las herranfientas con aislamiento doble no necesitan ser puestas a tierra,
IMPORTANTE
La reparaciOn de una herramienta con aislamiento doble exige extremo cuidado y
conocimiento del sistema pot Io lanto debe ser realizada solamente por un tecnico
de servicio calificado. En case de necesitar servieio, reoomendamos que devuelva
ta herramienta a su Centre de Servicio Sears m_s cercano para su reparacidn.
SIEMPRE use repueetos de f_brica originales cuando repare la herramienta.
CORDONES
PROBLEMA
CAUSA
SOLUCION
Se produce una
cantidad
excepcionalmente
1. Dientes da_ados
2. Velocldad de avance
demasiade lenta
1. Reemplace ins hoja_
2. Aumente la velocided
de avarice
grande de chispas
3. Dientes despuntados
3. Reemplace
Mucho desgaste
en algunas
secclones
1. Velocidad de avance
demasiado rapida
2, Oientes de_ados
1. Reduzca la velocidad
de avance
2. Reemplace las hojas
3, Oientes despuntades
4, No se est_ cortando en forma
perpendicular ala supefficie de trabajo
3, Reemplace las hojas
4. Sostenga la sierra perpendicular
a la supedicie de Irabajo
1. Dientes daOades
2. Ve!ocidad de avance
de_:qasiado r_pida
3. Dientes despuntados
4. Las hojas se han torcido
5. Las hojas se hen fundido
1. Reemplace las hoias
2, Reduzca la veIocidad
de avance
I-as heJas
se rompen
DE EXTENSION
El ueo de un cordon de extension causarb, una cierta p0rdida de potencia. Pare
mantener Ia perdida a un rninimo y evitar el sobrecalentamiento de la herramienta,
use un cordon de extension que sea Io suficientemente grueso como para
transporter le co_riente que necesitar_ su herramienta.
Para un cordon de extension de 100 pies o menos de largo se recopnienda por Io
menos el calibre 16 (A.W.G.). Cuando trabaje al aire libre, SIEMPRE use un cordon
de extensi0o adecuado para uso al aire libre. La envoltura del cordon estara
marcada con las letras WA.
z_ ATENCION:
Mantenga los cordones de extension alejados de la zona
de] corte y coloque e! cordon de lal manera que no se enredar;_ en la madera,
herramientas, etc., cuando est0 cortando
Causas posibles
de dientes rotos
Ias hoias
31 Reemplace ta_ hojas
4. Reemplace _as hoja_
5. Reemplace las hojas
1. Ve!ocidad de avarice
demasiado _pid_
2. La superficie que estt_ siendo
cortada es demasiado dura
3. Los dientes se daOaron a
cause de un impacto
4. Las hojas no est_n
debidamenle inslaladas
5. Las hojas est_n fundidas
6. No se esla cortando en forma
perpendictdar a Ia superf_e de trabajo
1, Reduzca la velocidad de avance
2. Reemplace tas hojas
3, Reernplace tas hojas
4. Reemplace las hojas y siga ias
instrucciones apropladas pma la
instalaciOn de las hojas
5. Reemplace las hojas
6, Reemplace las ho as y cuando
es_ cortande soslenga s empre
la sierra perpendicular a ia
superficie de trabajo
PELIGRO: Revise los cordones de extension antes de cada uso. Si est&n
daffados reernpl_celos inmediatamente. NUNCA use una herramienta con ,In
cordon da5ado pues al tocar el lugar dahado puede causer un choque electrico
que resulte en una lesi(m grave.
Los cordones de extension que son adecuados para usar con su sierra est&n
disponible en su Almao_n Sears m_s cercano.
T{PO OE CORTE TAANSVER_AL
t_IAT_RIAL
TAMANOMAX
tCORTE RAHSV_RSALI
_SPESOR
M_.X.
1 l/2"
1/8 _
1 I/2"
_/8"
! 1/2 _
1,8"
1 1/2 _
1_"
Hierlo
TLfbo hueco
ga[vallizado
A<:ero
C_n_F
cusdrado
d!llce
O00°'
A_e_
dulce
P_lgto_ero
PD: I a */ida
dement8
_lfi! Wollle/]io
ep
hoia
ALIME_TACI(_N
O
TIEMPO PROM_DI_
cortes
20segundo_
140 m_rte$
30segu_dos
8000
cortes
e _÷_u.
ell combinaoiorles
Madera
(Pino}
Pl_.<tico
(PVC)
!Je Ja i]oi,3 ind_2a
,3_
a¢
1/8"
2"×4"
1_ '¸
Io_ re_l}ltallos
r_s
_e _ot; m_teti_es
e a
obleni(los
aba_ecede_e
enur_le_dos
e_l i)ruel)a£
She
44
112
10000
pies
12000
pies
_a_go
4,3 #ul_/rain
m I
_16 ,r
r_e JUllcio
30 segundos
fie rfile f 11o realizadas
z_ ADVERTENCIA:
puede
ser peligroso.
El use de accesorios o dispoeitivos no recomendados
102 puls,/min
pies
1 1/2"
Los accesorios pare su sierra Twin Cutter que se indican a continuaciOn estan
disponibles en su Almac0n Sears local.
9-26677 - Un eonjunte de 2 Hojas Universales para Sierra Twin Cutter empacadas
9 26678 - 6 Varillas Lubricadoras a la Cera empacadas
5se_undos
120 cortes
70 pies/21
Pipe
mi_m_
380
de melal
AIq_rlir_io
Pe_no
UTIL PROM_DIO
O_ LA HOJA
[_
A]LJmin_O
Plancha
VI_A
diseOadas de 6 1/8 pulg. y nunca se debe usar ningL_notro tipo o lamaOo de hojas.
hojas de otto ripe y tamaOo
no funcionar_n
forma
segura
en esta sierra y
I Las
Z_ADVERTENCIA:
Esta sierra
Twin Cutterenusa
hojas
especialmenle
pueden provocar una lesion personal grave.
Ilsegu_os
6segundos
on tiF.os
Ios_esultadosp_Jedew_arstseutllfzala
....
espeoiales
45
\
03
\
\
I20V_50HZ
SIERRA TWIN-CUTTER
- NUMERO DE MODELO 286.26829
E! nL_mer0de mode{o se encuentraen la piaca de fabricante. SIEMPRE mencione el numero de model0 en [oda ta correspondencia referente a su herramienta.
NO.
I No,de piezai
Descripcibn
1
PW001
PW002
!
/i
Hoja
Placa Protectora
PW003
PW004
PW005
PW006
PW007
L
I
Protector Activo
Arandela del Protector
Tornillo M4 x 14
Pasador de Gorqa
TornilIo SA M4 x '12
PW008
PW009
PW010
i
Protector
I
Corcho deI Pasador
i Tornillo Autorroscar_te ST 4.2 x 35
PW011
PW012
PW013
PW014
I
',
2
3
4
5
6
7
8
9
10
11
12
13
4_
14
15
16
18
19
20
21
22
23
24
25
26
27
28
29
I
f
PW015
PW016
PW018
PW019
PW020
PW021
PW022
PW023
PW024
PW025
PW026
PW027
PW028
PW029
=
!
Caja de Engranaies
Maniia Letral
Cubierta
Pih6n
Cantidad
i Set
SA
Cojinete 6000 VV
I
i
Inducido
I
Aro de Goma
Cojinete 607 VV
Etiqueta
Blindaje del Cordsn
P_atina del Cordon
I
Torni_lo Autorroscante ST 4.2 x 12
Conductor IV
Resorte
Arandela E!astica
Paianca de_ Interruptor
TornilloAutorroscante ST 4.2 x 20
8ot6n de{ Interruptor
1
1
1
1
t
1
!
1
4
1
1
1
1
1
1
1
1
1
1
I
1
,
No_
30
31
33
34
35
36
38
40
4t
42
43
47
48
49
50
51
52
____53
54
55
56
57
I
No.de pleza
PW030 i
PWo_,I"> I
PW033 !
PW034
Description
Cubierta
Resorte
Etiqueta PequeSa
Ultima P_tgina
Cantidad
1
t
I
1
'
I
1
I
I PW035
PW036
!Tomillo Autorroscante ST 4.2 x 16
i
P aca de Fabr can e
I
2
1
i PW038
i PW040
PW041
PW042
i
Interruptor
I
Caia
,I
Estator
i
!Tomillo Autorroscante ST 4.2 x 65 i
1
1
1
2
i PW043
_
1
i PW047
i
!
1
i PW048
PW049
PW050
_ornil{o Autorroscante ST 2.2 x 8.5_
I
Arandela
I
:
Escobilla
4
4
2
PW051
PW052
. PW053
PW054
PW055
I
'_
2
t
1
1
1
I
PW056
PW057
i
Cord6n y Enchufe
Conductor
VII
Portaescobilla
Clip Exterior
Clip
Llave
Tubo de Cera
Dispositiivo Lubrlcador
Tomillo Autorroscante ST 4.8 x 10
2
1
1
1
2
1
I
VEA LAS INSTRUCClONESPARA HACER PEDIDOS DE REPUESTOSEN LA ULTIMAPAGINA,
i
t
:
1
1
i ilizii iiiiiiii:ii:ii:
ii i
,,i
:i_
;_ i
ii_
Your Home
For repair fi in your home d of all major brand appliances,
lawn and garden equipment, or heating and cooling systems,
no matter who made it, no matter who sold it!
For the replacement
parts, accessories
and
owneris manuals that you need to do-it-yourself.
For Sears professional
installation of home appliances
and items like garage door openers and water heaters.
i
1-800-4-MY-HOME
(1-800469-4663)
www,sears.com
®
Anytime,day or night
(U,S.A. and Canada)
www.sears.ca
OurHome
iii_:?'_!i!,
For repair of carry-in products like vacuums, lawn equipment,
and electronics, call or go onqine for the nearest.
Sears Parts and Repair Center,
i _,ii!'
1-800-488-1222
Anytime,dayor night(U.S.A_
only)
www.sears,com
To purchase a protectionagreement (U.S.A.)
or maintenance agreement (Canada) on a product serviced by Sears:
1-800-827-6655 (u,sA)
_;:ii!i
1-800-361-6665 (Canada)
_i,iiiiiiii_!
q
•
Au Canada pour service en fran_}ais:
1-800-LE.FOYER Ma
(1-80o.533_937)
Para pedJr servicio de reparaci6n
domicilio, y para ordenar piezas:
1-888-SU-HOGAR _
(1_8_784Po42T)
wv_f.saars,ca
¢) Se_s, Roeh_ck and Co.
,_Registered
,af:Marc_
Marque
Trademark
Registrada
f
TM
/ 1_ Marca
de _omrnerce
Trademark
/ sM Service
de F, bril;a
/ Mo M_rque
/ su Marca
d_pos_e
Mark
of Sears,
de Sef®cio
de Sears,
Roebuck
Roebuck
de Sears,
and
Co
and Co.
Roebuck
and Co.