1
Multimedia Player With Navigation
METRA OE RADIOS
~
~GPSCARO
MDF-7313-1
Preface Merge
NavMate navigation software provides turn-by-turn route guidance while traveling to your destination.
Before operating, take a few minutes to review the safety and operating instructions in this manual so
you can quickly and safely become familiar with your NavMate software's many features.
This User Manual explains the NavMate software's functions, and provides details on:
• Using the control buttons
• Entering destinations
• Understanding the different screens available on your NavMate software
• Adjusting user preferences
Note: All users should read this manual prior to operating your NavMate software.
Copyright© 2011
All rights reserved.
NavMate Software User Manual Version 4.0.60 (480 x 272)
This document and the software described in it are furnished under license and may be used or
copied only in accordance with such license. Except as permitted by such license, the contents of this
document may not be disclosed to third parties, copied, or duplicated in any form, in whole or in part,
without the prior written permission of Horizon Navigation, Inc.
The NavMate software, including its operation and use, is covered by one or more of the following
patents: US Patents No. 5,262,775; 5,283,575; 5,291 ,412; 5,291 ,413; 5,291 ,414; 5,297,028; 5,303,159;
5,311 ,434; 5,339,246; 5,343,400; 5,345,382; 5,359,529; 5,374,933; 5,377,113; 5,390,123; 5,394,333;
5,402,120; 5,414,630; 5,430,655; 5,440,484; 5,477,220; 5,508,931; 5,515,283; 5,515,284; 5,550,538;
5,608,635; 5,712,788; 5,731,978; 5,862,509; 5,898,390; 5,902,350; 5,904,728; 5,910,177; 5,912,635;
5,922,042; 5,928,307; 5,938,720; 5,987,381; 6,058,390; 6,144,919; 6,147,626; 6,253,154; 6,259,987;
6,282,496; 6,298,305; 6,360,165; 6,456,931; 6,456,935; 6,470,268; 6,542,814; 6,552,656; 6,600,994;
6,622,086; 6,735,516; 0364,840; 0397,046; 0457,823; EP0987665A3. The sale and/or licensing of the
NavMate software and associated materials does not include any licenses (implied or otherwise) to
patents or technology, unless specifically stated in writing.
NavMate® is a trademark of Horizon Navigation, Inc. The NavMate software and associated materials
are protected by copyright in the US and internationally.
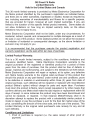
End-User License Agreement
This End-User License Agreement (EULA) is a legal agreement between you (either an individual or a single entity)
and HORIZON NAVIGATION, INC. for the operating software and updates thereof that run the digital map database
and associated hardware (collectively the "Software"). By installing or using the Software, you agree to be bound
by the terms of this Agreement. If you do not agree to the terms of this Agreement, return the Software, along with
all other accompanying items in the form they were purchased, within thirty (30) days after such purchase to the
authorized dealer from where the Software was purchased, for a full refund of any fees paid. Use of the Software
without acceptance of this Agreement is unauthorized and not permitted.
1. License Grant. HORIZON NAVIGATION, INC. grants you a non-exclusive license to use your purchased copy
of the Software for your own internal purposes of accessing the digital map database and running the associated
hardware and not for service bureau time-sharing, or other similar purposes.
2. Limitations On Use. You are not permitted to copy, modify, decompile, disassemble, or reverse engineer any
portion of the Software without the expressed written permission from HORIZON NAVIGATION, INC.
3. U.S. Government End Users. The Software is provided with Restricted Rights. Use, duplication, or disclosure by
the Government is subject to restrictions as set forth in subparagraph (c) (1) (II) of the Rights in Technical Data and
Computer Software clause at DFARS 252.227-7013 or subparagraphs (c) (1) and (2) of the Commercial Computer
Software-Restricted Rights at 48 CFR 52.227-19, as applicable. HORIZON NAVIGATION, INC., 4701 Patrick Henry
Dr. Suite 1301 Santa Clara, CA 95054 USA.
4. Indemnity. You agree to indemnify, defend and hold free and harmless HORIZON NAVIGATION, INC., including
its licensors, assignees, subsidiaries, affiliated companies, and the respective officers, directors, employees,
shareholders, agents, authorized dealers or sales agents, and representatives of each of them from and against any
liability, loss, injury, demand, cost, expense, or claim of any kind of character, including but not limited to attorney's
fees, arising out of (a) any use or possession of the Software, or (b) any breach of any warranties or representations
made by you in this Agreement or of your obligations under this Agreement.
5. Disclaimer of Warranty. HORIZON NAVIGATION, INC. does not make any warranties or representations, either
express or implied, with respect to the software, without limiting the foregoing, HORIZON NAVIGATION, INC.
expressly disclaims any implied warranties of quality, performance, merchantability, fitness for a particular purpose
or non-infringement. Some states do not allow the exclusion of implied warranties, so some portion of the above
exclusion may not apply to you.
6. Limitation of Liability. HORIZON NAVIGATION, INC. shall not be held responsible for any actual, anticipated
or speculative loss of profit or direct, indirect, incidental, special, or consequential damages, including, without
limitation, loss of revenue, data, or use incurred by you or any third party arising out of your use or possession of the
software, whether in an action in contract or tort or based on a warranty, even if HORIZON NAVIGATION, INC. has
been advised of the possibility of such damages.
7. Warnings. A. Copies of the digital map database reflect conditions as they existed at various points in time before
your receipt of such copies. Accordingly, copies of the digital database map may contain inaccurate or incomplete
data or information due to inaccurate or incomplete source materials, the passage of time, road construction,
changing conditions, and other wise. B. Neither the Software nor the digital map database include, analyze, process,
consider or reflect any of the following categories of information, i.e., neighborhood quality or safety; population
density; availability or proximity of law enforcement, emergency, rescue, medical or other assistance; construction
work, zones, or hazards; road and lane closures; various legal restrictions (such as vehicular type, weight, load,
height and speed restrictions); road slope or grade; bridge height, width, weight or other limits; road, traffic or
traffic facilities safety or conditions; weather conditions; pavement characteristics or conditions; special events;
traffic congestion; or travel time.
8. Transfer. This Agreement, including all rights, obligations and representations may be transferred to another
individual or single entity, provided the same transfer includes the simultaneous transfer of the associated hardware
in which the Software is installed, and further provided that such other individual or single entity accepts all the
terms of this Agreement. In the event such individual or single entity to which the Software is transferred does not
accept the terms of this agreement, then the License herein automatically terminates. Further use of the Software is
unauthorized and not permitted.
9. Governing Law. This Agreement shall be governed by the laws of the State of California, without giving effect to
its conflict of laws provisions.
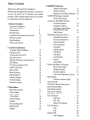
Table of Contents
Thank you for buying this product.
Please read through these operation instructions
so you will know how to operate your model
properly. After reading please keep this booklet
in a safe place for future reference.
1 Before You Start
Important Safeguards
About this manual
Precautions
Maintenance
Location & function of the controls
Remote control
Specifications
Wiring connection
7
7
8
9
10
11
13
14
2 Common Operations
To Select Source by Menu
Reset the Unit
Turning the Unit On/Off
Volume Control
Setting the Sound Characteristics
EQ Setting
Turning Loudness On/Off
Insert a SO Card
Eject a Disc
Mute Function
Mode Selector
Infrared Sensor
Screen Display
Double Function
15
15
15
15
15
16
16
16
16
16
16
16
16
16
3 Main Menu
Main Menu Setup
Video Adjust
Audio Adjust
Time Adjust
Screen Adjust
System
Key Configuration
Background
Default
17
17
17
18
18
18
19
19
20
4 NAVMATE Software
Safety Information
Vehicle Position
Map and information Database
NAVMATE Software Operation
Quick Start Guide
Using Your NAVMATE Software
Function Buttons
Navigation Menus
List Mode, Spell Mode &
Most Recently Used
Map Screen
Destination Selection (GO TO ...)
Address/1 ntersection
Point of Interest (POl)
Home Address
Office Address
Favorites
Address Book
Trail Book
Trip Book
Coordinates
History
Using Map
Route Calculation & Guidance
Route Calculation
Please Proceed
Route Guidance
True View (Intersection Zoom)
Map Display
Current Location Screen
Arrival Screen
Off-route & Route Interruptions
Edit Favorites Menu
Edit Address Book
Edit Home Address
Edit Office Address
Edit Trail Book
Add Trail
Edit Trail
Setup Trail Display
Edit Trip Book
Add
Edit
Edit My POl
Add Category
21
22
22
22
23
24
24
25
26
27
28
29
29
29
30
30
30
30
30
31
31
31
32
32
33
33
33
33
34
34
34
35
35
36
37
37
38
38
38
Setup Display
Edit Category
Add to MY POl
Edit My POl
Set-up Menu
Setup Routing Criteria
Display Options
User Preferences
Language Settings
Voice Guidance
Set Time
Distance Units Settings
Day/Night Settings
POl leon Setup
Location Reset
System
Volume
GPS Diagnostic
System Information
Trip Computer
Planned Route
Detour
Cancel Route
Follow Trail
39
39
39
40
40
40
41
41
41
42
42
42
42
42
43
43
43
43
43
44
44
44
45
46
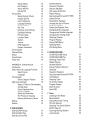
APPENDIX A: Utilities Manual
Introduction
Select Device &Language Function
Select Device
Language
POl Uploader
Select Category Feature
Map/Voice Uploader
Steps to Follow to Downloading
the Map Data
Select Database Area
Select Language
Select the Destination
The Process of Copying
Remove the Memory Device
Backup
Restore
47
47
47
47
47
48
48
50
5 DVD/VCD/MP4
DVD/VCD/MP4 Setup
DVD/VCD/MP4 Play
Selecting Tracks Fast
50
50
50
51
51
52
52
53
54
54
54
Number Buttons
Pause the Playback
Stop the Playback
Play tracks at Random
Repeat Playing
Skip backward/forward/F. F/REW
System Switch
Slow Motion Playback
Increase the size of Picture
On Screen Display
Setting the Playback Time
Changing Audio Language
Changing the Subtitle Language
Changing the Viewing Angle
Selecting Channel
Program Playing
Playing PBC(Menu)
Selecting Menu
DVD Setup Menu
6 CD/MP3/SD/USB
CO/MP3/SD/USB Setup
CD/MP3/SD/USB Play
Selecting Tracks Fast
Repeat Playing
Number Buttons
Playing Tracks at Random
Stop play
Pause the PI ayback
Skip backward/forward/F. F/REW
the Playback
Selecting Track
On Screen Display
Program Playing
Eject SD Card
Eject USB
7 Tuner
Listening to the Radio
Band Selector
Manual/Automatic Tuning
DX/LOC Selector
Selecting The Stored Station
MOIST Selector
Scanning/Storing Stations
Automatically
54
54
54
55
55
55
55
55
55
56
56
56
56
57
57
57
57
57
58
64
64
64
64
64
64
.64
64
64
64
64
64
65
65
65
66
66
66
66
66
66
66
Go to FREQ
Number Buttons
67
67
RDS SETUP
Alternative Frequencies
Traffic Alarm
Program Type
67
67
67
67
8 AUX
AUX Touch Screen Menu
68
9 Bluetooth Mode
Bluetooth Operational Interface
Using a Bluetooth Wireless connection
Pairing Your Unit & Bluetooth Phone
Pairing in Hands-free Mode
Phone Pairing Mode
Bluetooth Connection &
Disconnection
Using the Unit as a Hands-free Device
Last Number Dialing
To-Dial by Cellphone
To Dial by the Unit
Using the Unit as Bluetooth Music
Audio Transfer between the Unit
& Phone
71
10iPod
iPod Play
Selecting Tracks Fast
Playing Track F.F/F.REW
Repeat Playing
Playing Tracks at Random
Pause the Playback
File Selector
Eject iPod
72
72
72
72
72
72
73
73
11 Additional Information
Simple Troubleshooting Guide
74
69
69
69
69
69
70
70
70
70
70
70
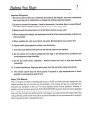
Before You Starl
7
Important Safeguards
1. Be sure to connect the color coded leads according to the diagram.lncorrect connections
may cause the unit to malfunction or damage the vehicles electrical system.
2. Be sure to connect the speaker{-) leads to the speaker{-) terminal. Never connect the left
and right channel speaker cables to each other or to the vehicle body.
3. Make sure all the connections are correct before turning on your unit.
4. When replacing the fuse{s), the replacement must be of the same amperage as shown on
the fuse holder.
5. When installing the unit, do not block heat vents. Blocking them may result in fire.
6. Please install unit properly to reduce driver distraction.
7. Use of the unit without having the car started may drain the car battery.
8. Do not expose unit to direct sunlight, extreme high or low temperature conditions and
avoid exposure to high humidity.
9. Do not put credit cards, cassettes, or watches around the unit, or they may become
inoperable.
10. To avoid interference, keep your phone away from the unit when using your phone.
11. The remote control may not work properly if exposed to high temperatures or direct
sunlight for prolonged periods of time.
About This Manual
This unit features a number of sophisticated functions. All the functions have been designed for the
easiest possible use, but many are not self-explanatory. This manual will help you understand the
functions and operations of the unit. This manual explains remote control operation. However, in
addition to those functions related with DVD/VCD/CD/MP3/MP4 operation that can only be operated
by the remote control, there are also functions that can be operated on the buttons provided for the
main unit. Due to continuous improvements and changes to our products the information within this
user guide may contain some inaccuracies of current information due to improvements to programs
and/or equipment and/or typographical errors.
Before You Star!
8
Precautions
This unit can play the following discs only:
Type of disc
Label on the disc
Recorded Material
Size of disc
DVD
~
Sound &moving pictures
12 em
@ ruJo~~
Sound &moving pictures
12 em
mJo~fffi
Sound only
12 em
MP3
mJo~~
Sound only
12 em
MPEG-4
mJo~fffi
Sound &moving pictures
12 em
VIDE 0
VCD
VIDEO CD
CD
(DIGITAL VIDEO)
DIGITAL AUDIO
DIGITAL AUDIO
MP3
DIGITAL AUDIO
MPEG-4
NOTE: The unit is compatible with VCD1.0/1.1/2.0/3.0 version and DVCD disc.
• Do not attempt to modify the unit, modifying
the unit may cause permanent damage.
• Stop the vehicle before performing any
operation that could interfere with your
driving.
• Do not use/operate in extremely high or
low temperatures. Be sure the temperature
inside the vehicle is between +60° C and -10°
C before turning on your unit.
• To enjoy optimum sound and images while
playing, handle the discs as follows:
- Handle the disc by its edge to keep the disc
clean, and do not touch the surface.
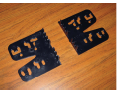
- Do not use COs with sticky residue or
ink on the surface.
- Do not use COs with labels or stickers
attached, which may leave a sticky
residue when they peel off. (As shown in the
picture)
~
- Clean the discs with an optional cleaning
cloth. Wipe each disc from the center out.
(As shown in the picture)
9
Before You Start
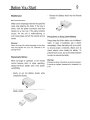
Maintenance
- Reinsert the Battery Holder into the Remote
Control.
Replacing the Fuse
Make sure the amperage matches the specified
value when replacing the fuses. If the fuse is
blown, check the power connection and then
replace with a new one. If the same problem
occurs, then the unit is malfunctioning. In
such cases, please consult the nearest service
center.
Warning!
Never use a fuse with a rated amperage of more than
what was supplied with your unit, otherwise it will
damage the unit.
Replacing the Battery
When the range of operation of the remote
control becomes short or stops operating,
replace the lithium battery with a new button
cell (CR2025).
- Gently pull out the Battery Holder while
pressing the Button.
- Put the battery with mark(+) upward into the
Battery Holder.
Precautions on Using Lithium Battery
Always keep the lithium battery out of children's
reach. In case of swallowing, see a doctor
immediately. Clean the battery with a dry cloth,
to ensure proper connectivity. Make sure to
check polarity when loading the battery. To
prevent short circuit, do not use metal tweezers
to insert or remove the battery.
Warning!
Improper handling of the battery may lead to explosion.
It cannot be charged, disassembled or disposed of in
a fire.
10
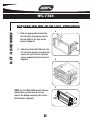
Before You Start
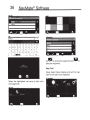
Location of the Controls
he Front Panel
~------------------------~13
,..-----------{ 12
~
~
GPS CARD
9
CD PWR/[VOL-/VOL +]
In waiting mode, briefly press this button
to tum on the unit, and then press and hold
it to tum off. When the unit is on, tum
clockwise to increase the volume, tum
counterclockwise to decrease the volume.
Press to select the sound mode you want,
when you select one, tum the VOL button
to adjust.
Q) REMOTE Infrared Sensor
G) SRC
Press this button to select modes.
@ MENU Button
During playback mode, briefly press to
enter the DVD setup menu;
During radio/AUX mode, briefly press it
to enter the MENU, press and hold it to
enter the SETTING menu.
®
DISP
Press this button to close display, press it
again or touch the screen to resume. Press
and hold it to enter the night mode.
®
MUTE Button
Press this button to mute, press and hold
it to activate equalizer function.
(j) AlVIN
®
SD CARD Slot
®
GPS CARD Slot(Navigation)
@ USB Slot
@ RES Button
Press this button to set the unit to initial
status.
@
~
Eject Button
Press it to insert or eject a disc.
@ Disc Loading Slot
@) NAVI Button
During other modes, press this button to
enter navigation mode; press it again to
exit.
If you use the navigation function in the
playback mode, press and hold this button
to pause playing, press and hold it again
to continue.
@) MIC (for bluetooth)
Before You Start
11
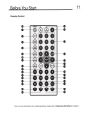
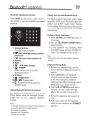
Remote Control
Tips: For more information as to replacing battery, please refer to Replacing the Battery on page 9.
12
Befcra You Start
1
SOURCE/PWR
2
GO TO{playing time/track/[press and hold it
to enter/exit the NAVI])
23 0-9 Number Buttons
3
BAND/TITLE
24 Eject Button
4
AMS(Automatic Memory Selection)/MENU
25 TA/LOUD (Traffic Alarm/Loudness)
5
LOC/SUB -T
26 AF/EQ (Alternative Frequency/Equalizer) Button
6
ST/AUDIO(mono or stereo/language or channel
selector)
27 ENTER (Left/Right/Up/Down ENTER)
7
PTYI ANGLE (Program type/DVD play angle)
8
OSD
Press it to show the current information; in radio
mode, press and hold it to show the version
number.
22 CLEAR
28 BT Button (bluetooth mode)
29 PAIR
9
ZOOM (zoom in or zoom out)
During bluetooth, press this button to pair.
30 During bluetooth, press to dial, redial or answer
a call.
31 During bluetooth, press to hang up or ignore
a call.
10 Slow Forward/Rewind ·
11
P/N
Press it to change the TV system, press and hold
it to capture the instant likeness as a logo type.
12 Mute
13 PROG(Program playing)
14 VOL+NOL-/SEL
15 RPT (Repeat Playing)
16 ROM (Playing Tracks at Random)
17 Pause/Play
18 Stop Playing
19 SETUP
20 F.R/F.F
21
Previous/Next Track
13
Before You Slarl
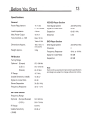
Specifications
General
VCD/CD Player Section
Power Requirement
14.4 V DC
VCD Signal System
AUTO/PAUNTSC
(11-16 Vallowable)
Signal-to-noise Ratio
60 dB
Load Impedance
4ohms
Separation
60 dB 1 KHz
Max. Power Output
45Wx4
Distortion
0.3%
Tone Controls +1- ?dB
Bass 100Hz
Treble 10 KHz
DVD Player Section
Dimensions Approx.
180 X 180 X 105
mm (d/w/h)
DVD Signal System
AUTO/PAUNTSC
Channels
2
Weight Approx.
3.2kg
Frequency Response
40Hz to 16KHz
Signal-to-noise Ratio
60 dB
Separation
60 dB
FM Section
Tuning Range
Optional (Europe)
87.5-108 MHz
(U.S.A.)
87.5-107.9 MHz
(Russia)
65-74 MHz
IF Range
10.7 MHz
Usable Sensitivity (-30dB)
10 dB uV
Signal-to-noise Ratio
60 dB
Stereo Separation
30 dB (1 KHz)
Frequency Response
40Hz-12KHz
AM Tuner Section
Frequency Range
Optional (Europe/Russian)
(U.S.A.)
522-1620 KHz
530-1710 KHz
IF Range
450 KHz
Usable Sensitivity
28 dB uV
(-20dB)
Note:
Due to continuous product improvement, specifications
and design are subject to change without prior notice.
14
Betora You Start
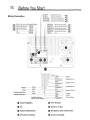
AUX OUT/R
Black line with red head
~--------------------~
Wiring Connection
_____
AU_X_O_U_T_IL_ _ _B_Ia_ck_l_ine_w_it_h_wh_it_e_he_ad___ ~
AV-OUT/CVBS 1
Dark Gray line with yellow head
l:f§J
AV-OUT/CVBS 2
Light Gray line with Yellow head
EII1§J
Brown line with yellow head Reverse Video Input
REAR OUT/R
Light Gray line with red head
Black line with yellow head
VIDEO IN
REAR OUT/L
Light Gray line with white head
Black line with red head
AUX IN/R
FRONTOUT/R
Dark Gray line with red head
Black line with white head
AUX IN/L
FRONTOUT/L
Dark Gray line with white head
AVIN-DET
SUBWOOFER
Brown line with brown head
AMP-CTR
Brown
Gray
Orange
REVERSE
'CJ
@
oc.
~
0
@G:~~
@
AUXIN
TV
IPOD+USB
£liiD
£liiD
£liiD
£liiD
£liiD
0
@
FUSE
Yellow
Battery+
Green
Green/Black
White
White/Black
Violet
PARKING _ _ _ _
Br_o_w_n_ _____,
Violet/Black
Grey
Black
Ground - - - - - - - - - - - - - - Grey
STEERING WHEEL KEY 1 _ _ _ _ _ _ _ _ _____.
White
STEERING WHEEL KEY 2 - - - - - - - - - - - - - - - -
AMPLIFIER TURN ON
DO NOT USE ON TIBURON
0
Output Plug(Male)
Speaker Rear L+/Speaker Front L+/Speaker Rear R+/Speaker Front R+/-
Grey/Black
Pink
Black
Red
Blue
Blue/White
Lamp In
Ground
Ignition Key
Antenna Power +
----------=~~.:..:..:..:..:~
O
Tuner Receptor
f) Fan
~ SocketforTV-Box
O
Output Socket(Female)
f) Microphone socket for Bluetooth
0
GPS antenna interface
() SocketforiPod/USB
15
CommQn QparatiQns
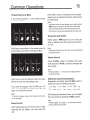
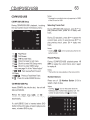
To Select Source by Menu
In any mode, touching
the menu as follow:
<
on the screen shows
Press RES button in the panel with a pointed
object (such as a ball point pen) to reset the unit
to initial status.
Note:
* If an error occurs on the display, you can also press
RES button to resume to normal, and it will erase
the clock setting and some memorized functions.
*This function can only be operated by the main unit.
Turning the Unit On/Off
Briefly press 1 PWR button to turn on the unit
when in standby, and then press and hold it to
turn off.
Slide finger horizontally on the screen menu to
see all options as shown in the figure below:
Note:
* Pressing PWR button on the main unit also performs
the same function.
Volume Control
Press 14 VOL+ button to increase the sound
level and press 14 VOL- button to decrease the
sound level.
Note:
*Pressing VOL+/- on the main unit also performs
the same function.
Click the icon for the desired mode then click
SETUP to enter into the settings menu.
If you want to navigate, click the GPS icon; if it
does not enter GPS mode, that means the unit
does not include the function.
Setting the Sound Characteristics
Repeatedly and briefly press 14 SEL button to
select the mode in the following order:
•
VOL
[
SUB
•
•
BAL
TRE
•
FAD]
BAS
Note:
* If the font displays in grey, that means this function
is not included.
After selecting the desired mode, you can adjust
the current level by pressing 14 VOL buttons.
Reset the Unit
Note:
*Pressing SEL and VOL+/- on the main unit also
performs the same function.
When operating the unit for the first time or after
replacing the car battery, you must reset the
unit.
16
Common Operations
EQ Setting
Mute Function
While listening to pop music, classic music or
rock music, you can adjust the sound to your
liking by using 26 EQ button.
Press 12 t!{] button to mute the unit. And "l1fJ" will
appear on the LCD. Press it again to resume to
previous volume level.
Repeatedly press and hold 26 EQ button to
choose the following modes in order:
Note:
* Pressing MUTE on the main unit also performs the
same function.
C
I
POP
CLASS
OFF
ROCK~
The default setting is OFF.
Note:
*Setting EQ on the AUDIO SETUP menu also performs
the same function.
Turning Loudness On/Off
Press 25 LOUD button to activate loud function.
You can press this button to increase the low
frequency, which can improve sensitivity for
your ears. Press it again to quit this function.
Note:
*This function is only available on the remote control.
Insert a SD Card
Common SD Card: insert a common SD card
into SO CARD slot and the card will be
played.
Nav~gation
SD Card: insert a navigation SD
Card (with the navigation map loaded onto the
SO Card) into SD slot, otherwise this unit's
NAVI will not work.
Eject a Disc
Press 24 ~ button to eject or insert a disc.
Note:
* Pressing ~ on the main unit also performs the same
function.
Mode Selector
Repeatedly press 1 SOURCE button to select
the different modes available.
Notes:
* Briefly pressing SAC on the main unit also performs
the same function.
Infrared Sensor
Receptor 2 on the main unit for the remote
control.
Screen Display
Briefly press DISP to enter the screen saver
mode, press again to go back to previous
status.
Note:
*When the unit is on black screen, touching the screen
also performs the same function.
Double Function
Press NAVI on the main unit to activate the
double function, which means that the current
mode remains on while using the navigation
mode. Press it again to turn off this function,
and go back to the previous mode.
. SECTIOr-.·-.-
-
USER GUIDf
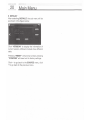
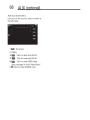
Main Menu
17
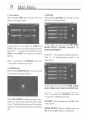
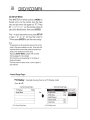
1 Video Adjust
After selecting VIDEO, the sub menu will be as
shown in the figure below:
Set Up Main Menu
I
I
, BT
!IPOD
.Tv
¢
f
~
',~..
•
I
•
,... ... t
I
I
• SETUP I AV-IN
"'
' "
~
'
.....
As shown on the above menu, press and hold
SETUP on the remote control or click it on the
screen to enter setting menu as seen below:
\,.
.. ""'
I l
I
I
<
VIDEO , AUDIO l TIME
.
' •
., .,.
"~
.,- '
'•
,'·"' ...... r
,t
fl..,,
I I
, TSC
Click+ I- to adjust the corresponding numerical
value, and then click SAVE to save preferences or
click RESET to set back to the default setting.
• SYSTEM
._
"
•
', • I
In this menu you can adjust BRIGHTNESS,
CONTRAST and COLOR.
.~ k.,.
This menu includes VIDEO, AUDIO, TIME,
SCREEN ADJ, SYSTEM, KEY CONFIG,
BACKGROUND, DEFAULT. Click the desired
item to enter corresponding setting sub menu.
Slide finger horizontally on the screen menu to
see all options as shown in the figure below:
Click < to go back to the SOURCE menu, click
_, to go back to the previous menu.
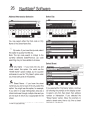
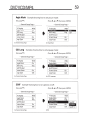
2 Audio Adjust
After selecting AUDIO, the sub menu will be
shown as in the figure below:
(
--
' ': '"1-"
!'(I
111111111111
111111111111
.-
111111111111
~,.,.
rn'tl<, T
~·
+
+
.
~"""'·.
~
....
1"
iii
f
-
ft~ ..
!"
f'l
In this menu you can adjust TREBLE, BASS,
SUBWOOFER and EQ.
Click < icon on the screen to go back to the
SOURCE menu.
Click+ I- to adjust the corresponding numerical
value, click > I < to choose your desired effect
and then click SAVE to save preferences or click
RESET to set back to the default setting.
Click < to go back to the SOURCE menu, click
_, to go back to the previous menu.
-18 Main Menu
.
~
I E-
3 Time Adjust
After selecting TIME, the sub menu will be as
shown in the figure below:
In this menu you can adjust the CLOCK and
TYPE. Click the hour (minute, second) first and
then click > I < to adjust the proper time. Click
SAVE or click RESET to set back to the default
setting.
Click < to go back to the SOURCE menu, click
-:>to go back to the previous menu.
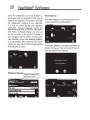
5 SYSTEM
After selecting SYSTEM, the sub menu will be
as shown in the figure below:
In this menu you can set the KEY BEEP,
BRAKE DETECT, REVERSE POLARITY and
GPS VOICE PROMPT.
Click the >I <to choose your desired selection.
Click A I v to change page as shown in the
figure below:
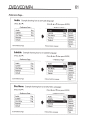
4 SCREEN ADJ
After selecting SCREEN ADJ, the sub menu will
be as shown in the figure below:
In this menu you can set the AMS, LOCAL
AREA, PANEL LIGHT, BACK UP DETECTOR.
Click the >I <to choose your desired selection.
Click < to go back to the SOURCE menu, click
-:>to go back to the previous menu.
Press ADJ SCREEN to display the above menu,
there is a + button at the upper-left corner of the
screen. Press the button at place 1, then button
at place 2, then place 3, then place 4, and press
last.
KEY BEEP: The key beeps when set ON, silent
when set OFF.
BRAKE DETECT: Brake is detected when set
ON, when set OFF brake is not detected.
SECTION 3
Main Menu
USER GUID~
19
REVERSE POLARITY: Reversed signal is sent
to the unit +12 V when set to BATTERY, 0 V
when set to GROUND.
GPS VOICE PROMPT: GPS voice prompt is
heard only during navigate mode when set OFF,
heard during any mode when set ON.
Note:
*If GPS voice volume is too low adjust the
volume on the map.
AMS FULL: All the pre-existing radio deposit
expires no longer allowed to save a new radio
when set ON; searching and then recover all of
the stored radio stations when set OFF.
LOCAL AREA: Depending on your area choose
Europe, America or RUSSIA, in order to search
. radio stations in your area.
PANEL LIGHT: The front panel button light is
not controlled by the cars headlights, as long
as the unit's working, the panel light is lit when
set OFF; the panel light will be controlled by the
cars headlight when set ON.
REVERSE CAMERA DETECT: The unit will
not operate while in reverse when set OFF; if
you choose 10, 15 or 20 seconds then the unit
would start automatically while in reverse, and
then turn off after 10, 15 or 20 seconds of driving
forward.
You can set the steering wheel buttons to the
features on the menu. For example, press a
steering wheel button first, and then select VOL
+on this menu, after saving, you can press the
steering wheel button to increase the volume.
Click < to go back to the SOURCE menu, click
~ to go back to the previous menu.
Notes:
*There is adefault setting for the steering wheel buttons.
They will need to be reprogrammed if set to default.
*According to the prompt that appears on the screen,
press button to set, there will be a corresponding
voltage display.
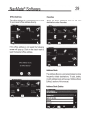
7 BACKGROUND
After selecting BACKGROUND, the submenu
will be as shown in the figure below:
6 KEYCONFIG
After selecting KEY CONFIG, the sub menu will
be as shown in the figure below:
You can select different background pictures on
this menu. Click a background in the right side
to preview, hold it to save.
Click < to go back to the SOURCE menu, click
~to go back to the previous menu.
USER GUIO~
20
J;:.._-------------------
..::S;;.:;;Eo:;;:,CT~IO:::,:.!:..:J
Main Menu
8 DEFAULT
After selecting DEFAULT, the sub menu will be
as shown in the figure below:
Click "VERSION" to display the information of
current version, differ-ent models show different
data.
Pressing "RESET" will prompt a reset, pressing
"CONFIRM" will reset unit to factory settings.
Click < to go back to the SOURCE menu, click
") to go back to the previous menu.
NavMate® Software
Safety Information and Precautions
WARNING! Please read and follow the following
safety precautions. Failure to follow the
instructions below may increase your risk of
collision and personal injury.
The Please Drive Safely screen is displayed
each time the NavMate software is turned ON
as a reminder to make use of the system's
navigational aids in a safe manner.
Before using the NavMate software, read this
entire manual. Make sure that you are familiar
with the system's features and know how to
operate the system. Proper use of the NavMate
software includes the following guidelines:
The NavMate software is not a substitute for
your personal judgment. The route suggestions
should never supersede any local traffic
regulation or your personal judgment and /or
knowledge of safe driving practices. Prior to
completing any maneuvers suggested by your
NavMate software (for example, a U-turn or a
left turn), verify that you can legally and safely
complete the maneuver. Do not follow route
suggestions if they direct you to perform an
unsafe or illegal maneuver, would place you in
an unsafe situation, or would route you into an
area that you consider unsafe.
Glance at the screen only when necessary and
safe to do so. Let the computer voice guide you.
If prolonged viewing is necessary, pull off the
road to a safe location.
Do not use the NavMate software to locate
emergency services (such as police, fire stations,
hospitals, and clinics). The database may not
include all emergency service providers. Use
your own best judgment and ask for directions
in these situations.
21
If the vehicle is in motion, only a passenger
should program the NavMate software. The
driver should not program the system unless
the vehicle is parked in a safe location.
The NavMate software's map database provides
information on suggested routes without
regard to factors that may affect your driving
experience or the time required to arrive at your
destination. For example, the system does not
reflect road detours, closures or construction,
some road characteristics (e.g., road surface,
slope or grade, weight or height restrictions,
etc.), temporary traffic congestion, weather
conditions, and similar factors.
22
NavMale® Scfl~are
Introduction to Your NavMate Software
NavMate software provides turn-by-turn visual
and voice assistance to direct you to your
selected destination. The software quickly
calculates step-by-step directions to any
destination available on the included navigation
map.
The NavMate software uses Global Positioning
System (GPS) satellites, and a digital roadway
map database to calculate and display travel
directions. The system's GPS antenna receives
signals from a constellation of 24 satellites
orbiting the earth and uses the strongest of
signals, to determine your position to within
meters.
NavMate Software Operation
Quick Start
Follow these four easy steps and you are on
your way.
Before operating your NavMate software,
please carefully read and follow the instructions
provided in the "Safety Information and
Precautions" section of this manual.
Step 1 -- Start up/Main Menu
After the NavMate software starts, you will see
the reminder warning to use your NavMate
software safely and lawfully.
Warning Screen
Vehicle Position
The NavMate software's computer considers
vehicle speed and heading changes, together
with longitude and latitude information, to
accurately determine vehicle heading and
position on a digital map.
Signals from GPS satellites are used to
determine the vehicle location. Three (good)
or four (best) satellites must be received to
accurately determine location.
The GPS
reception status is indicated by the GPS symbol
on the map.
Map provider logo will be displayed on the
splash screen.
Main Map Screen
Map and Information Database
The map database used by your NavMate
software was created using high-resolution
aerial and land based data collection.
Car navigation maps are frequently updated.
While the database was judged to be as
accurate as possible at the time of its release,
a map database can never be 100% accurate.
Road information that is maintained in the map
databases, such as turn restrictions or road
names may change over time.
This screen has TMC icon but TMC feature may
not be available on certain navigation units.
23
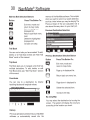
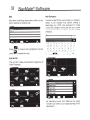
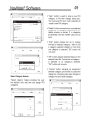
Step 2 -- Select Destination
You have many ways to select a destination. For
this example, let's find a nearby Airport.
Select by touching screen:
icon (F3) to activate main menu.
•
• Go To ...
• Point of Interest
• State or Province or Country NOTE: The
software remembers the last State/Province, so
this step is not necessary every time.
• Category
• Airport
• Click on Check Mark
• Sort by Distance
• Select one of these and the system will
calculate a route to that destination using the
criteria set in the Setup menu.
Step 3 -- Map/Guide along Route
Proceed to the highlighted route and drive while
the NavMate software provides audible and
visual guidance to your destination.
Using Your NavMate Software
The best way to learn about this product is to
explore it, while observing the safety precautions
discussed earlier.
Function Buttons
The buttons on the bottom of the display are
called function buttons. These buttons change
labels and function depending on the screen
displayed.
The list below provides a brief description of the
function buttons.
Function Buttons
a
.
Zoom in the map to show a smaller area.
Zoom out the map to show a larger area.
Return to Map mode.
Display menu, jump to main menu.
Step 4 -- Arrive at Destination
That's it! You've arrived at the selected
destination. Refer to the rest of this manual to
become more familiar with the many options
available on your NavMate software.
Display map in 3D view.
Display map in 2D view.
After panning map, select current
panned position.
II
Select currently highlighted item.
Display spell mode.
24
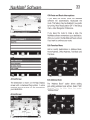
l1
r·I
~avMate® Software
Page up in displayed list.
Page down in displayed list.
(List Mode) or by searching using an on screen
keyboard (Spell Mode).
Navigation Menus
Many of the lists keep track of the last five most
recently used (MRU) selections. These are
placed at the top of the list in a different color
and allow you to quickly select items that are
used frequently. The pictures below illustrate
the List Mode and Spell Mode screens.
The table below briefly describes the Main
Menu options.
List Mode and Spell Mode
II
Go back one step.
Repeat voice instruction.
Main Menu Options At-A-Glance
Main Menu Option
Select this Option to ...
Home Address
Route to home address.
Go to ...
Pick a destination for
routing.
Setup
Set preferences for
routing and navigation
display.
Office Address
Route to office address.
Trip Computer
Display Speed, Trip,
Odometer and Clock
readings.
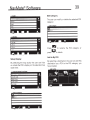
List Mode, Spell Mode, and Most Recently
Used
There are five ways to select a destination.
Several of the methods allow you to move
through a list by scrolling using the arrow keys
Most Recently Used Portion of List
25
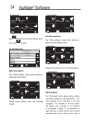
Spell Mode Buttons
Button
Mode
Press This Button To ...
Spell
Delete last entered
character.
Spell
Select currently input
characters and show list
of. matches.
Switch keyboard from
QWERTY layout to
special character layout.
Switch keyboard from
special character layout
to QWERTY layout.
Quit Spell Mode and
return to List Mode.
Spell
Spell
Spell
Destination Selection (Go To ...)
To select a destination, you must select "Go
To ... " from the Main Menu.
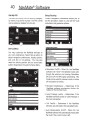
Map Screen
The table below explains the button functions
available on the Map Screen.
Map Buttons
Destination Selection Buttons
Button
Press This Button To ...
0
Show smaller map area.
II
The table below explains the button functions
available on the Destination Selection Menu.
Show larger map area.
Show Main Menu.
Button
Press This Button To ...
Return to map mode
Return to main menu.
Go back one step.
Change type of map view.
If no active route, select current
location.
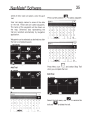
Address/1 ntersection
If you know the street address or cross streets of
your destination, use the "Address/Intersection"
selection. You must select the State/Province
where the destination is located. NOTE: The
system remembers the last State/Province
selected, so this step is not necessary every
time.
26
N~Mate® SQft'JYare
Address/Intersection Selection
Select City
You may select either the Post code or City
Name or the Street Name first.
Zip code -If you know the zip code, select
this option to quickly find the city.
Note: The zip code search is limited to the
currently selected State/Province. Zip code
searching may not be available in all areas.
Select Street
City Name - If you know the city and
street, select this option. You could use the
"Street Name" option instead, but it is quicker
and easier to use the "City Name" option when
you know both parts of the address.
Street Name - If you know the street
name but you are not sure of the city, select this
option. You might use this option, for example,
if you were in a large metropolitan area and a
street continues through multiple cities and you
are not sure of which city is appropriate for the
street.
(This feature is not available on all systems. It may be disabled
in order to meet 2GB limits.)
If you selected the "City Name" option, continue
by following the prompts on the display screen
to select a city first, then street, then address
number or intersection. If you selected the
"Street Name" option, follow the prompts to
select a street name, then a city, then a street
address or intersection.
27
Select State or Province/City/Street List
Mode Buttons
Button
Press This Button To ..
Return to map mode.
Page up in displayed list.
Return to main menu.
Page down in displayed
list.
Switch to Spell Mode.
Go back one step.
Point of Interest (POl)
The Point of Interest option is useful when you
are going to a public place or are looking for
some type of facility such as a gasoline station.
After selecting the Point of Interest option,
you must select the State/Province where the
destination is located. NOTE: The system
remembers the last State/Province selected, so
this step is not necessary every time.
• By City- You can select the city also.
• By Phone Number - If you know the phone
number of the desired POl, select this option to
quickly find the POl. Note: The phone number
search is limited to the currently selected
country. Phone number searching may not be
available for all POl's.
(This feature is not available on all systems. It may be disabled
in order to meet 2GB limits.)
• By Zip code -If you know the zip code, select
this option to quickly find the city. Note: Zip
code search is limited to the currently selected
State/Province. Zip code searching may not be
available in all areas.
• By Name - If you know the name of the Point
of Interest for example "COLISEUM", select this
option.
POl Category
Points of Interest may be searched by Category,
Zip code, Phone Number, or Name.
POl Search Methods
POl Name Speller
• By Category - If you are interested in the
closest POl of a certain type for example nearest
gas station, select this option.
28
~avMate® Software
Some POl categories may not be available in
some areas and not all possible POl's may be
listed for all categories. For example, although
the "Restaurant" category is very extensive,
it is only as current as the map database
information. Several categories restrict the
search radius as well to minimize the search
time. Since businesses change over time, so
will the accuracy of the points of interest in
your navigation map. To have the most accurate
map database, annual map database updating
is recommended. After selecting POl search
criteria, you may select to list the results sorted
by distance or by name.
POl Search Results
straight-line distance to POl
and POl phone number
Home Address
The Home Address is a convenient way to route
to· your saved home address directly.
If the home address is not saved the following
screen will pop-up. Click on the check mark to
save the desired home address.
29
NavMate® Software
Office Address
Favorites
The office Address is a convenient way to route
to your saved office address directly.
There are three additional ways to set your
destination under Favorites:
If the office address is not saved the following
screen will pop-up. Click on the check mark to
save the desired office address.
Address Book
The Address Book is a convenient place to store
frequently visited destinations. To add, delete,
or edit address book entries see "Address Book
Editing" section of this manual.
Address Book Entries
Address Book Selection Buttons
Press This Button To ...
Button
Exit menu mode and
return to map mode.
Edit the highlighted
displayed list.
Return back Main menu
level.
Delete the highlighted
displayed list.
Go back one step.
Iii
IJ
memory of the NavMate software. This is helpful
when you want to return to a recent destination,
such as a hotel where you may be staying. The
Previous Origin of the last calculated route is
also stored for easy return to your start point.
Previous Destination Selection
Trail Book
You can route to trails you have created. To add,
delete, or edit Trail Book entries see "Edit Trail
Book" section of this manual.
Previous Destination Selection Buttons
Button
Trip Book
Trip Book allows you to navigate a trip that has
multiple destinations. To add, delete, or edit
Trail Book entries see "Edit Trip Book" section
of this manual.
Press This Button To ...
Exit menu mode and
return to map mode.
~
'
Page up in displayed list.
Return back one menu level.
.·t..,~~ •
Coordinates
You can route to a destination by directly
inputting latitude and longitude values.
t,t~r=
t.._._Mi
•
n
1
,
11 ,
I
o "
"'.11w
•
r;J
Page down in displayed list.
li1
Delete the selected item.
[t8
Go back one step.
By using Map
You may select the destination by touching the
screen. The system will display the cross hairs
according to the location you touch.
History
Previous destinations entered into your NavMate
software are automatically saved into the
31
Route Calculation and Guidance
Select Destination from Map
I4;•111P\hlt P
...,
,j
I
•
2
0
t
h
p
0
'•
After selecting a destination, the system
calculates a route based on the route criteria set
in the Setup Menu.
Route Calculation
,J
The status bar indicates route calculation
progress.
to display location
Press current position
information about the current panned location.
Select the highlighted entry to select the panned
location for the following options.
Route Calculation Progress
Please Proceed
When route calculation is complete, the NavMate
software will instruct you to "Please proceed to
the highlighted route" unless you are already on
the route. The highlighted route is indicated in
magenta.
Route Guidance
Select Destination from Map Buttons
Button
Press This Button To ...
Return to map mode.
Return to main menu.
[~
Go back one step.
Once on the highlighted route, guidance
information is provided on the screen. Glance
at the screen only when necessary and safe to
do so.
As you continue on the route, the guidance
information is continually updated to correspond
with your progress to the destination.
32
NavMate® Software
Guidance Display
Road name or sign information
upcoming turn
Distance and time to
next turn
True View (Intersection Zoom)
Map display
Just before a turn point, the guidance display
will show a close-up or "true view" of the roads
around the turn point.
True View (Intersection Zoom)
The GPS symbol may change colors indicating
the strength of the signal. The GPS symbol
colors mean:
Green - GPS signal is free from obstruction
and is being received regularly. At least four
satellites are being received.
Map Display
The Map Display shows roads, road names, and
geographic features like lakes and rivers. You
can adjust the map scale, the map orientation,
map view, status information display, and the
distance units to your own preferences (See
Setup section of this manual).
Yellow - GPS signal is partially obstructed.
Three satellites are being received.
Red - GPS signal is unavailable. Two or fewer
satellites are being received.
Current Location Screen
Press current position
to display
information about the current map location.
Then select the location information box to add
it to address book, use it as a destination, re-set
position, or save location as HOME location.
33
Off-Route and Route Interruptions
If you leave the current route, the NavMate
software will automatically recalculate the
route. This feature may be disabled if you prefer
by turning "Auto Recalculation Off" in the Setup
menu, under Navigation Preference.
If you leave the route to make a stop, the
NavMate software remembers your destination.
After you re-start, the NavMate software will ask
if you want to continue your route.
Edit Favorites Menu
Add or modify destinations in Address Book,
Home Address, Office Address, Trail Book and
Trip Book.
Arrival Screen
Edit Address Book
The destination is shown on the Map Display
screen with a checkered flag symbol. A voice
message announces that you are approaching
your destination.
The "Address Book" option allows adding
and editing address book entries. Select "Edit
Favorites" from the Main Menu then select
"Address Book".
Arrival Screen
34
Use
NavMate® Scft~are
ilil
liJ
entry and
Edit Office Address
Edit function to rename address book
to delete.
The "Office Address" option allows adding or
replacing office address book.
Select office address from the following places.
Edit Home Address
The "Home Address" option allows adding or
replacing home address.
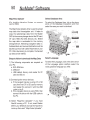
Edit Trail Book
Select home address from the following
places.
The "Trail Book" option allows adding, editing
and Setup display for trail book entries. The
main purpose of the "Trail Book" is off-road
navigation. For example in the area where
the digital map coverage is not sufficient
or completely missing. A trail represents a
path taken by a vehicle while the trail is being
recorded. Each trail is shown on the map as
35
NavMate® Soft)llare
series of dots. User can select a color for each
trail.
to add a waypoint:
Press current position
User can assign names to some of the dots
on the trail. These dots are called waypoints.
The name of the waypoints will be shown on
the map. Otherwise dots representing the
trail are recorded automatically by navigation
application.
Waypoints can be selected as destinations after
the trail is completed (saved).
Q
1\
S
D
. zl xJc
l . :·:~~l.t~L
Add Trail
Press Menu icon
and select Stop Trail
when you complete the trail.
!
Edit Trail
. Q
'
J\
I
'
l.
·l.w
:./
J~
~.[·
.j
X
Select the trail name, use
trail and
ii'il
lji to delete the trail.
to rename the
l
1J oJl P
H
~QlwJEJ'RJllvJu
l~ F G rH J
A
q
0
1 K I l. I
1s f o I
lx f clv f nlN IM I I 1J[1
il -~} ~l· -~
l. '~~J. ~l.'"" !l"'
: 1
...... ...__.,1 . --·······-'·'.__,; ·•
.. ..._ . . ;
..... ':':"~ • . .... · ··- - -
fl
to rename the waypoints and
Use
delete the waypoints.
liJ
to
Setup Trail
Display Select Setup Display and set the map
scale for the trails to be displayed.
Select the highlighted trail name to edit color
and waypoints.
37
NavMate® Sctt~are
Add
Add allows adding trips and destinations within
a trip.
Edit Trip Book
"Trip Book" is a collection of trips. Each trip
represents a set of multiple destinations.
Edit Trip Book allows adding and editing trips
and destinations within a trip.
trip. Press ....·.·...·...... to rename the destinations and
press
liJ to delete an existing destination in
a selected trip.
38
~avMate®
Software
Edit
Add Category
Edit allows modifying destinations within a trip
and or deleting an existing trip.
In order for My POl to work properly, a category
needs to be created first before adding a
destination as a POl. Use keyboard to create
a new POl category name and set icon, sound
and distance of your choice to the created
category.
Trtp , 2
Press
press
iPJi
liJI
I
}
I
J w l r J. t~ J f J.. v J u
A 1. s 1D J f 1G I H J J
, Q
to rename the highlighted trip and
to delete the trip.
1 '[..
l
x
1 ·
l. · -·
li
Jt
c
'J··
a•
v ll' n
-A
Jl._ .$W.I
J·r
-~
N
.l.· M
.;
A
Edit My POl
The user can create personalized categories of
Point Of Interest.
By selecting sound and distance the system
will alert you when you ·are approaching the POl
destination.
39
Edit Category
The user can modify or delete the selected POl
category:
Press
press
Setup Display
By selecting the map scale, the user can hide
or unhide the POl's display on the selected map
scale view.
i@i!"J
to rename the POl category or
to delete.
Add to My POl
By selecting a destination, the user can add this
destination as a POl to the POl category you
have created.
Edit My POl
Setup Routing
The user can modify the POl items by category,
by name or by phone number. The POl names
can be edited or deleted from the list.
Criteria Navigation Preferences allows you to
set the simulation mode on, and set the route
calculation and guidance options.
Set-Up Menu
You may customize the NavMate software to
your own preferences. Select Set-up option to
adjust navigation preferences, display options,
and units (km or mi) settings. You may also
reset the vehicle position and do some basic
system diagnostics through the Setup Menu.
• Simulation On/Off - When On, the NavMate
software will "drive" the selected route even
though the vehicle is not moving. Simulation
ON turns off the GPS signal processing. This
mode can be used to preview a route, or show
off the system to friends.
• Shortest time/distance - Determines if the
NavMate software emphasizes finding the
fastest or the shortest route.
• Avoid Freeway yes/no - Determines if the
NavMate software avoids or uses freeways in
the route calculation.
• Toll Yes/No - Determines if the NavMate
software uses toll roads in the calculated route.
• Auto Recalculation On/Off - When On, the
NavMate software will automatically recalculate
the route _if the current route is left.
41
NavMate® Scflware
• Voice Guidance On/Off- When On, the system
will give audible guidance.
• Compass Icon Display On/Off - Turn the
Compass symbol on or off.
Display Options
• Next Maneuver On/Off- Set the display of the
turn symbol.
Display options allow you to set the map
orientation and some of the information items
displayed.
• Intersection Zoom On/Off- Turn the true view
on or off.
User Preference
Language Settings
You can choose one of the following
languages.
• North Up/Heading Up- Determines if the map
is always displayed with North direction at the
top of the screen or if map is always adjusted
so that vehicle symbol points toward the top
of the screen.
• Status Bar Display On/Off- Turn the display of
the Status Bar on or off.
• GPS Icon Display On/Off- Turn the display of
the GPS reception symbol on or off.
• Scale Icon Display On/Off - Determines if the
map scale symbol is shown.
:."'---------~
' ',~..
,,,..~_
Et~•t~ •
.....-----------•
42
NavMate® Software
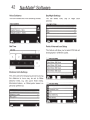
Voice Guidance
Day/Night Settings
You can choose one of the following Voices.
You can select Auto, Day or Night color
scheme.
Set Time
Point of Interest Icon Setup
r.§Sit. . . . ..
lime
This feature will allow you to select POl that will
be displayed in different scales.
3
4
5
Distance Units Settings
The units used when displaying and announcing
the distance to turns may be set to Miles
(decimal miles, e.g. zero point three miles),
Kilometers/meters, or Miles/yards based on
personal preference.
43
NayMate® SQftware
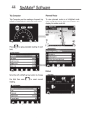
Location Reset
GPS diagnostic
You may reset the location of the vehicle symbol
using the Location Reset option.
The GPS diagnostic displays the number of
GPS satellites currently in view and how many
are currently being used. The GPS satellite time
is displayed (UTC) and so is the latitude and
longitude determined from GPS.
GPS Diagnostic Test Result
System
The System Diagnostics menu allows you to Set
Volume, diagnose the GPS reception status and
provides information on the current software
and map version numbers.
System Menu
System Information
The version numbers for the system software
and mapping can be found under System
Information.
System Information
Volume
Allows the user to set or mute the volume of the
navigation unit
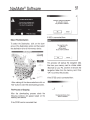
Trip Computer
Planned Route
Trip Computer gives the readings of speed, trip
related timing, elevation, odometer and clock.
To view planned route on a highlighted route
click the top left corner Icon and the system will
display the entire route list.
Press
field.
to display detailed reading of each
Detour
Scroll the UP or DOWN arrow button to choose
the field then press
reading.
r "1
to reset current
45
NayMate® Scttware
Avoid Specific Road
Avoid Next Ro..Yi
Detour Distance
Cancel Route
Select this function to cancel the current route.
46
NavMate® Software
Follow Trail
Next time you go off-road, you can follow the
same trail you created by selecting "Start Route
Guidance" then select "Trail Book" and finally
select an existing trail.
You can select to go to any points in this trail
as a starting point. Upon your selection, the
system will point you with a red line to that
starting location. You will follow the red line to
the starting point and start your trail blazing by
following the dotted line.
You will see the following screen upon selecting
a trail:
47
Navigation Software Utility
Select device
Press Menu icon n~;~:1 then select "Stop Trail"
to cancel route. ' ,~-
POl Uploader
MapNoice Uploader
Backup
Restore
Language
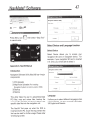
Select Device and Language function
Select Device
Select Device allows you to access your
navigation SO card or navigation device. For
example, if your navigation SO card is inserted
in E: drive, you will be able to select it.
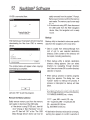
Appendix A: NavUtil Manual
Introduction
Navigation Software Utility
Select device
Navigation Software Utility (NavUtil) has 4 major
components:
1) POl Uploader
2) Map/Voice Uploader (For installing
POl Uploader
MapNoice Uploader
Backup
Restore
Navigation System on memory card or HDO)
3) Backup
4) Restore
This utility helps the user to upload/download
POl files, map and voices files, backup the
user specific data files and also to restore user
specific data files into the navigation unit.
The NavUtil Tool pops up when the DVD is
inserted into the PC. As per the requirement the
tool can be used for further usage. Please refer
to following screen:
Language
Exit
Language
It allows you to select different languages when
running NavUtil. So far it supports US English,
UK English and Russian.
48
NavMate® Software
• Activating "Category" pops up "Select
Category" dialog box. "Category" button
is intended to change assignment between
imported files and categories by editing or
creating new categories.
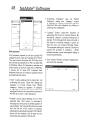
POl Uploader
POl Uploader intended to edit and upload POl
categories and import and upload list of POl's.
The user should download the POl files from
the internet and save them on PC in a folder like
C:\POIFiles. When POl Uploader is started and
"Add" button is clicked to open the C:\POIFiles,
it shows list of saved POl imported files.
Whatever files the user needs to upload should
be collected and loaded.
• "Add" button adds new file to import list. By
activating this button, "Open file" dialog box
appears. If a file is chosen then "Select
category" dialog box appears. If category
is selected or created (by new button) and
assigned to the file, file name will be inserted in
POl file list in front of main dialog box.
• "Delete" button allows deleting one or more
selected files. When button is activated a
message box with prompt to delete appears. If
user presses "Yes" selected file will be removed
from the file list. If "No" button is pressed,
deletingprocesswillbeterminated.The"Delete"
button will be disabled until; at least one (or
more) files are selected in the file list.
• "Upload" button starts the process of
uploading the file list to selected device. By
activating "Upload", a progress dialog box is
started. If the Storage folder does not exist in
the device a warning message is given so
that the user can create a Storage folder.
The progress dialog box contains a button to
cancel the process if necessary . When
upload process is over the progress dialog is
closed automatically.
• "Exit" button finishes running the application
and exits the uploader.
49
Nm!Mate® Sof1ware
Look in:
I0
NaviUtii_Zip
• "New" button is used to create a new POl
category. In the New Category dialog box,
the name and POl icon must be selected to
create a new POl category.
;.:)20070606. 121225.nsu
'0
20070608 ,140325. nsu
~san francisco.csv
~san jose.csv
• "Delete" button removes one or more selected
categories. If a category is assigned to a POl,
delete process is denied. If no categories
are selected in the list, "Delete" button will not
work.
• "Edit" button enables the user to change
the field of selected category. If there is not
a category selected category or more than
one category is selected, "Edit" button will
not work.
• "OK" button assigns selected category to the
selected main file. If more than one category
is selected or no category is selected,
"OK" button will not work.
Select Category feature
• "Cancel" button discards new assignment
between category and POl file and closes the
dialog box. Canceling also keeps changes in
category list and inside categories.
"Select category" feature provides the user
the ability to edit, add new and assign POl
categories.
I ,,, .
Map/Voice Uploader
Select Database Area
(For installing Navigation System on memory
card or HOD)
To select the Database Area, click on the down
arrow of the Database Area option and then
select the area you want to download.
The Map/Voice Uploader utility is used to upload
map data into the navigation unit. It helps to
copy the selected map data from the Master
DVD to the memory storage device like SD card,
CF card, HOD (Hard Disk Device), etc. Before
the map data is downloaded to the memory
storage device, the existing navigation data i.e.
Address Book and Previous Destinations will be
backed up into a folder called \Navmate on your
PC. After downloading is complete, the backed
up data can be restored.
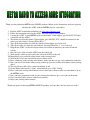
Steps to follow to download the Map Data
Select Language
1) The following components are required on
your PC:
a. DVD-ROM drive
b. USB port
c. USB cabled. Memory card reader for CF
card and SD card
To select the Language, click on the down arrow
of the Language option and then select the
voice guidance language you prefer.
2) Connecting the memory devices:
a. If the navigation device is using CF or SD
card, then insert CF or SO card to memory
card reader then connect it with the USB
cable to the PC.
b. If the navigation device is using HOD, then
connect the device with the USB cable to
the PC.
3) Select "Map/Voice Uploader" if you have
NavUtil running on PC. If not, insert Master
DVD in your DVD drive and wait for NavUtil to
come up then select "Map/Voice Uploader".
GO
51
; ~?tiM
Delete
All of the contents in destination
CF card will be erased.
Do you want to continue?
. . . . . . . . . . . . . . . .. . . 1
I[. . . . . . . .?..~ . . . . . . ..J!
~
Cancel
If HOD is connected then:
Select The Destination
To select the Destination, click on the down
arrow of the Destination option and then select
the destination drive of the memory device.
The map files in the
F:\Navmate
will be erased.
Do you want to continue?
OK
Cancel
This process will backup the navigation data
files from your memory card to a folder called
\Navmate on your PC, and then it removes the
navigation folder from the memory card. Click
"OK" to continue the process.
If the CF/SD card is connected then:
After making all the above selections click on
"GO" button to start the downloading process.
Deleting
:;;,:";
The Process of Copying
After the downloading process starts the
following windows will appear based on the
memory card device.
If the CF/SD card is connected then:
Cleaning Up Memory Card ...
Just for a moment...
52
NavMate® Software
If HOD is connected then:
safely removed from the system." Prompt.
Remove your memory card from the memory
card reader. The memory card is now ready
for use.
b. If the device is using HOD, then disconnect
the USB cable from the HOD navigation
device. Now, the navigation unit is ready
to use.
Deleting
Cleaning Up Map Files ...
Just f~:n a moment. ..
Backup
-After backing up, the program will start copying/
downloading the files from DVD to memory
device.
Copying...
[Kj
• Data is copied from directory/Storage from
root of unit to user selected destination
directory. Entire content of the directory will
be copied, including subdirectory.
I
• When backup utility is started, destination
directory dialog appears. User can select
directory by navigating through directory
tree. User can choose OK to confirm directory
selection or Cancel.
Navmate, exe
From 'common' to 'Navmate'
'-- - - - -- - - -'I
10 Seconds Remaining
Backup utility is intended to store user specific
data from the navigation unit to local drive.
Cancel .
The window below will appear when copying/
downloading is complete:
Download
Map download complete
• When backup process is started, progress
dialog box appears. The dialog has one
"Cancel" button to interrupt the process. If
process is interrupted no backup will take
place.
OK
Left click "OK" to exit this program.
Remove the Memory Device
Safely remove memory card from the memory
card reader or disconnect the USB cable.
a. If the device is using CF/SD card , then left
click "Unplug or Eject Hardware" icon on
your PC then left "OK" at the "The 'USB
Mass Storage device' device can now be
• During backup operation, data is being copied
from /Storage directory on the unit to directory
YYYYMMDD.HHMMSS.nsu- where:
YYYY- year, MM - month, DO- day
HH- hour(0-24), MM- minutes (00 .. 59)
SS - seconds (00 .. 59).nsu
Eg. 20070606.121225.nsu
• If destination directory exists and is not empty,
warning box appears to confirm overwrite of
NavMate® Software
files. The box contains OK and Cancel button.
OK confirms operation to continue. Cancel
terminates backup process.
~
.J H;r l',t.ll'nJ ·,
~titt4d
~
.., i nulrr#· (1' :1
~
:J A.u:~ ;T, (f•)
• .,. F!'"''" .-.:Hr f, -J ff )
• .., f1,.l,_,,,.<i,._ r•..~ lf -:•
• .., l,,..,.,,..-;t.,~.or.l!"J t:~ )
, ,., rtf'l..r\li) _flf' rH 1
~ . .., llrwn.·,..trr,-J I I
li
~ _j' H:r 'ilr'!"i":"~ 1\:'1: ~'\
Restore
Restore utility is intended for _restoring of
previously backed up data to unit and, also, to
manage backed up data.
• When restore utility is started dialog box
appears. This dialog contains current directory
path and list of previously backed up data in
current directory.
• Change current directory button (... ) starts
dialog to select directory. The dialog shows
current directory and user can navigate
through directory tree to choose new
selection. If user presses OK new current
directory will be set and backed up data
list will be updated. Cancel button terminates
the selection process and current directory
will be not changed.
• Delete button allows selected backed up
data directory to be deleted from list.
After activation of this button, a warning
to delete will pop up. If user confirms
delete operation, selected data directory
and its contents will be removed.
53
• Cancel button terminates the restore operation.
• Restore button starts the process of copying
data from selected backup directory to Storage
directory.
• If there is data in Storage directory, warning
appears to confirm overwriting files. When
restoring process is started, progress box
appears.
• The progress box contains a Cancel button to
terminate the process if necessary. If the
Cancel button is selected no data will be copied
to the storage directory. If OK is selected on
the progress box this allows the restore
function to continue.
54
DVPLVCPIMP4
DVD/VCD/MP4
DVD/VCD/MP4 Setup
During DVD/VCD/MP4 playback, touching the
top of screen shows the following menu:
Note:
*Clicking ~~~~~on the screen also performs the same
function.
Number Buttons
Press one of 23 Number Buttons (0-9) to select
a track to be played.
Note:
* Clicking lidil icon on the screen shows the following
menu: number keys appear, touch the number to
select track, click Iii icon to play.
1 CD
2 •
3 g
4 11
5 1pm
Play/Pause
Full Screen
0-9 Number Keys
Click it to back to root menu
Click it to enter DVD Setup menu
6 IM Click it to enter VIDEO setup
menu, see page 14 of the "Video Adjust"
7 Cl I ~ Fast reverse/Fast Forward
8 Display
9 I:J I 1::1 Previous Track/Next Track
10 ~ Press it to enter SOURCE menu
DVD/VCD/MP4 Play
Insert a disc into the slot the unit will
automatically switch on, if a disc is loaded,
press DVD button on the main unit to start the
playback. If the unit is in another mode, press
DVD to switch to disc play.
Selecting Tracks Fast
During DVD/VCD/M P4 playback, press 21•~
to play previous track, press 21 ~· to play next
track.
* Press 23 CLEAR to clear mistaken input.
Pause the Playback
During DVD/VCD/MP4 playback, press 17 11
to switch between play and pause. Press this
button again to end pause.
Note:
*Clicking
1:11
on the screen performs the same function.
Stop the playback
During DVD/VCD playback, first press, 18 •, then
press 27 or 17 on the remote control to replay;
press 18 • twice to stop playing completely,
then press 17 to return to the beginning of the
current track.
55
D~[l/VCD/M P4
During MP4 playback, press • first, then press
17 to return to the beginning of the current
track.
Note:
*This function is only available on the remote control.
System Switch
During DVD/VCD mode, Press 11 P/N on remote
control to set the TV standard to PAL or NTSC
or AUTO system.
,......--~•
AUTO
---•NTSC
~......-_ _ _ _ _ PAL -.11(---~----~
Playing Tracks at Random
NOTE:
*This function is only available on the remote control.
During DVD/VCD/MP4 playback, 16 ROM
button on the remote control to play any track
at random under the directory which you select.
Press it again to resume normal play.
Slow motion playback
Note:
* Clicking
During DVD mode, press 10
There are speeds as follows:
~~~
on the screen performs the same function.
C
Repeat Playing
C
~~~
to slow play.
1..,1/2-+ 1..,1/4-+ 1..,1/8-+ 1..,1/161
-411/2 +-- -411/4 +-- -411/8 +-- -411/16 ~
During DVD playback, pressing 15 APT on the
remote control to perform replay function as
follows:
Chapter
~
Title
I
During VCD/MP4 mode, press 10 ~~~ to slow play.
There are speeds as follows:
c
1~1/2 -1~1/4-:-1~1/8-1~1/16]
Repeat Off.......- - All ~
During VCD/MP4 playback, press APT on the
remote control to TRACK REPEAT.
Note:
*This function is only available on the remote control.
Skip backward/forward/F.F/F. REW the
playback
Press 20 ( .,. or ~ ) on remote control to perform
fast rewind or fast forward. Each pressing will
change as follow:
c 2 x - 4X-. 8X-16X-32XJ
NOTE:
* Clicking .,. I~ on the screen also performs the same
function.
NOTE:
*The function is only available on the remote control.
Increase the size of picture
During DVD/VCD/MP4 mode, Press 9 ZOOM
to increase the picture size. The sizes are as
follows, with the picture increasing in size each
time 9 ZOOM is pressed until the maximum size
is reached.
c2X
.....__--~•
3X--~ 4X J
No Change
Note:
*The function is only available on the remote control.
* Remove the image by pressing 27 button.
56
Dl!DLVQD/MP4
On Screen Display
then press ENTER.
During DVD status, press 8 OSD button the
display shows:
Notes:
*The function is only available on the remote control.
*Press 22 CLEAR to clear any mistaken input.
J
I Title Elapsed ---+Title Remain
LDisplay Off ~ Chapter ~ Chapter
Remain
Elapsed
During VCD/MP4 status, press OSD button the
display shows:
Lngle Elapsed -Single Remain I
Display Off~ Total ~ Total ~
Remain Elapsed
Note:
*The function is only available on the remote control.
Setting the Playback Time
During DVD mode, press 2 GOTO button to
set the playing time, when the TFT display :
title/chapter/audio/subtitle/angle/title time/
chapter time/repeat/time disp.
Press 27 [ • ][ " ] to select the options, press
ENTER to set the status. Then press NUMBER
BUTTONS or 27 [ ~ ][ ~ ] to set the current
status.
During VCD mode, press 2 GOTO button to set
the playing time, when the TFT display : /disc
time/track time/repeat/time disp.
Changing audio language (Multi-audio)
DVDs can provide audio playback with different
language. With DVDs featuring multi-audio
recordings, you can press 6 AUDIO to switch
between languages and audio systems during
playback.
Selection options switch as follows
AUDIO 1 -
AUDIO 2 -
AUDIO 3..•...
Note:
* This function is only available on the remote control.
* This function only operates with DVDs featuring
multi-audio recordings.
*The number in the "G)))" mark on a DVD's package
indicates the number of recorded languages/audio
systems.
Changing the subtitle language (Multi-subtitle)
With DVDs featuring multi-subtitle recordings.
You can press 5 SUB-T to switch between
subtitle languages during playback.
Selection options switch as follows:
Subtitles 1 - Subtitles 2 - •... - Subtitles OFF
Press 27 [ • ][ " ] to select the options, press
ENTER to set the status. Then press 23
NUMBER BUTTONS or 27 [ ~ ][ ~ ] to set the
current status.
During MP4 playback, first press 2 GOTO, and
monitor shows : ---, press your desired track by
using number buttons and press ENTER to set
the status. Second press GOTO button, and the
monitor shows: -:--:--, input your desired time,
Notes:
*This function is only available on the remote control.
*This function only operates with DVDs featuring
multi-subtitle recordings.
* Refer to the DVD packaging to determine the subtitle
languages available.
57
DVDLVQD/MP4
Changing the viewing angle (Multi-angle)
With DVDs featuring multi-angle (scenes shot
from multiple angles) recordings, you can press
7 ANGLE to switch among viewing angles
during playback.
Selection options switch as follows:
ANGLE 1 -
ANGLE 2 -
ANGLE 3..... .
Notes:
*This function is only available on the remote control.
*This function only operates with DVDs featuring
multi-angle recordings.
*The D mark on a DVD's package indicates whether
it features multi-angle scenes. The number in the
D mark indicates the number of angles from which
scenes were shot.
*ANGLE feature may not be used during fast forward,
reverse or pause modes.
Selecting Channel
During VCD status, repeatedly press 6 AUDIO
button to select the following channel:
• Stereo
~.....--
Mono Left ~
____ Mono Right _._. _ _ ___,
Selecting the corresponding channel to set the
different sound characters.
Note:
*This function is only available on the the remote control.
page; move the cursor to .,., and press ENTER
to move forward to the next page.
At any time, press 18 • to cancel the program
playing.
Note:
*The function is only available on the remote control.
* Press 22 CLEAR to clear any mistaken input.
Play_ing PBC (Menu)
During VCD status, first press 3 TITLE, PBC
playback starts and the menu of entire
disc appears on the monitor. You may then
select your favorite track by using 23 Number
Buttons. When a track is playing, you can press
4 MENU to return to the menu to select another
track. To cancel PBC playing, press 3 TITLE
button again.
Note:
*This function is only available on the remote control.
* PBC playing is available for version 2.0 of VCD and
SVCD discs only.
Selecting MENU
1 Selecting Menu: During DVD status, press
4 MENU to return to the root menu, all of the
chapters will appear on monitor. You can
press 27 or 23 button to select your desired
chapter.
2 Selecting Title: During DVD status, press 3
Program Playing
During VCD mode, press 13 PROG, the TFT
displays the program menu. Press NUMBER
BUTTONS to select the track Number and
then press 27 to move the cursor to START,
press ENTER to start program playing; move
the cursor to EXIT and press ENTER to exit
the program playing. Move the cursor to 1+4 and
press ENTER to move back to the previous
TITLE to return to the title menu, all of the titles
will appear on monitor. You can press 27
or 23 button to select your desired chapter.
Notes:
* Under DVD menu, touch the screen to select items.
* If your unit does not have the touch screen option or
the disc does not support touch, pressing TITLE+
on the remote control will display the titles. Then use
the corresponding arrow button to select the desired
title and • to enter your selected title.
58
lJVD/VClJLMP4
DVD SETUP MENU
Press 19 SETUP on remote control or MENU on
the main unit or on the monitor, then the main
menu and sub-menu will appear on TFT. Press
27 [ " ][ T ][ • ][ .. ] on the remote control to
select your desired items, then press ENTER.
Press " to go to the previous one, press SETUP
or press [ " ][ T ][ • ][ .. ] to move the cursor on
"X", then press ENTER to exit the menu setup.
Notes:
*The selections are the preferred options that will be
chosen if they are available on a disc. If the disc that
is inserted does not have the preferred option then
the discs own preference will be used.
* Regarding SETUP MENU, please refer to these
following pages for more details.
* Some functions vary depending on the types or
formats of the disc.
*Touch the screen to select menu, touch it again to
select the item.
--General Setup Page-
TV Display
Example showing how to set TV Display mode:
(Press • orT)
--General Setup Page--
--General Setup Page-I
TV Display
Angle Mark
Wide
Def.
t
Go To General Setup Page
TV Display
Angle Mark
OSD Lang
Spdif Output
Screen Saver
LogoType
Set TV Display mode
Wide
On
Eng
On
Def.
Norma liPS
Normai/LB
59
Q~[U~CD/M P4
Angle Mark
Example showing how to set picture mode:
(Press .A orT)
(Press
--General Setup Page-TV Display
Angle Mark
OSD Lang
Spdif Output
Screen Saver
Logo Type
Wide
On
Eng
OSD Lang
r-O_SD_L_a_ng~
E_n~g~~
_______
Spdif Output
Screen Saver
On
Logo Type
Def.
Set Angle Mark
Example showing how to set language mode:
(Press .A orT)
(Press
--General Setup Page-TV Display
Angle Mark
OSD Lang
Spdif Output
Screen Saver
LogoType
Wide
On
Eng
On
Def.
Go To General Setup Page
SPDIF
or T, then press ENTER)
--General Setup Page--
On
De f.
Go To General Setup Page
~,.A
~,.A
or T, then press ENTER)
--General Setup Page-TV Display
Angle Mark
OSD Lang
Spdif Output
Screen Saver
Logo Type
Wide
On
Eng
On
Def.
Set OSD Language
Example showing how to set captions on/off:
(Press .A orT)
(Press
--General Setup Page-TV Display
Angle Mark
osq Lang
Spdif Output
Screen Saver
Logo Type
Go To General Setup Page
~,.A
or T, then press ENTER)
--General Setup Page--
Wide
On
Eng
TV Display
Angle Mark
OSD Lang
Spdif Output
Screen Saver
Logo Type
On
Def.
SPDIF
Wide
On
Eng
On
Def.
60
[Jl!Q/~0/M~
Screen Saver Example showing how to set Screen Saver on/off:
(Press ~' • or T, then press ENTER)
(Press • orT)
--General Setup Page--
--General Setup Page-Wide
On
Eng
TV Display
Angle Mark
OSD Lang
Spdif Output
Screen Saver
LogoType
TV Display
Angle Mark
OSD Lang
Spdif Output
Wide
On
Eng
On
Def.
Screen Saver
Go To General Setup Page
Logo Type Example showing how to set Logo Type:
(Press ~' • or T, then press ENTER)
(Press • orT)
-- General Setup Page --
--General Setup Page--
.
Wide
TV Display
Angle Mark On
OSD Lang
Spdif Output
Screen Saver
LogoType
Eng
On
Def.
Go To General Setup Page
Wide
TV Display
Angle Mark On
OSD Lang
Spdif Output
Screen Saver
On
Logo Type
Def.
Eng
LogoType
--Down mix Setup-
DOWN MIX
Example showing how to set Stereo mode:
(Press • orT)
--Down mix Setup-DOWN MIX
Go To Downmix Setup
(Press ~' • or T, then press ENTER)
--Down mix Setup-DOWN MIX
Down mix (1 +1) Setup
DYQJVCD/M P4
61
--Preference Page-
Audio
Example showing how to set Audio language:
(Press .A orT)
(Press ..,, .A or T, then press ENTER)
-- Preference Page -Audio
Subtitle
Disc Menu
Parental
Default
Eng
Eng
Eng
Go To Preference Page
Subtitle
--Preference Page-Audio
Subtitle
Disc Menu
Parental
Default
Eng
Eng
Eng
Preferred Audio Language
Thai
Example showing how to set subtitle language:
(Press .A orT)
(Press ..,, .A or T, then press ENTER)
-- Preference Page -Audio
Subtitle
Disc Menu
Parental
Default
Eng
Eng
Eng
Go To Preference Page
Disc Menu
Preferred Subtitle Language
(Press ..,, .A or T, then press ENTER)
-- Preference Page --
Go To Preference Page
Thai
Example showing how to set Disc Menu Language:
(Press .A orT)
Audio
Subtitle
Disc Menu
Parental
Default
-- Preference Page --
Eng
Eng
Eng
-- Preference Page -Audio
Subtitle
Disc Menu
Parental
Default
Preferred Menu Language
Eng
Eng
Eng
Thai
62
Q)LPJVCQ/MP4
Example showing how to set Parental Control:
Parental
(Press ~'.A. or T, then press ENTER)
(Press .A. orT)
--Preference Page-Eng
Eng
Eng
Audio
Subtitle
Disc Menu
Parental
Default
-- Preference Page -Audio
Subtitle
Disc Menu
Eng
Eng
Eng
Set Parent Control
Go To Preference Page
1 Kid Sat
2G
3 Pg
4 Pg 13
5 Pqr
6R
7 Nc 17
8 Adult
Example showing how to set load factory setting:
Default
(Press ~' .A. or T, then press ENTER)
(Press .A. orT)
-- Preference Page -Eng
Eng
Eng
Audio
Subtitle
Disc Menu
Parental
Default
-- Preference Page -Audio
Subtitle
Disc Menu
Parental
Default
Eng
Eng
Eng
Load Factory Setting
Go To Preference Page
-
--Password Change-
Password
Example showing how to set password, and the default password is 8888:
(Press .A. orT )
-- Preference Page -Password
Go To Preference Page
(Press ~' .A. or T, then press ENTER)
-- Preference Page -Password
Change Password
-
63
CQLMP3/SD/USB
CD/MP3/SD/USB
CD/MP3/SD/USB Setup
During CD/MP3/SD/USB playback, touching
the top of screen shows the following menu:
Notes:
*At present our products can only support up to 16GB
of the SD card or USB.
Selecting Tracks Fast
During MP3/SD/USB playback, press 21 ·~ to
play previous track, press 21 ~· to play next
track.
During CD playback, press 21 ·~ to repeat the
current track, and in 3 seconds press 21 ·~ to
play previous track, press 21 ~· to play next
track.
1
2
3
4
5
6
7
8
9
10
1:11
Play/Pause
•
Full Screen
H 0-9 Number Keys
l'!!p Click it to back to root menu
lttppl Click it to enter DVD Setup menu
fii'fA Click it to enter VIDEO setup
menu, see page 14 of the "Video Adjust"
Cl I ~ Fast reverse/Fast Forward
Display
Cl I G:J Previous Track/Next Track
~
Press it to enter SOURCE menu
CD/MP3/SD/USB Play
Insert a CD/MP3 disc into the slot, the unit will
play automatically.
Remove the rubber plug USB or SO
card, to insert USB or SO card and it will play
automatically.
If a disc/USB/SD Card is inserted select DVD
button on the unit to play, or back to play source
menu, and select DVD to play.
Notes:
* Clicking C1 I
same function.
Cl on the screen also performs the
Repeat Playing
During CD/MP3/SD/USB playback, press 15
RPT to replay the current track, press it again
to replay all.
Notes:
*This function is only available on the remote control.
Number Buttons
Press one of 23 Number Buttons (0---9) to
select a track to play.
Notes:
* Clicking " g " icon on the screen shows the
following menu: number keys appears, touch the
number to select tracks, click Iii icon to play.
64
CP/M P3/SD/USB
Notes:
* Press 22 CLEAR to clear any mistaken input.
* During CD/MP3 mode, the upper left corner displays
"DVD" ; during USB/SO mode, the upper left corner
displays "USB/SO".
Playing Tracks at Random
During CD/MP3/SD/USB playback, press
16 ROM button on the remote control to play
any track at random. Press it again to resume
normal playing.
Notes:
*This function is only available on the remote control.
Stop Play
During CD/MP3/SD/USB playback, Press 18 •
to stop the playback.
Notes:
*This function is only available on the remote control.
Pause the Playback
During CD/MP3/SD/USB playback, Press 17 11
to switch between play and pause.
Notes:
* Clicking •n on the screen performs the same. function.
Skip backward/forward/F.F/F.REW
Press 20 ( ~ or .,. ) on remote control to perform
rewind or fast forward.
c2X-+4X-+• 8X-+16X-+32XJ
Notes:
* Clicking •~ I ~· on the screen also performs the
same function.
Selecting Track
During CD playback, first press 2 GOTO, and
TFT shows : disc go to:--:--, press your desired
time of the playback by using number buttons.
Second press GO TO button, track go to:--:-appears on TFT, also input your desired numbers
to play the current time of your selection.
During MP3/SD/USB mode, first press 2 GOTO
and the TFT shows:---. Then press NUMBER
BUTTONS to input the MP3/SD tracks Number
to play it; secondly press GOTO button, and the
TFT shows: --:--, now input the desired time to
play the current track at this point.
Notes:
*This function is only available on the remote control.
* Press 22 CLEAR to clear any mistaken input.
On Screen Display
During CD status, press OSD button the display
shows:
engle Elapsed -Single Remainl
Display Off+-- Total +-- Total ~
Remain Elapsed
Note:
*This function is only available on the remote control.
Program Playing
During VCD mode, press 13 PROG, the TFT
displays the program menu. Press NUMBER
BUTTONS to select the track Number and
then press 27 to move the cursor to START,
press ENTER to start program playing; move
the cursor to EXIT and press ENTER to exit
the program playing. Move the cursor to ·~
and press ENTER to the previous page; move
the cursor to .,., and press ENTER to the next
page.
65
CP/M E3LSDLUSB
During this process, press 18 • to cancel the
program playing.
TUNER
Listening to the Radio
Notes:
*The function is only available on the remote control.
* Press 22 CLEAR to clear any mistaken input.
Eject SO Card
Push SO card to eject it.
If the SO Card is ejected during the SO play
mode, the unit will automatically default to disc
mode. If there is no disc in the unit, it will default
to the USB mode and then the Radio mode.
If the SO Card is ejected while the unit is in any
other mode the unit will remain in its current
mode.
Eject USB
Pull USB to eject it.
If the USB is ejected during the USB play mode,
the unit will automatically default to disc mode.
If there is no disc in the unit, it will default to the
SO Card mode and then to the Radio mode.
If the USB is ejected while the unit is in any other
mode the unit will remain in its current mode.
1 Band Indicator
Shows which band the radio is tuned to.
2 Preset Number Indicator
Shows what preset has been selected
3 Frequency Indicator
Shows which frequency the tuner is tuned to
4 +4/11+
Press lightly to view presets. Hold to tune to
desired station.
5 Presets
Press to select station, press and hold
to save the current station to one of the six
presets.
6 Band
To select the bands
7 AMS (Automatic Memory Selection)
Press lightly to scan the current stations,
press and hold to tune to another station.
8 RDS
Press it to enter the Rf)S SETl JP MFN1 J.
9 Mute
Press this button to silence unit
10 <
Press this button to go back to the SOURCE
menu
Tuner
66
Band Selector
MOIST Selector
During radio status, repeatedly press 3 BAND
button to select bands in the following order:
During radio mode, you can press 6 ST button
on the remote control to select MONO mode or
STEREO mode.
C
•
.4
FM1-+ FM2-+ FM3-+~M
(Russia)
AM2 • · ·
· AM1
Note:
*Clicking 6 on the screen performs the same function
Manual/Automatic Tuning
Stereo mode is available when "STEREO"
appears.
It is in MONO mode when "MONO" appears.
Notes:
It is only available on the remote control.
*Switch to MONO to improve the listening quality
when encountering a weak signal.
* It is only available in the FM band.
*
Manual Tuning: Briefly press 20 ( ~ or.,. )
button on the remote control to select the
different bands.
Automatic Tuning: Press and hold 20 (-.. or
.. ) button the radio automatically searches a
station downward or upward respectively and
plays when it finds a station.
Note:
*Clicking 4 on the screen performs the same function.
DX/LOC Selector
During radio mode, press 5 LOC button to
determine station strength. When "LOC"
appears on the display only local stations are
available. When it disappears both distance and
local stations can be received.
Notes:
*The function is only available on the remote control.
*This function is not available in the AM band.
Select the Stored Station
During radio mode, press 27 • button to select
the stored station upward, press ' to select the
stored station downward.
Note:
*The function is only available on the remote control.
Scanning/Memorizing Stations
Automatically
During Radio mode, briefly press 4 AMS button
on the remote control to scan stored stations
from 1-6. You can press corresponding number
button to select your desired station.
Press and hold 4 AMS button to activate
automatic memory storing function. The radio
will automaticaBy select a station and store it in
one of the positions 1-6.
Notes:
*The unit can store up to 6 stations for each band.
* Clicking "AMS" on the screen performs the same
function.
67
Iuoer
GOTOTV
5.While PTY is activated, press this to
Press 2 GOTO , and the monitor will show:
search for program type
FREQ. Press the Number to choose your
6.BACK
desired TV station.
It is only available on units with TV Tuner
Press to return to radio listening
Alternative Frequencies (AF)
option.
Briefly press (26) AF to activate the auto
Number Buttons
search station function.
During radio mode, press Number Buttons
When AF is on, and signal is weak or not
to tune to stored stations.
available, only those preset frequencies or
During radio mode, Number Buttons
standard bands can be displayed.
(from 1 to 6) can help you store your
Note
favorite station. You can follow the
*Above function is also performed by
instructions below:
pressing [1] on the monitor as shown in
1.When tuned to a desired station, press
RDS screen image.
and hold any one of the
Traffic Alert {TA)
Number Buttons
(from 1 to 6) until the number appears on
Briefly press (25) TA to activate the traffic
the LCD. This indicates that station is
alert function. When
stored at the corresponding number
will display on LCD.
location.
If there is no TP information, the mode will
2.Press and hold 4 AMS
button to have
AF is activated, TA
search TP stations automatically.
unit seek and store stations automatically,
TA will be green when played by station.
in 1 to 6 respectively.
If not then TA will be yellow.
3.When listening to a preset station, you
When TA is active, volume will
may press and hold a number button for 3
automatically adjust to TA level when in
seconds to reassign it to a new preset
other modes (such as DVD, AUX).
location.
If a TA is active, the mode will skip to RDS
RDS SETUP
status automatically. It will then resume
primary mode after TA is completed.
Note
*Briefly press TA on head unit or [2] on
monitor as shown in RDS screen image.
*When TA is off, no Traffic Alerts will be
displayed on LCD.
1.AF (Alternative Frequency)
Program Type (PTY)
Press to activate AF Function
Briefly press (7) PTY or [4] on the monitor
2. TA (Traffic Alert)
to activate PTY function
Press to activate TA Function
When PTY is on, PTY displays on screen,
3.SEARCH [<] [>]
and you can press [<] [>] to select
Press to tune automatically - backward [<]
program type. While searching, screen
or forward [>]
will display PTY SEARCH.
4.PTY (Program Type)
If PTY is off, PTY OFF displays on screen
Press to activate PTY function
and searching is not accessible.
8UX (optional)
68
AUX Touch Screen Menu
Click AUX on the SOURCE menu to switch to
the AUX mode:
1U
Full screen
2 Display
3 l'pl;l'l Click it to enter front AUXIN.
4 !Irrrp Click it to enter rear AUXIN.
5
fin
Click it to enter VIDEO setup
menu, see page 14 of the "Video Adjust".
6 ~ Click it to enter SOURCE menu.
Bluetootb® (optional)
69
Bluetooth Operational Interface
Pairing Your Unit and Bluetooth Phone
Press 28 BT on the remote control or BT in
the monitor to open the bluetooth operational
interface:
The device supports hands-free profile, headset profile, A2DP (Audio Advanced Distribution
profile) and AVRCP (Audio Video Remote
Control profile). Follow the pairing instruction for
the first time use, after that the unit will connect
automatically.
1 Number Buttons
To input the phone number
2 f,k ,i Dial, redial last number, answer a
phone call
3 ~ Hang up, refuse a phone call
4 Display
5 PAIR
6 Iii ACH (audio change)
7 H POWER
Press it to turn on or turn off the
Bluetooth function
8 C (Clear)
9 CD PAUSE/PLAY
10 1:1 I 1::1 Previous/Next
11 ~ Press this button to go back to
SOURCE menu
Using a Bluetooth Wireless Connection
The device can be dialed wirelessly in bluetooth
status. Before using the Bluetooth function,
please turn on your cellphone Bluetooth
function.
Notes:
*To provide the best sound without or little distorted
sound (the cell phone or network brings).
* Full duplex conversation.
* Bluetooth ver2.0 compliant.
*The unit has own MIC.
Pairing in Hands-free Mode 1
1 Press 29 PAIR, and PAIRING shows on
the screen.
2 Get into CELLPHONE CONNECTION to
search devices;
3 If the cellphone has connected, PAIR
SUCCESS appear and then CONNECT in
order, ~ will change from blue to red.
Note:
* Clicking 5 on the screen also performs the same
function .
Cellphone Pairing Mode
1 Browse your cell phone menu and find
the connectivity or Bluetooth connection
section.
2 Select search for a new handsfree
device function and allow the phone
to find the mobile phone. (Different
cell phones have different bluetooth menus,
please refer to your phone manual.)
3 When CAR A/V DEVICE appear, select
this item. (if it can not be connected,
please refer to mobile manual, and try
again.)
4 To input the password, the password is:
1234.
5 Press the connect with the Handsfree
option on your cell phone, and CONNECT
appears.
70
Bluetggtb® (optional)
Bluetooth Connection and Disconnection
Last Number Dialing
When you have established Bluetooth
connection between this unit and the cell phone,
Bluetooth icon ton the display appears in red.
Press 29 PAIR to turn off Bluetooth connection,
and tappears in blue. Press 29, PAIR SUCCESS
appear on the display, then display shows
CONNECT when Bluetooth connected; display
shows PAIRING TIME OUT, when Bluetooth
disconnected.
Press 30~ button, and your last dialed number
will be displayed, press ~again, and then PICK
UP will appear on the display when the cal! is
answered.
Notes:
* Please keep the phone charged, or Bluetooth
connection will be lost.
*To ensure connection success
----Delete menu of cell phone with Bluetooth
----Reset the unit and cell phone.
----Reset every step of pairing.
after pairing
Disconnect
*
----Please pair the phone in manual.
For example: pairing fixture -cellphone -connect.
* Pressing 5 on the monitor also performs the
same function.
* Press 7 on the monitor to turn off the Bluetooth
function.
1. The unit is activated automatically when
you make a call by cell phone, and DIAL OK
appears.
2. When you receive a call, PICK UP appears
on the display.
Using the Unit as a Hands-free Device
When a call is incoming, call from and the phone
number ID****** will be diplayed,
To accept call: Press 30~ to answer a call, it
appears PICK UP on the display.
To reject call: Press 31 --.. to reject a call, it
appears REJECT on the display.
To end call: Press--.. to end call, and HANG UP
appears on the display.
Notes:
* Some cell phones do not support reject call
during Bluetooth mode.
* Pressing 2 and 3 on the monitor performs the same
function.
Notes:
* Pressing 2 on the monitor performs the same function.
*To dial the number of the unit in the car only.
To Dial by Cell phone
To Dial by the Unit
When cell phone is connected, press 23 to input
the call number, then press 30~ to dial, DIAL
OK appears, when the call is answered, PICK
UP appears on the display.
Notes:
* Press 22 CLEAR on the remote control or 8 in the
monitor to delete mistaken inputs.
* Pressing 1 and 2 in the monitor also performs the
same function.
Using the Unit as Bluetooth Music
During bluetooth mode, any music dovvnloaded
to the cell phone may be played through the unit.
To select music: press 21 1 ~ to play the previous
track, press *I to play the next one.
Pause play: press 17 n to pause play.
Stop play: press 18 • to stop play, and press
the PLAY to play the current track again.
Notes:
* Pressing 9 in the monitor also can play and pause music.
*Pressing 10 in the monitor also can play the
previous/next track.
Bluetooth® (optiooal)
Audio Transfer between the Unit and Phone
Press 6 to change a conversation from the
Bluetooth mode of the unit to the cell phone for
privacy.
Note:
*This will cause the Bluetooth link to be disconnected
in some phones. To reconnect, call back to
Bluetooth on unit, press 6 button again.
71
72
iEQD (pptiQoal)
Selecting Tracks Fast
iPod
iPod play
In IPOD mode, connect the IPOD wire (5V) to the
rear of main unit. If an IPOD is connected press
SAC to switch to the IPOD mode:
During IPOD mode, first press 21 1~ to return to
the beginning of the current track, press 21 ~~
again within 3 seconds to play previous track,
press 21 1~ to play next track .
Note:
* Clicking
function
1
~
I
.,.1
on the screen performs the same
Playing Track F.F/REW
Press 20" or~ to play the track fast forward or
rewind. Press it again or press ENTER to return
to normal playback.
Note:
* Clicking 1::1 I 1::1 on the screen performs the same
function
B
1::1
Back to the previous menu.
(First connect, click and hold it to go back
to root menu.)
Briefly press to play previous track,
press and hold to fast forward.
Repeat
During playback, press 15 APT to repeat track,
repeat disc, or turn off repeat function.
Note:
* This function is operated by using the remote control only.
I:J Briefly press to play next track, press
and hold to fast reward.
CD
Play/ pause
•
Click it to turn page up.
Playing Tracks at Random
During IPOD mode, press 16 ROM button,
Shuffle off, Shuffle Track, Shuffle Album will
be activated.
I
Click it to turn page down
Note:
* This function is operated by using the remote control only.
~
Click it to back to the SOURCE menu
Pause the Playback
During IPOD mode, press 17 n button to pause
the playback, Press it again to return to normal
playback.
Note:
* Clicking ~~~ on the screen also performs the same
function.
73
iPOQ (optional)
File Selector
During IPOD mode, press 19 SETUP on the
remote control to go back to the previous
catalog.
Press 21 ~· to select the previous 5 tracks,
press ~~to select the next 5 tracks (as shown
in the picture).
Note:
* Clicking MENU on the screen and • I"
perform the same function.
also
Eject IPOD
During IPOD mode, if the IPOD is removed, the
main unit will revert back to previous mode.
74
8ddjtjonallotormalico
Additional Information
Simple Troubleshooting Guide
The following checklist might help to solve the problems you may encounter when using the unit.
Please double check and make sure the connection and the procedure of operation is proper
before using the checklist below .
Problem
Cause/Solution
No Power
Check and make sure whether the fuse is not blown,
replace with the proper amperage if needed.
Some errors occur in the LCD or no
function when pressing the button
Press RESET button.
Unable to receive stations
Check and make sure the antenna is inserted or
the antenna is properly connected, if not, insert the
antenna or connect it properly.
COs cannot be loaded
A CD is loaded in the mechanism.
Sound skips
The CD is dirty or damaged.
Images skip
Improper setting of the color system. Set the color
system to "PAL' or "NTSC" according to the selected
television station.
Note:
*If any of the problems persist after a check of this list has been made, consult your nearest service dealer. Never
attempt to disassemble your unit by yourself.
Due to continuous product improvement, product operation is subject to change.
INSTALLATION INSTRUCTIONS FOR PART 95-7313
APPLICATIONS
2001-2006 Hyundai Elantra
2003-2008 Hyundai Tiburon
2002-2005 Hyundai Sonata
2001-2006 Kia Optima (2006 Early Production Models Only)
95-7313
KIT FEATURES
• DDIN Head Unit Provision
• STACKED ISO DIN Head Unit Provision
KIT COMPONENTS
A) DDIN Trim Plate | B) DDIN Brackets
B
A
TOOLS REQUIRED:
Flat Blade Screwdriver I Phillips Screwdriver
1-800-221-0932
www.metraonline.com
© COPYRIGHT 2004-08 METRA ELECTRONICS CORPORATION
95-7313
TABLE OF CONTENTS
Dash Disassembly ........................................................................ 1-4
Kit Assembly ................................................................................. 5-6
Final Assembly ................................................................................. 7
95-7313
2001-2006 HYUNDAI ELANTRA
Disconnect the negative battery
terminal to prevent an accidental
short circuit.
2
Remove (2) Phillips screws from
under the instrument cluster.
3
Remove ashtray then remove (2)
Phillips screws in ashtray cavity.
4
Unclip and remove panel surrounding radio. (Figure A)
5
Remove (4) Phillips screws securing
radio.
A
1
DASH DISASSEMBLY
1
95-7313
DASH DISASSEMBLY
2003-2008 HYUNDAI TIBURON
1
Disconnect the negative battery terminal to
prevent an accidental short circuit.
2
Unclip and remove the radio trim panel starting
with the bottom edge. (Figure A)
3
Remove (2) Phillips screws securing radio.
A
2
95-7313
2002-2005 HYUNDAI SONATA
2001-2005 KIA OPTIMA
Disconnect the negative battery
terminal to prevent an accidental
short circuit.
2
Unclip and remove entire panel surrounding radio. (Figure A)
3
Remove (4) Phillips screws securing
radio.
4
The rear support bar in the sub dash
will need to be cut and removed for
aftermarket radio clearance.
(Figure B)
A
3
B
DASH DISASSEMBLY
1
95-7313
DASH DISASSEMBLY
2006 KIA OPTIMA(2006 Early Production Models Only)
A
1
2
Disconnect the negative battery terminal to prevent an accidental short
circuit.
Unclip and remove panel surrounding shifter. (Figure A)
3
Remove (2) Phillips screws at bottom
of panel surrounding radio and climate control then unclip and remove
entire panel. (Figure B,C)
4
Remove (4) Phillips screws securing
radio. (Figure D)
5
The rear support bar in the sub dash
will need to be cut and removed for
aftermarket radio clearance.
(Figure E)
3:30
B
3:30
C
D
3:
E
4
95-7313
DOUBLE DIN HEAD UNIT PROVISION
A
Slide the appropriate bracket into
the trim plate aligning the holes in
the trim plate to the clips on the
bracket. (Figure A)
2
Slide the DDIN radio unit into the
trim plate bracket assembly and
secure the unit to the kit using the
screws supplied with the head unit.
(Figure B)
KIT ASSEMBLY
1
B
C
NOTE: For the 2003-2008 Hyundai
Tiburon applications you will need to
cut and remove the bottom mounting tabs on the DDIN brackets.
(Figure C)
CUT
CUT
5
95-7313
KIT ASSEMBLY
STACKED ISO DIN HEAD UNIT PROVISION
A
1 Slide the appropriate bracket into
the trim plate aligning the holes in
the trim plate to the clips on the
bracket. (Figure A)
2
Slide the stacked ISO DIN units into
the trim plate bracket assembly and
secure the unit to the kit using the
screws supplied with the head unit.
(Figure B)
B
C
NOTE: For the 2003-2008 Hyundai Tiburon
applications you will need to cut and
remove the bottom mounting tabs on the
DDIN brackets. (Figure C)
CUT
CUT
6
95-7313
FINAL ASSEMBLY
FINAL ASSEMBLY
1 Locate the factory wiring harness in the dash and make the connection as shown.
Metra recomends using the proper mating adapter and making the connections as
shown. (Isolate and individually tape off the ends of any unused wires to prevent
electrical short circuit.)
2 Re-connect the negative battery terminal and test the unit for proper operation.
3 Reassemble radio and dash assemblies in reverse order of disassembly.
FINAL WIRING CONNECTIONS
Make wiring connections using the EIA color code chart shown below and the instructions included with the head
unit. Metra recommends making connections as shown below; Strip, Splice, Solder, Tape. Isolate and individually
tape off ends of any unused wires to prevent electrical short circuit.
A
B
C
A)
Strip wire ends back 1/2"
B)
Twist ends together
C)
Solder
D)
Tape
D
METRA / EIA WIRING CODE
12V Ignition / Acc . . . Red
12V Batt / Memory . . Yellow
Ground . . . . . . . . . . . Black*
Power Antenna . . . . . Blue
Amp Turn-On . . . . . . Blue / White
Amp Ground . . . . . . . Black / White
Illumination. . . . . . . . Orange
Dimmer . . . . . . . . . . Orange / White
Right Front (+) . . . . . Gray
Right Front (-). . . . . . Gray / Black
Left Front (+) . . . . . . White
Left Front (-) . . . . . . . White / Black
Right Rear (+). . . . . . Violet
Right Rear (-) . . . . . . Violet / Black
Left Rear (+). . . . . . . Green
Left Rear (-) . . . . . . . Green / Black
*NOTE: When Black a wire is not present, ground radio to vehicle chassis.
All colors may not be present on all leads due to manufacturer’s specifications.
7
95-7313 INSTRUCTIONS
1-800-221-0932
REV. 05/20/08
www.metraonline.com
© COPYRIGHT 2004-08 METRA ELECTRONICS CORPORATION
INST95-7313
Thank you for purchasing METRA and AXXESS products! Below are the instructions on how to properly
interface the ASWC with the METRA radio in your vehicle.
1. Find the ASWC installation instructions on www.axxessinterface.com.
2. Follow the instructions and wire the ASWC into your vehicles wiring harness.
3. Connect the ASWC to your METRA radio via the female 3.5mm adapter (p/n: LD-SWC-F3.5) that
is included with the ASWC.
4. The brown wire from the female 3.5mm adapter (p/n: LD-SWC-F3.5) should be connected to the
radios gray wire labeled “Steering Wheel Key 1.”
5. Tape up the brown/white wire from the female 3.5mm adapter as it is not used.
6. Tape up the white wire from the radio labeled “Steering Wheel Key 2” as it is not used.
7. Program the ASWC via the auto detect feature listed on the instructions you retrieved from the
website
8. Once the led is solid red on the ASWC turn the vehicle off.
9. Then turn the vehicle on and wait for the led on the ASWC to turn off.
10. Immediately press and hold volume down on the steering wheel.
11. Wait for the led to come on and then release volume down.
12. Press volume up on the steering wheel 6 times; make sure that you get a led confirmation each time.
13. Once you have 6 led flashes from pressing volume up, press the volume down button on the steering
wheel.
14. The led will turn solid red for a moment and then go off.
15. On the Metra radio enter the “Setup” menu and then go to “SWC Config.”
16. Press each of the steering wheel buttons one at a time and set them to what you want them to do on
the METRA radio.
17. Once you have programmed each of your steering wheel buttons, press save and exit the menu.
18. Get to an audio source and test each of your controls.
19. Enjoy your steering wheel controls!
Thank you again for choosing METRA/AXXESS products, we hope that you enjoy your new radio!
METRA OE RADIOS
OEDirectFit.com • 800-221 -0932
DO NOT RETURN TO STORE- CONTACT METRA FIRST
Please contact Metra Electronics technical support at (800) 253-8324 or email us at
[email protected] if you have any questions or issues with this
product. We want to make sure you are happy with your Freeway purchase. Just have
your receipt and serial number of the product handy so you can provide this required
information to our customer service agent.
Always check your purchase for any missing items. All products ship complete but some
times components may be removed prior to purchase.
Missing components can be ~asily shipped to the store from which you purchased and
many times our customer service agents can quickly solve questions over the phone.
OE Direct Fit Radio
Limited Warranty
Valid in the United States and Canada
This 36 month limited warranty is provided by Metra Electronics Corporation for
the Metra product identified by the purchaser's registration as indicated below,
and there are no other warranties, expressed or implied, except as required by
law, including warranties of merchantability and fitness for a specific purpose,
that are provided for herein, however all such implied warranties, if any, are
limited to the duration of this specific limited product warranty. Some states do
not allow limitations on how long an implied warranty lasts, so the above
limitations may not apply to you.
Metra Electronics Corporation shall not be liable, under any circumstances, for
incidental, indirect, special, and consequential or multiple damages as a result of
the sale or use of this product. Some states/countries do not allow the exclusion
or limitation of incidental or consequential damages, so the above limitation or
exclusion may not apply to you.
It is recommended that the purchaser execute the product registration and
warranty registration via the web within ten days of purchase.
Limited Product Warranty:
This is a 36 month limited warranty, subject to the conditions, limitations and
exclusions identified herein. Metra Electronics Corporation warrants to the
original purchaser of the registered or identified product for a period of three
years from the date of purchase, that the product shall be free of defects in
design, material and workmanship, and subject to the limitations set forth below;
Metra Electronics Corporation will repair or replace, at its option, any defective
unit. Metra hereby warrants to the original retail purchaser of this product that
should this product or any part thereof, under normal use and conditions, prove
to be defective in material or workmanship within three (3) years from date of
original purchase, such defect(s) will be repaired or replaced with reconditioned
product (Metra's option) without charge for parts and repair labor. Purchaser
must return the product to Metra, return receipt requested or by other means that
confirms delivery and Metra shall make the said repairs or replacement within 60
days of receipt. In some instances the product may have been discontinued and
cannot be replaced, or repaired. In that instance Metra/Freeway shall in its
discretion attempt to replace the product with a substantially similar product in
model or design or pay the purchaser a sum for the then fair market value of the
price, considering the amount of time since sale, and the use of the product. This
Limited Warranty is the original retail purchaser's sole remedy for any and all
such defect(s).
Conditions and Limitations:
1. Proof of purchase is required (i.e. the sales receipt of other proof of
payment)
2. Damage caused by accidents, abuse, misuse or modification of the
product will render this warranty null and void.
3. This warranty is applicable only to the original purchaser and is not
assignable or transferable.
4. To obtain repairs or replacement under the terms of this warranty, please
contact Metra at 1-800-221-0932 or visit www.metra-online.com. You will
need to provide proof of purchase (dated receipt showing store where
purchased) and product serial number in order to receive warranty service.
The purchaser is required to send the product back to Metra Electronics
Corp or to a designated repair center and the purchaser is responsible for
all charges for shipping and handling.
This Limited Warranty does NOT cover:
1. Products which have been subject to abuse, accident, alteration,
modification, tampering, negligence, misuse, improper installation, lack of
reasonable care, unauthorized repair or service, or if the model or serial
number has been altered, tampered with, defaced or removed.
2. Initial installation or the removal and re-installation of product.
3. Cosmetic damage, damage that occurs in shipment, act of God or natural
disaster.
4. Missing accessories or components.
5. Products used for any and all commercial purposes.
THE EXTENT OF METRA'S LIABILITY UNDER THIS WARRANTY IS LIMITED
TO THE REPAIR OR REPLACEMENT AS PROVIDED ABOVE AND, IN NO
EVENT SHALL METRA LIABILITY EXCEED THE PURCHASE PRICE PAID BY
THE ORIGINAL RETAIL PURCHASER FOR THE PRODUCT.
Any questions of Notifications regarding this warranty should be addressed to:
Warranty Department, Metra Electronics Corporation, 460 Walker St., Holly, Hill,
Florida, 32117.
THIS WARRANTY IS IN LIEU OF ALL OTHER EXPRESS WARRANTIES OR
LIABILITIES. ANY IMPLIED WARRANTIES, INCLUDING ANY IMPLIED
WARRANTY OF MERCHANTABILITY, SHALL BE LIMITED TO THE
DURATION OF THIS WRITTEN WARRANTY. IN NO EVENT SHALL FREEWAY
I METRA BE LIABLE FOR ANY CONSEQUENTIAL OR INCIDENTAL
DAMAGES FOR BREACH OF THIS OR ANY OTHER WARRANTY EXPRESS
OR IMPLIED WHATSOEVER.
No person or representative is authorized to assume for Metra any liability other
than expressed herein in connection with the sale of this product. Some
jurisdictions do not allow limitations on how long an implied warranty lasts or the
exclusion or limitation of incidental or consequential damages so the above
limitations or exclusions may not apply to you. This warranty gives you specific
legal rights and you may also have other rights, which vary from jurisdiction to
jurisdiction.