1
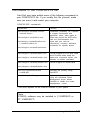
EPSON
PCMCIA Software
User’s
Guide
Printed on recycled paper with at least 10% post consumer content
®
IMPORTANT NOTICE
DISCLAIMER OF WARRANTY
Epson America makes no representations or warranties, either express or implied, by or
with respect to anything in this manual, and shall not be liable for any implied warranties
of merchantability and fitness for a particular purpose or for any indirect, special, or
consequential damages. Some states do not allow the exclusion of incidental or
consequential damages, so this exclusion may not apply to you.
COPYRIGHT NOTICE
All rights reserved. No part of this publication may be reproduced, stored in a retrieval
system, or transmitted, in any form or by any means, electronic, mechanical,
photocopying, recording, or otherwise, without the prior written permission of Epson
America, Inc. No patent liability is assumed with respect to the use of information
contained herein. Nor is any liability assumed for damages resulting from the use of the
information contained herein. Further, this publication and features described herein are
subject to change without notice.
TRADEMARKS
EPSON is a registered trademark of Seiko Epson Corporation
EPSON Connection and EPSON Direct are service marks of Epson America, Inc.
Card Soft, Card Wizard, and Card Lite are trademarks of System Soft Corporation.
System Soft is a registered trademark of System Soft Corporation
General notice: Other product names used herein are for identification purposes only and
may be trademarks of their respective companies.
Copyright © 1995 by Epson America, Inc.
Torrance, California, USA
ii
400442800
4/95
Contents
Introduction
How to Use This Manual . . . . . . . . . . . . . . . . . ...2
Where to Get Help . . . . . . . . . . 3
CompuServe
On-line
Support.
. . . . .. . . . 4
Chapter 1 Using CardWizard
Using CardWizard . . . . . . . . . . . . . . . . .
Solving Problems Using AutoCorrect. . . . ...
Modifying Resources Manually. . .. .. .
Launching Applications. . . .. . . .. .
Using the Correct Button for System Conflicts
Using Menus to Modify Resources. . .. ..
.
.
.
.
.
. . . ...1-2
. .
1-4
.
1-6
.
1-6
. .. . .1-7
..
. 1-8
Chapter 2 Using CardLife
Using the Configuration Utility. . . . . . . .
Starting the Configuration Utility. . . . . . .
Editing PC Card Configurations. . . . . . .
Changing the Card Insertion Parameters. . . . . .
Changing the Level of Card Support. . . ..
..
Using the CARDINFO Command. . . . . . . . .
Commands in the CONFIG.SYSFile. . . ... . . .. .
2-2
2-3
2-3
2-5
2-6
2-8
2-10
Chapter 3 Using CardSoft
Using the Configuration Utility. . . .. . .. . .
3-2
Starting the Configuration Utility. .. . . .. . . .
3-2
Editing the PC Card Configurations. . .. . . . . 3-3
Changing the Card Insertion Parameters. ... . . . . 3-6
Modifying the Resource Allocation. . . .. . . ..
3-7
Changing the Display for the Configuration Utility. . .. . . . 3-8
Using the CSALLOC Command. .. . . . ..
3-9
Using the CARDINFO Command .. . .. . . . ... . 3-10
Commands in the CONFIG.SYSFile. . .. . . .. 3-13
iii
Index
iv
Introduction
Your EPSON ® PCMCIA TM software makes it easy to configure
your computer for PC cards. The software is already installed
on your EPSON computer, and offers Plug-and-Play support
for both MS-DOS ® and Microsoft ® W i n d o w sTM environments.
You simply insert your PC card into the PCMCIA slot and
begin using it. You won’t need to configure the computer
because the PCMCIA software allocates system resources so
that PC cards and your system hardware work together
seam lessly.
PCMCIA software includes the following utilities:
CardWizard, TM which automatically corrects configuration
conflicts for you or lets you configure your PC cards using
an easy-to-use Windows interface
CardLite,TM which supports fax/ modem and LAN cards in
the MS-DOS environment in a way that leaves more
memory for other applications
CardSoft,T Mwhich provides the full range of PCMCIA
configuration options for the MS-DOS environment.
PCMCIA software supports PC cards from most vendors so
when you buy new PC cards for your computer, you’ll know
your software will support them.
Introduction
1
Note
Flash File System (FFS) software is not included with this
release of PCMCIA software. If you need support for linear
flash cards, contact your flash card manufacturer.
EPSON linear flash cards are compatible with PCMCIA
software, but require an appropriate Memory Technology
driver. Please contact EPSON for this driver.
How to Use This Manual
You do not need to read everything in this book. Since EPSON
has already pre-installed the PCMCIA software, you probably
won’t need to change any settings. Just insert your PC card and
you‘re ready to go. If you want to customize your system’s
configuration, see the following summary to find the chapters
you may need to read.
Chapter 1 describes how to use CardWizard.
Chapter 2 describes how to use the CardLite utilities from DOS.
Chapter 3 describes how to use the Card Soft utilities from DOS.
At the end of this book, you’ll find an Index and a list of
internation al marketing locations.
2
Introduction
Where to Get Help
If you purchased your EPSON product in the United States or
Canada, EPSON provides support and service through the
EPSON Connection.SM In the United States and Canada, dial
(800) 922-8911.
Call the EPSON Connection for the following:
Technical assistance with the installation, configuration,
and operation of EPSON products
Assistance in locating your nearest Authorized EPSON
Reseller or Customer Care Center
Customer relations
EPSON technical information library fax service
Product literature on current and new products.
You can purchase accessories, manuals, or parts for EPSON
products from EPSON Accessories at (800) 873-7766 (U.S. sales
only). In Canada, call (800) BUY-EPSON for sales locations.
When you call for technical assistance, be ready to identify
your system and its configuration, and provide any error
messages to the support staff.
If you purchased your EPSON product outside the United
States or Canada, contact your EPSON dealer or the marketing
location nearest you for customer support and service.
International marketing locations are listed at the end of this
manual.
If you need help with any other software application program
you are using, see the documentation that came with that
program for technical support information.
Introduction
3
CompuServe On-line Support
Your EPSON computer includes the CompuServe® WinCIM
information manager and a free CompuServe membership.
This membership entitles you to a $15 usage credit on
Compu Serve’s extended services and forums. The brochure
that came with your computer describes the CompuServe
services and how to access them, and also provides
subscription information.
Note
To access CompuServe, you must use a modem. If your
ActionNote did not come with a modem, you can install an
internal modem, an external modem, or a modem PC card.
If you have a modem, the fastest way to access helpful tips,
specifications, drivers, application notes, tables for DIP switch
or jumper settings, and bulletins for EPSON products is
through the Epson America Forum on CompuServe.
If you are already a CompuServe member, simply type
GO EPSON at the menu prompt to reach the Epson America
Forum.
4 Introduction
Chapter 1
Using CardWizard
Card Wizard is a user-friendly Windows interface for Card Soft
that can automatically reconfigure resources for your PC cards.
Specifically, CardWizard performs these tasks:
❑
Provides automatic detection and correction of PC card
configuration problems
❑
Lets you set up your system to start a program
automatically when you insert a card
❑
Displays detailed information about installed cards,
including status, assigned system resources, vendor name,
and card type
❑
Reconfigures PC cards and manages system resources, such
as I/O ports, IRQs, and memory
❑ Notifies you of any status changes for the PC cards in your
system.
CardWizard is a standard Windows application and uses
Windows techniques for selecting icons and for moving and
sizing windows. This chapter assumes that you are familiar
with these techniques.
If you need help while using CardWizard, you can use
CardWizard’s on-line help. Just select Help (or press F1), a n d
select Contents from the Help pull-down menu. Then select
the topic you want from the contents list.
This chapter describes how to start CardWizard, how you can
tell if your computer recognizes the card, and how to use
CardWizard to solve typical configuration problems.
Using CardWizad
1-1
Using CardWizard
Every time you start Windows, it loads the CardWizard
drivers. If a PC card is inserted, your computer beeps to notify
you of the card status.
If your system beeps twice, it recognizes the card you inserted
and identifies the card on the icon. If your system beeps once
and you see a message, CardWizard has not been able to
recognize the card or the card is unconfigured; see the next
section.
To start Card Wizard, double click on the Card Wizard icon in
the System Soft Tools program group located in the Windows
Program Manager, as shown below.
Note
To start CardWizard, the CONFIG.SYS file must load the
Card Soft drivers.
You can also start Card Wizard automatically every time you
open Windows by copying the CardWizard icon to the
Windows Startup Program group. See your Windows
documentation for more information.
1-2
Using CardWizad
After you start CardWizard, you see the introductory banner,
and then the following Card Information window.
From the Card Information window, you can use pull-down
menus to correct system conflicts, view system resources,
modify configuration settings, and customize CardWizard for
your system, as described in the following sections.
Using CardWizad
1-3
Solving Problems Using AutoCorrect
When the PC card you insert results in a configuration conflict,
you see the following notification screen:
Follow these steps to use the Auto Correct feature.
1. Select OK. CardWizard displays a Card Information screen.
A question mark (?) indicates a problem in a particular slot,
and a warning message describes the problem, as shown
below:
1-4
Using CardWizad
2. Select Wizard on this screen to see more information about
the problem, as shown below:
3. Select AutoCorrect to have CardWizard reassign
resources to resolve the problem.
CardWizard displays the message AUTO CORRECTION IN
PROGRESS in the Wizard Information screen.
After Card Wizard has resolved the problem, it m ay prompt
you to restart Windows or reboot your system to initiate the
changes.
If AutoCorrect cannot resolve the problem, it displays
additional options (in the Wizard Information screen) for you
to try.
Using CardWizad
1-5
Modifying Resources Manually
CardWizard allows you to manually correct resource conflicts
using the Correct button on the Wizard Information screen.
It also provides simple pull-down menus for changing system
settings, such as launching an application when you insert an
associated PC card. The following sections describe how to use
these CardWizard features.
Launching Applications
One of the most popular features CardWizard offers is the
ability to set up your computer so that when you insert a PC
card, the particular application you need to use with the card
starts automatically. For example, you can have your computer
start CompuServe or an electronic mail program whenever you
insert a fax/ modem card or start a backup utility when you
insert an ATA card.
Note
Card Wizard only starts an application when its associated
PC card is configured.
To setup your computer to launch an application with an
associated PC card, use the Options menu from the Card
Inform ation screen. See page 1-11 or the CardWizard on-line
help for more information.
1-6
Using CardWizad
Using the Correct Button for System Conflicts
After CardWizard analyzes a configuration problem, it displays
the results in the Wizard Information screen. If you don ‘t want
CardWizard to resolve the resource conflict for you, you can
resolve it yourself by selecting Correct.
CardWizard displays several resource values, such as a list of
available COM ports, and highlights the preferred choice for
the resource, as shown below:
If you want to use the highlighted choice, choose Select. If
you want another choice, click on it to highlight it, then choose
Select. CardWizard reconfigures your system resources
based on your selection and displays the results in the
information screen.
Using CardWizard
1-7
Note
When CardWizard cannot correct a conflict, it displays a
recoin mend ation in the Wizard Information window. For
example, if CardWizard found a DOS driver missing from
the CONFIG.SYS file, it recommends that you add the driver
to the CONFIG.SYS file.
Using Menus to Modify Resources
You can also view, reconfigure, or customize system resources
(even when CardWizard does not detect a conflict) through the
View, Settings, and Options pull-down menus in the Card
Information screen. For example, you may want to customize
your computer to start a particular program when you insert
the appropriate PC card (see page 1-6).
The tables in the following sections list the pull-down menus
and describe the options in them. For help with using these
menus, or for detailed information about menu items, use the
CardWizard on-line help feature. Select Help (or press F1),
and select Contents from the Help pull-down menu. Then
select the topic you want from the contents list.
1-8
Using CardWizad
View menu
You can use the View menu to display how your PC card is
configured, so that you can allocate resources from Windows
and other applications to use the card. Select the View menu to
open and view details about any of these CardWizard
resources:
Menu item
Description
Card
Displays up-to-date information in graphic and
text form about all PCMCIA slots in your
computer. Make sure your communications
application’s settings match those displayed
on this screen.
Information
I/O Range
Tells you which l/O ranges (displayed in 8-bit
increments) are free, used, reserved, included,
or excluded.*
IRQ
Tells you whether particular IRQs (Interrupt
ReQuest line) are free, used, reserved,
included, or excluded.*
Memory Range
Tells you which memory ranges (displayed in 4K
increments) are free, used, reserved, included,
or excluded.*
Modules
Displays version information about the drivers
that are loaded for PC card support.
* Do not reserve, include, or exclude resources unless absolutely necessary.
Using CardWizad
1-9
Settings menu
Select the Settings menu to modify these CardWizard
configuration settings:
Menu item
Description
Modem*
Allows you to change configuration settings
for fax/modem PC cards and to access
Windows COM Port settings so you can
synchronize your Windows settings with the
PCMCIA modem settings.
Network*
Allows you to change configuration settings
for network cards that have built-in support
in CardWizard. It does not allow you to
change settings for those network cards
that require their own Card Services client
drivers, such as the EPSON EEN10B Ethernet
card.
ATA*
Allows you to change the configuration
settings for ATA cards. CardWizard can
automatically configure both Type II
solid-state ATA-Flash and Type Ill rotating
media ATA cards.**
Revert
to
Defaults***
Allows you to return to the original
configuration. It is helpful if you have made
changes to Modem, Network, or ATA
settings that you need to reverse.
* Only advanced users who are familiar with managing system resources
and configuring modem, network, and ATA cards should modify these
settings.
** When
you select Non-Compliant PCMCIA ATA Cards, other standard
ATA cards might not work correctly.
*** Reverting to defaults might introduce configuration conflicts.
1-10
Using CardWizad
Options menu
Select the Options menu to change how CardWizard handles
the following insertion and removal options for PC cards:
Menu item
or option
Description
Notify
Changes the type and duration of the message
you receive when you insert a PC card
PCMCIA Views
Modifies how CardWizard displays your PCMCIA
slots on the Card Information screen
Speaker Beeps*
Turns speaker beeps on or off, in Windows and in
MS-DOS
Sound
Identifies sound files (.WAV files) your system uses
to notify you when you insert or remove a PC card
Launch
Files**
Associates applications with PC cards so that an
application automatically launches when the
associated PC card is inserted
Disabling Beep in Windows does not affect sound file assignments
** You must have a sound system installed on your computer to use the
Sound Files option or this option is grayed out.
Using CardWizad
1-11
1-12
Using CardWizad
Chapter 2
Using CardLife
CardLite is a subset of Card Soft that supports only the more
popular fax/ modem, ATA, and LAN cards. CardLite leaves
more memory available for Windows and other applications. If
you are using a PC card other than a fax/ modem, ATA or LAN
(network) card, or require the full support of Card Soft, see
Chapter 3.
CardLite provides two levels of card support: basic, for
fax/ modem card support only, and enhanced, for fax/ modem,
ATA, and LAN card support. You can use the CardLite
Configuration Utility to select the level you want, as described
on page 2-6.
CardLite uses less than 15KB of memory to provide basic
support and less than 25KB to provide enhanced support.
This chapter describes how to use the following CardLite
utilities:
Configuration utility
CARDINFO command.
Using CardLite 2-1
Using the Configuration Utility
The configuration utility allows you to modify the
configuration of PC cards controlled by Card Lite.
You can use the configuration utility to specify beep criteria for
card insertion/ removal notification and to set the level of card
support (basic or enhanced) based on the types of cards you
will use in your computer.
You can also use the configuration utility to switch between
CardLite and Card Soft, if it is installed. Choose CardLite if you
only need support for modem, ATA, and network cards, and
you want the PCMCIA drivers to use the minimum amount of
memory. Choose Card Soft if you require full PCMCIA support.
Note
This utility modifies the CARDID.INI, CARDLITE.INI, and
CONFIG.SYS files. Changes you make to your configuration
using this utility don’t take effect until you restart your
system.
The configuration utility also contains on-line help. General
help is available for the Main Menu items from the Help menu
in the Card Lite Configuration screen. To access help for a
particular subject, display the dialog box or configuration
screen for that item, then click on the Help button and press
Alt H or F1.
2-2
Using CardLite
Starting the Configuration Utility
Follow these steps to start the configuration utility:
1. Log onto the directory containing your CardLite software.
2. Type CLCFG and press Enter. You see an introductory
screen about the Card Lite Configuration Utility.
3. Press Enter to continue. You see the CardLite Configuration
screen.
4. If you have an MS-DOS mouse driver installed, you can click
on the menu option to display the corresponding pull-down
menu. You can also press Alt together with the highlighted
letter of the option you want to use.
5. To select a menu option, you can click on the option, move
the cursor to the option and press Enter, or type the
highlighted letter of the option you want to use.
After you have selected an option from a pull-down menu, the
message bar at the bottom of the screen shows how to use
it. Also, you can press Enter for <OK>, F1 for <Help>, and
E SC for <cancel>. To toggle an option on or off, highlight
it and press the space bar.
Editing PC Card Configurations
The Settings pull-down menu on the CardLite Configuration
screen provides options for editing modem and network cards.
It also allows you to specify when your system beeps.
Note
If your system is working properly, you don ‘t need to edit
any of the PC card configurations.
Using CardLite 2 - 3
Select the configuration (Modem or Network) you want to
change. You see the configuration screen for the PC card type
you‘ve selected. The options for each PC card configuration are
described in the following tables.
Note
To make sure the COM, IRQ, and I/O address settings you
select are available, see your computer’s Setup program and
documentation.
Fax/modem card configuration options
Option
Function
First Card Inserted*
Defines the COM port and IRQ for the first
fax/modem card inserted. The l/O address
associated with the selected COM port
appears. COM port values can be N/A or
COM1 through COM4; IRQ values can be
between 0 and 15.
Second Card Inserted*
Defines the COM port and IRQ for the first
fax/modem card inserted. The l/O address
associated with the selected COM port
appears. COM port values can be N/A or
COM1 through COM4; IRQ values can be
between 0 and 15.
Enable Audio
Determines whether you can hear the sounds
produced when the modem (or fax/modem) is
connecting to a remote device.
Enable Resume on
Ring Indicator**
Controls whether the system activates from a
suspend mode when receiving a modem or fax
call. When enabled, the system receives the call
even if it is in suspend mode. If this option is not
enabled, the system ignores the call.
* Do not change the displayed values for COM ports and IRQs unless you
have a specific reason.
** This feature is not supported by all modem or fax/modem cards.
2-4
Using CardLite
Network card configuration options
Option
Function
Memory Address 1 *
Identifies the memory address for the first PC
card.
Memory Address 2*
Identifies the memory address for the second
PC card.
Base l/O Address*
Identifies the address used by the PC LAN cards.
IRQ Line*
Sets the IRQ line used by the PC LAN cards. This
can be a value between 0 and 15.
Fast Token Ring Speed
Enables Fast Token Ring Speed if your PC LAN
cards support it. Refer to your card
documentation for more information.
* Do not change the displayed values for these options unless you have a
specific reason.
Once you have changed your configuration, make sure you
save the settings by selecting OK from the configuration
screen. When you exit the Card Lite Configuration Utility (from
the File menu), the program prompts you to allow it to save the
changes to the CARDLITE.INI and CONFIG.SYS files.
Changing the Card Insertion Parameters
Normally, your system beeps when you insert or remove a
card or when you have a configuration conflict. When you
select the Beeps option from the Settings pull-down menu,
you see the Beep Settings configuration screen, which allows
you to specify beep criteria for your system.
Note
If you change these parameters, make sure you save the
settings by selecting OK from the configuration screen.
When you exit the CardLite Configuration Utility (from the
File menu), the program prompts you to save the changes to
the CARDLITE.INI and CONFIG.SYS files.
Using CardLite 2 - 5
The following table describes the card insertion parameters.
Card insertion parameters
Option
Function
Beep on Card Insertion
Beeps when a PC card is inserted
Beep on Card Removal
Beeps when a PC card is removed
Beep on Card Error
Beeps when a PC card is inserted
and a configuration error occurs
Beep in DOS
Beeps in the MS-DOS environment
based on the card options
selected above
Beep in Windows
Beeps in the Windows environment
based on the card options
selected above
Changing the Level of Card Support
The CardLite option on the Configure pull-down menu
allows you to change the level of card support and the method
of card detection for your system.
Note
If you change these parameters, make sure you save the
settings by selecting OK from the configuration screen.
When you exit the CardLite Configuration Utility (from the
File menu), the program prompts you to save the changes to
the CARDLITE.INI and CONFIG.SYS files.
2-6
Using CardLite
The following table describes the card support parameters
Card support parameters
Option
Function
CardLite Basic
Provides PC fax/modem card
support only
CardLite Enhanced*
Provides fax/modem, ATA, and
LAN card support
Include support for ATA cards*
Supports ATA cards when
C a r d L i t e E n h a n c e d is selected
CardSoft - Full card support**
Activates the full range of PC card
support under CardSoft
Software Polling
Uses software polling to detect PC
cards
Hardware Interrupt
Uses a hardware IRQ line to detect
PC cards
IRQ Line
W h e n Hardware Interrupt i s
selected, specifies the IRQ value
used to control the PC card (any
value between 0 and 15); when
Hardware Interrupt iS not
selected, this option is grayed out
* To use ATA cards, you must also select Include Support for A T A
c a r d s . I f C a r d L i t e E n h a n c e d is not checked, I n c l u d e S u p p o r t f o r
ATA Cards is not available.
** Selecting this option grays out fields and menu items that are not used
when CardSoft is installed.
Using CardLite 2-7
Using the CARDINFO Command
The CARDINFO command provides these functions:
Identifies the types of PC cards inserted in the PCMCIA
slots
Identifies I/O ports, IRQs, and memory areas used by
PC cards so that you can ensure that two components do
not use the same resources
Turns power to the PCMCIA slots on or off
Displays manufacturer and product information about
PC cards
Identifies the drive letter for an ATA hard disk or ATA
flash card
Displays the most recent error for an inserted card.
You can run CARDINFO from the MS-DOS command line.
Unless you add the directory containing CardLite to the path
command in your AUTOEXEC.BAT file, you need to change to
your CardLite directory to run the CARDINFO command.
When you type CARDINFO without any switches at the
MS-DOS command line, the program creates a CARDID.INI
file and displays the following information for any cards
installed in the PCMCIA slots:
Card type
Manufacturer
Product name.
This program also identifies empty slots.
2-8
Using CardLite
You can also use the switches described in the following table
to perform different functions.
CARDINFO command switches
Command switch
Function
cardinfo /c
Provides the information you see when you type
the command without switches; also shows
software release information, the number of slots
being managed, and vendor revision and
copyright information.
cardinfo /v*
Provides more extensive information about the
PCMCIA slots than you see when you type the
command with no switches. The information
includes memory addresses, software version
numbers, vendor information, revision date,
most recent error on the device, and assigned
l/Os and IRQs.
cardinfo /off
Turns off power to all PCMCIA slots.
cardinfo /off :n
Turns off power to the specified slot (n). For
e x a m p l e , t y p i n g cardinfo /off :1 t u r n s o f f
the power to slot 1.
cardinfo /on
Turns on power to all PCMCIA slots.
cardinfo /on :n
Turns on power to the specified slot (n). For
example, typing cardinfo /on :1 t u r n s o n
the power to slot 1.
cardinfo /?
Displays information about CARDINFO switches.
* Some of this information may scroll off the screen before you can read it,
so add the parameter more after this command.
Using CardLite 2 - 9
Commands in the CONFIG.SYS file
CardLite may have added some of the following commands to
your CONFIG.SYS file. If you modify this file yourself, make
sure you save it and restart your computer.
CONFIG.SYS commands
Command
Function
devicehigh=c:\cardsoft\<socket
services driver>*
Commands necessary for
CardLite to support fax/modem
and application cards
devicehigh=c:\cardsoft\cardlite.exe
device high= c:\cardsoff\csalloc.exe
devicehigh=c:\cardsoft\atadrv.exe**
Provide support for ATA drive
cards and ATA flash cards
* This driver depends on the PCMCIA controller in your system.
** If selected.
2-10
Using CardLite
Chapter 3
Using CardSoft
Card Soft contains utilities and commands to configure and
manage PC cards in the MS-DOS environment.
Note
If you have a fax/ modem, ATA, or LAN (network) card, you
can probably use CardLite to configure and manage your PC
card. See Chapter 2 for more information.
This chapter describes how to use the following Card Soft
utilities:
Configuration utility
CSALLOC command
CARDINFO command.
This chapter also lists the command lines that Card Soft may
have added to your CONFIG.SYS file.
Using CardSoft 3 - 1
Using the Configuration Utility
The configuration utility allows you to customize your system
or reconfigure it when you have trouble using a PC card. You
can use this utility to change the following configurations for
your PC cards:
IRQs and COM port assignment order for fax/ modem cards
I/O port address, IRQ, and memory areas for network cards
Addresses for ATA cards.
You can also use the utility to modify the resource allocation
that the program scanned when you started your system. In
addition, you can define the type of video display you want to
use with this utility.
Note
This utility modifies the CARDID.INI and the CSALLOC.INI
files. Changes you make to your configuration using this
utility don‘t take effect until you restart your system.
Starting the Configuration Utility
Follow these steps to start the configuration utility:
1. Log onto the directory containing your Card Soft software
2. Type CONFIG and press Enter. You see an information
screen about the Card Soft Configuration Utility.
3. Press Enter to continue. You see the main menu for the
configuration utility.
3-2
Using CardSoft
4. If you have an MS-DOS mouse driver installed, you can click
on the menu option to display the corresponding pull-down
menu. You can also press Alt together with the highlighted
letter of the option you want to use.
5. To select a menu option, you can click on it, move the cursor
to it and press Enter, or type the highlighted letter.
After you have selected an option from a pull-down menu,
the message bar at the bottom of the screen shows how to
use it. Also, you can press Enter for <OK>, F1 for <Help>,
and ESC for <Cancel>. To toggle an option on or off,
highlight it and press the space bar.
Editing the PC Card Configurations
The Edit Configuration option on the File pull-down
menu lets you edit modem, network, and ATA card
configurations. It also allows you to specify when your system
notifies you of card events by beeping.
Note
If your system is working properly, you don‘t need to edit
any of the PC card configurations.
Select the configuration you want to change. You see the
configuration screen for the PC card type you‘ve selected. The
options for each PC card configuration are described in the
following tables.
Once you have changed your configuration, make sure you
save the settings by selecting Save configuration from
the File pull-down menu.
Using CardSoft 3 - 3
Fax/modem card configuration options
Option
Function
COM Port Order*
Defines the order in which ports are selected for
configuring modem or fax/modem cards. You
may need to change the order for the COM
ports if you need to reserve a particular port for
another device (such as a mouse).
COM Port Assignment
Order*
Determines whether COM ports are assigned
based on the order in which cards are inserted
or based on the PCMCIA slot into which they
are inserted. A bullet next to the option identifies
the selected order.
COM Port Definition*
Determines which addresses and IRQs are used
for each COM port. If you change the IRQs,
make sure you assign a value listed as available
by the CSALLOC utility. (See page 3-9.)
Enable Audio
Determines whether you can hear the sounds
produced when the modem (or fax/modem) is
connecting to a remote device.
Enable Ring Indicate**
Controls whether the system activates from a
suspend mode when receiving a modem or fax
call. When enabled, the system receives the call
even if it is in suspend mode. If this option is not
enabled, the system ignores the call.
* Do not change the displayed values for COM ports and IRQs unless you
have a specific reason.
** This feature is not supported by all modem or fax/modem cards.
3-4
Using CardSoft
Network card configuration options
Option
Function
Port*
Identifies the base l/O address (in hexadecimal)
for the network card. Except in rare cases, this
value should be between 100h and 3FFh.
IRQ*
Identifies the IRQ for the network card. Can be
any value between 3 and 15 that is available on
your computer.
Memory 1 *
Displays the value for the first memory window.**
Memory 2*
Displays the value for the second memory
window.**
Fast Token Ring***
Specifies the
Enabling this
16 Megabits
disabled, the
per second.
speed for a Token Ring card.
option sets the Token Ring speed to
per second. When this option is
Token Ring speed is 4 Megabits
* Do not change the displayed values for these options unless you have a
specific reason.
** These values must be between C000h and EF00h and are normally in the
range D000-DFFF. You only need to enter the first two characters for these
values.
*** You may not see this option on your system.
Using CardSoft 3 - 5
ATA * card configuration options
Option
Function
Try Primary ATA Address**
Configures ATA cards using the
standard primary ATA addresses
Try Secondary ATA Address
Configures ATA cards using the
standard secondary ATA addresses
Try Any Linear ATA Address
Configures ATA cards using the
linear-address mode available on
most cards
* Includes both ATA flash cards and ATA rotating-media cards.
** Select this option only when you know that no other disk installed on your
computer uses the primary ATA address.
Note
When you enable all three of the ATA card configuration
options, the software uses whatever addresses are available.
Changing the Card Insertion Parameters
Normally, your system beeps when you insert or remove a
card or when you have a configuration conflict. When you
select the Edit Configuration option from the File
pull-down menu, you see the Edit Configuration menu. This
menu contains the Card Insertion Parameters option,
which allows you to specify beep criteria for your system.
Note
If you change these parameters, make sure you select the
Save Configuration option from the File pull-down
menu to save your changes.
3-6
Using CardSoft
The following table describes the card insertion parameters.
Card insertion parameters
Option
Function
Continue on configuration failure
Continues searching card library
records when the system cannot
configure a card
Beep on Card Events in DOS
Beeps in the MS-DOS environment
whenever you insert or remove a
card or when there is a
configuration conflict
Beep on Card Events in Windows
Beeps in the Windows environment
whenever you insert or remove a
card or when there is a
configuration conflict
Modifying the Resource Allocation
The Resource Allocation option on the Utility
pull-down menu provides a quick view of the system resources
that are available to Card Soft. You can also edit these system
resources.
When you select the Open option, you see the scanned
resources for your system’s memory addresses, I/O ports, and
IRQs across the top half of the screen.
Caution
Do not change any resource allocation values unless you
understand how these resources work on your system.
Using CardSoft 3 - 7
If you need to change the resources available to your system,
follow these steps:
1. Move your cursor to the value you want to change in the
fields along the bottom of the screen and select Edit. You
see an Edit Options screen.
2. Select Add New, Change, or D e l e t e .
3. If you selected Add New or Change, the screen displays
the acceptable range of values and allows you to include or
exclude the resource and identify it as shared or reserved.
Make your changes and select OK.
If you select Delete, the screen displays the resource you
selected. Select OK to delete it.
4. Select OK again; then select Save to save your
configuration changes.
Changing the Display for the Configuration Utility
You can assign a color, monochrome, or LCD display mode for
the Card Soft configuration utility. To change the display mode,
select the Display pull-down menu; then select Color,
Monochrome, or LCD to identify the mode you want to use.
Make sure you select a mode supported by your hardware.
When you make your selection, the screen immediately reflects
the option you have chosen.
3-8
Using CardSoft
Using the CSALLOC Command
CSALLOC is an MS-DOS program that scans the system each
time you start it for available memory, I/O port, and IRQ
resources. This ensures that Card Soft does not use resources
that other system hardware or software may need to work
properly. CSALLOC maintains the information it collects in a
file called CSALLOC.INI.
You need to run CSALLOC if you want to display the system
resources available to Card Soft or if you‘ve changed port, IRQ,
or memory settings on your system. You should also run
CSALLOC when you install new hardware or software that
requires specific system resources so that Card Soft does not use
the resources instead.
You must run the CSALLOC command from the MS-DOS
command line. Unless you add the directory containing
CardSoft to the path command in your AUTOEXEC.BAT file,
you need to change to your Card Soft directory to run the
CSALLOC command.
Note
Remove any PC cards from the PCMCIA slots before you
run the CSALLOC command.
Using CardSoft 3 - 9
When you type CSALLOC (without any switches) at the
MS-DOS command line, the program scans your system’s
resources and updates the CSALLOC.INI file. You can also use
the switches described in the following table to perform
different functions:
CSALLOC command switches
Command
switch
Function
csalloc /r
Displays the current status of memory, I/O port
address, and IRQ resources on your system. The
information includes the following codes to identify
how each address is allocated:
(R) indicates addresses reserved for your PC cards or
other system components
(A) indicates addresses allocated for CardSoft
(S) indicates resources that can be shared by several
system components without conflict.
csalloc /d
Displays the contents of the CSALLOC.INI file.
csalloc /s
If the system contains a Plug-and-Play (PnP) BIOS,
scans system resources instead of using information
supplied by PnP BIOS.
Using the CARDINFO Command
The CARDINFO command provides these functions:
Identifies the types of PC cards inserted in the PCMCIA
slots
Identifies I/O ports, IRQs, and memory areas used by PC
cards so that you can ensure that two components do not
use the same resources
Turns power to the PCMCIA slots on or off
Displays manufacturer and product information about PC
cards
3-10
Using CardSoft
Identifies the drive letter for ATA hard disk or ATA flash
cards
Displays the most recent error for an inserted card.
You can run CARDINFO from the MS-DOS prompt or from the
MS-DOS icon within Windows.
Unless you add the directory containing Card Soft to the path
command in your AUTOEXEC.BAT file, you need to change to
your Card Soft directory to run the CARDINFO command.
When you type CARDINFO (without any switches) at the
MS-DOS command line, the program creates a CARDID.INI
file and displays the following information for any cards
installed in the PCMCIA slots:
Card type
Manufacturer
Product name.
This program also identifies empty slots.
Using CardSoft
3-11
You can also use the switches described in the following table
to perform different functions.
CARDINFO command switches
Command switch
Function
cardinfo /c
Provides the information you see when you type
the command without switches as well as the
software release information, the number of slots
being managed, and vendor revision and
copyright information.
cardinfo /v*
Provides more extensive information about the
PCMCIA slots than you see when you type the
command with no switches. The information
includes memory addresses, software version
numbers, vendor information, revision date,
most recent error on the device, and assigned
l/Os and IRQs.
cardinfo /off
Turns off power to all PCMCIA slots.
cardinfo /off :n
Turns off power to the specified slot (n). For
example, typing cardinfo /off :1 turns off
the power to slot 1.
cardinfo /on
Turns on power to all PCMCIA slots.
cardinfo /on :n
Turns on power to the specified slot (n). For
example, typing cardinfo /on :1 turns on
the power to slot 1.
cardinfo /?
Displays information about CARDINFO switches.
* Some of this information may scroll off the screen before you can read it,
so add the parameter more after the command.
3-12
Using CardSoft
Commands in the CONFIG.SYS file
Card Soft may have added some of the following commands to
your CONFIG.SYS file. If you modify this file yourself, make
sure you save it and restart your computer.
CONFIG.SYS commands
Command
Function
devicehigh=c:\cardsoft\<socket
services driver>*
Commands necessary for CardSoft
to support fax/modem and
application cards; other types of
cards may require the MTD driver
(see the documentation that
came with your card for
information); contains additional
commands for specific drivers
devicehigh=c:\cardsoft\cs.exe
devicehigh=c:\cardsoff\csalloc.exe
c:\cardsoft\csalloc.ini
devicehigh=c:\cardsoft\cardid.exe
devicehigh=c:\cardsoft\atadrv.exe
devicehigh=c:\cardsoft\mtddrv.exe
devicehigh=c:\cardsoft\mtsram.exe
Provide support for ATA drive cards
and ATA flash cards; install the
atadrv.exe command before the
sramdrv or mtddrv command
Provide support for SRAM cards
devicehigh=c:\cardsoft\mtddrv.exe
device=c:\dos\emm386.exe
x=d000-dfff
Excludes the memory range
D000-DFFF
install=c:\cardsoft\cs_apm.exe
If your system conserves battery life
using the Advanced Power
Management driver, allows
CardSoft to handle the power
management cycles
* This driver depends on the PCMCIA controller in your system.
Note
PCMCIA software may be installed in C:\CARDWIZ\ or
C: \CARDSOFT\
Using CardSoft
3-13
Index
A
Advanced Power Management
driver, 3-13
Applications, launching, 1-6, 1-11
ATA disks
configurations, 2-3—7, 3-3, 3-6
drive letter, 2-8, 3-11
drivers, 2-10, 3-13
memory addresses, 2-2, 3-2
ATADRV command, 2-10, 3-13
AutoCorrect, 1-4—5
AUTOEXEC.BAT file, 2-8, 3-9, 3-11
B
Basic card support, 2-1,2-7
Beeps, configuring, 1-11, 2-3, 2-5—6,
3-3, 3-6-7
BIOS, Plug & Play (PnP), 3-10
c
Card
information, 1-3, 1-9,
insertion parameters, 2-5-6, 3-6—7
notification criteria, 1-2, 1-11,
2-5-6> 3-6
support level, 2-6—7
CARDID.INI file, 2-2, 2-8, 3-2, 3-11
CARDINFO command, 2-1, 2-8—9,
3-1, 3-10—12
CardLite
basic card support, 2-1, 2-7
card insertion parameters, 2-5—6
card support level, 2-6—7
CARDID.INI file, 2-2, 2-8
commands, 2-1—10
CONFIG. SYS file, 2-2, 2-5-—, 2-10
configuration, 2-2—7
directory, 2-3, 2-8
enhanced card support, 2-1, 2-7
CardLite continued
memory restrictions, 2-1
on-line help utility, 2-2
utilities, 2-2—9
CARDLITE.INI file, 2-2, 2-5—6
Card Soft
card insertion parameters, 3-6—7
card notification criteria, 3-6
CARDID.INI file, 3-2, 3-11
changing configuration display,
3-8
commands, 3-1–14
CONFIG.SYS file, 3-1, 3-13
configuration, 3-2—8
directory, 3-2, 3-11
modifying resources, 3-7—8
path, 3-9
utilities, 3-1—12
CardWizard
Auto Correct, 1-4—5
card information, 1-3, 1-9,
card notification criteria, 1-2, 1-11
CONFIG. SYS file, 1-2, 1-8
configuration conflict, 1-4—8
functions, 1-1
icon, 1-2
launching applications, 1-6, 1-11
manual correct, 1-6—8
menus, 1-8—11
modifying resources, 1-6—11
on-line help utility, 1-1, 1-8
program group, 1-2
solving problems, 1-4–5
starting, 1-2,
system conflicts, 1-4—11
using, 1-1—11
CLCFG command, 2-3
Color video display, 3-8
COM port, configuring, 1-7, 1-10,
2-4, 3-2, 3-4
Index
1
Commands
ATADRV, 3-13
CARDINFO, 2-1, 2-8—9, 3-1, 3-10—12
CardLite, 2-1—10
CardSoft, 3-1—13
CLCFG, 2-3
CONFIG, 3-2
CSALLOC, 3-1—2, 3-4, 3-9—10
in CONFIG.SYS, 2-10, 3-13
CompuServe, Intro-4
CONFIG command, 3-2
CONFIG. SYS file, 1-2, 1-8, 2-2,
2-5—6, 2-10, 3-1, 3-13
Configuration
conflict, 1-4—8, 2-6, 3-7
utility, 2-2–9, 3-2—12
Configuring
ATA cards, 2-3-7, 3-3
beeps, 1-11, 2-3, 2-5—6, 3-3, 3-6—7
fax/ modem card, 1-6, 1-10, 2-1,
2-3-4, 2-7, 3-24
memory, 3-9–10
network cards, 1-10, 2-2–3, 2-5—6,
3-1-3, 3-5
resources, 2-6, 3-7—8
Correct button, 1-6–7
CSALLOC command, 3-l–2, 3-4,
3-9-10
CSALLOC.INI file, 3-2, 3-9–10
Customer support, Intro-3
D
Display, CardSoft utility video, 3-2,
3-8
E
Enhanced card support, 2-1,2-7
EPSON
America Forum, CompuServe,
Intro-4
Connection, Intro-3
linear flash cards, Intro-2
2 Index
F
Fast token ring, 2-5, 3-5
Fax/ modem cards, Intro-2, 1-6,
1-10, 2-1, 2-34, 2-7, 2-10, 3-24
Flash cards, Intro-2, 2-8, 3-6, 3-11,
3-13, see also Linear flash cards
H
Help
for CARDINFO switches, 2-9, 3-12
from EPSON, Intro-3
on-line, 1-1, 1-8, 2-2
I
I/O
ports and addresses, 1-1, 2-4, 2-8—9,
3-2, 3-5, 3-7, 3-9—10, -12
range setting, 1-9
IRQ lines, 1-1, 1-9, 2-4—5, 2-7—9, 3-2,
3-4—5, 3-7, 3-9—10, 3-12
L
LAN cards, see Network cards
Launching applications, 1-6, 1-11
Linear flash cards, Intro-2, see also
Flash cards
M
Memory
addresses, 2-2, 2-5, 3-2, 3-10,
3-12-13
configuring, 3-9–10
identifying, 2-8, 3-5, 3-10, 3-12
restrictions, 2-1
Technology drivers, Intro-2, 2-1
window, 2-5, 3-5
Menus, CardWizard, 1-8–l1
Modem cards, see Fax/ modem
cards
Monochrome video display, 3-8
Mouse, using with DOS
applications, 2-3, 3-3
N
R
Network card, Intro-2, 1-10, 2-2—3,
2-5, 3-2—3
Notification criteria, card, 1-2, 1-11
2-5—6, 3-6
Resources
management, 1-1, 2-1—9, 3-7–10
modifying, 1-4–11, 2-2—7, 3-7—8
shared, 3-10
Resume from suspend mode, 2-4,
3-4
O
On-line help, CardWizard, 1-1, 1-8,
2-2
Options
ATA configurations, 2-3—7, 2-7,
3-3, 3-6
card insertion, 2-5—6
fax/ modem configuration, 2-4
network configuration, 2-5
toggling, 2-3, 3-3
menu, 1-8–11
P
PC cards
ATA disks, Intro-2, 2-2-8,3-2-3,
3-6,3-11,3-13
configuring, 1-2
errors, 2-8, 3-11
fax/ modem, Intro-2, 1-6, 1-10, 2-1,
2-3-4, 2-7, 2-10, 3-24
manufacturer, 1-1, 2-8, 3-11
network, Intro-1, 1-10, 2-2–3, 2-5,
3-2-3
notification criteria, 1-2, 1-11,
2-5-6, 3-6
product information, 1-1, 2-8, 3-11
status, l-l–2
type, 2-8, 3-10–11
viewing information, 1-9
PCMCIA
slot power, 2-8–9, 3-10, 3-12
software utilities, Intro-1
Plug & Play (PnP) BIOS, 3-10
Port, configuring, 1-7, 1-10, 2-4, 3-4
Power to PCMCIA slots, 2-8–9,
3-10, 3-12
s
Settings menu, 1-10
Software applications, Intro-3, see
also Launching applications
Sound files, 1-11
SRAM card drivers, 3-13
Support, customer, Intro-3
Suspend mode, 2-4, 3-4
Switches
CARDINFO, 2-8-9, 3-11-12
CSALLOC, 3-10
System
conflicts, 1-2–11, 3-7
resources, 1-4–11, 2-1, 3-7–10
T
Technical assistance, Intro-3
Toggling options, 2-3, 3-3
Type, PC card, 2-8,3-10-11
V
Video display, with CardSoft utility,
3-2> 3-8
View menu, 1-9
w
WAV files, 1-11
Windows interface, see
CardWizard
Index
3
Epson America (USA)
EPSON ConnectionsSM
Tel: (800) 922-8911 (U.S. and Canada)
EPSON Accessories
Tel: (800) 873-7766
Fax: (310) 782-4401
EPSON DirectsSM
P.O. Box 2858,20770 Madrona Avenue
Torrance, CA 90509-1111
Computer system sales:
Tel: (800) 374-7300
(310) 782-5478
Fax: (310) 782-4455
Epson America, Inc.
20770 Madrona Avenue
Torrance, CA 90509-2842
Tel: (310) 782-0770
Epson America (International)
Epson Latin America
Miami, FL, USA
Tel: (305) 265-0092
Fax: (305) 265-0097
Epson Mexico, S.A. De C.V.
Mexico, D. F., Mexico
Tel: (525) 395-9944
Fax: (525) 395-9499
Hotline: (91800) 50326
Epson Argentina, S.A.
Buenos Aires, Argentina
Tel: (541) 394-6774
Fax: (541) 322-4637
Epson Do Brasil Ltda.
Av. das Nocoes Unidas, 13.771, 5th floor
04794-000 S50 Paulo - SP Brazil
Tel: (5511) 536-0300
Fax: (5511) 536-9200
Epson Chile, S.A.
Santiago, Chile
Tel: (562) 232-8966
Fax: (562) 233-3197
Epson Venezuela, S.A.
Caracas, Venezuela
Tel: (582) 241-0433
Fax: (582) 241-6515
Epson Costa Rica, S.A
San Jose, Costa Rica
Tel: (506) 234-6666
Fax: (506) 225-5709
Epson America, Inc.
International Division
20770 Madrona Avenue
Torrance, CA 90509-2842
Tel: (310) 782-0770
Fax: (310) 782-5051