1
USER MANUAL
MOBILE MULTIMEDIA SYSTEM WITH 7" WIDE
TOUCH SCREEN LCD MONITOR
Model: SD-906W
Table of Contents
DVD Region Management. . . . . . . . . . . . . . . . . . . . . . . . . . . . . . ..
2
Safety Information
3
Installation
4
Main Unit Display- Monitor Closed
.
Main Unit Oisplay- Monitor Open
.
.
10
General Operation
.
11
II
I...•
~
~_
14
16
Radio Operation. . . . . . . . . . . . . . . . . . . . . . . . . . . . . . . . . . . . . . . . . . . . . . .
17
RBOS Operation . . . . . . . . . . . . . . . . . . . . . . . . . . . . . . . . . . . . . . . . . . . . . . .
19
CO Player Operation. . . . . . . . . . . . . . . . . . . . . . . . . . . . . . . . . . . . . . . . . . . . . . .
21
MP3IWMA Player Operation. . . . . . . . . . . . . . . . . . . . . . . . . . . . . . . . . . . . . . . . . .
23
DVO Player Operation .... . . . . . . . . . . . . . . . . . . . . . . . . . . . . . . . . . . . . . . . . . .
24
JEPG Operation. . . . . . . . . . . . . . . . . . . . . . . . . . . . . . . . . . . . . . . . . . . . . . .
32
USB/SO Card Operation. . . . . . . . . . . . . . . . . . . . . . . . . . . . . . . . . . . . . . . . . . .
33
Bluetooth Operation. .. .. . . . . . . . . . . . . . . . . . . . . . . . . . . . . . . . . . . . . . . . . . . . ..
34
Media Device Operation .. .. . . . . . . . . . . . . . . . . . . . . . . . . . . . . . . . . . . . . . . . .
36
Troubleshooting. . . . . . . . . . . . . . . . . . . . . . . . . . . . . . . . . . . . . . . . . . . . . . . .
37
Specifications. . . . . . . . . . . . . . . . . . . . . . . . . . . . . . . . . . . . . . . . . . . . . . . . . .
38
I
i
.
Video Operation. . . . . . . . . . . . . . . . . . . . . . . . . . . . . . . . . . . . . . . . . . . . . . .
j
Ii
I1
9
Remote Control
Main Setup Menu
i
8
.
DVD Region Management
Some DVD discs can be played only in certain playback modes according to the intentions of the software.
Therefore, some functions may not work as intended. Please be sure to read instructions provided with
each disc. This player has been designed to play back DVD software encoded for specific region areas.
The unit will play discs labeled "Region 1" or "All".
DVO region codes:
123456-
USA, Canada
Japan, Europe, South Africa, Middle East
Rep. of Korea, Taiwan, Hong Kong, Parts of Southeast Asia
Australia, New Zealand, Mexico, South America
Eastern Europe, Russia, India, Africa
China
2
Safety Information
Please read all instructions carefully before installing or operating.
Due to its technical nature, it is highly recommended that your unit is installed by a professional installer
or an authorized dealer. This product is only for use in vehicles with 12VDC negative ground only.
Safety Notes:
The DVD video display of the in-dash unit will not operate while the vehicle is moving. This is a safety
feature to prevent driver from distracting. In-dash DVD video functions will be only operated when vehicle
is in Park and the parking brake is engaged. rt is illegal in most states for the driver to view video while
the vehicle is in motion.
To prevent damage or injury:
1.
2.
3.
4.
5.
Make sure to ground the unit securely to the vehicle chassis ground.
Do not remove the top or bottom cover of the unit.
Do not install the unit in a spot exposed to direct sunlight or excessive heat or splashing water.
Do not subject the unit to excessive shock.
When replacing a fuse, just use a new one with the prescribed rating. Using a fuse with wrong rating
may cause the unit to malfunction.
6. To prevent short circuits when replacing a fuse, disconnect the wiring harness first.
7. Use the provided hardware and wire harness.
8. You cannot view video while the vehicle is moving. Find a safe place to park and engage the parking
brake.
9. If you experience problems during installation, consult your nearest dealer.
10. If the unit malfunctions, reset the unit as described on page 4 first. If there is still problem, consult
your nearest dealer.
11. To clean the monitor, wipe only with a dry silicone cloth or soft cloth. Do not use a stiff cloth, or volatile
solvents such as paint thinner and alcohol. They can scratch the panel surface and/or remove the
printing.
12. When the temperature of the unit falls (as in winter), the liquid crystal inside the screen will become
darker than usual. Normal brightness will return after using the monitor for a while.
Additional notes:
1. When extending the ignition, battery or ground cables, make sure to use automotive-grade cables or
other cables with an area of 0.75mm (AWG 18) or more to prevent voltage drops.
2. Do not touch the liquid crystal fluid if the LCD is damaged or broken. The liquid crystal fluid may be
hazardous to your health or fatal. If the liquid crystal fluid from the LCD contacts your body or clothing,
wash it off with soap immediately.
This device complies with part 15 of the FCC rules and regulations.
Operation is subject to the following two conditions:
1) This device may not cause harmful interference, and
2) This device must accept any interference received, including interference that may cause undesired
operation.
3
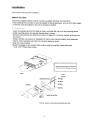
Installation
Please read the manual before installation.
Before You Start
• Disconnect negative battery terminal. Consult a qualified technician for instructions.
• Avoid installing the unit where it would be subject to high temperatures, such as from direct sunlight,
or where it would be subject to dust, dirt or excessive vibration.
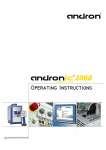
Getting Started
• Insert the supplied keys into the slots as shown, and slide the unit out of the mounting sleeve .
• Install mounting sleeve into opening, bending tabs to secure.
• Connect wiring harness and antenna as shown on pages 5-6. Consult a qualified technician if you
are unsure.
• Certain vehicles may require an installation kit and/or wiring harness adapter (sold separately).
• Test for correct operation and slide into mounting sleeve to secure.
• Snap trim ring into place.
• Mount the adapter to any smooth clean surface using the supplied double-sided tape
or #2 x 3/8" Phillips head screws.
Mounting sleeve opening dimensions
7-3/16" x 2-1/16" (183 mm x 53 mm)
KEYS
ASHER
WASHER
HEX NUT
T
PLAINW
SPRING
HEX BOLT
HEX BOL
MOUNTING SLEEVE
TYPICAL FRONT-LOAD DIN MOUNTING METHOD
4
Installation
Wiring Diagram
L
rj!
@
--:B::..::.::....lue_
®
-@
Black
®
11l-_:::.:;Bla:.::;ck::.....--er,VlI ~
Green with White
Stri~
®
I L---...:.P~in~k__@
Rear
Red
@
White/Black
®
H
Gray/Black
@---------,
L.---@
Gray (+)
White (+)
-'-@@
<:reen/BIack (-)
®
H
@)-----'
VlaIet (+)
Groen (+)
5
@
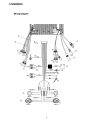
Installation
Wiring Diagram
- Components
1. Media Device connecting cable
2. Bluetooth Microphone
3. Radio Antenna
4 Car Phone (Brown)
5. Dimmer (Orange)
6. Rear Zone Audio Out LlR & Rear Monitor 1
* Red: Rear Zone Out R
* White: Rear Zone Out L
* Yellow: Rear Monitor
7. Center RCA Output(Gray) : The center output must be connected to an external amplifier for 3D or 6CH
mode.
8. Subwoofer RCA Output(Blue): The subwoofer output is available in all sound/audio modes.
9. Left Front Speaker(White, White/Black)
1O.Left Rear Speaker(Green, Green/Black)
11.Right Rear Speaker(Violet, Violet/Black)
12.Right Front Speaker(Gray, Gray/Black)
13.ACC Power Wire(Red): Connect to a +12 volt circuit that is only live when the ignition is on.
14.Parking(Pink): Connect to negative(-) parking brake wire. This wire MUST BE connected in accordance
with the traffic law. It is the end-user's responsibility to make sure this wire is connected
properly.
15.Back Camera(Green/ White)
16.Ground Wire(Black): Securely fasten the Ground wire to grounded metal part of the car's chassis. If
you cannot find an existing bolt or screw to fasten it to, drill a hole in the metal
and secure it with a screw. To ensure a good ground, remove any paint or greese
from areas where the wire will contact the surface.
17.Constant Power Wire(Yellow): Connet the 12V PLUS constant power wire to a live 12 volt wire in the
vehicle. Before making a connection, check that the wire you intend to
connect to is always live, even when the car's ignition is turned off. If a
live wire is not found, route the wire to the car's fuse block and connect
it to a live circuit there.
18.AUX IN LlR VIDEO
19.Rear Monitor 2, Camera
20.Power Antenna Wire(Blue): Connect to a motorized (power) antenna and/or to a remote turn-on lead for
an amplifier
21.Front and Rear RCA Outputs(Black/Gray)
* Replacing thef.use
.
.
. . . .• . ,.';:" '"
Whenteplacing"a f~se, be sure to use correct type and amperage to.svoid darnli9ing th~'uilit~
The SD~@6W uses one 10amp ATOfuse, located in the black filter box in-line·wfth,!Re maine
,>}¥ire h~rri~ss. . . . ......'. .. " . ' '.
',,' "', .
·*·,fte~.onnecting the 8attery
.,.
...
..•.
y{henwiriligiscomplete, reconMctthe battery negative terminal.
6
Installation
Wiring Diagram
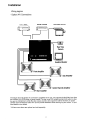
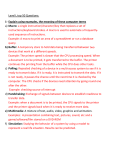
- Optional AN Connections
DVD Player
Game Console
Overhead Monitor
o
00
••
Rear View
Camera
Headrest Monitor
Front Amplifier
Sub Amp lifier
Center Channel Amplifier
Rear Amplifier
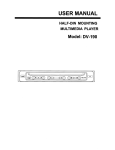
The diagram above illustrates the connection capabilities of the unit. Two separate AudioNideo inputs allow
the connection of a DVD player or game console. The rear zone DVD output provides both audio and video
for rear seat entertainment, while the video output provides video signal for external monitors. A rear view
camera can be connected to either AN input to provide assistance when backing up your vehicle. Visit your
local dealer for more details.
* All items shown above are optional and sold separately.
7
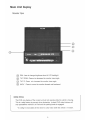
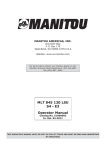
Main Unit Display
Monitor Closed
®
@@@@
CD
@
@
@)
@
@
(f)
® Chapter / Track Up
Band
AS / PS (Auto Store/Preset Scan)
Secondary LCD
DISP (Display)
Open / Close Monitor
Eject
Qjl
Chapter /Track Down
© Stop
© Play / Patse
t9 Fast Forward
@
Fast Reverse
® Mode
USB Port
® SO Card
® EO
@
@
Power
MuteNolume
Monitor Notes:
This model incorporates a motorized moving monitor. Before final installation, make sure the monitor will not
obstruct the dash, shifter or any other controls.
Upon installation, do not attempt to move the monitor up/down by hand. Use the ANGLE & ", OPEN and IN/OUT
buttons on the front panel only.
8
Main Unit Display
Monitor Open
@
@
@
@----
@
@
TILT DOWN- Press ... to decrease the monitor view angle.
@
TILT UP- Press Ato increase the monitor view angle.
@
INIOUT - Press to move the monitor forward and backward.
DIM - Press to change brightness level of LCD backlight.
Safety Notes:
The DVD video display of the in-dash unit will not operate while the vehicle is moving.
This is a safety feature to prevent driver distraction. In-dash DVD video functions will
only operate when vehicle is in Park and the parking brake is engaged.
* It is illegal in most states for the driver to view video while the vehicle is in motion.
9
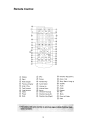
Remote Control
®
®
Display
@
@
@
@
Next Chapter
@
Eject
Previous Chapter
Enter / Play
Fast Forward
Fast Reverse
@ Mode
@ Power
@ Mute
@
@J
@
@
@
@
@
@)
®
@
SRC
Picture
@ Direction Key [Down]
@ Zoom / Call
Number Key
®
Audio Select
@ Subtitle
Volume Up
®
Volume Down
Setup
Direction Key [Up]
@ Angle
@ Repeat
@ Title
Direction Key [Left]
Direction Key [Right]
@
@
Direct to Folder
®
Goto
10
Stop / Band / Hang up
Audio
Menu
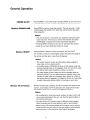
General Operation
POWER On/Off
Monitor OPEN/CLOSE
Press POWER or any other button (except OPEN) to turn the unit on.
Press and hold POWER for more than 2 seconds to turn the unit off.
Press OPEN to open or close the monitor. The unit will emit 1 confir-mation beeps. Be careful not to touch the monitor during the open/
close sequence.
Notes:
• The unit will stop if it encounters any obstacles during the open/
close sequence, If this occurs, remove the obstacle and press
OPEN again to resume the monitor open/close sequence.
• Pressing OPEN will also turn the unit on and open the monitor.
• Audio can be heard while the monitor is closed.
Monitor IN/OUT
Press theiN/OUT button to move the monitor "IN" and "OUT"
The monitor will move to a 90 degree position first when the angle of
the monitor and the deck is less than 90 degrees.
Notes:
• The vehicle must be in park and the parking brake applied to
view video on the in-dash monitor.
• As a safety feature, PARKING will show on the display when the
vehicle's parking brake is not engaged. DVD, AV1 and AV2 audio
can still be heard even though the vehicle is in motion.
• The video display of the in-dash unit will not operate while the
vehicle is moving. This is a safety feature to prevent driver's dis-traction. In-dash video only functions when vehicle is in Park or
the parking brake is engaged. It is illegal for drivers in most states
to watch video while driving. Refer to local laws in your area.
Monitor TILT Position
With the monitor open, pressing TILT .. to increase view angle of the
monitor, and pressing TIL TT to decrease view angle of the monitor.
The monitor angle can be adjusted in 6 different positions.
Notes:
• Do not attempt to move the monitor up/down by hand, which will
cause severe damage to the unit. Use the front panel buttons or
the remote control only.
• The color of the LCD monitor varies in different viewing angles.
Select an angle with the most optimum view for your location.
• When turning off, the last position of the monitor can be remem-bered that the unit will return to the last position automatically
when turned on in the next time. See Page14 for details.
11
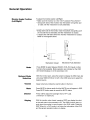
General Operation
Monitor Angle Position
(Left/Right)
To adjust the monitor positon Left/Right:
• Make sure the monitor is in the "OUT" position.Press IN/OUT
• Grasp both side of the monitor near the bottom and gently pull
on side until the mechanism is fully extended.
To return the monitor mechanism to the "closed" position
• Grasp both side of the monitor near the bottom and gently push
on the side that is extended until the mechanism is closed .
• A slight click will heard when the monitor mechanism is closed.
Refer to the diagram below.
r
,I
'.
i
Mechanism Closed
Mode
Optional Mode
Selection
Volumn
Mute
Mechanism Fully Extended
Press MODE to select between RADIO, DVD, AVX inputs or other
functions that available. Mode operation are indicated on the OSD
(On Screen Display) or on the secondary LCD.
With the monitor open, press the screen to display the OSD menu bar
and press RADIO,DVD,AV or AV2 in the OSD menu bar to select the
desired source.
Adjust volume by rolling the volumn button in the front.
Press MUTE to silence audio.And the MUTE icon will appear in OSD
Press MUTE button again to cancel the MUTE status.
Dimmer
Press DIM to adjust the backlight level of TFT LCD.
(1 minimum / 5 maximum).
Display
With the moniter under closed, pressing DISP can display the clock
or the radio rate in the secondary LCD. The DISP function does not
work when the monitor is open except in the DVD mode. Press the
DISP When it's in DVD mode, it will show the information of the DVD
and the general operation buttons in display.
12
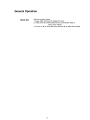
General Operation
Clock Set
With the monitor closed:
1. Press DISP button(4) to display the clock.
2. Press and hold DISP button(4)until a confirmation beep is
heard, then release.
3. Press .. or T to adjust the hours and .... or ~ to adjust the minutes.
13
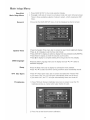
Main Setup Menu
Enter/Exit
Main Setup Menu
General
System Time
OSD Language
Beep
TFT Auto Open
TS Calibrate
1. Press MAIN SETUP in the mode selection display.
2. Press Iii] in left side of screen to exit setup mode and return to the last screen.
There is three available sUbjects of setup to select., which are General, ASP,
Video.
Once enter the MAIN SETUP menu, it will be displayed as General screen.
Press the Syetem Time menu bar on screen to open Clock Adjustment display.
Press ~ , ~ in display to set the hour and minute.
Press 24H/12H in display to select a display time way between 12/24(AM/PM).
Press Reset in display to reset the second count to Zero.
Press Iii] in display to complete setting time and go back to menu display.
Press the OSD Language menu bar in display and use
desirable language.
A
or ..... to select a
Press the Beep menu bar in display to activate the menu selection.
Press ~ or ~ to select On/Off for turning on/off the touch screen beep sound.
Press TFT Auto Open menu bar on screen and select the "Yes" and "No".
If you select "Yes", the TFT will open automatically when turn the set on.
If you select "No", the TFT will open automatically when turn the set off.
1. Press TS(Touch Screen) Calibrate menu bar on screen to open the TS
Calibrate window as below which asks Yes/No for start.
2. Press Yes to start touch screen calibration.
14
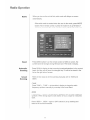
Main Setup Menu
3.Press 0 at up-left, dwon-Ieft, down-right and up-right corner on
screen as displayed below.
Use Default Settings
ASP
Bass Cent Freq
Press Use Default Settings menu bar on screen to choose
YES/NO. Press Yes to reset the unit, which will be turned off
automatically.
At the bottom part of the screen of MAIN SETUP menu, there are
three available items: General, ASP, Video.
Press ASP item to display audio setup menu.
To change the Bass Cent frequency from 60Hz, 80Hz, 100Hz, 200Hz.
Bass Q Value
Press Bass Q Value to activate the Bass Q Value bar and
select wanted value by using <IIIl or ~ .
* It will turn into yellow when activated.
Bass DC Gain
To select On/Off by using
<IIIl
or ~ .
TREB Cent Freq
To change the Cent frequency from 10KHz, 12.5KHz, 15KHz, 17.5KHz
LOUD Cent Freq
To change the Loud frequency from 400Hz, 800Hz, 2400Hz.
Power On Volume
Fixed Volume
Press <IIIl ,~ by Power On Vol menu bar on screen to set the volume
when power on. You can select Fixed or Last Volume.
- If you select "Last Vol", the last volumn will be heard when you turn
on the set.
- If you select "Fixed" at Power On Vol setup menu, you can select the
volume level by pressing <IIIl , ~ in the belowing. Fixed Vol menu bar
on screen.
Press
<IIIl, ~
to select the fixed volumn level from 10 to 30.
15
VIDEO Operation
VIDEO
Display Mode
Video Input
Camera Image
At the bottom part of the screen of MAIN SETUP menu, there are
three available items: General, ASP, Video.
Press Video item to display audio setup menu.
Press <II , ~ on Display Mode menu bar on screen to select the
display aspect of 16:9 or 4:3.
Press <II , ~ on Video Input menu bar on screen to select from AUTO,
PAL and NTSC.
Press <II , ~ on Camera Image menu bar on screen to select Normal
or Mirror. If you select "Mirror", the image reflected by camera will be
reversed as the image seen through mirror.
16
Radio Operation
Radio
When you turn on the unit at first, radio mode will displays on screen
automatically.
- If the radio mode is wanted when the user in other mode, press MODE
button (16) in remote control or press the mode icon at up-left side of
screen to go back to the mode selection display to find radio mode icon.
Band
Automatic
Scanning
Manual
Scanning
Press BAND button(1) on the remote control or BAND on screen, the
current band will change among AM band and FM3 bands in display.
Press SCAN in display to start scanning broadcasting stations in the current
band. And the unit will scan the strongest top 10 ratios to be stored in the
list on the right side of screen.
There are two ways to do the scanning manually, which is TUNE and
SEEK.
-TUNE
Press TUNE 1\ , TUNE v at downside in display to change the radio
frequency up/down manually by one step in the current band.
-SEEK
Press SEEK 1\ • SEEK v at downside in display to seek the radio frequency
up/down. When strong signal's radio station is found. it stops for 3 seconds
each.
Press SEEK 1\ • SEEK v again or ENT button(13) to stop seeking and
listen to the current broadcast.
17
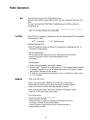
Radio Operation
EQ
Press EO button to enter the Audio Adjust screen.
EO has 5 basic different audio effects, which are User, Classical, Rock, Jazz and
Pops.
The user can adjust the FAD(Fade), BAL(Balance) and LOUD(Loudness) by
pressing .... , ~.
- If you select User, the Bass and Treble bars are activated. The user can select
from -7 to 7 levels of Bass and Treble effect.
LOC/DX
Press LOC/DX to change the sensibility of the unit. When select LaC, the sensibility
will decrease to 20dB.
*
LaC - Local wave
* DX - Distance wave
-Stereo Broadcast (ST)
When ST appears at upside of display, it's stereophonic broadcasting. If not, it's
monophonic broadcasting.
- Using Preset Stations
Ten numbered preset buttons store and recall stations for each band.
All ten stored stations for the current band appear on the
TFT screen.
- Storing Station
1. Select a band(if needed), then select a station.
2. Press to hold 1-0 buttons in remote control or 1-10 of station listed on rightside
in display (Press .... on the list to choose the number) for 3 seconds to store
each station's frequency to the number.
3. To listen to a corresponding stored station, press 1-0 buttons in remote control
or 1-10 in display.
AMS/PS
- AMS (Automatic Store)
Select a band and hold on AMS item for more than 3 seconds to
activate the Auto Store function, which will search six strong stations
in the current band and store them automatically in the list.
When activating this fuction, the yellow charactor "AS" appears instead
of the time on the upper-side of the screen.
- PS (Preset Store)
Scan stored stations in the current band.
- Select a band (if needed).
- Press PS shortly in display to activate the Preset Store function.
It will stay 3 seconds at each preset station.
- Press PS again to stop scanning in the current band when a
desired station is found.
18
RBDS Operation
TA
(Traffic
Announcement)
TA lets you receive traffic announcements automatically, no matter what source
you are listening to at the moment. TA can be activated for both a TP station or
an enhanced other networks TP station.
- To turn TA off/on, touch TA in screen.
- When recieving Traffic Announcement, if the volume is low than 16, it will be
changed to 16. And, except Volume and MENU control functions, other control
can not be operated by screen, remote control and the unit, until TA is turned
off. If you press other key during TA is on, unit will sound warning beep.
* Refer to Radio part for other functions as AS/PS, TUNE, SEEK, etc.
Press NEXT in screen to display the menu.
REG
(Regional Mode)
AF
(Alternative
Frequency)
(Program Type)
When AF is used to retune frequencies automatically, the regional
function limits the selection to stations broadcasting regional programs.
- To turn REG off/on, touch REG in screen.
When switching to RBDS mode, AF is flickering and on as a default.
When AF is on, if the current signal is weak or there are other problems, the unit
will automatically search for a different station in the same network which has a
stronger signal.
- To turn off/on, touch AF in screen.
You can turn in a station by using PTY information.
- Touch PTY in screen.
- Program type list will be displayed on screen. You can search for a specific type
of broadcasting program, such as those listed on the next page.
- Touch .... or ... at leftside of screen to select a program type.
- After choosing type of program, you can tune or seek station within the selected
type.
- Program Type List
- None
- News
- Affairs
- Info
- Sport
- Educate
- Drama
- Culture
- Science
- Varied
- Pop M
- Rock M
- Easy M
- Light M
- Classics
- Other M
- Weather
- Finance
- Children
- Social
- Religion
- Phone In
- Trevel
- Leisure
- Jazz
- Country
- Nation M
- Oldies
- Folk M
- Document
19
RBDS Operation
TA Volume
Clock Tune
You can select volume between 0-39.
Select "On", when you drive to different place, clock can adjust automatically.
TA Option
Seek I Alarm.
TA Retune
Long I Short.
20
CD Player Operation
CD Mode
Press MODE button(16) in remote control or touch the mode icon at
up-left corner of screen to go to the mode selection display, and
press DVD mode icon.(DVD mode icon is only activated when already
inserted a disc.)
Disc Insert/Eject
Play/Pause
Stoping play
Moving Track
Place CD, label side up, into the disc slot. After inserting the disc,
playback starts automatically and the CD mode's playback display
shows. To stop the playback and eject the disc, press Eject button.
Insert a CD, the unit will play it automatically. When playing a disc,
press once ~I button(13) in remote control or ~lIon screen to pause,
and press again to play again.Track list will be displayed at right side
of screen. When moving track, press .... ,~~ to move to previous/next
track and press'" , • to move to previous/next track list. Press the
track you desired directly to play.
Press _ button(35) in remote control or- /. in display once for
prestop, and press twice to stop playing.
Press
~
button(11) in remote control or
H~
in display to move to
previous track.
Press
Fast Forward /
Fast Reverse
~~
butlon(10) or
~~
in display to move to next track.
Press .... button (15) in remote control or NEXT, .... on screen for fast
reverse, increasing playback speed rate at X2, X4, X8, X16, Play
(normal) by pressing more. Press ~~ button(14) in remote control or
NEXT, ~~ on screen for fast forward, increasing playback speed rate
at X2, X4, X8, X16, Play(normal) by pressing more.
21
CD Player Operation
Repeat Play
Press REPEAT button(39) in remote contral or NEXT, REPEAT on
screen to repeat the current track. "Repeat Single" will be displayed
shortly on screen. Press again to repeat the full contents of disc.
"Repeat All" will displayed. Press third time to go back normal play.
"Off' will displayed.
Press NEXT,
Random Play
E:I in display to play all tracks on the disc in random,
displaying "Random" on screen.Press again to release random play
function, displaying "Normal" on screen.
When disc playback, press NEXT, INTRa below in display to play 10
seconds each fram current track. "Intra" will be displayed shortly on
screen.Press INTRa again to stop scanning, displaying "Intra Off' on
screen.
Intro Scan
iI
II
I
J
i
!
I
,
i
II
,
!
II
i
l
~
!
22
MP31 WMA Player Operation
Mp3/WMA Player
You can play MP3IWMA files stored in disc/SO card/USB.
Functions as play, pause, stop, track selection, fast forward/reverse,
repeat play, intro scan, random play, etc. are the same for MP3IWMA
and CD operation. Please see the CD player operation section for the
instruction about these functions.
After MP3IWMA disc/SO card inserted or USB connected, UMP3" or
"WMA"and its information displays on screen and the file in disc will be
played automatically.
Move Folder
When playing WP3IWMA. press RETURN in screen or press OIR button
(42) to stop the playing and move to folder list.
• Note: CO-R/RW must conform to the IS09660 level 1 or level 2
format Romeo Joliet. When naming files, be sure the file
name extension is "MP3 u or "WMA".
23
DVD Player Operation
DVD Player
When the unit is properly installed, DVD video cannot be displayed on
the main TFT screen unless the parking break is applied. If you attempt
to playa DVD while the vehicle is moving, the TFT screen displays
"WARNING! PITURE OFF FOR YOUR SAFETY" with a blue background.
* Rear video(installed for backseat), if applicable, will operate normally.
* Functions as switching mode, disc insert/eject, play, pause, stop,
selecting track, .fast forward/reverse, etc. are the same for CD operation.
Please see the CD player operation section for the instruction about
these functions.
Enter DVD Root Menu
Display / Hide DVD
Menu Bars in Screen
1. Insert DVD disc and DVD menu will display in screen.
2. Press Direction Key and ENT button to select menu and operate it, or
press the desirable menu on screen to play it.
3. If you want to go back to the DVD root menu in the middle of playing
video, press MENU button in remote control or NEXT, ROOT in
screen.
When playing DVD video, the screen hides DVD menu bars.
1. Touch screen to display DVD menu bars in screen.
2. Touch ~ to hide the menu bars in screen, or after 10 seconds from
no touch screen, it disappears automatically.
Display DVD
Information
Press INFO in screen or DISP button(4) in the remote control to display
Section A·B
Repeat Play
You can set a section in track and play the section repeatedly.
DVD information as track, audio, subtitle, etc. on screen.
1. When playback, press A-B in screen to initialize the starting point for
section repeat function, displaying "Rep A-" on screen.
2. Press A-B again to memorize the ending point for sectional repeat
function and play the section, displaying "Rep A-B" on screen.
3. Press A-B third times to release the function, displaying "Rep Off" on
screen.
24
DVD Player Operation
Go to Title Menu
Press TITLE button(40) in remote control or NEXT, MENU on screen to
go to DVD title's starting menu.
Selecting Angle
Press ANGLE button(38) in remote control or NEXT, ~on screen
repeatedly to view multiple picture angles recorded in disc in sequence.
Selecting Subtitle
Press SUB.T button(36) in remote control or NEXT. SUB-T on screen
repeatedly to display subtitles recorded in sequence.
Repeat Play
Zoom
GOTO
(Direct Access)
Press REPEAT button(39) in remote control or NEXT, REPEAT on
screen to select Repeat Single - Repeat All - Off.
Press NEXT,
0
in screen for zooming in screen.
You can select the desired track directly.
1 Press GOTO butlon(43) in remote control for opening direct access
display. Title search menu highlighted and selected first in the display.
2 I) Using the remote control:
• Using Direction key(30-33). you can move the selection: TItle Chapter - Time -lit]. Select one of Tltle/Chaptermme.
• Press Number key(25) and ENT bUllon(13) to go to the desired
position directly.
ii) Using touch screen:
• Touch the menu bar-Title/Chaptermme to select the menu and
open number key pad(0-9. RTN, ENT).
• Touch the desired number and ENT.
25
DVD Player Operation
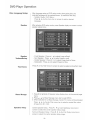
DVD SETUP
1. When playing DVD/CD, press SETUP button(29) in remote control
or press SETUP in screen to show DVD SETUP display.
2. After set up, to go back to DVD playback, press SETUP button(29)
in remote control or
~
at up-right side of screen. If no response
for 10 seconds, it will automatically go back to DVD playback.
Set Rating PWD
The Set Rating PWD and Parental Control is concering with the DISC
setup of the DVD.
1. Press Set Rating PWD(Password) bar menu on screen.
2. Enter 8888 and ENT in the keypad displayed in screen.
3. Press Set Rating PWD bar in screen again. The bar letters will
change to "Enter New PWD".
4. Enter 4 digit number which you want to set newly and ENT in the
keypad in screen.
26
DVD Player Operation
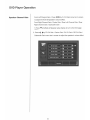
Parental Control
AUDIO ADJUSTMENT
You can set parental control to keep children from harmful video.
1. Press Parental Control menu bar in DVD setup display.
2. Number keypad will be displayed for entering password before
setting.
3. Press .... , ~ by Parental Control to set one control grade among
a.Adult /7.NC-17 / 6.R / 5.PG-R / 4.PG-13 / 3.PG / 2.G / Kid Safe.
The following contents are about the AUDIO ADJUSTMENT of DVD
Downmix
1.When the disc supports 5.1 cf4 sound effect, Downmix menu would
be activated on screen. If it is deactivated at the setup menu display,
you cannot select this menu option, while it is already applied "On"
automatically by unit.
2. Press .... , ~ by Downmix menu bar in screen to select On/Off.
Dolby Prologic II
Dolby Prologic II technology processes any high quality stereo (2CH)
movie and music audio into five playback channels(5.1 CH)
of full-bandwidth surround sound. Therefore when listening to
typical two-channel sources like CD, the listener can enjoy a richer
spatial effect
- Press .... , ~ by Prologic II menu bar in screen to select On/Off.
* Audio Adjustment - Dolby Prologic II
1. Select "On" of Prologic II in DVD setup menu.
2. Press A.SEL button(26) in remote control or EO on screen when
disc playback.
3. Select your preference in the Audio Adjust menu display by
pressing Direction key(30-33) in remote control or touching
screen. You can select the audio effect type of Dolby Pro
Logic II among the menu as below.
- Mode: Pro Logic / PLiI Matrix / PUI Movie / PLII Music
- DRC : On / Off
- When you selected PLiI Music mode, there would be activated
some menu as below.
PANOR : On / Off
Dim Ctrl : 0 - 6
C W Ctrl : 0 - 6
27
DVD Player Operation
Dolby 5.1CH
Some discs support 5.1-channel Dolby Digital surround sound. When this
kind of disc is inserted the unit. you can adjust the 5.1-channel audio effect
on your preference.
1. It should be selected "Off' of Prologic II and Downmix in DVD setup menu
for enjoying 5.1 CH sound effect.
2. Press A.SEL button(26) in remote control or EQ in screen when disc
playback.
3. Select your preference in the Audio Adjust menu display by pressing
Direction key(30-33) in remote control or touching screen.
- Volume: 0 - 40
- Left I Right I Center I L Surr I R Surr I SubW : -7 - 7
- DRC : On I Off
Video Type
1. Press.,.. at rightside of DISC setup menu to find out "Video Type" bar.
2. Press ~ • ~ by Video Type menu bar on screen to select one type among
FiliI Original I Height Fit I Width Fit I Auto Fit I Pan Scan.
28
DVD Player Operation
Disc Language Setup
Speaker
Speaker
Volume Setup
Test Tones
Bass Manage
After language setup at DVD setup mode, when playing disc, the
selected language will be applied/shown. (if available at the disc)
- Subtitle / Audio / DVD Menu:
Press <4 , ~ by the menu bar on screen to select a desired
language.
After entering DVD setup mode. press Speaker display on screen to show
speaker setup menu.
- Front Speaker: Press <II , ~ to select Large or Small.
- Surr Speaker: Press <II, ~ to select Large or Small.
- Center Speaker: Press <II , ~ to select Large, Small or None.
- Subwoofer : Press <II , ~ to select Present or None.
Press <4 ,
~
by Test Tones in screen to select a speaker and perform test.
1. Press ..... at rightside of Speaker setup display to turn to the second page
menu.
2. Press <4 ' ~ by Bass Manage menu bar to select Off/On.
3. When selected On at Bass Manage, Center Filter menu will be activated.
Press <4 , ~ by Center Filter menu bar to select the center filter value
of bass from 80 - 300.
Speaker Delay
Center Speaker Delay: Press <4, ~ by Cent Spkr Delay menu bar in
screen to select the center speaker delay range.
Surround Speaker Delay: Press <4 , ~ by Surr Spkr Delay menu bar in
screen to select the center speaker delay range.
29
DVD Player Operation
Speaker Channel Gain
Front Left Channel Gain: Press .... , ~by FL CH Gain menu bar in screen
to adjust the front left speaker's volume effect.
Front Right Channel Gain / Center Gain / Rear Left Channel Gain / Rear
Right Channel Gain / Subwoofer Gain:
1. Press Tat leftside of Speaker setup display to turn to the third page
menu.
2. Press .... , ~by FR CH Gain / Center Gain / RL CH Gain / RR CH Gain /
Subwoofer Gain menu bar in screen to adjust the speaker's volume effect.
30
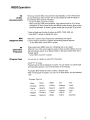
DVD Player Operation
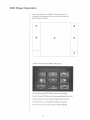
• Here are some tips for OSD(On Screen Display). It is
convenient for operation.We can divide the screen into
several areas as below.
A
B
D
E
C
F
Touch A area, launcher MENU will appear.
rs!J
M~.
~
--..-',-',
AUXIN
•• K..
.~
~
~~
.
RLU£TOOIH
)#~
~
........ eAM~
SD
~
SETUP
Tounch B area, SETUP MENU will be showned(26).
Touch C area, DVD Menu will be showned(Page24 and 25).
Touch D area, you can operate Chapter down function.
Touch E area, you can operate Chapter up function.
Touch F area, you can go to Search Menu(Page26).
31
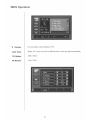
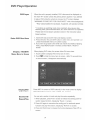
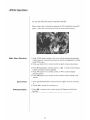
JPEG Operation
You can see JPEG file stored in disc/SO card/USB.
When using a disc, it should be operated in OVO mode. When using SO
CARD, select the corresponding mode at mode selection display.
.
Slide Show Operation
1. When JPEG mode is played, slide show will be operated automatically.
A slide stops for 5 seconds and goes to next file in alphabetical/ number
order of file name.
2. Press ~II button(13) in remote control or ~II in screen to play! pause.
3. Press - button(35) in remote control or in screen to stop playing.
Folders and file list will be diplayed.
4. Press I~~ button(11) in remote control or I~ in screen to display
previous picture.
5. Press ~~ button(1 0) in remote control or ~~I in screen to display next
picture.
Zoom In/Out
Rotating Display
1. Press ZOOM button(34) in remote control or Ill! in screen for zooming
in.
2. Preess Ii'! in screen for zooming out.
1. Press ltJ in screen to turn current picture 90 degree in a clockwise
direction.
2. The picture will be turned 90 degree each by pressing more.
32
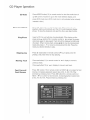
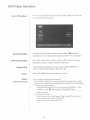
USB/SO Card Operation
Play Each Source
Press MODE button(16) or press the current mode icon at up-left of
screen to go to mode selection display and press USB / SD card
mode icon.
According to the source stored in USB or SD card, you can play it.
The source types compatible with this unit are in specification on page.
33
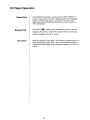
BLUETOOTH Operation
Bluetooth Mode
This unit supports Bluetooth wireless connection with a bluetooth cell-ular phone.
Note:
- Before using the bluetooth function in unit, please check that microphone
is installed to this unit.
- Digital noise & echo suppression system built-in.
- Provides the best sound clarity with little or no distortion. (Echo and
side-tone might be sensitivity depending upon cellular phone's
characteristics or service networks)
- Full duplex conversation
- Bluetooth version 2.0
Press MODE button(16) in remote control or touch the current mode icon
at up-left corner of screen to go to mode selection display, and press
BLUETOOTH mode icon in screen.
Bluetooth Setup
Before using bluetooth function in this unit, you should first turn on
bluetooth function at Bluetooth setup menu.
1.Press SETUP in screen to display Bluetooth setup menu.
2.Press ., ~ by Bluetooth menu bar in screen to enable bluetooth
function.
And then, three other bluetooth setup menu will be displayed below,
and Bluetooth icon
always appears at up-left corner(by mode icon)
in screen.
- Auto Connect: Press. ' ~ by Auto Connect menu bar to choose
On/Off.
- Auto Answer: Press ., ~y Auto Answer menu bar to choose
On/Off.
- Bluetooth Level: Press. , ~ by Bluetooth Level menu bar to choose
the level from 0-6.
0
34
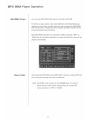
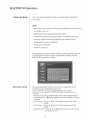
BLUETOOTH Operation
Pairing
1. Click Pair in screen to have the unit prepare starting pairing. It will
display "Waiting for Pairing" in screen.
2. Enable your cellular phone's bluetooth pairing. If the cellular phone
requires the pin code, enter 1 2 3 4.
3. It will display "Pair OK " on screen when the paring is completed.
* In case of failure of pairing
- Delete item in paired list on your Bluetooth cellular phone
- Reset both cellular phone and this unit by switching on/off
- Restart pairing as per previous procedures.
* Should your cellular phone battery be at low charge, the Bluetooth
connection may occasionally be lost. To maintain good connectivity
ensure that your cellular phone battery is adequately charged.
Disconnect
To disconnect Bluetooth link, just click DISCONNECT on screen.
Make a Call
(Unavailable if pass-word stored in the cellular phone)
1. Enter phone numbers in Dial Pad in screen or by using remote control.
-
~
on screen means erasing a number just entered.
2. Press Pick Up in screen or (Obutton(34) in remote control for calling.
3. Talk through the supplied microphone.
4. Press Hang Up in screen or@button(35) in remote control to hang up
the call displaying "Call End" on screen.
Receive a Call
1. When the unit is ringing, "Answer?" appears on screen.
Press Pick Up on screen or (0 button(34) in remote control for calling.
- If ringing in other mode such as DVD, Radio, ... this unit automatically
change into Bluetooth mode. After phone conversation, it also resume
back to the previous mode after 5 seconds delay time as below image.
- Even though making a call by cellular phone, not by this unit, this unit
would activate automatically, showing "Talking" in screen.
2. Talk through the supplied microphone.
3. After finishing conversation, press Hang Up on screen or @
button
lt
(35) in remote control to hang up the call displaying "Call End on screen.
Call Transferring
During conversation, for privacy or any other reason, you can transfer the
call between the unit and your cellular phone by pressing
35
I~
on screen.
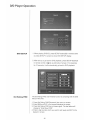
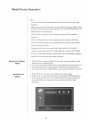
Media Device Operation
Note:
- You should connect your Media Device with this unit first using the cable
supplied.
- After connecting Media Device the current mode will change to Media mode
and the unit will start playing the selected list or play all files registered on the
Media Device if no selected list.
- The unit will not operate, or may operate improperly with unsupported
versions.
- When the Media Device's internal battery becomes depleted, the Media
Device cannot be played even if connected to the unit. This unit cannot be
used to recharge the iPod.
- Playback functions as play, pause, stop, track selection, fast forwardl
reverse, repeat play, intra scan, random play, etc. are the same for Media
Device and CD/DVD operation, please refer to the CD/DVD player operation
section for the instruction about these functions.
Switching to Media
Device
Media Device
SETUP
1. Press VIDEO in screen at Media Device audio mode to standby for video
signal input from Media Device.
2. You cannot operate the Media Device video playback functions by this unit.
You should operate the video playback functions by your Media Device.
3. If you want to go back to Media Device audio mode, press Audio on screen.
1. Press SETUP in screen to open Media setup menu display.
2. Press ~ ,~ by Auto Connect menu bar to select On/Off. The default is
On. If you select Off, when you connect iPod to this unit, the mode will
not automatically be changed, while you should switch the mode
manually.
36
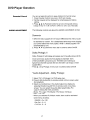
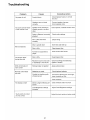
Troubleshooting
Problem
No power to unit
No sound can be heard
or the volume is low
Cause
Corrective Action
Fuse(s) blown
Check/replace fusees) in vehide
fuse box
Speakers are not wired
correctly
Connect speaker harness;
check speaker wires
Speaker wires shorting to
chassis ground or to each
other
Check splices, insulate all bare wires
Fader or Balance incorrectly
adjusted
Check audio settings
AV1 or AV2
correctly
Check wiring
not wired
Disc is upside down
Insert disc right side up
Disc is dirty
Clean/inspect disc
Format nol supported by
player
Insert correct disc fonnal
Disc is dirty
Cleanlinspect disc
Receiver mount is not solid
or backstrap is not secure
Check mounting and backstrap,
tighten jf needed
DVD will not play on
main screen
Parking brake not applied
Apply parking brake
Remote control does
not work
Batteries are weak
Check/replace batteries
Sunlight is interfering with
infrared sensor
If sunroof is allowing too much light.
close it partially or fully.
Will not read disc
The sound ~skips·
during disc play
Close windows
The display is dark
Direct sunlight reflecting off
screen
Close windows and/or sunroof
ColorlBrightness sellings
incoreect
Adjust Color/Brightness settings
Touch points in screen
are not correct.
Adjust the touch points at setup mode.
37
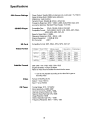
Specifications
CEA Power Ratings
Power Output: 18watts RMS x 4channels into 4-ohms @ < 1% THD+N
Signal to Noise Ratio: 90dBA below reference
(Reference: 1watt, 40hms)
Dynamic Power: 36watts @ 40hms x 4channels
Frequency Response: 20Hz - 20kHz (-3dB), AudioNideo input used
as source reference Standard Power Supply: 14.4 VDC
CD/DVD Player
I
I'
SD Card
Video Format
I
i
Compatible Disc:
CD-R, CD-RW, DVD-R, DVD-RW
Compatible Format: DVD-VIDEO, SVCD, VCD, CODA, MP3, WMA,
JPEG, MPG, MP4, OAT, AVI
Signal to Noise Ratio: > 90dBA
Frequency Response: 20Hz - 20kHz, -3dB
Channel Separation: > 60dB@1kHz
D/A Converter:
2481T
Compatible Format: MP3, WMA, JPEG, MPG, OAT, AVI
--
COOEC
FILE TYPE
MPEGl
*.MPG
*.OAT
*.VOB
*.MPEG
MPEG2
MPEG4
Subtitle Format
II
!
!
Video
FM Tuner
Bitrate (upto)
DISC
USB/SO
~4Mbps
~1.5Mbps
-4Mbps
-1.5Mbps
~4Mbps
~1.5Mbps
-4Mbps -1.5Mbps
-25Mbps -1 5Mbps
Resolution
Frame/sec
352 x 240
352 x 240
720 x 480
720 x 480
720 x 480
30fps
30fps
30fps
30fps
30fps
SMI/SRT/TXT/PSB/ASS/SSA/SUB
English 58 letters / Korean 29 letters
Name of Video file and Subtitle file should be the same.
* It can be not playable according to the video file's types or
recording ways.
Format: NTSC/PALIAUTO
Output: 1 Vp-p (750hm)
Input: 1 Vp-p (750hm)
Tuning Range: 87.5 - 107.9MHz
Mono Sensitivity (-30dB): 9dBf
Quieting Sensitivity (-50dB): 15dBf
Alternate Channel Selectivity: 70dB
Signal to Noise Ratio @ 1kHz: 58dB
Image Rejection: 60dB
Stereo Separation @ 1kHz: > 30dB
Frequency Response: 50Hz - 15kHz, -3dB
38
Specifications
AM Tuner
Monitor
General
Tuning Range: 530 - 1720kHz
Sensitivity (-20dB): 30uV
Signal to Noise Ratio @ 1kHz: 50dB
Image Rejection: 60dB
Frequency Response: 50Hz - 2kHz, -3dB
Screen Size: 7" (Measured diagonally), 16:9 Widescreen
7"(145mm)H x 3.5"(89mm)W
Screen Type: TFT Liquid Crystal Display (LCD) Active Matrix
DVD Player: 480(H) x 234(W) X 3(RGB)
Back Light: CCFL, 400cd/m2
Audio Input Impedance: 10k
Power Supply: 11-16 VDC, negative ground
Fuse: 1Oamp, ATO type
DIN chassis dimensions: 178mm(W) x 160mm(D) x 50mm(H)
39
Place
Postage
Here
VilLOR
MULTIMEDIA
Valor Warranty Validation Dept
18061 ArenthAve
City of Industry . CA 91748
V,lLOR
MULTIMEDIA
ONE YEAR LIMITED WARRANTY
VilLOR
MULTIMEDIA
ONE YEAR LIMITED WARRANTY
Valor Multimedia hereby warrants to the original retail purchaser of this
product that should this product or any part thereof, under normal use and
conditions,be proven defective in material or workmanship within one year
parts and labor from the date of original purchase. Such defect(s) will be
repaired or replaced with reconditioned product (at Valor Multimedia's
option) for parts and repair labor. This limited warranty is the purchaser's
exclusive remedy for any such defect(s).
This warranty does not apply to any product of part thereof which, in the
opinion of Valor Multimedia, has suffered or been damaged through
alteration, improper installation, mishan dling, misuse,neglect, accident, or
by removal or defacement of the factory serial number/bar codelabel(s). The
opinion of Valor Multimedia with respect to this matter shall be finalTHE
EXTENT OF VALOR MULTIMEDIA'S LIABILITY UNDER THIS
WARRANTY IS LI MITED TO THE REPAIR OR REPLACEMENT
PROVIDED ABOVE AND, IN NO EVENT, SHALL THE COMPANY'S
LIABILITY EXCEED THE PURCHASE PRICE PAID BY PURCHASER
FOR THE PRODUCT.
THIS WARRANTY IS IN LIEU OF ALL OTHER EXPRESSED
WARRANTIES OR LIABILITIES. ANY IMPLIED WARRANTIES,
INCLUDING ANY IMPLIED WARRANTY OF MERCHANTABILITY,
SHALL BE LIMITED TO THE DURATION OF THIS WRITTEN
WARRANTY. ANY ACTION FOR BREACH OF ANY WARRANTY
HEREUNDER, INCLUDING ANY IMPLIED WARRANTY OF
MERCHANTABILITY, MUST BE BROUGHT WITHIN A PERIOD OF 18
MONTHS FROM THE DATE OF ORIGINAL PURCHASE. IN NO CASE
SHALL THE COMPANY BE LIABLE FOR ANY CONSEQUENTIAL OR
INCIDENTAL DAMAGES FOR BREACH OF THIS OF ANY OTHER
WARRANTY EXPRESS OR IMPLIED WHATSOEVER.
No person or representative is authorized to assume for Valor Multimedia
any liability other than expressed herein in connection with the sale of this
product. Some jurisdictions do not allow limitations on how long an implied
warranty lasts or the exclusion of limitation of incidental or consequential
damages so the above limitations or exclusions may not apply to you. This
warranty gives you specific legal rights and you may also have other rights,
which vary from jurisdiction to jurisdiction.
MULTIMEDIA
Please complete all fields to validate your Valor Multimedia limited warranty. Remember to include a copy
of your dated sales invoice. Failure to return this card will result in warranty coverage starting on the date
of manufacture based on your serial number. Special warranty provisions will only be honored if this card
is returned complete. Limitations to warranty periods and exclusions may not apply to your area if
applicable by law. Please check with your local regulatory offices for details regarding warranty regulations
in your area.
NAME
DATE
SHIPPING ADDRESS (NO PO BOXES)
CITY
STATE
To obtain repairs or replacement within the terms of this warranty, please
visit www.valormultimedia.com or contact us at 18061 Arenth Avenue;City
of Industry, CA 91748 (626) 581-8900. Proof of warranty coverage (i.e.dated bill of sale) and a valid serial number is required.
V/1LOR
Warranty Validation Card
IZIP CODE
PHONE NUMBER
RETAILER NAME
RETAILER ADDRESS
RETAILER PHONE NUMBER
PRODUCT PURCHASED
PRODUCT SERIAL NUMBER
DATE OF PURCHASE
Why did you choose a Valor Multimedia product?
o
o
o
o
o
Appearance
Value
Features
Brand Name
Other
How was your product acquired?
o Gift
o Internet Retailer
o Standard Retailer
o Specialty Store
o Mass Merchant / Discount Retailer
Where will this product be used?
o
o
o
o
How long have you owned your vehicle?
Would you buy another Valor product?
Personal Automobile
RV
Commerci'al V.:hicle
Other
_
_
o BrandNew
o < I year
o 1- 2 years
o 3 - 5 years
o > 5 years
DYes
No
o
Would you recommend a Valor product?
DYes
o No
PRI\'ACY :-<OTICE: Information gathered is used for the sole purpose of product registration. Your personal information will not be
sold or offered for telemarketing or contact unless you request it.