1
PolorizingMicroscope
InstructionMqnuql
D< MEUITEcHNoco.,LTD.
JAPAN
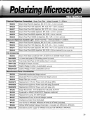
Tableof Contents
1.0 Introduction
Featuresat a glance
1.1 Microscope
1.2 GeneralSafetyGuidelines
1.3 IntendedProductUse Statement
1.4 Handlingthe microscope
1.5 WarrantyNotes
2.0 MicroscopeMainComponents
2.1 Installation
Site
2.2 Unpacking
2.3 MicroscopeSet Up MT9200& MT9300
2.4 MicroscopeSet Up MT9420& MT9430
Distanceand IntegratedReticleOrientation
2.5 AdjustingInterpupillary
2.6AchievingKoehlerlllumination
2.7 Centeringof Objectives
3.0 MicroscopeOperation
LightOperation- Brightfield
3.1 Transmitted
3.2 IncidentLightOperation- Brightfield
3.3 The BertrandLens- ConoscopicObservation
3.4 Attachingoptionalmechanicalor pointcountingstage
with 35mm SLR and DigitalSLR Cameras
3.5 Photomicrography
with DigitalStillCameras
3.6 Photomicrography
3.7 Connectinga Videoor OtherCamerathat usesa "C" mount
4.0 Maintenance
and Cleaning
5.0 Troubleshooting
the mainsfuseon the microscope
5.1 Replacing
or lncidentLightdoes not work
S.2Transmitted
6V 30W HalogenLamp
5.3 Replacingthe Transmitted
the Incident6V 30W HalogenLamp
5.4 Replacing
6.0 Storage
7.0 Packingand Transport
Parts
and Replacements
8.0 Accessories
9.0 TechnicalDescriptions
MT9OOOSeries
Polarizing Microscope
1. Introduction
The MeijiTechnoMT9000SeriesPolarizing
Microscopes
areusedin research,
industryandtrainingin
manyscientific
fieldssuchas
r Environmental
research- analysisof materials,
dustandfibers
I Medicine
and Biology determining
composition
of calculi,sediments
andbio-crystallates
- identification
. Forensics
of traceelementsandmaterials
suchas exolosives
. Materials
Analysis- metal,ceramics,
buildingmaterials,
etc
o Geology- minerals,
petrography,
etc
- QualityControlof in-process
. Chemistry
pharmaceuticals
or endproducts,
compounds,
Moderncompactdesignandergonomic
placement
of controlsto be versatile,
modularmicroscopes
systemswhichmakesthe MT9000Seriesidealfor usein research,
production
andqualitycontrol.
TheMT9000SeriesMicroscopes
deliverscrisp,distortion-iree,
highresolution
imagesin polarized
light.
Someof the standardpolarization
featuresinclude:
. BertrandLensand swing-in,swing-outpolarizerlanalyzer
provideeaseof use for bothorthoscopic
andconoscooic
observations
. A rotating,
polarizer
swing-inswing-out
indexedat every90 degreeslor easypolarorientation
. Easyto useDINstandardfullwaveandquarterwavecompensators
r Precision
175mmceramiccoatedrotatingstagewith360degreegraduations
andvernierdialfor
accuralemeasurements
e Focusstopwithspringloadedobjectives
prevents
crashingandslidedamage
o Centerable
StrainFreeAbbecondenser
in dovetailmount
o Powerful
30WHalogenillumination
withKoehlerfielddiaphragm
on transmitted
andincident
illuminators
. Automatic
voltagesensingpowersuppliesprovideregulated
andevenbrightness
lor high-resolution
videoor photomicroscopy
applications
MeijiTechnosuppliesa varietyof accessories
including
filters,micrometers
andcameraadapters.
1.1GeneralSafetyGuidelinesMicroscopeFeaturesat a glance
. Computer
AidedDesigned
FrameandOptics
r All Newand lmprovedPlanStrainFreeObjectives
. SlimCompactFootprint
o InfinityCorrected
OpticalSystem
o Powerful
(AllModels)
Koehlerllluminator
6V 30WTransmitted
r Powerful
(ModelsMT9420& MT9430)
6V 30WIncidentKoehlerllluminator
o LowPositioned
Ergonomic
CoaxialCoarseand FineFocusControls
. SmoothOperating
ReverseFacingQuadruple
Nosepiece
r Precision
CeramicCoated175mmrotatingstagewithoptionalattachable
mechanical
stageand
poinlcountingstageavailable
optionalattachable
. Factorysetfocusstopalongwithspringloadedobjectives
preventspecimendamageor slide
breakage.
. Siedentopf-type
Binocular
or Trinocular
ViewingHeadswithintegrated
reticleanglecompensation
syslem
r Widefield
(KHW1OXF-CP
HighEyepoint
Eyepieces
& KHW10XF.N.20)
. Automatic
VoltageSensingPowerSupplies
withdetachable
cordsets
. WideRangeof Compensators,
FiltersandAccessories
1.2GeneralSafetyGuidelines
for safeoperation
MeijiTechnoproducts
aredesigned
undernormaloperating
conditions.
Theinstrumenl
in thismanualhavebeenbuiltandtestedaccording
to industry
andaccessories
described
safety
for electronic
laboratory
instruments.
Incorrect
standards
usageor non-conformance
to operating
personal
property.
instructions
cancause
injuryor damageto equipment
Keepthismanualnearyour
or
instrument
for easyreference.
1.3IntendedProductUse
productis designedand intended
ProductDisclaimer:This
for useonlyas a lighlmicroscope
system.
Modifying
thisinstrument
in anywayfor usein anysituation
otherthanthe originalandintendedproduct
voidthewarranty.
In no eventshallMeijiTechnobe liableto any personor entity
designwillautomatically
for anyincidental,
indirector consequential
withthe useor
damages,arisingoutof or in connection
oerformance
of a modified
or alteredoroduct.
\\\N!NiN\\\N$$\R"\.$S
wrui|*sw
l-
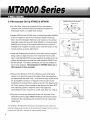
1.4ProductSafetyInformationHandlingthe Microscope
[Agtr
tl.t!l
D O N O TO P E R A T EU N L E S ST H E U N I TI S P R O P E R L Y
GROUNDED!
power
powercordin a wellgrounded
Useonlythespecified
socket.Do notusein an ungrounded
receptacle
or in caseswherethereis a breakin the groundconductor
wiring.
or damageto the electrical
typeandratingareto be usedas replacements.
Switchoffthe powerand
Onlyfusesof thespeci{ied
disconnect
the powercordbeforereplacing
fuses.Useof a non-compliant
lusemayresultin electrical
Do not replacethe bulbfor at least10 minutesalterthe unithas
shockor severedamageyourequipment.
turned
injury
may
resull.
been
offor
1.5 WarrantyStatement
for
Modifying
the instrument
in anywayor unauthorized
to disassemble
or usethe instrument
attempts
voidthe warranty.
applications
otherthanits intendeddesignwillautomatically
MeijiTechnowarrantsthisproductagainstdefectsin materialand/orworkmanship
for the lifeof the
instrument
fromthe dateof the originalpurchase
to theoriginalpurchaser.
MeijiTechnowillrepairor
replace,at itsoption,any instrument
whichundernormalconditions
of useandserviceprovesto be
in materialor workmanship.
withrespectlo defects
defective
No chargewillbe madefor laboror materials
providedall repairworkis doneby MeijiTechno.
coveredby thiswarranty,
Thiswarrantydoesnotcoverexpensesincurredin the removalor reinstallation
of anyinstrument
or
proven
instruments,
whetheror not
Replacement
delective.
or repairsfurnished
underthiswarrantyare
to
the
terms
and
of
the
warranty.
This
warranty
supersedes
anyother
subject
same
conditions
original
warrantyandis subjectto thefollowing
termsandconditions:
WARRANTY
productextendsto the originalpurchaser
Warranty
of the productandis nottransferable.
of MeijiTechno's
WAFRANTYDURATION
for the lifeof the
MeijiTechnowarrantsthisproductagainstdefectsin materialand/orworkmanship
instrument
fromthe dateof originalpurchase
Theelectrical
warrantyis oneyear.
to the originalpurchaser.
OWNER'S REGISTRATIONCARD
Returnof theowner'sregistration
cardby the originalpurchaser
withinten (10)daysaftertheoriginal
purchase
precedent
is a condition
to coverageunderthiswarranty.
MeijiTechnowillat itsoptionaccept
writtenproofof purchase
lromthe originalownerin lieuof a productregistration
card.
EXCLUSIONSAND LIMITATIONS
fromthiswarrantyarefailurescausedby abuse,neglect,misuse,improper
Specifically
excluded
operation,
normalwear,accident,
impropermaintenance
or modifications
oI ANYtype.Thiswarrantydoes
notcoverrepairor replacement
wherenormalusehasexhausted
the lifeof a partor instrument.
All
mechanical
devicesneedperiodicpartsreplacement
andserviceto performwell.Servicelifeof an
instrument
is dependent
uponthe careit receivesandthe conditions
underwhichit hasto operate.In no
eventshallMeijiTechnobe liablefor incidental
or consequential
damages.
SERVICE
pleasecontactMeijiTechnodirectlyandaskfor the ProductService
Toobtainserviceunderthiswarranty,
problem,
Department.
Statethe natureof the
modelandserialnumberol the instrument,
dateof purchase
andlocation
andnameof the distributor
the instrument
waspurchased
from.Afterverification
of warranty
registration,
MeijiTechnowillissuea returnauthorization
number.Customermaythenreturnthe product
postageprepaidandinsuredto the authorized
repairfacility
In mostinstances,
requests
lor warrantyservicewillbe performed
in a promptand routinemannerand
periodof timeor at MeijiTechno's
merchandise
willbe returnedin a reasonable
convenience.
In some
for warrantyservicearereceived
whichare notjustified.In thesecases,MeijiTechnowill
cases,requests
providean explanation
for non-warranty
action.
WARRANTY
TERMS
Thetermsof thiswarrantymaynotbe varredby any person,whetheror notpurporting
to represent
or act
on behalfof MeijiTechno.Thelimitedli{etime
warrantyprovidedis in lieuof anyandall warranties,
purposeor otherwise.
expressed
or implied,
whetherfor merchantability
or fitnessfor a particular
Liability
for consequential
damagesunderany,andall warranties
areexcluded
to the extentexclusions
are
permitted
gives
you
you
by law.Thiswarranty
specificlegalrightsand
mayalsohaveotherrightswhich
varyfromstateto state.Thiswarrantysetsforththe customer's
remedy,withrespectto
exclusive
products.
Thislimitedwarrantyshallbecomenullandvoidin the eventol a violation
defective
of the
orovislons
of thislimitedwarrantv
2.0MicroscopeMainComponents
The imagebelowdesignatesthe maincomponentsof the MT9000SeriesPolarizingMicroscopes.
Y --+
n
10-+
11 -+7
\--ILl,
--1L
ffil
1.
2.
3.
4.
5.
6.
7.
8.
9.
SiedentopfBinocularHead
EyepieceKHW10X,F.N.20
Eyepiece
KHW10X-F
withcross-line
andguidepin
Analizerin slidermount
RotatableBertrandLens (fixed)
Compensator
Slot
Ergonomicreversedcenterablenosepiece
Ceramiccoatedrotatablestage
StrainfreeAbbe 1.25condenserwith built-in
lris diaphragm
10. Rotatableswing-outpolarizer
11. Filtertrayfor 29.8mmbluefilter,swingout the
polarizerto open filter slot
12. Focustensionadjustment,
turnthe knurled
ringcounter-clockwise
to tightenthe tension
13.Adjustablesafetyknob,turn leverclockwiseto
lockthe stageheight
14. Condenserrackheightadjustment
knob
1 5 . F i e l dl r i s
16. Powerswitch
17. Low positionedergonomiccoaxialcoarseand
fine focusingcontrol
18. Low positionedvariablebrightnesscontrol
19.Trinocularheadwith integratedmaleC mount
20. Beamsplitterfor cameraport
2.1 lnstallationSite
possible.
Themicroscope
shouldbe operatedin a roomwithas littledustas practically
humidity.
Alsotry to avoidbig
Keepyourinstrument
awayfromsolvents,
chemicalfumesandexcessive
and
as theycanaffectmeasurements
directsunlightandvibration
swingsin ambienttemperature,
instrument
oerformance.
AmbientConditions
Operating
10 - 36'C (50 - 96.8'F)
Temperature:
RelativeHumidity: 0 - BO%up to 30"C (86'F)
2.2 Unpacking
arepresent.Keepa copyfor yourrecordsso
Pleasecheckyourpackingslipto insurethatall materials
partsor
whenorderingmoreequipment,
orderingreplacement
thatyou havethe properinformation
support.Pleasemakesurethatno smallpiecesor partsarelefl
accessories
or whencallingfor technical
Keepthe packingmaterials
in a safeplacefor the purposeof storageand
in the packingmaterial.
the microscope
andits accessories.
transporting
lAnrremor.rl
Evenvery
suchas lenses,filtersandglasssurfaces.
Avoidtouchingthe surfaceof opticalcomponents
or fingeroilscancorrodethe surfacesof opticsin a shortperiodof time.
smalltracesof perspiration
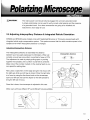
2.3MicroscopeSet Up MT9200& MT9300
o As a firststep,removeall componentsfromthe shipping
containerand removethe packingmaterialsand placethe
frameon a stablework surface.Placethe analyzermicroscope
Bertrandlens moduleontothe frameand tightenthe clampscrew
to securethe module.(Fig.1)
Next,placethe binocularhead
(MA952)or trinocularhead (MA953)on the top of the analyzerBertrandlensmoduleand tightenthe clampscrewwhilethe head
is in the correctpositionas shownright.(Fig.2)
Analyzer-Bertrand
L e n sm o d u l e
Figur e1
B i n o c u l ahr e a d
o lnstallthe Siedentopf
headwiththe 2mm allenwrenchsupplied
beingcarefulto alignthe notchin the headwith the set
Next,installthe MA407CPfocusingeyepieceby
screw.(Fig.3)
slidingit intothe slottedrighteyetubeand installthe other
eyepiece(MA407)intothe lefteyetube.The rubbereyeshields
can also be installedon top of each eyepiece.The eyepiecesfor
MT9000Series are a DIN standard 23.2mmdiameter.
Figur e2
o Removethe objectivesfromtheirobjectivecaseswhilebeing
carefulnot to touchany partof the optics.Strainfree objectives
are markedwiththe letter"POL"in red and are very sensitiveand
to pressureor impacts.They shouldonly be
are susceptible
handledby the knurledcollar.Gentlyscrewthe 10X objectiveinto
the "fixed"openingof the nosepiece(theopeningthat does NOT
Installthe restof the objectives
havecenteringscrews).(Fig.4)
incrementally
in orderof power(e.9.4X, 40X,60X, etc).
o Plugthe powercord intothe microscopeand the otherend intoa
groundedoutlet.
(Fig.5)
Figur e3
];lr{n\
<t\\
Fixed,Opening
YourMT9000& MT9400SeriesMicroscopeand standalonepower
supplyhaveautomaticvoltagesensingso they can be usedwith any
voltagef rom any countryin the worldf rom 100 voltsto 260 voltsAC
withthe propercordset.
Figur e4
,Acourre! l
The mains power cord should only be plugged into a known
grounded outlet. A simpleoutlettestercan be usedto verifycorrect
outletpolarityand the presenceof a groundedcircuit.lf no other
is nowreadyfor use.
aregoingto be installed,
the instrument
accessories
/t---l+'
Powercord-+ l[]lll]]l/lmL--
'
Figur5
e
B
2.4 MicroscopeSet Up MT942O& MT9430
MA955Verticalllluminator
Filterslot
A o e r t u r el r i s
)
o As a firststep,removeall componentsfromthe shipping
containerand removethe packingmaterialsand placethe
microscope
frameon a stablework surface..
i e l dl r i s
o ModelsMT9420and MT9430havea verticalilluminator
(MA955)
whichis installed
on top of the microscope
framefirst.(Fig.6)
Next,mountthe Analyzer-Bertrand
Lensmoduleon the vertical
placethe binocularhead(MA952)or trinocular
llluminator,
head
(MA953)ontothe top of the Analyzer-Bertrand
lens module(if
installed)
re-tighten
the clampscrewwhilethe headis in the
and
correctpositionas shownright.(Fig.7)
o lnstallthe Siedentopfheadwiththe 2mm allenwrenchsupplied
beingcarefulto alignthe notchin the headwith the set screw.
Next,installthe MA4OTCP
focusingeyepieceby slidingit intothe
slottedrighteyetubeand installthe othereyepiece(MA407)into
the lefteyetube.The rubbereyeshieldscan also be installedon
top of each eyepiece.The eyepieces for MT9000Series are a
DfN standard 23.2mm diameter.
o Removethe objectivesfromtheirobjectivecaseswhilebeing
carefulnot to touch any part of the optics.Strainfree objectives
are markedwith the letter"POL"in red and are very sensitiveand
to pressureor impacts.They shouldonly be
are susceptible
handledby the knurledcollar.Gentlyscrewthe 10X objectiveinto
the "fixed"openingof the nosepiece(theopeningthat does NOT
havecenteringscrews).Installthe restof the objectives
incrementally
in orderof power(e.g 20X,40X,60X,etc) .(Fig.)
o Plugthe cordfromthe verticalilluminator
intothe backof the
standalonepowersupply(MA927l05XFig.9)
and plugthe power
cordsetintothe microscopeand the otherend intoa grounded
outlet.(Fig.5)
Your MT9000or MT9400SeriesMicroscopeand standalonepowersupplyhave
automaticvoltagesensingso they can be used with any voltagefrom any countryin
the worldfrom 100 voltsto 260 voltsAC with the propercordset.
Figur e6
Lamp adjustingknob
Figur e7
Figur e8
Plugthe vertical
llluminatorMA927105
Figur e9
The mainspowercord shouldonly be pluggedintoa knowngroundedoutlet.
A simpleoutlettestercan be usedto verifycorrectoutletpolarityand the presence
of a groundedcircuit.lf no otheraccessories
are goingto be installed,
the
instrumentis now readyfor use.
2.5AdjustingInterpupillaryDistance& IntegratedReticleOrientation
MT9000and MT9400seriesmodelscomewithSiedentopf
Binocular
or Trinocular
viewingheadswith
integrated
reticleanglecompensation
system.Thissystemensuresthatthe reticleremainssquarein the
eyepiece
evenwheninterpupillary
distanceis changed.
AdjustinglnterpupillaryDistance
The Interpupillary
Distanceis essentially
the distance
betweenyour two pupilsexpressedin millimeters.
When set
correctly,
one will see one uniformroundfieldof view or FOV.
The adjustmentis made by simplypullingapartor pushing
togetherthe eyetubesuntila uniformroundfieldis achieved.
Makenoteof the numbermarkedon the viewingheadso you
can repeatthe settinglater.
i nterpupillary distance
ffi
Next,placea specimenon the stageand get it intofocuswith
the righteye whileyour lefteye is closed.Oncethe rightside
is in focusby usingthe fine focusknobon the microscope,
openyour lefteye and use the diopteron the lefteyetubeto
bringthe leftside in focus.
Oncethis is done,the microscopeis adjustedto this user.
Otheruserswill havedifferentlP's and differentfocusingabilities.
one uniform
roundfield
r0
2.6AchievingKoehlerillumination
r Turnon the microscope
powerswitchandsetthe illumination
to a comfortable
level.
' Establish
onetieldof viewby adjusting
the inter-pupillary
distanceof the Siedentopf
viewinghead.
o Makesurethatthe BertrandLens,analyzerandanyothersliders
areclearof the opticalpathand
thatthe irisdiaphragm
on thecondenser
is all thewayopen.
o Rackup thecondenser
to its highestpositionor untilthetop erementof the condenser
rs
approximately
1mmbelowthe bottomof the slide.
' Placea familiarspecimen
on thestage.Usingthe 1oXobjective,
bringthe specimenintofocus.
' whileviewingthe specimenclosedownthelielddiaphragm
jusrenoughso thatthe inneredgeof the
irisleavesarevisibleas shownin {igure,,A',
' use thecondenser
focusingknobto slightlylowerthecondenser
ro bringthe edgeof the irisleaves
intosharpfocusas shownin figure,,B,,
' By usingthetwo condenser
centering
screws,adjustthe irisopeningso it is centeredin the middleot
thefieldof viewas shownin figure,,C,,
r open up thefielddiaphragm
so thatit just clearsthe edgeot the fieldof viewas shownin figure,,D,,.
Coarse
focusknob
Brightnesscontrol
ilArl
lt
il8il
i l ci l
D
2.7 Centeringthe Objectives
Whenobjectives
mayleavethe fieldof viewwhenrotating
the stage.
arenotcentered,
specimens
properly:
Performthestepsbelowif objectives
not
centered
are
1. Before
starting,
makesurethatthe10Xobjective
is installed
in thefixedholeof thenosepiece.
Thisisthe
position
thatdoesNOThavecentering
screws.
All objectives
willbeadjusted
the10Xposition.
against
2. Makesurethe BertrandLens,the analyzer
andanyotherslidersareclearof the opticalpathandthe
irison the illuminator
is openallthe way.
3. Usea smallgrainor sometypeof targetandplaceit in thecenterof thefieldof viewwiththe 10X
objective
andbringit intofocusas shownbelowin "A".
4. Centerthetargetby rotatingthestageandevaluating
howcenteredthetargetappears.
5. Oncethe targetis centered,
moveto the nexthighestobjective
and insertthe centering
keysintothe
nosepiece
for thatposition.
6. Bringthe specimen
againintofocusandnoteits positionin thelieldof view.
7. Rotatethe stageuntilthetargetmoveslarthestawayfromthe crossline
at the as shownbelowin
"D"(Position
1).
8. Adjustthe centering
screwson the nosepiece
untilthe targetis midwaybelweenPosition1 andthe
crossline
as shownin "D".
L Rotatethe stageandevaluatecentricity.
Onemayneedto repeatthisprocedure
untilthetarget
srays
in thecenterof the crossline
whenthe stageis rotated("D").
Repeatthesestepsfor allotherobjectives
in the nosepiece.
To maintain
centering,
it is important
that
objectives
be handledverygentlyandonlytouchedon the knurledportionwhenchangingobjectives.
'H
Analyzer
Bertrandlens
Centeringkey
A
B
C
/,'D\
D
@@ vL-/ @
#
\ott
12
3.0 Operation
installed
correctly
hasbeensetupin itsworkinglocationwilhallof the components
Oncethe microscope
andaligned,it is readyfor use.
with
Alwayshandleyourmicroscope
to lasta lifetime.
instrument
designed
YourMT9000is a precision
andshock.
careandavoidabruptmotion,vibration
z\cry!!g!
byMeijiTechno:
otherthanonesdesignated
anybulbinyourinstrument
i Donotinstall
lilrlgz
Alwaysdisconnectthe powercord fromthe back of the microscopewhen not beingused,or when
or when makingany repairs.
cleaningyourinstrument
[aca!M!N]
AvoidDismantling
Thiswillvoidyourwarrantyandcouldpossiblyleadto the
the instrument.
Neverattemptto dismantle
accurately.
no longerperforming
instrument
3.1 TransmittedLight Operation- Brightfield
The partnumbersfor
lightobjectives.
of transmitted
requires
the installation
lightoperation
Transmitted
appearat the endof thissection
lightobjectives
transmitted
. First,setyourinterpupillary
eyetubesby pullingthemapartor pushing
distanceon the microscope
onewillseeoneuniformroundor "fused"
themclosertogetherto fit youreyes.Whensetcorrectly,
whenadjusted
to yourlikingso you canlaterrepeatthe
fieldof view.Makenoteof the distance
setting.
is donewiththe
lightbrightness
r Turnon the microscope
powerswitch.Adjusting
thetransmitted
controlknobon the bodyof the microscope.
variablebrightness
13
. Makesurethe{ieldirisdiaphragm
is openedallthewayto start.
on the verticalilluminator
. We recommend
on
Placethatspecimen
flatspecimen.
thatyou initiallyusean easilyrecognizable
the stage.
. Selecta lowerpower"scanning"
objectivelikethe4X or the 10Xto findthe areaof intereston the
nosepiece..
quickly.Be surethe objective
specimen
"clicks"intoplacewhenyouturntheobjective
r By usingthe coarseandfinefocusknobsshownabove,adjustyourspecimenintolocuswithyour
Withthe specimenin focus,closethe right
lefteyeclosed(lookingonlythroughthe righteyetube).
eyeyoujustusedandopenthe left.lf the specimenis outof focusfor the lefteye,adjustthediopter
for thisuser.Focusing
is nowadjusted
on the eyetubeuntilthe focusin correct.The microscope
eye lenses.lf youwearglasses,you
for usersthatwearcorrective
eyetubes
allowsus to compensate
maywantto removethe rubbereyeguards.
canbe "stoppeddown"or closed
locatedon the verticalilluminator
Note:Theapertureirisdiaphragm
power.
of yourspecimenmoreor lesscontrastor resolving
somewhat
to givethe observation
image
resolution
andbrightness
but increases
decreases
Stoppingdownthe irisdiaphragm
contrastanddeDthof focus.
PossibleBrightfieldModeOperationalProblems
exist:
lf normaladjustments
are notgettingthe resultsyou expect,checkto see if theseconditions
. Incorrect
lightobjectives
installed,
i.e.incidentlightmodeusingtransmitled
inadvertently
components
anovrceversa
. Components
notmountedcorrectly
r Dirty,smudgedor roughlyhandledoptics
MT9000SeriesPlan Strain Free IncidentLight Obiectives
- F = 200mm
Corrected
Brightfield Objectives Transmitted - Strain Free Plan - Infinity
MA935
S t r a i n F r e e P l a n 4 X o b j e c t i v e ,N A : 0 . 1 0 , w o = 1 5 . 3 ( i n c l u d e d )
MA936
S t r a i n F r e e P l a n 1 0 X o b j e c t i v e ,N A : 0 . 2 5 , w D = 7 . 3( i n c l u d e d )
MA937
Strain Free Plan 20X, objective,NA: 0.73, wD = 5 omm(optional)
M4938
MA939
(included)
S t r a i n F r e e P l a n 4 0 X o b j e c t i v e ,N A : 0 . 6 5 , w D = o . 7 2 m m
(optional,l
Strain Free Plan 60X objective,NA: 0.85, wD - 0.2mm
MA94O
(optional)
S t r a i n F r e e P l a n 1 0 0 X o b j e c t i v eo i l , N A : 1 . 2 5 , w D = o . 1 4 m m
14
3.2 lncidentLight Operation- Brightfield
Incident
lightoperation
requires
the installation
of incidentlightobjectives.
The listof partnumbersfor
incidentlightobjectives
appearsat theendol thissection.
l
r First,set your interpupillary
distanceon the microscopeeyetubes
by pushor pullingthemapartor pushingthemcloserto fit your
you will see one uniformroundor
eyes.When set correctly,
"fused"fieldof view.Make noteof the distancesettingwhen
adjustedto your likingso you can laterrepeatthe setting.
@
\\/
. Adjusting
the brightness
is donewiththe variablebrightness
powersupplyshownat
controlknobon the verticalilluminator
right.
Briqhtnesscontrol
o Makesurethe fieldirisdiaphragm
is
on the verticalilluminator
openedall the way to start.
o We recommend
flat
thatyou initiallyuse an easilyrecognizable
MA955Verticalllluminator
F i l t e rs l o t
Aoerturelris
)
specimen.Placethatspecimenon the stage.
o Selecta lowerpower"scanning"
objectivelikethe 4X or the 10X
i e l dl r i s
to findthe areaof intereston the specimenquickly.Be surethe
objective"clicks"intoplacewhen you turn the objectivenosepiece..
. By usingthecoarseandfinefocusknobsshownabove,adjustyourspecimenintofocuswithyour
Withthe specimenin focus,closethe right
leJteyeclosed(looking
onlythroughthe righteyetube).
eyeyoujustusedandopenthe le{t.lf the specimenis outof focusfor the lefteye,adjustthediopter
on theeyetubeuntilthefocusin correct.
Themicroscope
is nowadjusted
Jorthisuser.Focusing
eyetubesallowsus to compensate
for usersthat
wearcorrective
eye lenses.lf youwearglasses,you maywanllo removethe rubbereyeguards.
locatedon the verticalilluminator
canbe "stoppeddown"or closed
Note:Theapertureirisdiaphragm
power.
to givetheobservation
of yourspecimenmoreor lesscontrastor resolving
somewhat
resolution
andbrightness
butincreases
image
Stopping
downthe irisdiaphragm
decreases
contrastanddeothoJfocus.
t5
I
PossibleBrightfieldModeOperationalProblems
lf normaladjustments
exist:
arenotgettingthe resultsyouexpect,checkto see if theseconditions
. Incorrecl
inadvertently
installed,
lightobjectives
componenls
i.e.incidentlightmodeusingtransmitted
andviceversa
I
. Comoonents
notmountedcorrectlv
\
o Dirty,smudgedor roughlyhandledoptics
MTgOOO
P I St
Senes Fran
ti
ulrarn Free rncident Li ht obieclrves
- F = 200mm
Brightfield Objectives Transmitted - Strain Free Plan - Infinity
Corrected
MA935
MA936
MA947
MA948
S t r a i n F r e e P l a n 4 X o b j e c t i v e ,N A : 0 . 1 0 , w o = 1 5 . 3( t n c t u d e d )
S t r a i n F r e e P l a n 1 0 X o b j e c t i v e ,N A : 0 . 2 5 , w D - 7 . 3 ( t n c t u d e d )
fornoncoverslip
Strain Free Plan 20X objective,NA: 0.40, wD - 5.2mm(optional)
(optional)
fornoncoverslip
Strain Free Plan 40X objective,NA: 0.65, wD - 0.81mm
16
3.3The BertrandLens- ConoscopicObservation
An "lnterference
Figure"is a phenomena
whichdetailswhata specimenproduces
at the rearfocalplane
lightlenssystem.Thiscolorfulfigureis usedfor materialdiagnosis
of a transmitted
and identilication.
Intereference
Figuresareachieved
withcertainspecimens
likecrystalswhichfieldof viewbecomes
extinctwhenviewedundercrossedoolars.
To performconoscopic
:
observation
.
.
.
r
Placeyourspecimen
on the stage,usuallya preparedslide.
Engagethe40xobjective
by rotating
the nosepiece
intothatposition.
Bringyourspecimenintofocus.
Turnupthetransmitted
lightilluminator
up allthewayto its brightest
setting.
Note:Objectives
shouldbe centeredotherwise
specimen
detailmaymoveoutof thefieldof viewwhen
turningthe stage.
o Engagethe analyzer
whichis theonlysliderbelowthe viewingheadandswingin the polarizer
which
is locatedjustabovethetransmitted
lightilluminator.
o Whilelookingintothe eyetubes,
removethe specimenand rotatethe polarizer
andfindthe pointin
your
whichthefieldbecomes"extinct"
or darkened
andthenre-position specimen.
o Engagethe Bertrand
lensby rotatingthewheeldirectlybelowthe viewingheadfrom"O"to "8"
settingprintedon thewheel.
r lmmediately,
oneshouldobservesometypeof interference
figuresomewhat
similarto whatis shown
below.
r Rotatethe stageto observethe movement
andcoloration
of the isochromes
and isogyres
whichare
the coloredandblackened
figuresyouobserve.
Conoscopic
cannotbe observedunderverticallllumination
17
r
I
3.4Attachingoptionalmechanicalor point countingstages
Thestageclipsthatcomewiththe microscope
willneedto be removedpriorto installation
ol optional
srages.
Eachclipsimplyliftsoutof the holein the stage.
Themechanical
or pointcountingstagesareattached
to the threadedholespre-drilled
intothestageas
shownbelow:
MA299Mechanical
staoe
Be sureto storethe removedstageclips.l{ the pairare lost,theycan be replaced.
The partnumberis
MA946.
/;;), 6;\
M
\-/ M
/;\ 6;\
\-7
@M
/6i'
,a')'
M M
\V/
MA945Pointcountingstage
IB
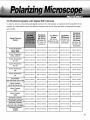
with 35mmSLR and DigitalSLR Cameras
3.5 Photomicrography
ModelMT9300and MT9430microscopes
havea trinoculartube
with integratedmale"C" mounton top of the headfor
photomicroscopy.
Thread
In orderto securea 35mm SLR camerabodyto thesemicroscopes,
tube (M4150/50or MA150/60)
will
an optionalcameraattachment
T2 AdapterRingthat
needto be usedwiththe corresponding
Beamsplitter
matchesthe camerato be used.
The tablebelowshowsthe differentcamerasand adapterringsthat
ClamoScrew
can be used:
T2 CameraAdapterRings
T2-1
T2-2
T2-3
T2-4
T2-5
T2-6
T2-7
T2-8
T2-g
T2-10
Canon
Minolta
PentaxK
PentaxS (threaded)
Nikon
Olympus
Contax,Yashica
Konica
Canon EOS
MinoltaAlpha/ Maxim2000
In addition,
a photoeyepiecewillbe neededto makean imagefor thecamera.Thetablebelowshowsthe
photoeyepieces
different
thatareavailable:
Photo eyepieces
MA512 2.5XPhotoeyepiece
MA508 5X Photoeyepiece
MA500 3.3XPhotoeyepiece
t9
wswuswwl
wt
with DigitalStill Gameras
3.6 Photomicrography
gradedigitalcamerato the microscope,
In orderto mounta consumer
an optionalcameraadapterwillbe
adapter
needed.
Thetablebelowshowsthe different
camerasthatcanbe usedandtheircorresponding
partnumber:
-s$ffi
Digital Camera
Model
N$
*ffi
Eyetubes
"C" Mount
TM Series
Thread
ML Series
(25.4mm)
( 2 3 . 2 m ml D , (attaches
to male
27.2mmOD
thread)
c-mount
Eyetubes)
Eyetubes
EM Series
(30.5mm
lD,
34.0mmOD
Eyetubes)
Eyetubes
RZ Series
MT Series
TC Series
IM Series
(30.0mm
lD,
34.0mm
OD
Eyetubes)
Canon Powershot
A61 0, A620
A630, A640
M A 15 1/ 3 0 / 7 3
M A 1 5 1/ 3 0 / 7 3
M A 1 5 1/ 4 0 / 7 2
M A 1 5 1/ 4 5 / 7 2
MA 1 51/ 50/ 72
Canon Powershot
A700, A700 ls
MA151/30/75
MA151/30/75
M A 1 5 1/ 4 0 / 7 4
MA 1 51 /45/74
MA 151/ 50/ 74
Canon P ower s h o t
Gl, G2
M A 1 5 1/ 3 0 / 4 3
M A 15 1/ 3 0 / 4 3
M A 1 5 1/ 4 0 / 4 2
MA 1 51 /45/42
MA 151/ 40/ 42
Canon P ower s h o t
G 3, G 5
MA151/30/41
M A 1 5 1/ 3 0 / 4 1
M A 15 1/ 4 0 / 4 0
M A 1 5 1/ 4 5 / 4 0
MA 151 150/ 40
Canon Powershot
G6
M A 1 5 1/ 3 0 / 3 1
M A 1 5 1/ 3 0 / 3 1
M A 15 1/ 4 0 / 3 0
M A 1 5 1/ 4 5 / 3 0
M A 1 5 1/ 5 0 / 3 0
Canon Powershot
G7
M A 1 5 1/ 3 0 / 2 1
MA151/30/21
M A 15 1/ 4 0 / 2 0
M A 1 5 1/ 4 5 / 2 0
M A 1 5 1/ 5 0 / 2 0
M A 1 5 1/ 3 0 / 8 1
M A 1 5 1/ 4 0 / 8 0
M A 1 5 1/ 4 5 / B O
M A 1 5 1/ 5 0 / 8 0
M A 15 1/ 3 0 / 5 0
M A 1 5 1/ 3 0 / 5 1
M A 15 1/ 4 0 1 5 0
M A 1 5 1/ 4 5 / 5 0
MA 1 51/ 55/ 50-
Nikon Coolpix
5000
M A 1 5 1/ 3 0 / 7 0
M A 1 5 11 3 0 1 7 1
M A 1 5 1/ 4 0 / 7 0
M A 1 5 1/ 4 5 / 7 0
Nikon Coolpix
5400
M A 15 1/ 3 0 / 5 3
M A 1 5 1/ 3 0 / 5 3
M A 1 5 1/ 4 0 / 5 2
M A 1 5 ' 1/ 4 5 / 5 2
M A 1 5 1/ 3 0 / 6 1
M A 1 5 1/ 4 0 / 6 0
M A 1 5 1/ 4 5 / 6 0
M A 15 1/ 3 0 / 6 3
M A 1 5 1/ 4 0 / 6 2
M A 1 5 1/ 4 5 / 6 2
M A 1 5 1/ 3 0 / 6 3
M A 1 5 1/ 4 0 / 6 4
M A 15 1 / 4 5 / 6 4
F uji F inepix
M A 15 1/ 3 0 / 8 1
49002,
5602,
69002,
S20Pro,
5700(
Nik on Coolp i x
800,900,950,990,995,4500
O ly m pus Cam e d i a
c.2000,
c.2020,
c.3000,
c.3030,
c-3040, M A 1 5 1 / 3 0 1 6 1
c-3100,
c-4040,
c-4100,
c-5050
O ly m pus Cam e d i a
c-730,
c-740,
c-750, MA 1 5 1 /3 0 /6 3
c-700,
c-720,
C-765,
C-770,
SP500UZ
c-755,C-760,
Olympus Camedia
c-s060
c-7070
M A 1 5 1/ 3 0 / 6 5
MA 1 51/ 50/ 52
MA 1 51/ 50/ 62
20
I
d.
iffdpti
VideoMicroscopy
@
CK3100Nor CK3100P
1/3"CCD-Camera
DK3000
1
or CK3900P
CK3900N
112'CCDCamera
|
I rrgtt;1110rnts
with Lens
O)
M A 1 5 1 / 3 5 / 0 30 . 3 x
t-..1 MA151l35lo4 0.45x
I i
M A 1 5 1t 3 5 t 5 o o . 5 x
I I
M A 1 5 1 / 3 s / 1 51' o x
i 1
M A 1 5 1t 3 5 t 2 o o ' 7 x
M A 1 5 11 3 5 1 2 52 ' 5 X
S|ipthe,.C,.mountwith|ensoverthetopofthephototube
C K 3 1 0 0 No r C K 3 1 0 0 P
1/3"CCD Camera
f2-1 Canon
T2-2 Minolta
f23 PentaxK
T2-4 PentaxS
T2-5 Nikon
T2-6 OlymPus
f2-7 Contax,Yashica
T2-B Konica
T2-9 CanonEOS
CK3900Nor CK3900P
112'CCDCamera
r2-10
lo'oo
N|!9lH
MAl50 / 60
CameraAttachment
w/findereyePieces
Photo EYePieces
MA512 2.5X
)-1 MA500 3.3x
MAsOB5.OX
/a\
t!7
Connect directlYto
"G" mount tYPeCCD Cameras
TrinocularHead with
Integrated Male "C" mount
21
Trinocular Headwith
Photo tube
NIKON,OLYMPUS,
FUJI,
DIGITALCamera
DIGITAL
Gamera
adapter
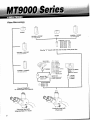
3.7 Connectinga Video or Other Gamerathat has a "C" mount
In orderto attacha camerathatemploysa standard"C"mountto the MT9300or MT9430microscope,
male"C"mountby unscrewing
onecan usethe integrated
andremoving
thechrometube.
Tochangethe magnilication
seenby the camera,an optional"C-Mount"
cameraattachment
WITHLENS
portof the microscope
canbe usedbetweenof thetrinocular
andthe camera:
Optional ''Crr Mounts With Lenses
- Forall MeijiTrinocular
Microscopes
photo
MA1s1/35/03
"C" Mount Adapter with 0.3X lens lstipsoverexisting
tube)
photo
MA151135/04"C" Mount Adapter with 0.45X lens (Slips
tube)
overexisting
photo
MAl 51/35/50 "C" Mount Adapter with 0.5X lens lstlpsoverexisting
tube)
photo
MA151135/15"C" Mount Adapter with 1 .0X lens (Slips
tube)
overexisting
photo
MA151/35/20 "C" Mount Adapter with 0.7X lens (Stips
tube)
overexisting
photo
MA151135125
" C" Mount Adapter with 2.5X lens (Slips
tube)
overexisting
4.0 Maintenanceand Cleaning
. Disconnect
priorto performing
the powercordon yourequipment
mainlenance
cleaning,
or repair.
o Keepelectrical
components
awayfrommoisture
or humidity.
. In warmhumidclimates,
fromexposure
takespecialcareto preventyourequipment
to fungalgrowth
by usingdesiccant
in an airtightstoragecontainer
or by othermeans.
. Cleanthe microscope
aftereachuse.Keepingyourmicroscope
cleanwillinsureits properoperation
overits lifetime.
DustProtection
Be sureto usethe supplieddustcoverwithyourmicroscope
a{tereachworksession.
Cleaning
Dust,fibersandotherdebriscancauseyourfieldoi viewto getobstructed
so keepingyourmicroscope
cleanwillhelpthe overallqualityof yourwork.
Gleaningof PaintedSurfaces
Usea softbrushor linffreecottonclothto removedustandlooseDarticles.
Toughdirtcanbe removedwithwateranda milddetergent.
6."rt-9{
NEVER
usE AcEToNEoR orHERHARSH
cHEMIcALS.
Painledor plasticsurfacesshouldnotbe tarnished
or etchedwithcleaningagentsthataretoo powerful.
Tocleanpaintedsurfaces,
lint-free
usea moistened
cottonclothwithmildsoapywater.
22
Cleaningthe Stage
Usea softbrushor lint-free
cottonclothlo removedustandlooseoarticles.
DONOTUSEACETONE
OR OTHERHARSHCHEMICALS,
usea moistened
lint-free
cottonctothwitha
solution
of mildsoapywater.
Cleaningof GlassSurfaces
Usea softbrushor lint-free
cottonclothto removedustandlooseoarticles.
Fortoughdirt,usea softlint-free
cottonclothmoistened
withdistilledwater.
lf thatfails,try usingmedicalor reagenlgradeisopropyl
alcohol.
Cleaningthe Objectives
l9o"!eE!l
Objectives
shouldNEVERbe disassembled
for cleaningor for anyotherreason!
Wedo notadvisecleaningthe insidesurfacesof objectives
or eyepieces.
Usea softbrush,bellowsbrushor a softlint-free
cottonclothto removedustandlooseoarticles.
Fortoughdirt,usea softlint-free
cottonclothmoistened
withdistilled
water.
lf thatfails,carefully
try usingmedicalor reagentgradeisopropyl
alcohol.
Wipelensesimmediately.
Overtime,waterandsolventscandissolveopticalcementsthatholdoptics
togetherso NEVERsoakobjectives
withANYtypeot fluid.
5.0 Troubleshooting
MeijiTechnoproducts
aremanufactured
exclusively
in JapanunderlSOgOOl
manutacturing
standards.
However,
if youeverhaveanydifficulty
withany Meijiproduct,
feelfreelo contactus at:
M E I J IT E C H N OC O . ,L T D .
322-1, Chikumazawa,
Miyoshimachi,lruma-gun
Saitama354-0043,Japan
Phone:
049-259-0111
049-259-0113
E-mail:
Phone:
MeijiTechnoAmerica
3010OlcottStreet
E-mail:
SantaClara,CA 95054-3207
Web:
[email protected]
http://www.meijitechno.co.jp
800.832.0060
408.970.5054
[email protected]
http:/iwww.meijitechno.com
Our technicalstaffis trainedto assistyou on mechanicalor electricalissuesyou may have.
23
Operationallssues
"Operations"
Please
referto theprevious
chapters
whichcoincide
withtheobservation
modethatyouareusing.
problems
positioning
thermproper
Themostcommon
operational
include
theimproper
of contrast
accessories,
partsinstalled.
lf youareunable
to obtainthedesired
imagefromthemicroscope,
adjustment
or theincorrect
pleasereferto thecorresponding
chapters
of thismanualundertheproperoperation
mode:brightfield,
etc.
ElectricalProblems
Electrical
oroblems
can include:
. Thelampon the microscope
is notworking.
. Novoltageis present.
probable
Checkthefollowing
causes:
. Checkthatall powercordsareproperlyconnected
to the rightspots.
. Makesurepoweris actuallypresentat thewalloutlet.
. Checkto see if thereis a fuseblown.
5.1Replacing
the mainsfuseon the microscope
|AcarrrroNl
ALWAYSDISCONNECT
YOUREQUIPMENT
BEFOREDOINGANY REPAIR,
Location of Mains Fuse
The mainsfuse of the MT SeriesMicroscopes
is locatedon the back
panelof the microscopeas shown.
lnstructionsto replacethe mains fuse:
r Turnthe powerswitchto the off position.
o Unplugthe microscope
from the wall outlet.
o Loosenthe fuse cap fromthe fuse holder.
o Removethe blownfuse fromthe fuse cap.
o Replacethe fusewith the CORRECTtype and ratingwhichis:
30W Halogen Systems
M4327 3 Amp, 250V,5 X 20mm
o Reinstallthe fuse holderwith the new fuse in place.
trP4lqEql
NEVERUSE REPLACEMENT
FUSESOF A DIFFERENTRATING.
24
S.2Transmitted
or IncidentLight does not work
1. Makesureyour mainsoutletindeedhas power.
2. Checkto see if the mainsfuse has blown.
3. Checkto see if the lamphas blown.
5.3 ReplacingTransmitted6V 30W HalogenLamp
CAUTION ALWAYSDISCONNECTYOUR EQUIPMENTBEFOREDOINGANY REPAIR.
Do not installany bulb in your instrumentotherthan ones designatedby MeijiTechno:
MT920O,MT9300,MT9420& MT9430 I
6V 30W Halogen ForAll Integratedllluminators
Do nottouchthe glassenvelope
Keepthe protective
of the lampduringinstallation.
sleeveor bagof the
lampduringinstallalion
andremoveit rightafterinstallation.
MAyBEHorro rHEroucH.
l@HdTt-l LAM'ANDLAM'HousrNG
o Switchotf the microscope.
o Disconnect
the powercord.
o Waituntilthe housingand bulb havecooledsufficiently.
o Removethe illuminator
coverscrewsand liftthe coverto
remove.
o Replacethe defectivelamp.
o Placea new lampintothe socketwhileavoiding
touchingthe glass.Noticethe bulb is wrappedin plastic.Use
it to avoidtouchingthe glassenvelopeduringinstallation.
o Be surethe bulb is pushedin as far as possiblethereby
aligningthe filamentin the illuminator.
o Reinstallthe lampcoverdoor.
o Reconnectthe powercord and switchon the microscopeto
verifyproperilluminator
operation.
25
5.4 Replacingthe Incident6V 30W HalogenLamp
youR EeurpMENT
BEFoRE
ANyREpArR.
DorNG
A="oaitolr ] nr-wavsDrscoNNEcr
Do not installany bulb in your instrumentotherthan ones designatedby MeijiTechno:
ForAll Integratedllluminators
MT9200,MT9300,MT9420& MT9430 l
MAyBEHor ro roucH.
@ HOTI i LAMeANDLAMeHousrNG
o Switchoff the microscope.
o Disconnect
the powercord.
o Waituntilthe housingand bulb havecooledsufficiently.
. Loosenthe clampscrewand directthe backingplateso it can be
=7
Loosenthe
clampscrew
removedfromthe housing.
o Removethe defectivelamp.
o Placea new lampintothe socketwhileavoidingtouchingthe
glass.Noticethe bulb is wrappedin plastic.Use the bag to avoid
touchingthe glassenvelopeduringinstalfation.
o Be surethe bulbis pushedin as far as possibletherebyassuring
the alignment
of the filamentin the illuminator.
o Reinstallthe lampcoverdoor.
o Reconnectthe powercord and switchon the microscopeto align
the filamentand to verifyproperilluminator
operation.
26
6.0Storage
Protectyourmicroscope
fromdustaftereachuseby coveringyourinstrument
withthe protective
dust
coverthatcamewithyourmicroscope.
storeyourmicroscope
in a cabinetthathasa stabletemperature
andlowhumiditv.
lf youlivein an areathathashighhumidity,
considerstoringyourmicroscope
in a sealedcontainer
along
witha desiccant
suchas silicaoel.
It is alsorecommended
thattheobjective
andeyepieces
be storedin a separateairtightcontainer
with
desiccant
suchas smallbagsof silicagel.
7.0 Packingand Transport
Whenever
the microscope
is goingto be moved,shipor transport
the microscope
andthe accessorres
rn
itsoriginalpacking.
It is advisable
to keepa copyof all necessary
information:
copyof theoriginalinvoice,
the operattons
manual,etc.included
withthe microscope
whenshipping.
parts
8.0Accessoriesand Replacements
Partnumbersandproductdescriptions
for accessories
andpartsfor MTgoooSeriesMicroscoDes
can
alsobe foundonline.Accessories
andreplacement
pafisareavailable
throughourdealernetwork.Callus
tollfree(800)832-0060MondaythroughFridaygam- 5pm pSTandwe canreferVouto a deater.
MT9000SeriesComponents& Accessories
Viewing Heads
Part Number Description
MA952
MA953
Siedentopf
type binocularhead,30" inclined,2J.2mml.D.eyetubes
with integratedreticleanglecompensation(includedwith MT920O& MT9420)
Siedentopf
type trinocularhead,30" inclined, z3.2mmI D.
with integratedreticleanglecompensation(includedwith MTg300& MT9430)
"y"trb"t
Eyepieces
Part Number Description
MA4O7
MA4OTCP
27
DIN KHW10Xsuper widefieldHighEyepointeyepiece,F.N.20
(standard)(accepts21mm reticle)
DIN KHW1Ox-FsuperwidefieldHighEyepointfocusing,F.N.20
(standard)cross-lineincluded
rr
- F - 200mm
Polarized Objectives Transmitted - Strain Free Plan - lnfinityCorrected
MA935
(included)
S t r a i n F r e e P l a n 4 X o b j e c t i v e ,N A : 0 . 1 0 , w D = 1 5 . 3 m m
MA936
NA: 0.25,wD = 7.3mm(included)
StrainFreePlan10Xobjective,
MA937
S t r a i n F r e e P l a n 2 0 X o b j e c t i v e ,N A : 0 . 7 3 , w D = 5 . 0 m m( i n c l u d e d )
MA938
Strain Free Plan 40XS objective,NA: 0.65 = O.72mm(optional)
MA939
StrainFree Plan60XSobjective,NA: 0.85 = 0.2mm(optional)
(optional)
NA: 1.25 = 0.14mm
StrainFreePlan100XSoil objective,
MA94O
- F; ?00mm
Polarized Objectives Incident Light - Strain Free PIan - InfinityCorrected
MA935
(included)
S t r a i n F r e e P l a n 4 X o b j e c t i v e ,N A : 0 . 1 0 , w D = 1 5 . 3 m m
M4936
S t r a i n F r e e P l a n 1 0 X o b j e c t i v e ,N A : 0 . 2 5 , w D = 7 . 3 m m( i n c l u d e d )
MA947
for noncoverslip
Strain Free Plan 20X objective,NA: 0.40, WD = 5.2mm(optional)
MA948
for noncoverslip
Strain Free Plan 40XS objective,NA: 0.65 = 0.81mm(optional)
Pol Accessories
MA469/05
StrainFreeAbbecondenserNA 1.25withirisin dovetailmount(included)
114wavetest platein DIN slidingmount(included)
MA470105
FirstOrderRed Platein DINslidingmount (included)
MA471105
A n a l y z e ri n - m o u n t( i n c l u d e d )
MA654/05
(optional)
QuartzWedge,6 order,un-graduated
QuartzWedge,6 order,graduated(optional)
MA954
MA654/05N
MiscellaneousParts& Accessories
MA299
Attachablemechanicalstage(optional)
MA945
AttachablePointCountingmechanicalstage(optional)
MA946
Stage Clips (pairincluded)
MA809/10
MA809/20
115VAC Powercordwithplug(USA)
Replacement
Replacement
220VAC Powercordwith plug (Eurocord)
M4292
220VAC Powercord with plug (UK)
Replacement
1mm dividedinto100 parts,0.01mm
StageMicrometer,
MA2OO
Eyepiece(optional)
Eyeshieldfor MA407KHW1OXCP
MA326
Lamp,6V 30W halogen
Replacement
M4327
Replacement
Fuse,3A for all Halogenmodels
lnterference
ColorChart(lncluded)
MA809/30
MA9O5
MA7O1
MA955
MA927lO5
DustCoverfor MT9200,MT9300,MT9420& MT9430(included)
Vertical30W KoehlerHalogenllluminator(includedwith MT9420& MT9430)
Standalonepowersupplyfor MA955(includedwith MT9420& MT9430)
28
9.0TechnicalDescriptions
Specifications
B ul b
100-230V50/60H2
oMA326Halogenbulb6V 30W (Philips
code :5761),3100'Kat max.intensity
BulbLife
o 100 hoursaveragefor halogenbulb
LightControlMethod
Voltagecontrol
o Indooruse
oAltitudeup to 2,000m
oMAfNS supplyvoltagefluctuations
up to +1O"hof the nominalvoltage
oTemperature
(50
: +10 to 36'C
to 96.8'F)
o RelativeHumidity: 0 to 80% up to 30"C (86'F)
oTransientovervoltages
typicallypresenton the MAINSsupply.
is impulsewithstand
Note:The normallevelof transientovervoltages
(overvoltage)
categoryll of IEC 60364-4-443.
.ApplicableRATEDPOLLUTION
degree
PowerSource
Normal
Environmental
Conditions
Filtersand Applications
Filter
I Application
ll4Wavelengthtest plate
I The quarter-wavetest plateis made from a birefringent
crystalthat producesa phase-shift
of one-quarter
cycle
betweenthe elementsof lightpassingthroughit. The
quarter-wavewave platecan be used to convertlinearly
polarizedlightto circularlypolarizedlight.
QuartzWedge
I
i
I
I
I
I
A quartzwedgeis a semi-quantitative
compensator
made
wedgeangle.
fromquartzthatis cut withan elongated
employed
for qualitative
Quartzwedgesarecommonly
(rock
retardation
measurements
ol petrographic
specimens
mineral
thin
sections)
and
other
birefringent
materials
and
valuefallswithinthewedgelimits.
whoseretardation
I
Plate
FirstOrderRedCompensating
Platesare used
] FirstOrderRed(FullWave)Compensating
in determining
the
Tint"or "GypsumPlate" I with polarizedlightmicroscopes
aka "Sensitive
of birefringent
materials.
Thecompensator
covers
I properties
j 1 order,approximately
550nm.
Bertrand
Lens
belowthe viewing
I Th" a"rtr"nd Lensis foundimmediately
head.lt can only be usedwith the 40X objectiveand when
engaged,convergentlightis usedto observewhat is called
Figure".
an "lnterference
29
I
:ali!,!ii! !!l
**w
mffi
EI
x
E
-
rl
IH
E
1/777,',
MT9200
,,;il
//y^ ,
3
*i
f
E (_)
,-:t.
. E
i
. .
263
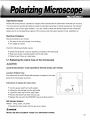
Weight&
MT9200:
MT9300:
MT9420:
MT9430:
MT9420
Dimension:
212mm(W) x 390mm(D) x 456mm(H),9.06k9
212mm(W) x 390mm(D) x 51Omm(H),9.75k9
212mm(W) x 424mm(D) x 501mm (H), 11.19kg
212mm(W) x 424mm(D) x 555mm(H),11.88kg
30
MEUIrEcHNo co.,LTD.
X
MEIJITECHNOCO.,LTD.
322-1,Chikumazawa,
Miyoshimachi,lruma-gun
Saitama354-0043
Japan
Phone:
Fax:
E-mail:
Web:
049-259-0111
049-259-0113
[email protected]
http://www.meijitechno.co.jp
M E I J IT E C H N OA M E R I C A
3010 OlcottStreet,
SantaClara,CA 95054
U.S.A.
Tollf ree:
Phone:
Fax:
E-mail:
Web:
(800)832-0060
(408)e70-47ee
(408)e70-5054
[email protected]
http://www.meijitechno.com
MEIJITECHNOUK, LTD.
The Vineyard,Axbridge
Somerset,8526 2AN
U.K.
Phone:
Fax:
E-mail:
Web:
01934 733 655
01934 733 660
enquiries
@meijitechno.co.
uk
http://www.meijitechno.co.uk
,.
Dr
f(f'l
w/
[%*4r]l
Y Il
g
uxes
ry
,,:;;l
l
-"'"il',)i'l.,i
-
a,tR\
((,o\:
\.!J--l,
'08.04. 3,000V1 Printedin
Japan