1
APRS functions Manual
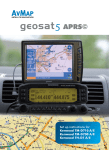
Your journey, Our technology
Indice
I. Introduction II. Quick Set-up
III.Activating the APRS mode
IV. Finding APRS Contacts
V. Managing APRS contacts IV. Messaging to APRS contacts
VII.Setting an APRS contact as Target
VIII.APRS Options
IX.Compatibility
X. Technical Specifications
4
5
6
7
10
11
13
15
16
18
Appendix: Units setup Setup Instructions
20
26
AvMap - 3
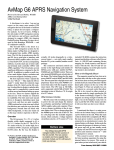
I. Introduction
APRS is a method for sending and receiving position and
other information over a radio transceiver.
The Geosat 6 APRS is ready to accept APRS inputs from a
radio transceiver and to provide fix position output data
to the transceiver in order to transmit its current position.
Geosat 6 APRS provides GPS location information for your
transmitted APRS beacons, and it shows received APRS
information on its map display.
The Geosat 6 APRS comes with an APRS cable for use with
designated Kenwood transceivers
The input/output port used for APRS is the serial port on
the right side of the Geosat 6.
APRS© was developed by Bob Bruninga, WB4APR
4 - AvMap
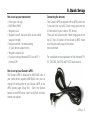
II. Quick Set-up
How to set-up your transceiver:
• Enter your call sign
• BAUD Rate=9600
• Waypoint=ALL
• Waypoint size=9 character (this as also called
waypoint length)
• Beacon method = Smartbeaconing
(if your device supports this)
• Waypoint output=ALL
• If you are using a Kenwood D72 turn off F-1
Internal GPS
Connecting the devices:
Your Geosat 6 APRS is supplied with an APRS cable: the
3 pole end (the one with 2 black rings) goes into the
2.5mm socket of your radio or TNC device.
The 4 pole end (the one with 3 black rings) goes in the
top 2.5 mm I/O socket of the Geosat 6 APRS; make
sure they are really snug in the socket.
foto connettore
For a detailed set-up explanation of the Kenwood THD7, TM-D700, TM-D710 and TH-D72 read Annex A.
How to set-up your Geosat 6 APRS:
The Geosat 6 APRS is defaulted to 9600 BAUD rate. If
your radio device supports 4800 BAUD rate you can
change this setting also on your Geosat 6 APRS in the
APRS options page (Chap VIII). Touch the Options
button in the APSR menu, touch Serial Port and then
choose your option.
AvMap - 5
III. Activating the APRS mode
To enter in the APRS mode, open the main navigation
menu and press the APRS Functions button. To enable or
to disable the APRS mode, press the Enable/disable APRS
Button in the APRS Functions Menu. Push this button to
enabled or disable the other buttons.
The APRS Functions menu includes four buttons:
• Disable/Enable APRS
• APRS contacts
• Messages
• Options (APRS Settings)
The Messages function when a Geosat 6 APRS is connected
to compatible radio transceiver or modem supporting
the Messaging function. Find the list of Geosat 6 APRS
compatible radio transceivers and modems supporting
messaging on line www.avmap.us or/and www.avmap.it.
6 - AvMap
IV. Finding APRS Contacts
APRS icons on the map:
As soon as you connect Geosat 6 APRS to your transceiver
you will start receiving APRS positions called “APRS
contacts”. Geosat 6 can store up 1000 APRS contacts and
display them on the map.
You can watch APRS activity right on the screen and you
can distinguish between fixed and mobile APRS stations.
Static positions are represented by blue bulls-eye icons
along with the associated call sign. If the Geosat 6 APRS
is used with a Kenwood D710A/E or TH-72A/E and if
it is set in the KENWOOD format sentence, it supports
standardized APRS icons.
To get more info on an APRS contact on the map, zoom in
and touch it, the Call sign will appear in the info bar in
the bottom of the screen, Touch it to view the Full info
page.
APRS contacts list:
You can also see the list of received contacts; you can
AvMap - 7
APRS Functions
sort them or delete them by entering the APRS contacts
Menu. To enter in the APRS Contacts Menu, press the APRS
Contacts button in the APRS Functions menu. The APRS
contacts folder shows all APRS contacts received from the
connected radio. Touch one APRS contact on the list to
open the Full info page.
Full info on APRS contacts:
You have detailed info on stationary and moving APRS
contacts as Geosat 6 APRS fully takes advantage of the
Kenwood format sentence.
This ‘Tactical mode’ allows you to select an APRS contact
from the APRS contact list, or from the map to see on the
full info page: call sign and position, time stamp of its last
report as well as (for moving APRS contacts) its speed,
course and altitude.
The Full info page show the info about the APRS contact
and 6 buttons on the right column:
8 - AvMap
APRS functions
• Delete: Touch this button to delete the selected
APRS contact from the APRS contact list.
• Save as contact: touch this button to save the
selected APRS contact as a normal Contact. This
may be useful to save the Call Sign, telephone
number and address (for fixed stations), if you
need to reach them even when the APRS functions
are disabled. Contacts can be accessed from the
Main Menu / My Data page.
• Show on Map: touch this button to see the position
of the contact on the map.
• Send Message: Select this button to send a
message to the selected APRS contact. (This
function is only available when a compatible radio
transceiver or modem supporting Messaging is
connected to the Geosat 6 APRS).
• Set as Target: touch this button to set the
selected APRS contact target to be tracked. (Read
Chap.VII)
• Go To: touch this button to set the selected
APRS contact as destination. The navigator will
calculate the route to drive from your current
position to the selected APRS contact.
AvMap - 9
V. Managing APRS contacts
Geosat 6 APRS can auto-delete the received APRS
contacts’ positions after a set timeout.
You can also sort your APRS contacts by alphabetical
order or receiving time.
Touch the Options button in the APSR menu.
Contacts sorting:
Touch Contact sorting, and then choose to sort the APRS
Folder on call sign or on date-time.
Contacts Timeout:
Touch Contacts timeout and can choose to delete
automatically contacts from the APRS Contacts Folder
after the indicated time period. It is important to have
your time correctly set on your TNC and on your AvMap
Geosat 6 APRS.
10 - AvMap
IV. Messaging to APRS contacts
The Messages function when a Geosat 6 APRS is connected
to compatible radio transceiver or modem supporting
the Messaging function. Find the list of Geosat 6 APRS
compatible radio transceivers and modems supporting
messaging on line www.avmap.us or/and www.avmap.it.
Once the Geosat 6 APRS has connected to a modem, the
messaging menu will remain available to read received
messages also when the modem is not connected
anymore.
In the Message Menu you can choose to send a message,
read received messages, read sent messages and check
the outgoing messages.
Screenshot
Sending messages:
• Enter the Messages menu
• Touch new Message and digit the text with the virtual
keyboard.
• To digit special symbols, touch the symbols button
AvMap - 11
APRS Functions
and the special symbol virtual keyboard will be
displayed. To go back to the normal keyboard
touch ABC.
• To change the characters from small to CAPITAL,
use the buttons on the right: “A” for the Capital
keyboard or “a” to go back to the small keyboard.
• Once the text has been completed, touch enter.
• Insert the recipient’s by touching Edit Recipient.
Now you can select one or more recipients from
the APRS contact list.
• Touch “accept”.
• Touch send message.
Once the message has been sent, the Software will go
back to the map and the message will be saved in the
Sent Message folder.
Receiving Messages:
When you receive a Message from an APRS contact, a
warning is displayed on the map and you can choose
12 - AvMap
to open the message or to read it later. In both cases,
the message is saved in the received message folder,
so you can read it anytime.
If you choose “Read now”, the message is displayed,
to avoid distractions you can touch Read it to me, and
the Geosat 6 APRS will read the message out loud for
you thanks to the Text-to-speech technology.
You can choose to receive pop-up messages for your
personal messages or also for bulletin messages sent
to “ALL” in the APRS options menu. Touch the Options
button in the APSR menu, touch Messages on Map and
then choose your option.
VII. Setting an APRS contact as Target
On the full info page of the APRS contact, you can set the
APRS contact as Target, by touching the Set as Target button.
This allows you tracking a moving APRS contact: you will have
a shortcut on the map to display the position of the target,
and you will be able to monitor info relative to the target in
the data boxes in the left side of the map.
Intercepting the target:
After you set the APRS contact as Target, a pop-up window
asks you if you want to set this target as your destination
too.
If you touch “Yes”: the map will be displayed and Geosat
6 APRS will calculate the route to intercept the target.
This way, not only you will be able to monitor the target
but you will also navigate towards it getting rerouting
instructions when its new position is reported.
If you touch “No” the APRS contact is set as target to be
tracked even if no destination or another destination is
set. To display the map touch the Map button in the upper
AvMap - 13
right corner of the screen.
Tracking the position of the target:
Once you have set the APRS contact as target, the
Target button with a target icon and the target CALL
SIGN is displayed in the lower right corner of the map.
By default the map is centered on your position, touch
the target button to centre the map on the target.
Screenshot
To go back to view your own position on the map,
touch the car button in the lower right corner of the
map.
Screenshot
Monitoring the info in the target:
While navigating, three data boxes appear on the
map (on the left side in the horizontal view or on the
bottom in the vertical view). Once you have selected
an APRS contact as target, these data boxes show
relevant information of the selected target. To change
14 - AvMap
displayed information on the data box, touch the data
box on the map and select the data from the list that
would like to display on the map:
• Target ID
• Target Lat/Lon
• Target Speed
• Target Course
• Target Altitude
VIII. APRS Options
In the APRS options menu you can edit settings for
the contacts management: Contacts sorting (Chap V),
Contacts Timeout (Chap V), for Messages display (Chap
VI), and for the Serial Port (Chap II).
AvMap - 15
IX. Compatibility
The Geosat 6 APRS comes with an APRS bidirectional RS-232 APRS interface compatible with
all APRS Kenwood amateur radios models and with
all the TNC (Terminal Node Controllers) that
support NMEA format sentence.
Current APRS ready Kenwood transceivers include:
• TH-D7A/E
• TM-D700A/E
• TM-D710A/E
• TH-D72A/E
Kenwood format sentence compatible radio
transceivers
If the radio’s TNC supports the Kenwood format
sentence you can get the best out of your Geosat 6
APRS: you are able to see APRS standard icons, full
tactical information for APRS contacts such as COG,
16 - AvMap
SOG, Lat-Lon, altitude, and time stamp allowing
time contact sorting.
Other NMEA sentence radio transceivers
If the radio’s TNC does not support the Kenwood
format sentence, you can see only two types of
APRS icons: a bull’s eye for APRS stations, and a
triangle for moving APRS contacts. You do not get
the time stamp, so no contact time out sorting is
possible.
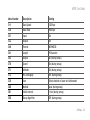
APRS functions
Type of radio
transceiver
Geosat 6 APRS functions/ Kenwood
sentence compatible
NMEA sentence only
All standard icons
Only fixed / moving
APRS contact Time
Stamp
Yes
No
Contact time out
sorting
Yes
No
APRS icons
AvMap - 17
X. Technical Specifications
Hardware
• Dimensions and weight: 133.6 x 83.4 x 21 mm; 270 g
• Memory Support: Secure Digital
• Display: touch screen LCD 4.8”, 65536 colors
• Resolution: 480 x 272 pixels
• Automatic Brightness Control
• Processor: 520 MHz
• GPS receiver: u-blox 50 channels
• RAM: 64 MB
• Built-in Li-Ion rechargeable battery
• Mini USB port
• Serial port for Bi-directional NMEA communication
• Built-in speaker
• Audio output for earphones
• Included Accessories: smart mount, car charger,
power supply cable, USB cable, APRS cable
18 - AvMap
Software
• Operative System: Windows CE
• Software: AvMap with free updates
• 2D, 3D and night view
• Multiple destinations: up to 10 waypoints
• The best route: the fastest, the shortest
• Customize your trip: choose to avoid Toll roads,
walkways, ferry routes, u turns, highways, unpaved
roads, built-up areas.
• Lane Assistant
• Stop planner
• Trip Computer
• Turn-by-turn vocal instructions with text-to-speech
APRS operations
• Full bi-directional RS-232 APRS communication
• Compatible with NMEA and Kenwood format
sentences 4800 and 9600 baud rate
APRS functions
• Intercept to target function
• Tactical mode
• Store up to 1000 APRS contacts
• APRS contacts auto-delete
• APRS contacts sorting
• Standard APRS icons
AvMap - 19
Appendix: Units setup
Set up instructions for:
Geosat 6 APRS APRS
with the following devices:
•
•
•
•
Kenwood TM-D710 A/E
Kenwood TM-D700 A/E
Kenwood TH-D7 A/E
Kenwood TH-D72 A/E
Introduction
APRS is a method for sending and receiving position
and other information over a radio transceiver.
The Geosat 6 APRS is ready to accept APRS inputs
from a radio transceiver, and to provide fix position
output data to the transceiver in order to transmit
your current position.
The Geosat 6 APRS comes with a cable that is prewired for use with designated Kenwood radios. The
20 - AvMap
input/output port used for APRS is the same port
that is used for TMC, and is labeled TMC on the back
of the Geosat 6 APRS . Due to the multi-use of the
TMC port, it is not possible to operate APRS and TMC
simultaneously.
APRS functions
Set-up for the Kenwood TH-D72A/E
with the AvMap Geosat 6 APRS
These instructions provide the essential information
necessary to configure your AvMap Geosat 6 APRS and
your Kenwood TH-D72A/E HT for basic APRS operation.
After you have achieved basic operation and have some
experience with the system, you will want to adjust
various parameters to more closely meet your particular
environment and operating requirements.
Note: These instructions assume you have basic operating knowledge
of both the AvMap Geosat 6 APRS and the Kenwood TH-D72A/E. They
also assume that both units are at factory default settings. If you
have problems getting the system to work, return both units to
factory default. Perform these instructions, and then reset any
other settings to your preference. Do not connect the two units
until the configuration of both units has been completed.
AvMap G6 APRS Setup
• Make sure the interface is set to 9600 (this is the
default).
• Make sure that contacts are displayed.
• Make sure that APRS Contact timeout is Off.
The Geosat 6 APRS is now set up and ready to
interface with the radio.
Kenwood TH-D72A/E Radio Setup
• Turn the TH-D72A/E ON.
• Press the F button.
• Use the up/down/OK/Esc control to select and set
the following functions:
- F-1 – Int. GPS – Off
- F-7 – Voice Alert – Off
• Press Esc to exit the function menu.
• Use the A/B button to select the desired radio side
for APRS.
AvMap - 21
• Press the VFO button and adjust the frequency to your standard APRS frequency (144.39MHz in the US).
• If necessary, press F-Shift to remove + and – from the display.
• If necessary, press Tone to remove the T, CT, DCS, and D/O icons from the display. The icon position should be
blank.
• Press Menu button and set or verify the menu settings below. Leave all other settings at default, for now. Note:
only important default settings are included here.
• Press the Menu button again to close the Menu.
Menu Number
Description
Setting
110
Battery Saver
Off or 0.03 sec
111
APO
Off (during setup)
120
Audio Balance
Mid-point (during setup)
300
My Callsign
(Your callsign-SID)
301
Beacon Type
APRS
302
APRS Lock
Off
Data Band
Set to A or B depending on the side you selected
for the APRS frequency.
310
APRS functions
Menu Number
Description
Setting
311
Data Speed
1200 bps
330
Baud Rate
9600 bps
331
Input
On
332
Output
On
340
Format
KENWOOD
341
Length
9-Character
342
Output
All (during setup)
370
Speed
On (during setup)
371
Altitude
On (during setup)
372
Pos. Ambiguity
Off (during setup)
3C0
Icon
Select desired or leave set to Kenwood
3D0
Method
Auto (during setup)
3D1
Initial Interval
1 min (during setup)
3E0
Decay Algorithm
Off (during setup)
AvMap - 23
APRS Functions
Menu Number
Description
Setting
3E1
Prop. Pathing
Off (during setup)
3H0
Type
New-N
3H1
WIDE1-1
On
3H2
Total Hops
2 (during setup)
3J0
TX
Off
3K0
Digipeat (MyCall)
Off
3T0
RX Beep
All (during setup)
3T1
TX Beep (Beacon)
On (during setup)
Making it all work!
The Kenwood TH-D72A/E is now ready to interface
with the Geosat 6 APRS.
Now that the configuration is complete, it’s time to
24 - AvMap
see if it will work.
1. Turn off the Geosat 6 APRS and the TH-D72A/E.
2. Connect the two units using the data cable provided with your AvMap Geosat 6 APRS. Plug the four-
APRS functions
conductor plug, with three black insulating rings,
into the I/O port on the Geosat 6 APRS. This is the
top jack on the right side of the Geosat 6 APRS. Make
sure the plug is firmly seated in the jack. Open the
COM cover on the TH-D72A/E and plug the three-conductor plug (two black insulating rings) into the COM
port. Again, make sure it is firmly seated. A common
problem with operation failure is not having the plugs
firmly inserted in the units, or having the connections
reversed. Double check your connections.
3. Turn on the Geosat G6 APRS and the TH-D72A/E.
Wait until the Geosat 6 APRS has acquired sufficient
satellites to establish a 3D position. A blinking GPS
icon (not iGPS) should then appear in the upper right
corner of TH-D72A/E display.
4. Set the volume at about 1/3 volume. If there is
APRS activity in your area, you should here the brief
“growl” of packet transmissions. You will hear a short
beep when you receive an APRS signal, a longer beep
when you transmit your position, and a double (highlow) beep when you receive your position back from
a digipeater.
Now that you have a working system, you will want
to decrease your beacon rate, and change other settings according to your desired operating method.
Read the APRS section of the Kenwood TH-D72A/E CD
manual. This manual provides additional information
on the functions of the various APRS controls, and
how to set them for your desired operating conditions.
Troubleshooting
If you do not see a flashing “GPS” signal on the upper
right hand corner of the TH-D72A/E, or APRS stations
are not appearing in the APRS Contacts list on the
Geosat 6 APRS, then the data cable may not be fully
AvMap - 25
or correctly seated.
1. Remove one plug and assure that it is the correct
plug for that unit and is plugged into the correct port,
according to the description in the previous section
of these instructions. Return the plug to the proper
port and firmly push it in.
2. Check that the cord at the other end is in the correct port and firmly press on the plug to assure it is
properly seated.
3.Check the cord for continuity and no shorts, using
an ohmmeter, especially if it is a home brewed data
cable.
4. Verify that the Geosat 6 APRS is computing a position fix.
5. Listen to your APRS frequency on the TH-D72A/E
or on a different radio to verify there is APRS activity
in your area.
6. Reread and verify the setup sections of these instructions.
7. Perform a Partial Reset of your TH-D72A/E per the
instructions on page RESET-1 of the CD manual, then,
repeat the setup instructions. A partial reset will not
erase your memory channels, but will set all other
settings to their default values.
APRS functions
Set-up for Kenwood TM-D710 A/E
with the AvMap Geosat 6 APRS
NOTE: These instructions assume you have basic familiarity with
operation of both the TM-D710 A/E and the AvMap Geosat 6 APRS .
a. Turn the radio ON.
b. Press the “F” key to access the Setup Menu.
c. Press the MHZ knob.
d. Turn knob to select APRS.
e. Press the MHZ knob again enter the menu selection
mode
Basic Setting Menu #600
a. Enter your call sign.
b. Set Beacon Type to APRS.
c. Turn the MHZ knob to scroll through menus.
Internal TNC Menu # 601
a. Do not make any changes. Leave all settings at
“Default.” Be sure that 1200 Bps is selected
GPS Port Menu #602
a. Change the Baud Rate to “9600”
b. Set the Input to “GPS”
c. Set the Output to “Waypoint”
Waypoint Format Menu # 603
a. Set Format to “Kenwood”
b. Change NAME to “9-CHAR”
c. The Output setting should be set to “ALL”
Beacon Information Menu # 606
a. Speed setting should be turned ON
b. Altitude setting should be turned ON
c. Position Ambiguity should be turned OFF
AvMap - 27
APRS Functions
Beacon TX Algorithm Menu # 611
a. Set the Method to “Auto”
b. Press ESC to return to the main page
c. Change the APRS Frequency to: 144.390
d. Select TNC and press to turn on APRS 12
e. Press “BCON” to turn on -- BCON will appear in the
upper right corner The Kenwood Radio is now ready to
interface with the Geosat 6 APRS .
Making it all work!
a. Make sure both the Kenwood TM-D710 and AvMap
Geosat 6 APRS are turned OFF!
b. Connect the four pole 2.5mm communication cable
end to theserial port of the Geosat 6 APRS (show picture
of Geosat 6 serial port) and the three pole 2.5 mm end
to the D710’s GPS receptacle. IMPORTANT! These are
easily reversed and hooked up backwards…also…when
connecting to the Geosat 6 APRS make sure you plug
28 - AvMap
into the serial input…not audio input.
Check for a good click into the unit.
c. NOW POWER UP BOTH UNITS!
CAUTION!
If you interface the units and do not see a flashing “GPS”
signal on the upper right hand corner of the Kenwood,
then the APRS cable may not be plugged-in all the way
or correctly. Please check that the cord is plugged into
the proper ports and plugged-in all the way.
Also verify that the Geosat 6 APRS is receiving a GPS fix.
Once your Geosat 6 APRS and radio are working properly
together, you will see an indication on the radio (if it
provides such) that it is receiving GPS position data.
In addition, as the radio provides position information
to the Geosat 6 APRS , stations will be plotted on
the screen. Depending upon the location of plotted
stations, you may need to expand the scale of the
APRS functions
map, or translate the map to a different location in
order to see them. You can also verify this in the APRS
Contacts folder. The Geosat 6 APRS will detect whether
a station is moving based on the data received from
that station.
Screen # Item
Select/Enter
3-1
CALL SIGN
{your call sign}
3-2
GPS UNIT- NEMA FORMAT
{NEMA96}
3-3
WAYPOINT
{9 DIGITS NEMA}
3-5
POS AMBIGUITY
{OFF}
3-7
POS LIMIT
{OFF}
3-B
PACKET PATH
{WIDE1-1,WIDE2-2}
3-C
PACKET TRANSMIT
METHOD
{3 MIN.} NOTE: Smaller times (<5min) are for mobile units while
stationary stations will use longer times (~10 min. and up)
3-D
PACKET TRANSFER RATE
{1200 bps}
AvMap - 29
APRS Functions
Set-up for Kenwood TM-D700 A/E
with the AvMap Geosat 6 APRS
NOTE: These instructions assume you have basic familiarity with
operation of both the TH-D700 A/E
and the AvMap Geosat 6 APRS .
a. While programming the Kenwood TM-D700 and/or
the AvMap Geosat 6 APRS , the communication cable
should be disconnected. Strange and/or bad things can
occur if you fail to head this warning!
b. Starting with the Kenwood TM-D700. Note: Items in
[ ] are buttons and { } are items you enter and/or ‘see’
on the radio screen.
c. Turn on the radio.
d. Make sure that {T}, {CT} and {DCS} do not appear at
the top of your Kenwood TM-D700 screen, if they do
press the [TONE] button until none of these appear.
e. Press the menu button [MNU] and use the control
30 - AvMap
knob to get to the APRS setup menu {APRS
3-X} (the X here can be any letter or number) and
press the [OK] button to select/enter.
f. Use the [é] and [ê] buttons to go to different
screens in the APRS menu and the [OK] button to
select/enter that particular screen.
g. Once you make your selection and/or entry push
the [OK] button again to save the selection/entry.
Then go back to ‘f.’ above to get to the next APRS
screen and enter all the Table 1 settings below.
h. Press the [ESC] button to leave the APRS setup
screen and return the D700 user screen.
i. You can now power down the radio and it will keep
your settings.
APRS functions
Screen # Item
Select/Enter
2-1
CALL SIGN
{your call sign}
2-2
GPS UNIT
{NEMA96}
2-3
WAYPOINT
{9 DIGITS NEMA}
2-5
POS AMBIGUITY
{OFF}
2-7
POS LIMIT
{OFF}
2-B
PACKET PATH
{WIDE1-1,WIDE2-2}
2-C
DATA TX
{AUTO}
2-D
PACKET TRANSFER INTERVAL
{3 MIN.} NOTE: Smaller times (<5min) are for mobile units while
stationary stations will use longer times (~10 min. and up)
2-N
PACKET SPEED
{1200 bps}
Making it all work!
a. Make sure both the Kenwood TH-D7 and AvMap
Geosat 6 APRS are turned OFF!
b. Connect the four pole 2.5mm communication cable
end to the serial port of the Geosat 6 APRS and the
three pole 2.5mm end to the D7A’s GPS receptacle.
IMPORTANT! These are easily reversed and hooked
up backwards; also when connecting to the Geosat
6 APRS make sure you plug into the serial port, not
the audio input.
AvMap - 31
APRS Functions
c. NOW POWER UP BOTH UNITS!
d. Make sure the D7A is on the two meter band and
the channel is set to 144.390.
e. OK here we go! Press the [TNC] button on the
D7A. This will open the {TNC} of your D7A and
communications between the Geosat 6 APRS and D7A
should now begin. NOTE: Make sure that the radio
isn’t in [TNC PACKET] mode.
f. DOES IT WORK?? Press the [POS] button. This will
bring up the coordinates screen. IF the Geosat 6 APRS
is talking to the D7A you should see the (degrees,
periods and commas) blinking. if they are not blinking
you are NOT communicating. Press the [POS] button
again to return to the normal user screen.
32 - AvMap
www.geosat6.com