1
Release Notes for Cisco Voice Interworking
Service Module Release 3.1(1)
January 2003
The Voice Interworking Service Module (VISM) product is supported by MGX Voice Media Gateways.
Refer to these release notes for Media Gateway and version level support guidelines.
The software Release 3.1(1) for VISM/VISM-PR is an upgrade from the VISM 3.1(0) Release. For
details related to new features added in Release 3.1, refer to Release Notes for Cisco Voice Interworking
Service Module Release 3.1(0).
The software Release 3.1(1) for VISM/VISM-PR is supported by the Cisco VISM Installation and
Configuration Guide, which is available on the Web at the following locations:
•
http://www.cisco.com/univercd/cc/td/doc/product/wanbu/mgx8850/vism31
•
http://www.cisco.com/univercd/cc/td/doc/product/wanbu/mgx8250/vism31
•
http://www.cisco.com/univercd/cc/td/doc/product/wanbu/mgx8230/vism31
•
http://www.cisco.com/univercd/cc/td/doc/product/wanbu/mgx8830/vism31
•
http://www.cisco.com/univercd/cc/td/doc/product/wanbu/8850px45/release3/vism/relnotes
•
http://www.cisco.com/univercd/cc/td/doc/product/wanbu/8850px1e/release3/vism/relnotes
Contents
These release notes contain the following sections:
•
“Features Introduced in Previous Releases of VISM Software” section on page 2
•
“Elements of Release 3.1(1)” section on page 2
•
“Installation and Upgrade Procedures” section on page 8
•
“Caveats” section on page 15
•
“Related Documentation” section on page 17
•
“Obtaining Documentation” section on page 17
Corporate Headquarters:
Cisco Systems, Inc., 170 West Tasman Drive, San Jose, CA 95134-1706 USA
Copyright © 2003 Cisco Systems, Inc. All rights reserved.
Features Introduced in Previous Releases of VISM Software
Features Introduced in Previous Releases of VISM Software
You can access lists of features and descriptions of features contained in previous releases of VISM
software at the following location:
•
http://www.cisco.com/univercd/cc/td/doc/product/wanbu/mgx8850/index.htm
Elements of Release 3.1(1)
This section describes the following elements of software Release 3.1(1) for VISM/VISM-PR:
•
“VISM Management Information Base” section on page 2
•
“New VISM/VISM-PR CLI Commands” section on page 2
•
“VISM Redundancy” section on page 4
•
“VISM Call Rate” section on page 5
•
“Compatibility” section on page 5
•
“Limitations and Restrictions” section on page 7
VISM Management Information Base
The VISM Management Information Base (MIB) Version 0.0.30 is provided with the delivery of
software Release 3.1(1) for VISM/VISM-PR, which bundles with the MGX 8230, MGX 8250, MGX
8830, and MGX 8850(PXM1) software on CCO and is located on the Web at the following location:
http://www.cisco.com/kobayashi/sw-center/beta/
When the selected FW *.tar file or FW*.zip file is downloaded, untar or unzip the file and you will find
all the latest MIBs bundled with this release.
The MIB is in standard ASN.1 form and can be compiled with most standards-based MIB compilers.
Refer to the MIB release notes on CCO.
New VISM/VISM-PR CLI Commands
Software Release 3.1(1) for VISM/VISM-PR includes the following new command-line interface (CLI)
commands:
Note
•
dsplinesabyte
•
cnflinesabyte
The CLI does not have MIB variables associated with these commands. If the VISM card is reset, you
must reconfigure the parameters.
Release Notes for Cisco Voice Interworking Service Module Release 3.1(1)
2
OL-3480-01 Rev. C0, January 2003
Elements of Release 3.1(1)
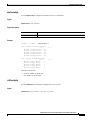
dsplinesabyte
Use the dsplinesabyte to display the transmit and receive SA buffers.
Syntax
dsplinesabyte <line_number>
Syntax Description
Parameter
Description
line_number
Line number in the range 1–8.
Example
cvgmgx1a.1.20.VISM8.a > dsplinesabyte 1
Line 1 Transmit SA Buffer Registers
------Transmit Sa4-byte Buffer:
255
Transmit Sa5-byte Buffer:
255
Transmit Sa6-byte Buffer:
255
Transmit Sa7-byte Buffer:
255
Transmit Sa8-byte Buffer:
255
Line 1 Receive SA Buffer Registers
------Receive Sa4-byte Buffer:
0
Receive Sa5-byte Buffer:
0
Receive Sa6-byte Buffer:
0
Receive Sa7-byte Buffer:
0
Receive Sa8-byte Buffer:
0
-------
-------
Possible errors include
•
Incorrect number of parameters.
•
Line number is out-of-range.
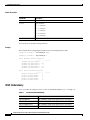
cnflinesabyte
Use the cnflinesabyte command to configure SA bytes on a line.
Syntax
cnflinesabyte <line_number> <sa_byte> <sa_value>
Release Notes for Cisco Voice Interworking Service Module Release 3.1(1)
OL-3480-01 Rev. C0, January 2003
3
Elements of Release 3.1(1)
Syntax Description
Parameter
Description
line_number
Line number in the range 1–8.
sa_byte
Type of sabyte.
sa_value
•
1 = sa4-byte
•
2 = sa5-byte
•
3 = sa6-byte
•
4 = sa7-byte
•
5 = sa8-byte
Range is 0–255.
The possible error includes invalid parameters.
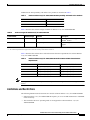
Example
This example shows configuring SA buffers on line 1 and displaying the results.
cvgmgx1a.1.20.VISM8.a > cnflinesabyte 1 3 0
cvgmgx1a.1.20.VISM8.a > dsplinesabyte 1
Line 1 Transmit SA Buffer Registers
------Transmit Sa4-byte Buffer:
0
Transmit Sa5-byte Buffer:
255
Transmit Sa6-byte Buffer:
0
Transmit Sa7-byte Buffer:
255
Transmit Sa8-byte Buffer:
255
Line 1 Receive SA Buffer Registers
------Receive Sa4-byte Buffer:
0
Receive Sa5-byte Buffer:
0
Receive Sa6-byte Buffer:
0
Receive Sa7-byte Buffer:
0
Receive Sa8-byte Buffer:
0
-------
-------
VISM Redundancy
Table 1 provides the support level for 1:N Service Module Redundancy (N = 1 through 11).
Table 1
Service Module Redundancy
Front Card Model Number
Redundancy Support
MGX-VISM-8T1
1:N redundancy (bulk mode support for T1 lines only).
MGX-VISM-8E1
1:N redundancy (bulk mode support for E1 lines only).
MGX-VISM-PR-8T1
1:N redundancy (bulk mode support for T1 lines only).
MGX-VISM-PR-8E1
1:N redundancy (bulk mode support for E1 lines only).
Release Notes for Cisco Voice Interworking Service Module Release 3.1(1)
4
OL-3480-01 Rev. C0, January 2003
Elements of Release 3.1(1)
Note
You can use a VISM-PR card as a redundant card for a VISM card, but a VISM card cannot be used
as a redundant card for a VISM-PR card.
There is support for Bulk Distribution using the SRM-3T3 and SRM-E (OC3) cards.
VISM Call Rate
Software Release 3.1(1) for VISM/VISM-PR handles at least 10 CAS, SS7, or PRI calls per second per
VISM card.
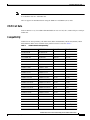
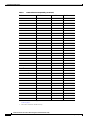
Compatibility
VISM software interoperability with MGX 8830, MGX 8850(PXM1E), MGX 8850(PXM1), MGX
8850(PXM45), MGX 8250, and MGX 8230 platform software is listed in Table 2.
Table 2
VISM Software Interoperability
Product
CW2000 Name
Latest Firmware
Min. Firmware
AUSM-8E1/B
AUSM-8E1/B
20.0.2.0
20.0.2.0
AUSM-8T1/B
AUSM-8T1/B
20.0.2.0
20.0.2.0
AX-CESM-8E1
CESM-8E1
10.2.00
10.0.22
AX-CESM-8T1
CESM-8T1
10.2.00
10.0.22
AX-FRSM-8E1/E1-C
FRSM-8E1
20.0.1.0
10.0.23
AX-FRSM-8T1/T1-C
FRSM-8T1
20.0.1.0
10.0.23
AXSM-1-2488
AXSM-1-2488
3.0.10
3.0.10
AXSM-1-2488/B
AXSM-1-2488/B
3.0.10
3.0.10
AXSM-16-155
AXSM-16-155
3.0.10
3.0.10
AXSM-16-155/B
AXSM-16-155/B
3.0.10
3.0.10
AXSM-16-T3/E3
AXSM-16-T3/E3
3.0.10
3.0.10
AXSM-16-T3/E3/B
AXSM-16-T3/E3/B
3.0.10
3.0.10
AXSM-16-T3E3-E
AXSM-16-T3E3-E
3.0.10
3.0.10
AXSM-2-622-E
AXSM-2-622-E
3.0.10
3.0.10
AXSM-32-T1E1-E
AXSM-32-T1E1-E
3.0.0
3.0.0
AXSM-4-622
AXSM-4-622
3.0.10
3.0.10
AXSM-4-622/B
AXSM-4-622/B
3.0.10
3.0.10
AXSM-8-155-E
AXSM-8-155-E
3.0.10
3.0.10
BPX/IGX
BPX/IGX
9.3.42
9.2.42
CESM-8E1
CESM-8E1
20.0.2.0
20.0.2.0
CESM-8T1/B
CESM-8T1/B
20.0.2.0
20.0.2.0
CWM
—
11.0.10
10.5.101 patch 1
FRSM-12-T3E3
FRSM-12-T3E3
3.0.10
3.0.10
Release Notes for Cisco Voice Interworking Service Module Release 3.1(1)
OL-3480-01 Rev. C0, January 2003
5
Elements of Release 3.1(1)
Table 2
VISM Software Interoperability (continued)
Product
CW2000 Name
Latest Firmware
Min. Firmware
MGX 1
MGX 1
1.2.11
1.1.42
MGX 2
MGX 2
3.0.10
2.1.80
MGX-AUSM-8E1/B
AUSMB-8E1
10.2.00
10.0.23
MGX-AUSM-8T1/B
AUSMB-8T1
10.2.00
10.0.23
MGX-CESM-8T1/B
CESM-8T1/B
10.2.00
—
MGX-CESM-E3
CESM-E3
10.2.00
10.0.22
MGX-CESM-T3
CESM-T3
10.2.00
10.0.22
MGX-FRSM-2CT3
FRSM-2CT3
10.2.00
10.0.23
MGX-FRSM-2T3E3
FRSM-2T3
10.2.00
10.0.23
MGX-FRSM-2T3E3
FRSM-2E3
10.2.00
10.0.23
MGX-FRSM-HS1/B
FRSM-HS1/B
10.2.00
10.0.23
MGX-FRSM-HS2
FRSM-HS2
10.2.00
10.0.23
MGX-FRSM-HS2/B
FRSM-HS2/B
20.0.1.0
—
MGX-RPM-XF-512
MGX-RPM-XF-512
12.2(11)YP
12.2(8)YP
MGX-SRM-3T3/B
SRM-3T3
—
—
MGX-SRM-E
SRM-E
—
—
MGX-VISM-8E1
VISM-8E1
3.1(1)
1.5
MGX-VISM-8T1
VISM-8T1
3.1(1)
1.5
MGX-VISM-PR-8E1
VISM-PR-8E1
3.1(1)
3.1(0)
MGX-VISM-PR-8T1
VISM-PR-8T1
3.1(1)
3.1(0)
PXM-1
1.2.10
1.1.40 and 1.2.0
PXM1-OC12
1.2.10
1.1.40 and 1.2.0
PXM1-2T3E3
1.2.10
1.1.40 and 1.2.0
PXM1-4OC3
1.2.10
1.1.40 and 1.2.0
PXM1E
PXM1E
3.0.10
3.0.10
PXM45
PXM45
3.0.10
3.0.10
RPM
RPM
12.2(8)T4
12.2(8)T4
RPM IOS
RPM IOS
12.2(8)T4
—
RPM/B
RPM/B
12.2(8)T4
12.2(8)T4
RPM-PR
RPM-PR
12.2(11)T1
12.2(8)T4
MGX-RPM-XF
RPM-XF
12.2(11)YP
12.2(11)YP
MGX-RPM-PR-256/512
RPM-PF
12.2(11)T1
12.2(11)T1
SES
SES
3.0.10
1.0.14
PXM1
2
PXM1-1-622
1
PXM1-2-T3E3
PXM1-4-155
1
1
1. CWM Release 10.5 does not support all of the new MIBs listed in the “VISM Management Information Base”
section on page 2.
2. This card is available for VISM cards only.
Release Notes for Cisco Voice Interworking Service Module Release 3.1(1)
6
OL-3480-01 Rev. C0, January 2003
Elements of Release 3.1(1)
VISM software interoperability with other Cisco products is described in Table 3.
Table 3
Software Release 3.1(1) for VISM/VISM-PR Interoperability with Other Cisco Products
Cisco 3810
12.2(8)T1
AS5400
122-10.7
Virtual Switch Controller Software
VSC 9.1.5
Table 4 describes the software images available for Release 3.1(1) for VISM/VISM-PR.
Table 4
Software Images for Release 3.1(1) for VISM/VISM-PR
Product Name
Software Image
Firmware
Description
MGX-VISM-SW3100
003.001.000.000
vism_8t1e1_003.001.000.000.fw
This image does not support the
CALEA1 feature.
MGX-VISM-LISW3100
003.051.000.000
vism_8t1e1_003.051.000.000.fw2
Use this image for CALEA1 feature
support.
1. CALEA = Commission on Accreditation for Law Enforcement Agencies.
2. The CALEA implementation supports the CALEA law intercept confirmation interface.S
Table 5 describes the software boot code and run-time firmware requirements for software Release
3.1(1) for VISM/VISM-PR.
Table 5
Note
Software Release 3.1(1) for VISM/VISM-PR Software Boot and Run-time Firmware
Requirements
Board Pair
Latest Boot Code Version
Minimum Boot Code Version
MGX-VISM-8T1
vism_8t1e1_VI8_BT_3.1.01.fw
vism_8t1e1_VI8_BT_3.1.00.fw
MGX-VISM-8E1
vism_8t1e1_VI8_BT_3.1.01.fw
vism_8t1e1_VI8_BT_3.1.00.fw
MGX-VISM-PR-8T1
vism_8t1e1_VI8_BT_3.1.01.fw
vism_8t1e1_VI8_BT_3.1.00.fw
MGX-VISM-PR-8E1
vism_8t1e1_VI8_BT_3.1.01.fw
vism_8t1e1_VI8_BT_3.1.00.fw
Loading this release of the backup bootcode is required for existing VISM cards not using this new
release.
Limitations and Restrictions
The following limitations and restrictions are valid for software Release 3.1(1) for VISM/VISM-PR:
•
Software Release 3.1(1) for VISM/VISM-PR requires you to use 64 Mb VISM cards or VISM-PR
cards exclusively.
•
The switched AAL2 PVC operating mode is not supported in software Release 3.1(1) for
VISM/VISM-PR.
Release Notes for Cisco Voice Interworking Service Module Release 3.1(1)
OL-3480-01 Rev. C0, January 2003
7
Installation and Upgrade Procedures
•
Cisco recommends that you use the cnfcodecjtrdelay command to configure the jitter-delay
argument to 20 msec when using DSP firmware versions 3.4 and 3.6.
•
Table 6 describes the design constraint which is identified in software Release 3.1(1) for
VISM/VISM-PR.
Table 6
Known Design Constraint
DDTS Issue
Description
CSCdv37382
The addcid command can put VISM into the fail state. If non-AAL5 cells are sent to
an AAL5 PVC of VISM, this can cause the VISM SAR chip to hang and VISM to go
into failed state. This is because, in case of AAL5, the last bit of the Payload type
indicator is used to determine which cell contains the end of that payload. All cells
which have this bit set to 0 are held in the reassembly buffer until the cell with this
bit set to 1 arrives. In case of non-AAL5 cells, this bit will never get set to 1, and
ultimately this buffer will overflow. So, care should be taken that only AAL5 cells are
sent to AAL5 PVCs of VISM.
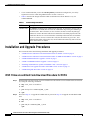
Installation and Upgrade Procedures
This section describes the following installation and upgrade procedures:
•
“VISM Firmware and Boot Code Download Procedure for PXM1” section on page 8
•
“VISM Firmware and Boot Code Download Procedure for PXM1E and PXM45” section on page 9
•
“VISM/VISM-PR Firmware Upgrade” section on page 9
•
“VISM to VISM-PR Hardware Upgrade” section on page 11
•
“Installing VISM Software Updates with PXM1 Cards” section on page 11
•
“VISM Boot Code Upgrade Procedure with PXM1 Cards” section on page 13
•
“VISM Downgrade Procedure” section on page 14
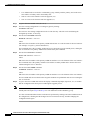
VISM Firmware and Boot Code Download Procedure for PXM1
Step 1
Step 2
Download the selected revision of service module boot code into the service module in the selected slot
by issuing the following commands.
a.
tftp <node_name or IP address>
b.
bin
c.
put <backup boot> POPEYE@SM_1_0.BT
d.
quit
Proceed to Step 2c. to upgrade all VISM cards or proceed to Step 2d. to upgrade an individual VISM
card.
a.
tftp <node_name or IP address>
b.
bin
c.
put <FW file> POPEYE@SM_1_0.FW
quit
Release Notes for Cisco Voice Interworking Service Module Release 3.1(1)
8
OL-3480-01 Rev. C0, January 2003
Installation and Upgrade Procedures
d.
put <FW file> POPEYE@SM_1_<slot number of card to upgrade>.FW
quit
Do not enter two put commands in the same TFTP session.
Note
Step 3
Proceed to the “Installing VISM Software Updates with PXM1 Cards” section on page 11 to install the
download.
VISM Firmware and Boot Code Download Procedure for PXM1E and PXM45
Step 1
Access the image on the Cisco Web site in order to download the image.
Step 2
Use the ftp node-ip command, where node-ip is the IP address of the node to which you want to
download the image, to download the image.
Step 3
Enter your username and password.
Step 4
Type cd C:FW to access the appropriate directory.
Step 5
Type bin.
Step 6
Use the put image-version, where image-version is the downloaded image from Step 1, to download the
image to your C:FW directory.
Step 7
Type bye to exit the download procedure.
VISM/VISM-PR Firmware Upgrade
Software Release 3.1(1) for VISM/VISM-PR introduces the new VISM-PR card. Complete the
following steps to gracefully upgrade from VISM cards to VISM-PR cards. You must ensure that the
VISM and VISM-PR cards have the minimum boot code version of vism_8t1e1_BT_3.1.00.fw.
The following versions of VISM software Release 3.1(1) are available:
Note
•
300.001.000.000—without CALEA
•
003.051.000.000—with CALEA
You do not have to complete these instructions in order to use software Release 3.1(1) for
VISM/VISM-PR; however, see the VISM Features section of the Release Notes for Cisco Voice
Interworking Service Module Release 3.1(0) of features that are not available to you if you do not
perform this upgrade procedure.
VISM cards and VISM-PR cards use the same back cards. There are no new back cards introduced with
this release. In the following procedure:
•
Perform the firmware upgrade in the following procedure on the VISM cards; do not remove the
VISM cards and replace them with VISM-PR cards at this time.
Release Notes for Cisco Voice Interworking Service Module Release 3.1(1)
OL-3480-01 Rev. C0, January 2003
9
Installation and Upgrade Procedures
•
Two VISM cards are involved in a redundancy group, initially with the primary card in the active
state and the secondary card in the standby state.
•
Old-rev refers to the firmware before the upgrade (2.2).
•
New-rev refers to the firmware after the upgrade (3.1).
Step 1
Log in to the active PXM1 card (slot 7 or 8).
Step 2
Save the existing configuration as a contingency plan by entering:
savesmcnf <SM slot#>
This will save the existing configuration in the C:CNF directory. This file can be used during the
downgrade procedure, if necessary.
Step 3
Execute the PXM install command:
install sm <SM slot#> <new-rev>
where:
SM slot# is the slot number of the primary VISM card and new-rev is the file name of the new firmware
(for example, vism_8t1e1_300.001.000.000.fw).
This command causes the secondary VISM card to reset and come up in the standby state, running the
new-rev firmware. The primary VISM card is unaffected by this command.
Step 4
Execute the PXM newrev command:
newrev sm <SM slot#> <new-rev>
where:
SM slot# is the slot number of the primary VISM card and new-rev is the filename of the new firmware.
This command causes the primary VISM to reset and the secondary VISM card to become the active
VISM running the new-rev firmware.
Step 5
Execute the PXM commit command:
commit sm <SMslot#> <new-rev>
where:
SM slot# is the slot number of the primary VISM card and new-rev is the filename of the new firmware.
The two VISM cards are now back to their original condition except that both cards are now running the
new-rev firmware.
Step 6
Log in to the active VISM card and use the display commands (dspendpts, dspcasvar, etc.) to confirm
that the configuration has been preserved through the upgrade process.
Note
For more than one primary VISM card in a redundancy group, ensure that the secondary card is in the
standby state and repeat Step 4 and Step 5 for each VISM card in the redundancy group.
It is also recommended that a further verification be performed by making some minor modifications to
the configuration, checking that the changes have been executed correctly, and then changing the
configuration back again.
Release Notes for Cisco Voice Interworking Service Module Release 3.1(1)
10
OL-3480-01 Rev. C0, January 2003
Installation and Upgrade Procedures
Note
If the VISM card is not part of a redundancy group, Step 1 to Step 3 are sufficient.
VISM to VISM-PR Hardware Upgrade
Complete the following steps to upgrade your system from VISM cards to VISM-PR cards.
Caution
You must install the redundant (standby) VISM-PR card first; failure to follow this recommendation
results in traffic loss. In addition, do not remove an active VISM card from your chassis; ensure that you
configure an active VISM card to the standby state before you remove it and replace it with a VISM-PR
card.
Step 1
Remove the redundant (standby) VISM card from your chassis.
Step 2
Install a VISM-PR card in the slot you removed the VISM card from in Step 1.
Step 3
Administratively configure the VISM-PR card you installed in Step 2 as primary (active).
Step 4
Remove the now redundant VISM card from your chassis.
Step 5
Install a VISM-PR card in the slot you removed the VISM card from in Step 4.
Step 6
Log into the redundant (secondary) VISM-PR card and execute the dspcd command. Verify that the
output from the dspcd command lists the card type under FunctionModuleType as a VISM-PR card. If
the card type still indicates the VISM card, execute the resetcd slot-num command from the PXM and
repeat the dspcd command to insure that the correct card type is shown.
Step 7
Log into the active VISM-PR card and execute the dspcd command. Verify that the output from the
dspcd command lists the card type under FunctionModuleType as a VISM-PR card. If the card type still
indicates the VISM card, execute the resetcd slot-num command from the PXM and repeat the dspcd
command to insure that the correct card type is shown.
Step 8
If you have no other VISM cards in your chassis, you have completed the hardware upgrade procedure;
do not proceed to Step 9. If you have more VISM cards in your chassis, proceed to Step 9.
Step 9
Remove a standby VISM card from your chassis.
Step 10
Install a VISM-PR card in the slot you removed the VISM card from in Step 9.
Step 11
Repeat Step 9 and Step 10 to remove any remaining VISM cards in your chassis and replace them with
VISM-PR cards.
Step 12
Repeat Step 6 and Step 7 on the remaining VISM-PR cards to insure the correct card type is shown.
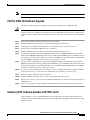
Installing VISM Software Updates with PXM1 Cards
Software Release 3.1(1) for VISM/VISM-PR provides a procedure for the graceful upgrade (one in
which the existing VISM configuration is preserved throughout the upgrade procedure) from the earlier
VISM 2.0 release.
Release Notes for Cisco Voice Interworking Service Module Release 3.1(1)
OL-3480-01 Rev. C0, January 2003
11
Installation and Upgrade Procedures
Caution
Installing VISM software updates from VISM Release 2.2 with CALEA to VISM Release 3.0
without CALEA is not graceful.
Caution
Temporary traffic loss occurs during Step 4 and Step 5 of the VISM graceful upgrade procedure of
the Upgrade Procedure for software Release 3.1(1) for VISM/VISM-PR.
Initial Conditions
The following initial conditions are required before the graceful upgrade procedure can be started:
•
The MGX 8000 Series shelf must be configured with at least two VISM cards in a redundant
configuration (refer to the add redundancy, addred, command in the MGX 8830, MGX 8850, MGX
8250, and MGX 8230 Command Reference documentation for more information).
•
The VISM cards must be running VISM 2.0 and be configured to the desired configuration.
•
The software Release 3.1(1) for VISM/VISM-PR must have been already downloaded to the MGX
shelf.
•
Ensure that you have the version of VISM software that supports CALEA, if you are using the
CALEA feature.
Upgrade Procedure
Upgrades are available for the following releases:
•
From VISM 1.5 to VISM 3.1
•
From VISM 2.1 to VISM 3.1
•
From VISM 2.2 to VISM 3.1
•
From VISM 3.0 to VISM 3.1
Installing VISM Software Updates with PXM1E or PXM45 Cards
Complete the following steps to update the VISM software when you are using PXM1E or PXM45 cards
in your MGX 8000 Series chassis:
Step 1
Log on to the active PXM1E or PXM45 card.
Step 2
Ensure that the card is in the redundant mode, where the active card is the primary card.
Step 3
Use the saveallcnf command to save the existing configuration as a contingency plan.
Step 4
Use the loadrev sm-primary-slot-num new-rev command, where sm-primary-slot-num is the slot number
of the VISM/VISM-PR card you to which you want to install the new software, and new-rev is the new
firmware version number for the VISM software.
Step 5
Use the runrev sm-primary-slot-num new-rev command to execute the download.
Step 6
Use the commitrev sm-primary-slot-num new-rev command to commit the new download to the
VISM/VISM-PR card.
Release Notes for Cisco Voice Interworking Service Module Release 3.1(1)
12
OL-3480-01 Rev. C0, January 2003
Installation and Upgrade Procedures
You have completed the steps. Proceed to the VISM Boot Code Upgrade Procedure with PXM1E and
PXM45 Cards, page 14.
VISM Boot Code Upgrade Procedure with PXM1 Cards
There is a new backup boot code change from VISM Release 2.2(0) to software Release 3.1(1) for
VISM/VISM-PR. Complete the following steps to upgrade the new backup boot code when you are
using PXM1 cards in your MGX 8230, MGX 8250, and MGX 8850 chassis:
Note
Step 1
Note
Step 2
Caution
This procedure re-programs the VISM boot code for previous VISMs using the VISM runtime image
version 1.0 to 2.0.
Telnet to MGX shelf and cc to the VISM card.
VISM must be in the active state in order to update the VISM boot code.
Access the server where the VISM boot code resides and TFTP the VISM boot code to the VISM card
with the following procedure:
a.
Type tftp <IP address of the MGX shelf>
b.
Type bin at the tftp prompt.
Ensure that you perform Step 2b. If you to not perform Step 2b. the boot code will be corrupted and
not recoverable.
c.
Caution
Type install [bt] [sm <slot>] <version> at the PXM prompt.
Do not touch the VISM card until the status comes back ('Sent xxx bytes in yyy seconds'). Failure to
follow this recommendation will corrupt the boot code and it will not be recoverable.
When the boot code is being written to PROM, you will see comments displayed at the VISM prompt.
This is normal and expected behavior.
Step 3
Use the resetcd command for VISM from the PXM card for the latest boot take effect.
Step 4
Type the version command to verify the correct boot code.
Note
Step 4 is optional.
You have completed upgrading the new VISM backup boot code.
Release Notes for Cisco Voice Interworking Service Module Release 3.1(1)
OL-3480-01 Rev. C0, January 2003
13
Installation and Upgrade Procedures
VISM Boot Code Upgrade Procedure with PXM1E and PXM45 Cards
There is a new backup boot code change from VISM Release 2.2(0) to software Release 3.1(1) for
VISM/VISM-PR. Complete the following steps to upgrade the new backup boot code when you are
using PXM1E or PXM45 cards in your MGX 8000 Series chassis:
Step 1
Complete the steps in the VISM Firmware and Boot Code Download Procedure for PXM1E and PXM45,
page 9.
Step 2
Log on to the PXM1E or PXM45 card.
Step 3
Use the burnboot sm-primary-slot-num new-rev command, where sm-primary-slot-num is the slot
number of the VISM/VISM-PR card you want to upgrade and new-rev is the firmware version number
of the new VISM software, to upgrade the VISM/VISM-PR boot code.
The VISM/VISM-PR card automatically resets and becomes active with the latest boot code image. You
have completed the boot code upgrade procedure.
VISM Downgrade Procedure
Use this procedure to downgrade VISM software from software Release 3.1(1) for VISM to the earlier
VISM Releases 3.1, 3.0, 2.2, 2.1, and 2.0. By following the downgrade procedure described here, the
configurations will be retained after downgrade.
Note
It is important to note that the configurations that existed with old-rev firmware should have
been saved earlier. You cannot downgrade from VISM-PR to VISM.
Complete the following steps to downgrade the VISM software from software Release 3.1(1) for
VISM/VISM-PR to Release 3.1, 3.0, 2.2, 2.1, or 2.0:
Step 1
If the VISM card is in a redundancy group, remove the redundancy.
delred <SM slot#>
Step 2
Download the old-rev firmware onto the MGX shelf.
Step 3
Execute the PXM clrsmcnf command:
clrsmcnf <SM slot#>
where:
SM slot# is the slot number of the VISM card to be downgraded.
The VISM card will be reset on executing this command. Wait for the card to come active.
Step 4
Execute the PXM restoresmcnf command:
restoresmcnf -f <filename> -s <SM slot#>
where:
The filename is the name of the old configuration file that was saved while the old-rev firmware was
running. The file can be found in the C:CNF directory on the MGX shelf.
The SM slot# is the slot number of the VISM card to be downgraded.
Release Notes for Cisco Voice Interworking Service Module Release 3.1(1)
14
OL-3480-01 Rev. C0, January 2003
Caveats
The VISM card will be reset again. When the card comes active, it will have the old-rev firmware running
and will have the old configuration.
Step 5
Reconfigure redundancy group, if required.
Caveats
This section describes resolved and open software caveats for this release of VISM. Caveats describe
unexpected behavior or defects in VISM software.
Resolved Caveats
Table 7 describes the caveats issued against VISM software that have been resolved in software Release
3.1(1) for VISM/VISM-PR.
Table 7
Resolved Caveats for Software Release 3.1(1) for VISM/VISM-PR
DDTS Issue
Description
CSCuk38197
VISM replies Line Out Of Service to AUEP after cnflnoos/cnflnis.
CSCdw65362
Announcement file play volume is too high, causes distortion.
CSCdy26382
VISM encapsulates UDPTL for T.38 over RTP
CSCdy36418
CSCdy36418 VISM-PR card must be reset after initial installation into MGX shelf
CSCdy39693
Demotion from GW to Line is not happening
CSCdy46975
vismscalarchange trap not generated with ip address change
CSCdy87408
POS problem, modem calls failing with G729 codec
CSCdy89344
endpts stay active even when gw. is forced oos
CSCdy89423
DLCX always sent to Inactive call agent
CSCdy89462
need a command to display VCCI
CSCdy89474
cnfoamparams / dspoamparams should be accessible in all mode
CSCdy89494
dspmgcgrps and dspdnallips show different status for MGC
CSCdz00374
POS problem, modem calls failing with G729 codec
CSCdz01636
VISM Reboots when Domain Name has a lengthy name
CSCdz06991
E1 CCS NFAS bits not configurable
CSCdz12617
T38 Fax call made on VISM to 5400 causes VISM DSP to crash
CSCdz32964
Dynamic Payload broken due to file merge
Release Notes for Cisco Voice Interworking Service Module Release 3.1(1)
OL-3480-01 Rev. C0, January 2003
15
Caveats
Open Caveats
Table 8 describes possible unexpected behavior by software Release 3.1(1) for VISM/VISM-PR.
Table 8
Open Caveats for Software Release 3.1(1) for VISM/VISM-PR
DDTS Issue
Description
CSCdx94130
Title: VISM loses some DTMF digits when ON time is less than 45ms
Description: VISM randomly fails to detect some of the digits resulting in call failure.
Workaround: The equipment should generate DTMF digits with ON time greater than
or equal to 45ms.
CSCdz65510
Title: CSCdz65510 T.38 calls fail in Voip Trunking
Description: When using ISDN PRI backhaul in Voip Trunking on VISM-T1, running
a load of 23 T.38 Fax Relay calls can cause the backhaul LAPD session to
intermittently go down.
Workaround: The problem is related to VISM only and was not experienced on
VISM-PR when running a similar T.38 Fax relay load. However, if VISM-PRs are not
available and VISM is the only option, use fax pass through instead, if higher number
of T.38 fax calls is expected, since this problem was not experienced when running
corresponding load via fax pass through over the ISDN Backhaul in Voip Trunking.
CSCdz65552
Title: Running Fax Pass-Thru load over ISDN PRI fails in VoIP Switching mode
Description: On a VISM-T1 in Voip Switching mode, running a fax pass thru call load
over ISDN PRI for extended periods of time causes call completion rate to go down.
CSCdz64830
Title: Broadcasting T.38 FAX relay on 20+ endpoints on a VISM card fails
Description: When running on VISM-T1 in Voip Switching mode, running a
sustained load of more than 20 fax calls via T.38 relay causes the VISM card to
lockup and starts failing the calls. This is a performance issue and is experienced
when running a higher number of T.38 fax calls.
Workaround: This problem is not experienced when running a similar T.38 Fax load
on the VISM-PR card.
CSCdz64206
Title: Degradation of voice quality when multiple announcement RQNTs sent
Description: Degradation of voice quality was observed when playing announcement
concurrently on all 240 endpoints on a VISM-E1.
Workaround: It was observed that voice quality is fine up to 185 endpoints, but it
starts to progressively deteriorate beyond that. Therefore, it is not expected to have
significant impact on VISM-T1, which supports up to 192 endpoints.
Release Notes for Cisco Voice Interworking Service Module Release 3.1(1)
16
OL-3480-01 Rev. C0, January 2003
Related Documentation
Related Documentation
The following documents contains information that may be useful to software Release 3.1(1) for
VISM/VISM-PR:
•
Cisco VISM Installation and Configuration Guide, Release 3.0
•
Cisco MGX 8830, MGX 8850 (PXM45 and PXM1E), and MGX 8950 Command Reference, Release 3
•
Cisco MGX 8850 (PXM45 and PXM1E) Hardware Installation Guide, Release 3
•
Cisco MGX 8850 (PXM45) and MGX 8950 Software Configuration Guide, Release 3
Obtaining Documentation
Cisco provides several ways to obtain documentation, technical assistance, and other technical
resources. These sections explain how to obtain technical information from Cisco Systems.
Cisco.com
You can access the most current Cisco documentation on the World Wide Web at this URL:
http://www.cisco.com/univercd/home/home.htm
You can access the Cisco website at this URL:
http://www.cisco.com
International Cisco web sites can be accessed from this URL:
http://www.cisco.com/public/countries_languages.shtml
Documentation CD-ROM
Cisco documentation and additional literature are available in a Cisco Documentation CD-ROM
package, which may have shipped with your product. The Documentation CD-ROM is updated monthly
and may be more current than printed documentation. The CD-ROM package is available as a single unit
or through an annual subscription.
Registered Cisco.com users can order the Documentation CD-ROM (product number
DOC-CONDOCCD=) through the online Subscription Store:
http://www.cisco.com/go/subscription
Ordering Documentation
You can find instructions for ordering documentation at this URL:
http://www.cisco.com/univercd/cc/td/doc/es_inpck/pdi.htm
You can order Cisco documentation in these ways:
•
Registered Cisco.com users (Cisco direct customers) can order Cisco product documentation from
the Networking Products MarketPlace:
http://www.cisco.com/en/US/partner/ordering/index.shtml
Release Notes for Cisco Voice Interworking Service Module Release 3.1(1)
OL-3480-01 Rev. C0, January 2003
17
Obtaining Technical Assistance
•
Registered Cisco.com users can order the Documentation CD-ROM (Customer Order Number
DOC-CONDOCCD=) through the online Subscription Store:
http://www.cisco.com/go/subscription
•
Nonregistered Cisco.com users can order documentation through a local account representative by
calling Cisco Systems Corporate Headquarters (California, U.S.A.) at 408 526-7208 or, elsewhere
in North America, by calling 800 553-NETS (6387).
Documentation Feedback
You can submit comments electronically on Cisco.com. On the Cisco Documentation home page, click
Feedback at the top of the page.
You can e-mail your comments to [email protected].
You can submit your comments by mail by using the response card behind the front cover of your
document or by writing to the following address:
Cisco Systems
Attn: Customer Document Ordering
170 West Tasman Drive
San Jose, CA 95134-9883
We appreciate your comments.
Obtaining Technical Assistance
Cisco provides Cisco.com, which includes the Cisco Technical Assistance Center (TAC) Website, as a
starting point for all technical assistance. Customers and partners can obtain online documentation,
troubleshooting tips, and sample configurations from the Cisco TAC website. Cisco.com registered users
have complete access to the technical support resources on the Cisco TAC website, including TAC tools
and utilities.
Cisco.com
Cisco.com offers a suite of interactive, networked services that let you access Cisco information,
networking solutions, services, programs, and resources at any time, from anywhere in the world.
Cisco.com provides a broad range of features and services to help you with these tasks:
•
Streamline business processes and improve productivity
•
Resolve technical issues with online support
•
Download and test software packages
•
Order Cisco learning materials and merchandise
•
Register for online skill assessment, training, and certification programs
To obtain customized information and service, you can self-register on Cisco.com at this URL:
http://www.cisco.com
Release Notes for Cisco Voice Interworking Service Module Release 3.1(1)
18
OL-3480-01 Rev. C0, January 2003
Obtaining Technical Assistance
Technical Assistance Center
The Cisco TAC is available to all customers who need technical assistance with a Cisco product,
technology, or solution. Two levels of support are available: the Cisco TAC website and the Cisco TAC
Escalation Center. The avenue of support that you choose depends on the priority of the problem and the
conditions stated in service contracts, when applicable.
We categorize Cisco TAC inquiries according to urgency:
•
Priority level 4 (P4)—You need information or assistance concerning Cisco product capabilities,
product installation, or basic product configuration.
•
Priority level 3 (P3)—Your network performance is degraded. Network functionality is noticeably
impaired, but most business operations continue.
•
Priority level 2 (P2)—Your production network is severely degraded, affecting significant aspects
of business operations. No workaround is available.
•
Priority level 1 (P1)—Your production network is down, and a critical impact to business operations
will occur if service is not restored quickly. No workaround is available.
Cisco TAC Website
You can use the Cisco TAC website to resolve P3 and P4 issues yourself, saving both cost and time. The
site provides around-the-clock access to online tools, knowledge bases, and software. To access the
Cisco TAC website, go to this URL:
http://www.cisco.com/tac
All customers, partners, and resellers who have a valid Cisco service contract have complete access to
the technical support resources on the Cisco TAC website. Some services on the Cisco TAC website
require a Cisco.com login ID and password. If you have a valid service contract but do not have a login
ID or password, go to this URL to register:
http://tools.cisco.com/RPF/register/register.do
If you are a Cisco.com registered user, and you cannot resolve your technical issues by using the Cisco
TAC website, you can open a case online at this URL:
http://www.cisco.com/en/US/support/index.html
If you have Internet access, we recommend that you open P3 and P4 cases through the Cisco TAC
website so that you can describe the situation in your own words and attach any necessary files.
Cisco TAC Escalation Center
The Cisco TAC Escalation Center addresses priority level 1 or priority level 2 issues. These
classifications are assigned when severe network degradation significantly impacts business operations.
When you contact the TAC Escalation Center with a P1 or P2 problem, a Cisco TAC engineer
automatically opens a case.
To obtain a directory of toll-free Cisco TAC telephone numbers for your country, go to this URL:
http://www.cisco.com/warp/public/687/Directory/DirTAC.shtml
Before calling, please check with your network operations center to determine the level of Cisco support
services to which your company is entitled: for example, SMARTnet, SMARTnet Onsite, or Network
Supported Accounts (NSA). When you call the center, please have available your service agreement
number and your product serial number.
Release Notes for Cisco Voice Interworking Service Module Release 3.1(1)
OL-3480-01 Rev. C0, January 2003
19
Obtaining Additional Publications and Information
Obtaining Additional Publications and Information
Information about Cisco products, technologies, and network solutions is available from various online
and printed sources.
•
The Cisco Product Catalog describes the networking products offered by Cisco Systems as well as
ordering and customer support services. Access the Cisco Product Catalog at this URL:
http://www.cisco.com/en/US/products/products_catalog_links_launch.html
•
Cisco Press publishes a wide range of networking publications. Cisco suggests these titles for new
and experienced users: Internetworking Terms and Acronyms Dictionary, Internetworking
Technology Handbook, Internetworking Troubleshooting Guide, and the Internetworking Design
Guide. For current Cisco Press titles and other information, go to Cisco Press online at this URL:
http://www.ciscopress.com
•
Packet magazine is the Cisco monthly periodical that provides industry professionals with the latest
information about the field of networking. You can access Packet magazine at this URL:
http://www.cisco.com/en/US/about/ac123/ac114/about_cisco_packet_magazine.html
•
iQ Magazine is the Cisco monthly periodical that provides business leaders and decision makers
with the latest information about the networking industry. You can access iQ Magazine at this URL:
http://business.cisco.com/prod/tree.taf%3fasset_id=44699&public_view=true&kbns=1.html
•
Internet Protocol Journal is a quarterly journal published by Cisco Systems for engineering
professionals involved in the design, development, and operation of public and private internets and
intranets. You can access the Internet Protocol Journal at this URL:
http://www.cisco.com/en/US/about/ac123/ac147/about_cisco_the_internet_protocol_journal.html
•
Training—Cisco offers world-class networking training, with current offerings in network training
listed at this URL:
http://www.cisco.com/en/US/learning/le31/learning_recommended_training_list.html
CCIP, the Cisco Arrow logo, the Cisco Powered Network mark, the Cisco Systems Verified logo, Cisco Unity, Follow Me Browsing, FormShare,
iQ Breakthrough, iQ Expertise, iQ FastTrack, the iQ Logo, iQ Net Readiness Scorecard, Networking Academy, ScriptShare, SMARTnet, TransPath,
and Voice LAN are trademarks of Cisco Systems, Inc.; Changing the Way We Work, Live, Play, and Learn, Discover All That’s Possible, The Fastest
Way to Increase Your Internet Quotient, and iQuick Study are service marks of Cisco Systems, Inc.; and Aironet, ASIST, BPX, Catalyst, CCDA,
CCDP, CCIE, CCNA, CCNP, Cisco, the Cisco Certified Internetwork Expert logo, Cisco IOS, the Cisco IOS logo, Cisco Press, Cisco Systems, Cisco
Systems Capital, the Cisco Systems logo, Empowering the Internet Generation, Enterprise/Solver, EtherChannel, EtherSwitch, Fast Step, GigaStack,
Internet Quotient, IOS, IP/TV, LightStream, MGX, MICA, the Networkers logo, Network Registrar, Packet, PIX, Post-Routing, Pre-Routing,
RateMUX, Registrar, SlideCast, StrataView Plus, Stratm, SwitchProbe, TeleRouter, and VCO are registered trademarks of Cisco Systems, Inc. and/or
its affiliates in the U.S. and certain other countries.
All other trademarks mentioned in this document or Web site are the property of their respective owners. The use of the word partner does not imply
a partnership relationship between Cisco and any other company. (0208R)
Copyright © 2003, Cisco Systems, Inc.
All rights reserved.
Release Notes for Cisco Voice Interworking Service Module Release 3.1(1)
20
OL-3480-01 Rev. C0, January 2003