1
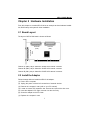
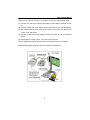
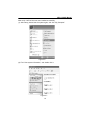
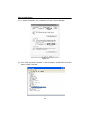
PCI Ultra160 SCSI Adapter
AEC-67162/67162S
User’s Manual
Version: 1.3
Copyright © 2006 ACARD Technology Corp.
Release: June 2006
Copyright and Trademarks
The information of the product in this manual is subject to change without prior
notice and does not represent a commitment on the part of the vendor, who assumes no liability or responsibility for any errors that may appear in this manual.
ACARD and SCSIDE are the trademarks of ACARD Technology Corp. Microsoft
and the Windows Logo are the registered trademarks, and Windows is the trademark of Microsoft Corporation. All brands and trademarks are the properties of their
respective owners.
This manual contains materials protected under International Copyright Laws. All
rights reserved. No part of this manual may be reproduced in any form or by any
means, electronic or mechanical, including photocopying, without the written permission of the manufacturer and the author. All inquires should be addressed to
ACARD Technology Corp.
Table of Contents
Chapter 1 Introduction ...................................... 5
1.1
1.2
1.3
1.4
1.5
Overview .................................................................. 5
Features .................................................................... 5
Specifications .......................................................... 5
OS Compatibility ..................................................... 6
Package .................................................................... 6
Chapter 2 Hardware Installation ....................... 7
2.1
2.2
2.3
2.4
Board Layout ........................................................... 7
Install the Adapter ................................................... 7
Connect Internal Devices ...................................... 8
Connect External Devices ..................................... 8
Chapter 3 BIOS Setup ..................................... 10
3.1 Description of Functions ..................................... 11
3.1.1 Channel .................................................................................. 11
3.1.2 SCSI Devices......................................................................... 11
3.1.3 Adapter Setup .......................................................................12
3.1.3.1 SCSI Speed Setup .......................................................... 13
3.1.3.2 Additional Setup Functions ........................................... 13
3.1.4 Utility .......................................................................................14
3.1.5 Load Defaults ........................................................................14
3.1.6 Exit Setup...............................................................................15
Chapter 4 System & Driver Installation.......... 16
4.1 In Windows 2000/XP/Server 2003 ....................... 16
4.1.1 Install the Driver ...................................................................16
4.1.2 Boot from AEC-67162 .........................................................21
4.2 In Windows NT4.0 ................................................. 21
4.2.1 Install the Driver ...................................................................21
4.2.2 Boot from AEC-67162 .........................................................22
4.3 In Windows 98/ME................................................. 22
4.3.1 Install the Driver ...................................................................22
4.3.2 Boot from AEC-67162 .........................................................22
4.4 In Linux ................................................................... 23
Chapter 5 Troubleshooting ............................. 29
Appendix Make An Installation Diskette ........ 31
Technical Support Form .................................. 34
AEC-67162/S Manual
Chapter 1 Introduction
1.1 Overview
ACARD AEC-67162 is a 2-channel, PCI-to-Ultra160 SCSI adapter. AEC-67162S is a
single channel, PCI-to-Ultra160 SCSI adapter. They both have the full features of PCI
64-bit bus master transfer capability and PCI enhanced data transfer commands.
1.2 Features
n
AEC-67162: high-performance Ultra160 2-channel adapter
AEC-67162S: high-performance Ultra160 1-channel adapter
n
n
n
n
n
n
n
n
n
n
n
n
Data transfer rate up to 160MB/s per channel
PCI bus master reduces the I/O loading of CPU
Domain validation confirms the probably highest data transfer rate
Auto terminator control
Upgradeable on-board flash BIOS
Double-edge clocking technology
CRC for data security
Cable length up to 12 meters in LVD mode
Supports 80MIPS RISC SCSI phase engine
Supports 64-bit/66MHz PCI bus master (32-bit/33MHz compatible)
Supports multitasking and multithreading
Supports SCSI-1, SCSI-2, SCSI-3, Ultra Wide SCSI, Ultra2 SCSI
and Ultra160 SCSI
n
Connects up to 15 SCSI devices per channel
1.3 Specifications
n
Power requirement ---
Voltage: 3.3V +/– 2%
5V +/– 2%
Current: 0.5A Max.
n
Environment ---
Operation temperature: 0oC to 60oC
Storage temperature:
–20oC to 85oC
Humidity: 15% to 90%
5
AEC-67162/S Manual
n
Dimensions ---
Width: 16.76cm
Height: 8.83cm
n
Connectors ---
AEC-67162: Two 68-pin SCSI internal connectors and
one 68-pin SCSI external connector
AEC-67162S: One 68-pin SCSI internal connector and
one 68-pin SCSI external connector
1.4 OS Compatibility
n
n
n
n
n
n
Windows Server 2003
Windows XP Home Edition, Professional
Windows 2000 Professional, Server, Advanced Server
Windows NT4.0 Workstation, Server
Windows 98/ME
Linux Red Hat, Fedora Core, SuSE, Turbo
1.5 Package
The package of AEC-67162 contains the following items.
n
n
n
n
n
AEC-67162 SCSI Adapter × 1
Internal SCSI Cable
×2
Terminator × 2
Users Manual × 1
ACARD Support CD × 1
The package of AEC-67162S contains the following items.
n
n
n
n
n
AEC-67162S SCSI Adapter × 1
Internal SCSI Cable
×1
Terminator × 1
Users Manual × 1
ACARD Support CD × 1
6
AEC-67162/S Manual
Chapter 2 Hardware Installation
From this chapter on we take AEC-67162 as an example to show hardware installation, BIOS setup, and system & driver installation.
2.1 Board Layout
The layout of AEC-67162 board is shown as follows.
Channel A
(CN2)
Channel B
(CN1)
Channel B
(CN3)
Channel A (CN2): 68-pin Ultra160 LVD/SE SCSI internal connector
Channel B (CN3): 68-pin Ultra160 LVD/SE SCSI internal connector
Channel B (CN1): 68-pin Ultra160 LVD/SE SCSI external connector
2.2 Install the Adapter
Follow the steps below to install the AEC-67162 adapter .
(1). Power off the computer.
(2). Unplug the power cord and all connections of external devices.
(3). Remove the computer’s case (refer to your PC manual).
(4). Locate an unused PCI expansion slot. Unscrew and remove the slot cover.
(5). Insert the adapter’s PCI edge connector into the slot firmly.
(6). Screw the adapter to the PC frame.
(7). Replace the computer’s case.
7
AEC-67162/S Manual
2.3 Connect Internal Devices
Connect internal devices to the adapter according to the following steps.
(1). Connect one end of the internal SCSI cable to any one of the adapter’s 2 internal connectors.
(2). Find an unused connector on the other end of the cable, and connect it to your
SCSI device.
(3). Repeat step 2 if you want to connect more than one devices.
(4). Add a terminator to the last end of the cable.
(5). Be sure that the internal devices’ ID numbers don’t conflict with one another.
2.4 Connect External Devices
Connect one external device to the adapter according to the following steps.
(1). Connect one end of the external SCSI cable to the adapter’s external connector.
(2). Connect another end of the cable to the first connector of your SCSI device.
(3). Add a terminator to the second connector of the device and enable it.
8
AEC-67162/S Manual
Connect more external devices to the adapter according to the following steps.
(1). Connect one end of the external SCSI cable to the adapter’s external connector.
(2). Connect another end of the cable to the first connector of your first SCSI device.
(3). Get another external SCSI cable, and connect its one end to the second connector of the first device.
(4). Connect another end of the cable to the first connector of your second SCSI
device.
(5). Repeat step 3 to step 4 when you connect more devices.
(6). Add a terminator to the second connector of the last device and enable it.
Please see the figure below for internal and external connections.
9
AEC-67162/S Manual
Chapter 3 BIOS Setup
After installing AEC-67162 and booting the system, you will see the following screen
appear shortly after the screen of motherboard.
Figure 3-1
NOTICE: If the message shows the IRQ Number : 10...ERROR, tested
UNMATCHED, it means that the PCI slot has not been assigned IRQ #.
You need to choose another PCI slot, or modify the system BIOS INT and
IRQ setting.
On the above figure press <F1> or <F10>, and you can enter the setup utility.
Figure 3-2
10
AEC-67162/S Manual
3.1 Description of Functions
On the BIOS screen use <á>,< â>, etc. to move the cursor, press <Enter> to
select and confirm, press <Space> to change setup, and press <Esc> to exit.
3.1.1 Channel
This figure shows setting a device according to the selected channel to which the
device is connected.
* This function is blocked in AEC-67162S.
Figure 3-3
3.1.2 SCSI Devices
This figure shows that the SCSI device is connected to the SCSI bus.
Figure 3-4
11
AEC-67162/S Manual
3.1.3 Adapter Setup
Figure 3-5
t
t
t
t
Host adapter SCSI ID: Default is 7.
Host adapter BIOS: Default is Enable.
PCI Master-DMA Burst mode: Default is Enable.
Host adapter SCSI termination: Activate or inactivate the SCSI terminator.
Default is Automatic.
t
Support removable disk as a fixed disk: Select the removable disk as a
fixed disk. Default is Disable.
t
t
Support multiple LUN: Use multiple LUN or not. Default is 0.
SCSI parity check: Choose to support SCSI parity check or not. Default is
Disable.
t
SCSI device disconnection: Choose to support SCSI device disconnection.
Default is Enable.
t
Extended BIOS transfer for a drive larger than 1GB: The disabled backward compatibility with AHA1542B format. Default is Enable.
t
CD-ROM bootable: Enable to boot from the SCSI CD-ROM. Default is
Disable.
t
Include In Scan: Choose a needed ID number for scanning.
12
AEC-67162/S Manual
3.1.3.1 SCSI Speed Setup
In SCSI Speed Setup you can choose a speed by moving the highlighted bar, and
then press “Enter”.
Figure 3-6
3.1.3.2 Additional Setup Functions
Additional setup functions include Boot Target ID and Boot LUN Number. You can
change any of them or all of them, and press “Enter”.
Figure 3-7
13
AEC-67162/S Manual
3.1.4 Utility
The utility includes three items: Preformat, Verify, and Quick Erase.
Preformat is used to format a hard drive beforehand. But if the hard drive contains
important data, you had better back it up at first.
Verify is used to examine if a hard drive is sound. If there is any error, a message
will show to ask you whether to reassign or not.
Quick Erase is used to erase the contents of a hard drive completely and quickly.
Figure 3-8
3.1.5 Load Defaults
Load defaults means to load the default parameters.
Figure 3-9
14
AEC-67162/S Manual
3.1.6 Exit Setup
In Exit Setup you can choose “Update Data & Exit” or “No Update, Exit”.
Figure 3-10
15
AEC-67162/S Manual
Chapter 4 System & Driver Installation
Driver installation varies somewhat in different operating systems. You can install the
driver of AEC-67162 in an existing OS, or install a new OS into the hard drives connected to AEC-67162. The latter is to boot from AEC-67162. AEC-67162S shares the
same driver with AEC-67162.
4.1 In Windows 2000/XP/Server 2003
Since the operations of Windows 2000/XP/Server 2003 are the same, we only take
Windows XP as an example to explain.
4.1.1 Install the Driver
Follow the steps below to install the driver of AEC-67162.
(1). After installing AEC-67162, boot the computer and enter Windows XP.
(2). The system will detect a new device and require a directory to access. Select
“Install from a list or specific location (Advanced)”. Then click “Next”.
Figure 4-1
16
AEC-67162/S Manual
(3). Follow the wizard. Windows XP will require the driver’s location. Select
“Include this location in the search”.
(4). Select “Browse” to find the driver’s directory of AEC67162.inf such as A:\WinXP.
Figure 4-2
(5). After the wizard finds the driver, click “Next” to install it.
Figure 4-3
17
AEC-67162/S Manual
(6). Click “Continue Anyway” to continue the installation.
Figure 4-4
(7). Follow the directions. The system will complete the setup automatically.
Figure 4-5
18
AEC-67162/S Manual
Now verify if AEC-67162 has been installed successfully.
(1). After setup, please boot the system again, and click “My Computer”.
Figure 4-6
(2). Find “View system information”, and double click it.
Figure 4-7
19
AEC-67162/S Manual
(3). In “System Properties” click “Hardware” and then “Device Manager”.
Figure 4-8
(4). Click “SCSI and RAID Controllers” to see the adaper “ACARD AEC-67162 PCI
Ultra3 LVD/SE Controller”.
Figure 4-9
20
AEC-67162/S Manual
NOTICE: During driver installation, if you encounter the problem of Windows logo, please click “Continue Anyway”. Windows logo is a mechanism
designed to prevent OS from working abnormally because of installing
unidentified software. Yet, the driver of AEC-67162 has been proven not to
affect the entire work of OS.
4.1.2 Boot from AEC-67162
Follow the steps below to install a new OS into the hard drives connected to AEC67162.
(1). Find the driver of AEC-67162 from the package on the support CD. Copy the
driver into a formatted floppy disk and label it. Please refer to Appendix.
(2). Put the CD of Windows XP into CD-ROM (be sure that booting from CD-ROM
has been set in BIOS).
(3). On seeing the first blue screen, you need to press <F6> to install the OS into the
hard drives connected to SCSI card. After the installation program loads needed
files, press <S> and put the driver diskette into the floppy drive.
(4). The installation program will load the driver of AEC-67162. And you can select
a hard drive into which you intend to install the OS. Then follow the wizard to
complete.
(5). During installation, if you encounter the problem of Windows logo, please click
“Continue Anyway”.
4.2 In Windows NT4.0
4.2.1 Install the Driver
Follow the steps below to install the driver of AEC-67162.
(1). After installing AEC-67162, boot the system again.
(2). Click “Control Panel”, “SCSI Adapters”, and “Drivers”. Then click “Add”. Put the
driver diskette or the CD of AEC-67162, and specify the driver’s location.
(3). Follow the wizard to complete. After execution, boot the system again.
21
AEC-67162/S Manual
4.2.2 Boot from AEC-67162
Refer to 4.1.2.
4.3 In Windows 98/ME
4.3.1 Install the Driver
(1). After installing AEC-67162 and booting the system, “Add New Hardware Wizard
prompt” saying “Searches for new drivers for PCI SCSI Bus Controller...” will
show up. Click “Next” to continue.
(2). Select the recommended option “Search for best driver for your device” when
the Wizard asks you “What do you want Windows to do?”
(3). Let Windows search the appropriate location of the driver such as A:\Win9x.
(4). Wait a moment. Windows will search a driver file for the device “ACARD
AEC67162 PCI Ultra3 LVD/SE SCSI Adapter”. Click “Next” to begin installing
the driver.
(5). Click “finish” to complete the installation.
(6). Reboot the computer.
(7). Follow the direction below to verify if AEC-67162 has been installed well.
---“Start”, “Settings”, “Control Panel”, “System” and “Device Manager”.
4.3.2 Boot from AEC-67162
(1). Before installing OS into the hard drives connected to AEC-67162, you may
need to boot from DOS or Windows 98 start up diskette to run FDISK and
FORMAT commands so as to create a clean FAT format partition. For details of
MS-DOS commands, please refer to the related document or manual.
(2). Booting the system from the Windows 98/ME installation CD or bootable diskette.
Then begin to install OS.
(3). After installing OS and booting it successfully, install AEC-67162 driver instead
of other drivers like Intel chipset, LAN, AGP, etc. at first.
(4). Follow the direction below to install the driver of AEC-67162.
---“Start”, “Settings”, “Control Panel”, “System” and “Device Manager”.
22
AEC-67162/S Manual
(5). Double click the unknown SCSI device icon, and “Add New Hardware Wizard
prompt” saying “Search for new drivers for PCI SCSI Bus Controller...” will show
up. Click “Next” to continue.
(6). Select the recommended option “Search for best driver for your device” when
the Wizard asks you “What do you want Windows to do?”
(7). Let Windows search the appropriate location of the driver such as A:\Win9x.
(8). Wait a moment. Windows will search a driver file for the device “ACARD
AEC67162 PCI Ultra3 LVD/SE SCSI Adapter”. Click “Next” to begin installing
the driver.
(9). Click “finish” to complete the installation.
(10). Reboot the computer.
(11). Follow the direction below to verify if the unknown SCSI device is recognized
as “ACARD AEC67162 PCI Ultra3 LVD/SE SCSI Adapter”. If that is all right, it
means the driver of AEC-67162 has been installed successfully.
---“Start”, “Settings”, “Control Panel”, “System” and “Device Manager”.
4.4 In Linux
There is a variety in Linux version, and the installation is somewhat different. Here
we provide you with the installation procedures of Linux OS like Red Hat, SuSE,
Turbo. You can also refer to the readme file in the driver package you download or
on the support CD. The update of Linux version is frequent, so visit ACARD’s Web
site to download the latest driver and support information.
Red Hat Linux
ACARD AEC-67162 Driver Diskette & Installation Guide for Red Hat Linux 7.3 & 8.0
& 9.0
Copy all contents of the files into a formatted floppy diskette and label it as "AEC67162 Red Hat Driver".
23
AEC-67162/S Manual
(1). Install AEC-67162 driver into an existing system:
a. Boot linux system and login as root.
b. Put "AEC-67162 Red Hat driver" diskette into floppy drive
and issue the following commands to install AEC-67162 driver:
# mount /dev/fd0 /mnt/floppy
# cd /mnt/floppy
# ./install
(Wait a few seconds for the system to copy some files... and complete)
# cd /
# umount /dev/fd0
After this the AEC-67162 driver will be loaded when linux is booted.
c. Reboot Linux system.
d. Don't forget to mount drives before using them.
(2). Install a new system into Hard Drives connected to AEC-67162 card:
a. Boot up the system with Linux installation CD.
b. On the first installation screen "Welcome to Red Hat ...",
you will see a prompt "boot:" at the bottom of the screen.
Please type [linux dd] to install linux to a specific device.
c. Press "Yes". There are drivers for Linux on the "Devices" dialog box.
d. Insert the AEC-67162 Driver disk into floppy drive and press "ok" to continue.
e. Follow the installation guide to finish your OS installation.
f. Restart.
***PS: If your on-board hard drive contains important data or OS, it is strongly recommended to remove it first before installing Linux. Thus, the OS won't be installed
into a wrong disk.
24
AEC-67162/S Manual
SuSE Linux
ACARD AEC-67162 Driver Diskette & Installation Guide for SuSE Linux 8.1
Copy all contents of the files into a formatted floppy diskette and label it as "AEC67162 SuSE8.1 Driver".
(1). Install AEC-67162 driver into an existing system:
a. Boot up linux system and login as root
b. Put "AEC-67162 SuSE8.1 driver" diskette into floppy drive
and issue the following commands to install AEC-67162 driver:
# cd /boot/grub
# vi menu.lst -->(Most of Linux OSs including SuSE don't support ACPI
function well, please enter bootloader to add a "acpi=off" parameter
behind the kernell setting line) Refering to the following example:
.
.
title linux
kernel (hd0,0)/boot/vmlinuz root=/dev/hda1 acpi=off vga=788
initrd (hd0,0)/boot/initrd
.
.
Save changing and reboot the system.
Login again
# mount /dev/fd0 /media/floppy
# cd /media/floppy
# ./install -->(Wait a few seconds for the system to copy some files... and
complete)
# cd /
# umount /dev/fd0
c. Mount drives and done.
(2). Install AEC-67162 driver into a new system:
a. Boot up the system with Linux installation CD.
b. On the first prompt screen, please select "Manual Installation".
And please add "acpi=off" parameter into boot options dialog field.
c. Choose your language & keyboard map.
d. Select "Kernel modules (hardware drivers)".
25
AEC-67162/S Manual
e. Select "Load IDE/RAID/SCSI modules".
f. Select "--More modules--" -->SuSE 8.1 Linux has no driver for AEC-67162.
g. Insert the "AEC-67162 SuSE8.1 Driver" diskette into floppy drive and press
OK to add an AEC-67162 module.
h. Press "Enter" --> No parameters need to be entered.
Press "OK" after Module "aec67162" loaded successfully.
i. Press "Esc" to return to Main menu.
j. Select "Start installation / system".
k. Start installation / update; choose source medium...
follow the message's instructions to continue OS installation.
l. In the middle of installation (CD1-estimated around 50%),
please press "Ctrl+Alt+F2" to go to a command console.
m. Execute the following commands to load AEC-67162 driver into the system:
# mount /dev/fd0 /media/floppy
# cd /media/floppy
# ./setup-67162boot --> wait a few seconds and you'll see
"completed" shown on the screen. Unfortunately, it tells you
"Error: no module directory exists". Please try again later
# cd /
# umount /dev/fd0
Remove the floppy disk and press "Ctrl+Alt+F7" to go back to installation
terminal.
n. Complete SuSE linux installation as you wish.
***Note: Normally, when we install OS into other drives instead of an on-board hard
drive, we have to load the driver of the adapter card before installation. But in SuSE
Linux 8.1, we have to load the driver twice (step h and n), because the first time we
execute "load driver" it is loaded to the system cache. But SuSE doesn't copy the
loaded driver into the hard drive when installation comes to an end, so no driver is
found. An error message will appear, then you will be forced to quit the installation.
***PS: If your on-board hard drive contains important data or OS, it is strongly recommended to remove them first before installing Linux. Thus, the OS won't be installed into a wrong disk.
26
AEC-67162/S Manual
Turbo Linux
ACARD AEC-67162 Driver Diskette & Installation Guide for Turbo Linux 8.0
Copy all contents of the files into a formatted floppy diskette and label it as "AEC67162 Turbo8.0 Driver".
(1). Install AEC-67162 driver into an existing system:
a. Boot up linux system and login as root.
b. Put "AEC-67162 Turbo8.0 driver" diskette into floppy drive
and issue the following commands to install AEC-67162 driver:
# mount /dev/fd0 /mnt/floppy
# cd /mnt/floppy
# ./install
Answer "Y or N" to load AEC-67162 module when linux booting... complete
# cd /
# umount /dev/fd0
c. Mount hard drives and done.
(2).
a.
b.
c.
d.
e.
Install AEC-67162 driver into a new system:
Boot up the system with Linux installation CD.
On the first prompt screen, press Enter to start installation.
Choose your language.
Wait a few seconds for the system to prepare installation files...
Then, when you see the "Select Install Class" dialogue box appear,
please press "Ctrl+Alt+F2" to go to a command mode terminal
and issue the following commands to load AEC-67162 Turbo driver:
Put "AEC-67162 Turbo8.0 Driver" diskette into floppy drive
# mount /dev/fd0 /mnt/floppy
# cd /mnt/floppy
# ./load67162
Wait a few seconds for the system to copy some files...and loading is ok.
# cd /
# umount /dev/fd0
Press "Ctrl+Alt+F7" to continue linux installation...
f. After going back to installation screen,
please follow the installer's instructions to continue OS install...
until the dialogue box "Congratulations" appears.
27
AEC-67162/S Manual
g. Do not press "finish" at this moment!!!
Instead, please press "Ctrl+Alt+F2" again to enter command mode terminal
and issue the following commands to load AEC-67162 Turbo driver into the
hard drives
Insert "AEC-67162 Turbo8.0 driver" diskette into floppy drive
# chroot /mnt/sysimage
# mount /dev/fd0 /mnt/floppy
# cd /mnt/floppy
# ./setup67162
# cd /
# umount /dev/fd0
Press "Ctrl+Alt+F7" to go back to the dialogue box and finish Linux installation...
h. Reboot the system.
***Note: Normally, when we install OS into other drives instead of an on-board hard
drive, we have to load the driver of the adapter card before installation. But in Turbo
Linux 8.0, we have to load the driver twice (step e and g), because the first time we
execute "load driver" it is loaded to the system cache. But Turbo forgets to copy the
loaded driver into the hard drive when installation comes to an end, so no driver is
found. An error message will appear, then you will be forced to quit the installation.
***PS: If your on-board hard drive contains important data or OS, it is strongly recommended to remove them first before installing Linux. Thus, the OS won't be installed into a wrong disk.
28
AEC-67162/S Manual
Chapter 5 Troubleshooting
After installing AEC-67162, if it cannot work normally, follow the checklist given below
to solve the problems.
1. Power status
Check if the power is strong enough for all connected devices. For external SCSI
devices you need to power them on before booting the system.
2. The adapter
Check if the adapter AEC-67162 is inserted firmly into the slot on the motherboard.
If the adapter is fine but cannot be detected, that is usually bad connection. You can
remove the card and insert it into the original or the other PCI slot again.
3. Connectors and cables
Check if all power connectors, SCSI connectors and internal or external SCSI cables
are connected well. Be sure that connector pins aren’t bent, and cables aren’t
damaged because of improper fold.
4. The external cable
If you connect a lot of SCSI devices to the system via daisy chain with an external
SCSI cable but fail constantly, you had better replace the cable with another fine
one.
5. SCSI ID
Check if each SCSI device has a unique ID number. Don’t let ID numbers conflict
with one another so as to avoid errors.
6. Terminator
If some or all devices on the SCSI bus have been correctly installed but cannot be
detected by the adapter, it is usually the problem of terminator. The possible causes
are lack of terminator, bad installation of terminator, two or more terminators on the
same bus, and terminator of bad quality.
29
AEC-67162/S Manual
7. Boot issue
Enter the BIOS of motherboard to set booting from the SCSI device. But if you have
more than one bootable device connected to the same SCSI card, you need to set
booting from the device which you desire to start in the BIOS setup utility of the SCSI
card.
8. Driver
There are two ways to install the Windows driver. One is to let OS search the driver
CD or the appropriate driver for the current OS on the floppy disk automatically.
Another is to specify the driver’s location as those mentioned in Chapter 4. If AEC67162 cannot work normally or there is an exclamation mark appearing before the
card as shown in “SCSI and RAID Controllers” because the system could not search
the appropriate driver successfully, you can try the second way to install the driver
again.
In the part of Linux driver, the difference between one Linux kernel and another like
2.4.20 and 2.4.22 is not much, but you still need to compile the driver for each
version. In order not to trouble users, ACARD simply provides the driver for standard
OS such as Red Hat 8.0, 9.0. It won’t provide the driver for the update of kernel.
30
AEC-67162/S Manual
Appendix Make An Installation Diskette
To install Windows 2000, XP, or Server 2003 into a hard drive connected with an
adaper like AEC-67160, you need a floppy diskette containing the SCSI card’s driver
to boot the hard drive. Follow the steps below to make an installation diskette.
1. Insert ACARD Support CD into CD-ROM.
2. Click “Explore This CD”.
31
AEC-67162/S Manual
3. Under the “Driver” folder find your SCSI card’s model number. For example, AEC67160’s driver is Drivers>SCSI>AEC67160.
32
AEC-67162/S Manual
4. Choose the driver folder, and right-click “Send to 3.5” floppy”. Meanwhile insert an
empty diskette into the floppy drive.
33
AEC-67162/S Manual
Technical Support Form
Email: [email protected]
http://www.acard.com
Model AEC-67162/S
System Configuration
Motherboard
BIOS version
SCSI adapter
Chipset
Memory
Display card
Other I/O card
OS version
Hard Disk
Configuration
Hard Disk Model/type
Capacity
Firmware version
Others
Problem Description
F/W Version
34