1
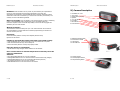
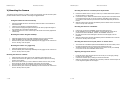
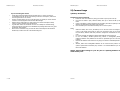
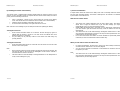
Drift Innovation
X170 Action Camera
Drift Innovation
X170 Action Camera
Drift Innovation X170
Dear Customer,
I. Contents
2
II . Quick Start
3
III. Camera Precautions
4
IV. Camera Description
6
V . Mounting The Camera
10
a)
• Battery Installation
10
b)
• Installing the remote control battery
11
c)
• Camera Lens Rotation
13
d)
• Inserting/Removing the SD Card
13
e)
• Taking Video Footage
14
f)
• Taking Photos
14
Thank you for purchasing the X170 by Drift Innovation.
Here at Drift Innovation, we understand all to well that action, outdoor and adventure sports
enthusiasts as well as everyday enthusiasts love to
record and view first person footage captured by our hands free action cam.
For this reason, the X170 was designed and engineered with extreme precision,
to allow you to capture a relive all of your activities.
Review the following pages for technical information, tips and troubleshooting which
will allow you to maximize your experience with the X170.
CAPTURE AND RELIVE ALL YOUR ACTION SPORTS
VII . Menu Options
15
• Main Menu
15
• Video Menu
16
• Photo Menu
16
• Settings Menu
17
• Setting Date/Time
17
• Firmware Menu
20
VIII . Computer Requirements and Technical
21
• Playing back video footage
21
• Technical Specification
22
• Computer System Requirements
1 of 28
7
VI . Camera Usage
22
IX. FAQ
24
X. Troubleshooting
26
XI. Warranty
28
2 of 28
Drift Innovation
X170 Action Camera
II) Quick Start
Turning the Camera On
Press and hold the Select button (/) for 2 seconds. The LCD screen
should turn on and the select button should turn green, the remaining battery charge will be
shown in the top left, and the remaining memory card storage will be shown in the right
hand corner.
Taking Video Footage
1. Aim at what you want to record.
2. Press the Select button to start recording (the unit should bleep, and the light on the
select button turn red.).
3. Press Select button again to stop recording (Low pitch bleep, light turns green)
Capturing Photos
1. Press the Menu button.
2. Use the Up and Down arrows to highlight the settings option, and press the Select button.
3. The screen will show a list of settings, highlight camera options and press select . The
camera options submenu should appear, highlight record mode and press select to change to
photo mode. Press the menu button three times to return to viewing mode. Aim at what you
wish to capture and press the select button (One bleep, and the light turns red). The picture
is captured as soon as the light turns red, although it stays on for a second while saving.
3 of 28
Drift Innovation
X170 Action Camera
III) Camera Precautions
Notice the following guidelines when using your camera
• The X170 is shock resistant, not shock proof.
• For your safety, do not press the buttons on the camera during sports activities.
• Do not place the camera in areas prone to dust or damp for extended periods of time.
• Do not leave the camera in places exposed to extremely high temperatures, such as
under direct sunlight, for extended periods of time. This may affect the camera housing and
internal components.
• Clean the lens with a soft cloth to remove fingerprints or dust.
• We recommend using Lithium AA batteries for longest life.
• The camera has a working temperature range of -10°C to 40°C The working temperature
range of a normal Alkaline AA battery is 0°C to 40°C. Below 0°C always use Lithium
batteries.
• Turn the camera off before removing the batteries or memory card. The card and the
data may be damaged if the memory card is inserted or removed while the camera is
still on.
• Remove the batteries and memory card before storing the camera for long periods of
time. Keep it in a well-ventilated place to prevent mould.
4 of 28
Drift Innovation
X170 Action Camera
Disclaimer: Drift Innovation will not, under any circumstances, be responsible for
injuries or property damage incurred during participation of any high-risk
sport/activity not endorsed or recommended by Drift Innovation. Should the camera
malfunction under these circumstances, it would not be covered by the warranty. The
warranty will cover manufacturing defects.
Notes on copyright: Users are asked to note that the transfer of memory containing
photos or data protected under copyright laws is only permissible within the
restrictions imposed. Users assume all responsibility in the event that copyrights are
violated by the use of this camera.
Drift Innovation
IV) Camera Description
1.
2.
3.
4.
5.
6.
7.
8.
Rotatable 170o Lens
Top of lens
Select Button (On/Off)
Speaker
1.5” LCD Screen
Up Button
Menu Button
Down Button
Waterproof Feature
The X170 action camera is waterproof up to 0.5m. Drift Innovation will not assume
any responsibility for camera malfunction caused by liquid entering the camera as a
result of misuse by the user.
Precaution:
Ensure the battery hatch is correctly and completely locked to keep
liquid out of the camera.
Liquid may get inside the camera if the latch is not locked properly
• If the camera gets wet, wipe the liquid off as soon as possible with a dry cloth.
• Other camera accessories may not be waterproof.
• Ensure the battery hatch is correctly and properly locked.
9. Waterproof battery hatch
10. 8mm Mount Thread
11. Microphone
12. Mini-USB Port
Using the camera in cold weather
• We recommend using Energizer lithium batteries in cold weather.
Don't use the camera in extreme temperatures as this may cause the
camera to malfunction.
Attention:
•
•
•
•
•
Non-rechargeable batteries are not to be recharged;
Rechargeable batteries are to be removed from the camera before being charged;
Rechargeable batteries are only to be charged under adult supervision;
The supply terminals are not to be short-circuited;
Exhausted batteries are to be removed from the camera.
5 of 28
13. Remote Control
14. Record/Capture Button
15. Stop Recording Button
6 of 28
X170 Action Camera
Drift Innovation
X170 Action Camera
Drift Innovation
Mounting the camera on a vented cycle or kayak helmet
V) Mounting the Camera
The camera can be mounted in a number of ways using the straps, mounts and velcro patch
provided. Please follow the methods of mounting as suggested below:
1. Position the helmet mount in the top or side of your helmet and find the optimum
mounting position on the helmet.
2. Use the short strap to attach the helmet mount using the slits in the helmet mount
Fixing the camera onto the universal clip
1.
2.
3.
4.
Align the threaded side of the universal clip with the thread on the underside of
the camera body.
Twist the screw thread in a clockwise direction.
As the universal clip tightens against the body of the camera, adjust the angle of
the universal clip to provide the desired angle.
Tighten fully the screw on the universal clip. This should now fit firmly against the
camera body.
Mounting the camera using the headstrap
1.
2.
3.
Attach the goggle mount to the elastic headstrap as shown in the illustration.
Adjust the diameter of the head strap by sliding the plastic buckles.
Slide the camera (with universal clip attached) into the goggle mount until the two
arms on the clip, 'click' into place.
Mounting the camera on a goggle strap
1.
2.
Attach the goggle strap to your goggles.
Slide the camera (with universal clip attached) into the goggle mount until the two
arms on the clip 'click' into place.
Mounting the camera on a helmet
1.
2.
3.
4.
5.
7 of 28
Attach one side of the velcro strips to the underside of the helmet mount.
Position the helmet mount against your helmet and find the optimum mounting
position on the helmet.
Ensure the surface where you wish to attach the helmet mount is clean, oil and
dust free and dry. Attach the remaining velcro strips onto the helmet.
Push the helmet mount onto the helmet until the velcro is firmly attached.
Slide the camera (with universal clip attached) into the helmet mount until the two
arms on the clip 'click' into place.
X170 Action Camera
3.
to thread the strap through. It may be necessary, depending on the position, to
use a section of the velcro strip to ensure the mount and strap firmly fit onto the
helmet.
Slide the camera (with universal clip attached) into the helmet mount until the two
arms on the clip 'click' into place.
Mounting the camera on a handlebar
1.
2.
3.
4.
Unscrew the nut from the handlebar mount and remove the screw.
Fit the handlebar mount onto the handlebar, ensuring that the rubber pad is
positioned around the handlebar, between the handlebar and mount.
Re-insert the screw and nut and tighten until the mount fits tightly onto the
handlebar.
Slide the camera (with universal clip attached) into the handlebar mount until the
two arms on the clip 'click' into place.
Mounting the camera onto a tripod, camera- or suction mount
1.
2.
The camera has a standard tripod thread embedded into the camera body. This is
the same thread into which the universal clip normally screws into.
Thread the camera onto a tripod, camera mount or suction mount (not included)
or any other mount with a standard camera thread.
Adjusting the angle of the camera
1.
2.
3.
8 of 28
Unclip the camera with universal clip from the mount you are using by pressing
the arms on the universal clip.
Untwist the universal clip by rotating the screw anti-clockwise.
When the universal clip is sufficiently far unscrewed, rotate the universal clip to the
correct angle and tighten the screw again.
Drift Innovation
X170 Action Camera
Drift Innovation
X170 Action Camera
VI) Camera Usage
Tips on mounting the camera
•
•
•
•
•
Great video footage generally features another person or object. In skiing or
snowboarding, this can be the user following a friend. In motorsports, this can be
the ferring of a bike or car bonnet.
Position yourself exactly how you would be during your activity to ensure that the
camera is correctly aligned to film the best video footage.
Because of the wide angle lens, within reason, the camera will capture exactly
what you want if pointed in the right direction.
A great video shot is also the direct user shot. For example in mountain biking,
having the camera mounted on the handlebars but pointing back at the user, gives
great action video footage.
Ensure that in whichever way you have the camera mounted, that the camera is
fitted firmly to reduce the risk of the camera being lost.
a) Battery Installation
Installing the camera batteries
1.
2.
3.
4.
Notes:
•
•
•
•
•
Unlock the rear of the camera by using your thumb to push up the rear clip.
Once the rear hatch is open, slide the battery door up to unlock and lift up the
hatch.
Insert 2 AA alkaline or lithium batteries into the battery slot with the polarity in the
direction as illustrated on the inside of the rear door.
Close the battery door and slide the battery door to lock it in place.
When the battery level is low, the battery icon on the LCD screen will change in
colour to red. Please ensure that you save your recording as soon as you notice
the low battery indicator and then proceed to change the old batteries for new
ones.
Do not mix old and new batteries. Replace both batteries at the same time.
Do not mix alkaline, standard (carbon-zinc), lithium or rechargeable (nickelcadmium) batteries. Only batteries of the same or equivalent type are to be used
together.
Remove the batteries if the camera is not going to be used for extended periods of
time.
Alkaline, lithium and rechargeable batteries can be used with the product. For
optimum performance and battery life, however it is recommended that you use
lithium AA batteries.
Always upload video footage to your PC prior to replacing batteries to
avoid memory loss
9 of 28
10 of 28
Drift Innovation
X170 Action Camera
b) Installing the remote control battery
The remote control is supplied with its battery already fitted. The remote control is as such
ready to use from purchase. Should you suspect that the remote control battery has lost its
power, follow the following instructions:
1.
2.
3.
Using a screwdriver, remove the four screws fixing the remote control battery
cover. This should uncover the mechanics of the remote control and the battery.
Carefully remove the battery and replace with a new one.
Fix the remote control battery cover again with the four screws.
Note: Take care not to damage any of the waterproof seal when replacing the battery.
Turning the camera on
1.
2.
Press and hold the Select button for 2 seconds. The LED will light up green to
indicate that the camera is turned on. The LCD screen will indicate how much
battery and memory is remaining.
For your safety, do not press any buttons on the camera unit itself during any
sporting activities.
Turning the camera off
1.
Note:
•
•
Press and hold the Select button for 5 seconds. The LCD screen will turn off as will
the LED on the control panel.
Drift Innovation
c) Camera Lens Rotation
A unique feature about the camera is the ability of the user to manually rotate the camera
lens to fit their mounting situation. The camera is waterproof to 1m and this is not affected
by the rotation of the camera lens.
How the lens rotation works
•
•
•
•
•
Note:
•
it may result in damage or injury.
11 of 28
The camera lens rotates separately from the main camera body. This feature
allows users to align the camera lens to get the video footage you require
independently of how you have mounted the camera.
Whilst holding the camera body in one hand, use your index finger and thumb on
your other hand to grab the camera lens firmly. Twist the camera lens into the
desired angle.
The camera lens can not be rotated through 360 degrees. Rather there is a hard
stop that spans approximately 20 degrees. This stop has been positioned so as to
impact least on your mounting options.
Do not force the camera lens rotation. If excess resistance is experienced, double
check that you have not reached the camera rotation stop.
When you will need to rotate the camera lens
•
Ensure that the camera is turned off when inserting and removing an SD card. The
card and the data on the card may be damaged if the SD card is inserted or
removed while the camera is turned on.
The camera does not have the ability to recharge batteries. Do not attempt this as
X170 Action Camera
12 of 28
In certain circumstances, the best way to mount your camera safely and securely
will mean that the camera lens is not correctly aligned.
You can twist the camera lens clockwise or anti-clockwise to rotate the lens into
the position you want.
The camera lens can not be rotated through 360 degrees. Rather there is a hard
stop that spans approximately 20 degrees. This stop has been positioned so as to
impact least on your mounting options.
Drift Innovation
X170 Action Camera
Drift Innovation
SD card insertion / removal
Taking video footage
1.
2.
This camera can take SD cards in size up to 16GB.
Insert:
1.
2.
3.
4.
3.
Turn the camera off.
Unlock the rear cover to open the camera
Insert the SD card into the SD card slot, ensuring that the SD card connect
terminals are facing up. Insert it carefully and completely until it click into place.
Close the rear cover.
4.
Taking photos
1.
2.
Recording Time:
3.
The available recording time is an approximation (these vary depending on the recording
conditions and the type of card):
Lo
Internal
Memory
32MB
6 mins
Med
(Approx)
2 min 25s
SD Memory Card
4GB
8GB
16GB
12 Hours
24 Hours
48 Hours
3 Hours
6 Hours
16 Hours
Follow the steps under 'Mounting Description' to correctly mount the camera.
Ensure that the camera has been set into the 'Video' mode using the Settings
menu.
Press the Select button on the control panel to start recording (one beeping
sound). The LED on the control panel will change from green to red to indicate
that the camera is recording.
Press the SELECT button again to stop recording (one beeping sound). The LED on
the control panel will change from red to green to indicate that the camera has
stopped recording but is still on.
Warning:
When the low battery warning appears please change the batteries in the camera to avoid
any accidental memory loss or file corruption.
Remove:
1. Turn the camera off.
2. Unlock the rear cover to open the camera
3. Push the card until it clicks and then pull the card out.
4. Close the rear cover.
Memory Type
X170 Action Camera
High
2 Hours
4 Hours
8 Hours
Follow the steps under 'Mounting Description' to correctly mount the camera.
Ensure that the camera has been set into the 'Photo' mode using the Settings
menu.
Press the SELECT button on the control panel to take a photo (one beeping
sound). The LED on the control panel will briefly change from green to red to
indicate that the camera is capturing the photo. As soon as the photo has been
captured, the LED on the control panel will change from red to green.
Using the remote control
1 min 45s
1.
2.
3.
4.
Ensure that the remote control has been enabled using the Settings menu.
Attached the remote control to your wrist, handlebar or jacket using the short
velcro strap. Ensure the remote control is tightly fastened so there is no risk of
losing the remote control.
If the camera is in the video mode, press the RECORD button to start recording
(one beeping sound). The green LED on the control panel will change to red. Press
the STOP button to stop recording (one beeping sound). The LED on the control
panel will change back from red to green.
If the camera is in the photo mode, press the RECORD button to capture a photo
(one beeping sound).
Note:
1. Default resolution is 720 x 480 pixels.
2. If the recording time is long, the video file may be separated into multiple files
automatically. The user does not need to monitor this process, the camera will resume
filming once the file is saved (after a couple of seconds). Please note that the time duration
needed to save video files may vary depending upon the length of the file. Please be patient
during this process.
13 of 28
14 of 28
Drift Innovation
X170 Action Camera
Drift Innovation
X170 Action Camera
VII) Menu Options
Videos
•
•
Press the Menu button to start selecting options.
The Menu settings will appear:
Once you have selected the Video option, you will see individual thumbnail images of the
videos that are recorded on the cameras chosen memory.
The information presented with the thumbnail images will be:
•
•
•
The number of the video out of the total number of videos (e.g. 1/10)
The actual video file name
The video duration (hh:mm:ss)
To play or delete any one of the videos:
The different icons and their meanings are shown below:
Show video Clips
1.
2.
3.
4.
Scroll through the thumbnail images, until you reach the thumbnail of the chosen
video.
Press the SELECT button on the control panel.
Select either the View or Delete option by using the UP or DOWN buttons.
If deleting, you will be asked to confirm your selection.
Show Still Camera Pictures
Photos
Settings Menu
Once you have selected the Photo option, you will see individual thumbnail images of the
photos that are saved on the cameras chosen memory.
The information presented with the thumbnail images will be:
Firmware Upgrade
•
•
1.
2.
3.
15 of 28
To enter one of the menus, use the UP and DOWN buttons to position the marker
over the icon / menu option you require and press the SELECT button.
The icons for Videos and Photos will adjust automatically to illustrate the number
of Videos / Photos the camera has saved onto your chosen memory.
To exit any of the menu settings or options, press the MENU button until you
revert to the Menu you require or reach the screen showing the camera current
image.
The number of the photos out of the total number of photos (e.g. 1/10)
The actual photo file name
To view or delete the photos:
•
•
16 of 28
Scroll through the thumbnail images, until you reach the thumbnail of the chosen
photo.
To delete the photo, press the SELECT button. You will be asked to confirm your
selection.
Drift Innovation
X170 Action Camera
Drift Innovation
Menu
X170 Action Camera
Sub
Menu
Options
Description
Press select to choose between
aspect ratio. 4/3 Normal, 16/9
Wide, and 3/2 Hybrid
Exposure settings are adjustable
depending on the video
capturing conditions. To reduce
exposure sensitivity (e.g. bright
snow), select a negative figure.
To increase exposure sensitivity
(e.g. dusk), select a positive
figure.
The user can select between
MP4 or MJPEG formats. The
former allows for increased
compression and reduced file
size.
Video Options
Settings
The options within the Settings menu are as follows:
Aspect
Ratio
•
•
•
4/3
16/9
3/2
Exposure
•
•
•
•
•
-1
-0.5
0
0.5
1
File Type
•
•
MP4
MJPG
Mic
Sensitivity
•
•
•
Hi
Med
Lo
•
•
•
•
•
•
•
Hi
Med
Off
Hi
Med
Lo
Off
Settings Menu
Menu
Sub Menu
Options
Description
Camera
Options
Record
Menu
•
•
Video
Photo
Remote
Control
•
•
On
Off
LCD
Brightness
•
•
•
Hi
Med
Lo
TV Mode
More
17 of 28
•
•
•
•
•
NTSC
PAL
Date
Time
Language
Press the select button to
choose between still camera
and video options
Press the select button to
switch the remote control on
or off
Press select to choose
between brightness of the
LCD screen
Press select to choose
between NTSC (North
America, Central America,
Asia etc.) and PAL (Europe)
mode.
The time & date of the
camera can be set to ensure
that videos and photos reflect
the correct time and date.
This needs to be set each
time you change batteries.
Sound
Options
Beep
Volume
Speaker
Volume
The language can be
changed by the user into
either English, German,
Spanish, Portuguese, Italian
or French
18 of 28
The user can adjust the mic
sensitivity. For example when
mounted next to engine noise
set the mic to Lo, for quieter
activities set the mic to Hi
The user can select the volume
of the beep that starts and tops
recording
The user can adjust the volume
of the inbuilt speaker for
playback of video
Drift Innovation
Menu
X170 Action Camera
Sub
Menu
Branch
Memory
Available
Delete all
•
•
SD Card
Internal
•
0% to
100%
•
Confirm
Yes/No
This allows the user to select
between recording or capturing
videos and photos onto either
the built-in memory or the
external (SD card) memory.
This indicates the memory
remaining as a percentage (%).
This allows the user to delete all
information from the selected
“Record To” memory. This is
identical to formatting the
memory. It should be done
every time a new SD card is
inserted into the camera to
ensure that information is
correctly recorded onto the SD
card.
Firmware
The options within the Firmware menu are as follows:
Menu
Camera
Off
LCD Off
19 of 28
•
•
•
•
•
•
•
•
•
•
•
•
•
0% to
100%
Never
1min
5min
10min
20min
30min
Never
5secs
10secs
20secs
1min
5min
Sub
Menu
Options
Description
Memory
Options
Version
Reset
Settings
Power
Options
Power
Remaining
X170 Action Camera
Description
Memory
Options
Record to
Drift Innovation
This indicates the battery life
remaining as a percentage (%).
The camera unit can be set to
power down when a specific
period of inactive time has
passed. Recording video is
classed as active time.
Update
Firmware
The LCD screen can be set to
switch off after a specific period
of time. This helps conserve
battery. The camera unit
remains on during this time and
the control panel LCD light will
remain illuminated. To reactivate the LCD screen, simply
press any button on the control
panel.
20 of 28
This indicates which version of
the camera firmware you have
installed on your camera. Make
sure that you keep up-to-date
with the latest firmware
versions by checking the
manufacturers website.
This is a factory reset, the
camera would reset to how it
was out of the box.
This option is only present if a
firmware update is saved onto
an inserted SD card. This option
is meant to allow the firmware
of the camera to be upgraded
to handle the occasional
firmware upgrades.
Drift Innovation
X170 Action Camera
VIII) Computer Requirements and Technical
Connecting to a computer
You can copy your recorded video footage to a PC by connecting the camera to your PC
using the USB cable.
1.
2.
3.
4.
5.
6.
7.
With the camera turned off, connect it to a PC via the USB cable.
Switch the camera on
The USB icon should appear on the camera LCD screen and the camera should
become recognised by your PC as an external memory device.
The camera will now be connected to your PC and the photos and videos are
available for review. To confirm this, the camera should appear as DRIFT X170 in
your 'My Computer' folder on your PC.
Open the DRIFT X170 folder. In it you will find a sub-folder called DCIM.
Open the DCIM folder and you will find a folder called '100DRIFT' which contains
all photos and videos recorded on the SD card. If a lot of photos and videos are
recorded there will be multiple folders called 100DRIFT, 101DRIFT, etc.
Copy the desired video to your PC.
Playing and editing video footage on a Computer
1.
2.
3.
The users computer may not have all the codec’s required for playback.
If your experience difficulties playing clips, download free media player VLC from
www.videolan.org
If you are experiencing problems with playback or video editing and you do not
wish to use VLC player, you will need to download the latest Codec packs. It is
suggested that you download and install FFDshow from http://www.freecodecs.com/FFDshow_download.htm
Playing back video footage onto a TV
1.
2.
3.
4.
5.
21 of 28
With the camera turned off, connect it to a TV using the AV cable. If your TV does
not have phono connectors, you may require a Photo to Scart adaptor.
Switch the camera on.
Once booted up, you should now be able to see the camera sensor image directly
on your TV.
Use the camera in exactly the same way as if you were viewing the images / menu
icons on the camera LCD screen.
For instance, when playing back a video, rather than it appearing on the built-in
LCD screen, you will see it on the TV screen.
Drift Innovation
X170 Action Camera
Technical Specifications
• Sensor type: CMOS
• Lens angle: 170°
• Built-in Microphone
• Video format: MP4 or MJPEG AVI (user selectable)
• Frames per second: 30 fps
• Video format: 4:3 or 16:9 (user selectable)
• Batteries: 2x 1.5V AA batteries
• It is highly recommended to use Lithium batteries
• Power-Save option saves batteries by powering down the screen
• Built-in memory: 32 MB
• SD memory capacity: Supports memory cards up to 16 GB
• Video resolution: 720 x 480
• Photo resolution: 5 Megapixel
• Exposure: Auto
• LCD screen: 1.5” colour TFT
• Lens focal range: 0.5m to infinity
• Dimensions: Camera - 133 (L) x 50 (D) x 33 (W) mm / Remote Control – 52 (L) x 40 (W) x
13 (D) mm
• Power: Camera - DC 3V, 2x AA batteries (included) / Remote control: DC 3C, 1x CR2032
battery (included)
• RF: Receiver (Camera): 433.92MHz ISM band / Transmitter (Remote): 433.92MHz ISM
band
• Weight: Camera - 128g / Remote control - 19g
IV) Computer System Requirements
Minimum System Requirements
• Pentium III 800 MHz or higher
• Windows 2000, Windows XP, Windows Vista and Apple Mac X 10.4 and
below
• 128 MB RAM
• 800 MB Free hard disk space
• SVGA 800 x 600 resolution video support (32 bit)
• 16 bit Windows compatible sound device
22 of 28
Drift Innovation
X170 Action Camera
Looking after your camera
Drift Innovation
X170 Action Camera
IX. Frequently Asked Questions
The camera is specifically designed for extreme sports. Whatever your vice, the X170 should
allow you to capture some great video footage.
What type of SD Card does the camera support?
Inevitably, the camera will get dirty or wet. Although this is not an issue, it is recommended
that you clean the X170 whenever it gets dirty or wet.
The X170 supports SD cards from all leading brands, but we recommend class 6 cards for
video. The unit is also compatible with SDHC cards by leading brands
Below are some outline details on how to do this:
How does the remote control work?
Cleaning the lens and LCD screen
The remote control works using radio frequency (RF) to communicate directly with the
camera unit.
The remote is RF based, rather than infrared or IR (such as other helmet cameras).
You do not need to point the remote at the camera. As long as the remote is within a 5m
radius of the camera, the camera will pick up the remote control signal
•
•
•
Be careful not to scratch the camera lens whilst cleaning it.
Wipe off any surface mud or water from the lens with a damp cloth
Then use a dry scratch-proof cloth to polish the lens
Cleaning the seals
•
•
•
To ensure that the camera remains waterproof to 1m, it may be necessary from
time to time to clean the contact surfaces around the rear camera hatch seal.
This can be done by wiping a damp cloth around the seal. Ensure that this does
not leave excessive water on the seal. Let it air dry.
To add extra seal, run a bit of vaseline around the seal from time to time.
How long will the batteries last?
We advise using either Energizer Lithium AA batteries or 1800mAh NiMH rechargeable AA
batteries. Using brand new Energizer Lithium batteries you will get 4 and a half hours worth
of battery life. The "try-me" batteries included in the camera kit as purchased will give you
30 minutes of battery life. Using Duracell AA batteries, you would get approximately 60
minutes of battery life. Ultimately battery life is dependent upon operating temperature. In
cold environments (e.g. skiing / snowboarding), Lithium batteries are less affected and
remain most of their battery life.
How do I get more battery life out of my camera?
The built-in LCD screen consumers power so one of the best ways to save battery life is to
use the menu settings and go into the Power Options section. You will have the ability to
change the LCD screen settings such that the LCD screen switches off, whilst recording. This
will ensure that whilst the camera still is ready to start recording or is recording, the LCD
screen will not be drawing power. For users with cigarette lighter adaptors (motorsports /
motorbikes), it is possible to power the camera directly from the cigarette lighter without
using any batteries. You will need a USB cigarette lighter adaptor for this. Note that we
recommend Energizer Lithium or rechargeable 1888mAh NiMh batteries for best battery life.
The batteries provided in the box are "Try Out" batteries which only hold approx 30mins of
life to get you going with the camera.
23 of 28
24 of 28
Drift Innovation
X170 Action Camera
Drift Innovation
X170 Action Camera
X. Troubleshooting
The videos and photos give me a slight fisheye effect. Is this right?
Yes it is. We specially selected a 170 degree lens to provide users with the really quirky wide
angle that was really prominent in the early days of helmet cameras (especially in
skateboarding). The effect will be less pronounced on objects in the distance and more
pronounced on objects closer to the camera lens.
If you want a narrower angle of view or less funky image, then this may not be the product
for you.
What are the dimensions of the video camera?
The dimensions of the camera are 133 (L) x 50 (D) x 33 (W) mm and those of the remote
control are 52 (L) x 40 (W) x 13 (D) mm.
How far will the remote control work?
The wireless remote control uses radio frequency signal to transmit the 'START' / 'STOP'
messages to the camera. The range is 5m.
What is the biggest SD card I can use?
We specify that the largest SD card size is 16Gb. However we have conducted successful
tests with leading brands using 32GB cards too. Note that file sizes can quickly become very
large as the unit uses approx 1Gb for 30 minutes of high resolution video.
Can I connect my camera to a tripod or suction cup?
Yes. The X170 is the only camera on the market that comes with a built-in 8mm / 1/4"
female camera thread. You can therefore fix the camera to any tripod, suction mount (eg
Panavise 809) or other camera mount with the 8mm / 1/4" camera thread. These mounts
can be purchased from all our leading dealers or camera stores.
Can I power my camera from a cigarette lighter adaptor?
Yes. In order to do this connect the USB cable into the camera and into a USB cigarette
lighter adaptor. The unit will then take its power from your bike or car battery. Note that
although this allows you to power the camera unit, it does not recharge rechargeable
batteries if you are using them. You can buy the USB cigarette lighter adaptor from all of our
leading dealers or from electrical stores.
25 of 28
There's no display
•
Are the batteries properly installed?
•
Do the batteries need replacing?
After the camera is connected to my PC, it cannot find the new drive in
the 'My Computer' folder
•
Ensure each end of the camera USB cable is properly and firmly connected.
•
Ensure your USB port is working properly. Try connecting another USB device into
the port. If the other device does not work, the USB port may have a malfunction.
In this case, contact your system manufacturer or the manufacturer of your USB
card.
I can't capture video footage
•
Ensure there is enough space on the internal memory of camera or the SD card;
the display will tell you how much time there is left for video recording.
•
Ensure the SD card is not locked. The LCD will display a message if the SD card is
locked.
The remaining time is not accurate
•
The remaining time is an estimate.
•
The remaining time depends not only on the time recorded, but on the colour
density of the video footage. Under conditions with high contrast, such as
outdoors, the actual time available will be less than under low-contrast conditions.
I can't play the video footage on my television
•
Ensure each end of the AV cable is properly and firmly connected to the camera
and to your television.
•
Ensure the camera and television are both turned on.
•
Ensure you have set the television to the AV-mode.
Some captured video footage cannot be found when SD card is inserted
•
The video footage may be stored on the internal memory. Connect the camera to
your PC without an SD card, and it will show the files in the internal memory.
The sound is very low or there is no sound
•
Ensure the audio is on by following the instructions in the Sound Recording
section.
•
The camera is specifically designed for extreme sports and is waterproof, it is for
this reason that we have made the microphone less sensitive.
I can’t few clips on my computer, or I get an error message
•
You may have outdated codecs. Please use VLC player available from
www.videolan.org
•
If you still wish to use WMP or other editing software you need to upgrade your
codec pack. Download ffdshow from http://www.freecodecs.com/FFDshow_download.htm and install the file.
I switched my camera off during recording, and the clip recorded is damaged.
•
Please ensure that you stop recording before switching off your camera, as this
can damage the video clip you are currently recording.
26 of 28
Drift Innovation
X170 Action Camera
Further Help
We make every effort to ensure the accuracy and appropriateness of the information
provided on our products. We encourage you to contact our Technical Support Team on
[email protected] with any problems and/or suggestions.
Please note that the Technical Support Team cannot issue or authorise any RMA's or
replacements. For an RMA or replacement please contact the place of purchase.
This device complies with Part 15 of the FCC Rules. Operation is subject to the following two
conditions:
(1) this device may not cause harmful interference, and (2) this device must accept
any interference received, including interference that may cause undesired
operation.
WARNING:
Changes or modifications to this unit not expressly approved by the party responsible for
compliance could void the user's authority to operate the equipment.
NOTE:
This equipment has been tested and found to comply with the limits for a Class B digital
device, pursuant to Part 15 of the FCC Rules. These limits are designed to provide
reasonable protection against harmful interference in a residential installation. This
equipment generates, uses, and can radiate radio frequency energy and, if not installed and
used in accordance with the instructions, may cause harmful interference to radio
communications. However, there is no guarantee that interference will not occur in a
particular installation.
If this equipment does cause harmful interference to radio or television reception, which can
be determined by turning the equipment off and on, the user is encouraged to try to correct
the interference by one or more of the following measures:
• Reorient or relocate the receiving antenna.
• Increase the separation between the equipment and receiver.
• Connect the equipment into an outlet on a circuit different from that to which the receiver
is connected.
• Consult the dealer or an experienced radio / TV technician for help.
27 of 28
Drift Innovation
X170 Action Camera
INFORMATION FOR USERS
In accordance with European Directives 2002/95/CE, 2002/96/CE and 2003/108/CE on the
restriction of the use of dangerous substances in electric and electronic equipment as well as
their waste disposal.
The barred symbol of the rubbish bin shown on the equipment indicates that, at the end of
its useful life, the product must be collected separately from other waste.
Therefore, any products that have reached the end of their useful life must be given to
waste disposal centres specialising in separate collection of waste electrical and electronic
equipment, or given back to the retailer at the time of purchasing new similar equipment, on
a one for one basis.
The adequate separate collection for the subsequent start-up of the equipment sent to be
recycled, treated and disposal of in an environmentally compatible way contributes to
preventing possible negative effects on the environment and health and optimises the
recycling and reuse of components making up the apparatus.
Abusive disposal of the product by the user involves application of the administration
sanctions according to the laws in force.
CAUTION RISK OF EXPLOSION IF BATTERY IS REPLACED BY AN INCORRECT TYPE.
DISPOSE OF USED BATTERIES ACCORDING TO THE INSTRUCTIONS.
XI. Warranty
Thank you for purchasing the Drift X170. We are
confident you will have great fun with the X170!
Warranty
To obtain our warranty service, register your
product at www.driftinnovation.com as soon as
you purchase it.
Customer Support
• Check www.driftinnovation.com for firmware
updates, product updates and user videos.
• We are here to help. If you have any suggestions,
comments or problems, please contact our customer
support team on [email protected].
28 of 28