1
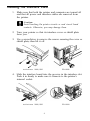
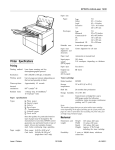
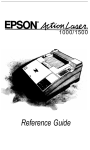
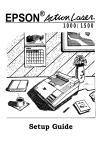
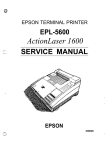
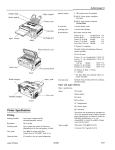
EPSON
®
Connect Your Macintosh® Computer
to Epson Laser Printers
Installation Guide for
N ActionLaser™ 1000
N ActionLaser 1500
l EPL-8000
CPD-1310
Epson Talk™
Connect Your Macintosh® Computer to Epson Laser Printers
Epson Talk allows you to use an Epson printer with your
Macintosh computer. Use this Installation Guide to install
Epson Talk quickly. If you require further details, please read
the manuals enclosed, Epson Interface Card for LocalTalk™
C823121 and Epson PostScript™ Card C826091 User’s Guide,
along with your printer manual.
What You Need for Installation
Ci
A minimum of 2.0 MB RAM printer memory
Q
LocalTalk cable (not included)
0
Interface Card for LocalTalk (C823121)
Q PostScript Card (C826091)
Cl A cross-head screwdriver
U
An ActionLaser™ 1000, an ActionLaser 1500, or an EPL-8000
Before You Install Epson Talk
Use your printer’s Setup and Maintenance guide to set up and
test your new printer. Go only as far as test printing; you will
use the procedures in this guide to connect the Macintosh.
Once you see that your printer operates properly, install Epson
Talk as described below.
Installing the Interface Card
1. Make sure that both the printer and computer are turned off
and that all power and interface cables are removed from
the printer.
Caution:
e Avoid touching the printer circuits or card circuit board
contacts. Otherwise, you may damage them.
2. Turn your printer so that its interface cover or shield plate
faces you.
3. Use a screwdriver to remove the screws securing the cover or
shield plate; then lift it off.
ActionLaser 1000/1500
EPL-8000
4. Slide the interface board into the grooves in the interface slot.
Push it in firmly to make sure it connects to the printer’s
internal socket.
ActionLaser 1000/1500
EPL-8000
2
5. Secure the interface with the two screws provided with
the card.
6. Attach your LocalTalk cable to the LocalTalk port (indicated
by the f icon) on the interface card. (Do not use the serial
port.) Then plug the other end of the cable into your
computer.
7. Plug the power cord into your printer and an electrical outlet.
Installing the PostScript Card
e
Caution:
Cl Do not insert the card while the printer is turned on.
0 Do not touch the gold connectors along the card’s edge.
0 Do not use too muchforce when you insert and remove the
card. Otherwise, you may damage it.
1. Make sure the printer is turned off.
2. Hold the card so that the arrow on the card is aligned with
the arrow on slot A. (Do not use slot B.)
EPL-8000
ActionLaser 1000/1500
3. Gently but firmly slide the card into the slot as far is it can go.
4. Turn on the printer and computer.
3
-
Selecting PostScript
You need to change the emulation or mode setting through
SelecType before you can use PostScript.
The SelecType instructions below enable you to assign
PostScript quickly. If you need more detailed instructions on
using SelecType, see your printer manual
Note:
Be sure to install the interface and PostScript cards first. Otherwise,
the PostScript emulation or mode aloes not appear as a SelecType
option on the printer display.
For the ActionLaser 1000 and 1500
1. Press the ON LINE button to take the printer off line.
2. Press the SelecType Level 2 button.
3. Press V until EMULATION appears on the display.
4. Press b.
5. Press V until CH O appears.
6. Press b.
b
7. Press V until PS appears.
8. Press F to set the PS emulation.
9. Press the EXIT button twice to return to the READY message.
Note:
The READY message may not show O PS (indicating the
optional interface and PostScript) until after yourfirst print job
is sent from your computer to the printer each time you turn on
your printer.
10. Make sure that AppleTalk is active in the Chooser under the
Apple menu on your Macintosh.
4
11. Click LaserWriter in the Chooser menu. The name of your
printer appears in the Select a LaserWriter box. Click on the
name of your printer and then close the Chooser.
Note:
If the
LaserWriter printer driver is not yet installed on your
computer, you can find it on one of your Macintosh System disks.
Follow your computer manual instructions to install it on your
Macintosh.
12. begin printing using your application software.
For the EPL-8000
Note:
If
you have an Epson EPL-8000 printer, you must have aj%mware
version 22.48 or later to use Epson Talk. To find out your printer’s
firmware version, print a status sheet as described in your printer
manual. If you do not have the above firmware version, please call the
Epson Connection at (800) 922-8911.
1. Press the ON LINE button to take the printer off line.
2. Hold down the SelecType button until the Level 2 light
comes on.
3. Press v until MODE ASSIGN appears on the display.
4. Press b until CH P appears.
5. Press v until CH O appears.
6. Press F.
7. Press v until CH O PS appears.
8. Press ä to set the PS setting.
9. Press 4 to return to MODE ASSIGN.
10. Press v until P-CONFIG.SAVE appears.
5
11. Press b twice to save the CH O PS setting.
12. Press 4 twice to return to the READY message.
13. Press the ON LINE button.
Note:
The READY message may not show O PS (indicating the
optional interface and PostScript) until after your first print job
is sent from your computer to the printer each time you turn on
your printer.
14. Make sure that AppleTalk is active in the Chooser under the
Apple menu on your Macintosh.
15. Click LaserWriter in the Chooser menu. EPL-8000 appears
in the Select a LaserWriter box. Click on EPL-8000 and then
close the Chooser.
Note:
the LaserWriter printer driver is not yet installed on your
computer, you can find it on one of your Macintosh System disks.
Use your computer manual instructions to install if on your
Macintosh.
If
16. Begin printing using your application software.
6