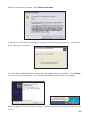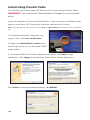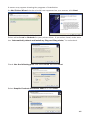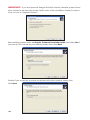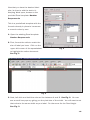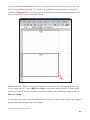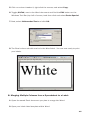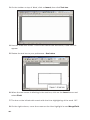
1
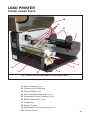
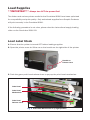
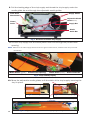
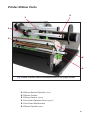
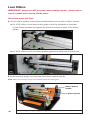
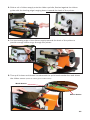
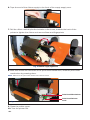
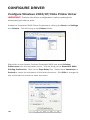
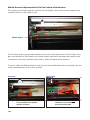
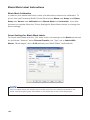
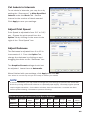
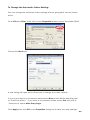
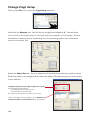
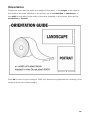
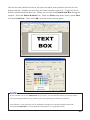
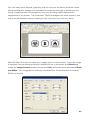
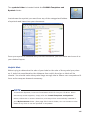
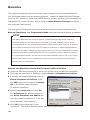
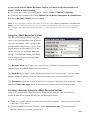
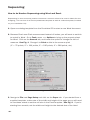
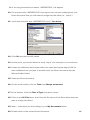
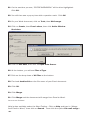
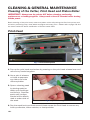
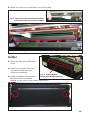
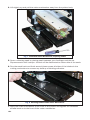
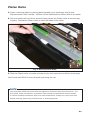
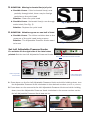
DuraLabel 9000
®
User’s Guide
Graphic Products, Inc.
1-800-788-5572
Local: 503-644-5572
www.DuraLabel.com
www.GraphicProducts.com
E-mail: [email protected]
INTRODUCTION
Welcome...
And congratulations on the purchase of your new DuraLabel® 9000 Thermal Transfer Printer!
We've included this guide to get you printing as quickly as possible.
In this guide you'll find information on setting up your printer, configuring your software, and
creating custom labels. We know that all topics cannot be addressed in any document and are
ready to answer your questions. If you have any questions or concerns, make sure to give us a
call!
Please contact us for all your labeling needs. From standardized to custom labels, we’re ready
to provide the labeling supplies you need. Call 1-800-788-5572 today to get your labeling
problems solved.
Graphic Products, Inc.
1-800-788-5572
CONTENTS
Warranty ............................................................... pg. 3
Getting Started ..................................................... pg. 4
Minimum System Requirements...................... pg. 4
Supplies ............................................................. pg. 4
Prepare Printer .................................................. pg. 4
Load Printer .......................................................... pg. 5
Printer Inside Parts ........................................... pg. 5
Load Supplies .................................................... pg. 6
Load Label Stock ............................................... pg. 6 - 8
Printer Ribbon Parts .......................................... pg. 9
Load Ribbon....................................................... pg. 10 - 12
Connect Printer .................................................... pg. 13
Insert Installation CD ........................................ pg. 13
Install Using USB Cable .................................... pg. 14 - 15
Install Using Parallel Cable ............................... pg. 16 - 19
Configure Driver ................................................... pg. 20 - 25
Configure Windows 2000/XP/Vista ................. pg. 20
Continuous Vinyl Printing Instructions ......... pg. 21
Die-Cut Label Instructions ............................ pg. 21 - 23
Black Mark Label Instructions...................... pg. 24
Cut Labels in Intervals .................................. pg. 25
Adjust Print Speed......................................... pg. 25
Adjust Darkness ............................................ pg. 25
Label Creation ...................................................... pg. 26
Use Templates ................................................... pg. 27
Set Up Microsoft Word Document ................... pg. 28
Select Printer ........................................................ pg. 28
Change Page Setup........................................... pg. 30
Orientation ......................................................... pg. 31
Label Design......................................................... pg. 32
Text ..................................................................... pg. 32 - 33
Graphics ............................................................. pg. 34 - 35
Symbols .............................................................. pg. 36 - 37
Barcodes ............................................................ pg. 38 - 39
Sequencing ........................................................ pg. 40 - 43
Import from Excel .............................................. pg. 44 - 48
Configure Ethernet Card ...................................... pg. 49
Cleaning & General Maintenance....................... pg. 50
Print Head .......................................................... pg. 50 - 51
Cutter.................................................................. pg. 51 - 52
Platen Roller ...................................................... pg. 53
Troubleshooting .................................................... pg. 54 - 56
Specifications ....................................................... pg. 57
-1-
-2-
WARRANTY
The Graphic Products DuraLabel 9000 is warranted to be free from defects in materials or
workmanship for a period of two years from the date of purchase with the following exception:
The DuraLabel 9000 print head is warranted to be free from defects in materials and
workmanship for a period of one year from the date of purchase. Within this period, Graphic
Products, Inc. will, at its sole option, repair or replace any components which fail in normal
use. Such repairs or replacement will be made at no charge to the customer for parts or labor,
provided that the customer shall be responsible for any transportation cost. This warranty does
not cover equipment or parts which have been misused, altered, neglected, carelessly handled,
used for purpose other than those for which the printer was manufactured or damages
resulting from unauthorized service.
NOTE: Repairs have a 90 day warranty. If the unit sent in is still under its original warranty,
then the new warranty is 90 days or to the end of the original warranty, depending upon which
is longer.
The Warranties and remedies contained herein are exclusive and in lieu of all other warranties
whether express, implied or statutory, including any liability arising under any warranty of
merchantability or fitness for a particular purpose, statutory or otherwise. This warranty gives
you specific legal rights, which may vary from state to state.
In no event shall Graphic Products be liable for any incidental, special, indirect or consequential
damages, whether resulting from the use, misuse or inability to use the product for any reason
including defect. Some states do not allow the exclusion of incidental or consequential
damages, so the above limitation may not apply in all areas.
Graphic Products retains the exclusive right within all warranty periods to repair, replace the
product or offer a full refund of the purchase price at its sole discretion. Such remedy shall be
your sole and exclusive remedy for any breach of warranty.
For further service information, please contact your Graphic Products representative at
1-800-788-5572 or www.graphicproducts.com.
-3-
GETTING STARTED
Minimum System Requirements
Operating System: Windows 2000 SP4, Windows XP SP2 and Windows Vista
Memory: 128 MB RAM
Additional Requirements: IT Administration Privileges
Supplies
®
The ribbon and various print media for the DuraLabel 9000 have been optimized for
compatibility and print quality. Only authorized supplies from Graphic Products will
®
print correctly in the DuraLabel 9000.
Prepare Printer
Instructions for unpacking, loading supplies and connecting your printer are located
in the Printer Manual (in electronic form). There is also an instructional video
included on the CD, that shows you how to load supplies. Please read and follow
those instructions carefully before continuing.
NOTE: To view the electronic version of the printer manual you will need a corresponding document viewer
(PDF or DOC). A suitable viewer is included on the installation CD - Adobe Acrobat Reader.
-4-
LOAD PRINTER
Printer Inside Parts
10
9
8
7
6
1
5
2
3
4
Fig. 1 Parts of the DuraLabel 9000 for Loading Label Stock
1. Media Sensor (green)
2. Printed Label Opening
3. Platen Roller (black)
4. Print Head Release Lever (green)
5. Adjustable Media Guide(s) (white)
6. Media Guide Bar (metal)
7. Supply Bar
8. Supply Guides
9. Adjustable Pressure Knobs (green)
10. Printer Cover
-5-
Load Supplies
**IMPORTANT** Always turn OFF the power first!
The ribbon and various printer media for the DuraLabel 9000 have been optimized
for compatibility and print quality. Only authorized supplies from Graphic Products
will print correctly in the Duralabel 9000.
If the following procedure is not clear, please view the instructional supply loading
video on the DuraLabel 9000 CD.
Load Label Stock
1. Ensure that the printer is turned OFF before loading supplies.
2. Open the printer cover by lifting up on the handle on the right side of the printer.
Handle on
Printer Cover
3. Push the green print head release lever to pop-up the print head mechanism.
Print Head
Print Head
Mechanism
Print Head
Release Lever
Fig. 2 Print Head Mechanism in up-right position
-6-
4. Remove the outside supply guide from the supply bar and set aside.
Supply Guide
Supply Bar
Fig. 3 Both Supply Guides still on Supply Bar
5. Adjust the inside supply guide to cover the number corresponding to the size of
vinyl supply being loaded. (see Figure 4 & 5)
Fig. 4 The inside supply guide is set
for 6" vinyl supply/media
Fig. 5 The inside supply guide is set
for 8" vinyl supply/media
6. Place the vinyl supply onto the supply bar.
NOTE: The vinyl supply should roll over the top and towards the front of the printer.
7. Fit the outside supply guide onto the label bar, against the vinyl supply, but with
enough room for the vinyl supply to rotate with ease.
Supply Guides
Supply Bar
Vinyl Supply/Media
Fig. 6 Vinyl loaded with outside Supply Guide applied to Supply Bar
-7-
8. Pull the leading edge of the vinyl supply and thread the vinyl supply under the
media guide bar and through the adjustable media guides.
Supply Guides
Print Head
Mechanism
Adjustable Media
Guides (white)
Platen
Roller
Supply Bar
Media
Guide Bar
Fig. 7 Direction of loaded Vinyl supply
9. Pull the vinyl supply over the black platen roller and through the printed label
opening.
NOTE: Make sure the label supply threads under the green media sensor, located under the print head
mechanism.
Media Sensor (green) Printed Label Opening
Platen Roller (black) Media Guide Bar
Fig. 8 Vinyl loaded properly
10. Move the adjustable media guides to fit the width of the vinyl supply, securing the
vinyl in place.
Fig. 9 Correctly fitted
Fig. 10 Not fitted properly
Adjustable Media Guides (white)
-8-
Fig. 11 Adjustable Media Guides fitted properly to vinyl width
Printer Ribbon Parts
1
6
2
3
5
4
Fig. 1 Inside of Printer with Print Head Mechanism in an upright position
1. Ribbon Rewind Spindle (front)
2. Ribbon Guides
3. Ribbon Sensor (black)
4. Print Head Release Lever (green)
5. Print Head Mechanism
6. Ribbon Spindle (back)
-9-
Load Ribbon
IMPORTANT! Always turn OFF the printer when loading supplies. Always wait at
least 5 seconds before turning ON the power.
Turn printer power OFF first!
1. Set the ribbon guides on the ribbon spindles based on the size of ribbon loaded.
a. For 4.33" ribbon, move each ribbon guide to the line indicated on the label
on the ribbon spindles and tighten the screw on the top of each of the ribbon
guides.
b. For 8.66" ribbon, move the ribbon guides against the inside wall of the printer.
2. Slide an empty supply core onto the front ribbon rewind spindle.
NOTE: Make sure the empty supply core is flushed against the ribbon guide.
Ribbon Rewind
Spindle
Ribbon Spindle
-10-
Fig. 2 Empty supply core applied to front Ribbon Rewind Spindle
3. Slide a roll of ribbon supply onto the ribbon spindle, flushed against the ribbon
guide with the leading edge hanging down, towards the back of the printer.
4. Pull the leading edge of the ribbon supply towards the back of the printer to
provide enough ribbon to go through the printer.
5. Then pull it down and thread it underneath the print head mechanism and above
the ribbon sensor (black bar above green media sensor).
Media Sensor
Ribbon Sensor
-11-
6. Tape the end of the ribbon supply to the front of the empty supply core.
7. Roll the ribbon rewind spindle clockwise a few times, towards the back of the
printer to tighten the ribbon and remove flaws and fingerprints.
Fig. 3 Ribbon supply tightened
8. With both hands on each side of the print head mechanism, close the print head
mechanism by pressing down.
NOTE: Make sure the print head release lever latches closed
Print Head Mechanism
Fig. 4 Print Head Mechanism closed
9. Close the printer cover.
10. Turn the printer ON.
-12-
Print Head Release
Lever
IMPORTANT! You must have administrative rights in order to install driver.
NOTE: Find out your Windows version by right-clicking on the My Computer icon (located on your desktop).
Select the Properties option. Your Windows version is located under the System heading. Make sure you
have installed the latest updates from Microsoft, including service packs.
CONNECT PRINTER
Connect the power supply from the DuraLabel® 9000 to an electrical outlet. Connect
the USB or Parallel Cable from the DuraLabel® 9000 to your PC. Power ON the
DuraLabel® 9000.
To the Right:
A Found New Hardware notification
will appear (only if using a USB
cable) in the bottom right hand
corner of your desktop after
plugging in all components and
powering ON the printer.
Insert Installation CD
Before inserting the Installation CD, please refer to the instructions for the type of
cable being used. When connecting with a USB Cable, please follow the “Install
Using USB Cable” instructions pages 13-14. For Parallel Cable, please follow the
“Install Using Parallel Cable” instructions pages 15-18.
-13-
Install Using USB Cable
The following instructions (pages 13-14) are only for those using a USB Cable.
Skip to page 15 of the User's Guide if installing manually.
IMPORTANT! You must have IT administrator privileges in order to install
driver.
IMPORTANT! If you are upgrading from an existing DuraLabel installation,
see the inside cover of the QuickStart Guide.
A Found New Hardware dialog box may appear. If so, select No, not this time.
Insert the DuraLabel® 9000 CD into the CD-ROM drive. Select Install the
software automatically and click Next. (This step may run automatically.)
-14-
When prompted to continue, click Continue Anyway.
A dialog box will appear showing the progress of the files being copied. It will close
after copying is complete.
A Found New Hardware Wizard dialog box will appear after completion. Click Finish
to exit and close the screen. A Found New Hardware notification may appear.
Skip to page 19 of User's Guide, section “Configure Windows 2000/XP/Vista Printer
Driver.”
-15-
Install Using Parallel Cable
The following instructions (pages 15-18) are only for those using a Parallel Cable.
IMPORTANT! You must have IT Administrative Privileges in order to install
driver.
Insert the Installation CD into the CD-ROM drive. (If you encounter a dialog box that
says you must have .NET Framework, follow the instructions in the box.)
NOTE: If the CD does not automatically run, go to Start >>> My Computer and double-click on the DL9000
icon.
A “Found New Hardware” dialog box may
appear. If so, select No, not this time.
To begin, click Manual Driver Install at the
®
bottom right corner of your DuraLabel 9000
setup screen.
A “DuraLabel 9000 Driver Setup” dialog box will appear, click Next to begin
installation. Click I Agree to the Windows Printer Driver License Agreement.
Click Install to accept the default directory, “C:\DL9000”
-16-
A screen may appear showing the progress of installation.
An Add Printer Wizard window should have appeared on your screen; click Next.
Select either Local or Network for your printer driver. If you select Local, make sure
the “Automatically detect and install my Plug and Play printer,” is unchecked.
Check Use the following port, and select LPT1 and click Next.
Select Graphic Products DuraLabel 9000 and click Next.
-17-
IMPORTANT! If you had previous Seagull Scientific drivers installed, press Cancel
then reload the cd and refer to the inside cover of the QuickStart Guide for instructions on how to "Upgrade Drivers".
Keep existing printer name as Graphic Products DuraLabel 9000 and select Yes if
you wish for it to be set as your default printer, then click Next.
Decide if you would like to share the printer with other network users, then
click Next.
-18-
Select No to “Do you want to print a test page,” then click Next.
Make sure your settings are correct. If so select Finish, otherwise select Back and
change to the correct settings.
If prompted to continue, click Continue Anyway.
A dialog box will appear regarding Completing the DuraLabel 9000 Driver Setup,
click Finish.
Your driver should be installed and you should be ready to set up for printing.
-19-
CONFIGURE DRIVER
Configure Windows 2000/XP/Vista Printer Driver
IMPORTANT! Perform the driver configuration before opening the
document you wish to print.
Access the DuraLabel 9000 Printer Properties by clicking the Start >>> Settings
>>> Printers. This will bring up the Printers folder.
Right-click on the Graphic Products DuraLabel 9000 and select Printing
Preferences from the drop-down menu. This will bring up the DuraLabel 9000
Printing Preferences. Click on the Page Setup Tab. Select either Landscape or
Portrait to match the orientation of the label document. Click Edit to change the
size of the label to match the label document.
-20-
Continuous Vinyl Printing Instructions
To set the cutter, select the Stock
Tab. Set the Media Settings “Type” to
Continuous. In order for the automatic
cutter to cut after each label, under
Media Handling next to “Post-Print
Action,” select Cut and then next to
“Occurrence” select After Every Page.
These settings may be later adjusted
to your specifications in the Printer
Properties as you are printing your
labels. Select Apply on the bottom of
the Printing Preferences window.
Die-Cut Label Instructions
Die-Cut Label Calibration
In order to print die-cut labels, the label stock needs to be calibrated. To do so, from
the DuraLabel 9000 Control Panel select Menu >>> Setup >>> Printer Setup >>>
Sensor >>> Calibration >>> Gap Mode >>> Automatic. Once this process is complete follow the "Driver Settings for Die-Cut
Labels" to change the driver settings.
Driver Settings for Die-Cut Labels
For die-cut labels with the 1/8" gap, the settings on the Stock tab should be as follows:
“Method” set to Thermal Transfer, the “Type”
set to Labels With Gaps, “Gap Height” set
to 0.12 (default) and “Gap Offset” to 0
(default.)
NOTE
You can adjust where the printer cuts to make sure the cut is directly centered in the gap
by adjusting the Feed Offset in the Stock tab of the Printer Properties.
-21-
Media Sensor Adjustment for Die-Cut Labels with Headers
For optimum printing using the various die-cut labels, the media sensor needs to be
adjusted either to the right or left.
Media Sensor
For Die-Cuts with a pre-printed header at the top of the label, such as Arc Flash, Danger, and Notice Die-Cut labels, the media sensor should be adjusted so that the end
is centered over the printable area (blank, white printable-area of label)
To do so, slide the Media Sensor until the end of the Media Sensor is located over the
white printable-area of the die-cut label.
Correct:
Fig. 1 End of Media Sensor centered
over printable-area (white
section of label)
-22-
Incorrect:
Fig. 2 End of Media Sensor Not
centered over printablearea of die-cut label
Media Sensor Adjustment for RTK Color Bar Die-Cut Labels
For RTK Color Bar Die-Cuts which have a blank printable-area at the top, the media
sensor should be adjusted so that it is centered over the printable-area (blank white
section of label) at the top of the RTK Color Bar die-cut label.
To do so, slide the Media Sensor until the end of the Media Sensor is located over the
the printable-area of the RTK Color Bar label.
Correct:
Fig. 10 End of Media Sensor centered over printable-area of RTK Color Bar Die-Cut
label
-23-
Black Mark Label Instructions
Black Mark Calibration
In order to print labels with black marks, the label stock needs to be calibrated. To
do so, from the DuraLabel 9000 Control Panel select Menu >>> Setup >>> Printer
Setup >>> Sensor >>> Calibration >>> Bmark Mode >>> Automatic. Once this
process is complete follow the "Driver Settings for Black Mark Labels" to change the
driver settings.
Driver Settings for Black Mark Labels
For black mark labels with the 1/8" black mark, the settings on the Stock tab should
be as follows: “Method” set to Thermal Transfer, the “Type” set to Labels With
Marks, “Mark Height” set to 0.12 (default) and “Mark Offset” to 0 (default.)
NOTE
You can adjust where the printer cuts to make sure the cut is directly centered on the
black mark by adjusting the Feed Offset in the Stock tab of the Printer Properties.
-24-
Cut Labels in Intervals
To cut labels in intervals, you may do so by
setting the “Occurrence” to After Specified
Interval under the Stock Tab. Set the
Interval to the number of labels needed.
Click Apply to save your settings.
Adjust Print Speed
Print Speed is adjustable from 2.0" to 3.0"/
sec. Choose the print speed from the
Option Tab by clicking on the arrow to the
right of the “Print Speed” box.
Adjust Darkness
The Darkness is adjusted from 0 to 15 in
increments of 1. From the Option Tab,
change the darkness by clicking on and
dragging the slider on the “Darkness” bar.
The Graphics Format settings should not
be adjusted. Leave them at Automatic.
When finished with your settings, click Apply then click OK.
Your driver is now set up and you are ready to create your labels!
NOTE
®
In certain situations, you may need to change the print settings to optimize the DuraLabel
9000 for printing with certain ribbons or a specialty tape supply. Generally, higher speeds
require higher densities. If the ribbon wrinkles, lower the darkness. Increase the Darkness to prevent fading. Decrease to prevent wrinkling.
Recommended Darkness and Print Speed Settings:
Chemical
Standard
Black
White
Red
Blue
Green
Orange
Darkness
-
4-6
4-6
4-6
4-6
4-6
Speed
2
2
2
2
2
2
Ribbon
Shrink
Tube
Die-Cut
Labels
4-6
-
8
2
2
2
-25-
LABEL CREATION
Before We Begin...
This documentation describes how to make standard labels. If you are printing RTK
labels, please see the RTK software documentation. The RTK documentation was
installed on your computer at the same time the RTK software was installed.
The examples in this tutorial were tested with Microsoft Word 2000. Some
variations may occur with different versions of Word, or with different word
®
processors, but the basic principles will be the same. The DuraLabel 9000 is
designed to work with any currently supported Windows software, and should work
with the software packages that you already have installed on your computer.
®
All portions of this tutorial assume that the DuraLabel 9000 has been properly
installed and is connected in the online mode. Please see the installation guide for
more information before proceeding with this tutorial.
Label Creation With Your Word Processor...
Many have invested in high-end word processing software that is never used
to its full potential. Today's word processors come packed with features and
capabilities that far surpass the average user's needs. Advanced page layouts,
graphic manipulation and printing options are only the beginning of what most word
processors have to offer.
®
The DuraLabel 9000 operates off of a standard Windows printer driver that makes
the printer accessible from a wide variety of software packages. Many printers will
only work with expensive, proprietary software that is often buggy and overpriced.
®
With the DuraLabel 9000 you will be able to use the software that you are familiar
with, and get the most out of an investment you've already made.
In this tutorial we will show you how to use Microsoft Word to create and print
custom labels and signs. If you have further questions concerning your software
package, or label creation in general, please contact your customer service
representative at 1-800-788-5572.
-26-
Use Templates
®
We have provided a variety of templates on the DuraLabel 9000 to help get you
printing labels in no time. To get to these templates, you should install from the
start-up screen on your Installation CD. This should only take a minute or two.
Click on Install Templates and Symbols
on the start-up screen. Follow the
on screen instructions to install the
templates. The Templates will install
into a folder on the Desktop of our
computer.
After installation is complete, templates and symbols will be located
in a folder called DL9000 Templates and Symbols on your Desktop.
Now, when you want to use a template,
just open Microsoft Word. Select Open,
then browse the DL9000 Templates and
Symbols folder. There are a variety of
templates for you to choose from, all of
which are setup to print correctly on the
®
DuraLabel 9000. Just customize the label
to your specifications and PRINT!
-27-
Set Up Microsoft Word Document
Once you open a new or existing document, you must change the paper size and
margins. Word processors will default to 8.5" x 11", but changing these settings is
generally very simple. The steps are outlined for Microsoft Word below:
Select Printer
Before you make any changes to the page layout you must first select the DuraLabel
9000 as your printer. The word processor communicates with the selected printer
driver to determine if margin and other settings are within the printers limits. To
select the DuraLabel 9000 click on the File menu, then the Print selection; which
will bring up the print dialog:
In the print dialog simply locate the pull-down selection and choose Graphic
Products DuraLabel 9000 as your printer. Click OK to continue.
NOTE
You may find that changing these settings for certain types of supplies is optimal. For
a label with mainly text and not a lot of large, dark areas, you may want to decrease
the darkness by 1 or 2. If you have large areas of solid color to print, you may need to
increase the darkness by 1 or 2. You'll have to experiment to get the desired quality.
-28-
To Change the Automatic Cutter Setting:
You can change the automatic cutter settings without going back into the printer
driver.
Go to File >>> Print , then click on the Properties button next to DuraLabel 9000.
Choose the Stock tab.
A new dialog will open which allows you to change the cutter options.
If you do not want to cut between labels select None under Media Handling next
to “Post-Print Action.” If you want to cut between labels, select Cut and next to
“Occurrence” select After Every Page.
Click Apply then click OK in the Properties dialog box to save your new settings.
-29-
Change Page Setup
Click on the File menu, then the Page Setup selection.
Now click the Margins tab. Set all of your margins and edges to 0. This will allow
you to print on the entire area of your tape with the exception of *9" supply. Set the
orientation to desired layout. Depending on your operating system, the orientation
may be on another Tab.
Select the Paper Size tab. Set your paper size to the size of the label you wish to create.
Either the width or the height should match the width of the tape supply you have loaded
in the machine.
*Settings required to print edge-to-edge for 9" supply
For the following orientations:
▪ landscape label: set height to 8.5"
▪ portrait label: set width to 8.5"
The maximum printable area is 8.66" (ribbon width)
Under “First Page” & “Other Pages”, either Default tray
(Continuous Roll) or Continuous Roll may be selected.
-30-
Orientation
Create the label with the width and height of the label. If the height of the label is
the width of the tape installed in the printer, set the orientation to Landscape. If
the width of the label is the width of the tape installed in the printer, then set the
orientation to Portrait.
Click OK to commit your changes. With your document properties set correctly you're
ready to move on to label design!
-31-
LABEL DESIGN
Text
Working with text for label creation is only slightly different from working with text
in a normal document. In a document, text can be treated as a whole: formatting,
layout and design can be universal. With a label, each section of text has to be
handled separately.
Titles will have to be moved and adjusted, portions of text will have to be moved
around independently and with more detail than in a normal document. In a
document it is sufficient to have most text single or double-spaced; in a label you
may want to move text only a few millimeters, or several centimeters.
Text Boxes
A text box may be formatted or positioned anywhere on the document. The box can
have borders and can be filled with different colors, or it can have no borders and
be transparent. All of these features make text boxes ideal for label creation. In MS
Word add a text box with the following steps. Click on Insert >>> Text Box.
Next, holding down the left mouse button, drag (in the document window) the square
handles on the border of the text box until it is the desired size. You can scale and
position text boxes with ease. The squares only appear after a text box is created.
While creating, the cursor is a cross.
-32-
Format the text inside the box to any size and style, then position the box for the
desired layout. Initially, the text box will have a border around it. To get rid of the
border, double-click the text box. When you do this, the Format Text Box dialog will
appear. Click the Colors & Lines Tab. Click the Color drop-down menu under Line
and select No Line. Then, click OK, and the border will be gone.
NOTE
If you choose not to use text boxes for your text, you will still be able to print your label,
but formatting problems may prevent you from getting the results you desire.
Information on the text box tool is available through your word processors help file.
Consult the help file for more detailed information on using text boxes.
-33-
Graphics
Drawing Tools
Many word processors have built-in drawing tools. You can use these tools to
enhance the look of your labels. Designs can be as complex as you desire, but
colors should be kept to black and white. Black and white will give you the best
contrast, and the best printing output. Actual print color depends on the ribbon and
®
vinyl loaded in the DuraLabel 9000 and is unaffected by the colors shown on your
computer screen.
Images
To insert a picture into a Word Document, first create a new text box so you can
insert the picture into the text box (this allows the image to be moved.) Once you’ve
created a text box, insert a picture by clicking inside the box, (the cursor should
be blinking) then from the menu click on Insert >>> Picture >>> From File, then
choose the location of the file you desire to insert.
®
Insert symbols by browsing to the Symbols folder on the DuraLabel 9000 CD. The
picture is automatically placed in your Word document. Change the size by clicking
and holding down on the corner of the box, while dragging it to the desired size.
-34-
You can insert other objects, graphics, and clip art from the same pull-down menu.
When working with images it is important to remember the type of printer you are
using. Images should be formatted so that your printing output matches the
®
capabilities of the printer. The DuraLabel 9000 is designed for label creation, and
has a monochromatic output (meaning it can only print one color at a time.)
With MS Word it is easy to make your images print in monochrome. Once the image
is inserted into the document simply double-click on it and select the Picture tab.
Under the Image Control section choose the Color pull-down menu and select Black
®
and White. Your image will be instantly converted to a format that the DuraLabel
9000 can handle.
-35-
Symbols
Symbols can be used on labels and signage to get your point across visually. When
safety is a concern, it is important to have a language that is universal, and symbols
accomplish just that.
For your convenience we've included more than 400 ready-to-use symbols, which
®
are divided by category, on your DuraLabel 9000 CD. Just choose a symbol, insert
it into your document, then print a visually appealing and informative label or sign.
To view or print a list of all of the included symbols, browse to the Symbols folder on
the CD. A PDF of all of the symbols in their respective categories is included in that
folder.
Inserting Symbols
Insert symbols into an Microsoft Word document by clicking on Insert >>> Picture
>>> From File. From that window, browse to the Symbols folder. If you have already
installed the symbols from the CD (they automatically install when you install the
templates), there will be a folder on your Desktop called DL9000 Templates and
Symbols.
-36-
The symbols folder is located inside the DL9000 Templates and
Symbols folder.
Just choose the symbol you want from any of the categorized folders
of symbols and insert into your document.
Once your symbol is inserted into your text document, you can resize and move it to
your desired layout.
Helpful Hint:
When trying to determine the size of your label or the size of the symbol you place
on it, take into consideration the distance from which the sign or label will be
viewed. You should make the symbol large enough that a viewer can comprehend it
from as far away as deemed necessary.
NOTE
To Install the Symbols, insert the DuraLabel® 9000 CD into your CD drive. When
the startup screen appears, simply click the “Install Templates and Symbols”
button, follow the on screen directions, and they will be automatically installed in
your My Documents folder. (See page 24 of User's Guide) You can browse to that
folder at any time to use the symbols or templates.
-37-
Barcodes
The barcode program we have included easily displays and prints barcodes from
your Windows based word processing program. Install the dBest Barcode Package
from the CD. When the DuraLabel 9000 start-up screen appears upon inserting the
installation CD in the CD drive, simply click on dBest Barcode Package and follow
the on-screen instructions.
You can get all of the technical information about the included barcodes in the
Barcode Font Library >>> Programmers Guide once the barcode software is installed.
NOTE
The dBest Barcode Font Library supports 11 standard barcode styles: Code 39;
Extended Code 39, Interleaved 2/5; Code 128; UCC 128; Codabar; UPC A and E
formats, EAN 8 and 13 formats and PostNet. Each barcode style supports a different
set of ASCII characters and is used for different situations or industrial applications.
For instance: Code 39 supports uppercase characters, numeric characters and a few
incidental characters while Interleaved 2/5 only supports numeric data, but does so
in a compressed format. You should choose which barcode style to use in your application based upon the type of data you need to support or by other requirements
placed upon your application.
Activate the dBest Barcodes Toolbar Template in Microsoft Word
1. Open the MS Word document in which you would like to create your barcodes.
2. Go to the top menu bar in MS Word. Select: Tools >>>Templates and Add-Ins
3. A window will appear showing a list of
Global Templates and Add-Ins. Click
the ADD button and locate the bcfonts.
dot in the bcfont main directory
(C:\bcfont\msoffice\).
4. Select the bcfonts.dot and Click OK.
The bcfonts.dot file should appear in
the Global Templates and Add-Ins list
with the check box selected. If the box
is not selected, then select it.
5. Click OK to exit, returning to your
document. The toolbar should appear within your work space.
-38-
If you do not see the dBest Barcodes Toolbar, you need to run the toolbar as a
macro. Refer to the following:
1. Go to the top menu bar in MS Word. Select: Tools >> Macro >>Macros
2. A window will appear with a list: Macros in: All Active Templates & Documents.
3. Select: Barcode Toolbar and click Run
NOTE: To force the toolbar to display every time you start Word, go to Start >>> Search >>> For Files and
Folders and type in BCFONT. Click OK. Once the file is found, right click it and choose “copy.” Next, go to
the C:/Program Files/Microsoft Office/Office/Start up/ folder, right click inside of the folder, and choose
“paste.”
Using the dBest Barcodes Toolbar
The Barcode String is where you can
type in the characters for the barcode
you wish to create. After typing in the
new barcode information, hit the Enter
key to save the information, or it will
revert back to the previous Barcode
String. The Barcode String pull down
menu displays previous strings that
have been used.
The Barcode Style pull down menu allows you to select a variety of barcode styles
supported by the dBest Barcodes Font Library.
The Point Size pull down menu determines the size of the barcode. You can enter
custom sizes by typing in the size and hitting the enter key to save the size.
The Font Style pull down menu allows you to select six different font widths for each
supported Barcode Style: three high density and three normal density widths.
Creating a Barcode Using the dBest Barcodes Toolbar
Once you have selected the necessary fields on the toolbar, you are ready to
create a barcode to place within your MS Word document.
1. Place your cursor where you want the barcode to appear. (You can do this inside
a text box if you wish.)
2. Go to the dBest Barcodes Toolbar. Click Create Barcode. The barcode will
appear where you placed your cursor.
-39-
Sequencing
How to do Number Sequencing using Word and Excel.
Sequencing is most commonly used to increment a numeric value to be used in labels for wire
wrapping. You can use of an Excel spreadsheet template as well as a Word template (included
on your installation CD):
1. Open an existing template from the DuraLabel CD or start a new Word document.
2. Because Excel uses Pixel measurement instead of inches, you will want to set this
to match in Word. Go to Tools menu >>> Options to bring up the property sheet
for Word. Click on the General tab, and locate the option to change the unit of
measure. See Fig. 1. Change it to Point as this is the same as pixel
(1" = 72 points, 2" = 144 points, 3" = 216 points, 4" = 288 points, etc.)
Fig. 1
3. Next go to File >>> Page Setup and click on the Paper tab. If you started from a
supplied template, make note of the width and height of the page as you will need
to use these values to set the cell size in the Excel template. See Fig. 2. If you're
starting from scratch, set the width and height to the desired size of the label.
-40-
Now that you have the desired label
size, its time to add the text to it.
Keeping Word open, browse to the
provided Excel template: Number
Sequence.xls
This is a predefined template with the
formula already in place to increment
a numeric value by one.
1. Open the existing Excel template
Number Sequence.xls
2. First, format the cells to match the
size of label you have. Click on the
upper left corner of the spreadsheet
Fig. 2
to highlight the entire document.
See Fig. 1.
Fig. 3
3. Next, left-click and hold the column line between A and B. See Fig. 2. You can
see a small box pops up giving you the pixel size of the width. You will want to set
that value to the same width as your label. Do the same for the Row Height.
See Fig. 3.
-41-
Fig. 4
4. Now that you have the correct size matching your label, change the value in the
first cell (column A, row 1) and enter any static text you want. Leave it blank for
none. In the next cell (column B, row 1) enter the number you would like to
increment. See Fig. 4. The next cell (column C, row 1) enter the value you would
like to increment by Default is 1.
Fig. 5
After setting this, you should see the increment in each cell below cell 1. In this
example, the cells have been adjusted in increments of 10. However, to increment
further, simply left-click on cell 10 to highlight it, then left-click and hold on the small
point in the lower right corner of the cell and drag down over how many cells you
want to increment. See Fig. 5. Example: to increment the value 100 times, drag
the cells down to the 100th row.
-42-
Once you're satisfied with the amount of increments and cell span, its time to copy
this into your Word template. Go back to the Word document that you previously
created. !!Remember!! The page layout of the Word template must match the cell
size you specified in your Excel template.
Select the entire Column you just created by clicking on the top header of the cell.
In this case, the “A.” Go to Edit >>> Copy, to copy the entire column. Now switch
over to your Word document, click anywhere inside your predefined page and go to
Edit >>> Paste.
If the cells don't paste into the exact measurements of your label, adjust the margins
so that they encompass the entire label.
You should be ready to print.
-43-
Import from Excel
How to transfer Excel spreadsheet information into a Word label
NOTE
These instructions are for users of Windows 2000. If you are using Windows XP, please
follow the directions on page 35.
A. Merging One Column from a Spreadsheet to a Label:
1. Make sure the Excel file you are going to merge has been saved.
2. Open up the Word Document with the label template.
3. Alter the font in Word to the size of your choosing.
4. Open up the Excel file you intend to merge into the Word label.
-44-
5. Click on column header A, right click the mouse, and select Copy.
6. Toggle (Alt-Tab) over to the Word document and find the Edit button on the
Windows Tool Bar (top left of screen) and then click and select Paste Special.
7. Next, select Unformatted Text and click OK.
8. The Excel column should now be in the Word label. You are now ready to print
your labels.
B. Merging Multiple Columns from a Spreadsheet to a Label:
1. Open the saved Excel document you plan to merge into Word.
2. Open your blank label template within Word.
-45-
3. On the toolbar on top of Word, click on Insert, then click Text box.
4. Use the cross hair cursor. Click in the field of the document, a text box will
appear.
5. Resize the text box to your preference. See below
6. When the text cursor is blinking in the text box, click on the Insert menu and
select Field.
7. The box on the left should remain with the blue highlighting of the word “All”.
8. On the right column, move the cursor so the blue highlight is over MergeField.
-46-
9. In the long horizontal box below, “MERGEFIELD” will appear.
10. Put a space after “MERGEFIELD” then type in the column heading from your
Excel document that you will want to merge into the label (i.e., “Input.”)
11. It will then look like this: “MERGEFIELD Input.” See below
12. Click OK and the box will vanish.
13. At this point, you should have the word “Input” (for example) in your text box.
14. Create an additional text box(es) within the label and repeat steps 3-12 for
each additional cell you plan to transfer from the Excel document into the
Microsoft Word label.
15. Close the Excel document.
16. On the word toolbar, click on Tools then Merge documents.
17. At the bottom, click the Files of Type drop-down menu.
18. Click on the All Files item, then find the file name of the Excel document you
plan to merge into Word.
19. Note -- make sure you are looking in your My Documents folder.
20. Double-click on the correct Excel document.
-47-
21. On the next box you see, “ENTIRE WORKBOOK” will be blue highlighted.
Click OK.
22. You will then see a pop up box with a question mark. Click OK.
23. On your Word document, click on Tools, then Mail merge.
24. Click on Create, then Form Letters, then click Active Window.
See below
25. Click on Get Data, then click on Open Data Source.
26. At the bottom, you will see Files of Type.
27. Click on the drop down of All Files at the bottom.
28. Find and double-click on the file name of your Excel document.
29. Click OK.
30. Click Merge.
31. Click Merge and the document will merge from Excel to Word.
You are now finished
Help is also available under the Word Toolbar. Click on Help and type in “Merge
from Excel to Word,” then click on Search. Then click the option Use mail merge...
-48-
Configure Ethernet Card
The internal Ethernet card can be configured by using the front display panel buttons
and LCD on the DL9000.
‘MENU’ button on the front display panel will provide access to the printer menu. ‘UP’
and ‘DOWN’ buttons will navigate through the menu. To enter data, ‘UP’ button will
increment the highlighted digit by 1 and the ‘DOWN’ button will shift one over and
highlight the next digit. Pressing ‘SELECT’ will accept the selection. Pressing ‘MENU’
will take you to the previous screen.
Directions to configure the IP address:
1. Press the ‘MENU’ button
2. Select Main Menu
3. Select Setup
4. Navigate down to ‘Ethernet’, press ‘SELECT’
5. Select DHCP or Static IP
To set a Static IP
1. Highlight ‘Static IP’ and press ‘SELECT’
2. Set the IP address using the ‘UP’, ‘DOWN’, ‘MENU’ and ‘SELECT’ buttons as
described above.
-49-
CLEANING & GENERAL MAINTENANCE
Cleaning of the Cutter, Print Head and Platen Roller
IMPORTANT! Always turn the printer OFF before cleaning, performing
maintenance, or loading supplies. Always wait at least 5 seconds before turning
ON the power.
Basic cleaning of the print head, cutter and platen roller will prolong the life of the printer and
will aid in producing crisp, clear labels and signs with every print. Please refer to page 4 & 8 of
the User's Guide for better clarification of Printer Inside Parts.
Print Head
Fig. 1 Print Head is the entire metal bar that sits under the print head mechanism
Fig. 1 Print head exposed
1. Pop-up the print head mechanism by pressing on the print head release lever and
remove any loaded supplies.
2. Use a pair of scissors
or blade to separate
any ribbon from the
ribbon spindles.
3. Open a cleaning swab
by placing swab between your forefinger
and thumb. Squeeze
swab until it snaps.
Alcohol will be distributed to cotton side of
the swab.
Fig. 2 Open a cleaning swab
4. Run the swab back and forth several times across the Print Head to remove any
built-up adhesive, ribbon residue, or dust particles.
-50-
5. Clean the front and underside of the Print Head.
Fig. 3 The front of the print head should be
cleaned to remove any ribbon residue
Fig. 4 The entire area outlined in red should be cleaned
Cutter
1. Open the Duralabel 9000 top
cover.
2. Rewind any supply that may
be loaded away from the
cutting mechanism.
Fig. 5 Cutting Blades
at the printed label opening
3. Using a magnetic screwdriver,
remove the two recessed
screws on the front of the cutter mechanism.
Fig. 6 Remove the recessed screws which are located at the red circles
-51-
4. Lift slightly up and pull the cutter mechanism away from the printer body.
Fig. 7 Detached Cutter Mechanism, exposing blades
5. Open a cleaning swab by placing swab between your forefinger and thumb.
Squeeze swab until it snaps. Alcohol will be distributed to cotton side of the swab.
6. Run the swab back and forth several times across all sides of the blades in the
cutting mechanism to remove any buildup of labeling adhesive.
Fig. 8 Cleaning blades inside Cutter Mechanism
7. Apply the cutter mechanism to the front of the printer and tighten the recessed
screws back on to the front of the cutter mechanism.
-52-
Platen Roller
1. Open a cleaning swab by placing swab between your forefinger and thumb.
Squeeze swab until it snaps. Alcohol will be distributed to cotton side of the swab.
2. Run the swab back and forth several times across the Platen roller to remove any
buildup. Rotate the Platen roller to clean all sides of the roller.
Fig. 9 Cleaning Platen Roller
3. Give the Platen roller a couple minutes to dry, then reload your ribbon and supply.
Your DuraLabel 9000 is now cleaned and ready for use.
NOTE
The DuraLabel 9000 should be cleaned regularly to maintain optimal performance. The
print head, cutter mechanism, and platen roller should be cleaned with alcohol swabs
to remove buildup of adhesive, dust, and other substances. Always turn the printer OFF
before cleaning, performing maintenance, or loading supplies.
-53-
TROUBLESHOOTING
The following are simple solutions to the most common printing challenges that
®
occur with the DuraLabel 9000. Please call Graphic Products for free customer
support.
1. SYMPTOM:
Speckles appear throughout label
a. Possible Cause: Supply has not been stored
properly and dirt has contaminated the supply
Solution: Replace the label supply if the
problem persists after 1st few prints. Store
supplies in a dust free environment.
2. SYMPTOM:
Fig. 1 Dirty vinyl supply
Solid line appears across entire label
a. Possible Cause: Damaged print head
Solution: Contact customer service by calling
1-800-788-5572
Fig. 2 Bad print head
3. SYMPTOM:
Fading occurred during print
a. Possible Cause: The density is set too low
Solution: Increase the density
b. Possible Cause: The print speed is set too high
Solution: Decrease the print speed
(See page 22 of User's Guide)
4. SYMPTOM:
Fig. 3 Incorrect print settings
Hash marks appear throughout print
a. Possible Cause: The density is set too high
Solution: Decrease the density
b. Possible Cause: The print speed is set too low
Solution: Increase the print speed
(See page 22 of User's Guide)
-54-
Fig. 4 Incorrect print settings
5. SYMPTOM:
Missing horizontal line(s) of print
a. Possible Cause: If the horizontal line(s) runs
partially through label, there may be foreign
particles on the print head
Solution: Clean the print head
b. Possible Cause: Horizontal line(s) runs through
Fig. 5 Burnt-out pixel
entire label (See Fig. 5)
Solution: Replace the print head
6. SYMPTOM:
Wrinkles appear on one-half of label
a. Possible Cause: The ribbon wrinkles due to the
pressure of the print head being uneven
Solution: The Adjustable Pressure Knobs need
Fig. 6 Ribbon wrinkled
to be set
Set Left Adjustable Pressure Knobs:
For wrinkles on the right side of the label when
printed: Set the two left Adjustable Pressure Knobs.
Two Left Adjustable Pressure Knobs
Front of printer
on this end
Label dispensed
out this end first
Fig. 6 Ribbon Wrinkled
1. Press down on the far left Adjustable Pressure Knob and while holding down, turn
the Adjustable Pressure Knob clockwise to the desired number (amount of pressure).
2. Press down on the second-to-far left Adjustable Pressure Knob and while holding
down, turn the Adjustable Pressure Knob clockwise to the same number as the
far left Adjustable Pressure Knob was set to.
Fig. 7 Press down
Fig. 8 Press down, while turning knob
clockwise
-55-
Fig. 9 Top-down view of the printer
with the two left Adjustable
Pressure Knobs set
Fig. 10 Front view of printer with
the two left Adjustable
Pressure Knobs set
NOTE: You may need to use trial and error to determine which is the best setting to adjust to based on the
type of label or sign being printed.
Set Right Adjustable Pressure Knobs:
For wrinkles on the left side of the label when printed: Set the two right Adjustable
Pressure Knobs.
Front of printer
on this end
Label dispensed
out this end first
Fig. 11 Ribbon Wrinkled on Left Side
Two Right Adjustable Pressure Knobs
1. Press down on the far right Adjustable Pressure Knob and while holding down,
turn the Adjustable Pressure Knob clockwise to the desired number (amount of
pressure).
(See page 51, Fig 7 & Fig 8 of the User's Guide for demonstration)
2. Press down on the second-to-far right Adjustable Pressure Knob and while holding
down, turn the Adjustable Pressure Knob clockwise to the same number as the
far left Adjustable Pressure Knob was set to.
-56-
SPECIFICATIONS
Printer
▪ Type: Thermal Transfer
▪ Print Speed: Selectable speeds of 2 and 3 inches per second
▪ Resolution: 300 DPI
▪ Max. Print Width: 9 in.
▪ Max. Print Length: 50 in.
Indicators & Buttons
▪ Indicators: POWER, ON-LINE & ERROR
▪ Buttons: POWER, UP, DOWN, SELECT, PAUSE, FEED & MENU
Communication Interface
▪ Communications: USB 2.0, RS-232C, & Centronics
▪ Memory: 8 MB Flash memory, 32 MB SDRAM, SD Flash memory card slot
Power Requirements
▪ Input Voltage: Switching power, 115 VAC/230 VAC, 5A/3A, 50-60 Hz
Environment
▪ Operating Temperature: 41°F - 104°F (5°C - 40°C )
▪ Operation Humidity: 20% - 85% non-condensing
▪ Storage Temperature: 104°F - 140°F (-40°C - 60°C)
▪ Storage Humidity: 5% - 90% non-condensing
▪ Ventilation: Free air movement
Label Stock
▪ Type: Continuous, Black Mark & Die-Cut
▪ Width: 4 in. - 9 in.
▪ Gap Height: 0.12 in. min.
▪ Black Mark Height: 0.08 in. min.
▪ Black Mark Width: 0.31 in. min.
Ribbon Supply
▪ Type: Wax, wax/resin, resin
▪ Capacity: 300 m. with 1 in. core
Printer Body
▪ Dimensions: 13 in. (H) x 18.5 in. (W) x 21.65 in. (L)
For more specifications, please call 1-800-788-5572 to speak with a representative.
-57-
1-800-788-5572
P.O. Box 4030
Beaverton, OR 97076
© 2009, Graphic Products, Inc. All Rights Reserved
www.DuraLabel.com
v. 1.0 - 7/30/09