1
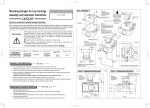
RRT LAUNCHER
SHOULDER STOCK
OPERATING INSTRUCTIONS
FULLY READ THE WARNINGS BEFORE OPERATING!
AMERICAN MADE AND BACKED BY A 3-YEAR WARRANTY.
PLEASE READ CAREFULLY BEFORE ATTEMPTING TO OPERATE
>> SHOULDER STOCK INSTRUCTIONS
The stock that you have just purchased is designed specifically for use with the Retriev-R-Trainer hand-held launcher. It
will improve the distance and accuracy of your shots and with practice can provide for single hand cocking and firing—not
possible without this accessory while using your hand held launcher.
The stock is designed to work with RRT hand held launchers that were manufactured from 1990 to the present. The grips
used during this period will require slight trimming to work properly with the stock. The only trimming required will be at the
base of the grip nearest the pull knob on the launcher. This can be achieved by using a sharp utility knife or by turning the
base of the grip on a sander. The RRT Launcher should fit snuggly into the stock. If you are unsure of any of the steps or
procedures in these instructions please contact us for further instructions and assistance.
>> INSTALLATION OF THE TRIGGER
If your Retriev-R-Trainer does not already have the trigger installed, Figure A, you must do so before using your new stock.
The tools that you will need are: Vice grips or a vise, pliers and a hammer. Release the thumb latch on your Retriev-RTrainer and place it in the open position.
Retain this position during the installation to guard against accidental release of the firing pin into an empty chamber
causing damage to it.
1. Pull the firing pin back to the “fire” position and secure it there with either vice grips or a vise.
2. Remove the old pull knob by placing a pair of pliers under the PAL NUT and tap off with a hammer. (The PAL
NUT looks like a chrome top hat).
3. Remove the old knob and spring.
4. Place the new pull knob on the firing pin. Then, slide the new spring onto the firing pin. It will rest inside the
knob.
5. Tap the new PAL NUT on the end of the firing pin securing the knob assembly in place. Make sure the teeth
of the PAL NUT catch in the groove on the firing pin.
6. Release the firing pin from the “fire” position. You are now ready to install the pin in your new pull knob which
will allow it to work with the new shoulder stock. Please note that one end of the pin is smooth while the other
end has a knurl. While laying the pull knob on a flat surface with the hole
side hanging just off the end, push the pull knob against the PAL NUT
Figure A
compressing the spring inside.
This will allow you to gently tap the SMOOTH end of the pin through both
holes at the back end of the knob.
Once you have the pin in that position, drive the knurled end flush with
the top hole. Trim your grip as instructed above. Your Retriev-R-Trainer is
now ready to use with your new Shoulder Stock.
1
SHOULDER STOCK INSTRUCTIONS
>> SHOULDER STOCK ASSEMBLEY & LAUNCHER
Your Shoulder Stock is manufactured in 2 sections for easy portability and storage. Section A is the end in which your
Retriev-R-Trainer will be located. Section B has the padded shoulder/thigh rest for your comfort during training. To
assemble, simply line up the hole in Section A with the locking button in Section B. Slide the 2 parts together until the
locking button is fully engaged into the hole in Section A.
You are now ready to install you Retriev-R-Trainer into the shoulder stock. Release the thumb latch on the launcher to make
sure it is not loaded. Position the launcher over the end of Section A while aligning the pull knob pin with the slot in Section
A. Keeping the pull knob pin aligned with that slot, insert the launcher in the tube. Position the launcher so that the thumb
latch on the launcher is in line with the slot in Section A.
Section A
Section B
>> MAINTENANCE
User must thoroughly clean the Shoulder Stock after each use. Be certain that the Shoulder Stock, Launcher, and Dummy
are all free of debris prior to every firing/launch. Improper maintenance and failure to properly and firmly position the
Shoulder Stock may result in serious injury or death.
>> PREPARATION FOR FIRING
Place the training dummy over the barrel of the Retriev-R-Trainer. Next, open the launcher and insert the desired power
load in the chamber. Make sure that the load is properly seated in the chamber. Slowly place your Retriev-R-Trainer into the
closed position. Make sure that the thumblatch has tightly secured the two sections (head and breech assembly) together.
ATTENTION: Never insert a power load in the chamber prior to placing a training dummy over the barrel. To do so may
cause premature firing due to the displacement of air within the barrel pushing the load back in the chamber.
>> FIRING
Your Retriev-R-Trainer can now be fired from either your shoulder or your thigh/hip. From either position you must squarely
place the padded butt end of your stock against your body and maintain a firm grip on the stock. To rest it only on an
edge could cause serious injury or death. Aim the Retriev-R-Trainer in the direction of your desired target area with your
holding hand positioned in such a manner as to allow you to slide your hand toward the firing pin and grasp it with your
index finger. Gently pull back on the firing pin until you have reached the end of its travel. Firm up your grip on the stock
and release the pin firing the Retriev-R-Trainer.
The Shoulder Stock does not contain any parts that will rust or corrode. It is guaranteed for one year from date
of purchase against defects in material and workmanship by the manufacturer.
SHOULDER STOCK INSTRUCTIONS
2
>> WARNING
• All instructions and warnings received with your Pro Model Retrive-R-Trainer Hand Held
Launcher apply to use and and application of your RRT Shoulder Stock as well. If you
do not have them or need an additional copy of them please contact Specialty Products
Company using the information below.
• Failure to assemble the components of this product correctly with your Retriev-R-Trainer
Launcher in addition to following these instructions with use of your RRT Shoulder Stock
may result in serious injury or death.
• Use extreme caution when using the Shoulder Stock and RRT Launcher.
• Recoil from Shoulder Stock may be too excessive for some users. Start with the lowest
power loads (green) first.
DISCLAIMER
Any use or modification of the Shoulder Stock not in conformity with the
manufacturer’s instructions as described in this user’s manual is AT THE SOLE
RISK AND RESPONSIBILITY of the individual performing such unauthorized
use and/or modification. Direct any inquires regarding use to Specialty
Products Company prior to use or continued use of this product.
Visit our website for more great products and
accessories for your RRT Launcher at
FIND
www.RRTLauncher.com
TLB Industries, Inc.
3
US ON
292 Dunn Road, Honesdale, PA 18431 USA
570-729-7192 | 570-729-7193
(Fax)
SHOULDER
STOCK INSTRUCTIONS
[email protected]