1
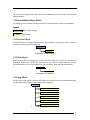
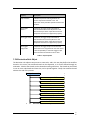
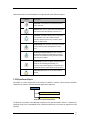
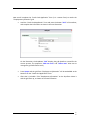
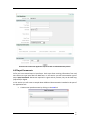
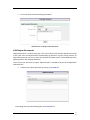
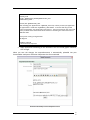
User Manual Release V.1.1.1366 ProcessMaker Documentation team June 2008 Table of Contents 1Welcome to ProcessMaker.........................................................................................1 1.1Introduction......................................................................................................................1 1.2What is a Business Process Management System?............................................................1 1.3ProcessMaker Object Model.............................................................................................2 1.3.1Process Object.................................................................................................................................2 1.3.2Task Object......................................................................................................................................2 1.3.3Step Object......................................................................................................................................2 1.3.4Derivation Rule Object....................................................................................................................3 1.3.5DynaForm Object............................................................................................................................4 1.3.6Trigger Object..................................................................................................................................5 1.3.7Case Variable...................................................................................................................................5 1.4Objectives for the User Manual........................................................................................5 2Getting Started..........................................................................................................6 2.1Introduction......................................................................................................................6 2.2System Requirements.......................................................................................................6 2.3 PHP Settings.....................................................................................................................6 2.4Installing ProcessMaker....................................................................................................6 2.5Apache Configuration .......................................................................................................7 2.6ProcessMaker Configuration ............................................................................................8 2.7Quick Start Guide............................................................................................................10 3ProcessMaker Users.................................................................................................11 3.1Introduction....................................................................................................................11 3.2My Account ....................................................................................................................11 3.3Managing Users..............................................................................................................12 3.3.1List of Users...................................................................................................................................12 3.3.2Create New User Account.............................................................................................................14 3.4Groups............................................................................................................................15 3.4.1Create a Group of Users................................................................................................................16 3.4.2Edit a Group .................................................................................................................................16 3.4.3Delete a Group..............................................................................................................................16 3.4.4Assign Users to an Existing Group.................................................................................................16 3.4.5Removing a User from a Group....................................................................................................17 3.5Roles...............................................................................................................................17 3.5.1Create a Role ................................................................................................................................18 3.5.2Assign Permissions to a Role.........................................................................................................18 ProcessMaker User Manual ii § 4Process Managing....................................................................................................20 4.1Introduction....................................................................................................................20 4.2A sample workflow: Credit Card Application Process......................................................20 4.3Creating the Process Map...............................................................................................22 4.3.1Creating Your First Task................................................................................................................23 a.Task Assignment Rules..................................................................................................................25 b.Task Timing Control.......................................................................................................................25 c.Task Case Labels ...........................................................................................................................25 d.Task Notifications .........................................................................................................................25 4.3.2Creating the Remaining Tasks.......................................................................................................25 4.3.3Defining the Starting Task.............................................................................................................26 4.3.4Defining the Ending Tasks.............................................................................................................27 4.3.5Defining derivation rules by Selection..........................................................................................27 4.3.6Defining derivation rules by Evaluation .......................................................................................28 4.3.7Defining derivation rules by Parallel fork and Parallel Join..........................................................29 4.4Creating Steps.................................................................................................................30 4.4.1Master Dynaforms........................................................................................................................30 4.4.2Grid Dynaforms.............................................................................................................................33 4.4.3Input Documents..........................................................................................................................36 4.4.4Output Documents.......................................................................................................................37 4.4.5Triggers..........................................................................................................................................39 4.5Assigning Steps, Messages and Users to Tasks................................................................39 4.5.1Assigning Steps to Tasks................................................................................................................39 4.5.2Assigning Users ............................................................................................................................41 4.5.3Defining Process Supervisor .........................................................................................................41 4.6Connecting to other Databases.......................................................................................43 4.7Importing and Exporting Processes.................................................................................44 4.7.1Export Procedure..........................................................................................................................44 4.7.2Import Procedure..........................................................................................................................45 5Reports on ProcessMaker.........................................................................................46 5.1Introduction....................................................................................................................46 5.2Standard Reports............................................................................................................46 5.3Report Tables..................................................................................................................46 6Setting – Up.............................................................................................................48 6.1Introduction....................................................................................................................48 6.2Languages.......................................................................................................................48 6.3Plug-ins...........................................................................................................................48 6.4Upgrade System..............................................................................................................49 6.5E-mail..............................................................................................................................49 ProcessMaker User Manual ii i Annex 1: System Case Variables.................................................................................51 Annex 2: Dynaform Fields – Properties.......................................................................52 ProcessMaker User Manual ii ii 1Welcome to ProcessMaker 1.1Introduction ProcessMaker is an open source process management software suite, which includes tools to automate your workflow, design forms, create documents, assign roles and users, create routing rules, and map an individual process quickly and easily. The present document introduces some general concepts related to Business Process Management Systems and its implementation in ProcessMaker. Likewise it explains the software installation and shows how you can start to automate your processes using ProcessMaker. 1.2What is a Business Process Management System? The vast majority of business software serves one main purpose: supporting business processes. Most of them rely on people to initiate the process, approve involved documents, make decisions, resolve exceptional situations, to name a few. In either case, it's often possible to define a discrete series of tasks, known as a workflow, describing the activities involved in the process. A Business Process Management System – BPMS - is a software system that manages the execution of workflows by interpreting process definitions allowing interaction with workflow participants. A BPMS supports the definition and administration of workflow schemes as well as the execution and monitoring of process instances. ProcessMaker is a web based Business Process Management System (BPMS), which has many characteristics to support any business process. In order to take full advantage of ProcessMaker, this manual will focus on the key concepts and terminology behind workflow design. Process A Process is a collection of tasks that takes one or more kinds of input and creates an output that is of value to the customer or to an end user within the organization. Task A task is a logical group of sequential steps, sharing a common goal. Step A step is a piece of work that forms a clearly defined activity. A step may be a manual activity, or a workflow (automated) activity. Business Case A Business Case, often referred to just as ‘Case’, is an instance of a process definition. ProcessMaker User Manual 12 0§ The next section explains the object model in ProcessMaker, which is based on the concepts explained before. 1.3ProcessMaker Object Model The following section explains the object model of a process definition within ProcessMaker. Legend Element Element Main or parent object Child object 1.3.1Process Object The Process object is located at the top of the object hierarchy. Any business case is always an instance of an existing process definition. Process Task(s) Illustration 1. Process Structure 1.3.2Task Object A task corresponds to a rectangle in a Process Map. This object has a rich set of properties and dependant objects, as it defines the interaction of every object residing inside the business process definition, such as users, derivation rules, dynaforms, input and output documents. Task Step(s) Illustration 2. Task structure 1.3.3Step Object A step can be composed of a sequence of DynaForms, input documents and output documents. The Derivation Step is always executed upon task completion. Step Derivation Rule Dynaform(S) Input Documents Output Documents Triggers Illustration 3. Step Structure ProcessMaker User Manual 22 0§ Property Description Step Condition A Boolean expression defining whether the current step will be executed or not. This expression usually evaluates specific business case variables. Run Triggers Before A sequence of Trigger scripts which will be executed before the current DynaForm or the Derivation step is shown. Input documents and Output documents don’t support this property. Run Triggers After A sequence of Trigger scripts which will be executed after the current DynaForm or the Derivation step is shown. Input documents and Output documents don’t support this property. Run Triggers Assign Tasks A sequence of Trigger scripts can be executed before the user is assigned to the next task. There is also the possibility to executed Trigger scripts before and after the derivation rule is done. Table 1. Step Properties 1.3.4Derivation Rule Object The derivation rule objects connect two or more tasks, and in this way they define the workflow thread. In this sense, the workflow thread can be sequential, or it can be defined through an evaluation. Likewise the thread can be selected according a decision. The thread can be forked in two or more sub-threads and later they can be joined together. Finally the workflow thread achieves the end of the process. Derivation Rule Sequential Selection Evaluation Parallel Fork Parallel Fork by Evaluation Parallel Join End of the Process Illustration 4. Derivation Step Structure ProcessMaker User Manual 32 0§ Table 3 describes how ProcessMaker has implemented these different options. Property Description Sequential: the workflow thread follows directly to the next task. Selection: the user can select what task should be executed to next. More details in section 4.3.5 Evaluation: A condition defines what task should be executed to next. This condition usually evaluates specific business case variables. More details in section 4.3.6 Parallel (Fork): The workflow thread will be forked in more than one task. More details in section 4.3.7. Parallel by Evaluation (Fork): On basis condition, the workflow thread can be forked in more than one task. This condition usually evaluates specific business case variables. Parallel Join: Once the workflow thread has been forked in sub-threads (parallel tasks), it is necessary to join them together. The Parallel Join guarantees this aim. More details in section 4.3.7. End of Process: Define the end of the workflow thread. Table 2. ProcessMaker Derivation Step Properties 1.3.5DynaForm Object This object is a main component of the task user interface. It allows a direct human-workflow interaction by means of a distributed web application approach. DynaForm Fields / Variable JavaScript Illustration 5. DynaForm Structure. The fields in a DynaForm have different properties; they are described in Annex 2. Likewise any JavaScript code can be embedded inside a DynaForm definition to increase its ergonomics and usability. ProcessMaker User Manual 42 0§ 1.3.6Trigger Object A Trigger is a piece of code. It is intended to add flexibility when dealing with complex business rules. Most business rules are far more than simple Boolean conditions. In such scenarios, Triggers provide the appropriate framework to perform complex calculations, to name a few. Trigger PHP Code Variables Illustration 6. Trigger Structure. PHP code can be injected directly by means of the Custom Functions interface. This allows business architects to express the most complex business rules by means of a high level programming language. 1.3.7Case Variable A case variable can be the value stored inside a DynaForm field, or the result of a calculation inside a Trigger. Likewise there are system variables; they are listed in the annex 1. A case variable must have a unique name and can be overwritten as the business case moves forward. To reference a Case Variable within the process definition, it must always be prefixed with a double “at” sign (@@). To evaluate a Case Variable it is possible to use Boolean expressions which will return either true or false. Variable(s) Illustration 7. Variable Structure. Case variables can be used with different aims; among others they are useful to define conditions for derivation rules by evaluation, to customize output-documents or labels cases. That will be explained in the section 4.3 and 4.4 1.4Objectives for the User Manual The objectives of this User Manual are to: Help you to install and configure ProcessMaker Describe the users and groups management Provide detailed instructions for managing both processes and cases. ProcessMaker User Manual 52 0§ 2Getting Started 2.1Introduction In this chapter are detailed the requirements and the procedures for installing ProcessMaker. It gives also an overview of the main options of this software. 2.2System Requirements You need to be sure that your web server, or the service provided by your web host, meets the minimum requirements before you download the ProcessMaker software. These are: Apache 2.2.3 or greater – http://www.apache.org. With the following modules: Deflate, Expires, Rewrite, Vhost alias PHP 5.1.6 or greater - http://www.php.net MySQL 4.1.x or greater - http://www.mysql.com 2.3 PHP Settings Make sure that the following parameters in PHP are set as follows: asp_tags = On short_open_tag = On file_uploads = On register_globals = On memory_limit = 80M ProccesMaker needs a minimum of 80MB in the parameter "memory_limit" of PHP. Likewise for previous versions to pmos-1.0-1284, the parameter "magic_quotes_gpc" should be disabled. To change these parameters you need to edit the php.ini file, setting the parameters as shown above. After that, restart the httpd service. ProcessMaker can be used with most major browsers including: Internet Explorer (version 6.0+), Netscape and FireFox. These browsers take advantage of the ProcessMaker graphical interface. 2.4Installing ProcessMaker In order to begin, it is necessary to install the following ProcessMaker dependencies: php-gd, php-mysql, php-xml, php-soap, php_mbstring. 1. Download the latest ProcessMaker http://sourceforge.net/projects/processmaker/ tarball from 2. The files are in .tar.gz format and can be extracted using most compression tools, like the command tar in Linux or the Winrar Programm in Windows. ProcessMaker User Manual 62 0§ Due to security reasons, it is highly recommended to install ProcessMaker under the /opt/ directory. Thereby extract the pmos-x.x-xtar.gz file under the directory /opt/ LINUX tar -xvzf pmos-x.x-xtar.gz /opt/ WINDOWS Use Winrar to extract the file pmos-x.x-xtar.gz in c:\opt\ This will create a new directory "processmaker/" containing all files and directories. ProcessMaker 3. Make sure that the following subdirectories are world writable LINUX chmod 777 /opt/processmaker/workflow/engine/config/ chmod 777 /opt/processmaker/workflow/engine/content/languages/ chmod 777 /opt/processmaker/workflow/engine/js/labels WINDOWS Right click on the following folders, choose option: "Properties", on window "Properties" uncheck the option "Readonly" C:\opt\processmaker\workflow\engine\config\ C:\opt\processmaker\workflow\engine\content\languages\ C:\opt\processmaker\workflow\engine\js\labels\ the 2.5Apache Configuration 1. Define a Virtual Host in Apache for ProcessMaker. To do that, create a new file pmos.conf with the following definition: # Please change the ip address with your server ip address and # the ServerName with you own subdomains. NameVirtualHost '''''your_ip_address''''' #processmaker virtual host <VirtualHost your_ip_address > ServerName "your_processmaker_domain" DocumentRoot your_processmaker_directory DirectoryIndex index.html index.php <Directory "your_processmaker_directory"> AddDefaultCharset UTF-8 AllowOverRide none Options FollowSymlinks Order allow,deny Allow from all RewriteEngine on RewriteRule ^.*/(.*)$ sysGeneric.php [NC,L] # ExpiresActive On # ExpiresDefault "access plus 1 day" ProcessMaker User Manual 72 0§ # # # # # # ExpiresByType image/gif "access plus 1 day" ExpiresByType image/png "access plus 1 day" ExpiresByType image/jpg "access plus 1 day" ExpiresByType text/css "access plus 1 day" ExpiresByType text/javascript "access plus 1 day" AddOutputFilterByType DEFLATE text/html </Directory> </VirtualHost> WHERE: your_ip_address: IP Adresses of the Server/Computer where ProcessMaker is intalled your_processmaker_domain: Domain for ProcessMaker defined in your DNS or your ''hosts'' file. If you don't have a domain, you should put instead "your_processmaker_domain" the value of "your_ip_adress" in the Virtual Host Definition presented before. your_processmaker_directory: corresponds to the /public_html directory of ProcessMaker LINUX /opt/processmaker/workflow/public_html WINDOWS C:\opt\processmaker\workflow\public_html 2. Save the pmos.conf file in the following directory. LINUX The virtual server defined in pmos.conf will be dynamically loaded in this directory: Apache from /etc/httpd/conf.d/pmos.conf WINDOWS C:\wamp\bin\apache\apache2.2.8\conf\extra\pmos.conf Please add the following line in your httpd.conf file, so that the ProcessMaker Configuration can proceed. Virtual Include "C:\wamp\bin\apache\apache2.2.8\conf\extra\pmos.conf" NOTE: It is also possible to define the virtual host for ProcessMaker directly in the htttp.conf file. That can be done by adding the above exposed virtual server definition. After that restart the httpd service 2.6ProcessMaker Configuration Open your browser and load the ProcessMaker site (in our virtual server example this means http://your-processmaker-server). You should see the test page (See Illustration 8). If you don't see it, please check the installation steps. ProcessMaker User Manual 82 0§ On the test page, Enter your MySQL database account information, which should have privileges to create databases and users. Test your connection and paths, by clicking the Test option upper right-hand corner. Illustration 8. Installation – Configuration Page I After that, click on the tab "Install" (in the upper right-hand corner) Illustration 9. Login Page After few seconds you will get the confirmation of your installation. If it was successful, click on the button "Finish installation" and enjoy ProccessMaker. Otherwise, please visit our forums (http://forum.processmaker.com/) to get support. To login to ProcessMaker use these credentials: user: admin / password: admin ProcessMaker User Manual 92 0§ 2.7Quick Start Guide Illustration 10 shows the different options of the ProcessMaker Main Menu. Illustration 10. Main Menu My Account: option presents the information related to the logged user, it is also possible to change this information anytime. The section 3.2 describes this option. Users: Includes the different options to managing user and groups. Section 3.3 explains the operation related. Cases: A case is the instance of a Process. The menu option Cases lists the instances initiated in ProcessMaker. This option makes possible the supervision and monitoring of the cases in different status and with different users. Processes: This option gives the opportunity to configure a Process Map and on this basis to define the different tasks and steps related. This option is powerful and it is explained in the section 4. Reports: Present default summaries to monitoring your cases and processes. Section 5.1 gives an overview about this topic. Setup: From this option it is possible to configure ProcessMaker’s pluggings and languages installed. More details in section 6 The recommended steps to obtain a complete business process are: 1. Process Map: create all tasks and define their relationships in the option Processes. 2. Steps: create all required types of steps (DynaForms, Triggers, Input Documents and Output Documents). Then assign them to the appropriate tasks. That should be made in the option Processes 3. Users Management: create the necessary accounts and groups of users and assign tasks accordingly (See option Users). 4. Start your Cases: Once you have defined your Process (with its tasks, rules, and users), you are now able to start a case and so automate and track your process with ProcessMaker. The following sections will guide you through the necessary steps to obtain a working business process definition. ProcessMaker User Manual 10 20 3ProcessMaker Users 3.1Introduction This chapter describes the necessary tasks required for setting up your account and managing your ProcessMaker user accounts and group users. 3.2My Account Illustration 11. My Account ProcessMaker User Manual 11 20 The Illustration 11 shows the form that allows updating your personal information. Most of these fields are self-explanatory. In this form you can upload a résumé to your profile, likewise you can upload your personal photo, and it will show up in the user profile. To change your password you must provide the following information: New password Confirm your new password 3.3Managing Users Illustration 12. Main Menu – Users Option The Users tab allows managing: User accounts: they are divided in two roles, PROCESSMAKER_ADMIN role and PROCESSMAKER_OPERATOR role. Groups: a group of users simplifies the assignment of tasks. For example, a Help Desk process may involve a pool of customer support clerks, all belonging to a user group named Customer Support. A user account can belong to 0, 1 or more user groups. Roles: makes it possible to define customized roles with different levels of permissions, extending the functionalities of user management. 3.3.1List of Users This section shows a list of current user accounts for the ProcessMaker platform. As shown on the illustration 13 below. Search: this option allows the very useful utility to filter user accounts. You should put the search criterion, and every row that matches with this criterion will be filtered on the list. Name: this column corresponds to the name of the user account. Role: this column shows the current role of each account. There are two types of users: Administrators and Operators. Administrator accounts are enabled to create, modify or delete existing processes. Operator accounts are meant for production mode, using the facilities of the cases interface Due date: this value defines a date when this account will no longer be allowed to accessing the platform. ProcessMaker User Manual 12 20 Illustration 13. List of users View link: When you click on the view link, you will see the selected account's information in read-only mode. Edit Link: You can click on the corresponding hyperlink to edit the account. Delete link: To delete an employee's user account, you just click on the Delete hyperlink. You will be prompted to confirm this operation. If you accept, the selected account will be deleted. Otherwise, the operation is cancelled. In order for an account to be successfully deleted, a few conditions must be met: The target account can't be a member of any Group. The target account can't have assigned or completed activities. In general, it is easier to simply deactivate an account by switching its status from Active to Inactive. It is possible to customize the fields of the list users. Just right-click on the top of the list (title area) and you will see the different fields (illustration 14), and there you can activate/deactivate them. ProcessMaker User Manual 13 20 Illustration 14. List of users – Table options 3.3.2Create New User Account Illustration 15 is from the form which allows creating new user accounts. All required fields are identified by an asterisk (*). Most of these fields are self-explanatory. We will only clarify the meaning of some of them. User ID: this is the account that should be provided when the user logs into the system. E-mail: this information is crucial for the appropriate delivery of e-mail alerts concerning open cases. Expiration date or Due Date, this value defines a date when this account will no longer allow access to the platform. Status: if this value is set to Active, this account is permitted access to the platform. If the value is Inactive, the access is denied. Role: this field defines the privileges assigned to each account. ProcessMaker includes the following default roles: Administrator, Operator ProcessMaker User Manual 14 20 Illustration 15. Creating a new user account 3.4Groups Groups are intended to simplify the way you assign tasks to users. For example, you could define two groups: “Sales” and “CC Application”. Then you could add selected users to the Sales group. Upon defining the derivation rules for a given task, you will be able to select either a specific user or a group of users. The latter approach is much more flexible, as you don’t need to modify each process when accounts are deactivated or modified. A user account can belong to one or many Groups. In other words, there is a many-groups-tomany-accounts relationship. The Illustration 16 shows an overview of the existent groups and the associated users. ProcessMaker User Manual 15 20 Illustration 16. Groups of Users 3.4.1Create a Group of Users The left pane of the Groups section depicts the whole structure of existing groups (See Illustration 16). To create new groups you must click on the New Group hyperlink on the left pane 3.4.2Edit a Group This form allows you to modify the current settings of a selected user group: Illustration 17. Editing an Existing Group of Users. 3.4.3Delete a Group The left pane of the Groups depicts the whole structure of existing groups (see Illustration 17). To delete an existing group, you must click on the Delete link of the selected group on the left pane. The resulting form will request your confirmation to delete the target group. 3.4.4Assign Users to an Existing Group The following form allows assigning employees to the current user group. This list includes all employees currently not assigned to the selected group. Please note that you can assign an employee account to many groups. And a given group can have many employees assigned. In other words, there is a many-groups-to-many-employees relationship. ProcessMaker User Manual 16 20 Illustration 18. Assigning an Employee to an Existing Group. 3.4.5Removing a User from a Group To remove a user from an existing group, you must click on the Remove link of the selected group on the left pane (See Illustration 16). The resulting form will request your confirmation to remove the requested user from the group. 3.5Roles A role is a set of permissions applied to specified groups of resources. Users with a given role have specific permissions on specific resources. Property Description PM_LOGIN Option/Right to login into the system. Every Role should have this permission assigned. PM_SETUP Access to the Setup Menu and permission to perform the related options PM_USERS Access to the Users Menu and permission to perform the related options PM_FACTORY PM_CASES Access to the Processes Menu and permission to perform the related options Access to the Cases Menu and permission to perform the related options PM_ALLCASES Right to review and modify CASES under certain conditions, more details in Section 4.7.3 PM_REASSIGNCASE Right to reassign CASES under certain conditions. Table 3. ProcessMaker Derivation Step Properties ProcessMaker User Manual 17 20 In ProcessMaker, resources include access to specific options in the system and permissions to perform them. Table 2 explains which permissions can be assigned to a role and illustration 19 shows the Roles List. The options on this list allow you to manage the roles for ProcessMaker. Illustration 19. Roles List 3.5.1Create a Role To create new Role please click on the New hyperlink from the Roles List (Illustration 20). This form allows you to add a new role: Illustration 20. Creating a new Role. 3.5.2Assign Permissions to a Role To create a new Role, please click on the Permission hyperlink from the Roles List (Illustration 19). This form allows you to assign permissions to the current role. The permissions are described in table 2. ProcessMaker User Manual 18 20 Illustration 21. Assigning a Permission to an Existing Role. ProcessMaker User Manual 19 20 4Process Managing 4.1Introduction In the following lessons you will be guided through the necessary steps to design and execute a business process from scratch. Before you ever start creating a new process you must have at least the following information at hand: A compliant business process diagram A list of users and groups who are going to interact with the process A list of forms and documents used during the process. Once you have this information at hand you can proceed to designing the actual business process by entering the ProcessMaker Process Managing interface. The recommended steps to obtain a complete business process are the following: Define the Process Map: create all tasks and define their relationships. (See section 4.3) Create Steps: for each task created in step 1. There are different types of steps: DynaForms, Triggers, Input Documents and Output Documents, they are explained in sections 4.4. Users Management: create the necessary accounts and groups of users and assign tasks accordingly. For details about the user management option in ProcessMaker please see section 3. Before you start the process configuration, it is important to take into account the ProcessMaker Object Model which is defined in the section 1.3. After that, in order to explain the different options of Process Managing in ProcessMaker, a sample workflow for Credit Card Application is presented. 4.2A sample workflow: Credit Card Application Process The process you are about to create from scratch is a Credit Card Application Process. It is intended to be used by a fictional financial institution, and it will allow its Credit Card Center to process new applications. The Process Map is as follows: ProcessMaker User Manual 20 20 Illustration 22. ProcessMap for the Credit Card Application process. The process starts when a credit card officer receives an online application submitted by an applicant and a new case is opened (Task: Application). The credit card officer needs to verify the sent information (Task: Verification). If the information in the application is not complete the officer sends the case to a call center to contact the applicant and complete the form over the phone. (Task: Complete information) When all information in the application is complete, the officer registers the applicant data (Task: Database Update). After that two parallel tasks will take place, because the credit card officer sends a request for employment and credit checks. In other words, on one hand the call center verifies the employment status of the applicant (Task: Employment Verification). And on the other hand the officer in charge of credit risk assessment receives the application and runs a credit check with a 3rd party (Task: Credit Check) ProcessMaker User Manual 21 20 Once all parallel tasks take place, the credit officer has all the necessary information to evaluate and decide if the application should be accepted or rejected (Task: Application Evaluation): If the application fulfills all requisites, the credit card application is approved and the agreement generation proceeds (Task: Generate Agreement). After that the case can be closed. Otherwise the credit card is declined and the case is closed. In the following lessons you will be conducted through the necessary steps to create and try this fully functional process from scratch. 4.3Creating the Process Map In the following section you will create the Credit Card Application process described in the last section. Then you will define all required tasks in order to reflect the business process. Create a new process: Processes New. Fill the New Process dialog as shown below: Illustration 23. Creating a new process on ProcessMaker It is possible to create a process based on a template. The templates basically create a process base with some tasks and derivation rules. Once you press the Save button you will be conducted to the Process Map, which is an interactive and friendly Business Process Design environment. This interface consists of a top pane menu and an interactive design area. The latter contains a large number of contextual menus that will allow you to design and maintain ProcessMaker User Manual 22 20 business processes with ease. Now that the business process has been defined, we will proceed with creating the tasks and their relationships. Illustration 24. The Process Map: a powerful Business Process Design interface 4.3.1Creating Your First Task The following section explains how to create your first task (or activity). Right-click on the design area and select Add Task: ProcessMaker User Manual 23 20 There should be a new task in your design area named “Task 1” . Right-click over the newly created task and select Properties option: Now we are going to change the properties of this very first task, as shown below. Illustration 25. Defining the task properties ProcessMaker User Manual 24 20 The other tabs on the illustration 25 allow defining different options for the tasks and they will be described as following: a.Task Assignment Rules The task assignment rules define what user will execute the task in a given business case. ProcessMaker has tree variations: Round Robin Assignment: use the principle to choose automatically and equally one user from the entitled user group in a rational order. Manual Assignment: gives the possibility to choose manually one user from the entitled user group, in other words the user list is displayed for the assignment. Value Based Assignment: is done depending on the value of a given case variable (Section 1.3.7 explains case variables) b.Task Timing Control Processes and therefore tasks have to be done in determined times, for this reason ProcessMaker implements timing control. It is possible to define duration time limits in calendar or working days. Such duration time limits can be expressed in mount of days, hours or minutes. c.Task Case Labels Task case labels add more flexibility for the business cases defining customized labels with the use of case variables (See section 1.3.7 for more details about case variables). In this way it is possible to have a customized case title, or customized case description or status. This option is helpful when the number of business cases is large. d.Task Notifications ProcessMaker makes it possible to send an email notification when the case is being sent to the next task. The tab Notifications allows you to define a text for the notification. Here it is also possible to use Case Variables (See section 1.3.7 for more details about case variables) in order to personalize the message. Currently the notification will be sent to the email address of the user who is in charge of the next task in the workflow. In order to be able to send a notification it is necessary to set up the email service, more details in section 6.5. 4.3.2Creating the Remaining Tasks Follow the same steps to create all remaining tasks (2 through 7). Below is a summary of required settings for these tasks. All non-mentioned fields should be left to their default values. Task 2: Verification Description: In this task, the credit officer will verify the information sent together with the application. If the information is not complete he will send the application to the call center, otherwise the application will be sent for processing. ProcessMaker User Manual 25 20 Task 3 Complete Information Description: In this task, the call center will call the applicant and verify the observed or incomplete information. Task 4 Database Update Description: In this task, the applicant information will be recorded in the Data Base. Task 5 Credit Check Description: In this task, the credit officer runs a credit check on the applicant. Task 6 Employment Verification Description: In this task, the call center verifies the current employment of the applicant. Task 7 Application Evaluation Description: In this task, the credit officer verifies that the application fulfills the necessary requirements. As an outcome of the preceding evaluation, the credit officer takes the decision to approve or to reject the application. Task 8 Generate Agreement Description: If credit card application has been accepted, in this task the credit officer generates the corresponding Agreement. Once you have completed the creation of these tasks, use the design area to organize them. Also add line guides and texts, as shown on the illustration 22. The following sections explain how you can define derivation rules, starting and ending tasks. 4.3.3Defining the Starting Task In this section, you will define the starting task of this sample process. Right-click over the Application task, and enter the Properties interface. Now check the Starting Task checkbox, as shown in illustration 25. Press the Save button and go back to the Process Map. The first task should be similar to the following screenshot: In the next section you will define an ending task for this sample process. ProcessMaker User Manual 26 20 4.3.4Defining the Ending Tasks There are three possible ending points for the Credit Card Application Process: either the information is not complete, either the application is rejected, or it is approved. These outcomes have a corresponding activity in the current process design. Two of these ending points are a consequence of derivation rule (that is after tasks: Complete Information and Application Evaluation). Following sections related to derivation rules explain how you can define them. Now you will define the ending point after Generate Agreement task: Select on the derivation tool the “End of process” button. Drag and drop the button on the Generate Agreement task. Now this task should look like this: In the next section you will define different derivation rules for this sample process. 4.3.5Defining derivation rules by Selection As shown in the section 1.3.4 derivation rule objects define the workflow thread, and this section gives an example of sequential derivation for the Credit Card Application process. Illustration 26. Defining Derivation Rule by Selection In the task “Complete Information” the call center will call the applicant and verify the observed or incomplete information. Select on the derivation tool the “Selection” button. Drag and drop the button on the Complete Information task and connect it with the Database information task. ProcessMaker User Manual 27 20 Right-click on Complete Information task and select Derivation Rules menu option. Write the description to orient the selection for the task Database information. For this example “If the information is complete” the workflow thread goes to Database Update. This description will be displayed when a business case runs. After that press the New link and choose from the dropdown the option “End of Process” to end the workflow thread (see illustration 26). Finally write the description to orient the selection, in this case If the information is not enough” the workflow thread ends. 4.3.6Defining derivation rules by Evaluation The thread workflow can change its course according a condition. The derivation rule by evaluation supports this feature using case variables to build conditions. This section explains how the derivation rule by evaluation works using the Credit Card Application example. In Application Evaluation task the credit officer evaluates if the application fulfills the necessary requirements. Then he takes the decision to approve or to reject the application. Illustration 27. Defining Derivation Rule by Evaluation For this example it is necessary to define the Case Variable “DECISION” on a dynaform assigned to the task Application Evaluation. A condition in the derivation rule by evaluation will evaluate the value given to this case variable (see illustration below). To reference a case variable within the process definition, it must always be prefixed with a double “at” sign (@@), that is @@DECISION. Select on the derivation tool the “Evaluation” button. Drag and drop the button on the Application Evaluation task and connect it with the Generate Agreement task Right-click on Application Evaluation task and select Derivation Rules menu option. Write the condition to lead the thread workflow course to the task Generate Agreement, that is If @@DECISION==’’Y” – (approved), see illustration 27. ProcessMaker User Manual 28 20 Now it is necessary define where thread workflow course if @@DECISION==’’N” – (rejected), in this case thread workflow ends. Then press the Add link and choose from the dropdown the option “End of Process” (see illustration 27). Finally write the related condition, that is: @@DECISION==’’N”. 4.3.7Defining derivation rules by Parallel fork and Parallel Join The thread workflow can take different sub-threads and start different tasks at the same time. Then when such tasks are finished the sub-threads should be joined, and the workflow can continue. In this context ProcessMaker has the derivation rules by “Parallel Fork” and “Parallel Join”. This section gives an example for both derivation rules for the credit card application. Once the Database Update concludes, two parallel tasks starts i.e. Credit Check and Employment Verification. Select on the derivation tool the “Parallel (fork)” button. Drag and drop the button on the Database Update task and connect it with the Credit Check task. After that, select the derivation tool “Parallel (fork)” button. Drag and drop the button on the Database Update task and connect it with the Employment Verification task. If you right-click on the Data Base Update task and select Derivation Rules menu option you can see the following illustration. There it is possible to define more parallel tasks. Illustration 28. Defining Derivation Rule by Parallel Join In order to ensure the workflow continues only when every parallel task is finished, every parallel task needs a “Parallel Join”. For this reason, drag and drop the derivation “Parallel Join” button on Credit Check Credit task and connect it to Evaluation Application. Repeat this step for the Employment verification task. At this point these tasks should look like this: ProcessMaker User Manual 29 20 Information is entered to build a case by using DynaForms. DynaForms are web forms, which can be easily designed with a powerful tool already embedded into ProcessMaker, the DynaForms Editor. In the following sections you will create your first DynaForm, the Application Form. 4.4Creating Steps In the following lessons you will create DynaForms, Input Documents and Output documents. Then you will assign them to existing tasks of your business process definition. The following sections present you a brief introduction regarding the steps creation. To run a case for the process “Credit Card Application” you can import the whole process definition using the “CreditCardAappplication.pm”. The section 4.7 explains you the import procedure and you find this file at: http://wiki.processmaker.com/index.php/Credit_Card_Application_Process/ 4.4.1Master Dynaforms Illustration 29. Creating a Master-Dynaform ProcessMaker User Manual 30 20 In this section you will create the Application form. This form is intended to be used by an external applicant. Once you enter the Process Map interface go to the DynaForms section. Create a new DynaForm by clicking on the New link. Fill out the New DynaForm interface as shown on illustration 29 and press the Save button. After that you should now be presented with the list of existing Dynaforms. By clicking on the Edit link, you will see the DynaForms management interface, presented on illustration 30. This interface contains all required tools for dealing with DynaForms. Now you will learn how to add fields to your first DynaForm. Illustration 30. DynaForms Management Interface We will add one field of type Title to the Credit Card Application DynaForm. From the toolbox, click on the control of type Title: Illustration 31. Field Toolbox for DynaForms Enter the following information: ProcessMaker User Manual 31 20 After pressing Save, you will be presented with a DynaForm in Preview mode, similar to this: Illustration 32. DynaForm in Preview Mode with First "Title" Control To sort the different fields, you can use the tab “Field List” and order them properly as shown in illustration 33. Another option is to edit the XML definition on the respective tab. Illustration 33. Dynaform’s Field List Now you know how to include fields into a DynaForm. Annex 2 includes a description of the different field types. Create all remaining fields according to the following illustration. ProcessMaker User Manual 32 20 Illustration 34. Credit Card Application DynaForm 4.4.2Grid Dynaforms With ProcessMaker it is possible to manage data grids. For that it is necessary to create a Dynaform type “Grid” that includes the data (columns) definition. To render and to manage this information, the grid should be joined to a dynaform “Master” type. This section will explain how to create a Grid-dynaform and how to join it with an existing Master-dynaform. Illustration 35. Creating a Grid-Dynaform ProcessMaker User Manual 33 20 In order to get more detailed information about the Applicant employment information, we will create a new grid-dynaform. This grid-dynaform will be embedded the “Credit Card Application” dynaform Once you enter the Process Map interface go to the DynaForms section. Create a new DynaForm by clicking on the New link: Fill out the New DynaForm interface as shown on illustration 35 and press the Save button. This dynaform has the type “Grid”. After pressing Accept, you will be presented with a DynaForm in Preview mode, similar to this: You can edit the fields “A” and “B” using the tab “Field List” and order/rename them properly as shown in the next illustration. Another option is to edit the XML definition on the respective tab. From the toolbox in the dynaform builder interface (presented in illustration 30) you can select the fields to build the next grid-dynaform. ProcessMaker User Manual 34 20 Now we will complete the “Credit Card Application” Form (it is a master form) to render the “Employment Information” grid. Load the “Credit Card Application” Form and press the button “Grid” of the toolbox, and complete the information as shown in the next illustration: On the illustration, the dropdown “Grid” displays the grid-dynaform created for the current process. The properties “Add new rows” and “Delete rows” allow one to manage the grid information easily. Press Accept and the grid-form “Employment Information” will be embedded at the button from the “Credit Card Application” form. After that is included a Title “Employment Information” on the dynaform. Move it and the grid-form up; as shown on the next illustration. ProcessMaker User Manual 35 20 Illustration 36. Credit Card Application DynaForm with an embedded Grid-Dynaform. 4.4.3Input Documents So far you have created steps in DynaForms. Such steps allow receiving information from end users who must type input data into Web forms. In this section you will create another type of steps: Input Documents. Documents required in a given activity context, they can be hard copy (impressed) or digital. In this section you will create a sample about Additional Documentation intended to be part of the Application task. Create a new input document by clicking on the new link ProcessMaker User Manual 36 20 Fill out the form with the following information: Illustration 37. Creating an Input-Document 4.4.4Output Documents Output Documents is another steps type. They can be either PDF (Portable Document Format) or RTF (Rich Text Format) documents automatically generated in a given activity context. An Output document can use one or more case variables and place them in a formatted output file, applying a PDF or RTF template definition. In this section you will create a sample “Approval Letter” intended to be part of the Application Evaluation task. Create a new output document by clicking on the new link In the design area copy the following text, then save the file: ProcessMaker User Manual 37 20 @#TASK_DATE Mr./Ms. @#APPLICANT_NAME @#APPLICANT_LAST @#APPLICANT_EMAIL Dear Mr./Ms. @#APPLICANT_LAST After reviewing your application for a @#CARD_TYPE card, I inform you that your application was approved for a credit limit of @#CREDIT_LIMIT Dollars. In the next few days you will receive an agreement. You should sign it and return us. Then you will receive your new credit card. If you need further information do not hesitate in contacting our credit card center at 1-800-567-2333. Thank you for trusting our organization. Best Regards @#CREDIT_OFFICER Credit Card Center Supervisor Apply appropriate formatting to this document. You can include graphic elements, such as logos. When you save the changes, the output-document is automatically uploaded into your ProcessMaker workspace. Illustration 38 presents the form associated. Illustration 38. Newly Created Output Document ProcessMaker User Manual 38 20 4.4.5Triggers Most business rules are far more than simple Boolean conditions. For this reason Triggers provide the appropriate framework to perform complex calculations, to name a few. In this section you will create a trigger to get the actual time from the operating system which to be part of the Application task. Create a new input trigger by clicking on the new link: After that, fill out the form with the following information: Illustration 39. Creating a Trigger Now all pieces are in place to start assigning steps to each and every task. 4.5Assigning Steps, Messages and Users to Tasks 4.5.1Assigning Steps to Tasks This lesson will guide you through the required step to assign the a Credit Card Application form to the starting task. Go to the process map Right-click on the Application task and select the Steps option: ProcessMaker User Manual 39 20 On the resulting popup click on Add Step link and select the element “Credit Card Application form” from the DynaForm list: Here it is possible to assign input and output documents as well. Following you can add also the input document “Identification” defined in section 4.4.3. After that the task “Application” has two steps. Illustration 40. Assigning a step to a task When a business case runs, these steps will be shown in the same order as defined on the Step Windows. For this example, when Application task runs, first will be shown the Dynamform “Credit Card Application Form” and after that the Input document “Identification” ProcessMaker User Manual 40 20 4.5.2Assigning Users By accessing the Users management interface, you can create users and groups with complete freedom (More details in section 3). In order to assign a user to a process, you should follow the same steps described in the last section. 4.5.3Defining Process Supervisor In some cases it is necessary to have a supervisor for processes who can monitor the cases, checking the dynaforms or documents of a specific case. Likewise due to a special situation, it can be necessary to edit a dynaform. For this reason ProcessMaker allows you to define a process supervisor, to do that follow the next steps. Right-click on the design area and select Process Supervisor: Illustration 41. Pop-up menu – Process Design Area The following window appears. Click on Process Supervisor and select a user, who will supervise the process. This user should have a role with permission PM_ALLCASES, section 3.5 explains this feature. ProcessMaker User Manual 41 20 After that you should define which dynaforms can be edited by the Process Supervisor. To do that Right-click on the process design area (Illustration 43) and select Dynaforms for the supervisor. The following window appears which allows you to select the Dynaforms for the supervisor. 4.6Connecting to other Databases BPMs need to be interconnected with other third party systems; a basic functionality is the Databases Source Connection. Currently ProcessMaker supports connection with: MySql, PostgreSQL, Microsoft SQL Server, Oracle,Informix, SQLite. The following illustration shows the database source configuration interface. You can create a new database connection by clicking on the Database Connections option of the Business Process Design environment (Illustration 24). ProcessMaker User Manual 42 20 Illustration 42. Creating a Database Source The ProcessMaker routine for database connections detects the database modules installed on your PHP Server. In llustration 40 the routine has detected MySql, PostgreSQL, Microsoft SQL Server, Oracle. In order to create a database connection, it is necessary to fill in the following information: Server: IP address or ServerName where the database source is installed DatabaseName: From the data source UserName and Password: that have access to the database source Port: for the Database. If this field is empty, the routine takes the default port Description: If it applies Once you have filled out this information, you need to test the connection by clicking on the Test Connection button. The test routine verifies hostname, port, service and the existence of the database, as show below: Illustration 43. Testing Database Connection ProcessMaker User Manual 43 20 If the test is successful the connection can be created. After that the database connection will be available and it can be used in combination with the dynaforms elements. Annex 2 details which dynaforms elements have the property SQL connection. 4.7Importing and Exporting Processes ProcessMaker gives the possibility to import new processes and export your own processes. With this aim, ProcessMaker generates a file .pm that includes the whole structure of your process. That means a .pm file has the definition of the processmap, dynaform, input and documents, and triggers as well. You can find some .pm files in our WIKI at: http://wiki.processmaker.com/index.php/Processmaker:Community_Portal On this page you find also the file “CreditCardApplication.pm” that includes the whole definition for our process example. 4.7.1Export Procedure To export a .pm file follow the next steps: Right-click on the design area (See illustration 43) and select Export Process: There will be presented the following window, which have a link to the generated CreditCardApplication2.pm file. If you click on this link, you can download this file, which contains the process definition. 4.7.2Import Procedure To import a .pm file follow the next steps: Click on the Import link of the Process Menu-option (See following illustration). ProcessMaker User Manual 44 20 There will be presented the following window. There you can select the .pm file and import it. ProcessMaker User Manual 45 20 5Reports on ProcessMaker 5.1Introduction In order to monitor easily your processes it is necessary to have summaries about the tasks, users and cases in a BPM system. For this reason ProcessMaker implements default summaries in the Report option and at the same time allows you to get customized information from your cases with the Report Tables option. 5.2Standard Reports ProcessMaker has the following standard reports: Case duration by process and task Number of cases per process In the near future these reports and new ones will be available combined with the use of dashboards. 5.3Report Tables Report Tables allows you to export the information of your cases to the database rp_workflow. You can export this information and generate your own reports. The following illustration shows the existing report tables. You have access to this list by clicking on Report Tables option of the Business Process Design environment (Illustration 24). By clicking on New/Edit links you have access to the following window, where you define the field for your report table. ProcessMaker User Manual 46 20 There are two Report Table types: Global: Has access to the fields defined in Master dynaforms. Report Tables of this type store a new row for each case. The fields by default are: app_uid (corresponds to the uid of the dynaform) and app_number (the case id). Grid: Has access to the fields defined in grid dynaforms. Report Tables of this type store the information according to the grid. ProcessMaker User Manual 47 20 6Setting – Up 6.1Introduction This section describes the configuration of different ProcessMaker options, mainly related to plug-ins, updates and to internationalization. 6.2Languages Illustration 44. Languages available in ProcessMaker This module allows managing different languages in ProcessMaker. To add a new language into ProcessMaker click on “Import or Update” link and a file selector window appears, where you can select the file that has the translation of the new language. ProcessMaker uses portable object files (.po) for translations into different languages. Various tools exist to help working with .po files. A good cross-platform editor for .po files is the editor Poedit (to download at http://www.poedit.net/). Please visit our ProcessMaker Wiki at http://wiki.processmaker.com/index.php/Translations to check existent translations. 6.3Plug-ins The main aim for plug-ins is to add new features to the ProcessMaker. Actually there are few plug-ins, but this number should be increasing in the near future. The following illustration shows the existing plug-ins. From this panel it is possible to import new plug-ins, to enable or to set-up them. The description on the panel gives a brief description about the existing plug-ins. ProcessMaker User Manual 48 20 Illustration 45. List of Plug-ins available in ProcessMaker 6.4Upgrade System From release pmos-1.0.1142 on, it is possible to upgrade ProcessMaker keeping your existing processes and case information intact. The upgrade routine updates the source code and database changes. For this reason it is important to use this option in order to update the new features maintaining your process and cases information. To upgrade ProcessMaker, please click on the Setup Up menu, and select Upgrade System. After that you can upload the patch file (see illustration below) and update the system by clicking on the button Upgrade. Illustration 46. Upgrading ProcessMaker 6.5E-mail Notifications via email add more flexibility to a BPM. The option Email in the Setup Up menu defines the email engine and the parameters required to enable this feature. ProcessMaker supports three email engines: Mail PHP - http://www.php.net/mail/ PHP Mailer - http://phpmailer.codeworxtech.com/index.html OpenMail - http://openwebmail.org/ ProcessMaker User Manual 49 20 Illustration 47. Upgrading ProcessMaker Once you have filled in the parameters according to the email engine (as shown in illustration 47) you are able to test the email configuration by clicking on the Test button and filling out the information required in the next illustration: , Illustration 48. Upgrading ProcessMaker When a test email is sent to [email protected] (for example), it could be that this email goes to the spambox. If you experience problems with the email notifications, you should review the engine mail parameters and execute this test again. The test mail option can be performed at any time and it is helpful in order to identify possible problems. Section 4.3.1.d explains how you can define email notifications in your processes. ProcessMaker User Manual 50 20 Annex 1: System Case Variables Name Description SYS_LANG Current language two-letters code. SYS_SKIN Current Skin name SYS_SYS Current Workspace name SYS_APPLICATION Current Case ID(*) SYS_PROCCESS Current Process ID(*) SYS_TASK Current Task ID(*) USR_USERNAME Current User ID(**) (*) Available up PMOS v.1.0.1135 or greater (**) Available up PMOS v.1.1-1366 or greater ProcessMaker User Manual 51 20 Annex 2: Dynaform Fields – Properties The following table presents the different main properties according the different fields for dynaform. Many of these properties are common for HTML tags. FIELD Name Label Required Text Currency Percentage Password TextArea Title Subtitle Button Submit Reset Dropdown Yes/No ListBox CheckBox × × × × × × × × × × × × × × × × × × × × × × × × × × × × × × × × × CheckGroup × × Radiogroup Date Hidden Link File Grid × × × × × × × × ProcessMaker User Manual × × × × × × Sql Connection × × Sql Options × Options × × × × × × × × × × × × × × × × Read Only × × × × Default Value × × × × × Size × × × × Max Length × Dependent Fields × Dynaform size × × × × × × × × Sql × × × × 52 50