1
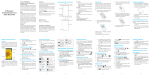
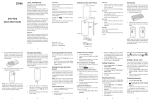
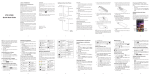
LEGAL INFORMATION
ZTE Grand X2
WCDMA/GSM Mobile Phone
Quick Start Guide
Copyright © 2013 ZTE CORPORATION.
All rights reserved.
No part of this publication may be quoted,
reproduced, translated or used in any form
or by any means, electronic or mechanical,
including photocopying and microfilm, without
the prior written permission of ZTE Corporation.
Notice
ZTE Corporation reserves the right to make
modifications on print errors or update specifications in this guide without prior notice.
We offer self-service for our smart terminal
device users. Please visit the ZTE official
website (at www.ztedevice.com ) for more
information on self-service and supported
product models. Information on the website
takes precedence.
Disclaimer
ZTE Corporation expressly disclaims any
liability for faults and damages caused by unauthorized modifications of the software.
Images and screenshots used in this guide
may differ from the actual product. Content in
this guide may differ from the actual product
or software.
1
Charging the Battery
1. Connect the adapter to the charging jack.
Ensure that the adapter is inserted with
the correct orientation. Do not force the
connector into the charging jack.
The home screen is the starting point for your
phone’s applications, functions, and menus.
You can customize your home screen by adding application shortcuts, folders, widgets,
and more.
Status bar
8
Widgets
Wallpaper
Shortcutss
Phone
People
Headset
Earpiece
Power Key
Inductor
Front Camera
Volume Keys
Touch Screen
is a trademark of the
SD-3C, LCC.
Other trademarks and trade names are the
property of their respective owners.
Charger/USB
Jack
Back Key
Menu Key
Home key
Back Camera
Flash
Power Key
• Press and hold to power on, select
phone modes, reboot, turn on/off airplane
mode, or power off.
• Press to turn off or on the screen display.
Home Key
• Touch to return to the home screen from
any application or screen.
Menu Key
• Touch and hold to see recently used applications.
• Touch to get the options for the current
screen.
Back Key
Touch to go to the previous screen.
Volume Keys
Press or hold to turn the volume up or down.
Starting Up
Switch off your phone before installing or
replacing the battery or the SIM card. The
microSD card is optional and can be installed
and removed while the phone is turned on.
Unmount the microSD card before removing
it.
1. Place your finger in the slot of the back
cover to lift and remove the cover.
3. Hold your microSD card with the metal
contacts facing down and slide it into the
microSD card slot.
4. Align the connectors on the phone and
the battery and slide the battery into the
compartment. Then gently press the battery down until it is secured.
2. Hold the SIM card with its cut corner oriented as shown and slip it into the card
holder.
Back Cover
Version No. : R1.0
Edition Time : 201310
Manual No. : 079584506130
SIM 2
5. Press the cover gently back into place
until you hear a click.
SIM 1
Speaker
Caution: Install your WCDMA or GSM SIM
card into SIM slot 1.
Install your GSM SIM card into SIM slot 2.
4
5
Opening Applications
Applying New Wallpapers
1. Touch the Home Key if the current
screen is not the home screen.
You can set the wallpaper for the home
screen.
1. Touch the Home Key > Menu Key >
Wallpaper.
2. Select a wallpaper source from Gallery,
Live Wallpapers, Video Wallpaper, or
Wallpapers and touch the image or animation you want to use as the wallpaper.
3.Touch Set wallpaper.
2.Touch
.
3. Slide left or right on the screen and touch
an app to open it.
Adding Shortcuts or Widgets
1. Touch the Home Key >
.
2. If you want to add a widget, touch WIDGETS.
3. Touch and hold a widget or an app icon
and drag it to the home screen.
Removing Shortcuts or Widgets
1. Touch and hold a widget or shortcut on
the home screen.
All Apps
2. Drag it to
Browser
Messaging
Organizing Shortcuts With Folders
NOTE: Your home screen extends beyond
the initial screen, providing more space
for shortcuts, widgets, and folders. Simply
swipe left or right to see the extended home
screens.
9
Getting to Know Your Phone
3
Getting to Know the Home
Screen
2. Connect the charger to a standard AC
power outlet.
3. Disconnect the charger when the battery
is fully charged.
Make sure the battery is charged before powering on.
• Press and hold the Power Key to turn on
your phone.
• To turn it off, press and hold the Power
Key to open the options menu. Touch
Power off > OK.
microSD logo
2
Google Search
Powering On/Off Your Phone
Trademarks
ZTE and the ZTE logos are trademarks of the
ZTE Corporation. Google and Android are
trademarks of Google, Inc.
The Bluetooth ® trademark and logos are
owned by the Bluetooth SIG, Inc. and any
use of such trademarks by ZTE Corporation
is under license.
to remove it.
1. Touch and hold a shortcut on the home
screen.
2. Drag the shortcut icon over another and
release your finger. A new folder is created and both shortcuts are added into
the folder.
3. If needed, drag more shortcuts and drop
them into the folder.
10
Checking the Phone Status
The status bar at the top of the screen displays phone and service status with various
icons. Below are some of the icons and their
meanings.
Signal
strength
No SIM card
installed
Portable WiFi hotspot
6
New Gmail
message
Setting Ringtone and Sounds
Setting Ringtone or Notification Sound
> Settings >
Audio profiles > General.
2.Touch
3.Touch Voice call ringtone, Video call
ringtone or Default notification.
4. Select the ringtone you want to use.
5.Touch OK.
Setting System Sounds
1. Touch the Home Key >
> Settings >
Audio profiles > General.
Mobile data
in use
Flight mode
2.Touch
Ringer off
Bluetooth on
Vibrate mode
Connected to a
Wi-Fi network
3. Scroll to the SYSEM section and check
the sounds you want to hear or uncheck
those you do not need.
Battery full
New SMS /
New MMS
Alarm set
New Email
11
.
Adjusting Volumes
To adjust call volume, press the Volume
Keys while on a call. To adjust other volumes,
follow the steps below.
12
.
3.Touch Volumes.
4. Drag the sliders to adjust the volume for
the ringtone and notification volume, and
the alarm volume.
5.Touch OK to save.
TIP: Press and hold the Power Key and then
touch
.
Pattern to create a pattern
that you must draw to unlock the
screen.
uTouch PIN or Password to set a numeric PIN or a password you must
enter to unlock your screen.
uTouch
> Settings >
Audio profiles > General.
2.Touch
USB tethering
is on
1. Touch the Home Key >
1. Touch the Home Key >
7
to enable the silent mode, touch
to enable the vibration mode, or touch
to
disable the silent mode.
Setting a Screen Lock
You can protect your phone by creating a
screen lock. When enabled, you need to draw
a pattern, or enter a numeric PIN or password
to unlock the phone’s screen and keys.
1. Touch the Home Key > Menu Key >
System settings > Security > Screen
lock.
2.Touch None, Press, Pattern, PIN or
Password.
uTouch Press to enable unlock with
a ‘touch and hold’ gesture. You can
unlock the screen by touching and
holding
Checking Voicemail
1. Touch the Home Key >
.
3. Select a SIM card.
4. If prompted, enter your voicemail password.
5. Follow the voice prompts to listen to and
manage your voicemail messages.
Making a Call
1. Touch the Home Key >
2. In the dialer tab
.
, enter the phone
number with the on-screen keypad.
Touch
to delete incorrect digits.
3. Touch the
icon below the keypad.
4. Select a SIM card to place the call.
NOTE: To call a contact, touch the Home Key
>
>
and touch a contact or a number.
at the center of the dis-
play.
13
.
, touch and hold
2. In the dialer tab
14
Adding Contacts
3.Touch
Creating a New Contact
1. Touch the Home Key >
>
and
.
touch the all contacts tab
2.Touch
3. Store the contact to SIM/Phone.
4. Enter the contact name, phone numbers.
Touch DONE to save the contact.
Importing Contacts in Batches
>
.
2. Touch the Menu Key > Import/export.
3. Select SIM card, SD card, phone, or
phone storage.
4.Touch Next.
5. If prompted, select an account in which
to save the contacts, and touch Next.
6. For importing from the SIM card, touch
all the SIM contacts you want to import
and touch OK.
Sending a Message
1.Touch
in the home screen and select
Messaging, then touch
Setting Up Email Accounts
Setting Up Gmail
.
1. Touch the Home Key >
.
4. Select SIM card to send the message.
.
2. Enter the recipient(s) and message text.
If you want to send an MMS, add subject
and attachments.
1.Touch
in the home screen and select
Gmail.
NOTE: If another Gmail account is already set up, touch the Menu Key > Settings > ADD ACCOUNT.
2.Touch Existing to sign in to your existing
Google Account. If you have no Google
Accounts, touch New to create one.
3. Follow the instructions on the screen to
set up the account.
Setting Up Email
1.Touch
in the home screen and select
Email.
NOTE: If another email account is already set up, touch the Menu Key > Settings > ADD ACCOUNT.
2. Enter the email address and password.
3.Touch Next and follow the onscreen instructions.
15
16
Connecting to PC
You can connect your phone to a computer
with a USB cable and transfer music, pictures, and other files in either direction. Your
device stores these files in internal storage or
on a removable microSD card.
1. Touch and hold the status bar across the
top of the screen and flick down.
2.Touch
Number
Function
1
Touch to return to the library.
2
Album artwork.
3
Song and artist names.
4
Playback control. Skip songs,
pause and resume playback.
Drag the progress bar to jump to
any part of the song.
5
nection mode]).
3. Choose one of the following options:
u
u
u
Touch to see the current playlist
(queue), Shuffle, or Repeat.
u
u
22
(Connected as [current con-
USB storage: XP recommended.
Lets you transfer files between your
computer and your Android device.
Media device (MTP): Lets you transfer media files on Windows, or using
Android File Transfer on Mac.(See
www.android.com/filetransfer)
Camera (PTP): Lets you transfer
photos using camera software, and
transfer any files on computers that
don’t support MTP.
Charge only: Stop all USB functions.
Lets you speed up USB charging and
decrease power consumption.
Built-in CD-ROM: Show a virtual
CD-ROM containing some useful
software.
23
Connecting With a Bluetooth
Headset
Installing Apps From the
Google Play Store
1. Turn on the Bluetooth headset and
switch it to pairing mode. Refer to the
headset’s user guide for more information.
There are tens of thousands of games and
applications in the Google Play Store for you
to download and install. You can send feedback or comments on an application.
Before you begin, make sure that you have
signed in to your Google account.
NOTE: The content you can access in the
Play Store depends on your region and your
service provider.
2.Touch
in the home screen and select
Settings > Bluetooth.
3. Slide the ON/OFF switch if Bluetooth is
off. When Bluetooth is on, the
icon ap-
pears in the status bar.
NOTE: Your phone automatically scans
for and displays the IDs of all available
Bluetooth devices in range. You could
touch SEARCH FOR DEVICES if you
wanted to scan again.
4. Touch the ID of the headset, or any other
device you want to pair with your phone.
Enter a passcode if prompted.
5. If necessary, touch the ID of the paired
headset to connect with it. Once con-
nected, the
icon in the status bar turns
blue.
TIP: Touch the ID again to end the connection.
1. Touch the Home Key >
> Play Store.
The first time you launch Play Store, accept the Google Play Terms of Service.
2. Find the apps you need either by cat
egory or by touching
.
18
To disconnect the device from the computer,
simply unplug the USB cable when you’re
finished.
1. Touch the Home Key > Menu Key >
System settings > More > Mobile networks > Access Point Names.
2. Select a SIM card.
3. Touch the Menu Key > New APN.
4. Touch each item to enter the information
you get from your service provider.
5. Touch the Menu Key > Save to complete.
Connecting via Wi-Fi
1. Touch the Home Key > Menu Key >
System settings > Wi-Fi.
2. Slide the ON/OFF switch if Wi-Fi is off.
Your phone automatically searches for
Wi-Fi networks in range and displays
their names and security settings. Your
phone also connects to previously linked
networks when they are in range.
3. Touch a network name to connect to it.
If the network is secured, enter a password or other credentials. (Ask your network administrator for details.)
Connecting via Mobile Network
To connect to the Internet via mobile network
you can use the default Access Point Names
(APN). If you want to add a new APN, please
contact the service provider to get the necessary information. Do not change the default
settings unless instructed by the service provider. Otherwise the service might stop working.
24
icon appears in the status bar. You can
find the new app after touching the Home
Key >
.
Taking a Photo
1.Touch
in the home screen and select
Camera.
2. Aim the camera at the subject and make
any necessary adjustment.
•
From the home screen, touch
> Set-
tings > Apps and close the apps you do
not need but still run in the background.
•
From the home screen, touch
> Set-
tings > Audio profiles > General >
and uncheck Vibrate on touch.
25
Capture a photo.
2
Change the camera settings.
3
View photos and videos you
have captured.
Switch between the front cam-
4
era and the back camera.
5
Switch the flash.
6
Select the camera mode.
3. Touch the area where you want the
camera to focus. Green brackets appear
around the focused area.
4. Lightly touch the button
.
Recording a Video
Number
Function
1
Start or stop recording a video.
2
View photos and videos you
have captured.
3.Touch
in the home screen and select
to start and
to stop re-
cording.
Playing Music
1.Touch
in the home screen and select
Music.
2. Touch a category, such as Artists or Albums, to find the song you want to play.
3. Touch the song to play it back.
20
Freeing Up Memory Space
Use Apps to free up memory space and optimize system speed.
1. From the home screen, touch
> Set-
tings > Apps.
2. Touch the app and touch the Force stop
button next to the application you do not
need.
Managing the Phone Storage
There are several things you can do to make
your battery last longer.
• Turn on Wi-Fi, Bluetooth, GPS, mobile
data, auto-sync only when you need to.
• Lower the screen brightness.
• Use Bluetooth tethering or USB tethering
(when you have a cable) instead of portable Wi-Fi hotspot to share your phone’s
data service.
Function
1
Camera.
2. Aim the camera at the subject and make
any necessary adjustment.
19
Extending Battery Life
Number
1.Touch
3. Touch the app to see detailed description.
4.Touch INSTALL (free apps) or the price
(paid apps). If the app is not free, you
need to sign in to your Google Wallet account and select a payment method.
CAUTION: Once installed, some apps
can access many functions or a significant amount of your personal data. The
Play Store will show you what the app
can access. Touch Accept & download
(free apps) or Accept & buy (paid apps)
17
Connecting to the Internet
to proceed, or touch the Back Key to
cancel.
5. Wait for the app to be downloaded and
installed automatically. Payment needs
to be authorized before paid apps start
downloading.
The app is successfully installed when the
Deleting Old Messages
You can manually delete old messages to
free up some storage space. You may also
set up auto deletion of the oldest messages
when the limits are reached.
1. From the home screen, touch
> Mes-
saging.
2. Touch the Menu Key > Settings > General.
3.Check Delete old messages to enable
auto deletion.
4.Touch Text message limit or Multimedia message limit to set the maximum
limit.
5.Touch Set.
26
21
Clearing Browser’s Local Content
1. From the home screen, touch
>
Browser.
2. Touch the Menu Key > Settings > Privacy & security.
3.Touch Clear cache, Clear history, and
Clear all cookie data.
Product Safety Information
Do not use hand-held while driving
Do not use while re-fuelling
For body-worn operation maintain
a separation of 15 mm
This device may produce a bright
or flashing light
Small parts may cause a choking
hazard
Do not dispose of it in a fire
Avoid contact with magnetic media
Avoid Extreme Temperatures
Keep away from pacemakers and
other personal medical devices
Avoid any contact with liquid, keep
it dry
Switch off when instructed in
hospitals and medical facilities
Do not attempt to disassemble
Switch off when instructed in
aircrafts and airports
Only use approved accessories
Switch off in explosive environments
Do not rely on this device for
emergency communications
This device may produce a loud
sound
To prevent possible hearing damage, do not listen at high volume
levels for long periods.
27
28