1
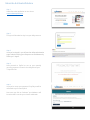
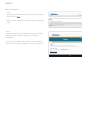
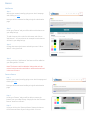
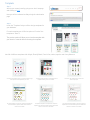
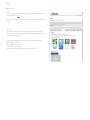
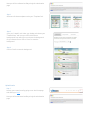
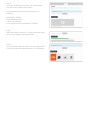
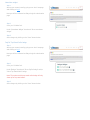
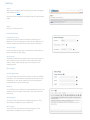
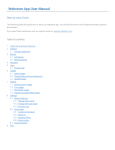
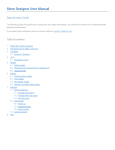
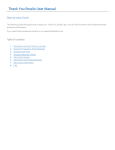
Webstore User Manual
Step-by-step Guide
The following guide will explain how to setup our Webstore solution. You will also find here a list of frequently asked
questions and answers.
If you need further assistance visit our support center at: support.3dsellers.com.
Table of contents:
1.
2.
3.
4.
5.
6.
7.
8.
9.
Subscribe & activate Webstore
Address
2.1. Change subdomain
Banner
3.1. Add banner
3.2. Remove banner
Template
Logo
5.1. Change logo
Header
6.1. Select header
6.2. Change featured item background
6.3. Upload header
Sidebar
7.1. Social buttons widget
7.2. Text widget
7.3. Newsletter widget
7.4. PayPal/Top Rated Seller badge
Settings
8.1. General settings
8.1.1. Change store name
8.1.2. Change items per page
8.1.3. Sort items by
8.2. About page
8.2.1. Contact information
8.2.2. About us
8.2.3. Shipping Policy
8.2.4. Return policy
8.3. Social networks
FAQ
Subscribe & Activate Webstore
Step 1:
Subscribe to the application on our site at:
www.webstoreplace.com.
Step 2:
First you will be asked to sign in to your eBay account.
Step 3:
Once you’ve signed in you will reach an eBay authorization
page. Authorize linking your eBay account to Webstore by
clicking on “I Agree”.
Step 4:
Next proceed to PayPal to set up your monthly
recurring payment. You won’t be charged until your
7-day trial ends.
Step 5:
Once you’ve set up your payment in PayPal you will be
redirected to your control panel.
Now once you click on “Activate” your Webstore will
be active and live under your chosen subdomain.
Address
Change Subdomain
Step 1:
Access your control panel by going to our site’s hompage
and clicking on login.
Next you will be redirected to eBay to login & authorization
page.
Step 2:
Next you will arrive at your Webstore control panel. At the
first tab you will be able to change your webstore’s
subdomain.
You can only use letters and numbers in your subdomain,
you can’t use any special characters such as &,*,@ and $.
Banner
Add Banner
Step 1:
Access your control panel by going to our site’s hompage
and clicking on login.
Next you will be redirected to eBay to login & authorization
page.
Step 2:
Under your “Banner” tab you will be able to add a banner to
your eBay listings.
To add a banner pick a color for the banner and click on
“Add banner”. You can also see an example how the banner
will look in your eBay listings.
Step 3:
Change the text on the banner and add your own “Call-toAction” in the given field.
Step 4:
Once you click on “Add banner” the banner will be added to
your listing within 12 hours.
Note: The banner can’t be added to listings that can’t be
revised such as auctions with bids or auctions that will end
in the next 12 hours.
Remove Banner
Step 1:
Access your control panel by going to our site’s hompage and
clicking on login.
Next you will be redirected to eBay to login & authorization
page.
Step 2:
Under your “Banner” tab you will be able to remove the
banner from your eBay listings. Simply click on the “Remove
Banner” button to remove it.
Step 3:
Once you click on the “Remove Banner” button the banner
will be removed from all your listings within 12 hours.
Template
Step 1:
Access your control panel by going to our site’s hompage
and clicking on login.
Next you will be redirected to eBay to login & authorization
page.
Step 2:
Under the “Template” tab you will the design templates for
your Webstore.
For each template you will find an option to “Preview” the
template or “Save” it.
The preview option will allow you to view the template with
your items in a new tab before choosing the template.
We offer 6 different templates: Win 8 Style, Electrify Black, French Lilac, Verde, Aquarius and Cherry Blossom.
Our Win 8 style template offers you a clean & modern design
with a layout that will emphasize your items.
Our Verde template is a green hue responsive template with
a full width header, dynamic sidebar and a selection of
textures for the header.
Our Electrify Black template is a bold black & white
template featuring icons in the sidebar.
Our Aquarius template is a turquoise hue responsive
template with a full width header, dynamic sidebar and a
selection of textures for the header.
Our French Lilac template has a soft lilac hue
and a unique layout.
Our Cherry Blossom template is a pink hue responsive
template with a full width header, dynamic sidebar and a
selection of textures for the header.
Logo
Change Logo
Step 1:
Access your control panel by going to our site’s hompage
and clicking on login.
Next you will be redirected to eBay to login & authorization
page.
Step 2:
By default your webstore’s logo will be your eBay profile
image, but you can also choose one of our designed logos
or upload a new logo.
The recommended sizes for your logo are as following:
Win 8 Style: 175X146
Electrify Black: 221X135
French Lilac: 140X140
Verde, Aquarius and Cherry Blossom: 180X132
Header
Select Header
Step 1:
Access your control panel by going to our site’s hompage
and clicking on login.
Next you will be redirected to eBay to login & authorization
page.
Step 2:
Under your “Header” tab you will be able to choose what to
display in your webstore’s header: a featured item, a
designed header or a custom header. By default your
featured item will be showing in your Webstore.
Featured item:
You can choose which type of item to feature in your
Webstore: newly listed, best match, ending soon, most
expensive and cheapest item. Once you pick the type click
on” Save” to save the type.
Designed header:
You can also choose one of our designed headers for your
header. Click on the header to choose it.
Custom header:
You can upload your own custom header. Recommended
sizes are as following:
Win 8 Style: 1150X350
Electrify Black: 960X300
French Lilac: 960X300
Verde, Aquarius and Cherry Blossom: 1150X260
Change featured item background
When using templates Verde, Aquarius and Cherry Blossom you will be able to change the background for your featured
item.
Step 1:
Access your control panel by going to our site’s hompage
and clicking on login.
Next you will be redirected to eBay to login & authorization
page.
Step 2:
Select one of these templates under your “Template” tab.
Step 3:
Go to your “Header” tab. Under your header tab choose your
“Featured item” tab. Here you will find 4 different
backgrounds from which you can choose the background
for your featured item. Click on “Save” to save the
background.
Step 4:
Click on “Save” to save the background.
Upload header
Step 1:
Access your control panel by going to our site’s hompage
and clicking on login.
Next you will be redirected to eBay to login & authorization
page.
Step 2:
Go to your “Header” tab and choose the “Upload header”
tab. Click on the “Choose header” button.
Recommended sizes for the custom header are as
following:
Win 8 Style: 1150X350
Electrify Black: 960X300
French Lilac: 960X300
Verde, Aquarius and Cherry Blossom: 1150X260
Step 3:
Select the header from your PC. Once you select the image
you will see it loading in your control panel.
Step 4:
Once your header loads you will see it in your control panel.
Your new header will automatically show in your Webstore.
Sidebar
When using templates Verde, Aquarius and Cherry Blossom you will be able to add widgets to your webstore’s sidebar
including social buttons, text box, newsletter button and PayPal/Top Rated Seller badge.
Social buttons widget
Step 1:
Access your control panel by going to our site’s hompage
and clicking on login.
Next you will be redirected to eBay to login & authorization
page.
Step 2:
Go to your “Sidebar” tab. Under “Social Buttons Widget” fill
out your social links as following:
Facebook: www.facebook.com/3dsellers (page name or
page ID)
Twitter: https://twitter.com/3DSellers (Twitter username)
Google +: https://plus.google.com/+3dsellers (Page name
or profile ID)
YouTube: www.youtube.com/user/3DSellersOfficial
(YouTube user name)
Pinterest: http://www.pinterest.com/3dsellers (User name)
Step 3:
Once you fill out the fields save your changes by clicking on
the “Save” button in the bottom.
Text widget
Step 1:
Access your control panel by going to our site’s hompage
and clicking on login.
Next you will be redirected to eBay to login & authorization
page.
Step 2:
Go to your “Sidebar” tab.
Under “Text Widget” checkmark “Show text widget”.
Step 3:
Enter your own title and text for the text box, or leave the
default text.
Step 4:
Once you fill out the fields save your changes by clicking on
the “Save” button in the bottom.
Newsletter widget
Step 1:
Access your control panel by going to our site’s hompage
and clicking on login.
Next you will be redirected to eBay to login & authorization
page.
Step 2:
Go to your “Sidebar” tab.
Under “Newsletter Widget” checkmark “Show newsletter
widget”.
Step 3:
Save changes by clicking on the “Save” button below.
PayPal/ Top Rated Seller badge
Step 1:
Access your control panel by going to our site’s hompage
and clicking on login.
Next you will be redirected to eBay to login & authorization
page.
Step 2:
Go to your “Sidebar” tab.
Under “Badges” checkmark “Show PayPal badge” and/or
“Show Top Rated Seller” badge.
Note: The option to add a top rated seller badge will only
show up for top rated sellers.
Step 3:
Save changes by clicking on the “Save” button below.
Settings
Step 1:
Access your control panel by going to our site’s hompage
and clicking on login.
Next you will be redirected to eBay to login & authorization
page.
Step 2:
Go to your “Settings” tab.
General settings:
Change store name:
Under “Store title” fill out the name you want for your
Webstore. This will change the name of your Webstore in
search results and the title at the top of your Webstore.
Items per page:
Under “items per page” you can decide how many of your
items will show in each page.
Sort items by:
Similarly to eBay sorting options, you can choose here by
which order to show the items in your Webstore: Best
match, newly listed, ending soon, most expensive or
cheapest item.
About page:
Contact information:
You can fill out here your email, phone number and Skype
username. This information will appear at the top of your
homepage (in our Verde, Aquarius and Cherry Blossom
templates) and in your about page.
About us:
You will find in your “About us” page a default text, you can
change it here or replace it with your own description for
your store.
Shipping policy:
You can fill out and edit your shipping policy here. This
information will appear in your “About us”.
Return policy:
You can fill out and edit your return policy here. This
information will appear in your “About us”.
Social networks:
You can fill out here the links to your social accounts and
link your Webstore with your Facebook, Twitter and
Pinterest accounts.
This will link your social icons at the right top corner of your
homepage with your social accounts.
Step 3:
Once you change your store name save your changes by
clicking on the “Save” button in the bottom.
FAQ
Q: What is “Webstore”?
A: Webstore is a ready-to-use solution that with 1-click creates an eBay storefront for your eBay items outside of eBay. This
allows you to increase traffic driven to your eBay items from Google, Bing and other search engines.
Q: How do I open a Webstore?
A: To subscribe to Webstore and start your 7-day trial visit our site at www.webstoreplace.com.
Q: Will Webstore replace my eBay store design?
A: Webstore does not change the design of your eBay store, instead it displays your eBay listings in a designed storefront
outside of eBay. If you are looking for an app that will design your eBay store check out our Store Designer app.
Q: Do I need an eBay store to use Webstore?
A: You don't need to own a store on eBay to use Webstore. Webstore is actually the perfect solution for eBay sellers that don't
have a store but that still want a short store URL and a storefront.
Q: How long will it take until my Webstore is live?
A: Once you click on “Activate” in your control panel your Webstore will immediately be live. If your Webstore doesn’t activate
and stays in “Preview mode” visit our support center or contact us at: [email protected].
Q: How do I access my control panel?
A: You can access your Webstore control panel on our site, click here to login.
Q: Why do I need a unique sub-domain?
A: Your Webstore sub-domain can act as your business card. It provides you with a short URL for your eBay listings that you
can use in social networks, emails, blogs and forums etc. to promote your Webstore.
Q: How long does it take until my Webstore is indexed in search results?
A: It can take up to a few weeks until search engines fully index your Webstore.
Q: I’ve changed my eBay user ID, what should I do?
A: If you’ve changed your seller ID please contact us at [email protected] so that we can update your new user ID in our
database.