1
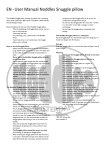
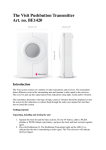
Manual
Babyfoonzender
English
Wijkermeerstraat 16 ● 2131 HA Hoofddorp
T 023-5544011 ● F 023-555646 ● TT 023-5571610
E [email protected] ● I www.multicaresystems.nl
Introduction
The Visit system consists of a number of radio transmitters and receivers. The transmitters
detect different events in the surrounding area and transmit a radio signal to the receivers. The
receivers pick up this signal and provide indications using light, sound and/or vibration.
The transmitter determines what type of light, sound or vibration should be displayed so that the
reason for the indication is evident. Read through the entire user manual first and then start to
install the system.
Getting started
Unpacking, installing and testing the unit
1. Open the battery cover (6). Fit one 9V battery, either a 6LR61 alkaline or 6F22 lithium
type battery, and close the battery cover.
2. Press the Test Button (3). The Visit Baby Cry Transmitter lights up the LED (1) to
indicate that the unit is transmitting a radio signal. The Visit receivers will indicate the
Baby Cry Transmitter.
3. The Visit Baby Cry Transmitter can either be placed on a level surface using the base
supplied or suspended on the wall mount bracket (5) on the screw supplied. A suitable
distance from the child is 0.5-2 m. It should not be placed close enough for the child to
reach it.
Function
General
The BE1490 Visit Baby Cry Transmitter is a radio transmitter within the Visit System for indoor
use, which recognises the sound from a crying baby. The Baby Cry Transmitter is activated by
the built-in microphone and can transmit different signal patterns to the receivers in the Visit
System. The sensitivity can be controlled via the sound sensitivity switch (4) and the delay time
before the Baby Cry Transmitter transmits radio signals can be controlled via the delay switches
(7).
3 = On, high sensitivity
2 = On, normal sensitivity
1 = On, low sensitivity
0 = Off
Radio key
On delivery all Bellman Visit units are tuned to the same Radio Key. If you have a neighbour with
a similar system, you can change to different Radio Keys so that you do not affect each other÷s
systems.
If you use the Radio Key Switch (8) to change the Radio Key on this transmitter, you must also
change all other units in your Visit System to the same Radio Key. Refer to the user manual for
the relevant unit.
Please note:
All Bellman Visit products within the same system must be tuned to the same Radio
Key in order to operate as a group.
Indicators and Signals
System indicators
The LED (1) lights up when the Baby Cry Transmitter transmits radio signals.
Power supply
When the Baby Cry Transmitter is activated, the LED (1) lights up green. This means that the
battery is in good condition.
If the LED (1) lights up yellow, this means that the battery is flat and must be changed. Only use
an alkaline 6LR61 or a lithium 6F22 type battery.
T roubleshooting in brief
PRO BLEM
N othing happens when the
transmitter is activated.
T he LED (1) lights up yellow when
the Baby Cry T ransmitter is
activated.
SO LUT IO N
Check that the Baby Cry Transmitter is switched on.
Change the battery. Only use an alkaline 6LR61 or a lithium
6F22 type battery.
Change the battery. Only use an alkaline 6LR61 or a lithium
6F22 type battery.
T he LED (1) lights up green when
the Baby Cry T ransmitter is
activated, but the receivers are not
signalling.
Check the battery in the receiver.
Check that the receivers are not placed too far away by
moving them closer to the transmitter.
Check that the Baby Cry Transmitter is set to the correct
radio key. For further information see Function/Radio key.
T he Baby Cry T ransmitter does not
signal even though the child is crying.
Increase the sensitivity using the sound sensitivity switch (4)
or place the Baby Cry Transmitter closer to the child, but
not close enough for the child to reach it. For further
information see Function/General.
T he Baby Cry T ransmitter transmits
a signal even though the baby is not
making much noise.
Reduce the sensitivity using the sound sensitivity switch (4)
or move the Baby Cry Transmitter further away from the
child. For further information see Function/General.
T he child cries for a long time before
the Baby Cry T ransmitter transmits
a signal to the receiver.
Reduce the delay time using the Delay Switch (7). For
further information see Function/General.
T he Baby Cry T ransmitter transmits
a signal even though the baby only
cries for a short time.
Increase the delay time using the Delay Switch (7). For
further information see Function/General.
T he receiver signals when no
transmitter is activated.
Change the Radio Key on all units in the system. For further
information see Function/Radio key
T echnical illustration
1.LED. Combined transmission and battery indicator.
For further information see Indicators and Signals
2.Microphone
3.Test button
4.Sound sensitivity switch
5.Wall mount bracket
6.Battery cover
7.Delay and signal switches
8.Radio key switch