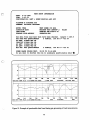
1
USER'S MANUAL
for the
UMTRIIFHWA ROAD
PROFILING (PRORUT)
SYSTEM
M. W. Sayers
T. D. Gillespie
M. R. Hagan
July 1987
UMTRI
The University of Michigan
Transportation Research Institute
Technical Report Documentation Page
1. Report No.
3.
2 Government Acwulon No.
Redpknt'a Catalog No.
FHWA/RD-871043
4.
n n e a d subtluo
5. bport Data
July 1987
USERS MANUAL FOR THE UMTRVFHWA ROAD
PROFILING (PRORUT) SYSTEM
6.
Performing Organization Code
8.
Performing Organization Reporl No.
7. Author(8)
Uh4TR.I-87-5
M.W. Sayers, T. D. Gillespie, and M. R. Hagan
9.
10. Work Unit No. (TRAIS)
Performing Orglniullon Name and A d d n w
The University of Michigan
Transportation Research Institute
2901 Baxter Road, Ann Arbor, Michigan 48109
11. Contract or Grant No.
DTFH61-83-C-00123
13.
12. Sponroring Agancy Nunr and A d d n u
Type of Report and Period Covered
Final
9/83 - 1/87
Federal Highway Administration
U.S.Department of Transportation
Washington, D. C. 20590
14. Sponorlng Agency Code
I
15. Supplementary Notor
Contract Technical Representative: Dr. R.R. Hegmon
16. &+act
The objectives of this project were to assess the capabilities that are needed in a road
profilometer and develop a design tailored to minimize life costs of the system. This led
to the development of a system based on the IBM PC microcomputer. With the exception
of a signal conditioning unit, the system is constructed from commercial components. The
software controls the measurement of road profde and rut depth, the viewing of the data,
and daily checks of the hardware integrity.
This document is the users manual for the system-presently known as the PRORUT.
It is intended for the operator of the PRORUT, and describes how to use the system to
obtain plots of elevation profile, roughness, and rut depth. It also gives step-by-step
instructions for performing daily checks to ensure that the measures being obtained are
valid.
There are three companion reports prepared as part of the same project. One gives an
overview of the project (FHWA/RD-87/042), another is a reference manual containing
details of the hardware and software design (FHWA/RD-87/04), and the third describes
the validation of the system along with other profdometers at a profdometer meeting
(WARD-86/100).
I& Dktrikrtlon Statammt
17. Kay Wwdr
longitudinal profde, profdometer, road
roughness, quarter-car, digital data
acquisition systems, IBM PC, rut depth,
road profde
10. SIcurlIy Clurlf. (of W a repon)
Unclassified
No restrictions. This document is available
to the public through the National Technical
Information Service, Springfield, VA 22161
20. %turfy Clawif. (dM a p g e )
Unclassified
21. No. of Pagee
66
22 Price
TABLE OF CONTENTS
Secrion
pa~e
.
2. DESCRIPTION OF THE PROFILOMETER ......................................... 2
.
.
.
............................................... 2
2.1 Capabilities ......................
1 INTRODUCTION ............................................................................ 1
2.2
2.3
2.4
2.5
2.6
Hardware Description .................................................................. 6
Data Processing..........................................................................11
Interacting with the Computer .........................................................12
Starting and Stopping the System ....................
.
...
.
.....................21
Loading and Unloading Tapes.........................................................22
3. CHECKING THE SYSTEM .............................................................. 24
3.1 Electrical Calibration ................................................................... 24
3.2 Bounce Test ............................................................................ 30
3.3 Pulser Check .......................................................................... 35
4. MEASURING A ROAD .................................................................... 38
4.1 Setting Up .............................................................................. 38
4.2 TakingData .........................
.
.
.
............................................41
.
....................... 43
5. VIEWING AM) PROCESSING DATA ........................
5.1 Data Files ............................
.
.
.
.......................................... 43
5.2 Checking Data ..........................................................................45
5.3 Plotting ..................................................................................48
5.4 Printing ..................................................................................54
6. CHANGING TRANSDUCERS...........................................................
57
7 . DLAGNOSTICS FOR THE INPUT/OUTPUT HARDWARE........................... 60
8. REFERENCES................................................................................ 62
LIST OF FIGURES
Figure
pa~e
1. The FHWA proflometer................................................................... 3
2 . Measuring rut depth, ........................................................................ 5
3. View of the computer. tape recorder. monitor. and keyboard.......................... 7
4 . Inverter used to power the instruments.................................................... 8
5. Signal conditioner for Selcom Optocator installed in the rear of the van.............. 9
6. Overview of the profilometer software.................................................... 13
7 . The MAIN PROFILOMETER MENU .................
.
.
............................ 15
8. Screen display for selecting a file to open.................................................17
9. Screen display when setting up a road measurement ...................................18
10. Example plots of left and right profile filtered at 20 A .................................. 20
11. The MAKE ROAD MEASUREMENTS menu...........................................26
12. Set up for daily calibration..................................................................27
13. Example results of electrical calibration and checking the height transducers........ 28
14. Example transducer signals and profde measures from a bounce test.................32
15. Example roughness and rut depth measures from a bounce test....................... 34
16. Configurations available for the proflometer.............................................39
17. The VIEW AND PROCESS DATA menu................................................44
18. Example of questionable data found during pre-processing of road
measurements ...............................................................................46
19. Example profile plots showing the effect of the filter baselength...................... 49
20. Example menus used to select variables and scales for plotting........................ 51
2 1. Example plot of IRI roughness along a test section......................................53
........................................55
22. Screen display when setting up to p ~numerics
t
..........................58
.
.
23. Screen display when configuring the transducers........
24. The INPUT/OUTPUT EXERCISER menu .............................................. 61
LIST OF TABLES
Table
1. Locations of power switches of various components..........................,.......
Page
10
2. Summary of keystrokes used for controlling the computer.............................14
3. Example printout of roughness and rut depth along a test section..................... 56
1.
INTRODUCTION
This manual tells how to use the profiling and rut depth measuring system that was
designed and built by The University of Michigan Transportation Research Institute
(UMTRI) as a part of the FHWA project "Methodology for Road Roughness Profiling and
Rut Depth Measurement," Contract No. DTFH61-83-C-00123. The system, called simply
"the profilometer" in this manual, is sometimes called the PRORUT system in other
documents. It is a specially equipped vehicle that can measure longitudinal profile and rut
depth at normal highway speeds.
The profilometer is designed to be easy to use. The various components and instruments in the system are controlled by an on-board computer that automatically handles most
of the highly technical matters, leaving the operator in charge of measuring data and viewing the results in an intelligible form. However, an instnunent capable of measuring longitudinal profile and rut depth at highway speeds necessarily involves some sophisticated
equipment. The system is not foolproof; yet, it can be operated fairly easily by persons
having no specialized background with computers, electronics, or instrumentation.
Section 2 describes what the profilometer is, what it does, and the basics for interacting
with the computer.
The next three sections contain instructions for using the profilometer. Section 3
explains how to perform daily checks of the system to guard against the possibility of
gathering bad data due to a malfunction. Sections 4 and 5 tell how to measure a road and
how to view the measurements obtained with the proflometer system.
The system also includes a number of features to aid the technician or engineer who
needs to change components, perform extensive calibrations, or diagnose malfunctions.
Section 6 describes how to change transducers or add more sensors to the system. Section
7 is written for the specialist who might wish to use the profilometer to diagnose various
hardware components. Sections 6 and 7 contain no information pertaining to the routine
use of the system.
Section 8 is a list of references, including three companion reports that relate to this
profilometer.
Methodology for Road Roughness Profiling and Rut Depth Measurement is a
summary report for the project under which the profilometer was designed and
built.[l]
Reference Manual for the UMTRIIFHWA Road Profiling (PRORUT) System
provides reference documentation for the hardware and software for the system.[2]
The Ann Arbor Profilorneter Meeting describes some of the testing and analysis
methods used in its development, along with validation results.[3]
As delivered, the profilometer uses the English system of units. Therefore, all
measures and numerical values given in this manual also use the English system.
DESCRIPTION OF THE PROFILOMETER
This section provides an overview of the profdometer. It begins by demibing what the
profdometer can do, and then describes briefly the hardware components that together
comprise the profiling and rut depth measuring system. It concludes by covering the basics
for using the computer that is the heart of the system.
2.1
Capabilities
The profilometer is a van equipped with an IBM personal computer and various
instruments that together allow the measurement and recording of various characteristics of
a road. These include the longitudinal profiles of the two travelled wheeltracks, rut depths
of the travelled wheeltracks, and roughness levels in the travelled wheeltracks.1 Figure 1
shows a photograph of the system. The measures can be processed, plotted, and printed
using the computer in the profilometer. The data can also be copied onto 5-114 inch floppy
disks for transfer to other computers that are compatible with the IBM PC.
2.1.1 Measuring Profile
Longitudinal profile is measured using the profilometer concept invented by Spangler
and Kelly at the General Motors Research Laboratories.[4] Three transducers are used: (1)
a height sensor measures the distance between the van and the road while the van is driven
over the road; (2) an accelerometer measures the vertical acceleration of the van as it
bounces in response to the road profde; and (3) a speed sensor measures the instantaneous
speed of the van as it traverses the road. A computer program is used to combine these
thee measures so that the effects of the vehicle speed and the vehicle bouncing are
eliminated, leaving the vertical. profile of the road.
%he road profiles obtained with this system are independent of the measuring sped and
the type of van used. The system has been validated through comparison with profile
measures obtained with rod and level surveying equipment. The measured profiles show
variations in elevation and slope as they affect roughness, but do not include the static
elevation or slope. For example, the profdes do not show that a road is going up a hill.
However, they do show details such as patches, potholes, slabs, and undulations for
wavelengths ranging ffom 1 ft up to several thousand ft.[31
The profdometer plots profdes on the computer screen display. Hard copies can be
obtained at any time. Any section of the profde can be viewed, using a variety of scale
factors. Normally, the variations in profile that occur over short distances are rather small
in amplitude when compared with the variations occuning over longer distances. To help
With the hardware delivered to the FHWA, the system measures the average rut depth of the two wheel
tracks.
Figure 1. The FHWA prof i 1ometer
'
.-
view different types of roughness over various wavelengths, the system can isolate a range
of wavelengths from the plotted data. It is possible to prepare one plot showing
undulations covering long wavelengths, and a second plot showing the "roughness"
occurring at short wavelengths.
Although the profiles are independent of speed over the range of wavelengths seen by
the system, this range does depend on the vehicle speed during testing. In order to view
undulations that are a thousand feet long, highway speeds (50 mi/h) are required during
testing. (When low speeds are used, the longer wavelengths are not available when
viewing data.)
2.1 2 Measuring Roughness
The roughness of each wheeltrack is computed at the same time as the longitudinal
profde. The roughness numeric is a standardized version of the "in/mi" statistic, called the
International Roughness Index (IRI). Developed as a reference measure by The World
~ank,[S]it is based on a quarter-car simulation described in NCHRP Report 228L61 and a
standard simulation speed of 80 km/h (50 mi/h). Each wheeltrack is given independent
roughness values, with units of incheslmile. The IRI roughness is compatible with the
Mays Meter "in/miWindex obtained with response-type systems, with an important
difference: the IRI is computed from profile, and is independent of how the profile was
measured. IRI measures obtained from this system match those obtained from other valid
profilometers, and also IRI measures obtained using rod and level survey equipment.
The profdometer prints the roughness of each wheeltrack using any arbitrary interval
selected by the operator. It also plots the roughness using any baselength for averaging.
The roughness numerics can be shown on the screen; they can be printed, and they can be
written into a disk file for processing with other programs such as word processors and
spreadsheets.
2.1 3 Measuring Rut Depth
To measure the rut depth in a travelled wheeltrack, it is necessary to have one height
sensor on either side of the wheeltrack and one pointing into the rut. To measure rut depth
for both wheeltracks, five height sensors would be employed, as shown in figure 2. As
delivered, the system includes three sensors (the outboard sensors shown in figure 2 are
excluded). When the profilometer is driven in the center of a lane to obtain the profiles of
the wheeltracks, the rut measure is an average of the rut depths of the two wheeltracks if
the road is otherwise flat (no camber). Note that a road with camber and no rutting will
cause the height in the center to differ from the average of the heights in the two
wheelpaths. Adding additional sensors beyond the minimum of three would improve
accuracy.
3,
k.J
Len Outboard Left Height
Height Senso?
Sensor
Center Height
Sensor
Right Height
Sensor
*Not included with delivered pf~lometer
Figure 2. Measwing rut depth.
Right Outboard
Height Sensor*
To measure the rut depth for a single wheeltrack with the present configuration, the
vehicle can be centered over the wheeltrack. Additional height sensors could be positioned
as shown in the figure and plugged into the system to allow simultaneous measurement of
rut depth in both wheeltracks.
2.2
Hardware Description
The profdometer is a system composed of a 1974 Dodge B300 van, an IBM PC, an
ADIC model 550 cartridge tape recorder, an UMTRI signal-conditioning unit, several
transducers, and various components that are commercially available for IBM PCs. The
IBM PC includes two floppy disk drives, a bubble memory card that appears to the PC as a
third disk drive, a floating-point processor, an expansion chassis, 640 kilobytes of
memory, a Data Translation Analog model DT-2801-AAD and D/A board, a Hercules
graphics card, an ADIC controller card for the tape recorder, a C. Itoh dot matrix printer,
an IBM monochrome monitor, and a keyboard All but the UMTRI signal-conditioning
unit are commercially available components.
Most of the components are installed in an instrumentation console that is isolated from
the van body by cable springs commercially available from Aeroflex. The monitor and
keyboard are on a stand located between the driver and operator seats in the van, as shown
in figure 3. The power switch for the console is located at the bottom of the right-hand
side, immediately behind the driver seat. The console, in turn, is plugged into an inverter
located at the rear of the vehicle as shown in figure 4. The inverter converts the 12 volts
h m the van into 120 volts AC for the computer. When the system is used in a garage, an
extension cord can be used to bypass the inverter. (The power cord for the console is
shown by the arrow in figure 4.)
As delivered, the system uses Selcom height sensors which have their own power
supply and signalconditioning box. This unit is located at the rear of the van, opposite the
inverter. It is also mounted on cable springs for shock isolation, as shown in figure 5.
The individual components have their own power switches. These switches should be
left on, so that the power for the whole system is controlled by the single switch mounted
on the outside of the cabinet. If one of the components doesn't work, it is possible that
someone has turned it off. Generally, details concerning the individual components are not
included here because they would duplicate the manufacturers instructions. As an
exception, table 1 shows the locations of every power switch in the system that might
inadvertently be turned off.
Dmhg measurement the system acts as a digital data acquisition system. Measures
from the transducers are monitored and recorded on tape, The IBM PC controls the
process and coordinates the various components. At that time, the system is completely
occupied with the task of taking data. The rest of the time, the profilometer acts as a data
processing system. When processing data, the transducers and the UMTRI signal
Figure 3. View of the computer, tape recorder, monitor and keyboard.
-
Figure 4. Invemr used to power the instruments.
Figure 5. Signal conditioner for Selcom Optocator
installed in the rear of the van.
Table 1. Locations of power switches of various components.
Component
Main Cabinet
Video Monitor
Printer
UM'IlU Signal Conditioner
IBbl PC computer
Selcom Signal Conditioner
Inverter
Power Switch Location
bottom, right-hand side of the cabinet behind driver's seat
powered by the PC
right-hand side, near back
behind panel on left side of cabinet (front panel opens)
rear of PC, inside cabinet
key-operated switch on front panel of the Selcom Box
right-hand side of Inverter Box
conditioner are not required. (The data can be viewed on any IBM PC system with the
floating-point processor, 640 k memory, and a Hercules graphics card.)
This manual does not cover details of the transducers, which come from commercial
sources. Generally, they either work adequately or they don't. The profilometer design
allows daily checking of the system to ensure that the transducers are indeed providing
valid data. If they require service or recalibration, the operator should consult the
documentation for the transducer or contact the manufacturer, as necessary. (The
profilometer design makes no assumptions about the transducers. As delivered, it included
two Sunstrand accelerometers, three Selcom laser height sensors, and a wheel pulse pickup
to measure distance. Other height sensors can be used, as long as they provide a voltage
linearly proportional to height over a range of at least f 1 in. Other accelerometers can be
used also.)
The system also includes a calibration bar used to check the transducers daily and
provide a zero rut depth condition to automatically adjust offsets in the height sensors.
2.3
Data Processing
The profdometer software has numerous tools for analyzing and processing the
measures obtained by the sys& The major capabilities include:
pmf11e computation,
rut depth computation,
quartercar simulation,
high-pass filtering,
low-pass filtering (smoothing), and
checking for transducer enor.
The profile and rut depth computations can take several minutes to perform. An option
is available for processing multiple files in a batch mode, which frees the operator for other
duties while the data are processed. The process of checking the measures for bad data are
useful at the time of measurement; therefore, an option is provided to check the data
immediately after a measurement to c o n f i i that a test was valid before leaving the test
area.
All of the various analyses are performed automatically as needed to display the data,
such that the operator does not need to know the details of how or when they are
performed. For example, if the operator chooses to print roughness numerics over
intervals of 3/10mi, the software does whatever is needed to calculate those numerics. If
the profile has already been computed, fine. If not, the system computes the profile from
the raw transducer signals.
The profilometer includes the option to view and inspect the raw transducer signals, as
a means to diagnose malfunctions or bad data. This option is not available after profiles
have been computed from those signals, because the raw data on the tape are overwritten to
store the processed data.
2.4
Interacting with the Computer
The profdometer software is designed so that persons with little or no experience with
computers or the IBM PC can effectively use the system There are no commands to learn
for normal operation of the system. Hitting the wrong key does not cause a disaster-it is
just ignored. Other than turning the power off or using special break keys (which require
that several keys be pressed simultaneously), there is little that can be done to accidently
lose data.
The most important key on the keyboard is labelled End and is located towards the
right-hand side. Pressing the End key always tells the computer to proceed with the next
action. For example, when the power is first turned on, a logo is shown on the screen.
Press the End key to proceed to the next step,
Figure 6 shows an overview of the profilometer software in the form of a conceptual
road map. For example, the figure shows that after the logo is displayed, the
PROFILOMETER MAIN MENU appears. This menu is used to change tapes, configure
transducers, and to transfer control to four other menus shown connected in the figure.
(The use of menus is covered below.)
Table 2 summarizes how the keyboard is used to enter information into the computer
while using the profilometer software. Notice that the contents of the screen can be printed
at any time, using the PrtSc key when normal text is displayed (words and numbers in the
standard size) or using the P key when graphics are displayed.
-
WARNING
If the wrong printer key is used, the printer can act unusually and may start
sending out sheets of blank paper. If this happens, the printer can be turned
off (but the rest of the system should be left on!) for a moment. Once the
program is through tqing to print, it behaves normally again.
Four types of displays are used throughout the profdometer software, offering different
levels of control. They are described below.
2.4.1 Menus
Whenever several options are available to the operator they are shown as a menu of
possible choices. A menu always appears as a vertical list of choices, with a double
underlined tide. As an example, figure 7 shows the PROFILOMETER MAIN MENU,
used to access several modes of operation available in the system. When a menu appears,
one of the choices is selected, as indicated by a reversed display on the screen. (In the
figure, the option to VIEW AND PROCESS Data are selected.) The keyboard includes
INPUTIOUTPUT
EXERCISER menu
Resets Cards
I0ReadA/D
l
1
1
Transducers
system
-I
Display Logo
PROFILOMETER
MAIN MENU
1
VIEW & PROCESS
DATA menu
MAKE ROAD
MEASUREMENTS
i
l
l
Select configuration/
Electrical calibration1
Bounce Test
I
Check Pulser
Measure Road
l
l
t
l
l
l
Quit
(enter
MS DOS)
l
Open a file
Plot data
Print data
1
Figure 6. Overview of the profdometer software.
1
Table 2. Summary of keystrokes used for controlling the computer.
Menus
Return, End
go up or down menu list to select a different choice,
make the selected choice.
Screen Editing
There will be one or more items (names, numbers, yeslno answers) that can be modified,
At any given time, only one is selected. The selected item is highlighted on the screen,
t , + , normal keys
Ctrl t , C t r l +
u f ' g ~ p PgDn
.
Return
End
change the selected item. (What you see is What you get.)
select item to the left or right to modify.
select item above or below to modify.
select next item to modify.
quit this screen display using the setting(s) show.
Hardcopies
print out the text that is on the screen (menus, tables, etc.).
print out a plot or the logo that is on the screen.
Plotter Commands
Return
End
+,+
Ctrl t ,Ctrl +
fy?p, PgDn
Cnl-PgUp, Ctrl-PgDn
+X, -X
++X, --X
+Y, -Y
++Y, --Y
change active plot (only when 2 plots are on screen).
quit plotter.
move the cursor to the left or right one point.
move the cursor to the left or right quickly.
scroll plot(s) left or right by one page.
scroll plot(s) left or right by 112 page.
expand or reduce scale for X axis by about 2.
expand or reduce scale for X axis by 5.
expand or reduce scale for Y axis of active plot by about 2.
expand or reduce scale for Y axis of active plot by 5.
PROFILOMETER MAIN MENU
--
Selected choice
change with
T and 4keys.
Execute with
End or Return
keys
f
LOAD NEW DATA TAPE
UNLOAD DATA TAPE
............................
CONFIGURE TRANSDUCERS
EXERCISE INPUT/OUTPUT SYSTEM
---------------------
DISPLAY LOGO
QUIT
Figure 7. The MAIN PROFILOMETER MENU.
special keys grouped on the right-hand side, that include f and & keys. Pressing the T key
selects the next option up, while pressing the key selects the next option down. When
the desired option is selected, the End key is pressed to proceed.
Sometimes not all of the menu options are valid For example, it is not possible to plot
data from a file unless a file has been previously selected. The menu choices that are not
valid are still shown for reference, but they cannot be selected Instead of the highlighting
used for a selected option, a small underline cursor is shown. In order to proceed from a
menu, one of the choices must be highlighted when the End key is pressed.
Figure 6 provides an overview of the functions available from the four major menus
contained in the software.
2.42 File Selection
When choosing a file, a modified form of a menu is shown in order to fit more choices
on the screen. The file names are shown in four columns of names. Figure 8 shows the
appearance of the screen at this time. The f and keys still move the selection up and
down. In addition, the selection can be moved to the right and left using the + and t
keys. If there are so many files that the screen is completely filled, the Pg Up and PgDn
keys are used go peruse up to four screens full of file names. As before, the End key is
used to proceed using the selected file.
2.4.3 Entering Names and Numbers (Screen Editing)
Sometimes several pieces of information are shown on the screen that can be changed
as needed. For example, figure 9 shows the screen as it is displayed when setting up to
measure a road. The information in the figure includes the distance between elevation
measures (the sample interval), the estimated length of the m, the estimated speed, the
name of the operator, the name of the road, and so on. Once the information on the screen
looks OK, pressing the Eitd key continues to the next step of making the measurement. If
some of the information needs-to be changed, it should fxst be selected and then changed
using the keyboard.
Whenever information on the screen can be modified, one of the names or numbers is
highhghted (the file name is selected in the figure) and one of the spaces is underlined (the
letter B is underlined in the figure). The selected name/number can be modified or replaced
by using + and c keys to move the cursor (the underline) along with the normal
typewriter keys (numbers and letters) to replace the underlined character. At all times, the
name or number that will be used is the one shorn on the screen. For example, the name
of the data file in the figure is Baxterl. If the name desired for the new file is Baxter2, the
cursor can be moved to the 1 using the arrow keys and then the 2 key can be pressed to
change the name.
SITE3.DTA
SITE6 .DTA
BAXTER;! DTA
SITES.DTA
.
BAXTER1.DTA
SITE8 .DTA
SITE1O.DTA
SITE4.DTA
SITE9 .DTA
SITE11.DTA
Selectedjle. Change with
T, 1,c,and + keys.
Open with End key.
-
-
Figure 8. Screen display for selecting a file to open.
'
r
TEST SETUP INFORMATION
DATE: 1- 5-1987
TIME:17:18: 0
CONFIGURATION: LEFT
RIGHT PROFILE +MID RUT
+
ROUTE : M14
DIRECTION:
TEST SPEED =55 MPH
MAXIMUM TEST LENGTH=5.0 MILES
SAMPLES PER FOOT-4.00
0BERATOR:MIKE W A N
Selected item that can be edited. Select something
else using the T, J, ctrl c,
and ctrl + keys.
Cursor. Move using c and + keys.
Change m e by typing new m e .
Accept all of the information shown on the page and proceed
to next action by pressing the End key.
Figure 9,Screen display when setting up a road measurement.
Other keys are used to change the selection, as indicated in the table. The f , 4,and
Return keys select different names and numbers for editing. To move to the left or right,
the control key is used together with the -+ and t keys. Holding the control key down
and pressing the + key selects the next namelnumber to the right, for example.
The procedure for editing the information shown on the screen begins by inspecting
that data carefully. If something should be changed, the arrow and other special keys are
used to select the namelnumber to be edited. The normal typewriter keys are then used to
enter the desired name or number. The process is repeated as needed with the other names
and numbers. When everything looks OK, press the End key to continue.
2.4.4. Plotting
Data can be plotted using the VIEW AND PROCESS DATA menu, as indicated in
figure 6. Figure 10 shows an example of the plots that can be obtained. When data are
plotted on the display screen, the numerical value of the plotted signal is shown for one
particular location. That location is indicated by a cursor shaped like a +. In the figure,
the cursor is located in the upper plot, at position X= 1223 ft. The X and Y coordinates
associated with the cursor are always shown below the plot. In the figure, the coordinates
are X (distance) = 1222.968 ft and Y (Left Elevation) = -.1181 in. As indicated in table 2,
the cursor can be moved using the arrow keys. If the Control key is held down when the
arrow keys are pressed, the cursor moves more rapidly. When two plots are shown on the
screen, the cursor is in one or the other. When two plots are shown on the screen, the
crosshair cursor is shown in the "active" plot. The cursor is moved to the other plot by
pressing the Return key.
Often, the range of distance shown in the plot does not include all of the data contained
in the tape fde. To move up and look at the next page full of data, use the PgUp key. To
look at the previous page, use the PgDn key. If the Control key is held down while the
PgUp and PgDn keys are used, the data range is shifted by a half page. The PgUp and
PgDn keys give the effect of scrolling the plot in the X direction. The plots can also be
scrolled in the Y direction by using the f and keys. For example, if a plotted profie goes
off the top of the screen, the f key can be pressed to bring it into view.
The scaling can be changed by "zooming" in or out on either the X or the Y axis. To
zoom in on the X axis, locate the cursor at a point of interest, and type the two keys + and
X in sequence. This changes the scaling by roughly a factor of two. To zoom in more
rapidly, type three keys in sequence + + X. To zoom out, use - X or - - X. To change the
scaling of the Y axis, use + Y, + + Y, - Y, or - - Y.
Using the scrolling keys and the rescaling keys, it is usually possible to go from a
broad overview of a profile to a detailed blowup of a small section fairly easily.
Pressing the End key returns to the menu that was used to select the plotter.
F igu re 10.
Example plots of left and right profile fdtered at 20 R
2.5 Starting and Stopping the System
25.1 Powering up the Profilometer
When the profilometer is started, it performs several checks. The procedure for turning
on the system for normal operation is a matter of using the power switch, and pressing the
End key as prompted by messages on the display screen until the PROFILOMETER MAIN
MENU appears. The sequence is as follows:
1. Turn on the system. The power switch is located on the bottom of the computer
cabinet immediately behind the driver's seat.
2. The IBM PC will check some of its hardware components, and the prompt "6"
will appear with a blinking underline cursor.2
3. Type PROFILE. The logo will appear on the screen. Press any key to continue.
4. The computer checks part of the Data Translation digitizer and the floating-point
processor. If the digitizer test fails, the system can still be used to view data. If the
test of the floating point hardware fails, very little of the profilometer software will
function? Press any key to continue.
5. The computer asks if the A D should be checked. Type the letter Y so that the
answer indicates yes instead of the default no. Then continue by pressing the End
key. (The profdometer software can be run on a different computer to view and
process data measured with the profilometer. When this is the case, accept the
default n because there is no A/D to check.)
6. The PROFLOMETER MAIN MENU is displayed (see figure 7).
If you will be measuring data or viewing data fiom a tape, this is a good time to load a
tape as described in subsection 2.6.
When the system is turned on, the ADIC tape recorder immediately performs a'selfcheck. This self-check occurs at the same time that the IBM PC is performing its selfcheck, such that the tape recorder is usually finished by the time the profilometer logo
appears on the screen. The tape recorder shows a red light if it fails the self test. The
ADIC manual should be consulted if this occurs, as the tape unit may be damaged.
If the prompt does not appear within a minutes after the power was turned on, fmt check the power
switches for the individual components to make sure they are all on. If they are, there may be a problem
with the IBM PC, and the IBM manual should be consulted for guidance.
This test will fail if the software is being run on an IBM PC that does not have the floating-point
hardware installed.
2 52 Turning Ofthe Profilometer
Before turning the system off, the tape should be removed. Return to the
PROFILOMETER MAIN MENU and select UNLOAD TAPE. The computer updates
anythmg that needs updating and then ejects the tape.
It is a good idea to QUIT the profilometer software before turning the power off. This
ensures that no data are lost or that tape space will not be wasted the next time the
profdometer is used.
25.3 Running IBM PC Software
To run software on the computer other than the profilometer program, select QUIT
from the PROFILOMETER MAIN MENU to enter the standard user interface for the
operating system, MS DOS. The system ceases being a profilometer, acting instead as an
IBM PC. Most programs compatible with the PC can be run from the floppy disks. One
reason for entering MS DOS is to copy profile data from the tape drive to a floppy disk so
that the data can be carried to other PC computers. When in MS DOS, the tape appears as
four hard disk drives named D, E, F, and G.
The profilometer program resides on dive C (the bubble memory), and can be restarted
by making C the default drive with the command C: and by then typing the command
PROFILE.
2.6
Loadlng and Unloading Tapes
The profilometer software interacts with a computer in the tape recorder to make
effective use of the tape. To do so, it must read information from each tape before it can
create new files. This process is called loading the tape. It must dso update information
on the tape after creating or modifying files. This is called unloading the tape,
The normal sequence involving a tape cartridge is:
1. the tape is inserted in the drive.
2. the tape is loaded.
3. information is added to the tape by measuring, viewing, or processing profile data.
4. the tape is unloaded.
5. the tape is removed from the drive.
2.6.1 Loading a Tape
The profilometer registers that it is ready for the tape to be inserted (if it isn't already
inserted) by putting a message on the screen
IS THE TAPE READY? U
where N is the default answer. It asks this when it cannot continue without access to the
tape. This occurs after either of the following actions:
LOAD NEW DATA TAPE is selected from the PROFILOMETER MAIN MENU
shown in figure 7,
MEASURE ROAD is selected from the MAKE ROAD MEASUREMENTS menu
(shown in figure 11in section 3) but a tape has not been loaded
When the question IS THE TAPE READY?appears on the screen, make sure that there
is a tape in the drive and that the green light labelled TAPE has gone out. If you insert a
tape at this time, it takes from several seconds up to a minute or more while the ADIC tape
drive reads information from the tape to control it properly. When the light stays off,
indicate that the tape is ready by changing the answer to Y and press the End key. If you
attempt to load the tape too early, before the ADIC drive is finished, the following type of
message appears on the screen:
Not ready e r r o r reading d r i v e D
Abort, Retry, Ignore?
If this happens, wait until the green light goes out and then enter R.
The green light flashes some more as the proflometer software accesses the tape during
loading.
2.62 Unloading a Tape
The proflometer indicates that it is ready to unload the tape by putting the question
ARE YOU SURE YOU WANT TO UNLOAD THE TAPE? U
This occurs after either of the following actions:
UNLOAD DATA TAPE is selected from the PROFILOMETER MAIN MENU
shown in figure 7.
QUIT is selected from the PROFILOMETER MAIN MENU when there is a tape
loaded.
After answering Y to the prompt, the green TAPE light on the ADIC drive flashes as
the profdometer software accesses the tape during unloading. When the screen shows new
information, the tape is unloaded and can be remlbved.
3. CHECKING THE SYSTEM
The profilometer is designed so that periodic calibration by a specialist is unnecessary.
However, because components do break and wear out, it has been designed to check itself
so that data can be obtained with greater confidence. There are three tests that should be
performed daily, and they are described in this section. The first-the electrical
calibration-allows the computer to calibrate the electronic components and to correct for
fluctuations that normally occur from day to day. If this test is omitted, the data collected
may be less accurate than what the machine is capable of measuring. If the system is being
used to measure rut depth, the electrical calibration is critical and should be performed at
least once per day. The other two tests-the bounce test and the pulser check-are used
solely to confirm that everything in the system is working properly, If the profilometer
should fail either of these tests, then all data collected since the last check should be
discarded. Thus the interval between performing these tests should be chosen on the basis
of how much data can be discarded without disaster, Both of these tests require about a
minute to perform, and are designed to be performed daily, immediately after the electrical
calibration.
The profilometer has other checking capabilities. Some of the hardware is tested when
it is turned on, as described in subsection 2.5. If the system fails one of these tests, the
appropriate manufacturer's documentation should be consulted. The measured road data is
also checked as a form of preprocessing, as described in subsection 5.2. That subsection
also explains the options available when questionable data are obtained
3.1
Electrical Calibration
During the electrical calibration, the computer calibrates some of the circuitry by feeding
in a series of voltages and reading the output. Knowing both the input and output, it
calculates the true gains of the amplifiers that day, and accounts for drift in the transducers
or the circuitry. The signals from the height sensors are adjusted by the computer to
indicate a perfectly flat surface. The system also measures the background electrical noise
during the calibration test to help spot defective comections and transducers.
A second type of test is performed, using the same hardware, to check for proper
operation of the height sensors over an operating range of +1 inch. Both types of testing
are performed duri~gthe electrical calibration.
3.1.1Pelforming the Calibration
This calibration test requires several minutes. The only requirement of the operator
during that time is to leave it alone, so that there are no vehicle motions to corrupt the
calibration data. Before starting the calibration, however, it is necessary to position the
profilometer so that the surface immediately under the height sensors is absolutely flat and
close to the nominal zero position. Special hardware is provided to satisfy this condition.
The procedure for performing the Electronic Calibration is initiated from the main menu
as follows:
1. From the main menu (see figure 7), choose MAKE ROAD MEASUREMENTS to
obtain the MAKE ROAD MEASUREMENTS menu shown in figure 11. Choose
DO ELECTRICAL CALIBRATION.
(From this point on, the computer display provides step by step instructions,
summarizing the information provided below.)
2. Four wooden blocks are provided that are wedge shaped. Place these in front of
the four tires and carefully drive the vehicle forward as necessary to locate it on the
blocks as shown in figure 12. The ground surface must be reasonably flat for this
calibration.
3. Hang the calibration bar under the vehicle. The bar is installed by bending the
support arms outward slightly to hang it from the pegs attached to the transducer
boxes, as shown in the figure. On each side, there are three holes in the support
arms. At this time, use the center holes. The arms should hang vertically, such that
the bar is directly under the height transducers.
4. Press the End key to indicate the beam is installed. The computer now calibrates
the electrical components in the system, beeping in a minute or so when it is
finished. It is important that there is no movement in the van until this time is
finished. The results are displayed in a form similar to the example in the top of
figure 13, and are explained in section 3.1.2.
5. Move the bar to the top position by changing the holes on each side, and then press
the End key. The computer checks that the measured distance matches the known
distance between the holes, beeping when it is finished. It then shows results
similar to those in the bottom of figure 13.
6. Move the bar to the bottom position by changing the holes on each side, and then
press the End key to repeat the test with the beam in this position.
The testing is now complete. Remove the calibration beam and drive the van off of the
wooden blocks,
3.12 Results of the Electrical Calibration
The results of the above three tests are displayed at the end of each test. Figure 13
shows example results, with the top screen display summarizing the results of the electrical
calibration:
Initial Offset. These are averaged readings from each transducer before the
calibration. Theoretically, the transducers should all give zero readings, so these
readings are measures of error. Two readings are given for each transducer. The
MAKE: ROAD MEASUREMENTS
CHECK PULSER
MEASURE ROAD
PROCESS DATA
EXIT TO MAIN MENU
Figure 11. The MAKE ROAD MEASUREMENTS menu.
F g u re 12 . Set up for daily calibration.
T
CALIBRATING CHANNELS FOR LEFT + RIGHT PROFILE +MID RUT
CHAN
ID
CONFIGURATION
INITIAL ADJUSTED AMPLIFIER AMPLIFIER
OFFSET OFFSET
GAIN (NOM) GAIN (ACT)
#
FULL
SCALE
UNITS
**** ******** ******** ******** ********* ********* ********
0
HGT RGHT
1
AZ RGHT
2
VELOCITY
-.3415
,0217
-.0122
.0186
.0122
.0200
3
AZ LEFT
.0146
-.0122
.0213
-.0122
.0190
,0146
,0204
.0195
*******
2.0000
2.0007
2.5978
INCH
1.3000
1.2972
1.4940
G'S
1.6000
1.6011 64.7440
MPH
1.3000
1.3139
G'S
1.5005
INCH
INCH
Average
RMS error
.0021
I
Estimates
Mear&es
MeLures entered
during
bej4ore
after
configuration
calibration calibration
Scalibration
~ of V
results
HIT ANY KEY TO CONTINUE
Results of electronic calibration with bar in center position.
'
CHECKING TRANSDUCERS WITH THE BAR IN THE TOP
SENSOR
NAME
HGT RGHT
HGT LEFT
MID RUT
(
NOMINAL
HEIGHT
ACTUAL
HEIGHT
9.000
1,000
1,000
1,021
-992
.968
%
ERROR
-2 .I13
.783
3.229
POSITION
STATUS
WARNING
OK
WARNING
CHECKING TRANSDUCERS WITH THE BAR IN THE BOTTOM POSITION
SENSOR
NAME
------HGTRGHT
HGTLEFT
MID RUT
NOMINAL
HEIGHT
-em-----
-1.000
-1.000
-1.000
ACTUAL
HE IGHT
%
ERROR
STATUS
-------
-------
-------
-1.225
-1.036
-.969
-1.225
-3 636
OK
WARNING
WARNING
3.116
Results of transducer check with bar in top and bottom positions.
Figure 13. Example results of electrical calibration and checking the height transducers.
top value in each pair is an average, which indicates a bias error. (Bias error is
caused by drift in electronic components.) The bottom value in each pair is a rootmean-square (RMS) error about the average value, which indicates the amount of
noise. Levels higher than 0.05 can indicate faulty transducers or bad connections.
The RMS noise will also be high if the vehicle moves during the calibration.
Adjusted Offset. These are averaged readings from each transducer after the
calibration. The computer tries to cancel each offset completely, and these
measures indicate the level of success. As with the initial offsets, each transducer
has two associated values corresponding to bias and RMS error, Bias error (the top
number of each pair on the screen) is typically reduced by the calibration to .02 or
less. RMS error (the bottom number) is generally unaffected by the calibration.
RMS errors significantly higher than .02 may indicate faulty transducers, faulty
electronics, or poor connections.
Amplifier Gain (nominal). These are the values entered for the corresponding
transducers when the transducers are configured for the profdometer, and reflect the
calculated gains for the amplifiers based on resisters that are installed. These values
are unaffected by the electrical calibration.
Amplijier Gain (actual).These are the amplifier gains measured during the electrical
calibration, which are used for all measurements made until the next calibration.
Small differences in the actual and nominal gains always occur, because the
nominal gains are merely estimates that are needed to get started in the calibration.
Unless the differences are larger than lo%, the differences between the actual and
nominal gains have no effect on the measurements made by the system. If one is in
error by more than lo%, it should be changed under the CONFIGURE
TRANSDUCER option described in section 6 to improve the accuracy of the
calibration.
Full Scale. The computer has a limit in amplitude for each sensor, based on the
amplifier gain. This limit is shown for each amplifier. In the figure, the right
height sensor has a maximum range of k 2.5785 in; the right accelerometer (AZ
RGHT) has a maximum range o f f 1.4940 g's; and the velocity sensor has a limit of
64.744 mi/h. Measures beyond these ranges are not possible, and errors result if
they are attempted. The limits are determined by the amplifier gains selected (see
section 6). These maximum ranges are not necessarily achievable if the transducer
imposes further limits. For example, if the right height sensor has a range of k2
inches, it reaches that limit before the limit of the amplifier is reached. The full
scale for a transducer is changed by changing the amplifier gain for the associated
analog signal conditioning card (see the reference manual for
3.1.2 Results of the Height Sensor Check
The bottom two screen displays shown in figure 13 summarize the results of the check
of the height sensors:
Nominal height. This is the distance between the holes in the brackets used for the
different checks.
a
Actual height. These are the measures from the height sensors, which are
compared to the nominal heights.
% Error. The height transducers are moved approximately 1.00 inch when the
calibration bar is raised or lowered. Errors of one percent (one hundredth of an
inch) are expected due to the limited precision of the calibration hardware, and a
warning is printed for errors larger than 2%. Significantly larger errors can indicate
a problem with the height sensors. If the error is larger than 5%, a repeat test is
recommended.
This test checks that the height sensors are functioning properly, but it is not a
comprehensive calibration, If a large error is consistently observed, the offending sensor
should be removed from the profilometer and calibrated in the laboratory. (See the
manufacturer's instructions for calibrating a height sensor.)
3.2 Bounce Test
The bounce test is performed to ensure that the transducers used to measure
longitudinal profile and rut depth are matched against each other. As implied by the name,
the stationary vehicle is bounced while measuring data. The data are processed using the
same software as used for road tests. Ideally, the bouncing of the vehicle is removed by
the system software, leaving measures of profile and rut depth that show negligible
deviation.
Rut depth is measured with three height sensors. If the system passes the electrical
calibration and the bounce test, then the operator can be confident that those three sensors
and any associated electronics are working properly.
Profde is measured with an accelerometer, a height sensor, and the speed sensor. If the
system passes the electrical calibration and the bounce test, then the operator can be
confident that the height sensor and accelerometer are functional and properly calibrated.
(A separate test is required for the speed sensor.)
3.2.1 Performing a Bounce Test
The bounce test is performed as follows:
1. Choose DO BOUNCE TEST from the MAKE ROAD MEASUREMENTS menu
(see figure 11.).
2. The screen displays setup information, similar to that used for road tests and shown
in figure 9 in 2.4.3. The data measured during the test are stored in a file having
the name indicated. Change any of the information as desired, and proceed by
pressing the End key.
3. Press a key to begin. Then go to the rear of the vehicle, climb on the rear bumper,
and bounce the vehicle as much as possible for about 30 seconds. The computer
waits 10 seconds after the key is pressed, allowing time to go to the bumper, and
beeps when it starts taking data. (It is not necessary to wait until the beep, which
might be hard to hear in a noisy environment.) The computer beeps a second time
when it is through taking data.
32.2 Interpreting the Results of a Bounce Test
Measures from a bounce test are processed and viewed in the same manner as measures
from road tests, using most of the options described in section 5. There are minor
differences between the display of bounce measures and the display of road measures,
because the measures are made as a function of time during a bounce test instead of a
function of travelled distance as during a road test. The various plots that might be made
are mentioned here.
Raw Data. Plots of the raw data from the transducers should resemble the
examples shown in the top of figure 14. (Figure 14 is composed of plots that are
taken from the display screen at three different times. The profilometer software
never shows more than two plots on the screen at the same time.) A lack of any
sinusoidal motion for a height sensor or accelerometer indicates that it is broken or
disconnected. Excessive deviations about the sinusoidal shape indicate that there
may be extraneous "noise" on the signal, due to poor connections or electrical
problems. (The speed sensor is disconnected for this test; thus there is no reason to
plot it.)
Profile. Even though the accelerometer and height sensor show the sinusoidal
vehicle motions, these motions should be largely eliminated by the profile
computation algorithm when "profile" is plotted, as shown in the middle plot in the
figure for the profile computed for this example bounce test. The software is not
optimized for bounce tests, and often shows a peculiar "profile" shape at the
beginning and end of a test, as shown in the figure. However, the center part of the
"profile" should show little or no variation. The bottom plot in the figure shows the
same results on a more detailed scale, obtained by zooming in. Although sinusoidal
variations are now visible, the amplitudes are small relative to the motions of the
vehicle-about .015 inch peak-to-peak. This indicates that over 98% of the vehicle
0
2
4
6
8
R8U DATO F3OM FILE: 8:BOUNCMRH HCT RCHT:
0
2
4
6
8
RAW >At,\ FriOfl FILE: :\:BOUNCNRIIAZ RGHT :
10
12
,8443 INCH
10
12
G' S
---
14
16
TIME
:
14
TIME
:
,0849 SECONDS
16
SECONDS
a. raw transducer signals
CBOUNCMRH
0
C:BOUNCMRH
I
2
BOUNCE
2
BOUNCE
4
6
8
R. ELEU :
4
6
12
10
INCH
8
R. ELEU :
la
12
.la92 INCH
:
18
28
SECONDS
:
f6
18
28
14.5506SECONDS
14
TIME
16
14
TIME
b. '@profiles"shown with two levels of magnfication
Figure 14. Example transducer signals and profile measures from a bounce test.
I
motions shown at the top of the figure-roughly
cancelled correctly in the profile computation.
1 inch peak-to-peak-were
If large variations are present in a profile plot and the height sensors were checked
with the beam during an electrical calibration, the problem is most likely due to the
accelerometer.
The profilometer software allows two methods for viewing profiles measured on
the road--quick and detailed. Only the quick plotting is valid for profiles obtained
in a bounce test.
Roughness. Ideally, the roughness measured for a road is determined only by the
road surface. In practice, measurement errors add a component to the profile, such
that additional "roughness" is included in the measurement. The bounce test offers
a means for determining how significant the measurement error is. Figure 15
shows an example roughness plot. Note that roughness is shown in a different
format than normally used for road tests. Because the vehicle is not moving
forward, it makes no sense to use units of inlmi. Instead, we are interested in
seeing how fast extra inches of accumulated "roughness" are added into the
measure. Thus the plot shows accumulated inches as a function of time. This plot
can be used to calculate an upper bound of the error that can be encountered during
measurement of a road
In the example shown in the figure, there are 5.6 inches added in 20 seconds, at an
approximate rate of .28 in/sec. This means that for a test conducted at 55 mi/h,
(65.45 sectmi), the measured roughness could be high by as much as 65.45 x .28
= 18 in1m.i. Note that this type of error increases for lower road speeds. .
This indication of measurement error is a very conservative "worst case,"
corresponding to maximum vehicle motion (the bouncing) and minimum road input
(none). When the input of the road is added to the input due to error, the effect of
the error is diminished, because the combined roughness is approximately an RMS
sum. That is, the measured roughness is the square root of the squared error plus
the squared road roughness. For example, if the true road roughness is 100 intmi,
the error shown in the figure would result in a measured roughness of about
[1002 + 182]1/2 = 101.7 inlmi.
Rut Depth. The height sensors are primarily tested during the electrical calibration,
by the multiple heights used with the calibration bar. A plot of rut depth from a
bounce tests adds a second check. The movement of the vehicle should largely be
cancelled, as shown in the bottom plot of figure 15. The bounce test is a valid
check on a flat or rutted rutted surface. Either way, the test should show a constant
measure of rut depth. However, the constant depth is zero only for a flat surface.
If the bounce test shows changes in rut depth, then at least one of the height sensors
has a linearity problem
\
f
I
8
1
I
I
I
,
I
I
I
I
I
I
----- -- - --- - !
7 - I- - - - - - !
I
I
-------!
I
I
,
I
I
I
I
I
I
I
I
- - - - - - - L - - - - ------!- -- --- --- -!- i ...-----
I
I
I
I
6 --------!-------!-------!-------!-------.!-..--.-!.-.-.--!
I
I
I
I
I
I
I
......................
......................
I .
I
I
I
I
I
I
I
I
16
18
I
0
2
CJOUNCMRH
4
L. I R I
BOUNCE
r
6
8
:
10
12
14
TIME
4.2199 I N
I
I
:
14.5506 SECONDS
I
,
I
I
I
I
I
I
I
I
I
I
rI - - - - - - - TI - - - - - - -
I
I
I
I
I
I
I
I
I
I
I
I
I
I
I
I
I
I
I
I
I
I
I
I
I
I
I
I
I
I
I
I
I
I
I
I
I
I
I
I
I
4
05
-.- - - - -
r------- r------I
I
I
0
2
4
6C , RUT
8
:
20
--------
I
.,""'--,"'-"1 - - - - - - - .,-------,-----..I
10
12
,1451 INCH
14
TIME
:
I
I
16
18
20
14,5506 SECONDS
,'
i
Figure 15. Example roughness and rut depth measures from a bounce test.
Printing. The roughness and rut depth numerics can be printed, using the PRINT
NUMERICS option described in subsection 5.4. The printed roughness numerics
have units of time (inlsec),rather than distance (inhi).
3.3 Pulser Check
The pulser transducer, mounted in the right-front wheel of the profilometer vehicle, is
used to control the digitization of the signals from the other transducers. It also provides a
measure of the vehicle speed, using a frequency-to-voltage converter. Both the pulser and
the frequency-to-voltage converter are checked by driving the profilometer over a known
distance. The start and stopping points are indicated manually by pressing a key on the
computer keyboard. For everyday checking, mileage markers along a highway are
sufficiently accurate and the vehicle can be driven at normal highway speeds.
The same test can also be used for calibration purposes, to accurately measure the
interval between pulses and to measure the gain of the frequency-to-voltage converter.
When the test is used for this purpose, the accuracy of the measured distance is very
important, as is the ability of the operator to hit keys at precisely the starting and stopping
points. Thus, a low speed is recommended when high accuracy is required. Repeat tests
are also recommended.
The distance and speed measures are based on the circumference of the right front tire.
Thus the sample interval shown on the screen when CONFIGURE TRANSDUCER is
selected should be changed as the tire wears. The pulser should be recalibrated whenever
the tire is changed. As a routine maintenance item, the operator should regularly check the
inflation pressure of tires to minimize errors in speed and distance measurements.
33.1 Pelforming the Pulser Check
To perform the pulser check test,
1. Choose DO PULSER TEST from the MAKE ROAD MEASUREMENTS menu.
(The computer display provides further instructions for the following steps.)
2. The screen shows the default distance to be covered during the test. Modify the
distance if it is not correct, and press the End key to continue.
3. The screen prompts you to press a key to start the measurement. Drive the
profdometer to the beginning of the measured distance, and press any key to begin
the test. Press the key when the marker on the road lines up exactly with a
convenient reference point in the profilometer vehicle, such as the leading edge of
the rear door.
4. During the test, the speed of the vehicle does not have to be constant. However,
the speed must not drop below 5 mih.
5. When the profdometer reaches the end of the measured distance, as indicated when
the end marker lines up with the reference point, press a key to stop the test.
3.3.2 Interpreting the Results of the Pulser Check
The screen now shows the results of the test. The results include:
the distance as measured using the current calibration factor for the pulser.
the average speed as measured by dividing the measured distance by the time
duration of the test.
the average speed as measured using the frequency to voltage converter.
For casual daily checking, the measured distance should agree approximately with the
known distance, and the two measures of speed should agree within 5%. Performing this
test daily will give a good idea of the type of results to expect. If the distances gradually
grow longer, the tire may be wearing and a new calibration may be warranted
If the distance error changes abruptly from past results, there may be a problem with
the pulser transducer itself. It should then be checked in the laboratory using an
oscilloscope and adjusted or replaced as necessary.
If the distance measures are okay but the speed measures disagree, the problem lies
with the frequency-to-voltageconverter. Erratic results from test to test indicate a problem
with the converter, which should be checked by someone with the necessary technical
skills. If the results are consistently in error by a constant percentage, the calibration factor
for the converter needs to be updated.
3.3.3 Calibrating the Pulser and Frequency-to-Voltage Converter
The same pulser test is used to calibrate these components, but it should be performed
very carefully. A low speed is recommended at the start and finish of the test, to minimize
the errors caused by imperfect timing in manually stating and stopping the test. The
measured distance should be at least several hundred feet in length, with a length of a mile
being recommended. The distance should have been measured with tape to an accuracy of
five ft/mi or better, and permanent markers are recommended for indicating the starting and
stopping points.
After making the test, the correct sample interval (Abue) is calculated from the old
sample interval (Aold, shown on the screen under the CONFIGURE TRANSDUCER
option) using the relationship:
where Lold is the length as measured with the old calibration factor, and he
is the true
length of the test. The gain of the frequency to voltage converter is also calculated from
these results:
Where Vme is the speed as measured by timing the test, The new sample interval and
converter gain (Atrue and Gtrue) should be entered using the CONFIGURE
TRANSDUCER option.
4. MEASURING A ROAD
Measuring a road with the profilometer is mostly a matter of choosing that option from
the MAKE ROAD MEASUREMENTS menu shown in figure 11, updating the setup
information shown on the screen (see figure 9), and pressing a key twice to indicate the
start and stop of the test. The options available when making a measurement are described
in this section.
4.1
Setting Up
After selecting MEASURE ROAD from the MAKE ROAD MEASUREMENTS menu,
information is shown on the screen similar to that in figure 9. This information is recorded
dong with the measured data, and is displayed whenever the data in the fde are viewed,
4.1.1 S e w Data that Cannot be Edited
The screen shows the following information is not changed on a test-by-test basis. The
methods for changing these settings are described below:
DATE. The current date is shown, based on the clock on an auxiliary card in the
computer. If the date is incorrect, the clock is set wrong and should be reset
according to the instructions provided for the AST Six Pack Plus clock card
(contained in the "Guide to Operations" manual that comes with the computer).
TIME. The current time is shown, also based on the clock in the computer. If it is
incorrect, the clock should be reset according to the instructions for the AST card.
CONFIGURATION. Ten configurations of transducer combinations are possible
for the profilometer. These are shown in figure 14. If the configuration shown is
not the one desired, cancel the test to return to the measurement menu, and choose
the f i t menu option, SELECT CONFIGURATION.
Configurations can be selected only if the required transducers are installed in the
profilometer. However, not all of the transducers need be used. If a transducer is
not required for the selected configuration, it is ignored by the profilometer during
measurements. This can allow more measures to fit on the tape, and can also allow
very long runs at high speeds. For example, if the left profile is the only measure
of interest, Configuration #1 can be selected. In Configuration #1, the profilometer
can usually be run at 55 mith continuously for over 30 mi if there is room on the
tape.
The system does not care one way or the other whether transducers not required for
the selected configuration remain plugged into the system or are removed.
f
I
Thesefour optiorw
are available witi
the transducers or;
the profilomete?
as delivere~
SELECT CONFIGURATION
---------------
f
LEFT PROFILE
RIGHT PROFILE
LEFT+RIGHT PROFILE+LEFT+MID RUT
ALL THREE RUTS
LEFT PROFILE AND ALL RUTS
RIGHT PROFILE AND ALL RUTS
LEFT+RIGHT PROFILE +ALL RUTS
Figure 16. Configurations available for the profilometer.
4.1 2 Setup Data that Can be Edited (Using the Screen Editor)
The screen shows the following information can be modified when setting up a test
using the screen editing methods described in 2.4.3. The information from the previous
test is always shown as a default, and is used if not changed during the setup.
FILENAME. The name shown will be used to identify the file containing the
measure that is about to be made. The prefix indicates the D M PC drive on which
the file will be written. The drive is selected automatically by the computer and
cannot be changed by the operator. The computer starts with drive D for a fresh
tape, and continues to drives E, F, and G in sequence as they are filled with data.
The suffix is the file extension used for a l l IBM PC files, which is ,DTA for all data
files containing profilometer data. In between the prefix and suffix is the file name,
which can have up to eight characters. A default name is always provided, but it is
often convenient to use a name associated with the site being measured.
COMMENT. This space (about 60 letters worth) is available for recording general
comments about the forthcoming run.
*
ROUTE. This space is available for identifying the name of the road.
DIRECTION. This space is available for identifying the direction of travel.
a
LANE. This space is available for identifying the measured lane.
SURFACE TYPE. This space is available for recording the type of surface of the
road.
TEST SPEED. Some of the instrumentation is set automatically at the beginning of
a measurement according to the estimated speed that will be used. The actual
vehicle speed is recorded during measurement and variations from this value are
allowed. However, if the test speed shown here vastly differs from the actual
speed, the reliability and accuracy of the measures suffer. The actual test speed
should generally be within 10 mi/h of the speed entered here.
Choosing the best test speed is a matter of trading off several technical limits. At
high speeds, the profilometer sees longer wavelengths and captures a more
complete profile. However, the data are measured faster and sometimes the IBM
PC and the ADIC tape recorder cannot keep up after a mile or so. If a test is
terminated prematurely, a lower test speed is needed. The lower limit of the
profilometer for measuring IRI roughness accurately is about 20 mith. As
delivered, the upper limit is determined by the amplifier setting used for the speed
sensor, which is about 63 mi/h. (The amplifier gain can be changed to redefine the
full scale velocity, as described in the reference manual.[2])
For test lengths of a mile or so, the best speed is usually the highest allowed by
traffic given the constraint that the measure should be made without changing lanes.
MAXIMUM TEST LENGTH. The primary reason for entering this information is
so the computer can check that sufficient space is available on the tape for recording
the test data. The recording tape is divided into four volumes appearing as hard
disk drives D through G in DOS (see section 2.5.3). If the space in the current
volume is insufficient to hold the data, the computer informs the operator of the
length remaining. The operator can choose to reduce the length of test to this value,
in which case the data are written to the current volume. If the length is not reduced
the computer goes to the next volume, and the remainder of the previous volume is
not used. If there is doubt about how long the test will be, it is better to overestimate the length and terminate the run manually. However, the test length should
not be over-estimated excessively because of the loss of recording capacity. As an
example, suppose that the maximum length is kept at 10 miles for all runs, and that
most runs are about 1 mile in length. When there is less than 10 miles worth of
tape left in a volume, the computer proceeds to the next volume even though there
would be room for nine more runs of one mile each.
When the tests are routinely stopped by the manual mode, the maximum test length
should be roughly 50% longer than the expected length. That is, for tests that are
expected to be 1 mile long, a value of 1.5 mile should be used for the maximum test
length. When a test is stopped early, there is no loss of the data already measured.
The operator should note that the test is automatically terminated (rather precisely)
when this maximum distance is travelled. Thus, the entry can also be used to
control test lengths to a precise value.
SAMPLES PER FOOT. For high-quality profile measures, a value of 4 (4
sampleslft = .25 ftlsample) is recommended. Lower values are permitted,
however, to allow continuous operation at high speeds when all sensors are
connected. The profilometer was validated using the 4 samplelft value, and may
not be as accurate when lower values are used.
OPERATOR. This space is available for recording the name of the person'
responsible for making the measurements.
4.2
Taking Data
After editing the setup information, the screen shows a message to start the.test by
pressing a key. As might be expected, pressing a key starts the test.
A test can be stopped three ways:
1. Manually. The test can be stopped manually by pressing a key at any time.
2. Reaching the maximum test length. When the maximum length indicated in the
setup is reached, the test is automatically stopped.
3. Running out of memory. During testing, the digitizer is putting data into the
computer and the tape recorder is taking data out of the computer. Data are typically
transferred to tape faster than they are digitized, such that the test can proceed
continuously until the maximum length is reached. However, the ADIC software
sometimes takes extra time to update a directory on the tape. When this happens,
the computer memory can fill up. When it becomes completely full, the test is
terminated immediately to avoid losing existing data.
The third method of termination can be a problem when attempting very long
measurements (several miles or longer) at highway speeds when using configurations
involving five or more transducers. It can be eliminated by any combination of the
following remedies:
*
Take fewer samplesfft. Instead of the default 4 sampleslft, try 3 or 3.5.
Run at a lower speed. Changing the test speed by 5 or 10 mi1h.r can eliminate the
problem.
*
Use fewer sensors, Avoid measuring data that will never be used.
*
Make shorter tests. Tests that are longer than 1.0 mi are more difficult to view and
can result in files that are too long to copy to floppy disks,
5. VIEWING AND PROCESSING DATA
The data measwed by the profilometer are viewed by selecting options from the VIEW
AM> PROCESS DATA menu shown in figure 17. This menu can be selected from either
the MAIN PROFILOMETER MENU (see figure 7) that appears when the machine is
started, or from the MAKE ROAD MEASUREMENTS menu used for measuring road data
and performing routine equipment checks (see figwe 1 1).
Most of the analyses used within the profilorneter software are not displayed on menus,
but are called upon as needed to provide the views of the data that are chosen. Some of the
analyses are performed every time the data are viewed, while others are performed just
once in the history of the data as they are transformed from raw transducer signals to
profiles of elevation, roughness, and rut depth.
In order to view data, first select a file using one of the first two choices from the
VIEW AND PROCESS DATA menu, OPEN TEST FILE and OPEN BOUNCE FILE.
Once the fde is opened, the contents can be plotted or printed using the associated options
from the menu.
5.1 Data Files
Measures made by the profilometer during a road test or a bounce test check are stored
for later viewing in files on a 3M tape cartridge. Files containing road data have names
ending in the MS DOS extensions .DTA; files containing results of bounce tests have
names ending in .BNC.
The menu option to OPEN TEST FILE is used to access the files containing road data.
After selecting this option, a second menu appears with a list of the disk drives and
volumes. Drives D, E, F, and G are volumes on the tape that appear to the IBM PC as
drives. A and B are the two floppy disk drives. Drive C is the bubble memory, which will
normally not contain any data files. After selecting a drive, all of the files with names
ending in .DTA are shown on the screen, as illustrated in figure 8. After a file is selected
and opened, the setup information is shown for that file, with a display similar to that in
figure 9. In addition, the screen display shows the state of the data in the file (see below).
Opening a file with data from a bounce test is accomplished the same way, with the
only difference being that files with names ending in .BNC are shown.
The data in a file can be in one of four states:
1. The file contains raw transducer signals. These are the measures from the height
sensors, the accelerometers, and the speed transducer, as they were recorded
directly to tape during the test.
2. The file contains raw transducer signals that have been checked for ranging errors.
A pre-processing stage is included to check all of the signals as described in
VIEW AND PROCESS DATA
OPEN TEST FILE
OPEN BOUNCE FILE
CHECK RAW DATA
PRE-PROCESS FILES
.......................
PLOTTING...
PROFILE (DETAILED)
- ROUGHNESS RUT DEPTH
-.......................
W W DATA
&
PRINT NUMERICS
--.---.----------------
BACK TO PREVIOUS MENU
Figure 17. The VIEW AND PROCESS DATA menu.
subsection 5.2. The results of the check are stored within the file, so that the preprocessing need not be repeated.
3. The file contains profiles, such as longitudinal profile, rut depth profile, and
roughness profile. These profiles are written on the same part of the tape that
originally stored the raw signals, Thus, the raw data no longer exist.
4. In the unfortunate event that a hardware problem occurs during the proceesing
involved in going from state 2 to state 3, the data in the file are hopelessly
scrambled and cannot be recovered. This could happen if the power is turned off
during processing of the data. Should this occur, the file is identified and cannot be
viewed to give erroneous data.
The status of the file is always shown in the setup view when the file is opened.
5.2
Checking Data
52 .I Manual Checking
Any file containing raw data can be checked after it is opened by choosing CHECK
RAW DATA from the view menu shown in figure 17. A message similar to the following
appears:
CHECKING RAW DATA.
CHECKING...
LOOKING AT BUFFER #
1 OF 1
The purpose of the check is to look for saturation of any of the measured transducer
signals. To do this the computer finds the maximum and minimum values obtained during
the test, and searches for repeated samples of either value. When repeats are found, they
indicate the measures are questionable, and the computer does not automatically perform
the irreversible transformation of the data from state #2 to state #3 described in subsection
5.1. Instead it displays a summary similar to that shown in the top screen view in figure
18. If nothing is known about the roughness levels involved, it is a good idea to look at
the raw signals in question. The bottom screen view in figure 18 shows the transducer
signals that were flagged as being suspect, and indeed, the signals did saturate. (This test
included a railroad crossing on a country road, which caused the large amplitudes in the
vehicle bouncing motion.)
When the pre-processing check finds questionable data, the computer offers an option
to shorten the test at a point just before the signals saturate (see the prompt at the bottom of
the top screen in the figure). If this option is selected, the effect is the same as if the test
had been terminated at a point just before the questionable measures occurred, and data
measured after that point in the run cannot be recovered.
A file containing raw data can be checked any number of times. For example, the file
used to prepare figure 18 could be checked a second time, with the result that the computer
TEST SETUP INFORWATION
DATE: 8-15-1986
TIME: 9:43:39
CONFIGURATION: LEFT
+ RIGHT PROFILE +MID
RUT
FILENAME E:SITE3RREI,DTA
COMMENT: RAILROAD CROSSING
ROUTE: TERR
DIRXCTI0N:EAST
LANE :RIGHT
SURFACE 2YPE:ASPHALT
TEST SPEED =30 MPH
TEST LENGTHz.2
S W L E S PER FOOW4.00
OPERATOR :RRH
MILES
WIlUOM
test that ham been checked. Length = 1323.5
WAS QUESTIONABLE
2 TIME (S), 1ST AT X = 753.09
SIGNAL WAS OK.
SIGNAL WAS OK.
SIGNAL WAS OK.
SIGNAL WAS OK.
WAS QUESTIONABLE
2 TIME (S), 1ST AT X = 752.61
R a w data from road
HGT RGHT
AZ RGHT
VELOCITY
AZ LEFT
HT LEFT
MXB RUT
SPEED RANGE DURING TEST: 28.00 TO 31.64 MPH
Do you want t o shorten the run t o eliminate questionable data?
1,6428 INCH
I W D A T A F R O M F I L E : C:SITE3RRHHGTRGHT:
-2
DISTANCE:
I
I
I
I
I
I
I
I
I
I
I
I
I
I
I
I
t
I
I
I
I
,--**---1-------
I
I
I
I
I
I
I
I
I
I
----- -- -r-------r-..----
y"""-l---""
700
710
720
738
7 48
tRW M T b FROM F I L E : C : S I T E 3 R R H MID RUT :
I
I
I
758.2224 FEET
I
I
I
I
I
I
INCH
I
I
,-------,------I
I
I
I
I
I
I
I
I
970
788
790
960
758
I
I
DISTANCE:
- 8 - - - - - - - -
888
FEET
Figure 18. Example of questionable data found during pre-processing of road measurements.
would once again offer to truncate the run at X = 752 ft. This time, the offer could be
accepted to eliminate the portions of the run including the saturated signals.
The results of the most recent check are recorded in the file. If a file is truncated, a new
check on the shorter file can be used so that the results stored in the file show all of the
signals to be OK
52.2 Implicit Checking
Whenever data in a file are viewed as profile, they will be processed if they are in either
state #1 or state #2 as defined in subsection 5.1 above. The computer will print the
message:
T H I S F I L E HAS RAW DATA AND NEEDS TO BE PROCESSED,
WHICH MIGHT TAKE A MINUTE OR TWO.
I S T H I S OK? X
If, for some reason, you do not wish to process the file, answer N at this time. If you
answer Y, it proceeds to process the data in the file. If the raw data have not been checked,
the data are checked in the same way as described above in 5.2.1. If the data check out as
having no saturation problems, the processing continues until the raw data are replaced
with profiles. The computer continues with showing the data in the requested form, by
proceeding to the next step that would have been followed if the file had contained profile
data all along.
If the check shows that one or more of the signals may have saturated, the setup
summary of the sort shown in figure 18 is presented on the screen and the processing is
discontinued so that the raw measures can be viewed if desired.
If a profile view is selected for a file that has already been checked, the measures are
transformed into profile without further checking, regardless of the outcome of earlier
checks.
5 2 3 Batch Pre-Processing of Files
It is sometimes helpful to know shortly after taking a series of measurements whether
the runs are valid or not. For example, if a series of measures are made in one region, it is
reassuring to check the measures before leaving the area. The PRE-PROCESS FILES
option h m the view menu allows a batch of data files to be checked automatically.
After selecting this option, a prompt appears for a file name that can include wild
characters. MS DOS allows two kinds of wild characters that can be used within the eightcharacter names:
? can be used in place of any single character, including a blank. For example, the
name SIT?? would include the files named SITE1, SIT1, SITE2, SITN3 in the
batch to be processed, if those files were present on the drive. A file named
SITElO would not be included, because there is no ? in the specified name to match
the 0 at the end of SITElO.
*
* can be used in place of the remainder of a name. For example, SlT* is the same
as SIT?????.Use the name * to check all files on a drive. Use the name M14* to
check all files beginning with the three characters M14.
The automatic pre-processing continues until all of the files are checked, or until a
suspect measure is found. If a questionable test is identified, the setup summary for that
file is shown on the screen (see figure 18) and further batch processing is cancelled.
If a file is included in the batch that has already been checked, the computer will open
the file, see that it has been checked, and skip that file. Thus there is no danger to the data
if the batch includes a mixture of files that have different states. However, opening a file
on a tape sometimes involves a lot of rewinding and fast forwarding, which can delay the
processing.
5.3 Plotting
The view menu offers plotting for four kinds of data. All use the same plotter, and all
use additional menus to determine which variables are to be plotted and what scales to use,
For all of the profile variables, a filter parameter is also selected from a menu.
53.1Profile Plots
The elevations of the left and right wheeltracks can be viewed using the two options
PROFILE (DETAILED) and PROFILE (QUICK). The detailed view takes longer to plot,
and is therefore best left for examining small details in a profile. The quick view is faster
for looking at large sections, but can be inaccurate for inspecting details such as individual
patches or small specfic features. Generally the two will provide the same view, but the
QUICK option will do it faster.
Whenever elevation profiles are viewed, the long wavelengths are removed using a
moving average fdter. By selecting different baselengths for the filter, the plotted profile
will show details specific to the remaining wavelengths. For example, figure 19 shows
measured profiles as filtered with baselengths of 500 ft (top screen) and 20 ft (bottom
screen). Both sets of plots are valid, but they display different aspects of the profiles. The
plots in the top of the figure show undulations that are about 200 ft in length and several
inches in amplitude. Small bumps might be more interesting for engineering applications,
but they are hard to see. For example, there is a sharp bump at 1095 ft. The plots in the
bottom of the figure show the same profiles with wavelengths of 20 ft and longer removed.
The bump at 1095 ft is more clearly visible, as are other surface features involving shorter
wavelengths. The filtering used is called high-pass, because the low frequencies (long
wavelengths) are stripped from the profile, leaving the high frequencies.
f
\
....--.
..-.-.
2
I
I
I
I
I
I
I
-LI.II.I
4
I
I
ma--..
-a
b
*-.---.;
I
-.-.--..,..---.
I
-2
I
I
-4 - - - . * - - . r . . . . - I
I
I
1009
1058
1100
A:SITE4
TLT. BASE 500
4
I
I
I
llS0
1209
1250
1308
L. ELEU:
1.4431INCli
.------.
I
I
I
1358
1400
14581500
DISTANCE: 1266.8820 FE7S
I
I
I
L-------b-------r.r.l.r--...A-------L-------J-------J-------J....--.I
I
I
I .
I
I
I
I
I
I
I
I
I
I
1
I
I
I
1090
1050
1100
A:SITE4
FLT. BASE 500
I
1150
1290
R, ELPJ :
1258
139%
I NCU
1359
1400
DISTANCE:
14501500
FEET
I
\
a. 500frbaselength
r
\
I
I
I
I
1000
1059
1188
A:SIIE4
FLT , BASE 2Q
I
I
I
I
I
I
I
I
I
1150
1208
La W :
I
I
1258
1300
-,lL8l INCH
I
I
I
I
I
1358
1409
1450 1588
DISTANCE: 1222.9688 FEXI
I
1
0.
--I
,----.-
-,4......--r...-..-r--.-.-.,-.
1090
1058
1100
&:SITE4
FLT. BASE 20
-*I.
I
1159
1208
R. ELN :
1259
1390
1NCH
1358
1400
DISThNCE:
14581588
FEET
i
\
J
b. 20ft baselength
Figure 19. Example prof~leplots showing the effect of the Nter baselength.
The high-pass filter used in the profilometer is precisely defined. As filters go, it is
also easily visualized. It involves calculating the average elevation over a baselength, and
subtracting that average from the elevation as measured at the center of the baselength.
Each point that is plotted is a deviation from an average, where the average moves with the
points being plotted. Comparisons between this profdometer, other profdometers in use,
and rod and level measures show that comparable filtered profiles are obtained for
baselengths up to 500 ft-the length of the profiles measured by rod and level.
Immediately after choosing to plot profile, a menu appears with available baselengths
that can be used for the moving average filter. Figure 20shows an example menu of this
sort as example a. This menu is characteristic of those offering choices of numerical values.
The minimum allowable value is the top one listed, and the maximum allowable value is the
bottom one. In this case, the baselength must be a value between 12.131 and 1742.6 ft.
Usually, one of the numbers in between is appropriate and can be selected quickly using
the arrow keys. If a value is desired that is not in the list, select CUSTOM. A prompt will
appear to which a number can be typed For example, if the desired baselength is 164.04 ft
(which happens to be 50.00 m), select CUSTOM and then type 164.04 at the prompt. The
next t h e the profiles in this file are plotted, the value 164.04 will also appear in the menu,
between 100 and 200.
When choosing the quick plot, the range of baselengths is more limited than when
choosing the detailed plot. In order to use baselengths less than 12 ft, the detailed plotting
option is required. For viewing profile features that are less than 5 ft in length, the detailed
plotting option is recommended
Most of the menus ueed in setting up the plotter also have an option at the bottom to
CANCEL. If selected, the view menu reappears instantly and the plotting request is
forgotten.
After selecting the baselength, a menu appears with choices for the range covered in the
X axis of the plot (see example b in figure 20). This menu operates the same way as the
previous one. Common choices are shown, and CUSTOM is available for entering an
arbitrary range. Similar menus are used to select the variables to plot and the ranges used
for the Y axis in each plot. (See menus c and d in figure 20.)
Once the plots are generated, the keystrokes shown in table 2 are used to zoom and
pan, and to read numerical values using the cursor.
5.32Roughness Plots
Roughness profiles are stored in the data files and are viewed by selecting the
ROUGHNESS & RUT DEPTH plotting option. The roughness analysis is based on a
quarter-car simulation using standard parameters, and is called the International Roughness
Index (IRI). Roughness is a property that is defined over an interval of road. It is
meaningless to talk of the roughness of a point. Instead, one must always consider
roughness as a property of the profile connecting two points. The roughness profiles
(b)
(a)
BASELENGTH TO REMOVE LONG WAVES
SELECT RANGE FOR X-AXIS
1 2 . 1 3 1 FEET
20 FEET
50
100
200
500
FEET
FEET
FEET
FEET
500 FEET
1000 FEET
CUSTOM
CANCEL
1 7 4 2 . 6 FEET
CUSTOM
CANCEL
PLOT
L . ELEV
R . ELEV
(4
SELECT FULL SCALE FOR L . ELEV
.1 INCH
. 2 INCH
CANCEL
5 INCH
10 INCH
20 INCH
CUSTOM
CANCEL
Figure 20. Example menus used to select variables and scales for plotting.
obtained with this system also involve a moving average. Each point that is plotted is the
average roughness over a baselength, centered about that point. Figure 21 shows an
example. The caption in the plot indicates that the baselength is 528 ft (AVE. BASE 528)
(1/10 mi). The first point at the,beginning of the plot (X=264 fi) is the average roughness
over 528 ft centered at 264 ft, covering the interval from 0 to 528 ft. The plot shows that
the roughness over this interval is 210 in/mi. The next l/lO-mi interval covers the range
528 to 1056 fi, centered at 792 ft. The plot shows that the roughness over this interval is
323 idmi. Between the points at 264 and 792 ft, the plot also shows roughness values for
every possible 528-ft interval. For example, there is a local maximum of 250 in/mi at about
400 ft, for the interval covering 136 to 664 fi. The highest roughness level anywhere in the
test is easily seen to be at the cursor position, which is the interval centered at 1045 ft with
an associated roughness value of 346 in/mi.
One of the difficulties involved in repeating profile measures involves the imprecision
in starting the measurement at precisely the same road location for each test. Plots such as
the one shown in figure 21 show very clearly those errors in repeat tests, because the same
roughness profile is obtained except that it is shifted along the X axis. This
plotting/analysis tool solves the problem of determining whether differences in roughness
indices from two runs are due to the starting position or whether they are due to something
else.
533Rut Depth Plots
Rut depth profiles are stored in the data files and are viewed by selecting the
ROUGHNESS & RUT DEPTH plotting option. The process for viewing rut depth is
exactly the same as used for viewing roughness, d e d b e d above in 5.3.2. As with the
roughness plots, each point that is plotted is an average over a selected baselength.
53.4 Plotting Vehicle Speed
The measurement speed of the profdometer is also saved in the data files after the
profdes are computed, and it can be plotted using the same method as used for roughness
and rut depth. Vehicle speed is one of the variables that can be selected when
ROUGHNESS & RUT DEPTH are chosen as a plotting option from the view menu.
535 Plotting Raw Data
As described in subsection 5.1, the data files initially contain raw measures from the
transducers exactly as they are recorded during a test. After a profde of any sort is viewed
or printed from that fde, the raw data no longer exist. The RAW DATA option from the
VIEW AND PROCESS DATA menu cannot be selected for a file containing processed
data. However, until the data are processed to yield profdes, the raw data signals can be
viewed using the plotter by selecting RAW DATA. (See figures 14 and 18 for example
plots of raw data.) The same menus are used for selecting variables to plot and scale
I
\
t
1
I
I
1
I
I
I
I
I
I
I
I
I
I
I
I
I
I
I
I
I
I
I
I
I
I
I
I
-
I
I
I
r - . - - - - - L - - - - - - - - - - . I l r - - r r - .
I
I
I
I
I
I
I
I
I
7""".
I
I
I
I
I
I
I
I
I
I
I
I
I
I
1
I
I
I
I
I
I
I
I
1
I
I
I
I
I
I
I
I
I
I
I
I
I
1
I
500
1000
2588
3 089
I
159.
A:SITE4
I
I
I
I
"---~~'..-'-l-..'-*~-.-~."~~~~.'~.I
--p----------.-*r-----.
I
AUE, BASE 528
L. IRI
1580
2088
: 345.9789 INIMI
I
DISTANCE: 1045,6920 P m
L
J
Figure 2 1. Example plot of IRI roughness along a test section.
factors as are used for the other types of plots, with the exception that baselengths are not
entered because raw data are not filtered.
5.4 Printing
Roughness, average rut depth, and average speed are summary measures that can be
printed over constant intervals. After opening a test file, the PRINT NUMERICS choice
can be selected. All of the print settings are shown together on the screen, as illustrated in
figure 22. These settings can be modified by using the conventional page editing methods.
The variables that can be printed are shown in the top part of the screen, followed by
either Y (yes) or N (no). Those variables followed by Y will be printed, those followed by
N will not.
The values can be printed on the screen, on the printer, or into a file. These three
options are shown on the screen, also followed by Y or N. If the file option is checked
(Y), then the name shown will be used for the file containing the printed data. When the
file option is Y, the name and drive can be edited. The fie created will. be an ordinary text
fire, which can be edited using most word processors for the IBM PC. It can also be used
as input for analysis programs. (If the file option is disabled with an N, the file name
cannot be edited.) In the example shown, the numerics will be sent to the printer and also
put into a file on a floppy disk in drive A called SITE4RRH.NUhll. Table 3 shows an
example of the output to the printer.
The range and intervals used for printing are set at the bottom of the screen. As
shown, the printout covers 528-ft intervals, starting at 0.00 ft and continuing to the end of
the test at 3639.30 ft. After changing the interval from 100 to 528, the printout shown in
table 3 is obtained.
MODIFY THESE SETTINGS AS NEEDED TO PRINT NUMERICS
CBANNELS TO PRINT:
L. IRI
R. IRI
SPEED
ECHO TO:
START:
.
C RUT
SCREEN Y
. O O FEET
PRINTER Y
Y
FILE
Y
FILE NAME: A : ~ ~ . N U M
STOP: 3639.30 FEET
INTERVAL:
5 2 8 . 0 0 FEET
Press t h e "Endw key t o accept t h e s e l e c t i o n s .
Figure 22. Screen display when setting up to print numerics.
Table 3. Example printout of roughness and rut depth along a test section.
DISTANCE
FROM.
.
a
FEET
TO
L. I R I
IN/MI
R. I R I
IN/MI
C . RUT
INCH
------------.I2
.01
01
-.02
.03
.06
.04
-.
6. CHANGING TRANSDUCERS
The profilometer software makes few assumptions about the transducers provided with
the system, so that transducers can be added or changed as needed. When changes are
made in one or more of the transducers, the only change required for the software is that
the corresponding calibration factors for the transducers must be updated.
The main menu (see figure 7) offers the choice to CONFIGURE TRANSDUCERS.
When this is selected, a display similar to figure 23 is shown on the screen. Nearly all of
the items shown can be edited using the page editing methods mentioned in 2.4.3. These
items are:
ID. Each transducer has an identification name (ID) that can be up to eight
characters long. The names shown are used when a transducer is identified in a
plot or on the screen. The names originally used for the two accelerometers are AZ
LEFT and AZ RGHT. (AZ is an abbreviation used for vertical acceleration because
most vehicle coordinate systems call the vertical axis Z.) The three height sensors
are initially called HGT LEFT, HGT RGHT, and MID RUT, and the wheel pulser
is called PULSER. The signal from the wheel pulser goes into a frequency-tovoltage converter, to produce a measure of vehicle velocity, called VELOCITY.
These names can be changed without affecting the quality of the measures made by
the system
Units. The name of the units shown for each transducer can be changed to use
different abbreviations or spellings. However, the actual units used are built into
the software, and cannot be changed. These must be as follows: height
sensors-inches; accelerometers-g's; and speed-milh. Regardless of how the
units are spelled, the elevation and rut depth profiles will have units of inches, and
the roughness measures will have units of inlmi.
Type. All transducers used on the profilometer are type 0.
Calibration constant. The calibration constants are experimentally determined
numbers that relate the output of the transducer to physical units. For the
accelerometers, these values have units of gts/volt. For the height sensors, the
units are inchesJvolt. For the velocity transducer (the frequency-to-voltage
converter) the units are mi/h/volt. The wheel pulser is a special case in which the
value indicates the distance travelled along the road for each pulse, in inches. The
numbers must be measured carefully and accurately in order for the profilometer to
function as designed. They are specific to the individual transducers, and therefore
new values must be entered whenever a transducer is replaced, added, or modified.
The measurement of these gains is normally performed in a laboratory, to provide
precise inputs while monitoring the output. The calibration method for the pulser is
covered in sub-subsection 3.3.3. Calibration instructions for the remaining
transducers are provided by the manufacturers of each transducer.
UNITS
TYPE TRANSDUCER AMPLIFIER OFFSET AT AMPLIFIER
CAIN
CAIN (NOH) ZERO VOLTS GAIN (ACT)
FULL
SCALE
**** ********** ********* ********** ********* ******
0
BGT RGHT
1
AZ RGHT
2
VELOCITY
AZ LEFT
HGT m
F11
MIDRUT
I W T RUT
RGHT RUT
DISTANCE
3
4
5
6
7
8
INCH
G'S
mH
G'S
INCH
INCH
INCH
INCII
INCH
Figure 23. Screen display when configuring the transducers.
2.59761
1.4930
64.7312
1,4995
2.5928
OOQO
0000
* 0000
.0008
.
.
Amplifier gain (nominal). Each transducer is plugged into an analog signal
conditioning card that amplifies the signal into the range of fi volts for digitization.
The gain of this card is adjustable, as described in the Hardware section of the
reference manual.[2] The nominal gain for the card is an estimate of the gain,
which is needed by the computer to set up the measurement of the actual gain
during an electrical calibration. The nominal gain must not differ too much from the
true gain (more than 10%) because the computer will apply the wrong range of
voltage during the calibration and measure an incorrect gain. At the same time,
exact agreement is not necessary, because the computer always uses the actual gain
in processing the data.
Offset at zero volts. These values should all be 0.
Amplifier gain (actual). The actual amplifier gains are measured by the system
during an electrical calibration, as described earlier in subsection 3.1. The results
from the most recent electrical calibration are shown here, and cannot be edited
Full scale. The system cannot make measures beyond the full scale shown here,
and attempts to do so result in error. For example, figure 23 shows that the full
scale for the velocity is 64.7 mih. If the vehicle speed exceeds this limit during a
test, the results will not be valid The maximum amplitude that can be measured for
a channel is established by the choice of amplifier gain. The full scale values
.shown on the screen cannot be edited directly. To obtain a different limit, the
amplifier gain can be modified. (See the reference manual for details.[2])
If a new transducer is installed in the profdometer, the replacement must occupy the
same channel, as indicated in figure 23. The calibration constant for the new transducer
must be entered using the CONFIGURE TRANSDUCER option. If the new transducer
has a significantly different calibration constant, differing from the old one by more than
20%, the full scale will probably not be appropriate and the amplifier gain should therefore
be changed.
7. DIAGNOSTICS FOR THE INPUTIOUTPUT HARDWARE
The profdometer software includes the capability for using the hardware in the system
to duplicate the functions of some common laboratory instruments. Unlike other functions
offered by the system, these have no well defined role in the context of routine testing,
checking, or maintenance. They are merely tools that a technician may choose to use as he
or she sees fit.
The main menu includes an option to EXERCISE INPUTIOUTPUT SYSTEM.When
this option is selected, the menu shown in figure 24 appears. The choices on this menu
assume some familiarity with the system hardware, which is described in the separate
reference rnanual.[2] The options from the menu perform the following tests:
SET CALIBRATION DIA allows the operator to set the value (k5volt range) of the
calibration signal going into the calibration relays on the analog cards.
CALIBRATION RELAY switches the calibration relay to connect this signal to the
amplifier.
SET OFFSET puts an eight bit value (5127) into the offset DJA on a card.
READ AID samples a channel at an operator-selected gain and frequency and prints
out the average voltage over the given sampling time.
WAlT FOR A SPECIFIED TIME checks the calendar clock,
CLEAR DATA TRANSLATION BOARD initializes the Data Translation AID
board,
SET DATA TRANSLATION CLOCK sets clock on Data Translation A D board to
a specified frequency.
SET FILTER CLOCK sets the filter clock generator on the IBM Calibration
Interface board to the frequency that operator inputs.
RESTORE ANALOG tuns off all calibration relays and load d l of the offset DIA9s
with their last entered values. This command is used to restore the state of the
signal conditioning unit when power is turned off to enable board removal and
insertion.
AID REFERENCE switches on the A/D reference signal on the A/D check card so
that it can be checked with a voltmeter.
An example application of these functions is the measuring of amplifier gain, such as
the AMPLIFIER GAIN (NOM) value required for configuring a transducer (see section 6).
To measure the approximate gain of an amplifier, switch the cal relay, put in two known
voltages, read the outputs, and calculate the gain based on the intewds. (The electrical
calibration, described in 3.1, uses this nominal value as a starting point for measuring the
gain more accurately with additional intervals and repeated measures.)
SET CALIBRATION D/A
CALIBRATION RELAY
CLEAR DATA TRANSLATION BOARD
SET DATA TRANSLATION CLOCK
SET FILTER CLOCK
RESTORE ANALOG
A/D REFERENCE
EXIT TO MAIN MENU
Figure 24. The INPUTIOUTPUT EXERCISER menu.
8. REFERENCES
[I] T. D. Gillespie, M. W. Sayers, and M. R, Hagan, "Methodology for Road
Roughness Profiling and Rut Depth Measurement." FHWA Report FHWAIRD871042, July 1987.
[2] M. R. Hagan and M. W. Sayers, "Reference Manual for the UMTRI/FHWA Road
Profiling (PRORUT) System ." FHWA Report FHWAIRD-871044, July 1987.
[3] M. W. Sayers, and T. D. Gillespie, "The Ann Arbor Road Profilometer Meeting."
FHWA Report No. FHWA/RD-861100, July 1986,226 pp.
[4] E. Spangler and W. Kelly, "GMR Road Profilometer-A Method for Measuring
Road Profile." Highway Research Record 121, Highway Research Board, 1966.
[5] M. W. Sayers, T. D. Gillespie, and W. D. 0. Paterson, "Guidelines for the Conduct
and Calibration of Road Roughness Measurements." Technical Report No. 46, The
World Bank,Washington D.C., January 1986, 87 pp.
[6] T. D. Gillespie, M. Sayers, and L. Segel, "Calibration of Response-Type Road
Roughness Measuring Systerns." NCHRP Report No. 228, December 1980,88 pp.