1
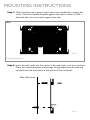
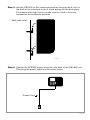
cb 1500
quick start guide & user manual
Time and Attendance Made Simple...
and Smart!
™
ABC Office • 1142 West Flint Meadow Drive, Kaysville, UT 84037 • (800) 658-8788 • www.abcoffice.com
Sign-up
Thank you for purchasing the CB1500 Time Clock, part of the uAttend Employee
Management System by ProcessingPoint, Inc. You’ve made an excellent choice now let’s get started!
We’ll guide you through the signup process in a few convenient steps. The signup
process is designed to take only about 5 minutes, if the steps are performed in order.
Step 1: Open your web browser and visit: http://trackmytime.com/signup
Step 2: You’ll be prompted to enter the DEALER ID, which can be found on
a sticker on the outside of the CB1500 box and on the cover of this
Quick Start Guide. If the Dealer ID is missing, please contact us at
[email protected] or by calling (800) 518-8925.
Step 3:After entering the dealer ID, you will be prompted to select a plan
that best fits your needs. The plans are delivered via a monthly
subscription depending on the number of employees you will have
using the system. You can easily upgrade and downgrade your plan at
any time, and all plans are month-to-month.
Step 4:After you select a plan, we’ll ask you for additional information about
your company.
Login Page: Use this field to specify an easy URL (web
address) for you to remember. A shortened version
of your company name would be a good idea,
however, it cannot be longer than 20 characters
and cannot contain special characters or spaces.
Clock Admin:The clock administrator has full access to the
account. This person is required to setup and
manage the account. Additional supervisors and
users will be added later.
Billing Info:Enter your billing information - the credit card you
enter will be stored on our system (encrypted
and secure) for recurring monthly billing. All plans
come with a 30-day money back guarantee in case
you are not satisfied.
Congratulations!
You are now signed up for the service. Next, we’ll show you how to link your
CB1500 to your uAttend account that you just created.
Time Clock Setup
In the area where you want to mount your time clock, plug the CB1500 into an
electrical outlet and also attach an Ethernet cable between the CB1500 and your
router.
Step 1: The CB1500 should be on, with the display illuminated.
Step 2: You should still be signed into trackmytime.com - If not, please login
with the credentials you setup in the first step.
Step 3: Click on the SETTINGS tab on the top menu.
Step 4: Next, click on the green link for TIMECLOCKS
Step 5: Click the green link in the upper-right hand corner: ADD TIMECLOCK
Step 6:You will need to locate the DEVICE ID (also called Device ID) on the
CB1500 unit. The Device ID is printed on a sticker on the front of the
CB1500. If you cannot locate this sticker, you can also find the Device
ID in the CB1500. To do this, press the Arrow Down / ID key to see
the Device ID. The Device ID will look like this: CB1500-13245736
(Example).
Step 7:In your uAttend account enter the DEVICE ID into the DEVICE ID
field. Then, enter a name for this clock that will help you remember
which one it is in the event you have multiple clocks associated with
your account. When finished, click the ADD button.
Step 8:VERY IMPORTANT – Restart the CB1500. This will successfully link
the device to your uAttend account.
You have now linked your CB1500 time clock to your uAttend account. Next, we will
walk you through setting up departments and employees.
Departments & Employees
Before using your CB1500 time clock, we’ll need to set up at least one department
and one employee. There is no limit to the number of departments you setup however, the number of employees are limited based off the plan you selected.
You can update your plan to include more employees by clicking on the ACCOUNT
link in the upper-right corner of trackmytime.com
To Add a Department:
Step 1:Click on DEPARTMENTS on the main menu. (tabs at the top of the
page)
Step 2:Next, click on the green ADD DEPARTMENT link in the upper-right
hand corner
Step 3:First, enter a code for the department. This can be any 3-digit number.
Next, enter the name of the department, then click the ADD button.
To Add a User to the Department:
Step 1: Click on USERS on the main menu. (tabs at the top of the page)
Step 2:Next, click on the green ADD USER link in the upper-right hand
corner
Step 3:Select the role of the user - either “Employee” or “Supervisor”, enter
the employee’s first and last name, then click the ADD button.
Step 4:Next, click on the name of the user you just added, this will open up
additional configuration options for the employee. You can edit any of
the fields by clicking on the EDIT link to the right of each option. We will go ahead and highlight some of the most used options in
this guide. For more specific options, please refer to the complete
CB1500 guide.
Step 5:If this employee will be using a PIN number to clock in or out, click
on the EDIT link on the “PIN NUMBER” row. Enter the desired PIN
number in the field provided, then click the SAVE button. The employee will now be able to use this PIN number on the CB1500
device to log in and out.
Step 6:If this employee will be using a RFID Badge, click on the EDIT link on
the “BADGE NUMBER” row. The BADGE NUMBER can be found printed on the RFID Badge - refer to the image to the right to
best locate this set of numbers. After you enter the Badge ID, click the SAVE button.
CB1500 Manual
The CB1500 is a time clock featuring an RFID reader that allows employees to
punch in or out using an RFID card or PIN number.
The devices main components are the monitor, where information is displayed,
the keyboard, and the fingerprint sensor.
Keyboard Functions
KEY
FUNCTION
1–0
Function as the numbers they represent. Use
the keypad to enter a PIN number by pressing
the correct 4 digits and then pressing “OK”.
ESC
Used to exit from a Menu or cancel a function
MENU
Used to enter MENU mode. Requires a manager
password. Default password is 53178. Default
password can be changed by manager.
Up Arrow / DEPT PRESSING THE UP ARROW / DEPT KEY IN STANDBY
MODE WILL ENABLE THE DEPARTMENT TRANSFER
FUNCTION. IN ALL OTHER MODES THIS KEY IS USED TO
SCROLL UP.
Down Arrow
/ ID
PRESSING THE DOWN ARROW / PIN KEY IN STANDBY
MODE WILL ALLOW A USER TO ENTER THEIR PIN. IN ALL
OTHER MODES THIS KEY IS USED TO SCROLL DOWN.
OK
Used to accept key entries.
#
Used to switch to alpha or numeric in MENU
mode.
CB1500 Menu Overview
There are three main menu sections:
1.
Device Management - [Menu] – Device Management
2.
Communications – [Menu] – CommSet
3.
System Management – [Menu] – System Management
Device Management - The Device Management Menu area offers the
following functions:
1.Update Time - Used to synchronize a new time if time settings in the
uAttend account change.
2.Device ID – Used to display the Device ID for this CB1500.
3.Upload Logo – Used to import a logo from a uAttend account to
display on the device.
4.Date Format – Used to change how dates are displayed on the
CB1500.
5.Reverify Time – Used to select how often the CB1500 will update its
time setting.
6.
7.Time Format – Used to change how the time is displayed on the
CB1500.
Sounds – Used to turn the CB1500 sounds off or on.
Communications - The Communications Menu area offers the following
functions:
1.IP Address – Displays the current IP address and allows a user to set
a new IP address.
2.Subnet Mask – Displays the current Subnet Mask and allows a user
to set a new Subnet Mask.
3.DefGateway – Displays the current Gateway and allows a user to set
a new gateway.
4.
DHCP – Used to turn DHCP off and on.
System Management - The System Management Menu area offers the
following functions:
1.
Reset – Resets the CB1500 to factory default.
2.Help – Displays help telephone number.
3.
4.Update Firmware - Updates the firmware to the most up to date
version.
5.
MAC Address – Displays the devices MAC address.
Firmware Version – Displays the firmware version.
Mounting Instructions
Step 1:Find a location near a power outlet where you would like to mount the
clock. Place the metal back plate against the wall as shown in FIG. 1
and mark the four screw holes against the wall.
Wall
Fig. 1
*image not actual size
Step 2:Insert the wall studs into the center of the wall marks in all four locations.
Place the metal back plate with prongs facing awaw from the wall and
up and screw the back plate to the wall in all four locations.
Wall (side view)
Fig. 2
Step 3:Afix the CB1500 to the metal back plate by lining up the 4 slots in
the back of the timeclock to the 4 metal prongs on the back plate.
Push down with slight force to make sure the clock is securely
fastened to the back plate and wall.
Wall (side view)
Fig.3
Step 4:Attache the AC220V power chord into the back of the CB1500 unit.
Then plug the power cable into the power outlet.
Power Cord
Fig.4
Troubleshooting
Error
Message
Notes
CLOCK ID ERROR
This error is displayed when the CB1500 time
clock has not been activated on an uAttend
account. Please refer to Page #2 of this
guide.
Net Not Found
The CB1500 was unable to contact the uAttend service.
Check to make sure:
•Y
our network allows DHCP connections
• The network is not behind a firewall that
blocks communication on port 80
Sorry, Dealer ID not
found
trackmytime.com will report this error if
the Dealer ID you entered is not valid. Please
contact your dealer representative for
assistance.
Can’t Login to
trackmytime.com
When you attempt to login to trackmytime.
com, the login form just refreshes. This
indicates that the username/password
combination you entered was not correct.
If you have forgotten your username and/
or password, click on the “Email Username/
Password” link at the top of the page.
Sorry, user not
found
If an employee swipes his/badge and this
message is displayed, it means that the
employee was not found on your account
with trackmytime.com
Check to make sure:
•Y
ou have entered the correct badge
number for the employee (see page 4)
• The employee is currently set to “Active”
CB1500 Limited Warranty
A.Warranty and Warranty Periods. ProcessingPoint, Inc. (“PPoint”) warrants only to the original end user that the
CB1500 will be free from defects in material and workmanship for the time during which the original end user
subscribes to the uAttend™ Employee Management System.
B.PPoint’s Obligation Under Warranty. PPoint’s sole obligation under the above warranty shall be to repair or replace
products and parts during the warranty period. PPoint does not assume responsibility for delays in replacement or
repair of products or parts. Products and parts repaired or replaced by PPoint under warranty shall be warranted
for the balance of the original warranty period. This warranty gives end users specific legal rights, and particular end
users may also have other rights which may vary from jurisdiction to jurisdiction.
C.DISCLAIMER OF ALL OTHER WARRANTIES. NO OTHER WARRANTIES, EXPRESSED OR IMPLIED, ARE
GIVEN, AND PPOINT EXPRESSLY DISCLAIMS ALL OTHER WARRANTIES, INCLUDING AND WITHOUT
LIMITATION, THE IMPLIED WARRANTIES OF MERCHANTABILITY AND FITNESS FOR A PARTICULAR
PURPOSE. Some jurisdictions do not allow limitations on how long an implied warranty lasts, so the above limitation
may not apply to particular end users.
D.Limitations. No salesperson, representative, or agent of PPoint is authorized to make any guaranty, warranty, or
representation that contradicts the terms contained in this Limited Warranty. Any waiver, alteration, addition, or
modification to the warranties contained herein must be in writing and signed by authorized representatives of PPoint
to be valid, binding, and enforceable. PPoint does not assume responsibility for any specific application to which
any products or parts are applied including, but not limited to, compatibility with other equipment. All statements,
technical information, or recommendations relating to the products or parts are based upon tests believed to be
reliable, but do not constitute a guaranty or warranty. PPOINT SHALL NOT UNDER ANY CIRCUMSTANCES
WHATSOEVER BE LIABLE TO ANY PARTY FOR LOSS OF PROFITS, DIMINUTION OF GOOD WILL, OR ANY
OTHER SPECIAL, CONSEQUENTIAL, OR INCIDENTAL DAMAGES WHATSOEVER WITH RESPECT TO ANY
CLAIM IN CONNECTION WITH PPOINT PRODUCTS AND/OR PARTS. Some jurisdictions do not allow the
exclusion or limitation of incidental or consequential damages, so the above limitation or exclusion may not apply to
particular end users.
E. What May Void the Warranty. This Limited Warranty shall be null and void in the following circumstances:
1. Modification or repair by the end user or any non-authorized PPoint service provider; or
2. Improper use or installation, or damage by accident or neglect, by the end user or any third party; or
3. Failure of the end user or any third party to exercise caution to protect from electrostatic discharge damage
and adverse temperature, or physical abuse; or
4. Failure by the end user to follow the Return Appointment Process set forth below.
F. Return Appointment Process. As a condition precedent to the above Limited Warranty, the end user must:
1.Obtain a return material authorization (RMA) from PPoint, which will include an RMA number that must be
prominently displayed on the outside of the shipping container. Returns without an RMA number may be
rejected by PPoint and immediately returned to end user, freight collect.
2.Ship the items being returned to PPoint, freight prepaid, together with a written description of the claimed
defect.
3.Pack the items being returned in the original packing carton or equivalent. Damage in transit is end user’s
responsibility and may be cause to void the warranty claim.
G.Transportation Costs. PPoint will pay surface freight to return products covered by this Limited Warranty. However, if
PPoint determines in the exercise of its reasonable but sole discretion that the product or part returned for warranty
service is not defective, or does not otherwise qualify for warranty service, end user shall be liable for all costs of
handling and transportation.