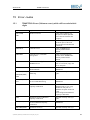
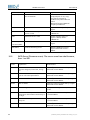
1
User Manual ® TRIME -PICO IPH TRIME®-PICO IPH 2013-06-26 Thank you very much for deciding to purchase this IMKO product!. Should you have any queries please contact your local distributor or address directly to IMKO: IMKO Micromodultechnik GmbH Im Stoeck 2 D-76275 Ettlingen Germany Phone: Fax: E-mail: Internet: 2 +49-7243-5921-0 +49-7243-90856 [email protected] http://www.imko.de I:\publik\TECH_MAN\PICO_IPH\TRIME-PICO IPH-manual_EN_Vers1_8.doc 2013-06-26 TRIME®-PICO IPH Manual for TRIME®-PICO IPH status June 13 List of contents 1 Functional Description TRIME-PICO IPH .................................................................................................... 5 1.1 Operation modes .................................................................................................................................... 5 1.1.1 Operation mode A (Protocol communication) ................................................................................ 5 1.1.2 Operation mode B (Single measurement) ....................................................................................... 6 1.1.3 Operation mode C (Cyclic measurement) ....................................................................................... 6 1.2 External power supply ............................................................................................................................. 6 1.3 Installation hints ....................................................................................................................................... 6 2 Technical Data ............................................................................................................................................. 7 2.1 3 TRIME-PICO IPH ...................................................................................................................................... 7 TRIME-PICO IPH Versions: .......................................................................................................................... 9 3.1 4 TRIME-PICO IPH cable 3.5m, 7-pin female connector ............................................................................ 9 Accessories ................................................................................................................................................ 10 4.1 PICO-BT, (Item no.: 300090) .................................................................................................................. 10 4.2 SM-USB (Converter Module), (Item no.: 100020) .................................................................................. 10 4.3 Extension cable, (Item no.: 300049) ...................................................................................................... 11 4.4 Analog extension cable, (Item no.: 300102) .......................................................................................... 11 5 Installation details: .................................................................................................................................... 12 5.1 General suggestions: ............................................................................................................................. 12 5.2 Installation equipment: .......................................................................................................................... 12 5.2.1 Auger equipment for ø44mm TECANAT tubes ............................................................................ 12 5.2.2 Soil anchor set for auger equipment, ............................................................................................ 13 5.2.3 TECANAT access tube 1m / ø44mm ............................................................................................. 13 5.2.4 TECANAT access tube 2m / ø44mm ............................................................................................. 13 5.2.5 TECANAT access tube 3m / ø44mm ............................................................................................. 13 6 Remote Power Supply to TRIME-PICO IPH ............................................................................................. 14 7 The TRIME-PICO IPH Tube Access Probe ................................................................................................ 16 7.1 Introduction ........................................................................................................................................... 16 7.2 Measuring Field ..................................................................................................................................... 16 7.3 Measuring experiences .......................................................................................................................... 18 7.4 Summary ................................................................................................................................................ 19 8 Access Tubes and Augers ......................................................................................................................... 20 9 Instructions for Access Tube Installation.................................................................................................. 21 9.1 Inserting and Fixing the Rubber Bung ................................................................................................... 23 The rubber bung can be pushed into the access tube with the screw- adapter and the handle (the screwadapter can be replaced instead of the screw auger) and can be fixed at the bottom of the access tube with two turns of the handle. If pushing down the rubber bung turns out to be difficult, just apply some talcum powder on the rubber bung sides and into the access tube. ........................................................................... 23 I:\publik\TECH_MAN\PICO_IPH\TRIME-PICO IPH-manual_EN_Vers1_8.doc 3 TRIME®-PICO IPH 9.2 10 10.1 2013-06-26 Inserting TRIME-PICO- IPH into the TECANAT Tube ............................................................................ 24 Basic Calibration with the Calibration Set................................................................................................ 25 What is a basic calibration? .................................................................................................................... 25 10.2 What are the benefits of the calibration set for the user? ..................................................................... 25 10.2.1 Calibration set for TRIME probes................................................................................................... 25 10.3 How to perform basic calibration? ......................................................................................................... 26 10.3.1 Preparation of the glass beads ...................................................................................................... 26 10.3.2 Basic calibration procedure ........................................................................................................... 26 11 Material-Specific Calibration ..................................................................................................................... 28 12 EMV/EMI protection.................................................................................................................................. 29 13 Information on Lightning Protection of the ENVIS Environmental Measurement System (IMP-Bus, GlobeLog Logger and integrated Sensors).............................................................................................. 29 13.1 Introduction ........................................................................................................................................... 29 13.2 Excess voltage protection on 110/220V mains supply .......................................................................... 29 13.3 Protection of modem and telephone lines ............................................................................................ 29 13.4 Excess voltage protection for network modules by "SM-Blitz"............................................................. 29 13.5 Lightning protection on meteorological towers .................................................................................... 29 13.6 Installation instructions for SM BLITZ lightning protection modules ..................................................... 30 13.7 Conclusion ............................................................................................................................................. 30 14 14.1 TRIME-PICO IPH with PICO-BT module ................................................................................................ 31 14.2 TRIME-PICO IPH with TRIME-HD ........................................................................................................... 31 14.3 TRIME-PICO IPH with SM-USB .............................................................................................................. 32 15 4 Configuration examples ............................................................................................................................ 31 Error codes ................................................................................................................................................ 33 15.1 TRIMETOOL Errors (Software errors),which will be coded with 4 digits ............................................. 33 15.2 PICO Errors (Firmware errors). The errors come from the firmware, from 1 to 255 .............................. 34 I:\publik\TECH_MAN\PICO_IPH\TRIME-PICO IPH-manual_EN_Vers1_8.doc TRIME®-PICO IPH 2013-06-26 1 Functional Description TRIME-PICO IPH The intelligent and compact TRIME-PICO IPH sensor is a measurement device for portable and nondestructive determination of volumetric soil moisture in a profile. This system is designed for portable field use. A variety of installation options (tubes are available in 1m, 2m and 3m) offer a wide range of applications. TRIME-PICO IPH can be used in different system configurations with either our display unit TRIMEHD to display the soil moisture value in the field. Alternatively it can be used together with a PDA (with the software PICO-Talk) in combination with the PICO-BT Bluetooth module. This system offers the ability to store the measurements and to handle different sites, sensors and depth. Also you are rid of annoying cables. Your sensor is supplied ready for use and works in a wide range of standard soils. For further information please check the details under Section 6! 1.1 Operation modes The TRIME-PICO IPH is supplied with an RS485 interface and analogue output of 0..1V for soil moisture. The TRIME-PICO IPH can be easily connected to: - PICO-BT Bluetooth module - TRIME-HD analog display unit - GlobeLog (special application in Version IMP-Bus) - Analog-Loggers (special application) A detailed description of how to select a specific operation mode for your application can be found below. PLEASE NOTE: Analogue dataloggers require differential inputs! 1.1.1 Operation mode A (Protocol communication) In the standard version the TRIME-PICO IPH will be delivered with RS485-Interface, as it’s required for the use with the PICO-BT Bluetooth module. If the TRIME-PICO IPH should be connected to the GlobeLog a special version with IMP-Bus has to be ordered. If multiple sensors are to be wired as a network, IMKO offers 3-port, 6-port and 12-port distribution modules (only for IMP-Bus). Please note that the RS485/IMP-Bus cable length and cable diameter must be properly matched as otherwise the energy consumption of the TRIME sensors (100mA @ 12V/DC for 2..3s) may cause a drop in voltage. More information is available in Section 5. For use with: PICO-BT Bluetooth module IMKO calibration and test software TRIME-Tool (see www.imko.de) with converter module SM-USB or PICO-BT module GlobeLogger (Special version with IMP-Bus) EnvisLog (PC-Software for Microsoft Windows) only with converter module SM-USB I:\publik\TECH_MAN\PICO_IPH\TRIME-PICO IPH-manual_EN_Vers1_8.doc 5 TRIME®-PICO IPH 1.1.2 2013-06-26 Operation mode B (Single measurement) The TRIME-PICO IPH will perform a single measurement when the power is switched on. Once the measurement has been taken (2..3s) the readings are supplied as analogue output signals until the power is switched off. The probe switches to the energy-saving mode (>1mA) and takes no more measurements until the power has been switched off. For use with: 1.1.3 TRIME-HD analog display module Analogue data loggers with relay (Special application) PC A/D converter boards with relay (Special application) Operation mode C (Cyclic measurement) TRIME-PICO IPH takes measurements at a freely configurable measurement rate (from 8s..24h). Once the measurements have been taken (2..3s) the measured values are supplied as analogue output signals. Until the next measurement is finished, the values of the previous measurement are available as analogue signal. In standby until the next measurement is executed the probe consumes 8..10mA @ 12V/DC. For use with: Mains power (Special application) Analogue data loggers with mains power (Special application) PC A/D converter boards (Special application) 1.2 External power supply The TRIME-PICO IPH does not contain any kind of power supply, so that it has to be supplied externally. At the portable systems PICO-BT and TRIME-HD this power will be provided by an internally rechargeable battery. If the TRIME-PICO IPH is used with the GlobeLogger it will be supplied by the IMP-Bus. For the use with other stationary systems it has to be ensured, that the TRIME-PICO IPH will be supplied by an external source with 7..24V/DC. 1.3 Installation hints Please assure careful installation of the probes with close contact between tube and soil. It is important to avoid air pockets around the tubes as the highest measuring sensitivity is directly around them. Air pockets around the tube wall can reduce the measured moisture reading. Where saturated soils are involved, water-filled air pockets will result in an exaggerated reading. IMKO supplies drilling equipment for an optimal preparation of the installation point, avoiding air gaps around the tube and compaction of soil. 6 I:\publik\TECH_MAN\PICO_IPH\TRIME-PICO IPH-manual_EN_Vers1_8.doc TRIME®-PICO IPH 2013-06-26 2 Technical Data 2.1 TRIME-PICO IPH For in situ monitoring of volumetric moisture in soils. The large measuring volume is particularly suitable for applications in heterogeneous and skeletal media. Burying capability for both horizontal and vertical orientation. I:\publik\TECH_MAN\PICO_IPH\TRIME-PICO IPH-manual_EN_Vers1_8.doc 7 TRIME®-PICO IPH 8 2013-06-26 I:\publik\TECH_MAN\PICO_IPH\TRIME-PICO IPH-manual_EN_Vers1_8.doc TRIME®-PICO IPH 2013-06-26 3 TRIME-PICO IPH Versions: 3.1 TRIME-PICO IPH cable 3.5m, 7-pin female connector Pin layout: Pin 1: +Vs Pin 2: RS485-B Pin 3: GND Pin 4: RS485-A Pin 5: Not connected Pin 6: Not connected Pin 7: Not connected List of abbreviations: +Vs: + Voltage supply (7..24V/DC) GND: Ground (for voltage supply) AGND: Analogue ground Spare cable, (Item no.: 980174) Sensor Head (Item no.: 300045) Corpus (Item no.: 303001) I:\publik\TECH_MAN\PICO_IPH\TRIME-PICO IPH-manual_EN_Vers1_8.doc 9 TRIME®-PICO IPH 2013-06-26 4 Accessories 4.1 PICO-BT, (Item no.: 300090) For connecting the TRIME-PICO with PICO BT+TRIME-HD cable (see 3.1) to a PDA/PC via Bluetooth interface. Module contains a internal rechargeable battery, which enables >1000 measurements. 4.2 SM-USB (Converter Module), (Item no.: 100020) For connecting any of the TRIME-PICO (adapter required) via the USB-Interface to a PC. The module offers 2 Sensor-Interfaces, IMP-Bus (IMKO specific) and RS485 (industrial standard). One sensor can be powered out of the USB-Interface, if multiple sensors are connected external power supply is required! 10 I:\publik\TECH_MAN\PICO_IPH\TRIME-PICO IPH-manual_EN_Vers1_8.doc 2013-06-26 4.3 TRIME®-PICO IPH Extension cable, (Item no.: 300049) with 1 each 7-pin female and 7-pin male connector, in free configurable length (maximum 35m!!!) 4.4 Analog extension cable, (Item no.: 300102) with a 7-pin male connector and 4 end-splices [for 0-1V analog output and power supply] in free configurable length (maximum 35m!!!) I:\publik\TECH_MAN\PICO_IPH\TRIME-PICO IPH-manual_EN_Vers1_8.doc 11 TRIME®-PICO IPH 2013-06-26 5 Installation details: 5.1 General suggestions: 5.2 Installation equipment: 5.2.1 Auger equipment for ø44mm TECANAT tubes 1 x Support pillar with clamp device (stainless steel), 1 x ramming head with 2 x wing nut (stainless steel), 1 x shock protection Nylon (TecaRIM) for ramming head, 1 x clamp device for rubber bung, 1 x Handle 1m (stainless steel), 1 x Edelman auger Ø 34mm, 1 x inner steel guide for 1m-access tubes (stainless steel), 1 x shock absorbing hammer with nylon heads Item no.: 303021 12 I:\publik\TECH_MAN\PICO_IPH\TRIME-PICO IPH-manual_EN_Vers1_8.doc TRIME®-PICO IPH 2013-06-26 5.2.2 Soil anchor set for auger equipment, 4x soil anchor for fixing the support pillar when installing 2m/3m TECANAT tubes 44mm. Item no.: 302022 5.2.3 TECANAT access tube 1m / ø44mm PC tube 44x42mm with steel cutting shoe 1 x rubber bung 1 x cap 1 x neoprene ring Item no.: 303008 5.2.4 TECANAT access tube 2m / ø44mm PC tube 44x42mm with steel cutting shoe 1 x rubber bung 1 x cap 1 x neoprene ring Item no.: 303010 5.2.5 TECANAT access tube 3m / ø44mm PC tube 44x42mm with steel cutting shoe 1 x rubber bung 1 x cap 1 x neoprene ring Item no.: 303012 For further options and detailed information please contact IMKO, thanks! I:\publik\TECH_MAN\PICO_IPH\TRIME-PICO IPH-manual_EN_Vers1_8.doc 13 TRIME®-PICO IPH 2013-06-26 6 Remote Power Supply to TRIME-PICO IPH The operation of TRIME sensors may cause problems when power has to be supplied via long cables. There are limitations to the maximum cable length depending on the cable diameter. When power is supplied over long distance the maximum cable length depends on the cable cross section A, the supply voltage Vs and the number n of the sensors measuring simultaneously. Devicespecific data also be applied to the formula: Power consumption during measurements: Power consumption at min. voltage: Supply voltage: Minimum sensor voltage at circuit end: Wire cross section: Specific electrical resistance of copper: Number of sensors: Inorm Imax Vs Vmin A n = = = = = = = 100mA @ 12V/DC 175mA @ 7V/DC 12V 7V 0,34mm² 0.0178Ω x mm² / m 1… The maximum possible circuit length Imax can then be calculated in the following manner: lmax A (Vs Vmin ) 2 n I max Please see the following the following example: In the IMP232 environmental measurement system a bus cable with a wire cross section of A = 0.34 mm2 is normally used. We further assume that the power supply voltage is Vs =12 V and only one sensor is designated to measure. Thus n = 1. lmax 0.34mm2 (12V 7V ) 270m mm2 0.0356 1 0.175 A m In the above calculation, no tolerance is included; for security reasons the calculated cable length should be reduced by 10% to obtain a realistic value. In order to increase the maximum possible cable length several solutions are feasible. 14 1. Using cables with larger conductor diameters By using 6-core conductor cables instead of 4-core, the cable length can be doubled as two extra cores can be used for power supply. Cables with conductors of larger diameters will further increase the maximum cable length possible. 2. Increasing the power supply voltage Power supply voltage can be increased up to 17V, thereby raising the maximum length from 270m to 540m in the example calculation above. 3. Installation of buffer batteries in the distributor Additional storage batteries close to the TRIME sensors, e.g. in the distributor, allow cable lengths up to 1km and enable simultaneous measurement of several sensors. However, this method requires an additional charging circuit for the buffer storage battery. 4. Installation of a voltage regulator at the distributor Voltage loss in the cable can be reduced with a 30V power supply and an installation of a voltage regulator directly in front of the TRIME sensor, thus allowing circuit lengths of up to 1km. I:\publik\TECH_MAN\PICO_IPH\TRIME-PICO IPH-manual_EN_Vers1_8.doc 2013-06-26 TRIME®-PICO IPH Which solution is best suited mainly depends on the nature of the power supply of the measurement system: Battery supply: solution 1 and possibly solution 3 should be considered, the latter being relatively expensive. Mains supply: solutions 1 and 2 could be combined, or, more expensive, solutions 2 or 4 could be chosen. I:\publik\TECH_MAN\PICO_IPH\TRIME-PICO IPH-manual_EN_Vers1_8.doc 15 TRIME®-PICO IPH 2013-06-26 7 The TRIME-PICO IPH Tube Access Probe 7.1 Introduction The measuring of soil water content with TDR (Time Domain Reflectometry) is now a well established method. However water content profiling is not possible with conventional TDR rod probes. The TRIME-PICO IPH tube probe was developed for this reason. Since 1994 the TRIME-T3 and the former TRIME-IPH have found numerous applications in earth and environmental sciences, fulfilling even the most exacting requirements. Now the new TRIME-PICO IPH replaces the TRIME-IPH and has new additional features, as the measurement of the temperature and a memory for up to 15 material specific calibrations. 7.2 Measuring Field The effective penetration depth of the probe is about 15 cm with the highest sensitivity in the immediate vicinity of the access tube and decreases exponentially with distance. Figure 1 shows the electric field distribution of the probe and the approximate measuring volume. Figure 1: Electric field distribution of the TRIME probe and approximate measuring volume. The elliptical measuring volume enables a higher representation to be achieved by several measurements rotating the probe after each measurement and calculating the mean value. 16 I:\publik\TECH_MAN\PICO_IPH\TRIME-PICO IPH-manual_EN_Vers1_8.doc 2013-06-26 TRIME®-PICO IPH Note that the necessity of a close contact between access tube and material is essential for reliable measurements and that the tubes should be installed by our recommended method. For example at an assumed water content of 15 vol. % an air gap of 1 mm around the whole length of the tube would result in an underestimation of 1 - 2 vol. %. At a water content of 25 vol. % the error would be 5 vol.-%. At very high water contents (50 vol. %) errors may reach 10 vol. %. In the case of a water filled gap under conditions of saturation the gap error would be much smaller. Problems may arise, however, in very inhomogeneous soils and when drilling under very dry conditions. For these soils other drilling methods are recommended (e. g. pre-boring with an Edelman auger, washing mud into the cavity around the tube). Losses in accuracy then has to be accepted, and measurements immediately after installation are not recommended. Problems can also arise in swelling and shrinking soils, since cracks develop especially along the access tubes. I:\publik\TECH_MAN\PICO_IPH\TRIME-PICO IPH-manual_EN_Vers1_8.doc 17 TRIME®-PICO IPH 7.3 2013-06-26 Measuring experiences The TRIME-Technology was thoroughly tested in the field and compared both to neutron probe measurements and thermo gravimetrically determined values. Figure 2: Comparison of TRIME measurements and gravimetric water content determination for a clayey soil. Figures 5 and 6 show a comparison of water content determinations for a loess and for a heavy clay, made with a neutron probe (Wallingford), the TRIME-T3 probe, and the gravimetric method. In contrast to the neutron probe, which is not suitable for measurements near the surface due to radiation losses to the atmosphere, TRIME has no problem at all to measure directly at the soil surface. Figure 3: 18 Comparison of neutron probe, TRIME-T3 and gravimetric method for water content determinations in a loess soil. I:\publik\TECH_MAN\PICO_IPH\TRIME-PICO IPH-manual_EN_Vers1_8.doc TRIME®-PICO IPH 2013-06-26 Figure 4 : Comparison of neutron probe and TRIME-T3 for water content determinations an illitic clay. Some materials, especially very clayey soils and soils with high organic contents, can afford material specific calibrations due to their different dielectric behaviour. A limiting factor in TDR measuring is the electrical conductivity. For the TRIME-PICO IPH tube probe, the pore water conductivity should not exceed 15 dS/m. Note that bulk soil electrical conductivity is a combination of the pore water electrical conductivity and the surface conductivity of the soil matrix. Due to the tortuous nature of the conductivity path in the soil (soil type dependent), the bulk soil conductivity is much lower than the electrical conductivity of the pore water and it is dependent on water content. 7.4 Summary The TRIME-PICO IPH tube probe is a promising new tool for determining water content profiles with the TDR method. Fast, routine and non destructive measurements of water content without the use of hazardous radioactive materials are possible. A measuring accuracy of 2 vol.-% is possible, provided that soil and access tube are in close contact and pore water conductivity doesn’t exceed 15 dS/m. I:\publik\TECH_MAN\PICO_IPH\TRIME-PICO IPH-manual_EN_Vers1_8.doc 19 TRIME®-PICO IPH 2013-06-26 8 Access Tubes and Augers The penetration depth of the measurement field of the 44mm TRIME tube-access-probe is up to 150mm into the soil. The measurement sensitivity is the highest near the access tube and decreases exponentially into the medium. Therefore the insertion method of the access tube is very important. Pre-boring of bore holes with standard augers destroy the soil texture, because it is difficult to come to a good and close contact of the access tube inside the soil. With the described auger equipment it is possible to set the access tubes directly into homogenous soils without pre-boring. In very stony soils it is not possible to use this method. Therefore it could be possible to use an Edelman-Auger for 20 I:\publik\TECH_MAN\PICO_IPH\TRIME-PICO IPH-manual_EN_Vers1_8.doc 2013-06-26 TRIME®-PICO IPH pre-boring and closing the air gaps with mud. Changes in soil structure, and a delay time (up to 4 weeks) before it is possible to come to precise measurement values must then be accepted. The IMKO auger equipment consists of: access tube support pillar with three soil anchors, ramming head with clamp device, screw auger with handle, clamp device for the rubber bung, and an internal steel guide/protection tube. Deliverable is a small version without soil anchors for setting of glass fibre tubes with 1m length. A steel cutting shoe is glued into the access tube. The screw auger, that moves easily within the guide tube is used to drill out soil to about 0,1m below the cutting shoe. Depending on soil homogeneity, the tube can be hammered 5..10cm into the soil. This cycle is repeated until the tube is fully installed. The internal protection tube is then removed and the access tube can be sealed by a rubber bung. 9 Instructions for Access Tube Installation The following instructions should be taken account of: FixationScrew The ramming head, the TECANAT access tube and the internal steel guide and protection tube are one unit. Ramming Head The internal protection tube has to lie with Clamp Device on the cutting shoe of the access tube, before it can be fixed with a screw to the ramming head. This fixation is necessary to secure the shoe against being squeezed out by the returning force of the hammer-blow. The access tube, however, is fixed to Pull for best the ramming head by the clamp device. position Both fixation screw and clamp device should be controlled during the installation process and be re-adjusted with the adjustable levers if necessary. The screw auger, that moves easily within the guide tube is used to drill out soil to about 0,1m below the cutting shoe. Depending on soil homogeneity, the tube is then hammered 5-10 cm into the soil with a plastic hammer (with open support pillar clamps!). The guide tube is not used for making the hole in the first instance because this could result in soil compaction around the hole, which would lead to higher measurement values. The access tube support pillar with three ground anchors avoids vibrations that would cause air gaps. Then the clamp of the support pillar must be closed and the soil can be removed with the screw auger. When the tube I:\publik\TECH_MAN\PICO_IPH\TRIME-PICO IPH-manual_EN_Vers1_8.doc 21 TRIME®-PICO IPH 2013-06-26 reach the support pillar, it must be removed and the access tube can be inserted to the final depth without the support pillar. A plastic collar should be mounted around the tube to prevent water from running down the tube wall and a plastic cap to protect the tube against rain. 22 I:\publik\TECH_MAN\PICO_IPH\TRIME-PICO IPH-manual_EN_Vers1_8.doc TRIME®-PICO IPH 2013-06-26 9.1 Inserting and Fixing the Rubber Bung 1. Orient the rubber bung with the black rubber washer downwards. 2. Insert the rubber bung into the TECANAT tube. 3. Let it glide down or push to the bottom of the tube. Black washer downwards! → 4. Fix the rubber bung with the screwing adaptor. The rubber bung can be pushed into the access tube with the screw- adapter and the handle (the screw-adapter can be replaced instead of the screw auger) and can be fixed at the bottom of the access tube with two turns of the handle. If pushing down the rubber bung turns out to be difficult, just apply some talcum powder on the rubber bung sides and into the access tube. I:\publik\TECH_MAN\PICO_IPH\TRIME-PICO IPH-manual_EN_Vers1_8.doc 23 TRIME®-PICO IPH 9.2 2013-06-26 Inserting TRIME-PICO- IPH into the TECANAT Tube When you are going to work with your TRIME-T3 tube access probe: Press the spring mounted wave-guides to the probe body when you insert the T3 probe into the tube. Thereby you avoid ripping off the spring mounted wave-guides. Depth markers (see picture right) are fixed along the cable in 1m steps from the measurement centre. The marker ears are positioned in direction of the oriented measurement field (see p.7) Please note Should you use new T3 probes (eight wave-guiding plates instead of two) in old GFK tubes, we advice to carefully chamfer the inner top side of the GFK tube. Thereby you avoid ripping off the spring mounted wave-guides. 24 I:\publik\TECH_MAN\PICO_IPH\TRIME-PICO IPH-manual_EN_Vers1_8.doc TRIME®-PICO IPH 2013-06-26 10Basic Calibration with the Calibration Set 10.1 What is a basic calibration? Basic calibration serves to compensate the cable length and tolerances of the probe mechanics (thickness of the rod coating, rod length, etc.). After two measurements, one in dry and one in water- saturated glass beads, the calibration data is calculated and stored in the TRIME sensor. Every TRIME-PICO IPH sensor must be calibrated before it can supply proper measurement results. Basic calibration is carried out by IMKO in the factory prior to shipment. 10.2 What are the benefits of the calibration set for the user? With the calibration set you can easily carry out basic calibration of your TRIME sensor yourself. If defective probe rods must be changed, you can perform the required basic calibration yourself. The calibration set cannot be used for establishing a material (soil) specific calibration. For this purpose a measurement dataset must be created for the specific material. The complementary calibration program TRIME-Tool is required to calculate the calibration data for this dataset and to download it to the TRIME-PICO-Probe. 10.2.1 Calibration set for TRIME probes For basic calibration of TRIME probes. - 2 x boxes (7 litres.) - 22kg glass beads Item no.: 305017 I:\publik\TECH_MAN\PICO_IPH\TRIME-PICO IPH-manual_EN_Vers1_8.doc 25 TRIME®-PICO IPH 10.3 How to perform basic calibration? 10.3.1 Preparation of the glass beads 2013-06-26 The glass beads, supplied with the calibration set, have to be prepared first: Fill up one bucket until the rods of the probe can be immersed completely. To obtain a consistent density, knock the bucket on the ground several times. The density of the glass beads increases with frequent insertion of probes. Therefore the glass beads should be poured out into another bucket and poured back to achieve the original density. Now the second bucket has to be filled with water in order to be able to fill in the glass beads without leaving air-bubbles. An additional precaution against air-bubbles is to stir slightly while filling in the glass beads. The container must now be knocked on the ground several times to obtain a consistent density. The surplus water must be poured out until the depth of the water film above the glass beads is less than 2mm. The water-saturated glass beads should be in a temperature range between 20°C and 25°. Attention: Water dissolves Na2O and K2O from glass which causes a rising pH-value and higher electrical conductivity. New glass beads have to be washed intensively with tap water!!! 1. Fill a bucket with water 2. Stir the beads under water to drive out all air bubbles 3. Pour out the water. This procedure should be done with new glass beads at least five times, each time with fresh water. If the glass beads have been in use for a prolonged period, three times is sufficient. Please note that the electrical conductivity of the water-saturated glass beads medium increases already after a few days storage. Therefore the glass beads must be washed again before the next calibration. 10.3.2 Basic calibration procedure Basic calibration must be performed using the calibration program TRIME-Tool . Please read the information about basic calibration with TRIME-Tool in the Help function of the TRIMETool software. 26 I:\publik\TECH_MAN\PICO_IPH\TRIME-PICO IPH-manual_EN_Vers1_8.doc 2013-06-26 TRIME®-PICO IPH Figure: TRIME-PICO IPH with T3/44mm probe head, while putting it into the Tecanat calibration tube for the basic alignment. Take care, that the wave guides of the T3/44mm has to be covered by glass beads completely! The basic alignment will fail if the wave guides are partly in air! I:\publik\TECH_MAN\PICO_IPH\TRIME-PICO IPH-manual_EN_Vers1_8.doc 27 TRIME®-PICO IPH 2013-06-26 11 Material-Specific Calibration Your TRIME measuring system operates with a universal calibration for mineral soils as a standard. The following parameters limit the application range of the universal calibration: Clay content: >50% Organic content: >10% Bulk density: <1.1kg/dm³ or >1.7kg/dm³ Exceeding these limits may cause the tolerances given on page 5 to be overstepped. Material-specific calibration is advisable if your soil is listed above or if you require accuracy down to the last digit. The TRIME-Tool software is required for setting up a material-specific calibration (download under www.imko.de). A test series with reference values is necessary for performing material-specific calibration (e.g. Oven drying at 105°C until weight is constant). The test series –and consequently the calibration– should include minimum and maximum moisture values. TRIME readings and reference values are compared in a table. The calibration coefficients must then be calculated and uploaded to the TRIME-device. 28 I:\publik\TECH_MAN\PICO_IPH\TRIME-PICO IPH-manual_EN_Vers1_8.doc TRIME®-PICO IPH 2013-06-26 12 EMV/EMI protection EMV/EMI protection using ferrite filters ensures better interference suppression and therefore improves measurement accuracy. Ferrite filters are integrated into the TRIME sensor and at the connector end of the sensor cable. 13 Information on Lightning Protection of the ENVIS Environmental Measurement System (IMP-Bus, GlobeLog Logger and integrated Sensors) 13.1 Introduction Lightning strikes can cause considerable and costly damage to unprotected electronics. The equipment is often totally destroyed. A good number of users are not or only partially insured. Customers who have lightning protection insurance must comply with defined clauses regarding lightning and excess voltage. Insurance companies only cover the damage when compliance with the defined clauses has been proven. IMKO strongly recommends adequate lightning / excess voltage protection equipment for ENVIS environmental measurement systems. 13.2 Excess voltage protection on 110/220V mains supply Lightning strikes in proximity to high-voltage transmission lines can cause excess voltage in the mains power supply which may result in damage of electronic components. Environmental measurement systems with 110/220V mains supply are at risk from this excess voltage. It may affect the whole system through the power supply unit and the central station (GlobeLog Logger or SM-23U). Excess voltage can even enter the measuring system through the data acquisition computer’s mains power supply. An excess voltage protection is highly recommended for all 110/220V devices connected to the ENVIS system. 13.3 Protection of modem and telephone lines Telephone lines are at risk from excess voltage. If a modem is connected to the measurement system the telephone line should also be protected by a lightning protection module. 13.4 Excess voltage protection for network modules by "SM-Blitz" Excess voltage caused by lightning strokes in close proximity to the environmental measurement test system may enter the IMP-Bus transmission lines. Longer lines increase the risk of lightning strikes. Theoretically maximum protection is achieved by installation of a lightning protection module (SMBlitz) in front of each SM-Module. Lightning protection is not cheap but it is certainly worthwhile. A compromise should be found between costs and the maximum-affordable protection, i.e. interconnection of adjacent SM-Modules to lightning protected groups. 13.5 Lightning protection on meteorological towers SM-Modules installed on meteorological towers cannot be protected from lightning strikes. The field strength resulting from the electromagnetic fields and the associated accumulated energy will cause damage to the electronics. Two solutions to the problem: Erect a higher lightning conductor close to the meteorological tower serving as a lightning conductor. I:\publik\TECH_MAN\PICO_IPH\TRIME-PICO IPH-manual_EN_Vers1_8.doc 29 TRIME®-PICO IPH 2013-06-26 Install the measuring modules a number of metres away. Then all lines coming from the tower have to be protected by lightning protection modules. 13.6 Installation instructions for SM BLITZ lightning protection modules Basically, there are two potential sources of risk in the field of environmental measurement technology: transmission lines and sensors or network devices. Lightning protection modules should always be installed at the beginning and at the end of a circuit in order to protect the electronics from excess voltage (Attention: SM-Blitz modules have a protected and an unprotected side). The SM-BLITZ lightning protection module has to be grounded using a ground conductor with a wire cross- section of at least 6 mm2 screwed to the long side of the module. A 2-metre long grounding rod may serve as a ground conductor. Grounding is optimal when the grounding rod is in direct contact with ground water. 13.7 Conclusion Only limited protection against excess voltage is possible where natural phenomenon such as lightning strikes are concerned. Direct lightning strikes may cause damage nevertheless. If you have any questions regarding lightning protection please do not hesitate to contact us. Tel.: 0049 - (0)7243 - 5921-0 Fax: 0049 - (0)7243 – 90856 e-mail: [email protected] 30 I:\publik\TECH_MAN\PICO_IPH\TRIME-PICO IPH-manual_EN_Vers1_8.doc 2013-06-26 TRIME®-PICO IPH 14 Configuration examples 14.1 TRIME-PICO IPH with PICO-BT module 14.2 TRIME-PICO IPH with HD2 I:\publik\TECH_MAN\PICO_IPH\TRIME-PICO IPH-manual_EN_Vers1_8.doc 31 TRIME®-PICO IPH 14.3 32 2013-06-26 TRIME-PICO IPH with SM-USB I:\publik\TECH_MAN\PICO_IPH\TRIME-PICO IPH-manual_EN_Vers1_8.doc TRIME®-PICO IPH 2013-06-26 15 Error codes 15.1 TRIMETOOL Errors (Software errors),which will be coded with 4 digits Code Explanation Measurement 0101-0108, Serial Port errors Check port's setting or if the port has been opened. Then close and restart the program. 0201 No answer Check the power of Pico, the serial port of PC and the connection between PC and PICO. 0202-0212 Protocol errors Check if TRIMETool’s version passes PICO’s version. 0302-0307 Protocol error, Parameter setting false Check if parameters are correct and if TRIMETool’s version passes PICO’s version. 0401 Can not find config file TRIMETool.con Look for the file in the exe path. If not found, copy the file to the path. 0501-0508 Errors in Event & MeasureMode Restart PICO and TRIMETool 0601,0602,0604, Operation errors in Basic Balancing Operate correctly and try it again. Communication or protocol errors in Basic Balancing Restart PICO and TRIMETool. 0701,0702 Read file errors in Material Property Calibration Check if the files are in the required path. If not, copy the files to the path or redefine the path under the menu Bus/Configuration/Material Property Calibration. 0703 Operation errors in Material Property Calibration Operate correctly and try it again. 0704, 0705,0706 Communication or protocol errors in Material Property Calibration Restart PICO and TRIMETool. 0801-0805,0901 Operation errors in Operate correctly and try it 0301 0605,0606,0607, 0609 0603,0608,0610, 0611 I:\publik\TECH_MAN\PICO_IPH\TRIME-PICO IPH-manual_EN_Vers1_8.doc 33 TRIME®-PICO IPH Calibration IDs and Names again. 1001,1101,1102 Read file errors in Calibration IDs and Names Check if the files are in the required path. If not, copy the files to the path or redefine the path under the menu Bus/Configuration/Material Property Calibration. 1201, 1203 Operation errors in Test Operate correctly and try it again. 1202 Communication or protocol errors in Test Restart PICO and TRIMETool. 1301 Write file error in Test Check file path and try it again. If failed, restart TRIMETool. 4001-4002, Read file or write file errors Check the files and try again. Intenal calculating errors Restart TRIMETool and try again.Otherwise contact IMKO. 4101-4106,4201 4301-4303 15.2 34 2013-06-26 PICO Errors (Firmware errors). The errors come from the firmware, from 1 to 255 Code Explanation Measurement 1-19 The serial communication errors due to Power off, power on PICO and try it again. incorrect telegram, baud rate, timing Otherwise contact IMKO. etc. 20-39 incorrect command number, command right or command parameters. Power off, power on PICO and try it again. Otherwise contact IMKO. 40-49 EEPROM is defect Power off, power on PICO and try it again. Otherwise contact IMKO. 50-59 ASIC is defect Power off, power on PICO and try it again. Otherwise contact IMKO. 60 Power voltage is too low Check power voltage of PICO, it is minimal 6V. 100 TDR measurement parameter is incor- Adjust the TDR measurement parameters rectly set or the material conductivity is or contact IMKO too high. 101 TDR measurement parameter is incorrectly set Adjust the TDR measurement parameters or contact IMKO 102 ASIC is defect Power off, power on PICO and try it again. Otherwise contact IMKO. I:\publik\TECH_MAN\PICO_IPH\TRIME-PICO IPH-manual_EN_Vers1_8.doc TRIME®-PICO IPH 2013-06-26 103 EC parameter is incorrectly set. Power off, power on PICO and try it again. Otherwise contact IMKO. 105 Tp is out of range for the standard calibration polynomial. Check if PICO is inserted in the measured material correctly. 108 TDR measurement parameter is incor- Adjust the TDR measurement parameters rectly set or the material conductivity is or contact IMKO too high. 120-129 Internal chip problem Power off, power on PICO and try it again. Otherwise contact IMKO. 130-199 Internal errors Contact IMKO 200-254 Reserved 255 The data transmission is not finished. I:\publik\TECH_MAN\PICO_IPH\TRIME-PICO IPH-manual_EN_Vers1_8.doc 35 Precise Moisture Measurement in hydrology, forestry, agriculture, environmental and earth science, civil engineering, as well as individual applications!