1
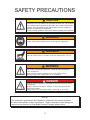
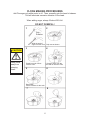
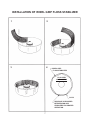
Econo-Floss / Mega-Floss
Instruction Manual
SAFETY PRECAUTIONS
! CAUTION
▲
This equipment is designed and sold for commercial use only. This
equipment is not to be used by the consumer in home use. Do not allow
direct contact of this equipment by the public when used in food service
locations. Only personnel trained and experienced in the equipment
operation may operate this equipment.
Carefully read all installation instructions before operating the equipment.
! WARNING
▲
Always wear safety glasses when servicing this equipment.
! WARNING
▲
To avoid serious burns, do NOT touch the kettle while it is hot.
! WARNING
▲
Any alterations to this equipment will void the warranty and
may cause a dangerous situation. NEVER make alterations
to the equipment.
Make sure all machine switches are in the OFF position
before plugging the equipment into a receptacle.
! DANGER
▲
Machine must be properly grounded to prevent electrical shock
to personnel.
Do NOT immerse the kettle, warmer, or any other part of this
equipment in water.
Always unplug the equipment before cleaning or servicing.
NOTE
The information, specifications and illustrations contained in this manual represent
the latest data available at time of publication. Right is reserved to make changes as
required at the discretion of Gold Medal Products Company without notice.
2
INSTALLATION INSTRUCTIONS
CHECKING UNIT
Check thoroughly for any damage which may have occured in transit. NOTE: Before
plugging in the cotton candy machine, the shipping bracket must be lowered.
This can be done easily by turning the two knobs on each side of the cabinet top then
pushing the knobs down to assure that the bracket is completely lowered. This will
allow the bell housing to float freely on the springs.
LOCATION
Place the ECONO-FLOSS / MEGA-FLOSS MACHINE onto the cart or table. Ventila
tion around the machine is important to insure proper operation. Be sure to allow a
minimum of six inches around each side vent. Do not remove the rubber feet.
Wash the floss pan thoroughly with soap and water. Install Floss Stabilizer on floss
pan (See diagram, page 7). Then put pan on the machine with the floss head extend
ing up through the center of the pan.
As a last precaution before plugging in the machine, look inside the
head assembly and make sure the floss ribbon (heating element)
has not shaken out of the band during transportation. If the ribbon
is out of the band, push it back into place with the index finger.
ELECTRICAL REQUIREMENTS
The GOLD MEDAL ECONO-FLOSS / MEGA-FLOSS MACHINE is
ready to plug into a 15 amp, 120 volt, 60 cycle standard wall recep
tacle. Maximum amp draw for the unit at 120 volts is 9 amperes.
NOTE: This figure is an approximation and may vary slightly. An
overloaded electric circuit will not allow the ECONO-FLOSS /
MEGA-FLOSS to make cotton candy.
FLOATER ADJUSTMENT
Form leather floaters as shown.
This creates a lifting action to
float the floss across the gap to
the side of the floss pan.
ROTATION
Leather
Floater
3
! DANGER
▲
You must have
the floss
machine
grounded! No
exceptions!!!
OPERATING INSTRUCTIONS
CONTROLS AND THEIR FUNCTIONS
MAIN SWITCH
Turns motor on or off and supplies current to the heat switch.
HEAT SWITCH
Turns current to the ribbon on or off.
HEAT CONTROL
This rheostat increases or decreases voltage to ribbon wire heating element graduation. All rheostat settings are at line voltage or below.
MACHINE OPERATION
1. Plug in floss machine.
2. Without motor running, fill floss head about 90% full with sugar. DO NOT OVERFILL! When
ever you add sugar to the floss head, always fill it about 90% full. This is necessary to obtain
a balanced condition in the floss head or excessive vibration will occur. NEVER ADD SUGAR
WHEN MOTOR IS RUNNING. After adding FLOSSUGAR you may turn motor back “ON”.
3. Turn MAIN SWITCH and HEAT SWITCH to “ON” position to make cotton candy floss.
4. Turn heat control knob in the clockwise position to maximum setting. This setting will produce
the fastest possible warm up.
5. The machine should begin to make floss in a few seconds. When the unit gets up to heat, it
will probably start to smoke. Just turn the heat control knob in the counter clockwise direction
to eliminate the smoking.
6. Once you find the ideal setting for the HEAT CONTROL, you should be able to operate near
this position each time.
7. Read the section in this manual on MAKING FLOSS before going into full production.
! CAUTION
▲
Never operate equipment for a prolonged period of time with the HEAT
CONTROL in a position that causes the sugar to smoke. This will result
in excessive carbonization of the ribbon (heat element). If you smell
burning sugar or see smoke, reduce the heat.
! WARNING
▲
Keep foreign objects out of the head.
Floss head rotates at 3450 r.p.m. Operator must keep hands and face
clear of head and keep spectators at a reasonable distance.
For safety, always us a floss bubble.
4
MAKING FLOSS
1. The WHIRL GRIP FLOSS STABILIZER works effectively to prevent floss from leaving the pan.
See illustration on page 7 which shows proper installation of the WHIRL GRIP FLOSS STABILIZER.
2. Plug in your machine and operate controls as described under OPERATING INSTRUCTIONS.
3. In operation the floss will collect on the FLOSS STABILIZER.
4. If the floss collects “low” on the stabilizer, twist the leading edge of the leather floaters down.
You get more lift and the floss will collect hotter. A little practice should give you good control
in any climatic condition.
5. TO PICK UP FLOSS: See diagrams on page 6. Anyone can be an expert at rolling the web of
cotton candy onto the cone. First, pick up the cone - if it sticks int he stack of cones, do not
“pull”, rather “twist” it off the stack.
Hold an inch or two of the pointed end of the cone between your two fingers and your thumb.
With a light flicking action, break the web of floss that is building up in the pan and roll onto cone.
Lift up the cone with the ring of floss attached and – by rotating the cone – roll the floss onto it.
DO NOT ROLL FLOSS ONTO THE CONE WHILE IT IS INSIDE THE PAN. This will just pack the
floss onto the cone. For additional help, see illustrations on page 6. PRACTICE MAKES
PERFECT.
If you experienced difficulty in getting the floss to stick to the cone, it will be helpful to pass the
cone near the spinner head to pick up a “starter” of melted sugar. Many operators prefer to lift the
ring out of the pan and – with a flick of the wrist – turn the ring into a figure eight and whip it
around the cone. This leaves giant pockets and makes it appear that you are serving a larger
portion.
6. When stopping operation for the day or any prolonged period, it is good to run all the sugar
out of the floss head. When empty, turn the heat to the highest position for approximately one
minute to somewhat “clean” the band. NEVER ALLOW WATER TO ENTER THE FLOSS
HEAD.
The easiest way to make sure you have the right sugar and proper flavor and colors is to use
GOLD MEDAL FLOSSUGAR> FLOSSUGAR gives you good rich colors and flavors, and does not
exceed the color limitations imposed by the Food and Drug Administration. FLOSSUGAR comes
in sealed plastic coated cartons with handy pouring spouts for filling the floss machine head. If
you do not wish to use PRE-MIXED products, then we suggest you mix your own by using our
FLOSSINE and your sugar. Follow the directions on the can and mix well. Dampening the sugar
at the rate of about one tablespoon of water to five pounds of sugar will bring out the colors much
brighter. DO NOT USE EXCESS COLOR – USING MORE COLOR THAN RECOMMENDED WILL
NOT DEEPEN THE COLOR OF YOUR FLOSS – THERE IS A LIMIT TO HOW DARK YOU CAN
MAKE FLOSS SINCE IT IS 98% AIR. If you use your own flavors in cotton candy, make sure they
are not of a gum or starch base – these items burn on the ribbons.
5
FLOSS MAKING PROCEDURES
Add Flossugar only while motor is off. Then, manually spin the head to balance.
This will eliminate excessive vibration of the head.
When adding sugar, always fill about 90% full.
DO NOT OVERFILL!
1
2
Grip Rotation
Wind the web of
Grip cone as shown.
sugar onto the cone.
! CAUTION
▲
Keep hands
away from
spinning
head!
3
4
Break into web of floss
with the cone.
Lift web of floss from the
pan and roll onto the cone.
5
6
Remember:
Let the machine do the work.
7
8
6
INSTALLATION OF WHIRL GRIP FLOSS STABILIZER
1
2
3
4
WHIRL GRIP
FLOSS STABILIZER
PLAN VIEW
OF FLOSS PAN
CLIPS
AIR SPACE IS REQUIRED
BETWEEN PAN AND
STABILIZER FOR PROPER
OPERATION.
7
BAGGING COTTON CANDY
How to get a really big one in the bag !
1.
2.
3.
4.
Make it big and fairly firm.
Hold bag open with one hand while grasping cotton candy cone with other hand.
Twist the serving down into bag.
Twist the bag with cone and floss inside, tie and display.
FOR MAXIMUM SALES
Change colors every 10 - 25 cones. Keep your display full at all times. Always use Gold Medal Flossugar.
Auto. floss bagger
Rotation
Floss bag
8