1
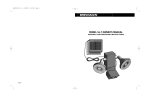
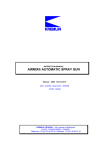
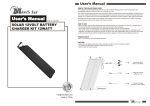
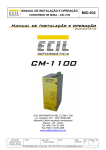
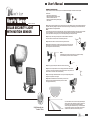
User’s Manual
ASSEMBLY INSTRUCTIONS
Inspect contents of the box to ensure all parts are included and undamaged. A screwdriver will be required.
b
d
Model no.: MS-7303
Step 1 Select a location and attach the main housing where you want to detect persons or moving objects. Ideal places
are patios, side doors, garages and pool area. Mount the main housing 6 to 8 feet above ground on a solid surface for
best motion detection and light distribution.
NOTE:
a)Do not place the main housing in high traffic areas. Doing so will discharge the battery quickly and unit will shut down
until it is recharged by the sun. Aim to motion detector away from streets, busy walk areas, trees and bushes.
b)Aim to place the main housing away from rain and water (excluding the solar panel module).
SOLAR SECURITY LIGHT
WITH MOTION SENSOR
Step 2 Fix 2pcs main housing mounting screws on the solid wall or solid surface.
The screw heads must stand out from the surface by about 6mm.
Step 3 Slide the two slots in the back of main housing onto the screws.
Step 4 Select a location within 4 metres from the main housing to mount the solar
panel module. The solar panel module must be mounted where it will receive full
direct sunlight for several hours each day.
NOTE:
Shaded areas will not allow the solar panel to fully charge the battery.
This will drastically reduce the number of activations
Step 5 Firmly plug the solar panel module cord into the main housing
W
Step 6 Aim the solar panel toward the south, facing upward at about 3base allows
mounting on most vertical, horizontal or sloping surface such as a wall, post or roof.
Excess cord can be tucked under the base securely.
N
S
E
30。?
Step 7 Point the light in the desired direction. You may want to adjust the light after
letting the unit operate for a few nights.
Step 8 Position the detector head in the direction you want to cover.
Never aim the motion detector head directly at the sun or above
a 90。angle (horizontal level).
Motion Detector
Head
18
0。
G
?M
RA
OT
VE
ION
DETECTOR CO
E
User’s Manual
c
PARTS LIST:
a. Home Security Main Housing
b. Main Housing Mounting Screws (2pcs)
c. Solar Panel module with Cord
d. Solar Panel module Mounting Screws(3pcs)
e. User Manual
90。?
[email protected]
made in China
10 metres
The motion detector covers an area of 180。approximately 10
metres unless its view is blocked by a stationary object such
as a building or tree. The higher the motion detector is
mounted, the greater the effective range. The motion detector
is most sensitive to persons or warm objects moving across
its detection zone, rather than toward or away from it.
User’s Manual
User’s Manual
TESTING INSTRUCTIONS
WINTER TIME TIPS
Step 1 After installing your light, leave the switch in the "1" position and charge at least 6 hours continually in full,
direct sunlight.
1. Clean snow and debris off the solar panel module, so that the battery can be recharged.
2. Check and replace battery periodically throughout the year, especially after winter months.
Note: "0" stands for "OFF" , "1" stands for " ON" and "Recharge on".
TROUBLESHOOTING & IMPORTANT INFORMATION
Step 2 After fully charged, the motion detector can be adjusted and tested. Point the motion detector head down 15。from
horizontal level.
If lights blink on and off:
• Direct lamps away from detector or reposition detector.
• Remove heat sources located near or under detector.
• Direct detector away from streets or active sidewalks.
• Battery is weak. Recharge the battery or replace the battery.
Motion Detector Adjustment
1. There are 3 adjustable knobs under the detector. "Time","Sens", "Lux".
Time Sens
Lux
2. Time Setting: 10”5 seconds to 4”1 minutes adjustable. The longer time setting ,
the longer lighting hours will be. "」ォ" stands for the long time setting, "」ュ"stands
for short time setting.
3. Sensitivity Distance: 0 ~ 10 metres. "」ォ" stands for the long distance setting, "」ュ"stands for short distance setting.
4. Lux control :The security light not only can light up at nighttime, but also can light up in daytime . When controller
set close to "
", it will detect and light on day, otherwise,
close to " ", it will detect and light up on night (can be adjustable).
Changing Batteries
1. Unscrew the four screws at the back of the cover and 2 screws which tight the motion detector and the front cover.
2. Remove the battery from rear housing, being careful not to pull on wires.
3. Disconnect wires from battery terminals and remove battery.
4. Connect wires to new battery terminals. Make sure red (+) wire is connected to red (+) terminal and black (-) wire is
connected to black (-) terminal.
5. Place new battery in rear housing
6. Attach the front housing to rear housing and tighten the screws.
Note: Please make sure to charge the new battery at least 6 hours continually for the direct sunlight for the first use.
Wire Connector
Terminal
IMPORTANT: The sealed battery in this product contains lead and must be recycled or disposed of properly. For
additional information regarding disposal, contact your local solid waste authority.
CLEANING
It is important that the solar panel module is kept free of dirt and debris. A dirty solar panel will not allow the battery to be
fully charged. This will shorten the life of the battery and cause the light to malfunction. Clean regularly with a dampened
cloth or paper towel.
STORAGE
Solar security lights can be left outside year round, even in cold weather. However, if you wish to store your light and Solar
Panel module indoors for more than two or three days, follow these steps to prevent damage to battery:
1. Turn the switch to "0" position. Store at room temperature in a dry area.
2. Never store the whole unit with switch in "1" position. This will damage the battery and it will discharge the battery.
3. During prolonged storage, unit must be fully charged once every four months. You may need to replace the battery after
prolonged storage.
4. For best performance, do not store for prolonged periods.
If lights do not turn on:
• Make sure the switch is in the "1" position.
• Make sure the solar panel module cord is plugged firmly into main housing. The battery will not be able to be charged if
this connection is loose.
• Battery is not fully charged or needs replacement:
a) Make sure light is located in an area where the solar panel gets the maximum amount of full, direct sunlight
every day.
b) If the weather has been cloudy or overcast during the day, the battery will not be charged for operation. If the solar
panel module does not receive enough sunlight one day, it will recharge the battery next sunny day and resume
normal operation.
c) Diminishing light or gradual decrease in number of activations indicate a dying battery that requires
replacement. Replacement battery may be purchased
from The GRANDSOLAR local agents.
• Dirty Solar Panel. A dirtly solar panel will not allow the battery to be fully charged. This will shorten battery life. Clean
regularly with a dampened cloth or paper towel.
If lights come on randomly:
• Aim motion detector head lower
• Cover areas which may be reflecting signals to motion sensor such as: cooling or heating ducts, reflective
surfaces, metal sheds, smooth walls or windows, etc.
• Mount your motion detector on a firm surface as vibrations can false trigger the unit.
• Aim detector away from busy streets or sidewalks, trees and bushes.
If range is too short or too long:
• Position your motion detector, so that movement is across detection zone.
• Aim the detector upward to increase range or downward to decrease range.
NOTE:After installing the main housing and solar panel module, leave the switch in the "1" position and charge AT LEAST
6 HOURS CONTINUALLY IN DIRECT SUNLIGHT. The light will turn on automatically when it detects motion.
CAUTION:Do not use any other battery size or type. It will damage the unit and void the warranty. Do not attempt to open
the detector housing. There are no user serviceable parts inside.