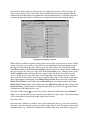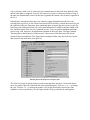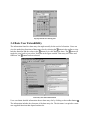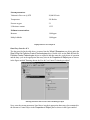
1
Air Compliance Advisor User Guide Version 7.1 US EPA Office of Air Quality Planning and Standards (OAQPS) Innovative Strategies and Economics Group (ISEG) OAQPS/ISEG MD-15 RTP NC 27711 Copyright 2000 Disclaimer of Warranty THIS SOFTWARE AND THE ACCOMPANYING FILES ARE PROVIDED "AS IS" AND WITHOUT WARRANTIES AS TO PERFORMANCE OR MERCHANTABILITY OR ANY OTHER WARRANTIES WHETHER EXPRESSED OR IMPLIED. The user assumes the entire risk of using this program. This software program was prepared as an account of work sponsored by an agency of the United States Government. Neither the United States Government nor any agency thereof, nor the University of Chicago, nor the University of Illinois, nor Wasmer Consulting, nor D & E Technical, nor any of their employees or officials, makes any warranty, expressed or implied, or assumes any legal liability or responsibility for the accuracy, completeness, or usefulness of any information, apparatus, product, or process disclosed, or represents that its use would not infringe privately owned rights. Reference herein to any specific commercial product, process, or service by trade name, trademark, manufacturer, or otherwise, does not necessarily constitute or imply its endorsement, recommendation, or favoring by the United States Government or any agency thereof. The view and opinions of authors expressed herein do not necessarily state or reflect those of the United States Government or any agency thereof. 1. Introduction 1.1 Background The Air Compliance Advisor (ACA) is a software tool designed to assist on-site air pollution managers in developing strategies for addressing air pollution compliance issues. The ACA utilizes source characterization, emission reduction techniques, permit requirements, and existing air pollution regulations. Results from the multiple analyses that the ACA can perform are presented in a concise, non-biased manner. These results can be used by air pollution managers to address the requirements of the 1990 Clean Air Act Amendments, including: • Title I (Attainment and Non-attainment) • Title III (Hazardous Air Pollutants) • Title V (Permits) • and other environmental programs and policies. The ACA is a joint project between Argonne National Laboratory, the University of Illinois, and the US Army (Corps of Engineers) Construction Engineering Research Laboratory (USACERL). The work is sponsored by USACERL, the US Air Force Environics Directorate of Armstrong Laboratory (AL/EQS), the US Army Center for Public Works (CPW), the Strategic Environmental Research and Development Program (SERDP), and the US Environmental Protection Agency (USEPA). 1.2 New Features in Version 7.0 & 7.1 of the ACA This release, Version 7.1 of the ACA, is the third full public release of this program. Users of any of the Version 6 releases will find a number of changes, including: • Wizards • Formatted Reports • Ability to Copy and Paste Objects • Ability to Export Data in Pieces • Ability to Import Data Objects • Sort/Reorganize Slots Based Upon User Preferences • Capability to Merge Multiple Pollutant Streams The information contained in Appendix B Tips on Obtaining and Estimating Chemical Property Data and Appendix D: Generating an ACA Control Device Report from the Command Line is also new from Version 6 of the ACA. Wizards to Streamline the Data Entry Process Wizards are now available to streamline the data entry process for three of the most common applications of the ACA: (1) adding volatile organic compounds (VOCs) to the Chemical Database, (2) adding particulate matter (PM) pollutants to the Chemical Database, and (3) entering the data required to evaluate air pollution control technologies. The Wizards greatly simplify data entry by providing easy-to-follow data forms with associated help. Example values are available for some of the data entry cells in order to further assist the user. All three Wizards are available from the main menu options titled Wizards. See Section 5 for more details. Formatted reports The output reports of the ACA are now formatted and can be exported to HTML (for web page) or HTML (for word processor input) formats by selecting File | Export | Report . Ability to Copy and Paste Objects In Version 7.1, users are now able to copy any object in the ACA using either the Edit|Copy menu or using the copy toolbar shortcut . Once an object has been copied, it will reside on the clipboard of the user's computer. The copied object can be pasted to an appropriate location in an ACA data structure either in the ACA file it was cut from or by opening a different ACA file and pasting there. Pasting an object is accomplished by first selecting an appropriate location to add the object contained on the clipboard (note that an object can only be placed in a location that allows for that type of object. If the user is not sure what the object is, they can always save the object in the Library Data | Miscellaneous Objects Library, which can accept any object type, and then they can move the object from there as needed). Next, the user will need to select the Edit|Paste menu option or use the paste toolbar shortcut . Ability to Export Data in Pieces In Version 7.1, users are now able to save objects (e.g., the ACA Library, a chemical object, a control device) to an external file. The external file will exist in standard ASCII formatted OXL format. Previous versions of the ACA only allowed the user to save the entire data set (i.e., all of the library data, all of the installation data and all of the What-if Scenarios data), which also included any user-supplied data (e.g., emission units at the installation). Saving a portion of the data (i.e., a data object) can be done by selecting the object to export in the EXLGUI Standard View, then selecting File|Export|Object. The user will then be directed to select a filename for the data. Note that export works like clipboard copy. That is, first you select the object to export or copy, then choose export or copy from the menu. Ability to Import Data Objects In Version 7.1, users are now able to import an object from an external file (e.g., an object saved via the Export feature). In order to import an object, the user will first have to select either a valid object slot (to replace) or a valid list of objects from the ACA's Standard View. Next, the user will have to select File|Import|Object. The user will then be presented with an Open File view that will allow them to select the filename that contains the data of interest. An object can only be placed in a location that allows for that type of object. Note, if the user is not sure what the object is, they can always save the object in the Library Data | Miscellaneous Objects Library, which can accept any object type, and then they can move the object from there as needed. Note that import works like clipboard paste. That is, first you select the location where you want to import or paste an object, then choose import or paste from the menu. Sort/Reorganize Slots Based Upon User Preferences In Version 7.1, users are now able to sort/reorganize slots based upon their own preferences with a new menu selection: Options | Slot Display Order. The user can then select from the following choices: • Default Order • Name • User Level • Source The "Default Order" choice will sort the slots based upon the criteria that has been pre-selected by the developers. The "Name" choice will sort the slots in alphabetical order based upon the slot name/title. The "User Level" choice will sort the slots based upon the user level required to view the slots (i.e., Novice, Intermediate, Expert). The "Source" choice will sort the slots based upon the type of slots it is (i.e., user-defined, functionally defined, or externally defined). Sort/Reorganize Objects in a List Based Upon User Preference In Version 7.1, users are able to sort the instances of object in a list (e.g., chemicals in the chemical database) based upon their own criteria. To sort an object list, first select the list in the EXLGUI Standard View, then choose Utilities | Sort Objects from the menu. The user will then be presented with a dialog box listing the slots of the objects in the list. The user will be prompted to select a slot to sort by. The objects in the list will then be sorted based upon that slot's value in each object. Capability to Merge Multiple Pollutant Streams In Version 7.1, users are now able to combine more than one pollutant stream to create a combined/merged stream. This capability is especially useful for evaluating the cost to control multiple pollutant streams with one control technology. See the end of Section 4.3 for instructions on how to merge pollutants streams. 1.3 Contact Information Questions and comments regarding the installation and use of the ACA program should be directed to Dan Maloney at the following address: Daniel M. Maloney D & E Technical 1008 W. William Street Champaign, Illinois 61821 (217)244-6808 (phone) (217)244-4416 (fax) [email protected] The ACA software and this User Guide are available from the ACA World Wide Web site: <www.detech.net/ACA>. This site also contains notices on the development of the ACA, papers and reports related to the ACA, and answers to frequently asked questions (FAQ). 2. Installing the ACA Program This chapter identifies the minimum system requirements and describes the procedure for installing the ACA software and loading sample data files. 2.1 Minimum System Requirements The ACA software requires the following computer components to run properly: • IBM PC or compatible computer • 486 (or later) type processor • VGA monitor • Mouse (or other pointing device) supported by MS Windows 95®, MS Windows 98® or MS Windows NT® • Microsoft Windows 95, Windows 98 or Windows NT • 12 MB of RAM (minimum) • 12 MB free hard drive space (minimum) • Screen area: 800x600 pixels (or greater) 2.2 MS Windows 95, Windows 98 and NT Installation The ACA is distributed as one compressed executable file aca.exe. To install the ACA to your computer's hard disk, run aca.exe from a temporary directory on the hard disk. The installation program asks for a destination directory as shown in the figure below. In most cases, you will want to select the default choice, c:\aca, however, you may select any location or drive. Click the Unzip button and all the necessary files will be expanded into the selected directory. Selecting a destination directory for the ACA 2.3 Starting the ACA Execute the file c:\aca\exlgui.exe to start the ACA program. Once the ACA finishes compiling, the ACA's graphical user interface (GUI) will be displayed, as shown in the figure below. The ACA's GUI contains pull-down menus and toolbar buttons for performing actions. The Standard View features a split screen, which is used for viewing the data and the overall data structure (the object/left pane of the split screen), as well as for entering data (the Properties of Objects/right pane of the split screen). The toolbar mirrors some of the key functions available from the pull-down menus. Toolbar and menu selections will be "grayed out" and unavailable to the user when they are inappropriate for the item highlighted in the active view (e.g., Standard View, report view). Users can find an explanation of each toolbar button by holding the mouse pointer over the button, causing a small "balloon help" window to appear. Note that a program and icon group can be made using the procedure as described in the MS Windows 95®, Windows 98® or NT® User's Manual. ACA GUI initial screen 2.4 Exiting the ACA To close the ACA, select File | Exit from the main menu. 2.5 Bits and Pieces • The ACA contains a large amount of built-in information known as library data. The chemical, material, and control device information is contained in the core library data file (library.oxl). The Regulation, Pollution Prevention, and Suggestions databases are not contained in the core library data file, but can be loaded as needed via File | Load. Any changes a user makes during an ACA session, including changes to the library data, will be stored if the user saves an ACA file using the File | Save or File | Save as functions. However, the original library data will be unaffected and will be available whenever a new ACA session is started. • Values may be specified in any set of units recognized by the ACA that are dimensionally correct for a particular property. See Appendix A for a list of units recognized by the ACA. The ACA contains a utility for converting units, available under Utilities | Units Conversion Utility in the main menu. • If insufficient information has been entered to perform an analysis, the analysis ceases and the ACA lists the missing variables. 3. Fundamentals of Using the ACA This section discusses several basic concepts related to using the ACA. This section will outline the user interface, the representation of data, data entry methods, user extendibility, and the standard libraries. Examples illustrating the use of the system have been included in Section 6 of this manual. The reader should refer to these examples in order to gain additional insight into the information presented in this section. The examples do not present a complete description of all the functions contained in the ACA. This information is best learned through experimentation with the system. 3.1 Stardard View The Standard View offers a simple interface for viewing and editing information. The figure shown in the previous section, Starting the ACA, shows the three core objects of the Standard View. Users view and edit installation and air pollution source information with the Installation Data object, library data with the Library Data object, and air pollution stream data with the What-if Scenarios object. Users can then run analyses based on this information and view the results of these analyses in the Standard View. More than one Standard View can be open at one time. Each time users select View | Standard View a new Standard View will be opened. Each opened Standard View will always contain the same information as every other opened Standard View. Opening multiple Standard View screens is sometimes helpful for dragging and dropping information between the opened views. Except for the three core objects discussed above, all other data and data structures are contained in a "slot." A slot can be an object, a list of objects, or a data entry slot. Objects are data structures that typically represent something in the real world (e.g., pollutants, pollution sources, and pollution control devices). Objects can contain data entry slots, lists of objects, and subobjects. The ACA is made up of a data hierarchy that begins with the three core objects. All other information in the ACA is related to one of the three core objects. The ACA represents these relationships graphically in the Standard View. The Standard View is similar to MS Windows Explorer®. There are two sides to the Standard View. The left side shows objects or lists of objects that are analogous to the folders found on the left side of Windows Explorer. These objects or object lists can be expanded or contracted to reveal more or less information about an object or list in the same way that folders can be expanded or contracted in Windows Explorer. A plus sign (+) to the left of an object or list indicates that this object or list can be expanded; a minus sign (-) indicates that this object or list has already been expanded; and a small circular bullet indicates that this object or list does not have other objects or lists associated with it at the current user level. The Standard View depicts relationships between objects or lists in the left pane by displaying and indenting "child" objects directly underneath the associated "parent" objects. The figure below shows the chemical Acetonitrile, which is an object contained in the Standard ACA Chemicals Library object list. Notice how all the information is ultimately related to the core object type Library Data. Standard View The right side of the Standard View, the Properties of Object pane, shows "slots" that are analogous to folders or files found on the right side of Windows Explorer®. The ACA displays slots associated with objects or object lists selected in the left pane of the Standard View and the title of this pane will reflect the chosen object or object list. These slots contain information that describes the selected object. Slots may be objects, object lists, or data entry slots. Users can view and edit information contained in data entry slots. The figure above shows some of the slots associated with the chemical object Acetonitrile. The toolbar icons , , and are used to control and indicate which panes are visible in the Standard View. Users select the leftmost icon to display the left pane only, the middle icon to display the right pane only, or the rightmost icon to display both panes. The selected icon will appear depressed in comparison to the other two icons. In the figure above, both panes (the rightmost icon) of the Standard View are selected. The user level setting in the ACA affects the appearance of the Standard View. Users may select from three different levels in the Options | User Level menu. These levels vary in degree of detail presented. The ACA starts in the "novice" mode (Options | User Level | Novice). This mode is the easiest to work with because it only presents the data that is frequently required. The novice mode reveals the minimum number of slots required for performing the majority of the calculations. The "intermediate" mode reveals a wider array of slots needed for detailed analyses. The final mode, "expert," allows the user access to all slots. 3.2 Slot Types There are three types of slots in the ACA: 1. User-defined slots 2. Calculation slots 3. External slots User-defined slots are parameters that typically are either entered by the user or would be information the user might need to change occasionally. For example, when describing a pollutant stream in the ACA the temperature of the stream is a value that the user would normally supply and therefore is a user-defined slot. User-defined slots may contain a default value or a default function that calculates a value. The value may or may not affect other slots in the ACA. In any case, these slots are designated as slots that can be changed by the user. Calculation slots are parameters that, by default, are calculated by a function. These functions may be dependent on other slots. Users must be very careful about modifying calculation slots since they are not slots that users would typically need to change. Calculation slots often either contain information that is a prime result of an analysis or is a crucial parameter used in the calculation of other slots. The slot "stream gas density," also associated with a pollutant stream, is an example of a parameter that is a calculation slot. The ACA has a built-in algorithm that will calculate the stream density based upon a number of other slots, such as temperature, pressure, pollutant concentrations, etc. If the user overrides this slot with a value, changes to stream parameters used in calculating stream density would no longer affect the value displayed in the stream density slot. Note that once a slot is overridden, with either data or a function, the user can revert back to the default value by using the reset toolbar button (i.e., ) this will reset a slot to the default function or value. Finally, external slots are parameters that are typically set by an outside action (e.g., executing one of the "analysis" options from the menu bar) or provided as built-in information (e.g., the Standard ACA chemical library object list). External slots are very similar to user-defined slots in that they can, and in some cases should, be modified. External slots are distinguished from user-defined slots because of the slot's information source rather than the types of actions that can be performed on the slot. There are actually very few data entry slots that are external slots. Users have the ability of modifying or replacing information found in almost all data entry slots. Those slots that can not be modified are visible, but are inaccessible to the user. Information can be modified or replaced whether slots hold information that is calculated or is entered directly. For example, equations used to size control devices can be changed, as can the equations used to determine the cost of control devices, or the actual emissions of emission units. Users can override any slot type with either a user-supplied value or a user-supplied function. After a slot is overridden, with either data or a function, the user can revert back to the default value by using the reset toolbar button (i.e., ) this will reset a slot to the default function or value. With all the possible combinations, the type of data found in a slot can become confusing. Therefore, small icons are used to indicate both the originally defined type of slot, and the type of information that is actually in that slot. These icons are located to the left of each slot in the Properties of Objects window, and are duplicated below with a brief discussion. Browsing the Properties of Objects window for each of the objects contained in the standard library will conveniently illustrate many of these notations. Holding the mouse over these icons in the Properties of Objects window causes a small "balloon help" window to display a description of the icon. User-Defined Slots • This icon indicates a user-defined slot, set to a default value. A User-defined slot, set to a default value typically starts out undefined since users enter information into these slots. An undefined slot will contain a "?" in place of a value. An example of a slot that would have this icon associated with it is the temperature of a pollutant stream before the user supplies a value for the temperature. Once users enter a value or function, the slot icon changes to one of the following two icons. • This icon indicates a user-defined slot, set to user-defined value. The "X" notation that is associated with this icon indicates that the user has entered a particular value for the parameter, and that the parameter is no longer set to the default value (which is typically set as a "?"). Using the example of the temperature slot, this icon would appear when the user specifies a temperature, such as 293 "K". Much of the built-in library information in the ACA is stored in this slot type. Note that you can revert back to the default state of this type of slot by using the reset toolbar option (i.e., ) in many cases the default value for this type of slot will be undefined or "?". • This icon indicates a user-defined slot, set to a user-supplied function. The "f(x)" notation associated with this icon indicates that the value of this slot is calculated by a function supplied by the user. For example, in the materials library users can enter an equation to describe the density of the material (a user-defined parameter) as a function of the properties of the individual components of the mixture. Note that you can revert back to the default state of this type of slot by using the reset toolbar option (i.e., ) in many cases the default value for this type of slot will be undefined or "?". Calculation Slots • This icon indicates a calculation slot, value computed by default function. As the image of the user is absent from this icon, the function used to define the particular parameter is a default equation contained within the ACA. The user can modify this type of slot by directly entering data or by supplying a function. For example, the mass-based heat of combustion (e.g., "BTU/lb") of a chemical is determined from the volumetric-based heat of combustion (e.g., "BTU/ft^3") and the vapor density. If the user enters a particular value for the mass-based heat of combustion of a chemical, the icon associated with the slot will change to that for a calculation slot, overridden with a user-supplied value icon. If the user modifies or replaces the equation with a different (user-supplied) equation, then the icon associated with the slot would change to that for a calculation slot, overridden with a user-supplied function icon. The explanation of the icons associated with each of these cases is illustrated below. • This icon indicates a calculation slot, overridden with a user-supplied value. As previously discussed, when a slot whose default value is computed by a function, such as a chemical's mass-based heat of combustion, is replaced by the user with a particular value, the definition of the slot changes to this category. This allows the user to determine at a glance which parameters he/she has changed, the default designation of the slots, and their new designation. The user can then determine the effect of any changes he/she may have made on the results of the analyses. However, the red "X" is a reminder that this type of slot is not typically something a user would change and that great care should be exercised when modifying a calculation slot, value computed by default function. Note that you can revert back to the default function/state of this type of slot by using the reset toolbar option (i.e., ). • This icon indicates a calculation slot, overridden with a user-supplied function. As previously discussed, the value of a calculation slots is, by default, computed by a function (for example, a chemical's mass-based heat of combustion). If this function is modified or replaced by the user, the definition of the slot changes to this category. This allows the user to determine at a glance which parameters he/she has changed, the default designation of the slots, and their new designation. The user can then determine the effect of any changes he/she may have made on the results of the analyses. However, the red "X" is a reminder that this type of slot is not typically something a user would change and that great care should be exercised when modifying a calculation slot, value computed by default function. Note that you can revert back to the default function/state of this type of slot by using the reset toolbar option (i.e., ). External Slots • This icon indicates an external slot, set to a default value. External slots are similar to userdefined slots. Like user-defined slots, these slots typically start out undefined because they are typically intended to be set by an external action or calculation and not by a pre-defined equation. Once the value of this type of slot is set, its icon changes to one of the following two icons discussed below. Note that you can revert back to the default state of this type of slot by using the reset toolbar option (i.e., ) in many cases the default value for this type of slot will be undefined (i.e., "?") or a constant value. • This icon indicates an external slot, set to a value supplied by either an external calculation or the user. The "X" notation associated with this icon indicates that an external action, or the user, has entered a particular value for the parameter and that the parameter is no longer set to the default value (which is typically set as "?"). Note that the ACA does not distinguish between a slot that is set by an external action and one that is set by the end user. You can revert back to the default state of this type of slot by using the reset toolbar option (i.e., ) in many cases the default value for this type of slot will be undefined (i.e., "?") or a constant value. • This icon indicates an external slot, overridden with a user-supplied function. The "f(x)" notation associated with this icon indicates that the user has entered a user-supplied function for an external slot. Note that you can revert back to the default state of this type of slot by using the reset toolbar option (i.e., ) in many cases the default value for this type of slot will be undefined [i.e., "?"] or a constant value. It is important to note that whenever the value of a slot is changed, whether to a particular value or to a function that is dependent on other parameters, all of the parameters that depend on the changed slot will be updated automatically. By way of comparison, one can compare this aspect of user extendibility to the operation of a spreadsheet. When a particular cell is updated, all of the cell values that depend upon the value of that cell will be updated automatically as well. The table below provides a quick reference to the icons discussed in this section. A more detailed discussion of how users can extend the ACA through the modification of slots is presented in Appendix C . Icon Meaning User-defined slots User-defined slot, set to a default value User-defined slot, set to user-defined value User-defined slot, set to a user-supplied function Calculation slots Calculation slot, value computed by default function Calculation slot, overridden with a user-supplied value Calculation slot, overridden with a user-supplied function External slots External slot, set to a default value External slot, set to a value supplied by either an external calculation or the user External slot, overridden with a user-supplied function Summary of icon slot definitions 3.3 Data Entry Data is entered into the ACA to provide input for the ACA's analyses or as a way of storing this information in a database. Data entry consists of modifying either objects or data entry slots. Objects can be added to object lists, replaced by other objects, and deleted. The types of data entry slots and the actions that can be performed on data entry slots were described in the previous sections. The analytic features of the ACA are described in greater detail in Section 4 . These descriptions in Section 4 include the information requirements of each analysis option. Objects Users manipulate objects through the add button , dragging and dropping, and the delete button . The usage of each of these object manipulation methods is discussed in the paragraphs below. The primary purpose of the add button is to add objects to object lists. To add an object to a list, users first click on an object list in the left pane of the Standard View, then click the add button to add another instance of that object (e.g., an emission source). After clicking the add button , a screen with a context relevant pick-list appears. Users select the desired object by highlighting it and then clicking . The figure below shows an example where coal fired boiler is about to be added to the list of sources at an installation. Adding an object to an object list The add button can also be used to replace certain objects. If the add button is available while an object is selected, then that object can be replaced by clicking on the add button and selecting from the available objects. When objects should not be added or replaced, either the add button will be unavailable or no objects will be displayed in the pick list when the add button is clicked. Objects can also be manipulated by "dragging and dropping" an object from one part of the Standard View to another. A drag and drop is accomplished by clicking and holding the left mouse button on an object, dragging it to the appropriate object list or object, and dropping the object by releasing the mouse button. A rectangular box will appear around an object list or object when a "dragged" object can be dropped there. When an object is dropped on a list, the object will be added to the list. When an object is dropped on an object of the same type, the object will be replaced. The figure below shows methyl ethyl ketone being dragged from the standard chemical data library to an undefined chemical/pollutant object. After this operation is complete, methyl ethyl ketone would become a chemical included in the pollutant stream. Dragging and Dropping a chemical When objects are added or replaced, either by the user or by the system, the new object is either a copy of an object or of a link. A copied object is an independent object and changes made to this object will not affect the object used to create the copied object. For example, the Coal Fired Boiler added to the Sources at Installation object list from the figure entitled "Adding an object to an object list" above is a copy of the Coal Fired Boiler object. Changes to the copied Coal Fired Boiler object will not effect the original Coal Fired Boiler object built in to the ACA. A linked object, on the other hand, is not independent. Any changes made to a linked object will also be made to the object used to create the linked object. For example in the figure above, the dragging and dropping of the Methyl Ethyl Ketone object will create a link to the Methyl Ethyl Ketone object found in the chemical library. Any changes made to the linked Methyl Ethyl Ketone object will be duplicated in the Methyl Ethyl Ketone object found in the chemical library. A linked object is designated graphically by a small arrow ( ) on the bottom left-hand side of the linked object's icon. The delete toolbar button is used to delete objects from the left-hand side of the Standard View. Users can delete all objects except for some higher-level object types. The deletion button will be unavailable for those objects that should not be deleted. Data Entry Slots Data entry slots contain text, numbers, times, dates, and logical data (e.g., true, false). Numeric data entry slots often also have units associated with the numeric data. The units are enclosed in quotation marks (e.g., "dollar/lb"). Information is added to data entry slots either by typing it in or by selecting it from a list. If a data entry slot contains numeric data with units, both the value and the units must be supplied. Users are free, however, to enter a wide array of units as long as the units are dimensionally correct for that slot. Appendix B contains a list of units recognized in the ACA. Information is entered into data entry slots either by typing information into the slot or by selecting from a pick list. A slot with an associated pick list will have a small down arrow key on the right side of the slot. Data entry slots containing dates or logical data always have a pick list. Data entry slots without pick lists will scroll when information is added beyond the length of the slot, and pressing the Enter key can expand these slots. Users can perform standard operations, such as copy, edit, and paste, on information contained in data entry slots. The figure entitled "Entering data in the Properties of Objects pane" shows some of the data entry slots for the chemical object acetaldehyde. This figure shows examples of data entry slots with text, logical data, numeric data with units, and a pick list. Entering data in the Properties of Objects pane The ACA has a built-in special utility to assist in entering dates into slots. Click on the down arrow key on the right side of the date slot and a calendar appears. Click on << or >> to change the year. Click on < or > to change the month. Click on the desired date in the body of the calendar to select a specific day. See the figure entitled "Pop-up calendar for entering date." Pop-up calendar for entering date 3.4 Basic User Extendibility The information found in a data entry slot might actually be the result of a function. Users can view the underlying functions of data entry slots by selecting the button in the toolbar to view both the functions and the values or the button to view the functions alone. The button will toggle the view back to just values. Note that in the figure entitled "Data entry slot values and functions" the button has been selected. Data entry slot values and functions Users can obtain detailed information about a data entry slot by clicking on the toolbar button . The information includes the slot name of the data entry slot. The slot name is required to create user-supplied functions that depend on that slot. Icon Meaning Reveal detailed information about a slot show slot values Toolbar buttons Users can edit existing functions or create new functions in the function view. The figure entitled "Data entry slot values and functions" shows an example of the right pane of the Standard View displaying both values and functions. The list of potential control device options is generated after running the Apply Control Technologies analysis for a What-if Scenario. Details of this analysis will be discussed in the "Apply Control Technologies" Section. The data entry slot for Pressure drop will be used for a simple example of how users can modify functions. The function view for the Pressure drop data entry slot shows a small section of computer code. This code is the function for pressure drop. In this case the function is a simple if-then type statement and the value of the slot is dependent on the slot name heat_exchanger efficiency. If a user had updated information from a vendor indicating that the pressure drop should really be 22 inches of water for heat exchanger efficiencies greater than or equal to 0.86, the user could modify the function to reflect this new information. The figure entitled "Results from editing pressure drop function" shows an edited function and the result this change had on the value of the Pressure drop data entry slot. The icon showing the slot type also changed to indicate that a user-supplied function had been entered. This brief example and discussion only covers a very small portion of the user extendibility options within the ACA. Appendix C contains much more detailed information on this subject. Results from editing pressure drop function Recall that the toolbar buttons and are used to set slots to unknown and to reset slots to the default value, respectively. For data entry slots, setting a slot to unknown sets the value to unknown and also removes any underlying function. For data entry slots with a function, resetting the slot to the default value will rejenerate the function and the value calculated by the function. Warning: If user-defined slots that begin with either a value or a function (i.e., slots with the or icons) are overridden by the user with either a new value or a new function, then the reset button will NOT reset to the initial value or function. Rather, it will reset the userdefined slot to the default value, which is typically undefined (i.e., "?"). 3.5 Standard ACA Libraries This section considers the five standard libraries contained in the ACA: • Chemicals Library • Materials Library • Control Devices Library • Federal Regulations Library • Pollution Prevention Library • Suggestions Library • Miscellaneous Object Library These library objects are shown in the figure entitled "Library data types found in the ACA." Note that only the Chemicals, Materials, and Control Devices Libraries are loaded automatically at program startup. The other three libraries can be loaded manually as needed through File | Load. Library data can be edited at will and changes a user makes during an ACA session will be stored if the user saves an ACA file using the File | Save or File | Save as functions. However, the original library data will be unaffected and will be available whenever a new ACA session is started. Each library object contains at least one standard and user-defined object list. A standard list contains the built-in library data and a user-defined list is designed to store user additions to the standard library items. Users can add new entries in the user-defined libraries either by creating a new library item or dragging and dropping an existing library item into the appropriate user-defined library list. To create a new entry into any of the libraries, the user first clicks on the appropriate user-defined library list in the left pane of the Standard View, then clicks the add button to add another instance of that object (e.g., a new chemical object). After clicking the add button, a screen with a context relevant pick-list appears (i.e., "select type of object to create"). Users select the object shown by highlighting it and then clicking . The drag-and-drop method will create a copy of an existing object that the user can independently edit. To create a new entry into any of the libraries using the drag-and-drop method, the user first clicks and holds the mouse on the appropriate object they wish to copy. Then simply drag that object to the appropriate user-defined library list in the left pane of the Standard View and release the mouse to drop it onto that list. This new object can now be edited by the user. Library data types found in the ACA Chemicals Library The Chemicals Library contains chemical properties for all of the hazardous air pollutants (HAPs) listed in Title III of the Clean Air Act Amendments of 1990, as well as the chemical properties of the criteria pollutants. The Chemicals Library is used to define the components of air pollution streams; determine chemical emission inventories on both a source specific and a facility-wide basis; assess applicable control technologies; and check the applicability of regulations, pollution prevention opportunities, and suggestions. Materials Library This library contains a few sample materials. The user can add materials to the library as needed as previously described. The material property data is used to define the material usage of air pollution sources; determine chemical emission inventories on both a source specific and a facility-wide basis; assess applicable control technologies; and check the applicability of regulations, pollution prevention opportunities, and suggestions. Control Devices Library The Control Devices Library contains all the air pollution control devices found in the US EPA's OAQPS Control Cost Manual and a few other control devices specified elsewhere. Each object in the Standard ACA Control Devices Library is a separate control device. The figure entitled "Control Devices Library" shows the beginning of the Control Devices Library and a few of the slots associated with the fixed bed Catalytic Incinerator control device. The Control Devices Library is primarily used during the Apply Control Technology analysis described in detail in the "Apply Control Technoligies" Section. The ACA uses the methods and information found in the OAQPS Control Cost Manual when determining the costs of applicable control devices. Control Devices Library Federal Regulations Library The Federal Regulations Library contains five lists of built-in regulations: NESHAP, NSPS, MACT Standards, Other Federal Regulations, and Facility-Wide Federal Regulations. The Federal Regulations Library also contains two user-defined regulation lists for emission-unit type regulations and facility-wide type regulations. Remember that this library data will need to be manually loaded in order to have access to it. Select File | Load | ACA Federal Regulations Database in order to load this library. Regulation lists contained in the Standard ACA Federal Regulations Library Portions of the US Army Construction Engineering Research Laboratories' environmental compliance assessment checklist manual have been incorporated into the Federal Regulations Library. The manual, also known as The Environmental Assessment and Management (TEAM) Guide, was developed for use by all DoD components to help determine compliance with current environmental regulations. Information from the TEAM Guide found in the ACA includes: the TEAM checklist ID, the summary of the requirements for the individual regulations, and the reviewer checklist that accompanies each regulation. Incorporation of the TEAM Guide in the ACA provides further context for assessing the applicability of particular regulations. This information appears as a data object associated with the corresponding federal regulation object. Individual regulations are defined by specific properties that appear in the Properties of Objects window, and by information contained in the Background Data, Applicability Data, TEAM Cross Reference & Compliance Check/Data, and Compliance Data objects as shown in the figure entitled "Data structure of a regulation" Each of these data objects has unique properties, just as individual chemicals have unique chemical properties. It should be noted that not every regulation will contain entries for the TEAM Cross Reference & Compliance Check/Data object, as the TEAM Guide considers only those regulations that have direct applicability to DoD facilities. Data structure of a regulation The Federal Regulations Library within the ACA is used in determining which regulations may apply to a specific source or sources. This is accomplished by identifying those regulations that are not applicable to the source. The ACA checks the applicability of regulations based on source type classifications (e.g., BLIS Process Codes and SCC values), chemicals used in a process, chemicals released during a process, facility ownership, and dates of construction, modification, reconstruction, and start up. As discussed in the "Prototype Analysis" Section of this manual, specification of these properties for a source facilitates the check for applicable regulations. Pollution Prevention Library Pollution prevention (P2) strategies and alternatives form the basis for this library. The user can explore details of various P2 strategies, including the cost, advantages and disadvantages of a particular strategy, chemical emissions, and obtain reference citations for further investigation of the strategies presented. The Pollution Prevention Library within the ACA is used in determining which pollution prevention opportunities may apply to a specific source or sources. Remember that this library data will need to be manually loaded in order to have access to it. Select File | Load | ACA Pollution Prevention Database in order to load this library. Suggestions Library The Suggestions Library provides the user with information on the control of nitrogen oxides (NOx) and emerging VOC control strategies. The information presented with each suggestion includes a general description of how the technology works, a discussion of the applicability of the technology to the waste stream, a discussion of necessary stream and operating conditions, and other information relevant to the technology. Remember that this library data will need to be manually loaded in order to have access to it. Select File | Load | ACA Suggestions Database in order to load this library. Miscellaneous Objects Library The Miscellaneous Objects Library provides the user with a place to store any ACA data object for future reference. The ACA is distributed with two Operating Schedule objects (i.e., "always on" and "On Monday − Friday 8hrs/day") which can be copied, as needed, by the user to define how equipment is operated. The Miscellaneous Objects Library is a good location for the user to store installation-specific objects that they may want to reuse and are a different type of object than those in the other libraries. 4. Analysis Options of the ACA While numerous calculations in the ACA are made "behind the scenes" (much like a spreadsheet automatically re-calculates in the background), there are several other specific analyses currently available within the ACA program. These analyses are accessed via the Analysis menu within the main menu of the program as shown in the figure below entitled "Standard Analysis options menu available in the ACA" Each of the analyses generates a report. To control the amount of detail in the reports, the menu selection Options | Report Level can be selected to be "Low," "Medium" or "High," with low being minimal information, medium being an intermediate amount of information and high being very detailed. The standard analyses are listed below: • Estimate Emission Rates • Summarize Emissions • Directly out of Emission Units • From Stack (to Atmosphere) • Apply Control Technologies • Prototype Analyses • Check for Applicable Regulations • Check for Applicable Pollution Prevention Opportunities • Check for Applicable Suggestions This section will discuss the basics of these analysis options. In order to give the user practice with these analysis options and the mechanics of entering data, example problems are provided in Section 6 . Standard Analysis options menu available in the ACA 4.1 Estimating Emission Rates The Estimate Emission Rates analysis option estimates emission rates for many sources of air pollution. The ACA can estimate emission rates for the following emission units: • Aboveground Tanks • Abrasive Blasting • Asphalt Cutbacks • Carpentry Operations # • Clean up Materials • Coal Fired Boilers • Degreaser Operations • Electroplating # • External Floating Roof Tanks • Fuel Dispensing Facility • Gas Fired Boilers • Gas Turbine (IC) • Graphic Arts / Printing • Industrial Engine • Internal Floating Roof Tanks • Jet Engine Test Stands • Loading Racks • Medical Waste Incinerators # • Multi-Chamber Incinerators • Natural Gas Prime Mover (IC) • Oil Fired Boilers • Petroleum Spill • Single-Chamber Incinerators • Solvent Spill • Spray Cleaner • Surface Coating • Tactical Haulers • Tank and Drum Cleaning • Thermal Metal Sprayers • Underground Tanks • Waste Oil Fired Boilers • Waste Solvent Recovery Operation • Waste water Treatment Units • Water Solvent Recovery Operation • Welding # • Wood Fired Boilers # Not fully tested The ACA calculates emissions by first estimating an emission rate (e.g., lbs/hr) and then using operating schedules to estimate emission summaries for any time period specified by the user. This emission estimating method allows realistic calculations of daily, weekly, monthly, or yearly emissions for all emission units. Users can input both actual and potential operational data sets for all emission units and the ACA will use this information to estimate both actual and potential emissions. ACA emission estimates are based on data that is typically available or can be measured. In general, source, operational, and material-specific data are required to make emissions estimates in the ACA. The ACA uses internal algorithms based on standard emission estimation techniques to calculate emissions. Most emission estimates are calculated using the US EPA's AP-42 emission estimation guidance. If a user does not enter information into a data entry slot required for emission estimation, the ACA will identify the name of the required data entry slot and its location. Note: Caution must be taken when interpreting the hourly emission rates for emission units that utilize AP-42 emission factors. These emission factors are designed to estimate yearly averages and not hourly values. The ACA makes these hourly estimates of emission rates to enable multiple operating scenarios, but when looking at emission summaries for less than one year, the limitations of the results should be considered. As the data requirements for estimating emission rates are dependent on the type of emission unit considered (e.g., gas-fired boiler vs. waste water treatment plant), the exact procedure for entering data into the ACA will be a function of the emission unit. However, the following are general steps that are true for most types of emission units: 1. In Standard View, select Installation Data. Then, add an emission unit to the Installation Data | Sources at Installation object list and expand the Sources at Installation object list and the emission unit object by selecting the button in the toolbar. The figure entitled "Addition of emission unit for estimating emissions" shows an example of this step where a surface-coating source was added to the Sources at Installation object. Notice that the RBLC process code has already been set; the Actual Operational Data and Potential Operational Data slots are attached but are empty, and the Attempt to Estimate Emissions? data entry slot is set to False. See the screens that follow this section for an example. 2. Set the emission unit data entry slot Attempt to Estimate Emissions? to True. 3. Review the other slots at the emission unit level for data that may be required for estimating emissions. 4. Add as many operational data objects as needed to describe all of the modes in which the emission unit operates. Make sure to add operational data objects to both the Actual Operational Data object list and to the Potential Operational Data object list. Fill in the data entry slots for each operational data object as needed. The figure entitled "Data entry slots for operational data" shows data entry slots for the Surface Coating Operational Data object. Do this by clicking on the Actual Operational Data slot in the Standard View and clicking on the add button in the toolbar. See the screens that follow this section for an example. 5. Describe the operating schedule. This step is optional since it is not required to estimate emission rates. However, this is a good time to enter this data, and an operating schedule is required to perform the Summarize Emissions analyses. To describe an operating schedule, select the Operating Schedule object and fill in the following data entry slots: • Schedule Name (optional but good for bookkeeping purposes) • Schedule Start Date • Schedule End Date • Average Operational Time per Day • Days Operating per Week Note that by going to the "Intermediate" User Level (Options | User Level) you are given the opportunity to enter daily operating schedules. In this case, the data entry slots Average Operational Time Per Day and Days Operating Per Week will be calculated by the ACA. The figure entitled "Operating Schedule data entry slots " shows the data entry slots associated with the Operating Schedule object in Novice mode. See the screens that follow this section for an example. 6. Describe the material used by the emission unit and enter its usage rate (for some emission units [e.g., coal-fired boilers], users can just enter in the summary material information contained in the Materials Inputs object at the Novice user level and then optionally enter in the actual material used at the Intermediate user level). To do this, first select and expand the Materials Inputs object by clicking on it in the Standard View. Next enter either the Mass Usage Rate or the Volumetric Usage Rate into the appropriate data entry slot. Then add a specific material to the undefined ( ) Material object by selecting from the menu provided when you click on the add button ( ) in the toolbar. Note that not all emission units (e.g., a gas-fired boiler) will require the addition of a specific material. Finally, review the other data entry slots of the Materials Inputs object for additional data that may be required for estimating emissions. The figure entitled "Materials Inputs object data entry slots " shows an example of data entry slots associated with the Materials Inputs object. See the screens that follow this section for an example. 7. Select Analysis | Estimate Emission Rates to perform the emission estimate analysis. Note: Steps 5 & 6 are to be repeated for each operational data set that you added in Step 4. Addition of emission unit for estimating emissions Data entry slots for operational data Operating Schedule data entry slots Materials Inputs object data entry slots When the emission estimate analysis is complete, three things will happen: 1. A report will be generated for each emission unit. 2. Estimated emissions are added to the Raw Stream and Stack Stream objects of each operation data set in both the Actual Operational Data and Potential Operational Data object lists. 3. Any errors, notes or warnings related to the analysis will be stored in a slot for each operational data set. Important: Be sure to read these reports as they contain important information. The ACA Emission Estimation Report appears in a new window. If no required data is missing, this report will contain estimates for most air pollutants the source emits. If a necessary piece of information was left out, the report will contain an error message directing the user where to provide additional information. The figure entitled "Emission Estimation Report" shows an Emission Estimation Report generated for an example benzene emission estimate from waste water treatment and an error message. Emission Estimation Report The estimated emissions are also shown in the Pollution Concentrations object list contained in the Raw Stream and Stack Stream objects. The Raw Stream object represents the emissions that come directly out of an emission unit. A "raw stream" may then pass through add-on control technologies before being emitted to the atmosphere through a "stack." The Stack Stream object represents the actual "stack stream" emissions to the atmosphere. A Pollution Concentrations object list has a Pollution Concentration Data object for each pollutant reported. Each Pollution Concentration Data object contains the emission rate of the pollutant and how this rate was determined. The figure entitled "Example pollutant concentration list" shows benzene emission data from a waste water treatment operation. The icon associated with the Chemical/Pollutant object indicates that it is a linked object. Any changes made to this object would also occur in the benzene object contained in the ACA Standard Chemicals Library. The Stack Stream object is actually a carbon copy of the Raw Stream object unless users override this relationship. Since the Stack Stream object is initially a function of the Raw Stream object, all data entry slots associated with the Stack Stream object are made unavailable to users to preserve this relationship. Users can override the relationship between Raw Stream objects and Stack Stream objects by creating a new "empty" Stack Stream object through the toolbar's add button or by dragging another stream object onto the Stack Stream object. If another stream object is dragged onto the Stack Stream object, the Stack Stream object will exhibit all the properties of the dragged stream. For example, users could first estimate emission with the Estimate Emission Rates analysis, use the calculated stream parameters to perform an Apply Control Technologies analysis (see the "Apply Control Technoligies" Section), and then drag the resultant stream object onto the Stack Stream object. Users can also enter actual emissions information directly into the appropriate data entry slot. In either case, the Stack Stream object would then represent the stream being emitted to the atmosphere. Example pollutant concentration list The Estimate Emission Rates analysis fills out the data entry slot Errors, Warnings, and Notes Report Generated When Estimate Emission Rates Was Last Run. This data entry slot is contained in each operational data element and is available at the Intermediate user level. As the name implies, this slot contains any errors, warnings, or notes associated with the most recent execution of the Estimate Emission Rates analysis. Additional Things to Try/Consider When Estimating Emission Rates If, instead of estimating emission rates, you have source emissions data, you can simply manually enter this data into the "Raw Stream" of each operational data set in both the "Actual Operational Data" list and to the "Potential Operational Data" list. If you want to enter the emissions by hand, then make sure that the emission unit slot "Attempt to Estimate Emission?" is set to FALSE. If you would like to view the algorithms for estimating emissions, then simple switch to the show slot function mode and set the User Level to "Intermediate." Locate the slot "Emission Rate Calculations Slot" at the emission unit level. You are also able to modify these algorithms by going into the slot definition window and reprogramming as desired. If you wish to modify the emissions, it is advised that you become familiar with the "End User Extendibility in the ACA" refer to Appendix C of this document. Emission Unit Types That the ACA Can Estimate Emission Rates Fully Tested Can Be Edited Via the "Easily Viewable" Slot Format Aboveground Tanks Yes Yes Abrasive Blasting No Yes Asphalt Cutbacks Yes No Carpentry Operations No Yes Clean Up Materials Yes Yes Coal Fired Boilers Yes Yes Degreaser Operations Yes No Electroplating No Yes External Floating Roof Tanks Yes Yes Fuel Dispensing Facility Yes Yes Gas Turbine Yes Yes Gas Fired Boilers Yes Yes Graphic Arts / Printing Yes Yes Industrial Engine Yes Yes Internal Floating Roof Tanks Yes Yes Jet Engine Test Stands Yes Yes Loading Racks Yes Yes Medical Waste Incinerators No Yes Multi-Chamber Incinerators Yes No Natural Gas Prime Mover Yes Yes Oil Fired Boilers Yes Yes Petroleum Spill Yes Yes Single-Chamber Incinerators Yes No Emission Unit Type Solvent Spill Yes Yes Spray Cleaner Yes Yes Surface Coating Yes Yes Tactical Haulers Yes Yes Tank and Drum Cleaning Yes Yes Thermal Metal Sprayers Yes Yes Underground Tanks Yes Yes Waste Solvent Recovery Operation Yes Yes Waste Oil Fired Boilers Yes Yes Waste Water Treatment Units Yes Yes Water Solvent Recovery Operation Yes Yes Welding operations No Yes Wood-Fired Boilers Yes Yes 4.2 Summarizing Emissions The Summarize Emissions analysis option is used to summarize all emissions (actual and potential) for all of the sources/emission units that are stored in the Installation Data | Sources at Installation. When executing this analysis, you can select between the following options: • Directly Out of Emission Units • From Stack (to Atmosphere) These two sub-analyses are similar in that they both present results in the form of three reports that summarize: 1. The facility-wide actual emissions 2. The facility-wide potential emissions 3. The actual and potential emissions on an emission unit-by-emission unit basis There are a couple of differences between these two sub-analyses. First, the "Directly Out of Emission Units" analysis summarized the "Raw Stream" emissions. These emissions are in each Operational Data set for each emission unit in the Installation Data | Sources at Installation list. Meanwhile, the "From Stack (to Atmosphere)" analysis summarizes the "Stack Stream" emissions that are also in each Operational Data set for each emission unit in the Installation Data | Sources at Installation list. Secondly, only the "From Stack (to Atmosphere)" analysis adds emissions data to the Installation Data | Emission Summary - Facility Wide object. The "From Stack (to Atmosphere)" analysis also adds emissions data to the "Emission Summary for Source" object that is contained within each emission unit (note that you will have to set the Options | User Level to "Expert" to see this data). When summarizing the emissions, the ACA also considers the operating schedule for the Operational Data set. The following general steps are required for the Summarize Emissions analyses: 1. Expand the Emission Summary - Facility Wide object contained in the Installation Data core object by double clicking on it. 2. Enter data into the following data entry slots contained in the Emission Summary - Facility Wide object: 1. Title of Emissions Summary (optional, but good for book keeping purposes) 2. Begin Date for Emissions Summary* 3. End Date for Emissions Summary* Note that you are not limited to any set time period. The default for these two slots are taken from the Installation Data object data entry slots Default Start Date for Emission Summaries and Default End Date for Emission Summaries. Users can * either edit the Installation Data object defaults or the two slots contained in the Emission Summary-Facility Wide object. In order to keep the emission unit-specific summaries consistent with the facility-wide summaries, it is advisable to edit the data entry slots contained in Installation Data object. The figure entitled "Slots contained in the Emission Summary-Facility Wide object" shows the slots contained in the Emission Summary- Facility Wide object. 3. Make sure that the Raw Stream and Stack Stream objects have been defined as described in the previous section, "Estimate Emission Rates." 4. Make sure the Operating Schedules object for all of the Actual Operational Data and the Potential Operational Data objects have been defined as described in the previous section, "Estimate Emission Rates." 5. Select either Analysis | Summarize Emissions | Directly Out of Emission Units or Analysis | Summarize Emissions | From Stack (to Atmosphere) from the Menu. Slots contained in the Emission Summary-Facility Wide object When an emission summary analysis is complete, three emission summary reports will be generated and displayed in separate windows. The reports summarize (a) actual and potential emissions on an emission unit-by-emission unit basis, (b) facility-wide actual emissions, and (c) facility-wide potential emissions. Each report shows the time period covered for each emission summary, and if a necessary piece of information was left out, the report will contain an error message directing the user to where additional information is needed. The following three figures show examples of these three reports. Note that the information contained in the reports for these figures is from example problem #5 in Section 6 of this User Guide. Report of actual and potential emissions on an emission unit-by-emission unit basis Facility-wide potential emissions report Facility-wide actual emissions report The From Stack (to Atmosphere) analysis adds emissions data to the Emission SummaryFacility Wide object. Both the Actual Emissions Summary and Potential Emissions Summary object lists will be filled in with a Chemicals with Emissions object for each pollutant emitted from the installation. Each of the Chemicals with Emissions objects will display the installation-wide total emissions for a specific pollutant. The figure entitled "Pollutant summary information in Emissions Summary - Facility Wide object" shows the data entry slot associated with the object Chemicals with Emissions: Cyclohexanone. The information contained in example5.oxl was used to generate this screen. The From Stack (to Atmosphere) analysis also adds emissions data to the Emission Summary for Source object that is contained within each air pollution source object. However, the user-level must be set to Expert to see this data. Pollutant summary information in Emissions Summary Facility Wide object 4.3 Apply Control Technologies The Apply Control Technologies analysis option will provide information on the control technologies that can be used to control a user-specified air pollution emission. Users describe an air pollution emission in the Size & Cost Air Pollution Control Technologies object contained in the What-If Scenario core object. The analysis requires data related to: • the air pollution stream to control • the annual hours of operation • the desired reduction efficiency The ACA will determine which control devices are applicable to a specific scenario and estimate the size and cost (both capital and operating) of the applicable control devices. The ACA can provide information on VOC control devices (i.e., carbon adsorption, regenerative thermal incineration, recuperative thermal incineration, catalytic thermal incineration, refrigerated condensation, and flares) and particulate matter (PM) control devices (i.e., electrostatic precipitators, baghouses, cyclones, mist eliminators, and wet scrubbers). The ACA contains a large library of control technologies located in the Control Devices Library object contained in the Library Data core object. All of the control technologies in this library will be considered for each study. Note that the Control Devices Library object contains both a list of standard ACA control technologies and a list of any user-defined control technologies. The control technologies in the standard ACA control technologies list are models based primarily upon guidance provided in the US EPA's OAQPS Control Cost Manual, William M. Vatavuk's Estimating Costs of Air Pollution Control, Louis Theodore and Anthony J. Buonicore's Air Pollution Control Equipment Volumes I & II, and the Air & Waste Management's Air Pollution Engineering Manual. Other technical references were used (to a much lesser extent) in these models and are typically referenced within the source code as needed. Many of the source code equations are referenced, and since the source code can be viewed from the ACA's graphical user interface, it is relatively straight-forward to follow the "flow" of the various models. The following general steps are required to size and cost air pollution control technologies: 1. Expand the Size & Cost Air Pollution Control Technologies object contained in the WhatIf Scenarios core object. 2. Enter data into the following data entry slots contained in the Size & Cost Air Pollution Control Technologies object: • Study Title (optional, but good for bookkeeping purposes) • Yearly Hours of Operation • Duty Cycle (this has a default that will appear after you enter data into the Yearly Hours of Operation slot; however, it can be overridden) The figure entitled "Data entry slots for Size & Cost Air Pollution Control Technologies object" shows these data entry slots (note that the information contained in this figure comes from data provided in example problem #1 of this user guide). 3. Double click on the Stream to Control object contained in the Size & Cost Air Pollution Control Technologies object to expand it. Then, enter information into the following data entry slots: • Temperature • Pressure • Either: Volumetric Flow Rate Actual OR Volumetric Flow Rate At STP (not both) • Moisture Content It is also a good idea to enter data for all of the other data entry slots at this level for which you have data available. Depending on the control technology under consideration, some or all of these other slots may be required. Users are notified if additional "undefined" data entry slots are required when you attempt to run the analysis. The figure entitled "Data entry slots for Stream to Control object" shows some of the data entry slots for the information contained in example1.oxl. 4. Add a Pollution Concentration Data object to the Stream to Control object for each chemical/pollutant that is contained in the stream. This is done by using the toolbar's add button when the Pollutant Concentrations object list is selected. 5. Describe the Pollution Concentration Data object by performing the steps below: Associate it with a chemical/pollutant. Select the undefined object Chemical/Pollutant, then select the add button on the toolbar and pick one of the available chemicals. (Note that all of the chemicals that are stored in User-Defined chemical database and the Standard ACA chemical database are available from the pick-list.) Enter one (and only one) measure of the pollutant's concentration*, namely one of the following data entry slots contained in the Pollution Concentration Data object: • Volumetric Concentration • Mass Concentration At STP • Mass Concentration, Actual OR • Mass Flow Rate Note: If users enter more than one measure of pollutant concentration they risk the possibility of these "co-dependent" variables becoming inconsistent. The ACA will, by default, calculate the other three measures of concentration from the one that was entered (provided that the pollutant stream's temperature, pressure and volumetric flow rate are known, as well as the molecular weight of the chemical/pollutant). To see the ACA calculated versions of all of the measures of concentration, go to the "Intermediate" User Level and view the disabled (grayed out) versions of these slots. The Volumetric Concentration data entry slot will not be calculated for pollutants that are particulate matter (PM), as this measure of concentration does not apply to PM pollutants. * Note: Repeat this step for each Pollution Concentration Data object added in the previous step. The figure entitled "Pollution Concentration Data objects added to Pollutant Concentrations object list" shows benzene and methyl chloride Pollutant Concentrations objects and the Volumetric Concentration data entry slot filled in. 6. Select the Emission Reduction Needed object contained in the Size & Cost Air Pollution Control Technologies object and enter the percentage of VOC or Particulate Matter reduction needed into the appropriate data entry slot. 7. Select Analysis | Apply Control Technologies. Data entry slots for Size & Cost Air Pollution Control Technologies object Data entry slots for Stream to Control object Pollution Concentration Data objects added to Pollutant Concentrations object list The results of this analysis are two fold: First, a report will be generated that summarizes: (a) any missing data that is required for any of the potentially applicable control devices, (b) which control devices are potentially applicable, (c) the main reasons why any control devices were determined to be non-applicable, and (d) cost and sizing data for each applicable control device. The figure entitled "Start of Control Device Report" shows an example of the start of this report. Start of Control Device Report Secondly, for each control technology that is found to be potentially applicable, an instance of that control device will be placed in the Potential Control Device Options object list contained in the Size & Cost Air Pollution Control Technologies object just below the Emission Reduction Needed object. Users are encouraged to review these instances (as one would a spreadsheet) and modify data entry slots to see how minor modifications affect the size and cost of each control technology. If you would like to get a summary report for the control devices in the Size & Cost Air Pollution Control Technologies/Potential Control Device Options list at any time other than when the analysis option is run, select Run User-Specified Analysis/Action from the "Analysis" Menu and then type in "WriteOutControlDataInWhatIf" at the data entry window. The figure entitled "Slots associated with Potential Control Device Options object" shows an example of a potential control device list. Slots associated with Potential Control Device Options object If you would like to view the algorithms for each of the slots, then simply use the "Show slot functions" toolbar button . More slots, which typically contain more detailed information or intermediate calculations, can be viewed by switching to the "Intermediate" User Level from the Options menu (Options | User Level). You are also able to reprogram any slot (except those that are disabled/grayed out) by going into the slot definition window and reprogramming as desired. If you wish to reprogram any slots, you should first become familiar with the "End User Extendibility in the ACA" refer to the "Basic End User Extendibility" Section and Appendix C in this User Guide. In addition, the reader is urged to review the example problems #1 (gaseous emissions) and #2 (PM emissions) in Section 6 to better understand the data required to model these two types of emissions. Merged Pollutant Streams (New in Version 7.1) Multiple pollutant streams can be combined/merged into one equivalent pollutant stream. The ACA will automatically calculate the temperature, pressure, volumetric flow-rate, and pollutant concentrations of a combined/merged stream if those corresponding parameters are given for all of the individual streams that are being combined. This feature is especially useful for exploring the costs associated with simultaneously controlling more than one pollutant stream. The default stream type in the ACA is a singular, non-combining stream (i.e., non-combining stream with a combining pollutant stream (i.e., be taken: ). In order to replace the ), the following steps need to 1. Select any singular, non-combining Stream object and then click on the add button in the toolbar. The Stream located in the What-If Scenario | Size & Cost Air Pollution Control Technologies is a good example stream to work with. 2. Select "Yes" to replace the object (see the figure entitled "Replacing the default Stream object" below ). 3. Select Create New from the Select Object to add pop-up window (see the figure entitled "Selecting a new Stream object to add" below ). 4. By selecting the Combining Stream object from the pop-up window titled Select type of object to create (see the figure entitled "Creating a new Combining Stream object" below ) a multiple pollutant stream will be created. 5. Next, select the Streams to Combine slot/list of the Combining Stream object and click on the add button in the toolbar to add (and then define) as many individual streams as you wish to the new merged stream (see the figure entitled "Adding individual streams to the new Combining Stream object" below ). These individual streams (see the figure entitled "A Combining Stream object with component streams" below ) will be combined to makeup the merged/combined stream. Keep in mind that the properties of the individual streams need to be defined in order for the merged stream properties to be calculated. Replacing the default Stream object Selecting a new Stream object to add Creating a new Combining Stream object Adding individual streams to the new Combining Stream object A Combining Stream object with component streams 4.4 Prototype Analyses Check for Applicable Regulations The Analysis | Prototype Analyses | Check for Applicable Regulations analysis compares the emission units that the user has defined with the regulations in the ACA Regulations Database. This analysis will rule out those regulations that do not apply to individual emission units. A report is generated that summarizes the findings. The potentially applicable regulations are listed with the emission units under the Potentially Applicable Regulations object associated with each emission unit (which can be viewed at the Intermediate user level). The ACA Regulations Database contains all of the NSPS, NESHAP, and MACT standards, as well as the NSR/PSD and NSR/NAA federal regulations. The ACA defines potentially applicable regulations/emission unit pairs as cases where the applicability of the regulation could not be ruled out. In the case of an emission unit for which little information is entered, many regulations will be listed as being potentially applicable. In order to take advantage of the ACA Regulations Database and comparison checking, it is necessary to describe the emission units in as much detail as possible. As this analysis is effectively based upon the "ruling out" of regulations, only a single negative comparison is needed to indicate that a regulation is not applicable. While numerous potential comparisons are made, the quickest ways to rule out regulations are to specify: • the BLIS Process Code (a default code is set for every emission unit) • SCC values, • construction, re-construction, modification, and start-up dates, and • pollution concentration data To perform this analysis, select from the menu: Analysis | Prototype Analyses | Check for Applicable Regulations. An example using the Check for Applicable Regulations analysis is given in example problem #5 in Section 6 . Check for Applicable Pollution Prevention (P2) Opportunities The Check for Applicable Pollution Prevention Opportunities analysis option is similar in nature to the Check for Applicable Regulations analysis. An ACA database of P2 Opportunities is compared with the emission units defined by the user. The ACA reports any P2 Opportunities that could not be ruled out for the emission units specified. A report is generated that summarizes the findings. The potentially applicable P2 Opportunities are listed with the emission units under the Potentially Applicable Pollution Prevention Opportunities object list (which can be viewed at the Intermediate user level). The ACA defines potentially applicable P2 Opportunities/emission unit pairs as cases where the applicability of the P2 Opportunities could not be ruled out. In the case of an emission unit for which little information is entered, a number of P2 Opportunities will be listed as being potentially applicable. In order to take advantage of the ACA P2 Opportunities database and comparison checking, it is best to describe the emission units as completely as possible. To perform this analysis, select from the menu: Analysis | Prototype Analyses | Check for Applicable Pollution Prevention Opportunities. An example using the Check for Applicable Pollution Prevention Opportunities option is presented in example problem #5 in Section 6 . Check for Applicable Suggestions The Check for Applicable Suggestions analysis option is similar in nature to the Check for Applicable Regulations and the Check for Applicable Pollution Prevention Opportunities analyses described in the previous section. An ACA database of Suggestions is compared with the emission units defined by the user. Suggestions that could not be ruled out for the emission units specified are reported by the ACA. A report is generated that summarizes the findings, and potentially applicable Suggestions are listed with the emission units under the Potentially Applicable Suggestionsobject list. The idea behind the Suggestions Library is to provide a database of suggestions/ideas (other than pollution prevention alternatives) that could prove useful to an environmental engineer in the course of managing the emission units at a facility. Currently the Suggestions Library contains "suggestions" on techniques to reduce NOx emissions for external boilers and a few emerging VOC control technologies. The ACA defines potentially applicable Suggestions/emission unit pairs as cases where the applicability of the Suggestions could not be ruled out. In the case of an emission unit for which very little information is specified, a number of Suggestions will be listed as potentially applicable. To take advantage of the Suggestions database and comparison checking, it is necessary to describe the emission units in as much detail as possible. To perform this analysis, select from the menu: Analysis | Prototype Analyses | Check for Applicable Suggestions. An example using the Check for Applicable Suggestions analysis is given in example problem #5 in Section 6 . If additional detail and guidance is required for any of the prototype analyses, please contact the program developers, as a draft tutorial and additional reports pertaining to these analyses can be made available. 4.5 Run User-Specified Analysis/Action The Analysis option titled Run User-Specified Analysis/Action is used to run any actions that exists in the EXL source code, including those that are not already linked to a specific menu option, as well as any user defined actions. Because the user of the ACA can extend the functionality of this program by adding their own data structures, functions, procedures and actions, this feature is the means by which user-defined actions can be run. Run User-Specified Analysis/Action Note: Refer to Appendix C of this User Guide for guidance on how to add user-defined actions to the ACA. In order to identify all of the actions that exist in the ACA, you can select the menu View | Advanced Views | Global Actions. Selecting this menu option will provide a long list of all of the actions in the ACA (note that all actions in the ACA are global). Any actions that are run from Run User-Specified Analysis/Action must be done at the risk of the user. The developers of the ACA have made the tried-and-true actions in the ACA available directly from the menu bar. It should be noted that some of the actions in the ACA are actions that were valid for previous versions of the ACA and are no longer used and could potentially cause havoc with your data. The bottom line is this: Be careful running an action that you are not familiar with. The following are a some useful actions that are not linked to a menu option but can be run from Run User-Specified Analysis/Action and can be used with confidence: English This action will instruct the ACA to write out all output reports in English units (e.g., "lb", "BTU"). Metric This action will instruct the ACA to write out all output reports in English units (e.g., "kg", "Joule"). Reset_ACA_Control_Library This action will re-initialize the control device instances that reside in the Library Data | Control Devices Library | Standard ACA Control Device Library object. This action would be the shortcut method for resetting all of the control device objects at once. While the user is encouraged to place any customized control device objects in the Library Data | Control Devices Library | User-Defined ACA Control Device Library, it seems likely that those in the Standard ACA database could actually be versions modified by the end-user. Note that any customized control technologies that are stored in this list prior to running this action will be lost (to prevent this, copy them over to the User-Defined Library). LoadACA_Chemicals This action will re-load the original Standard ACA Chemicals Library. Like the Reset_ACA_Control_Library action listed above, this action is used to get the original ACA version of the database back. Caution should be used in that any chemical properties that have been modified will be lost. Further, any chemicals that have been added to the Standard ACA Chemicals Library will be lost, copy any new chemicals over to the UserDefined Chemicals Library to prevent these new chemicals from being lost. WriteOutControlDataInWhatIf This action will write out a report that summarizes the size and costing data for all of the control technologies that are listed in the What-If Scenario | Size & Cost Air Pollution Control Technologies | Potential Control Device Options list. 5. Using the ACA Wizards The information contained in this section, which is also available from the Help | Tips on Using the ACA Wizard menu option, provides help for the three ACA Wizards and the Chemical Properties Conversion Worksheet. 5.1 Help for the Add VOC Chemical to User-Defined Chemical Library Wizard This Wizard allows the user to add VOC chemicals to the User-Defined Chemical Library. The chemical properties that are required for costing and sizing air pollution control technologies are the only chemical parameters that can be entered via this Wizard. Additional chemical properties can be added later by editing the Chemical object directly from the ACA's standard user interface. For more information on the chemical properties listed here, including definitions, how they are used in the ACA and how to obtain values, see the help option "Tips on Obtaining and Estimating Chemical Property Data" available from the main menu under "Help." Screen #1: Chemical Name Screen The first screen of this Wizard will prompt the user for a name for the new pollutant - please select a unique name. Screen #1 for Adding a VOC Chemical to the User-Defined Chemical Library Wizard Screens #2−#4: Enter Chemical Properties Screen The chemical properties that are required to calculate the cost and applicability of air pollution control technologies should be entered on screens #2−#4. In order to investigate all of the VOC control technologies, all properties must be entered. Listed below are the various chemical properties that can be entered in these screens, as well as the air pollution control technology calculations that require these parameters. For more information on the chemical properties listed here, including definitions, how they are used in the ACA and how to obtain values, see the help option "Tips on Obtaining and Estimating Chemical Property Data" available from the main menu under "Help." • Antoine Constants for Vapor Pressure (i.e., A, B, C): Refrigerated Condensers, Carbon Adsorbers • Boiling Point: Refrigerated Condensers, Carbon Adsorbers • Critical Temperature: Refrigerated Condensers • Diffusion Coefficient, Liquid in Water: Gas Absorbers • Diffusion Coefficient, Vapor in Air: Gas Absorbers • Gas Phase Heat Capacity: Refrigerated Condensers • Heat of Combustion: Thermal Incinerators and Flares • Heat of Condensation: Refrigerated Condensers, Carbon Adsorbers • Henry's Law Constant: Gas Absorbers • Index of Refraction: Carbon Adsorbers • Is Halogenated?: Thermal Incinerators • LEL (Lower Explosive Limit): Thermal Incinerators, Flares, and Carbon Absorbers • Liquid Density (at STP): Carbon Adsorbers • Molecular Weight: All VOC Control Devices • Vapor Pressure @ 293 K: Carbon Adsorbers Screen #2 for Adding a VOC Chemical to the User-Defined Chemical Library Wizard Screen #3 for Adding a VOC Chemical to the User-Defined Chemical Library Wizard Screen #4 for Adding a VOC Chemical to the User-Defined Chemical Library Wizard Screen #5: Finish Screen Once you have arrived at this screen, you have entered the data required to add a chemical/pollutant to the User-Defined Chemical Library. Note that the data entered using this Wizard includes only those chemical parameters that are required to perform an air pollution control technology analysis. Additional chemical data can be added for this chemical by directly editing the chemical from the standard ACA interface. For more information on editing data from the standard ACA interface, see Section 3. By selecting the Finish button the ACA will add this chemical to the User-Defined Chemical Library. By selecting the Back button you can review and/or modify the data you have entered before the chemical/pollutant is added to the User-Defined Chemical Library. By selecting the Cancel button you will be returned to the standard ACA interface and the chemical/pollutant will not be added to the User-Defined Chemical Library. Screen #5 for Adding a VOC Chemical to the User-Defined Chemical Library Wizard 5.2 Help for the Add PM Pollutant to User-Defined Chemical Library Wizard When adding a new Particulate Matter (PM) pollutant to the ACA User-Defined Chemical Library, the "Add PM Pollutant to User-Defined Chemical Library" Wizard can be used. Screen #1: Chemical Name Screen The first screen of this Wizard will prompt the user for a name for the new pollutant please select a unique name. Screen #1 for Adding a PM Pollutant to the User-Defined Chemical Library Wizard Screen #2: PM Property Entry Screen The second screen of this Wizard, the "PM Pollutant Properties Screen," requires the user to enter data on those properties that are required for determining the cost and applicability of a variety of PM air pollution control technologies. Definitions of the various properties that are required to be end-user supplied are given below. Is Water Soluble Specify if the PM is soluble in water. Particulate Phase Specify if the PM is a liquid or a solid. PM Density Enter the density of the PM. PM Size Distribution Required for: All PM control technologies. Definition: This parameter represents the aerodynamic particle size distribution for pollutants that are classified as particulate matter (PM). If a chemical/pollutant is a gas, do NOT enter any data in this slot. For PM data, it is advised that at least five (5) sets of data (particle size vs. percent mass above) be entered. This data will be used to calculate: (1) mass median diameter; (2) cut diameter; and (3) geometric standard deviation. These parameters are typically required to determine the applicability of PM air pollution control devices. The ACA will assume a best-fit log-normal aerodynamic particle size distribution (this gives a straight line on log-probability paper when plotted) in the calculation of the mass median diameter, the geometric standard deviation, and the cut diameter. Screen #2 for Adding a PM Pollutant to the User-Defined Chemical Library Wizard Screen #3: Finish Screen Once you have arrived at this screen, you have entered the data required to add a chemical/pollutant to the User-Defined Chemical Library. Note that the data entered using this Wizard includes only those chemical parameters that are required to perform an air pollution control technology analysis. Additional chemical data can be added for this chemical by directly editing the chemical from the standard ACA interface. By selecting the Finish button the ACA will add this chemical to the User-Defined Chemical Library. By selecting the Back button you can review and/or modify the data you have entered before the chemical/pollutant is added to the User-Defined Chemical Library. By selecting the Cancel button you will be returned to the standard ACA interface and the chemical/pollutant will not be added to the User-Defined Chemical Library. Screen #3 for Adding a PM Pollutant to the User-Defined Chemical Library Wizard 5.3 Help for the Apply Air Pollution Control Technologies Wizard The "Apply Air Pollution Control Technologies" Wizard is designed to prompt the user for the minimum data required to investigate potentially applicable air pollution technologies for a userdefined air pollution stream containing either particulate matter (PM) or volatile organic compounds (VOCs). Screen #1: Enter Parameters for an Air Pollution Control Technology Analysis The first Wizard screen contains the general parameters associated with the analysis, including: Case Study Title This parameter is used to describe the analysis you are performing. When using the Wizard, the title you enter can be as long as you wish, but it cannot include a carriage return. While this parameter is not required, it can be helpful in documenting your scenarios. Yearly Hours of Operation This parameter is used to describe the total yearly hours of operation that the air pollution stream will be operating. This parameter is used in the calculation of the annual operating costs. Duty Cycle This parameter is a measure of how often the emission stream is operated. This parameter is related to the Yearly Hours of Operation parameter and is used in determining the relative applicability of the various control technologies for a specific pollutant stream (e.g., some technologies perform better than others when they are operated continuously). As a general rule of thumb, 7000 hours/year or more can be considered "continuos," from 1000 hour/year to 7000 hours/year can be considered "shift," and less then 1000 hours/year can be considered "intermittent." Pollution Type This parameter is used to select the type of pollutant you are interested in controlling. Currently, the ACA allows for the control of Volatile Organic Compounds (VOC) or Particulate Matter (PM) pollutants. Desired Pollutant Reduction This parameter defines your desired percent reduction in either VOC or PM pollution. For many control technologies this parameter will have an impact on both the capital and operating costs of control technologies (i.e., the higher the desired reduction, the higher the costs to control). Screen #1 of the Apply Air Pollution Control Technologies Wizard Screen #2: Pollutant Stream Properties Screen The layout of this screen will depend upon which pollution type (VOC or PM) was selected in the first Wizard screen. There will be some similarities between the VOC and PM screens, so those parameters that are common to both types will be presented first, followed by those that are just for VOC pollutant stream control and then those that are just for PM pollutant stream control. Parameters Common to Both PM and VOC Pollutant Stream Properties Screen Temperature This parameter describes the temperature of the pollution stream. Temperature is required for numerous calculations related to sizing air pollution control equipment, including, for example, converting between actual and standard conditions and the determination of energy required to raise the pollutant stream temperature (for combustion) or lower the pollutant stream temperature (for condensation). Pressure This parameter describes the pressure of the pollution stream. Pressure is required for various calculations related to sizing air pollution control equipment, including, for example, converting between actual and standard conditions. Volumetric Flow Rate This parameter describes the volumetric flow rate of the entire air pollution stream (i.e., pollutants + air + other gases). The volumetric flow rate can be specified at either actual operating temperature and pressure or the equivalent volumetric flow rate at standard temperature and pressure. The volumetric flow rate combined with the pollutant mass concentration data is used to calculate the pollutant mass flow rate for evaluating air pollution control technologies, as well as converting between various measures of pollution concentration. Moisture Content This parameter describes the amount of moisture by volume in the air pollution stream. The moisture content is used in the evaluation of wet scrubbers, carbon adsorbers, and baghouses. Additional Parameters Applicable Only to VOC Pollutant Stream Properties Screen Oxygen Content This parameter describes the amount, on a percentage basis, of oxygen in the air pollution stream. The percent of oxygen present in the stream is used to determine if auxiliary air is required to complete combustion when evaluating thermal incineration control devices. Note: Normal outdoor air has approximately 20.9% oxygen. Particulate Matter in Stream This parameter is used to qualitatively specify if any particulate matter (PM) is present in the air pollution stream. This parameter is of primary importance when evaluating the relative applicability and ranking of VOC air pollution control technologies as some VOC air pollution control technologies do not perform well if there is any PM present, while other devices perform fine with some PM present. Additional Parameters Applicable Only to PM Pollutant Stream Properties Screen Stream Has... • Stream has Acid Gases • Stream has Alkalis • Stream has Fluorides • Stream has Mineral Acids • Stream has Metals • Stream has Condensable Metals This group of parameters that appears when using the ACA Wizard for the control of PM pollutant stream emissions are all used to determine which types of filter bags (for baghouses) would be applicable. Stream is Corrosive This parameter is used to determine if a stainless steel or fiberglass construction would be required, for those control technologies for which it is an option. Dust Type This parameter is used to qualitatively describe the PM (e.g., dust) that is present in the air pollution stream. This data is used to determine the air-to-cloth ratio for baghouses control technologies. Screen #2 of the Apply Air Pollution Control Technologies Wizard (VOC example) Screen #3: Enter Method Used to Define Pollution Concentration Data Screen This screen gives the user the option of which method to use to define their air pollution concentration data (which will be entered in the next screen). There are either three or four options for specifying the method for entering the pollution concentration data, depending upon the type of pollution you are trying to control. VOC pollution streams can be specified with four methods, while PM pollution streams can be specified with only three methods. The pollution concentration data can be specified for both VOC and PM in the following methods: • Mass Concentration at STP (with optional units) • Actual Mass Concentration (with optional units) • Mass Flow Rate (with optional units) For VOC pollution streams, the pollution concentration data can also be specified as: • Volumetric Concentration, in units of ppm (i.e., parts per million) Screen #3 of the Apply Air Pollution Control Technologies Wizard (VOC example) Screen #4: Enter Pollutant Concentration Data Screen This screen allows the user to add any number of pollutants to the stream and the associated concentration data (using the method and units specified in the previous screen). Only VOC pollutants can be added when analyzing VOC control technologies and only PM pollutants can be added when analyzing PM control technologies. The pull-down menu with the "Pollutant" parameter allows the user to view all of the appropriate pollutants (i.e., VOC or PM depending upon the type of pollutant you are investigating) in the Standard ACA Chemical Library and in the User-Defined Chemical Library. The user can also add new pollutants to the User-Defined Chemical Library right from this screen, which is described below. Screen #4 of the Apply Air Pollution Control Technologies Wizard Screen #5: Cost Data Screen This screen contains the user-supplied data that is used by the ACA to estimate the cost for the various control technologies. A summary of the variables that are required by the ACA and that are presented in this screen are listed below. Interest Rate The interest rate used in the ACA is the annual "real private rate of return" or the annual pretax marginal rate of return that could be realized on a private investment. The relationship between this interest rate (i) and the annual nominal interest rate (in) is given by the relationship that also includes the annual inflation rate (r), as (1+in)=(1+i)*(1+r). Year to Bring Cost to & Month/Quarter to Bring Cost to These two parameters represent the year and month for which the control device cost estimates will be valid. Data can be escalated or de-escalated to the year and month of interest. Currently the ACA has cost data for most control devices from January, 1989 to Fourth Quarter, 1997. The options for the parameter "Month/Quarter to bring cost to" include: • January • February • March • First Quarter • April • May • June • Second Quarter • July • August • September • Third Quarter • October • November • December • Fourth Quarter Operating Labor Pay Rate This is the wage rate that would be paid to personnel who would operate air pollution control equipment. Maintenance Labor Pay Rate This is the wage rate that would be paid to personnel who would maintain air pollution control equipment. Note that maintenance labor is typically higher then operating labor rates (typically by about 10%). Electricity Cost This parameter is the cost that the installation pays for electricity. Cooling Water Cost This parameter is the cost that the installation pays for water. Water Disposal Cost This parameter is the cost that the installation pays for the disposal of waste water. Steam Cost This parameter is the cost that the installation pays for steam. Dust Disposal Cost This parameter is the cost that the installation pays for the disposal of dust. Natural Gas Cost This parameter is the cost that the installation pays for natural gas. Screen #5 of the Apply Air Pollution Control Technologies Wizard Screen #6: Finish Screen Once you have arrived at this screen, you have entered all of the data required to perform an air pollution control technology analysis. By selecting the Finish button, the ACA will perform the air pollution control technology analysis and generate a report summarizing the results of the analysis. By selecting the Back button you can review and/or modify the data you have entered before running the analysis. By selecting the Cancel button you will be returned to the standard ACA interface and the air pollution control technology analysis will not be performed. Screen #6 of the Apply Air Pollution Control Technologies Wizard 5.4 Help for the Chemical Properties Conversion Worksheet Some references (e.g., the NIST www chemical database) provide many chemical properties on a basis that is different than the ACA allows (e.g., molar-basis vs. mass-basis). Therefore, a chemical property conversion worksheet is available in the ACA. To utilize this worksheet you must: 1. Set Options | User Level to "Expert" 2. Open up the Library Data | Chemicals Library | Property Conversion Worksheet This object will allow you to convert the following chemical parameters to a units basis that is consistent with the ACA chemical properties database: • Gas Phase Heat Capacity from a data given on a molar-basis to the equivalent volumetric based value that is required by the ACA. A conversion is also made from the molar-based data to the equivalent mass-based data for your reference purposes. Requires that the molecular weight value also be provided. • Heat of Condensation/Vaporization at Boiling Point from a data given on a molar-basis to the equivalent mass-based value that is required by the ACA. Requires that the molecular weight value also be provided. • Antoine vapor pressure constants (i.e., A, B, C) from data provided in the format of: • log10(P) = A - (B / (T + C)) : with P in "bar" and T in degrees "K" (as given with NIST data) to the format used in the ACA of: • log10(P) = A - (B/ (T + C) ) : with P in "mmHg" and T in degrees "C" • Heat of Combustion in the gas phase @ STP from data given on molar-basis to the equivalent mass-based value that is required by the ACA. Requires that the molecular weight value also be provided. • Henry's Law Constant from data given on a mass-basis to the equivalent volume-based value that is required by the ACA. Requires that the liquid density value also be provided. Important: Molecular Weight is required to convert the Gas Phase Heat Capacity data, the Heat of Condensation/Vaporization data, and the Heat of Combustion data, while the Liquid Density is required to convert Henry's Law Constant data. 6. Example Problems Five different scenarios are presented in this section in order to familiarize the user with the various analysis options available in the ACA and the mechanics of entering data into the ACA. The first four examples are relatively simple, utilizing one or two specific features of the ACA. The final example is more detailed. For each example a corresponding input file is provided with the installation of the ACA. The names of the input files directly correspond to the number of the example problems in this section (e.g., the input file for example #1 is named example1.oxl). All input files are located in the inputs folder (e.g., C:\aca\inputs\example1.oxl) and can be accessed from the menu bar under File | Open. Users are encouraged to enter the data as presented in each section without referring to the input files. The completed input files are provided as a reference. To enter data, start the ACA, or within an existing session start a new session by loading the library data from the main menu (i.e., File | New). Remember to save data from an existing session prior to starting a new session, otherwise this data will be lost. The instructions provided for entering data into the ACA are quite detailed. After the first example or two this level of detail may seem excessive. This is a good indication that one understands the data structure of the ACA. While it may take some time to become familiar with the (object oriented) data structure used in this program, once users are familiar with it, data management and data entry become quick and easy. 6.1 Example Scenario #1: Costing and Sizing VOC Control Devices Background/Objective The objective of this example is to determine the size and cost of applicable VOC control devices using the Analysis | Apply Control Technologies menu option. Users enter emissions data in What-if Scenarios. See the "Apply Control Technologies" Section for a generalized discussion of the Apply Control Technologies analysis option. Input Parameters/Assumptions To comply with an operating permit, assume that the emissions from a process need to be reduced by 95%. The following information summarizes the details of the process emissions: Parameter Value Operating schedule Yearly hours of operation 8,000 hr Duty Cycle continuous Stream parameters Volumetric flow rate @ STP 20,000 ft3/min Temperature 298 Kelvin Percent oxygen 21 % Moisture content 1.555 Pollutant concentrations Benzene 1,000 ppm Methyl chloride 1,000 ppm Input parameters for example #1 Data Entry Into the ACA The data provided in the table above is entered into the What-If Scenarios core object under the Size & Cost Air Pollution Control Technologies object. Double click on the Size & Cost Air Pollution Control Technologies object to expand it and then enter the yearly hours of operation and the duty cycle in the appropriate data entry slots in the Properties of Object pane as shown in the figure entitled "Entering data in the Size & Cost Control Technologies object" Entering data in the Size & Cost Control Technologies object Next, enter the stream parameters listed above into their appropriate data entry slots contained in the Stream to Control object in the Properties of Object pane as shown in the figure entitled "Entering the stream parameters into the Stream to Control object." In order to enter this data you will first need to double click on the Stream to Control object to expand it. Warning: When entering data, make certain not to use commas in numerical values. For example, enter 20000 without the comma instead of 20,000. If you do use a comma, a warning will appear on your screen. Entering the stream parameters into the Stream to Control object Next, add the two pollutants in the emission stream and enter their concentrations. To enter this data, a few steps are required: 1. Add two Pollution Concentration Data objects to the Pollutant Concentrations Data object list by following the steps below. 2. Associate the chemicals and enter the volumetric concentrations into the Pollution Concentration Data objects. This procedure is discussed in more detail below. To add a Pollution Concentration Data object, click on the Stream to Control object in Standard View, and then click on the Pollutant Concentrations object list. Click in the toolbar, and then click in the pop-up window. Repeat this procedure to add the second Pollution Concentration Data objects as shown in the figure entitled "Adding a Pollution Concentration Data object to the Pollutant Concentrations object list." Adding a Pollution Concentration Data object to the Pollutant Concentrations object list For each Pollution Concentration Data object in the Pollutant Concentrations object list, • Click on the Pollution Concentration Data object • Click on the yellow (+) sign to the left to expand that object • Click on the large yellow question mark Data object that was expanded associated with the Pollution Concentration • Click the add button on the toolbar Pick the desired chemical from the list that appears, in this case benzene or methyl chloride, and click . This procedure is shown in the figure entitled "Associating a chemical with a Pollution Concentration Data object." Repeat this procedure for the second Pollution Concentration Data object. Associating a chemical with a Pollution Concentration Data object Next, enter the volumetric concentrations for each chemical. To do this, select the Pollution Concentration Data objects (one for benzene and one for methyl chloride) and enter the Volumetric Concentration values in the Properties of Object pane. The data entry slots for the benzene Pollution Concentration Data object are shown in the figure entitled "Adding Volumetric Concentration data to the Pollution Concentration Data object." Remember not to use commas when entering numerical data. Adding Volumetric Concentration Data to the Pollution Concentration Data object Finally, enter the desired reduction efficiency (i.e., 95%). This datum is entered in the VOC Reduction Needed data entry slot contained in the Emission Reduction Needed object as shown in in the figure entitled "Entering in the desired reduction efficiency." Entering in the desired reduction efficiency Once the data has been entered, select Analysis | Apply Control Technologies from the main menu. The window "Control Device Report for WHAT-iF Scenario: Example #1" will appear as shown in the figure entitled "Control device summary report for Example #1." Control device summary report for Example #1 The ACA will create instances of the control devices that are found to be applicable. These instances are placed in the Potential Control Device Options object list below the Emission Reduction Needed object contained in the Size & Cost Air Pollution Control Technologies object as shown in the figure entitled "Listing of potential control devices for Example #1." Listing of potential control devices for Example #1 Extra Things To Try (Optional) To refine the cost of applying a control device to the pollutant stream described above, specific cost data can be added to the analysis. To do this: 1. Set the Options | User Level to "Intermediate." (This will provide access to additional data structures and parameters.) 2. Modify any or all of the following slots that are associated with the Installation Data object (at the top-level object) to see how the costs of the control devices (capital and operational) vary: • Year to bring cost estimates to • Month to bring cost estimates to • Interest Rate • Operating labor Cost • Maintenance labor Cost • Electricity Cost • Cooling Water Cost • Water Disposal Cost • Steam Cost • Natural Gas Cost 3. Re-run the Apply Control Technologies analysis option to view the results. 6.2 Example Scenario #2: Costing & Sizing PM Control Devices Background/Objective The goal of this example is to illustrate how to use the ACA to size and cost particulate matter (PM) control devices. Some additional parameters must be considered when defining PM emissions. While gaseous emissions can be described as a mixture of one or more chemicals in the vapor phase, PM pollutants cannot be described this simply. The attributes used to describe PM (e.g., mass distribution, mass median diameter) vary significantly from one emission unit to the next. Because the selection of PM control devices is dependent on these same attributes, it is important that they reflect the emissions of interest. The ACA offers three pre-defined PM emission types: PM10; PM - Liquid Mist, MMD - 1.66 µm; and PM - Liquid Mist, MMD - 7.7 µm. There are potentially an unlimited number of PM emission types, thus the user should always enter data to define their specific PM pollutants. Users enter emissions data into the What-If Scenarios core object. See the Apply Control Technologies section for a generalized discussion of the Apply Control Technologies analysis option. Input Parameters/Assumptions Parameter PM Reduction Required Value 98% Operating Schedule Yearly Hours of Operation 6,000 hr Duty Cycle intermittent Stream Parameters Volumetric Flow Rate @ STP 21,500 ft3/min Temperature 311 Kelvin % Moisture 3.253 PM Pollutant Data Particle Size Distribution Aerodynamic Diameter (µm) % mass above 0 100 0.5 96 0.8 85 1.4 60 2.5 30 4.5 8 PM Attributes Type Pollutant criteria air pollutant Corrosive false Metal false Condensable Metal false Water Soluble false Particulate Matter true Phase solid PM Concentration Data Mass Concentration at Actual 4.0 grains/ft3 Input parameters for Example #2 Data Entry Into the ACA The data provided in the Input Parameters/Assumptions section above is entered in the What-If Scenario core object under the Size & Cost Air Pollution Control Technologies object. Using the methods you learned in Example #1, enter the yearly hours of operation and the duty cycle in the appropriate data entry slots for the Size & Cost Air Pollution Control Technologies object in the Properties of Object pane. Refer to the figure entitled "Entering data in the Size & Cost Control Technologies object" as an example of this type of procedure. Enter the stream level parameters listed above into the appropriate data entry slots contained in the Stream to Control object in the Properties of Object pane. Refer to the figure entitled "Entering the stream parameters into the Stream to Control object" as an example. Next, add the PM in the emission stream and enter its concentrations. To enter this data, a few steps are required: 1. Add a Pollution Concentration Data object to the Pollutant Concentrations object list by following the steps below. 2. Associate the PM and enter the volumetric concentrations in the Pollution Concentration Data objects. This procedure is discussed in more detail below. To add a Pollution Concentration Data object, click on the Pollutant Concentrations object, then click , and click in the pop-up window. Refer to the figure entitled "Adding a Pollution Concentration Data object to the Pollutant Concentrations object list" for an example. Perform the following steps to associate the correct Particulate Matter instance to the Pollutant Concentrations object. • Click on the Pollution Concentration Data object • Click on the yellow (+) sign to the left to expand that object • Click on the large yellow question mark object that was expanded • Click the add button associated with the Pollution Concentration Data on the toolbar • Select the PM - Liquid Mist, MMD - 1.66 µm from the list that appears, and click . This procedure is shown in the figure entitled "Associating the PM type with the Pollution Concentration Data object." Associating the PM type with the Pollution Concentration Data object Next enter the mass concentration of the PM pollutant (4.0 "grains/ft3 ") into the appropriate data entry slot contained in the Pollution Concentration Data object as shown in the figure entitled "Entering the Mass Concentration at Actual Temperature and pressure to the Pollution Concentration Data object." Entering the Mass Concentration at Actual Temperature and pressure to the Pollution Concentration Data object Finally enter the desired PM reduction efficiency. This datum is entered in the Particulate Reduction Needed data entry slot contained in the Emission Reduction Needed object. Refer to the figure entitled "Entering in the desired reduction efficiency" for an example of this type of procedure. Running the Analyses Once the data has been entered, select Analysis | Apply Control Technologies. A report window will appear once the analysis is complete as shown in the figure entitled "Report window for example #2." Report window for example #2 The ACA will create instances of the control devices that are found to be applicable. These instances are placed in the Potential Control Device Options object list contained in the Size & Cost Air Pollution Control Technologies as shown in the figure entitled "List of applicable control devices for example #2" . List of applicable control devices for example #2 Extra Things To Try (Optional) Entering Your Own PM Pollutant To properly size and cost PM control devices, the qualitative parameters of the PM and its mass distribution need to be accurate. PM data should be entered for each PM emission for which control device applicability, size, and cost estimates are required. This section describes how to define PM mass distribution to be used in place of the pre-defined PM pollutants contained in the ACA chemical library. To define a new PM pollutant, expand the Library Data core object and the Chemicals Library object, then select the User-Defined Chemicals Library object list. Click on the add button on the toolbar and then click OK to add a Chemicals/Pollutant object to the list as shown in the figure entitled "Adding a Chemicals/Pollutant object." Adding a Chemicals/Pollutant object This action creates a new Chemical and its properties can now be entered. To completely define the new PM pollutant, it is necessary to specify the mass distribution data listed in the "Input Parameters for Example #2" table in the previous section. To enter this data, expand the newly added Chemicals/Pollutants object and highlight the PM Size Distribution object list. Click the add button from the toolbar and click OK. Do this six times so that six Mass Distribution Data Type objects are added to the PM Size Distribution object list. Finally, enter the Aerodynamic Diameter (µm) and Percent Mass Above data (given in the "Input Parameters for Example #2" table in the previous section) into each of the six Mass Distribution Data Type objects as shown in the figure entitled "Entering in the mass distribution data into the new PM Chemical." Entering in the mass distribution data into the new PM Chemical Sensitivity Studies Another method of refining a control device cost study (refer to Example 1 in the previous section) is to modify the parameters of the control devices that the ACA has created. To do this complete the following steps: 1. Set the Options | User Level to "Intermediate." (This yields access to some additional data structures and parameters.) 2. Expand the Potential Control Device Options object list contained in the What-if Scenario object and select any of the control devices in that list. 3. Edit any of the parameters associated with the selected control devices to see how all of the other parameters have changed. An example of some interesting parameters to modify include: year to bring cost estimates to, interest rate, control device life expectancy, auxiliary equipment cost, and pressure drop. 6.3 Example Scenario #3: Estimating Emissions (Gas Fired Boiler) Background/Objective The ACA can be used to estimate emissions from many different types of emission units; refer to the Estimate Emission Rates Section for a complete listing. The purpose of Examples 3 and 4 is to illustrate how the ACA can be used to estimate emission rates. In this example, the emission rates from a gas-fired boiler will be calculated. Input Parameters/Assumptions Parameter Value Emission Unit Type Gas Fired boiler Attempt to Estimate Emissions true Rated Input Capacity 5 MW PM Control Device in Place none SOX Control Device in Place none NOX Control Device in Place none Operating Schedule Data (for both actual and potential) Average Operational Time per Day 24 hr Days Operating per Week 7 Date the emission unit started operation January 1, 1985 Volumetric Usage Rate (Fuel Usage) 16,980 ft3/hr Type Gas Used natural gas Input parameters for Example #3 Further assume the emission unit is still operating. Data Entry Into the ACA Expand the Installation Data core object and select the Sources at Installation object list. Add a gas-fired boiler emission unit to the Sources at Installation object list by clicking the add button ( ) from the toolbar, selecting the gas fired boiler emission unit, and clicking the OK button. Enter the input data provided above into the appropriate data entry slots contained in the Gas Fired Boiler object. To do so, expand the Gas Fired Boiler object by double clicking on it. Then scroll down to find the appropriate data entry slots. Set the Attempt to Estimate Emissions Rate data entry slot to "True," specify "none" for each control device, and enter the Rated Input Capacity data as shown in the figure entitled "Data entry in the Gas Fired Boiler object." Data entry in the Gas Fired Boiler object Select the Actual Operational Data object list, click on the toolbar's add ( ) button, and click OK to add an Operational Data Set object. Expand the Gas Fired Boiler Operational Data object, select the Operating Schedule object and enter the data provided for the actual operational data into the appropriate data entry slots contained in the Operating Schedule object as shown in the figure entitled "Data entry for the Actual Operational Data in the Operating Schedule object." Note: The Average Time Operating Per Week and Hours per Schedule Time Period data slots are automatically calculated. Data entry for the Actual Operational Data in the Operating Schedule object Finally, enter the Volumetric Usage Rate and the Type Gas Used into the appropriate data entry slots contained in the Materials Inputs object as shown in the figure entitled "Entry of fuel usage rate." Scroll through the list of gas types to select "natural gas." Entry of fuel usage rate Running the Analysis After entering the data, select Analysis | Estimate Emission Rates from the menu bar. An ACA Emission Estimation Report will appear with estimates for each chemical/pollutant as shown in the figure entitled "The emissions estimate report for Example #3." The emissions estimate report for Example #3 Extra Things To Try (Optional) Other options can be applied to the source. These options allow a check for applicable regulations, suggestions, and pollution prevention alternatives. To check for applicable regulations, select Analysis | Prototype Analyses | Check for Applicable Regulations from the menu bar. The federal regulations may need to be loaded before running this analysis by selecting File | Load | ACA Federal Regulations Database. A federal regulation applicability report will appear in a new view on the screen. The report summarizes all the federal regulations potentially applicable to the gas fired boiler. The start of this report is shown in the figure entitled "Regulations Report for Example #3." Note: You will receive a warning within the report if you need to load the ACA Federal Regulations database. After loading, you will need to run the report again using the same procedure described above. Regulations Report for Example #3 To check for pollution prevention suggestions, select Analysis | Prototype Analyses | Check for Applicable Pollution Prevention Opportunities from the menu bar. The pollution prevention suggestions library may need to be loaded before running this analysis by selecting File | Load | ACA Pollution Prevention Database. A new view with a report summarizing pollution prevention opportunities will appear on the screen. The start of this report is shown in the figure entitled "Pollution Prevention report for Example #3." Note: You will receive a warning within the report if you need to load the ACA Pollution Prevention database. After loading, you will need to run the report again using the same procedure described above. Pollution Prevention report for Example #3 To check for applicable suggestions, select Analysis | Prototype Analyses | Check for Applicable Suggestions from the menu bar. The suggestions library may need to be loaded before running this analysis by selecting File | Load | ACA Suggestions Database. A new view with a report summarizing general suggestions for the gas fired boiler will appear on the screen. The start of this report is shown in the figure entitled "Suggestions report for Example #3." Note: You will receive a warning within the report if you need to load the ACA Suggestions database. After loading, you will need to run the report again using the same procedure described above. Suggestions report for Example #3 6.4 Example Scenario #4: Estimating Emissions (Waste Water Treatment Facility) Background/Objective In this section, the ACA will be used to estimate emission rates from an emission unit. This example uses a more complex emission unit (an "aerated biotreatment" unit at a waste water treatment plant) to illustrate the usefulness of the ACA. Input Parameters/Assumptions The input parameters needed for modeling a "mix tank" at a waste water treatment facility are presented in the following table. ACA Parameter Name Value SOURCE-LEVEL DATA Attempt to Estimate Emissions? true Water Surface Area 2,500 m2 Waste Water Depth 5m Plant Type Treatment Flow Model Flowthrough System Type aerated treatment Type of Aeration Mechanical Waste Water Is Bioactive True Water Has Oil Film False TYPE-DEPENDENT PROPERTIES|MECHANICAL AERATORS Turbulent Surface Area 47 m2 Total Power to Aerators 7.5 hp Number of Aerators 1 Impeller Diameter 60 cm Rotational Speed of Impeller 1200 rev/min Oxygen Transfer Rating of Surface Aerator 3 lb/hp-hr Oxygen Transfer Correction Factor 0.83 TYPE-DEPENDENT PROPERTIES|BIOACTIVITY Biomass Concentration 300 g/m3 OPERATIONAL DATA|MATERIAL USAGE DATA Volumetric Usage Rate 40 liter/sec MATERIAL COMPOSITION DATA Benzene 0.001 % BENZENE Half Saturation Biorate Constant 13.6 g/m3 Maximum Biorate Constant 19 mg/hr-g Input parameters for Example #4 Data Entry into the ACA Expand the Installation Data core object and select the Sources at Installation object list. Add a waste water plant emission unit to the Sources at Installation object list by clicking the add button ( ) from the toolbar, selecting the waste water plant emission unit, and clicking the OK button. Enter the SOURCE-LEVEL parameters from the "Input parameters for Example #4" Table into the appropriate data entry slots contained in the Waste Water Plant object as shown in the figure entitled "Parameters associated with a Waste Water Plant object." Parameters associated with a Waste Water Plant object Click on the Waste Water Plant object to expand it and expand the Type-dependent Properties object. Select the Mechanical Aerators object. Enter the TYPE-DEPENDENT PROPERTIES|MECHANICAL AERATORS parameters from the "Input parameters for Example #4" Table into the appropriate data entry slots contained in the Mechanical Aerators object as shown in the figure entitled "Parameters associated with a Mechanical Aerators object." Parameters associated with a Mechanical Aerators object When the mechanical-aerator parameters are entered, select the Bioactivity object and enter the TYPE-DEPENDENT PROPERTIES|BIOACTIVITY data shown in the "Input parameters for Example #4" Table. Select the Actual Operational Data object, click on the toolbar's add ( ) button, and click OK add an Operational Data Set object. Expand the Actual Operational Data object list, expand the Source Operational Data object, and select the Materials Inputs object. Enter the value listed the "Input parameters for Example #4" into the Volumetric Usage Rate data entry slot as shown in the figure entitled "Entry of the Volumetric Usage Rate for a Materials Inputs object" (note that you will need to change the default units given for this slot of "ft^3/hr" to "liter/sec"). Entry of the Volumetric Usage Rate for a Materials Inputs object Next a material is associated with the Materials Input object by expanding the Materials Input object, selecting the undefined Material object, and clicking on the toolbar's add button ( ) to select a material. However, in this example the material must first be created. A new material can be created from clicking the Create New button in the pop-up window containing materials and then clicking OK to add a new Material object as shown in the figure entitled "Creation of a new material from add material pop-up window." Creation of a new material from add material pop-up window The new material must be defined by specifying its chemical composition. Expand the new Material object contained in the Materials Input object and select the Composition object list. Click on the toolbar's add button and then OK to add a Chemicals with associated percents object to the Composition object list. Expand the Chemicals with associated percents object, highlight the undefined Chemical object, and click on the toolbar's add button to define the undefined chemical as benzene. Finally, click on the Benzene with associated percents object to add the benzene composition information from the "Input parameters for Example #4" Table to the Percent (by weight) data entry slot as shown in the figure entitled "Adding weight percent of benzene." The new material could have also been specified by adding it directly to the User-Defined Materials Library as previously described in Section 3 . Adding weight percent of benzene Running the Analyses From the Analysis menu, select Estimate Emission Rates. The emission results will be displayed on the screen as shown in the figure entitled "Emission rate summary report for Example #4." Emission rate summary report for Example #4 6.5 Example Scenario #5: Facility-Wide Study Background/Objective In this section the ACA will be used to analyze a facility that has two pollutant sources: a paint spray booth (used to apply primer to aerospace equipment) and a waste solvent recovery unit (used to recover spent solvent from the waste stream). This example involves creating sources, entering source data, and performing analyses on sources. In order to simplify this guide, references to figures from the previous examples are used whenever possible. Input Values/Assumptions Information regarding the operation of each of the sources is presented in the table that follows. Assume that the "potential" operational data for both sources is the same as the actual data, except that the Paint Spray Booth's potential operations include continuous operations (i.e., 24 hrs/day, 7 days/week). Parameter Value Source Specific Information Paint Spray Booth temperature 20° C (293° K) actual flow rate 180,000 cfm percent relative humidity 1.1458 % duty cycle intermittent average hours per day of operation 2.75 hours days operating per week 2 days/week start date January 1, 1997 end date December 31, 1998 desired VOC control efficiency 90% Composition of the waste gas stream cyclohexanone 12.6 ppm methyl ethyl ketone 29.3 ppm methyl n-amyl ketone 8.4 ppm methylene bisphenyl isocyanate 4.2 ppm Waste Solvent Recovery Unit temperature 100° F (310.8° K) actual flow rate 20,000 cfm percent relative humidity 3.2175 % duty cycle continuous average hours per day of operation 24 hours days operating per week 7 days/week start date January 1, 1995 end date December 31, 1995 desired VOC control efficiency 90% Composition of waste gas stream benzene 1,000 ppm methyl chloride 1,000 ppm Input parameters for Example #5 Data Entry into the ACA Data Entry for Spray Paint Booth Expand the Installation Data core object and select the Sources at Installation object list. Add a surface coating emission unit to the Sources at Installation object list by clicking the add button from the toolbar, selecting the Surface Coating object, and clicking the OK button. Open the newly created Surface Coating object and enter the information listed below into the appropriate data entry slots contained in the Surface Coating object as shown in the figure entitled "Entry of data for the surface coating operation." Parameter Value Name Paint spray booth Duty cycle Intermittent Paint spray booth data for example #5 Entry of data for the surface coating operation Expand the Surface Coating object, select the Actual Operational Data object, click on the toolbar's add button , and click OK to add an Operational Data Set object. Expand the Actual Operational Data object list, expand the Surface Coating Operational Data object, and select the Raw Stream object. In the Properties of Object pane, enter the data listed below to describe the actual operation of the Paint Spray Booth. Parameter Value Stream name Primer coat Volumetric flow rate 180,000 ft3/min Temperature 293 K Pollutant stream data for the paint spray booth, example #5 Next, enter the actual emissions data. Follow the steps below to do so. The emissions (actual = potential) are repeated here for convenience: Pollutant Concentration cyclohexanone 12.6 ppm methyl ethyl ketone 29.3 ppm methyl n-amyl ketone 8.4 ppm Pollutant concentration data for the paint spray booth, example #5 Add the three pollutants in the emission stream and enter their concentrations. To enter this data, a few steps are required: 1. Add three Pollution Concentration Data objects to the Pollution Concentrations object list. 2. Associate the chemicals and enter the volumetric concentrations into the Pollution Concentration Data objects. This procedure is discussed in more detail below. To add a Pollution Concentration Data object, click on the Pollutant Concentrations object list, click , and click in the pop-up window. Repeat this procedure until three Pollution Concentration Data objects have been added. Refer to the figure entitled "Adding a Pollution Concentration Data object to the Pollutant Concentrations object list" for an example of this procedure. For each Pollution Concentration Data object in the Pollutant Concentrations object list, 1. Click on it 2. Click on the yellow (+) sign to the left to expand that object 3. Click on the large yellow question mark 4. Then click the add button 5. Select the desired chemical from the list that appears and click . An example of this procedure is shown in the figure entitled "Associating a chemical with a Pollution Concentration Data object." To describe the operating schedule(s) of the waste solvent recovery unit, select the Operating Schedule object just above the Raw Stream object. Edit the Properties of Object pane using the Source Specific Information found in the beginning of this Example 5 section. The figure entitled "Entry of data for the Operating Schedule object" shows an example of this procedure. Entry of data for the Operating Schedule object After all the actual operation data has been entered, drag the Surface Coating Operational Data object from the Actual Operational Data object list and drop it onto the Potential Operational Data object list. This operation will create an exact duplicate of all the operational data. For this example, the only difference between the actual and potential operational data is the operating schedule. Expand the Potential Operational Data object list, expand the Surface Coating Operational Data object, and select the Operating Schedule object. Edit the appropriate data entry slots to create an operating schedule of 24 hours per day, 7 days per week. The ACA will assume this holds for the entire scheduling period. Data Entry for the Waste Solvent Recovery System The procedure for entering data for the Waste Solvent Recovery Unit is similar to the procedure for the Paint Spray Booth outlined in the section above. While the procedure is similar for all emission units, the description of data entry is repeated in detail here to avoid confusion. Expand the Installation Data core object and select the Sources at Installation object list. Add a waste solvent recovery operation emission unit to the Sources at Installation object list by clicking the add button from the toolbar, selecting the Waste Solvent Recovery Operation object, and clicking the OK button. Open the newly created Waste Solvent Recovery Operation object and enter the information listed below into the appropriate data entry slots contained in the Waste Solvent Recovery Operation object. The figure entitled "Entry of data for the surface coating operation" shows an example of this operation for the surface coating emission unit. Parameter Value Name Waste solvent recovery unit Duty cycle Continuous Waste solvent recovery unit data for example #5 Expand the Waste Solvent Recovery Operation object, select the Actual Operational Data object list, click on the toolbar's add button, and click OK to add an Operational Data Set object. Expand the Actual Operational Data object list, expand the Waste Solvent Recovery Operational Data object, and select the Raw Stream object. In the Properties of Object pane, enter the data listed below to describe the actual operation of the waste solvent recovery operation. Pollutant Concentration Volumetric flow rate 20,000 ft3/min Temperature 310.8 K Actual (and potential) operation data for waste solvent recovery unit, example #5 Next, enter the actual emissions data using the steps that follow. The actual and potential emissions are repeated here for your convenience: Pollutant Concentration benzene 1,000 ppm methyl chloride 1,000 ppm Composition of waste gas stream from Waste solvent recovery unit, example #5 Add the two pollutants in the emission stream and enter their concentrations. To enter this data, a few steps are required: 1. Add two Pollution Concentration Data objects to the Pollution Concentration Data object list. 2. Associate the chemicals and enter the volumetric concentrations into the Pollution Concentration Data objects. This procedure is discussed in more detail below. To add a Pollution Concentration Data object, click on the Pollutant Concentrations object list, click , and click in the pop-up window. Repeat this procedure so that two Pollution Concentration Data objects have been added. Refer to the figure entitled "Adding a Pollution Concentration Data object to the Pollutant Concentrations object list" for an example of this procedure. For each Pollution Concentration Data object in the Pollutant Concentrations object list, 1. Click on it 2. Click on the yellow (+) sign to the left to expand that object 3. Click on the large yellow question mark 4. Then click the add button 5. Pick the desired chemical from the list that appears and click . An example of this procedure is shown in the figure entitled "Associating a chemical with a Pollution Concentration Data object". To describe the operating schedule(s) of the waste solvent recovery unit, select the Operating Schedule object just above the Raw Stream object. Edit the Properties of Object pane using the Source Specific Information found in the beginning of this Example 5 section. The figure entitled "Entry of data for the Operating Schedule object" shows an example of this procedure. After all the actual operation data has been entered, drag the Waste Solvent Recovery Operation Operational Data object from the Actual Operational Data object list and drop it onto the Potential Operational Data object list. This operation will create an exact duplicate of all the operational data. For this example, there is no difference between the actual and potential operational, therefore the potential operational data object that was created from the actual does not need to be modified. Running the Summarize Emissions Analyses After entering the information for the two sources and their actual and potential operating parameters, the user can run the analyses for summarizing emissions. This analysis calculates facility-wide emissions. In order for the ACA to summarize facility-wide emissions, the time period of interest must be specified by the user. Open the Emissions Summary-Facility Wide object and enter the start and stop dates for the analysis period in the Properties of Object pane. For this example a one-year period will be used, assuming a start date of January 1, 1998 and a stop date of December 31, 1998. The analysis time period can be longer than one year or can be a fraction of one year, depending upon the needs of the user. It should be noted that these dates do not have to match the operational dates of any of the sources at the facility. The ACA program determines which sources are in operation during the analysis period; considers how these sources operate (based upon the individual source operating schedules); and uses this information to determine the actual and potential emissions for the facility as a whole, on a chemical-by-chemical basis. To perform this analysis select Analysis | Summarize Emissions and then either Directly out of Emission Units or From Stack (to Atmosphere) from the main menu. Please refer to the "Summarize Emmisions" Section in Section 4 for a general discussion of these two analysis options. These analyses will both produce three reports with each report in its own window. The three figures shown below show the report windows for this example after the Directly out of Emission Units analysis is run. Report of actual and potential emissions on an emission unit-by-emission unit basis for example #5 Facility-Wide Potential Emissions report for example #5 Facility-Wide Actual Emissions report for example #5 Running the Apply Control Technologies Analysis The ACA can be used to investigate the cost of control technologies. However this analysis is always based on information provided as part of the What-if Scenarios core object. Therefore a what-if scenario must be created before this analysis can be run. Because of the drag and drop feature of the ACA, a what-if scenario can be created in just a few steps. First expand the Surface Coating object until the Raw Stream object is visible. Expand the What-if Scenarios object and then the Size & Cost Air Pollution Technologies object so that the Stream to Control object is visible. Then drag the Raw Stream object and drop it onto the Stream to Control object. The figure entitled "Drag and drop of Raw Stream object onto Stream to Control object" shows this procedure. An independent copy of the surface coating stream is now contained in the Stream to Control object. Drag and drop of Raw Stream object onto Stream to Control object A few other data entry slots must be filled in before the Apply Control Technologies analysis can be run. First highlight the Size & Cost Air Pollution Control Technologies object and fill in the data entry slots for Study Title, Yearly Hours of Operation, and Duty Cycle as shown in the figure entitled "Entering What-if Scenario information for example #5" . The duty cycle information was presented in the "Input Values for Example #5" Table and the yearly hours of operation were calculated in the Operating Schedule object. Finally, select the Emission Reduction Needed object and enter 90 "percent" into the VOC Reduction Needed data entry slot. Entering What-if Scenario information for example #5 Select Analysis | Apply Control Technologies to run the analysis. Various control technologies will be applied to the waste gas streams from both of the emission units in an attempt to meet the desired reduction efficiencies. A new view with a report will be displayed with the analytical results. The figure entitled "Control device report for example #5" shows this report for the surface coating emission unit. Control device report for example #5 The same steps could be applied to run this analysis for the waste solvent recovery unit. Running Applicability Analyses Finally, from the main menu select: • Analysis | Prototype Analyses | Check for Applicable Regulations • Analysis | Prototype Analyses | Check for Applicable Pollution Prevention Opportunities • Analysis | Prototype Analyses | Check for Applicable Suggestions The ACA will compare each of the sources in this example with ACA library data for federal regulations, pollution prevention opportunities, and suggestions. All results are saved to text files, which the user can access from outside the ACA. Again, file names are listed at the bottom of each of the corresponding "results" windows. Additional Things To Try For the waste solvent recovery unit, see how applying a control technology will effect facilitywide emissions. To do this, expand the Size & Cost Air Pollution Control Technologies object contained in the What-if Scenarios object in order to view the control technologies that were found to be applicable in the Potential Control Device Options object list. Select one of these control devices and locate the "After Control Output Stream." This stream contains an estimate of the air pollution emission rates after the associated control technology is applied. Drag and drop the "After Control Output Stream" stream to the Stack Stream associated with the actual operational data set for the waste solvent recovery unit. This process will override the Stack Stream's dependency on the Raw Stream and the Stack Stream object will now contain the emissions that were the result of the what-if scenario analysis. Finally, re-run the Analysis | Summarize Emissions | From Stack (to Atmosphere) from the main menu. Note how the actual emissions have been reduced. Appendix A Tips on Using Units in the ACA As you use the ACA, you will notice that many of the slots are floating point numbers with associated physical units. The information in this help file is to provide help in entering data that has associated units. Important: If you are interested in programming with units, while it is quite easy and intuitive, you should review the EXLGUI programmer's manual, which is available on the Internet at the D & E Technical Web site. Click here to go there now. General Rules for Entering Associated Units Undefined slots that are floating point numbers with associated physical units will be presented in the slot window with a "?" and the default units (e.g., "m/s"). The default set of units should be used as a guide for the required dimensions of the units, and not as a requirement that the data be entered in those specific units. For example, let's assume that a slot in the ACA is requiring the volumetric flow-rate gas (i.e., volume of gas per unit time), the slot window (before being defined) might appear as: Volumetric Flow Rate ? "cfm" If the volumetric flow-rate was known to the user in "m^3/sec" then the user could fill in the slot window with those units, e.g., Volumetric Flow Rate 10 "m^3/sec" If, on the other hand, the user entered units of "kg/sec" a data-entry error would result. The following "Tips" should help to clarify the remaining rules of using physical units when entering data. 1. Units are separated from the floating point number in the slot window by at least one space and must be enclosed in double quotes, for example: slot a 2"meters" 2. The units from one slot to another do not have to be in a consistent set of units, for example: slot a 2.0"lb/sec" slot b 9.7"kg/foot" slot a 4.2"mm/year" 3. When entering units that contain more than one type of unit in the numerator or denominator of a slots units, then a "-" is used to separate the units. For example, the universal gas constant could be entered in to a slot as: slot a 8.314"Joules/gmmole-K" 4. The ACA limits the raising of units to integer powers. So, for example, the following units are allowed: slot a 5.0 "m^3/s-lb" slot a 10.0 "m^-1" The following would not be allowed: slot a 5.0 "m^2.2" 5. Use only those base units and prefixes to units that are allowed in the ACA database. While the allowable list is fairly extensive, it is important to know what is available to take the greatest advantage of the ACA. A review of the following two tables ("Base Units" and "Prefixes To Units") is helpful. Caution: When raising units to a power, prefixes are considered first. Table of Base Units Available in the ACA Quantity Length Mass Time Temperature Primary Unit Other Acceptable Units meter meters, m, Meters foot feet, ft, Feet inch inches, in, Inches yard yards, yd, Yards mile miles, mi, Miles micron microns angstrom angstroms, Angstrom, Angstroms, A gram gm, grams, g, Grams pound pounds, lb, lbs, Pounds grain grains, gr ton tons, t second seconds, sec, secs, Seconds, s minute minutes, min, mins, Minutes hour hours, hr, hrs, Hours day days, Days week weeks, wk, Weeks year years, yr, Years kelvin Kelvin, K, kelvins, Kelvins rankine Rankine, R, rankines, Rankines C (not allowed in programming, only data entry) F (not allowed in programming, only data entry) Plane Angle Area radian radians, Radians degree degrees, deg, Degrees revolution revolutions, rev, Revolutions, Revs acre acres, Acres Hectares Volume Velocity liter liters, l, Liters gallon gallons, gal, Gallons pint pints, Pints quart quarts, Quarts cf ft^3 knot knots, Knots mph Frequency hertz Hertz, hz, Hz Force newton newtons, Newton, Newtons, Neutons, N dyne dynes, dyn, Dynes lbf Energy Power joule joules, Joule, Joules, J WH Watt-hours erg ergs, Ergs btu btus, Btu, BTUS, BTUs, btu calorie calories, cal watt watts, Watt, Watts, W, w horsepower hp, BHP, Horsepower, horsepower pascal pascals, Pascal, Pascals, Pa bar bars, Bars atmosphere atmospheres, Atmosphere, Atmospheres, atm mmHg mmMercury, mmHg torr torrs, Torr, Torrs, torr inchwater incheswater, inches_water, inwater, in_water, inchwater footwater feetwater, footwater, ftwater, ft_water, feet_water Value dollar dollars, DOLLAR, DOLLARS Volume per Time cfm cubic(foot)/min, CFM Current ampere Ampere, Amperes, Amp, amp, amps, Amps Voltage volt V, Volt, Volts, volts Amount of Substance mole gmole, gmmole Pressure lbmole Luminosity candela Concentration ppm Relative Amount of percent Substance Warning: When raising units to a power, prefixes are considered first. Table of Prefixes to Units It is customary, especially in the metric system of units, to modify a unit name with a prefix, such as "kilo" or "milli." The unit conversion database contains a section where prefixes are specified. The prefixes in the default EXLGUI units conversion database are listed below. Prefix Name Abbreviation Value atto a 10^-18 femto f 10^-15 pico p 10^-12 nano n 10^-9 micro u 10^-6 milli m 10^-3 centi c 10^-2 deci d 10^-1 deca --- 10^1 hecto h 10^2 kilo k 10^3 mega M 10^6 giga G 10^9 tera T 10^12 peta P 10^15 exa E 10^18 Warning: When raising units to a power, prefixes are considered first. Examples With Units Units Example 1 "km^3" is equivalent to "(km)^3" Units Example 2 Assume that you are told that the cost of a material is $100 per thousand (1000) cubic feet. This material cost would first be defined as: var cost: float "dollar/ft^3"; The following ways would be correct ways to specific the value: cost:= cost:= cost:= cost:= 100 0.1 0.1 100 "dollar"/ 1000 "cf"; "dollar/ft^3"; "dollar/cf"; "dollar/kcf"; The following ways would not be a correct way to specific the value: cost:= 100 "dollar/kft^3"; // this value is equivalent to $100,000,000. per thousand cubic feet! Appendix B Tips on Obtaining and Estimating Chemical Property Data The standard ACA chemical database contains the commonly available chemical properties for a wide range of common volatile organic compounds (VOCs) and hazardous air pollutants (HAPs). To date, estimated chemical properties have not been used to "fill out" the ACA chemical database. The end user may need to either use estimated chemical properties (for those chemicals already listed in the ACA's chemical database) and/or obtain measured values from the literature for chemicals that are not yet in the ACA database that they choose to add. The guidance in this help menu will help to point the user in the right direction for obtaining and estimating the chemical properties that are need for costing and sizing air pollution control technologies. Background on the Chemical/Pollutant Properties Required By the ACA The following chemical properties are used by the ACA in determining the size and cost of air pollution control technologies (along with the associated control technology calculations that require the properties). Background on the VOC Chemical Properties Required By the ACA VOC Chemical Properties Required By the ACA Listed By Property Chemical Property Required for Analysis of… Antoine Constants for Vapor Pressure Refrigerated condensers, carbon adsorbers* Boiling Point Refrigerated condensers, carbon adsorbers Critical Temperature Refrigerated condensers Diffusion Coefficient, Liquid in Water Gas absorbers Diffusion Coefficient, Vapor in Air Gas absorbers Gas Phase Heat Capacity Refrigerated condensers Heat of Combustion Thermal incinerators and flares Heat of Condensation Refrigerated condensers, carbon adsorbers Henry's Law Constant Gas absorbers Index of Refraction Carbon adsorbers* Is Halogenated? Thermal incinerators LEL (Lower Explosive Limit) Thermal incinerators, flares, and carbon adsorbers Liquid Density (at STP) Carbon adsorbers* Molecular Weight All VOC control devices Vapor Pressure @ 293 K Carbon adsorbers* Yaws Coefficients Carbon adsorbers* Note: (*) The analysis for Carbon adsorbers requires either just the Yaws Coefficients or Antoine Constants / Vapor Pressure @ 293 K, Boiling Point, Heat of Condensation, Index of Refraction, LEL, Liquid Density, and Molecular Weight. VOC Chemical Properties Required By the ACA Listed By Control Technology Control Technology Required Chemical Properties Carbon adsorbers (Option #1 parameters) Antoine Constants or Vapor Pressure @ 293 K, Boiling Point, Heat of Condensation, Index of Refraction, LEL, Liquid Density, and Molecular Weight Carbon adsorbers (Option #2 parameters) Yaw's Coefficients and Molecular Weight Flares Heat of combustion, LEL, and Molecular Weight Gas absorbers Diffusion coefficient liquid in water, Diffusion coefficient vapor in air, Henry's Law Constant, Molecular Weight Refrigerated condensers Antoine Constants for Vapor Pressure, Boiling Point, Critical Temperature, Gas Phase Heat Capacity, Heat of Condensation, Molecular Weight Thermal Incinerators Heat of Combustion, Is Halogenated?, LEL, and Molecular Weight VOC Chemical Properties Definitions Antoine Constants for Vapor Pressure (i.e., A, B, C) The Antoine constants are for equations calculating vapor pressure (P) as a function of temperature (T). In the ACA, the Antoine constants must be in the form that will calculate pressure in units of mmHg, give temperature in units of "C." The form of the equation is: log(P) = A-(B/(T+C)). This parameter IS Temperature dependent. This parameter is required for: refrigerated condensers and carbon adsorbers*. Boiling Point This parameter gives the temperature at which a liquid will boil. While the boiling point can be measured at a variety of pressures, it is typically at standard pressure, unless otherwise noted. In the ACA, the boiling point is for standard pressure. This parameter is NOT temperature dependent. This parameter is required for: refrigerated condensers and carbon adsorbers. Critical Temperature The critical temperature is the temperature above which a compound in the gas phase cannot become liquefied with an increase of pressure. This parameter is NOT temperature dependent. This parameter is required for: refrigerated condensers. Diffusion Coefficient, Liquid in Water This parameter is a measure of the diffusivity of the chemical in water. This parameter IS temperature dependent. This parameter is required for: gas absorbers. Diffusion Coefficient, Vapor in Air This parameter is a measure of the diffusivity of the chemical in air. This parameter IS temperature dependent. This parameter is required for: gas absorbers. Gas Phase Heat Capacity This parameter is a measure of the amount of heat required to raise the temperature of a unit mass of a compound (in the gas phase) one degree. This parameter IS temperature dependent. This parameter is required for: refrigerated condensers. Heat of Combustion This parameter is a measure of the energy that is given off when the chemical (in the gas phase) is completely oxidized. Data for this parameter may be available on a mass-basis, on a volumebasis, or on a molar-basis. This property should be given for STP, but it is not strongly temperature dependent. This parameter is required for: thermal incinerators and flares. Heat of Condensation at Boiling Point This parameter is a measure of the amount of energy that is given off when a vapor condenses to a liquid at its normal boiling point. It should be entered into the ACA as a positive number and is equal in magnitude to the enthalpy (heat) of vaporization. The heat of condensation at a given condensation temperature other than the boiling point will be estimated directly in the ACA using the Watson equation (OAQPS, equation 8.13). This parameter is NOT temperature dependent. This parameter is required for: refrigerated condensers and carbon adsorbers. Henry's Law Constant This parameter is a measure of the slope of the gas absorption equilibrium curve over a small temperature range. The ACA offers two ways to model gas absorbers: 1) a graphical approach; and 2) an approach that uses the Henry's Law Coefficient. The default approach is using the Henry's Law Coefficient since this can be done using chemical properties that are readily available in the ACA database and are not dependent on the specifics of the pollutant stream concentration and removal efficiency desired. The Graphical Method is more accurate, but requires a graph of the equilibrium curve and operating line. Obtaining the data required for the Graphical Method is more difficult than the more simplistic approach of using the Henry's Law Approach. The Graphical Approach requires that the following two additional parameters: 1) the Outlet equilibrium pollution concentration in solvent, Xo* (on the op. line); and 2) the Gas pollution concentration in equilibrium with Xo (Yo* ). The Henry's Law Approach requires the Henry's Law Coefficient to be entered. This parameter IS temperature dependent. This parameter is required for: gas absorbers. Index of Refraction The index of refraction provides information on how a chemical interacts with light and is the ratio of the speed that light travels in a perfect vacuum to the speed that light will travel through the chemical. This parameter is used in the Calgon Corporation's modified DubininRadushkevich equation to calculate the polarizability used in estimating the adsorptivity of a compound on activated carbon. This parameter is NOT temperature dependent. This parameter is required for: carbon adsorbers. Is Halogenated? Halogenated compounds include those compounds that contain group VIIA elements from the periodic table, namely: fluorine (F), chlorine (Cl), bromine (Br), iodine (I), and astatine (At). This parameter is used to determine the required combustion temperature for thermal incineration halogenated compounds require a higher combustion temperature. This parameter is NOT temperature dependent. This parameter is required for: thermal incinerators. LEL (Lower Explosive Limit) This parameter is a measure of the minimum concentration in air that will support combustion. Concentrations greater then 25% of the LEL are typically considered to be unsafe for standard air pollution control technologies. This parameter is NOT temperature dependent. This parameter is required for: thermal incinerators, flares, and carbon adsorbers. Liquid Density (at STP) This parameter is a measure of the density of the liquid at standard temperature and pressure. The liquid density is equal to the (molecular weight)/(liquid molar volume). The liquid density is used to calculate the mass loading for the carbon adsorbers calculations. This parameter is NOT temperature dependent. This parameter is required for: carbon adsorbers. Molecular Weight This parameter is NOT temperature dependent. This parameter is required for: all VOC control devices. Vapor Pressure @ 293 K This parameter is the specification of a compound's vapor pressure at standard temperature (i.e., 293 K). If the Antoine constants are known, then they can be used to estimate this parameter, but if actual data is available it is preferred. DATA VALID AT 293 K, 1.0 atm. This parameter is required for: carbon adsorbers*. Yaws Coefficients The Yaws Coefficients (i.e., A, B and C) are used as part of an alternate approach to calculating the adsorptivity of a compound on activated carbon. These coefficients will be used/requested if all of the chemical parameters that are required for the Calgon Corporation's modified DubininRadushkevich equation are not available. Pollution Engineering presented an article by Dr. Charles Yaws that provides a carbon adsorption equilibrium concentration equation and associated coefficients for a long list of VOC chemicals. The equation used to calculate the adsorption capacity (Q, in units of "cm^3/hg") is given as: log10 (Q) = A + B*Log10(Y) + C*(log10(Y))^2, where Y is the VOC concentration in units of "ppm." Based upon an agreement that the ACA group and the US EPA / OAQPS / ISEG group has with Dr. Yaws, a limited number of chemicals (i.e., 30) with associated Yaws coefficients are given in the ACA database. The remaining chemicals in the ACA database require the user of the ACA to input the equation coefficients into their own personalize copy of the ACA themselves from either the table in the Pollution Engineering journal article or by buying Dr. Yaws' database (which is approximately $40). Professor Carl Yaws can be reached at: P.O. Box 10053, Beaumont, Texas, 77710, 409880-8787. DATA VALID AT 298 K. Required for: Carbon adsorbers. Background on the Particulate Matter (PM) pollutant properties required by the ACA The properties listed on the PM Pollutant Properties Screen are those properties that are required for determining the cost and applicability of a variety of PM air pollution control technologies. Definitions of the various properties that are required and are to be supplied by the end-user are given below. Is Water Soluble Specify if the PM is soluble in water. Particulate Phase Specify if the PM is a liquid or a solid. PM Density This is a measure of the density of the PM. PM Size Distribution Required for: All PM control technologies. This parameter represents the aerodynamic particle size distribution for pollutants that are classified as particulate matter (PM). If a chemical/pollutant is a gas, do NOT enter any data in this slot. For PM data, it is advised that at least five sets of data (particle size versus percent mass above) be entered. This data will be used to calculate: (1) mass median diameter; (2) cut diameter; and (3) geometric standard deviation these parameters are typically required to determine the applicability of PM air pollution control devices. The ACA will assume a best-fit log-normal aerodynamic particle size distribution (this gives a straight line on log-probability paper when plotted) in the calculation of the mass median diameter, the geometric standard deviation, and the cut diameter. Literature References for Obtaining VOC Chemical Properties There are numerous resources available for obtaining the chemical properties required by the ACA. Some of the more commonly available references that have been used to date in obtaining chemical properties for the ACA chemical database are listed below. With each reference listed, the relevant chemical properties that can potentially be estimated are listed. Perry, R.H., and D. W. Green, eds., Perry's Chemical Engineers Handbook, 6th ed., McGrawHill, New York, 1984. • Heat of combustion values • Liquid Density @ STP estimation method • Gas Phase Heat Capacity estimation method • Critical Temperature values • Heat of Condensation values Lide, D. R., ed., CRC Handbook of Chemistry and Physics, 72nd ed., CRC Press, Inc, Cleveland, OH, 1977. • Antoine Constants for Vapor Pressure (i.e., A, B, C) • Boiling Point • Critical Temperature • Diffusion Coefficient, Liquid in Water • Gas Phase Heat Capacity • Heat of Combustion • Heat of Condensation • Henry's Law Constant • Index of Refraction • LEL (Lower Explosive Limit) • Liquid Density (at STP) • Molecular Weight Dean, J. A., ed., Lange's Handbook of Chemistry, 14th ed., McGraw-Hill, Inc, New York, 1992. • Antoine Constants for Vapor Pressure (i.e., A, B, C) • Boiling Point • Critical Temperature • Gas Phase Heat Capacity • Heat of Condensation • Index of Refraction • Liquid Density (at STP) • Molecular Weight • Vapor Pressure @ 293 K Yaws, Carl L., Chemical Properties Handbook: Physical, Thermodynamic, Environmental, Transport, Safety, and Health Related Properties, McGraw-Hill, Inc, New York, 1999. • Vapor Pressure Equations Non-Antoines Equation • Boiling Point • Critical Temperature • Gas Phase Heat Capacity • Heat of Combustion • Heat of Condensation • Henry's Law Constant • Index of Refraction • LEL (Lower Explosive Limit) • Liquid Density (at STP) • Molecular Weight Yaws, Carl L. et al., "Determining VOC Adsorption Capacity," Pollution Engineering, February 1995, pp. 34-37. The Yaws Coefficients (i.e., A, B and C) are used as part of an alternate approach to calculating the adsorptivity of a compound on activated carbon. These coefficients will be used/requested if the chemical parameters that are required for the Calgon Corporation's modified DubininRadushkevich equation are not all available. Pollution Engineering presented an article by Dr. Charles Yaws that provides a carbon adsorption equilibrium concentration equation and associated coefficients for a long list of VOC chemicals. The equation used to calculate the adsorption capacity (Q, in units of "cm^3/hg") is given as: log10 (Q) = A + B*Log10(Y) + C*(log10(Y))^2, where Y is the VOC concentration in units of "ppm." Based upon an agreement that the ACA group and the US EPA / OAQPS / ISEG group has with Dr. Yaws, a limited number of chemicals (i.e., 30) with associated Yaws Coefficients are given in the ACA database. The remaining chemicals in the ACA database require the user of the ACA to input the equation coefficients into their own personalize copy of the ACA themselves from either the table in the Pollution Engineering journal article or by buying Dr. Yaws' database (which is approximately $40). Professor Carl Yaws can be reached at: P.O. Box 10053, Beaumont, Texas, 77710, 409880-8787. NIST WWW Database The following Internet site contains the NIST electronic chemical database: http://webbook.nist.gov/chemistry/ Relevant properties that are available (combination of measured and estimated values) include: • Chemical Structures* • Molecular Weight • Heat Capacity Gas Phase • Boiling Point • Critical Temperature • Heat of Vaporization // Heat of Condensation • Antoine Equation Constants: log10(P) = A - (B / (T + C)) • Vapor Pressure Data • Heat of Combustion • Henry's Law Constant (Water Solution) Note: The chemical structure can be of value when using some chemical property estimation methods. * Literature References for Estimating Chemical Properties The following references have chemical property estimation techniques that may be of value. With each reference listed, the relevant chemical properties that can potentially be estimated are listed. Edward J. Baum "Chemical Property Estimation Theory and Application," Lewis Publishers, New York, 1998 • Boiling Point • Diffusion Coefficient, Liquid in Water • Diffusion Coefficient, Vapor in Air • Henry's Law Constant • Absorbers • Liquid Density (at STP) • Vapor Pressure Data Lyman, W.J., W. F. Reehl, and D. H. Rosenblatt, eds., Handbook of Chemical Property Estimation Methods, Mcgraw-Hill, New York, 1982. • Boiling • Critical Temperature • Diffusion Coefficient, Liquid in Water • Diffusion Coefficient, Vapor in Air • Gas Phase Heat Capacity • Heat of Condensation • Henry's Law Constant • Index of Refraction • Liquid Density (at STP) • Vapor Pressure Data Douglas A. Logan, "Estimating Physical Properties for Control Equipment Design," Environmental Progress, Winter, 1997, Vol. 16, No. 4. • Heat of Combustion • Vapor Pressure • Heat of Vaporization • LEL • Liquid Heat Capacity • Gas Phase Diffusion Coefficients • Molecular Volume • Liquid Phase diffusivity • Vapor Liquid Equilibrium (Henry's Law Constant) Appendix C End-User Extendibility Basic end-user extendibility of the ACA deals with the ability of the user to modify (override) the functionality of slots directly from the graphical user interface by using the Show slot functions . The details of basic end-user extendibility are limited to using the View detailed information button to identify the variable names of other slots that belong to the same class. This is very much like programming a spreadsheet. Like basic end-user extendibility, intermediate end-user extendibility replaces/adds equations to the user's data, but does not add new source code to the core ACA program. In other words, all basic and intermediate end-user extensions (see below) will "reside" in the data files for the ACA (e.g., *.oxl files) and will be associated with a single object. The fact that the extension resides in the data files should not lead one to believe that extensions at these two levels (basic and intermediate) need be trivial. Entire complex algorithms can be changed. Advanced end-user extendibility, on the other hand, considers those additions to the ACA source code that reside outside of the data files. They are compiled when the ACA is started and become part of the core system. For example, a user can define a new EXLGUI class representing a new type of air pollution source. This new source type can then be used exactly like the source types that are included in the standard ACA library. Note that the information presented here does not address the details of the EXLGUI programming language. It is assumed that the reader of this appendix has a basic understanding of the features of EXLGUI. If the reader is not familiar with the EXLGUI programming language, then they should refer to the EXLGUI Programmer's Manual, Version 3.1. Basic End-User Extendibility Users can edit existing functions or create new functions in the function view. Users can view the underlying functions of data entry slots by selecting the button to view both the functions and the values or the button to view the functions alone. The button will toggle the view back to just values. The figure below shows an example of the right pane of the Standard View displaying both values and functions. The list of potential control device options is generated after running the Apply Control Technologies analysis for a What-if Scenario. Details of this analysis is discussed in the "Apply Control Technologies" Section of this manual . The data entry slot for Pressure drop will be used for a simple example of how users can modify functions. Data entry slot values and functions The function view (i.e., using the "Show slot functions" button ) for the Pressure drop data entry slot shows a small section of computer code. This code is the function for pressure drop. In this case the function is a simple if-then type statement and the value of the slot is dependent on the slot name heat_exchanger_efficiency. If a user had updated information from a vendor indicating that the pressure drop should really be 22 inches of water for heat exchanger efficiencies greater than or equal to 0.86, the user could modify the function to reflect this new information. The figure below shows an edited function and the result this change had on the value of the Pressure drop data entry slot. The icon showing the slot type also changed to indicate that a user-supplied function had been entered. This brief example and discussion only covers a very small portion of the user extendibility options within the ACA. Results from editing pressure drop function Users can obtain detailed information about a data entry slot by clicking on the toolbar button . The information includes the slot name of the data entry slot. The slot name is required to create user-supplied functions that depend on that slot. The "Set slot to unknown" toolbar button and the "Reset slot to default value" toolbar botton are used to set slots to unknown and to reset slots to the default value respectively. For data entry slots, setting a slot to unknown sets the value to unknown and also removes any underlying function. For data entry slots with a function, resetting the slot to the default value will regenerate the function and the value calculated by the function. Note: If a data entry slot without an underlying function is first set to unknown and then reset to the default value, the original value will not be recovered since there is no function to calculate the value. Icon Description Reveal detailed information about a slot Show slot values Show slot functions Show slot values and functions Toolbar buttons Intermediate End-User Extendibility Intermediate end-user extendibility can be considered the ability for the end-user to reprogram a slot by using global declarations (i.e., constants, procedures, functions, and types), as well as by referencing slots, procedures and functions of other objects in the ACA's data containment hierarchy. These two forms of intermediate end-user extendibility will be addressed separately. The Types of Objects view To determine how a particular object is defined, it is best to use the Types of Objects window. Choosing any of the available object types, one will see a list of the properties associated with the object in the Properties of Objects pane. By selecting a particular property, the EXLGUI source code associated with that property will appear in the Definition of Property pane located below the Types of Objects and Properties of Objects panes. The user can then determine how a particular slot, function, or procedure is defined, and decide whether to modify its definition by overriding it with a particular value, modifying an existing equation, or entering a new equation. The Types of Objects view will be most useful for advanced users who wish to extend the capabilities of the ACA. The Types of Objects view includes all of the various data types that are available in the ACA. In many cases the data types are arranged hierarchically. The parameters (or "slots"), functions, and procedures associated with each of these data types can be viewed from this view, as can the source code that makes up each slot. The first pane in the Types of Objects view, the upper-left pane, is titled Available Object Types and includes all of the data types that exist in the ACA. These are the hierarchically arranged data types that have been defined in the ACA. This pane is the same as the Types of Objects view in previous versions of the ACA. The second pane, the upper-right pane, of the Types of Objects view is titled Properties of Object. These are the slots (i.e., parameters), functions, and procedures associated with the "object type" that is selected in the upper-left view. The last pane, the bottom pane, in the Types of Objects view allows the user to view the source code that describes the slot, function, or procedure selected in the Properties of type ... pane. The title of this pane changes and is based upon the selected slot, function, or procedure. Referencing global declarations Global declarations can be used at any point in the ACA source code. Many slots within the ACA are described by using a global declaration of one type or another. For example, the global constant "GasLawConstant" is a global constant that is used in the calculation of many slots. An EXLGUI identifier can reference either a local, class-local, or global declaration. For example, consider the following source code fragment: var G: integer; ----class C; slot S: integer; function F: integer; end class; ----slot C.S: integer; const Z = 3; return G + F + Z; end slot; The return statement in slot S references three declarations: G (a global variable), F (a class-local function), and Z (a local constant). When the user wishes to find the declaration of an identifier that is encountered in a slot's source code, they should first search for the identifier's declaration in the current slot's source code, then in the current slot's class, then in the list of global declarations. When searching for an identifier's declaration in a class, either the Standard View or the Type of Objects view can be used. Global declarations can be searched for in the All Global Identifiers view, which can be displayed by choosing View|Advanced Views|All Global Declarations from the menu. Referencing slots, procedures and functions of other objects in the ACA's data containment hierarchy The three core objects in the ACA are the reference points for identifying slots, functions, and procedure used in other calculations. The three core objects and their programming name are: Library Data = library Installation Data = installation What-if Scenarios = worksheet With this bit of knowledge, the end user can reference slots, procedures, and functions of any other instance contained in the ACA data hierarchy. For example, the stream that is associated with the Control Technology What-if Scenario can be referenced like this: Worksheet.SingleControlScenario.Stream The programming names for the other slots following the core object were found by selecting those slots in the ACA and then pressing the "View detailed information" toolbar button . Advanced End-User Extendibility Advanced end-user extendibility can be considered the ability for the end-user to add new source code to the ACA. New actions, classes, subclasses, global variables, global functions, and global procedures can be added to the ACA. The basics of adding new source code to the ACA In order to add new source code to the ACA, the user must perform three steps. Step 1: Create one or more text files to hold the source code. All EXLGUI source code must be stored in text files. These files can be created by any text editor. The Notepad® utility that ships with the Microsoft Windows® operating systems works fine. Word processors such as Microsoft Word® should not be used, as they store documents in a proprietary binary format that cannot be read by the EXLGUI. Files that hold EXLGUI source code should be given the extension .exl. As an aid to the user, the ACA ships with a sample source code file called User_Defined_Code.exl. This file contains sample EXLGUI declarations. The user can add their own declarations to this file, using the existing sample code as a template for their own. The actual source code for the ACA is stored in the file ACA_Version_6_0_Source_code.exl. This file is shipped in an encrypted format to protect it from user modifications. This code can be view through the EXLGUI (See Other Notes below). Step 2: Insure that the files are included when the ACA is compiled When the ACA is first started, it reads a file called exlgui.fxl. This file contains a list of all of the EXLGUI source code files that are compiled as part of the ACA. The version of this file that ships with the ACA contains the following two lines. uses 'ACA_Version_6_0_Source_code.exl'; uses 'User_Defined_Code.exl'; These lines tell the EXLGUI that all of the ACA source code is contained in the two files: ACA_Version_6_0_Source_code.exl and User_Defined_Code.exl. The user can add lines to exlgui.fxl to reference other source code files if desired. Step 3: Add the source code to the files. New EXLGUI source code should be added to an .exl file in the form of one or more EXLGUI declarations, separated by lines of 5 dashes. The sample source code in User_Defined_Code.exl can be used as a model. The EXLGUI Programmer's Manual should be consulted for details. Other Notes Concerning End-User Extendibility • All ACA source code, including any user-supplied code, is compiled each time the ACA is started. If there are any errors in the code, a message will be displayed at this time. If the user edits user-supplied code, the changes will not take effect until the ACA is restarted. • All declarations (including user-supplied ones) can be seen directly from the graphical user interface (GUI) of the ACA, including: • Classes • Seen in the upper left pane when you select View | Advanced Views | Types of Objects from the GUI. This pane is called the Available Object Types. Note that the objects are listed in a hierarchy (e.g., Emission Units can be found by expanding the Physical Objects). This hierarchy represents the class inheritance hierarchy (i.e., base classes appear at the roots of this hierarchy, and their derived classes appear as children). • The class definition source code (i.e., class name in the code; ClassOptions; its super-class; and all slots, procedures & functions for the class) can all be seen in the pane at the bottom of the Types of Objects window when a specific class is selected in the upper left pane. Note: See the "EXLGUI Programmer's Manual," Version 3.1, page 29 for details. • Class declarations: i.e., slots, member functions, and member procedures • Seen in the upper right pane when you select a specific object in the Types of Objects view. This pane is called the Properties of type.... When selecting a specific property in the upper right pane, the code that describes that property will be displayed in the pane at the bottom of the window called Default definition of ..... This is where the source code of class functions and procedures can be seen. (Only slots source code can be seen from the Standard View) • Global declarations: i.e., constants, variables, types, functions, procedures, and actions • Currently, a subset of the global declarations can be seen when you select the option View | Advanced | All Global Declarations. In the near future, there will also be options for viewing a subset of the global declarations (e.g., "Global Actions"). • The code associated with the various global declarations will be displayed. Currently, this data appears as a simple text listing. In the future, it will appear as a two-paned window that operates similarly to the Types of Objects window. Appendix D: Generating an ACA Control Device Report from the Command Line Overview The Air Compliance Advisor's (ACA's) Control Technology Sizing and Costing functionality can be accessed from external programs by running the ACA in a special command line mode. When run in this mode, the ACA will initialize itself, read a file that contains the same information as is contained in the "Size and Cost Air Pollution Control Technologies" object, run the "Apply Control Technology" action, write the control device report to a file, and then exit. The external application can then read the report file and process it as needed. To access this functionality, run the ACA using the following command line option... exlgui -controlstream [controlstreamfile] ...where [controlstreamfile] is the file that contains a description of the stream to control, which is described below. The ACA will write the control device report to the file "report1.txt". A sample control stream file, named SampleControlStreamFile.dat, is shipped with the ACA. Important Notes: 1) The Control Stream File Format is also referred to as the ACA Control Technology Analysis Engine Interface Input File (i.e., ACTAEIIF) format. 2) Control Stream files can also be imported directly from the ACA by selecting the menu option: File | Import | Air Pollution Control Technology Data (ACTAEIIF format) Overview of the Format of the Control Stream File The Control Stream File is an ASCII file consisting of a sequence of data items (i.e., integers, floating-point numbers, and text strings) in free format. One or more characters of white space must separate two consecutive items. White space consists of blanks, tabs, and newline characters. Every data item has a type. The three types of data items are: Integer - Cannot contain a decimal point. integers: 0, -100, 23456 Example of Floating Point Number - Can optionally contain a decimal. Exponential notation can be specified using 'e' or 'E'. Examples of floating point numbers: 0 1.0, -2.3e10, 0.4E-5 Text String - Delimited by double quotation marks "". To put a literal double-quote in a string, use the three-character sequence {"}. To put a literal opening curly bracket { in the string, use the three-character sequence {{}. To put a literal closing curly bracket into the string, use the three-character sequence {}}. To put a line break in the string, use the three-character sequence {n}. Comments can appear in the file. go to the end of the line. Comments start with the pound sign #, and The phrases "For each" or "For every" in the description of the file format imply a list of items. Lists are terminated by the word END with no surrounding quotation marks. Note that the END marker must be present even if the list is empty. For example, a list of pollutants and associated flow rates in a pollutant stream is described like this in the file format description: For each pollutant in the pollutant stream: Name of the pollutant (text) Flow rate of the pollutant (float) An example of a list conforming to the above description would be: "Benzene" "Methyl Chloride" END 1320.0 2540.0 Format of the Control Stream File For each pollutant to be defined: Pollutant Name (text) Note: This must be unique, and must not be the same as any existing pollutant in the ACA chemical library. Code for type of pollutant (integer) Note: Use 0 for VOC, 1 for Particulate if (type of pollutant is VOC): Molecular weight, in gram/gmmole (float) Heat of combustion, gas phase, volumetric at STP, in BTU/ft^3 (float) Note: Specify -9.9e99 if this parameter is not known Boiling point, in degrees K (float) Note: Specify -9.9e99 if this parameter is not known Critical Temperature, in degrees K (float) Note: Specify -9.9e99 if this parameter is not known Antoine Constant A (float) Antoine Constant B (float) Antoine Constant C (float) Note: The Antoine constants are for equation calculating P in mmHg using the equation log(P) = A - (B/(T + C)), with T in deg C Note: Specify -9.9e99 for any of these parameter that are not known Liquid Density, in lb/ft^3 (float) Note: Specify -9.9e99 if this parameter is not known Heat Of Condensation, in BTU/lb (float) Note: Specify -9.9e99 if this parameter is not known Refractive Index (float) Note: Specify -9.9e99 if this parameter is not known Henry's Law Constant, in gmmole/l atm (float) Note: Specify -9.9e99 if this parameter is not known Diffusion Coefficient, Liquid in Water, in cm^2/sec (float) Note: Specify -9.9e99 if this parameter is not known Diffusion Coefficient, Vapor in Air, in cm^2/sec (float) Note: Specify -9.9e99 if this parameter is not known Heat capacity, in BTU/lb-R (float) Note: Specify -9.9e99 if this parameter is not known Lower Explosive Limit (LEL), in ppm (float) Note: Specify -9.9e99 if this parameter is not known Vapor Pressure, in psi (float) Note: Specify -9.9e99 if this parameter is not known Lowest Temperature for which Temperature-Dependent Parameters Apply, in degrees K (float) Highest Temperature for which Temperature-Dependent Parameters Apply, in degrees K (float) Note: Specify -9.9e99 for two these parameters if they are not known Note: The following parameters are temperature-dependent: 1) Antoine Constants 2) Gas-Phase Heat Capacity 3) Henry's Law Constant 4) Liquid in Water and Vapor in Air Diffusion Coefficients Is Is Is Is Pollutant Pollutant Pollutant Pollutant Halogenated? Use 0 for no, 1 for yes , 2 for unknown (integer) Sulfonated? Use 0 for no, 1 for yes , 2 for unknown (integer) Animated? Use 0 for no, 1 for yes, 2 for unknown (integer) Polyelemental? Use 0 for no, 1 for yes , 2 for unknown (integer) ...else if type of pollutant is Particulate... Is Pollutant Water Soluble? Use 0 for no, 1 for yes (integer) Phase at STP: use 0 for solid, 1 for liquid PM Density, in lb/ft^3 (integer) (float) Note: Now specify pollutant's particle size distribution as a list of particle aerodynamic diameters, in um, and percent mass above that diameter For each diameter/mass above pair in the particle size distribution table... Particle aerodynamic diameters, in um (float) Percent mass above this diameter (float) Control Device Case Study Title (text) Hours of Pollutant Stream Operation Per Year (float) Stream Duty cycle: use 0 for Intermittent, 1 for Shift, 2 for Continuous Stream Type: use 0 for VOC, 1 for Particulate Desired % Pollutant Reduction (integer) (float) Stream Temperature, in degrees K Stream Pressure, in atm (integer) (float) (float) Stream Volumetric Flow Rate, in ft^3/min (float) Code that specifies if previous parameter specifies actual flow rate or flow rate at STP. Use 0 for actual volumetric flow rate, 1 for volumetric flow rate at STP (integer) Does stream contain particulate matter? Note: Only used for VOC streams Use 0 for no, 1 for yes (integer) Stream Oxygen Content, in % (float) Note: Only used for VOC streams Stream Moisture Content, by volume, in % (float) Note: For the following seven parameters, Use 0 for no, 1 for yes. These seven parameters are only used for Particulate streams. Stream Stream Stream Stream Stream Stream Stream has Acid Gases? (integer) has Alkalis? (integer) has Fluorides? (integer) has Mineral Acids? (integer) is Corrosive? (integer) has Metal? (integer) has Condensable Metal? (integer) Stream Dust Type (integer) Note: Only used for Particulate streams Note: Use one of the following codes 0 = Unknown 1 = activated charcoal 2 = alumina 3 = aluminum dust 4 = ammonium phosphate fertilizer 5 = asbestos 6 = bauxite 7 = carbon black 8 = cardboard 9 = cellulose material 10 = cement 11 = ceramic pigment 12 = clay 13 = coal 14 = cocoa 15 = chocolate 16 = coke 17 = cosmetics 18 = detergents 19 = diactomaceous earth 20 = dry petrochemical 21 = dyes 22 = enamel frit 23 = feed 24 = feldspar 25 = fertilizer 26 = fibrous material 27 = flour 28 = fly ash 29 = grain 30 = graphite 31 = gypsum 32 = iron ore 33 = iron oxide 34 = iron sulfate 35 = kaolin 36 = lead oxide 37 = leather dust 38 = lime 39 = limestone 40 = machining operations 41 = metal powders 42 = mica 43 = paint pigments 44 = paper 45 = perlite 46 = plastics 47 = quartz 48 = resins 49 = rock dust 50 = rubber chemical 51 = salt 52 = sand 53 = sawdust 54 = silica 55 = silicates 56 = slate 57 = soap 58 = soda ash 59 = spices 60 = starch 61 = sugar 62 = supply air 63 = talc 64 = tobacco 65 = wood products Note: The following 11 parameters are used in estimating the costs of the various pollution control options. Yearly Interest Rate, in % (float) Year to bring cost to (1900 to 2100) (integer) Month or quarter to bring cost to (text) Note: Must be one of following values "January" "February" "March" "First Quarter" "April" "May" "June" "Second Quarter" "July" "August" "September" "Third Quarter" "October" "November" "December" "Fourth Quarter" Operating Labor Cost, in $/hr (float) Maintenance Labor Cost, in $/hr (float) Electricity Cost, in $/kilowatt-hr Cooling Water Cost, in $/kgallon (float) (float) Waste Water Disposal Cost, in $/kgallon Steam Price, in $/klb (float) (float) Dust Disposal Cost, in $/ton (float) Natural Gas Price, in $/ft^3 (float) Method used to specify pollutant flow rates in stream (integer) This is the method used to specify pollutant flow rates below. Use 0 for Mass Concentration at STP, in lb/ft^3 Use 1 for Actual Mass Concentration, in lb/ft^3 Use 2 for Mass Flow Rate, in lb/hr Use 3 for Volumetric Concentration, in ppm Note: Volumetric Concentration in ppm can only be used for VOC streams For each pollutant in the pollutant stream: Pollutant name (text) Note: The pollutant name must exactly match either 1) a new pollutant specified earlier in this file, or 2) a pollutant already in the ACA chemical library. Pollutant flow rate (float) Note: The pollutant flow rate is specified using the method and units specified above.