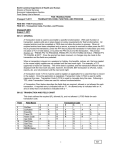
1
myCGS
CHAPTER 7
User Manual
‘Forms’ Tab
(for Home Health & Hospice Providers)
Originated July 31, 2012
Revised September 29, 2015
© 2014 Copyright, CGS Administrators, LLC.
CHAPTER 7
‘Forms’ Tab
(for Home
Health & Hospice Providers)
Table of Contents
‘Forms’ Tab 4
Submitting a Redetermination Request 4
Accessing the myCGS Redetermination Form 4
Determining Timely Appeal Request 5
Completing the myCGS Redetermination Form 6
‘Beneficiary Information’ Section 6
‘Provider Information’ Section 7
‘Claims Information’ Section 7
‘Attachments’ Section 8
Submitting a Redetermination Request Form 9
Redetermination Submission Message and Submission ID 10
Checking the Status of a Redetermination Request 11
Viewing Redetermination Documents 11
Submitting an e-Offset Request 12
Accessing the myCGS e-Offset Form 13
Completing the Immediate Offset Form (e-Offset) 13
Provider Level Offset 14
Demand Letter Offset 15
Originated July 31, 2012 • Revised September 29, 2015
© 2014 Copyright, CGS Administrators, LLC.
Letter Option 15
AR Option 16
Stop Provider Level Offset Previously Requested 18
DISCLAIMER
This educational resource was prepared to assist Medicare providers and is not intended to grant
rights or impose obligations. CGS makes no representation, warranty, or guarantee that this compilation
of Medicare information is error-free, and will bear no responsibility or liability for the results or
consequences of the use of these materials. CGS encourages users to review the specific statutes,
regulations and other interpretive materials for a full and accurate statement of their contents. Although
this material is not copyrighted, the Centers for Medicare & Medicaid Services (CMS)
prohibit reproduction for profit making purposes
myCGS User Manual
Page 2
CHAPTER 7
‘Forms’ Tab
(for Home
Health & Hospice Providers)
Checking the Status of an e-Offset Request 19
Responding to Medical Review Additional Documentation Requests 21
Accessing the MR ADR Response Form 21
Completing the MR ADR Response Form 22
‘Provider Information’ Section 22
‘Patient & Claims Information’ Section 23
‘Attachments’ Section 23
Submitting the MR ADR Response Form 24
Checking the Status of an MR ADR Response 26
Medicare Credit Balance Reporting 26
Accessing the Credit Balance Reporting Form 27
Completing the Credit Balance Reporting Form 27
‘Provider Information’ Section 28
‘Attachments’ Section 28
‘Electronic Signature’ Section 29
Submitting the Credit Balance Reporting Form 29
Originated July 31, 2012 • Revised September 29, 2015
© 2014 Copyright, CGS Administrators, LLC.
Checking the Status 29
DISCLAIMER
This educational resource was prepared to assist Medicare providers and is not intended to grant
rights or impose obligations. CGS makes no representation, warranty, or guarantee that this compilation
of Medicare information is error-free, and will bear no responsibility or liability for the results or
consequences of the use of these materials. CGS encourages users to review the specific statutes,
regulations and other interpretive materials for a full and accurate statement of their contents. Although
this material is not copyrighted, the Centers for Medicare & Medicaid Services (CMS)
prohibit reproduction for profit making purposes
myCGS User Manual
Page 3
CHAPTER 7
‘Forms’ Tab
(for Home
Health & Hospice Providers)
‘Forms’ Tab
The ‘Forms’ tab allows providers to submit certain forms directly to CGS through the
myCGS Web portal. Currently, 2 forms are available: Redeterminations and e-Offsets.
Reminder: Provider Administrators have access to all tabs within myCGS. Provider
Users only have access to those tabs granted by their Provider Administrator. If you are
a Provider User and the ‘Messaging/Forms’ tab is grayed out, but you believe you need
access to the ‘Messaging/Forms’ Tab, you should contact your Provider Administrator.
SUBMITTING A REDETERMINATION REQUEST
The ‘Forms’ tab option within myCGS allows Users to submit a Redetermination
request (1st level of appeal) to CGS using an electronic Redetermination Request Form.
In addition, this tab allows Users to submit additional supporting documentation
with their redetermination request. Users may also monitor the status of their
redetermination request using this option.
Accessing the myCGS Redetermination Form
Originated July 31, 2012 • Revised September 29, 2015
© 2014 Copyright, CGS Administrators, LLC.
Once you access the ‘Forms’ tab, in the “Go To page” field, click the drop-down box and
select ‘Secure Forms.’
Once on the ‘Secure Forms’ page, you will find options to Select a Topic and Select a
Type. The ‘Select a Topic’ field will default to “Appeals”, as this is currently the only
option available. Likewise, the ‘Select a Type’ field will default to “First level appeal on a
Medicare Claim.”
myCGS User Manual
Page 4
CHAPTER 7
‘Forms’ Tab
(for Home
Health & Hospice Providers)
Determining Timely Appeal Request
Originated July 31, 2012 • Revised September 29, 2015
© 2014 Copyright, CGS Administrators, LLC.
Redetermintation requests must be submitted within 120 days of the initial
determination (i.e. date on the Medicare remittance advice). myCGS will ask “Is your
appeal late?” and you must select “yes” or “no” from the drop-down box.
If you are unsure whether your redetermination request is timely, myCGS offers a link
to a CGS Appeals Time Limit Calculator to assist you. To access the Calculator, click on
the ‘Appeals Calculator’ link located in the lower-right of the screen.
The Appeals Time Limit Calculator will open in a new window. Enter the date of the
initial determination for the service being appealed and click Calculate!
myCGS User Manual
Page 5
CHAPTER 7
‘Forms’ Tab
(for Home
Health & Hospice Providers)
The Appeals Time Limit Calculator will display the last day to submit your
redetermination request in order to meet timeliness requirements. If your request is
still within this timeframe, return to the Secure Forms screen to complete and submit
the Redetermination form in myCGS.
Completing the myCGS Redetermination Form
Once you have determined that your redetermination request is timely, click on the
‘Redetermination 1st Level Appeal’ link.
The myCGS ‘Redetermination 1st Level Appeal’ form will appear. There are four
sections to the form: 1) Beneficiary Information; 2) Provider Information; 3) Claims
Information; and 4) Attachments. Each field marked with a red asterisk is a required
field.
Originated July 31, 2012 • Revised September 29, 2015
© 2014 Copyright, CGS Administrators, LLC.
‘Beneficiary Information’ Section
You must complete the following Beneficiary Information fields to submit your
redetermination request using myCGS:
• Patient Name
• Medicare Number
myCGS User Manual
Page 6
CHAPTER 7
‘Forms’ Tab
(for Home
Health & Hospice Providers)
‘Provider Information’ Section
The Contract/Region, Provider Name, Provider Number (PTAN) and National
Provider Identifier (NPI) fields default based on your User ID. You must complete
the following fields:
• Provider Address 1
• Provider Address 2 (optional field)
• Provider City
• Provider State
• Provider Zip Code
• Provider Phone Number
Originated July 31, 2012 • Revised September 29, 2015
© 2014 Copyright, CGS Administrators, LLC.
‘Claims Information’ Section
• Service Date From - This is the FROM date on the denied claim.
• Service Date To - This is the TO date on the denied claim.
• Date of Initial Determination - This is the date on your remittance advice for the
denied claim.
• Claim DCN – This is the document control number (DCN) of the original claim you
are appealing. The DCN is available from your remittance advice.
• Denied Services – Enter what services you are appealing (denied PT visit, reduced
level of care, etc.). If you are appealing an entire claim that was denied, enter
“denied home health claim” or “denied hospice claim.” Click “Add”, “Remove” or
“Clear All” to add, remove or delete the information entered.
• Is there an Overpayment Appeal? – If you are appealing a claim for which an
overpayment was assessed by Medical Review (MR), Zone Program Integrity
Contractor (ZPIC), the Comprehensive Error Rate Testing (CERT) Program, the
Recovery Auditor (RA) or another audit program, select “Yes.”
• Reasons/Rationale – Enter the reason/rationale for the appeal
myCGS User Manual
Page 7
CHAPTER 7
‘Forms’ Tab
(for Home
Health & Hospice Providers)
Once all information is entered, click ‘Validate.’ myCGS will validate the information
entered for completeness and accuracy. If information is missing or invalid, you will
receive a message indicating the information that must be corrected. If the information
was complete and correct, you will see a message at the top of the screen, indicating
“Your entries have been validated. Please attach the required documents, input your
name, and click Submit.”
Originated July 31, 2012 • Revised September 29, 2015
© 2014 Copyright, CGS Administrators, LLC.
‘Attachments’ Section
The ‘Attachments’ section of the Redetermination form allows you to attach
documentation (e.g., medical records, notes, orders, etc.) you would like CGS to consider
when processing your redetermination request. You can attach up to five documents.
Attachments can be up to 40MBs in size, not to exceed to total of 150MBs for all
attachments. The documents must be in a PDF format.
To add an attachment, select the “Browse” button, and a window will open allowing you
to locate the document you wish to add. Select the document to attach it. Repeat this
process for each additional document you wish to attach.
Note: At least one attachment is required to submit the Form.
myCGS User Manual
Page 8
CHAPTER 7
‘Forms’ Tab
(for Home
Health & Hospice Providers)
Below the ‘Attachments’ section is the ‘Name’ field. The name of the person completing
the form must be entered into this field.
Submitting a Redetermination Request Form
Originated July 31, 2012 • Revised September 29, 2015
© 2014 Copyright, CGS Administrators, LLC.
Once all requested information has been entered, and all necessary documents have
been attached, click on the “Submit” button.
An ‘e-signature’ box will appear, asking you to verify that the information entered
and attachments are correct. This ensures the signature requirement for all
myCGS User Manual
Page 9
CHAPTER 7
‘Forms’ Tab
(for Home
Health & Hospice Providers)
redetermination requests has been met.
If the information was entered correctly, and all desired attachments were included,
click ‘OK’ to submit the Redetermination form and all attachments.
If any information needs to be corrected, or if any attachments need to be added or
deleted, click ‘Cancel’ to return to the form.
REDETERMINATION SUBMISSION MESSAGE AND SUBMISSION ID
After submitting the redetermination form, you will receive a message in your myCGS
inbox. You can access the message by either clicking on the Messages tab located in the
menu, or clicking the link displayed in the Message Bar.
Originated July 31, 2012 • Revised September 29, 2015
© 2014 Copyright, CGS Administrators, LLC.
The message will contain a Subject indicating “Secure Form Received” to advise you
that your redetermination request has been received. It will not display a ‘Submission
ID’ until one has been assigned by CGS.
Once CGS has assigned the Submission ID, you will receive another message with a link
“Secure Form Confirmation” under the Subject column. Click on this link to view the
message. The message identifies the Submission ID assigned to your redetermination
request, and includes instructions on how to check the status.
CHECKING THE STATUS OF A REDETERMINATION REQUEST
myCGS User Manual
Page 10
CHAPTER 7
‘Forms’ Tab
(for Home
Health & Hospice Providers)
The message with the Submission ID assigned to the redetermination instructs you on
how to view the status of your request. You can check the status from this screen by
either selecting the Get Status button or clicking on the Submission ID in the message.
If you check the status by selecting the Get Status button, you must enter the
Submission ID assigned to your redetermination in the ‘Submission ID’ field,
and click ‘Submit.’
Originated July 31, 2012 • Revised September 29, 2015
© 2014 Copyright, CGS Administrators, LLC.
VIEWING REDETERMINATION DOCUMENTS
Whether you check the status by clicking the Get Status button or by selecting the
Submission ID within the message, myCGS displays the status of your redetermination
request. It also gives you the option to view the Redetermination form you completed
and any documents you attached to your request. Simply click on the Submission ID
that appears in the message.
A page will appear with the information entered on the redetermination form,
including the beneficiary information, the provider information, and the claim
myCGS User Manual
Page 11
CHAPTER 7
‘Forms’ Tab
(for Home
Health & Hospice Providers)
information. The status will appear in the “Submission ID Status” field.
The files that were attached with the redetermination form will appear under the
‘Attached Files’ header, however, the attachments themselves, cannot be viewed
from myCGS.
Originated July 31, 2012 • Revised September 29, 2015
© 2014 Copyright, CGS Administrators, LLC.
Once review of your appeal request has been completed, and a determination has been
made by CGS’s Appeals Department, you will receive another message with the Subject
‘Secure Form Completed.’
SUBMITTING AN E-OFFSET REQUEST
The Forms tab option within myCGS also allows Users to submit an electronic
authorization to offset from a pending overpayment due to CGS using an electronic
eOffset Request Form. Providers may request an immediate offset each time a
demanded overpayment is received, or authorize a permanent request for all future
demanded overpayments. Users may also monitor the status of their requests using
this option.
Accessing the myCGS e-Offset Form
myCGS User Manual
Page 12
CHAPTER 7
‘Forms’ Tab
(for Home
Health & Hospice Providers)
Once you access the Forms tab, in the “Go To page” field, click the drop-down box and
select ‘Financial Forms.’
You can also access the e-Offset form by selecting the ‘Financial Tools’ tab and then
the Financial Forms sub-tab. Here you will find the options Select a Topic and Select a
Form. The ‘Select a Topic’ field will default to “Financial,” as this is currently the only
option available. Under the ‘Select a Form’ drop-down, click on the ‘eOffset’ option to
load the form.
Completing the Immediate Offset Form (e-Offset)
Originated July 31, 2012 • Revised September 29, 2015
© 2014 Copyright, CGS Administrators, LLC.
Once you select the form, the myCGS ‘eOffset’ page will appear. This page explains the
immediate offset process and provides critical timeframes that must be considered
prior to submitting a request.
myCGS User Manual
Page 13
CHAPTER 7
‘Forms’ Tab
(for Home
Health & Hospice Providers)
There are three different forms available:
• Provider Level Offset: This option is selected to establish immediate offsets for
any current and future overpayments.
• Demand Letter Offset: This option is selected if you have received a demand
letter from CGS requesting an overpayment be returned.
• Stop Provider Level Previously Requested: Select this option to cancel
a request.
Once you select an option, a disclaimer box will display to confirm timeframes and to
ensure the User has selected the correct form.
PROVIDER LEVEL OFFSET
Originated July 31, 2012 • Revised September 29, 2015
© 2014 Copyright, CGS Administrators, LLC.
After you accept the disclaimer, the Provider Level Offset form will display. The
Contract/Region, Provider Name, Provider Number PTAN, and Provider NPI fields will
show pre-populated and identify the User’s information. You must complete the
following fields to submit your eOffset request using myCGS:
• Requestor Name
• Requestor Phone Number
• Name
After completing all required fields, click Submit to submit the form.
myCGS User Manual
Page 14
CHAPTER 7
‘Forms’ Tab
(for Home
Health & Hospice Providers)
An ‘e-signature’ box will appear, asking you to verify that the information entered is
correct. This ensures the signature requirement for all requests have been met. Click
OK if you agree or Cancel to return to the form to make corrections.
After submitting the form, you will be taken to the Message tab. Shortly after
submission, you will receive a confirmation message confirming receipt of the eOffset
request. A separate message will be sent to your inbox which will include a Submission
ID assigned to your request. See “Messages” in Chapter 6 for more details.
Demand Letter Offset
After you accept the disclaimer, a window will appear allowing you to submit your
request based on either the offset letter you received from CGS or up to 10 Accounts
Receivable (AR) numbers identified on an attachment to the demand letter.
Originated July 31, 2012 • Revised September 29, 2015
© 2014 Copyright, CGS Administrators, LLC.
Letter Option
Selecting the Letter option allows you to enter the number identified in the upper-right
of the demand letter to request the immediate offset.
Once the form for this option displays, you will find the Contract/Region, Provider
Name, Provider Number PTAN and Provider NPI fields will show pre-populated and
myCGS User Manual
Page 15
CHAPTER 7
‘Forms’ Tab
(for Home
Health & Hospice Providers)
identify the User’s information. You must complete the following fields to submit your
eOffset request using myCGS:
• Requestor Name
• Requestor Phone Number
• Letter Number
• Name
Originated July 31, 2012 • Revised September 29, 2015
© 2014 Copyright, CGS Administrators, LLC.
After completing all required fields, click Submit to submit the form. An ‘e-signature’
box will appear, asking you to verify that the information entered is correct. This
ensures the signature requirement for all requests have been met. Click OK if you agree
or Cancel to return to the form to make corrections.
After submitting the form, you will be taken to the Message tab. Shortly after
submission, you will receive a confirmation message confirming receipt of the eOffset
request. A separate message will be sent to your inbox which will include a Submission
ID assigned to your request. See “Messages” in Chapter 6 for more details.
AR Option
Selecting the AR option allows you to request an immediate offset using the AR
number assigned to the request.
myCGS User Manual
Page 16
CHAPTER 7
‘Forms’ Tab
(for Home
Health & Hospice Providers)
Using the AR option will allow you to enter up to 10 AR numbers, which are identified
on an attachment to the demand letter to request an immediate offset.
Once the form for this option displays, you will find the Contract/Region, Provider
Name, Provider Number PTAN, and Provider NPI fields will show pre-populated and
identify the User’s information. You must complete the following fields to submit your
eOffset request using myCGS:
• Requestor Name
• Requestor Phone Number
• AR Number
• Name
Originated July 31, 2012 • Revised September 29, 2015
© 2014 Copyright, CGS Administrators, LLC.
Upon entering the AR number, the Date of Overpayment Letter and Overpaid Amount
field with auto-populate.
Once all fields are completed, click the “Add AR Details” button. All information will be
added to the form. Enter additional ARs if submitting a request for more than one AR
under the PTAN/NPI. Up to 10 ARs may be entered on the same form. If at any time
the information is entered incorrectly, click the “Reset AR Details” button and re-enter
the information. After entering all ARs, click the “Submit” button.
myCGS User Manual
Page 17
CHAPTER 7
‘Forms’ Tab
(for Home
Health & Hospice Providers)
After clicking the SUBMIT button to submit the form, an ‘e-signature’ box will appear,
asking you to verify that the information entered is correct. This ensures the signature
requirement for all requests have been met. Click OK if you agree or Cancel to return to
the form to make corrections.
Originated July 31, 2012 • Revised September 29, 2015
© 2014 Copyright, CGS Administrators, LLC.
Upon submitting the form, a message box will ask if there are additional ARs to enter.
If so, press ADD. (myCGS will submit the ARs you entered then take you back to the
form to enter more.) If there are no additional ARs to be entered, press SUBMIT.
After submitting the form, you will be taken to the Message tab. Shortly after
submission, you will receive a confirmation message confirming receipt of the eOffset
request. A separate message will be sent to your inbox which will include a Submission
ID assigned to your request. See “Messages” in Chapter 6 for more details.
Stop Provider Level Offset Previously Requested
Upon accepting the disclaimer, the Stop Provider Level Previously Requested form will
display. The Contract/Region, Provider Name, Provider Number PTAN, and Provider NPI
myCGS User Manual
Page 18
CHAPTER 7
‘Forms’ Tab
(for Home
Health & Hospice Providers)
fields will show pre-populated and identify the User’s information. You must complete
the following fields to submit your eOffset request using myCGS:
• Requestor Name
• Requestor Phone Number
• Name
Originated July 31, 2012 • Revised September 29, 2015
© 2014 Copyright, CGS Administrators, LLC.
After clicking the SUBMIT button to submit the form, an ‘e-signature’ box will appear,
asking you to verify that the information entered is correct. This ensures the signature
requirement for all requests have been met. Click OK if you agree or Cancel to return to
the form to make corrections.
After submitting the form, you will be taken to the Message tab. Shortly after
submission, you will receive a confirmation message confirming receipt of the e-Offset
request. A separate message will be sent to your inbox which will include a Submission
ID assigned to your request. See “Messages” in Chapter 6 for more details.
Checking the Status of an e-Offset Request
The message with the Submission ID assigned to the eOffset provides instructions on
how to view the status of your request. You can check the status from this screen by
selecting the Submission ID in the message. The status can also be tracked by clicking
the Get Status button located on the upper-right of your inbox.
myCGS User Manual
Page 19
CHAPTER 7
‘Forms’ Tab
(for Home
Health & Hospice Providers)
If you check the status by selecting the Get Status button, you must enter the
Submission ID assigned to your eOffset request in the ‘Submission ID’ field, and
click ‘Submit.’
Originated July 31, 2012 • Revised September 29, 2015
© 2014 Copyright, CGS Administrators, LLC.
A page will display with the Submission ID, the status of the request, the date/time the
request was received, the type of eOffset request submitted and the User’s information.
Once your eOffset request is processed and completed, you will receive another
message with the Subject ‘Secure Form Completed’ in your message inbox.
myCGS User Manual
Page 20
CHAPTER 7
‘Forms’ Tab
(for Home
Health & Hospice Providers)
Responding to Medical Review
Additional Documentation Requests
The Forms tab within myCGS includes an option to allow users to submit
documentation in response to additional development requests (ADRs) received
from our medical review (MR) department. (Identified by Reason Code 39700.) This
option is offered as a convenience to you to facilitate an accurate and timely response
to our requests. Responses to MR ADRs must be received within 45 days of the date
on the request.
ACCESSING THE MR ADR RESPONSE FORM
Originated July 31, 2012 • Revised September 29, 2015
© 2014 Copyright, CGS Administrators, LLC.
Once you access the ‘Forms’ tab, in the ‘Go To Page’ field, click the drop-down box and
select ‘MR ADR’. (You can also access the form from the ‘Go To Page’ field located under the
‘Claims’ and ‘Messages’ tabs.)
Once you are on the MR ADR landing page, click the link to access the form.
myCGS User Manual
Page 21
CHAPTER 7
‘Forms’ Tab
(for Home
Health & Hospice Providers)
COMPLETING THE MR ADR RESPONSE FORM
When completing the MR ADR Response form, please be sure to view the ADR on FISS
Page 07 to help ensure the form is completed accurately.
REPORT: 001
MEDICARE PART A 15004
DATE : 02/05/2015
ADDITIONAL DEVELOPMENT REQUEST
CASE ID: 15004XXXXXXXXXXXXXXIAR
A GOOD AGENCY
123 MAIN STREET
ANYTIME
IA 50309 1234
PVDR NO : 7777777777
BILL TYPE: XXX
WE HAVE REVIEWED THIS CLAIM RECORDS AND FOUND THAT ADDITIONAL DEVELOPMENT
WILL BE NECESSARY BEFORE PROCESSING CAN BE FINALIZED. TO ASSIST YOU IN
PROVIDING THE REQUIRED INFORMATION, WE HAVE ASSIGNED REASON CODES TO THE
AFFECTED CLAIM RECORD (SEE BELOW) FOR YOUR REVIEW. PLEASE REFER TO THE
ACCOMPANYING LIST FOR EXPLANATION OF THE ASSIGNED CODES. WE MUST RECEIVE
THE REQUESTED INFORMATION BEFORE THE DUE DATE LISTED BELOW
CGS J15 MAC
J15 – HHH CORRESPONDENCE
P O BOX XXXX
NASHVILLE
TN 37202
Originated July 31, 2012 • Revised September 29, 2015
© 2014 Copyright, CGS Administrators, LLC.
PATIENT CNTRL NBR:
DUE DATE: 03/23/2015
MEDICAL REC NO:
DCN: 21415123456789PAR
HIC: XXXXXXXXXA
PATIENT NAME: BEN E
FICIARY
FROM DATE: 02/02/2015 THRU DATE: 02/02/2015 OPR/MED ANALYST:
TOTAL CHARGES:
2500.00
ORIG REQ DT: 02/05/2015 CLM RCPT DT: 02/03/2015
PRESS PF3-EXIT PF5-SCROLL BKWD PF6-SCROLL FWD PF8-NEXT PF9-UPDT
Once you select the link from the landing page, the myCGS ‘MR ADR Response’ form
will load. There are four sections to the form: 1) Provider Information; 2) Patient &
Claims Information; 3) Attachments; and 4) Electronic Signature. Each field marked
with a RED asterisk (*) is required.
‘Provider Information’ Section
This section will be pre-populated based on your myCGS account.
myCGS User Manual
Page 22
CHAPTER 7
‘Forms’ Tab
(for Home
Health & Hospice Providers)
‘Patient & Claims Information’ Section
You must complete the following fields:
• Health Insurance Claim (HIC) Number
• Document Control Number (DCN): The DCN is located on FISS Page 07.
Once all information is entered, click ‘Validate’. myCGS will validate the information
entered for completeness and accuracy. If information is missing or invalid, you will
receive a message identifying the fields that must be corrected. If the information is
complete and correct, you will see this message at the top of the screen:
Originated July 31, 2012 • Revised September 29, 2015
© 2014 Copyright, CGS Administrators, LLC.
‘Attachments’ Section
This section of the MR ADR Response form allows you to attach the documentation
requested in the ADR (e.g., medical records, operative/radiology reports) directly to the
form. You can attach up to 5 documents (up to 5 MB each). The documents must be in
a PDF format. NOTE: At least ONE document must be attached to the form.
To add an attachment, select the ‘Browse’ button and a window will open allowing you
to locate the document within your system that you wish to add. Select the document
to attach it. Repeat this process for each additional document you wish to attach. Click
the RED ‘X’ to remove an attachment.
myCGS User Manual
Page 23
CHAPTER 7
‘Forms’ Tab
(for Home
Health & Hospice Providers)
Below the ‘Attachments’ section is the ‘Name’ field. The first and last name of the
person authorized to complete the form must be entered into this field.
SUBMITTING THE MR ADR RESPONSE FORM
Once all information has been entered, the form validated and all necessary documents
have been attached, click the ‘Submit’ button.
Originated July 31, 2012 • Revised September 29, 2015
© 2014 Copyright, CGS Administrators, LLC.
An ‘e-Signature’ box will display, asking you to verify that the information entered and
attachments are correct. Clicking ‘OK’ also allows you to electronically sign the form.
If corrections are needed to the form or if any attachments need to be added or deleted,
click ‘Cancel’ to return to the form.
After submitting the form, you will be taken to the Messages tab where you will receive
a message confirming receipt of the MR ADR Response form. A second message will be
sent, which will include a Submission ID assigned to your request.
This is confirmation that the form was accepted and will be the final message received.
NOTE: The second message can take up to 24hrs. to be received.
myCGS User Manual
Page 24
CHAPTER 7
‘Forms’ Tab
(for Home
Health & Hospice Providers)
Originated July 31, 2012 • Revised September 29, 2015
© 2014 Copyright, CGS Administrators, LLC.
Selecting the second message with the Submission ID assigned to the form provides
instructions on how to view the status of your request. Once the message is open click
on the Submission ID in the message, or select the ‘Get Status’ button located in the
upper-left of the screen and entering the Submission ID.
The details of the MR ADR Response form submitted will display. It will show
a ‘CONFIRMED’ status, confirming the MR ADR Response form was accepted.
myCGS User Manual
Page 25
CHAPTER 7
‘Forms’ Tab
(for Home
Health & Hospice Providers)
Originated July 31, 2012 • Revised September 29, 2015
© 2014 Copyright, CGS Administrators, LLC.
CHECKING THE STATUS OF AN MR ADR RESPONSE
To confirm that your documentation was received and applied to the individual
claim, use FISS Option 12. When the documentation has been applied to the
ADRd claim, the claim will move to status location S M50MR. For more information,
refer to the “Additional Development Request (ADR) Process” Web page (http://www.
cgsmedicare.com/hhh/medreview/adr_process.html), or the FISS Guide, Chapter 3:
Inquiry Menu (http://www.cgsmedicare.com/hhh/education/materials/pdf/chapter_3inquiry_menu.pdf).
Medicare Credit Balance Reporting
The Forms tab within myCGS includes an option to allow users to report credit
balances. Providers use the quarterly CMS-838 report to disclose Medicare credit
balances based on the number and amount of refunds due to the Medicare program.
The option to report through myCGS is offered as a convenience to you to facilitate an
accurate and timely report.
myCGS User Manual
Page 26
CHAPTER 7
‘Forms’ Tab
(for Home
Health & Hospice Providers)
ACCESSING THE CREDIT BALANCE REPORTING FORM
Originated July 31, 2012 • Revised September 29, 2015
© 2014 Copyright, CGS Administrators, LLC.
Once you access the ‘Forms’ tab, in the ‘Go To Page’ field, click the drop-down box and
select ‘Financial Forms’. (You can also access the form from the ‘Financial Tools’ tab by
selecting the ‘Financial Forms’ sub-tab.) Then select ‘CMS 838 Credit Balance’ from the
drop-down options.
COMPLETING THE CREDIT BALANCE REPORTING FORM
Once the Credit Balance form loads, you will find three main sections: 1) Provider
Information; 2) Attachments; and 3) Electronic Signature. Each field marked with
a RED asterisk (*) is required.
myCGS User Manual
Page 27
CHAPTER 7
‘Forms’ Tab
(for Home
Health & Hospice Providers)
‘Provider Information’ Section
This section will be pre-populated based on your myCGS account.
• Select the quarter end date from the drop-down box
• Under ‘Check One,’ select an option:
-- Qualify as a Low Utilization Provider: Select this option if this situation
(http://www.cgsmedicare.com/hhh/financial/cost_reporting/utilization_cost_
reports.html) exists
-- The Credit Balance Report Detail Page(s) is attached: Select this option if the
appropriate documents are attached to the form
-- If there is no balance to be reported this quarter, select that option
Originated July 31, 2012 • Revised September 29, 2015
© 2014 Copyright, CGS Administrators, LLC.
‘Attachments’ Section
This section of the Credit Balance Reporting form allows you to attach documentation
(https://www.cgsmedicare.com/hhh/pubs/news/2015/0615/cope29545.html)
directly to the form. You can attach up to 5 documents (each up to 5 MB in size). The
documents must be in a PDF format. NOTE: As indicated on the form, the first attachment
must be the CMS-838 Credit Balance Report Form (http://www.cgsmedicare.com/hhh/
financial/CMS-588.html).
myCGS User Manual
Page 28
CHAPTER 7
‘Forms’ Tab
(for Home
Health & Hospice Providers)
‘Electronic Signature’ Section
This section of the Credit Balance Reporting form allows you to electronically sign and
submit the form.
• To sign the form, enter the name of the person authorized to submit the form on
behalf of the provider
• Enter the title of the person submitting the form
• Include the name and contact phone number of someone CGS can speak with
should there be questions about the submitted form
• Check the box certifying the form and attached credit balance reports are accurate
SUBMITTING THE CREDIT BALANCE REPORTING FORM
Originated July 31, 2012 • Revised September 29, 2015
© 2014 Copyright, CGS Administrators, LLC.
Once all information has been entered, the form validated and all necessary documents
have been attached, click the ‘Submit’ button.
After submitting the form, you will be taken to the Messages tab where you will receive
a message confirming receipt of the Credit Balance Reporting form. A second message
will be sent, which will include a Submission ID assigned to your request.
This is confirmation that the form was accepted. NOTE: The second message can take up
to 24hrs. to be received.
myCGS User Manual
Page 29
CHAPTER 7
‘Forms’ Tab
(for Home
Health & Hospice Providers)
An e-mail will also be sent confirming receipt of the form, which includes the
Submission ID and instructions on how to check the status.
CHECKING THE STATUS
Selecting the second message with the Submission ID assigned to the form provides
instructions on how to view the status of your request.
Originated July 31, 2012 • Revised September 29, 2015
© 2014 Copyright, CGS Administrators, LLC.
Once the message is open, click on the Submission ID in the message, or select the ‘Get
Status’ button located in the upper-left of the screen and enter the Submission ID.
The details of the Credit Balance Reporting form submitted will display.
myCGS User Manual
Page 30
Originated July 31, 2012 • Revised September 29, 2015
© 2014 Copyright, CGS Administrators, LLC.
CHAPTER 7
myCGS User Manual
‘Forms’ Tab
(for Home
Health & Hospice Providers)
Page 31