1
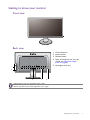
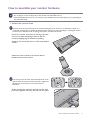
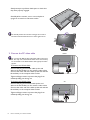
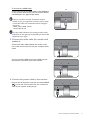
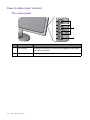
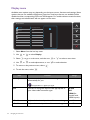
G Series
LCD Monitor
User Manual
Copyright
Copyright © 2014 by BenQ Corporation. All rights reserved. No part of this publication may
be reproduced, transmitted, transcribed, stored in a retrieval system or translated into any
language or computer language, in any form or by any means, electronic, mechanical, magnetic,
optical, chemical, manual or otherwise, without the prior written permission of BenQ
Corporation.
Disclaimer
BenQ Corporation makes no representations or warranties, either expressed or implied, with
respect to the contents hereof and specifically disclaims any warranties, merchantability or
fitness for any particular purpose. Further, BenQ Corporation reserves the right to revise this
publication and to make changes from time to time in the contents hereof without obligation of
BenQ Corporation to notify any person of such revision or changes.
The performance of flicker-free may be affected by external factors such as poor cable quality,
unstable power supply, signal interference, or poor grounding, and not limited to the above
mentioned external factors. (Applicable for flicker-free models only.)
Power Safety
Please follow these safety instructions for best performance, and long life for your monitor.
• The AC plug isolates this equipment from the AC supply.
• The power supply cord serves as a power disconnect device for pluggable equipment. The
socket outlet should be installed near the equipment and be easily accessible.
• This product should be operated from the type of power indicated on the marked label. If you
are not sure of the type of power available, consult your dealer or local power company.
• An approved power cord greater or equal to H03VV-F or H05VV-F, 2G or 3G, 0.75mm2 must
be used.
Care And Cleaning
• Cleaning. Always unplug your monitor from the wall outlet before cleaning. Clean the LCD
monitor surface with a lint-free, non-abrasive cloth. Avoid using any liquid, aerosol or glass
cleaners.
• Slots and openings on the back or top of the cabinet are for ventilation. They must not be
blocked or covered. Your monitor should never be placed near or over a radiator or heat
source, or in a built-in installation unless proper ventilation is provided.
• Never push objects or spill liquid of any kind into this product.
2
Servicing
Do not attempt to service this product yourself, as opening or removing covers may expose
you to dangerous voltages or other risks. If any of the above mentioned misuse or other
accident such as dropping or mishandling occurs, contact qualified service personnel for
servicing.
BenQ ecoFACTS
BenQ has been dedicated to the design and development of greener product as part of its
aspiration to realize the ideal of the "Bringing Enjoyment 'N Quality to Life" corporate vision
with the ultimate goal to achieve a low-carbon society. Besides meeting international regulatory
requirement and standards pertaining to environmental management, BenQ has spared no
efforts in pushing our initiatives further to incorporate life cycle design in the aspects of
material selection, manufacturing, packaging, transportation, using and disposal of the products.
BenQ ecoFACTS label lists key eco-friendly design highlights of each product, hoping to ensure
that consumers make informed green choices at purchase. Check out BenQ's CSR Website at
http://csr.BenQ.com/ for more details on BenQ's environmental commitments and
achievements.
3
Table of Contents
Copyright ......................................................................................................................................2
Getting started .............................................................................................................................5
Getting to know your monitor ................................................................................................7
Front view.................................................................................................................................................... 7
Back view ..................................................................................................................................................... 7
Input and output ports.............................................................................................................................. 8
How to assemble your monitor hardware ...........................................................................9
How to detach the stand base .............................................................................................................. 13
Using the monitor wall mounting kit ................................................................................................... 14
Getting the most from your BenQ monitor ...................................................................... 15
How to install the monitor on a new computer .............................................................................. 16
How to upgrade the monitor on an existing computer ................................................................. 17
How to install on Windows 8 system ................................................................................................ 18
How to install on Windows 7 system ................................................................................................ 19
How to adjust your monitor ................................................................................................. 20
The control panel..................................................................................................................................... 20
Basic menu operation ............................................................................................................................. 21
Picture optimization ................................................................................................................................ 23
Customizing the hot keys....................................................................................................................... 23
Adjusting display mode ........................................................................................................................... 23
Choosing an appropriate picture mode.............................................................................................. 24
Navigating the main menu ...................................................................................................... 25
Display menu ............................................................................................................................................. 26
Picture menu ............................................................................................................................................. 28
Picture Advanced menu ......................................................................................................................... 30
Audio menu ............................................................................................................................................... 33
System menu ............................................................................................................................................. 34
Troubleshooting ....................................................................................................................... 37
Frequently asked questions (FAQ) ...................................................................................................... 37
Need more help?...................................................................................................................................... 39
4
Getting started
When unpacking please check you have the following items. If any are missing or damaged,
please contact the place of purchase for a replacement.
BenQ LCD Monitor
Monitor Stand
Monitor Base
Quick Start Guide
CD-ROM
Power Cord
(Picture may differ from product supplied
for your region.)
Getting started
5
Video Cable: D-Sub
Video Cable: DVI-D
(Optional accessory)
Video Cable: HDMI
(Optional accessory, sold separately)
Audio Cable
(Optional accessory, sold separately)
• Available accessories and the pictures shown here may differ from the actual contents and the product supplied
for your region. For cables that are not supplied with your product, you can purchase them separately.
• Consider keeping the box and packaging in storage for use in the future when you may need to transport the
monitor. The fitted foam packing is ideal for protecting the monitor during transport.
Always keep the product and accessories out of reach of small children.
6
Getting started
Getting to know your monitor
Front view
Back view
1.
2.
3.
4.
Control buttons
Power button
Release button
Input and output ports (vary by
model, see Input and output
ports on page 8)
5. Kensington lock slot
1
2
3
4
5
• Above diagram may vary depending on the model.
• Picture may differ from product supplied for your region.
Getting to know your monitor
7
Input and output ports
Available input and output ports may vary depending on your purchased model. Check the
Specification document on the provided CD for details.
Models with audio and HDMI inputs
1. AC power input jack
2. Audio Line In
3. Headphone jack
1
2 3 4
5
6
4. HDMI socket
Models with dual inputs
5. DVI-D socket
6. D-Sub socket
1
5
6
Models with HDMI inputs
1
8
Getting to know your monitor
3 4
5
6
How to assemble your monitor hardware
• If the computer is turned on you must turn it off before continuing.
Do not plug-in or turn-on the power to the monitor until instructed to do so.
• The following illustrations are for your reference only. Available input and output jacks may vary depending on
the purchased model.
1. Attach the monitor base.
Please be careful to prevent damage to the monitor. Placing the screen surface on an object like a stapler or a
mouse will crack the glass or damage the LCD substrate voiding your warranty. Sliding or scraping the monitor
around on your desk will scratch or damage the monitor surround and controls.
Protect the monitor and screen by clearing a flat open
area on your desk and placing a soft item like the
monitor packaging bag on the desk for padding.
Gently lay the screen face down on a flat clean padded
surface.
Attach the monitor stand to the monitor base as
illustrated until it locks in place.
If the screen size is 27 inches, follow the illustration on the
right to attach the monitor stand and the base. Tighten the
thumbscrew on the bottom of the monitor base as
illustrated.
Orient and align the stand arm with the monitor, then
push them together until they click and lock into place.
How to assemble your monitor hardware
9
Gently attempt to pull them back apart to check that
they have properly engaged.
Carefully lift the monitor, turn it over and place it
upright on its stand on a flat even surface.
You should position the monitor and angle the screen to
minimize unwanted reflections from other light sources.
2. Connect the PC video cable
-5 ~ +20
O
Either
Do not use both DVI-D cable and D-Sub cable on the same
PC. The only case in which both cables can be used is if they
are connected to two different PCs with appropriate video
systems.
To Connect the D-Sub Cable
Connect the plug of the D-Sub cable (at the end
without the ferrite filter) to the monitor video socket.
Connect the other end of the cable (at the end with the
ferrite filter) to the computer video socket.
Tighten all finger screws to prevent the plugs from
accidently falling out during use.
To Connect the DVI-D Cable
Connect the plug of the DVI-D cable (at the end
without the ferrite filter) to the monitor video socket.
Connect the other end of the cable (at the end with the
ferrite filter) to the computer video socket.
Tighten all finger screws to prevent the plugs from
accidently falling out during use.
10
How to assemble your monitor hardware
Or
O
To Connect the HDMI Cable
Or
Connect the plug of the HDMI cable to the HDMI port
on the monitor. Connect the other end of the cable to
the HDMI port of a digital output device.
If there is more than one video transmission method
available to you, you might want to take the picture quality
of each video cable into consideration before making the
connection.
- Better quality: HDMI / DVI-D
- Good quality: D-Sub
The video cables included in your package and the socket
illustrations on the right may vary depending on the product
supplied for your region.
3. Connect the audio cable (for models with
speakers).
Connect the audio cable between the socket on the
rear of the monitor (Line In) and your computer audio
outlet.
You may connect headphones to the headphone jack
found next to the Line In jack of the monitor.
4. Connect the power cable to the monitor.
Plug one end of the power cord into the socket labelled
on the rear of the monitor. Do not connect the
other end to a power outlet just yet.
How to assemble your monitor hardware
11
5. Connect-to and turn-on the power.
Plug the other end of the power cord into a power
outlet and turn it on.
Picture may differ from product supplied for your region.
Turn on the monitor by pressing the power button on
the monitor.
Turn on the computer too, and follow the instructions
in Getting the most from your BenQ monitor on page
15 to install the monitor software.
To extend the service life of the product, we recommend
that you use your computer's power management function.
12
How to assemble your monitor hardware
How to detach the stand base
1. Prepare the monitor and area.
Turn off the monitor and the power before unplugging
the power cable. Turn off the computer before
unplugging the monitor signal cable.
Protect the monitor and screen by clearing a flat open
area on your desk and placing a soft item like a towel on
the desk for padding, before laying the screen face down
on a flat clean padded surface.
Please be careful to prevent damage to the monitor. Placing
the screen surface on an object like a stapler or a mouse will
crack the glass or damage the LCD substrate voiding your
warranty. Sliding or scraping the monitor around on your
desk will scratch or damage the monitor surround and
controls.
2. Press the locking clips to detach the
monitor base from the monitor stand arm.
While holding the monitor stand arm with one hand
and pushing the locking clips downward with the other,
detach the monitor base from the stand arm.
2
1
3
If the screen size is 27 inches, follow the illustration on the
right to detach the monitor base. Release the thumbscrew
on the bottom of the monitor base and detach the monitor
base as illustrated.
1
2
3
3. Remove the monitor stand.
Insert a pointed object such as a screwdriver to the
hole above the monitor stand arm, and then push the
screwdriver against the release button inside the hole.
Then pull the monitor stand backward away from the
monitor.
1
2
Release button
How to assemble your monitor hardware
13
Using the monitor wall mounting kit
The back of your LCD monitor has a VESA standard mount with 100mm pattern, allowing the
installation of a wall mount bracket. Before starting to install a monitor wall mounting kit,
please read the precautions carefully.
Precautions
• Install your monitor and monitor mounting kit on a wall with flat surface.
• Ensure that the wall material is stable to support the weight of the monitor.
• Turn off the monitor and the power before disconnecting the cables from the LCD monitor.
1. Remove the monitor stand.
Lay the screen face down on a clean and well-padded
surface.
Insert a pointed object such as a screwdriver to the
hole above the monitor stand arm, and then push the
screwdriver against the release button inside the hole.
Then pull the monitor stand backward away from the
monitor.
1
Release
button
2
2. Follow the instruction manuals of the wall
mount bracket you purchased to complete
the installation.
14
How to assemble your monitor hardware
Getting the most from your BenQ monitor
To gain the most benefit from your new BenQ LCD monitor, you should install the custom
BenQ LCD Monitor driver software as provided on the BenQ LCD Monitor CD-ROM.
The circumstances under which you connect and install your BenQ LCD Monitor will
determine which process you need to follow to successfully install the BenQ LCD Monitor
driver software. These circumstances relate to which version of Microsoft Windows you are
using, and whether you are connecting the monitor and installing the software onto a new
computer (without existing monitor driver software), or whether you are upgrading an existing
installation (which already has existing monitor driver software) with a newer monitor.
In either case however, the very next time you turn on your computer (after connecting the
monitor to your computer), Windows will automatically recognize the new (or different)
hardware, and will launch its Found New Hardware wizard.
Follow the wizard instructions until it asks you to select a monitor model. At that point, click
the Have Disk button, insert the BenQ LCD Monitor CD-ROM and select the appropriate
monitor model. Further details and step-by-step instructions for either an automatic (new) or
upgrade (existing) installation, see:
• How to install the monitor on a new computer on page 16.
• How to upgrade the monitor on an existing computer on page 17.
• If you require a User Name and Password to login to your Windows computer, you must be logged on as an
Administrator or as a member of the Administrators group in order to install the monitor driver software.
Furthermore, if your computer is connected to a network which has security access requirements, network
policy settings may prevent you from installing software on your computer.
• To check the name of the purchased model, refer to the specification label on the back of the monitor.
Getting the most from your BenQ monitor
15
How to install the monitor on a new computer
This instruction details the procedure for selecting and installing the BenQ LCD Monitor driver
software on a new computer which has never had a monitor driver installed before. This
instruction is only suitable for a computer which has never been used before, and for which the
BenQ LCD Monitor is the first ever monitor to be connected to it.
If you are adding the BenQ LCD Monitor to an existing computer that has already had another monitor
connected to it (and has monitor driver software installed), you should not be following these instructions. You
should instead be following the instructions for How to upgrade the monitor on an existing computer.
1. Follow the instructions in How to assemble your monitor hardware on page 9.
When Windows starts, it will automatically detect the new monitor and launch the Found New
Hardware Wizard. Follow the prompts until it displays the option to Install Hardware Device
Drivers.
2.
3.
4.
5.
Insert the BenQ LCD Monitor CD-ROM into a CD drive on the computer.
Check Search for a suitable driver for my device option, and click Next.
Check the option for CD-ROM drives (uncheck all others) and click Next.
Look to confirm that the wizard has selected the correct name of your monitor and click
Next.
6. Click Finish.
7. Restart the computer.
To find the suitable driver files for the purchased model, refer to the following table.
Driver files
16
Suitable models
GL2265
GL2265
GL2460
GL2460 / GL2460HM
GL2760
GL2760 / GL2760H
Getting the most from your BenQ monitor
How to upgrade the monitor on an existing computer
This instruction details the procedure for manually updating the existing monitor driver
software on your Microsoft Windows computer. It is currently tested as compatible for
Windows 8 and Windows 7 Operating System (OS).
The BenQ LCD Monitor driver for your model may well function perfectly with other versions of Windows,
however, as at the time of writing, BenQ has done no testing of this driver on other versions of Windows and
cannot guarantee its operation on those systems.
Installing monitor driver software involves selecting an appropriate information file (.inf) on the
BenQ LCD Monitor CD-ROM for the particular model monitor you have connected, and
letting Windows install the corresponding driver files from the CD. You need only steer it in
the right direction. Windows has an Upgrade Device Driver Wizard to automate the task and
guide you through the file selection and installation process.
See:
• How to install on Windows 8 system on page 18
• How to install on Windows 7 system on page 19.
Getting the most from your BenQ monitor
17
How to install on Windows 8 system
1. Open Display Properties.
Move the cursor to the lower-right of the screen or press the Windows + C buttons on the
keyboard to bring up the Charm bar. Go to Settings, Control Panel, Devices and Printers
and right-click the name of your monitor from the menu.
Alternatively, right-click the desktop and select Personalize, Display, Devices and Printers,
and right-click the name of your monitor from the menu.
2.
3.
4.
5.
6.
7.
Select Properties from the menu.
Click the Hardware tab.
Click Generic PnP Monitor, and then the Properties button.
Click the Driver tab and the Update Driver button.
Insert the BenQ LCD Monitor CD-ROM into a CD drive on the computer.
In the Update Driver Software window, select the option Browse my computer for
driver software.
8. Click Browse and navigate to the following directory: d:\BenQ_LCD\Driver\ (where d is
the drive letter designator for the CD-ROM drive).
The drive letter for your CD drive may differ from the example above depending upon your system - it may be
'D:' or 'E:' or 'F:' etc.
9. Select the correct folder name of your monitor from provided driver list, and click Next.
This will copy and install the appropriate monitor driver files to your computer.
10. Click Close.
You may be prompted to restart your computer after the driver update is complete.
18
Getting the most from your BenQ monitor
How to install on Windows 7 system
1. Open Display Properties.
Go to Start, Control Panel, Hardware and Sound, Devices and Printers and right-click the
name of your monitor from the menu.
Alternatively, right-click the desktop and select Personalize, Display, Devices and Printers,
and right-click the name of your monitor from the menu.
2. Select Properties from the menu.
3. Click the Hardware tab.
4. Click Generic PnP Monitor, and then the Properties button.
5. Click the Driver tab and the Update Driver button.
6. Insert the BenQ LCD Monitor CD-ROM into a CD drive on the computer.
7. In the Update Driver Software window, select the option Browse my computer for
driver software.
8. Click Browse and navigate to the following directory: d:\BenQ_LCD\Driver\ (where d is
the drive letter designator for the CD-ROM drive).
The drive letter for your CD drive may differ from the example above depending upon your system - it may be
'D:' or 'E:' or 'F:' etc.
9. Select the correct folder name of your monitor from provided driver list, and click Next.
This will copy and install the appropriate monitor driver files to your computer.
10. Click Close.
You may be prompted to restart your computer after the driver update is complete.
Getting the most from your BenQ monitor
19
How to adjust your monitor
The control panel
1
2
No.
20
Name
Description
1.
Control keys
Accesses the functions or menu items displayed on the screen,
right next to each key.
2.
Power key
Turns the power on or off.
How to adjust your monitor
Basic menu operation
All OSD (On Screen Display) menus can be accessed by the control keys. You can use the OSD
menu to adjust all the settings on your monitor.
1
2
Low Blue Light
Input
Volume
Menu
Exit
4
3
Low Blue Light
Input
Volume
Menu
Exit
1. Press any of the control keys.
2. The hot key menu is displayed. The top three controls are custom keys and are designated
for particular functions.
3. Select Menu to access the main menu.
4. In the main menu, follow the icons next to the control keys to make adjustments or
selection. See Navigating the main menu on page 25 for details on the menu options.
No.
OSD in hot key
menu
Custom Key 1
OSD icon
in main
menu
Function
• By default, the key is the hot key for Low Blue Light.
To change the default settings, see Customizing the
hot keys on page 23.
• For Up/Increase adjustment.
How to adjust your monitor
21
No.
OSD in hot key
menu
OSD icon
in main
menu
• By default, the key is the hot key for Input. To change
the default settings, see Customizing the hot keys on
page 23.
• For Down/Decrease adjustment.
Custom Key 2
Custom Key 3
Function
/
• By default, the key is the hot key for Volume (for
models with speakers) or Brightness (for models
without speakers). To change the default settings, see
Customizing the hot keys on page 23.
• Enters sub menus.
• Selects menu items.
Menu
• Activates the main menu.
• Returns to the previous menu.
Exit
Exits OSD menu.
• OSD = On Screen Display.
The hot keys only operate while the main menu is not currently displaying. Hot key displays will disappear after
a few seconds of no key activity.
• To unlock the OSD controls, press and hold any key for 10 seconds.
22
How to adjust your monitor
Picture optimization
The easiest way to obtain an optimal display from an analog (D-Sub) input is to use the Auto
Adjustment function. Go to Display and Auto Adjustment to optimize the currently
displayed image to the screen.
When you connect a digital input signal using a digital (DVI or HDMI) cable to your monitor, the Auto
Adjustment function will be disabled, because the monitor will automatically display the best image.
Please ensure that the connected graphic card on your computer is set to the native resolution of the monitor
when you use the Auto Adjustment function.
If you wish, you can always adjust the screen geometric settings manually using geometry menu
items. To assist you in this endeavour, BenQ has provided a screen test image utility which you
can use to check for screen color, grayscale and line gradient display.
1. Run the test program auto.exe from CD-ROM. You could also use any other image, such as
the desktop of your operating system. However, we recommend that you use auto.exe. As
you run auto.exe, a test pattern displays.
2. Press any of the control keys to bring up the hot key menu. Select Menu to enter the main
menu.
3. Go to Display and Auto Adjustment.
4. If you notice a vertical noise (like a curtain effect-shimmering of vertical lines), select Pixel
Clock and adjust the monitor until the noise disappears.
5. If you notice a horizontal noise, select Phase and adjust the monitor until the noise
disappears.
Customizing the hot keys
The top 3 control keys (also called custom keys) perform as hot keys to provide direct access
to pre-defined functions. You can change the default setting and designate different functions
for these keys.
1. Press any of the control keys to bring up the hot key menu, and press Menu to access the
main menu.
2. Go to System.
3. Select the custom key you want to change.
4. In the sub menu, select a function that can be accessed by this key. A pop-up message will
appear, showing that the setup is complete.
Adjusting display mode
To display images of aspect ratio other than 16:9 and size other than the panel size of your
purchased model, you can adjust the display mode on the monitor.
1. Press any of the control keys to bring up the hot key menu, and press Menu to access the
main menu.
2. Go to Picture Advanced and Display Mode.
3. Select an appropriate display mode. The setting will take effect immediately.
How to adjust your monitor
23
Choosing an appropriate picture mode
Your monitor provides various picture modes that are suitable for different types of images. See
Picture Mode on page 28 for all the available picture modes.
Go to Picture Advanced and Picture Mode for a desired picture mode. If Low Blue Light is
preferred, press the first control key (Custom Key 1) and select one of the low blue light
modes from the list.
24
How to adjust your monitor
Navigating the main menu
You can use the OSD (On Screen Display) menu to adjust all the settings on your monitor.
Press any of the control keys to bring up the hot key menu, and press Menu to access the main
menu. See Basic menu operation on page 21 for details.
Available menu options may vary depending on the input sources, functions and settings. Menu
options that are not available will become grayed out. And keys that are not available will be
disabled and the corresponding OSD icons will disappear. For models without certain
functions, their settings and related items will not appear on the menu.
The OSD menu languages may differ from the product supplied to your region, see Language on page 35 under
System and OSD Settings for more details.
For more information on each menu, please refer to the following pages:
• Display menu on page 26
• Picture menu on page 28
• Picture Advanced menu on page 30
• Audio menu on page 33
• System menu on page 34
Navigating the main menu
25
Display menu
Available menu options may vary depending on the input sources, functions and settings. Menu
options that are not available will become grayed out. And keys that are not available will be
disabled and the corresponding OSD icons will disappear. For models without certain functions,
their settings and related items will not appear on the menu.
Mode: Standard
Display
Auto Adjustment
Picture
Input
Picture Advanced
H. Position
Audio
V. Position
System
Pixel Clock
50
Phase
1. Select Menu from the hot key menu.
2. Use
or
3. Select
4. Use
to select Display.
to go to a sub menu, and then use
or
to make adjustments, or use
5. To return to the previous menu, select
6. To exit the menu, select
Item
Auto Adjustment
or
to select a menu item.
to make selection.
.
.
Function
Range
Optimizes and adjusts the screen settings
automatically for you.
Not applicable to a digital input signal.
26
Input
Use this to change the input to that appropriate to
your video cable connection type.
• D-Sub
• DVI
• HDMI (for
models with
HDMI inputs)
H. Position
Adjusts the horizontal position of the screen image.
0 to 100
V. Position
Adjusts the vertical position of the screen image.
0 to 100
Navigating the main menu
Item
Pixel Clock
Function
Range
Adjusts the pixel clock frequency timing to
synchronize with the analog input video signal.
See also: Picture optimization on page 23.
0 to 100
Not applicable to a digital input signal.
Phase
Adjusts the pixel clock phase timing to synchronize
with the analog input video signal.
See also: Picture optimization on page 23.
0 to 63
Not applicable to a digital input signal.
Navigating the main menu
27
Picture menu
Available menu options may vary depending on the input sources, functions and settings. Menu
options that are not available will become grayed out. And keys that are not available will be
disabled and the corresponding OSD icons will disappear. For models without certain functions,
their settings and related items will not appear on the menu.
Mode: User
Display
Brightness
Normal
Picture
Contrast
Bluish
Picture Advanced
Sharpness
Reddish
Audio
Gamma
User Define
System
Color Temperature
R
50 B
G
100 100 100
Hue
Saturation
Reset Color
1. Select Menu from the hot key menu.
2. Use
or
3. Select
4. Use
to select Picture.
to go to a sub menu, and then use
or
to make adjustments, or use
5. To return to the previous menu, select
6. To exit the menu, select
Item
28
or
to select a menu item.
to make selection.
.
.
Function
Range
Brightness
Adjusts the balance between light and dark shades.
0 to 100
Contrast
Adjusts the degree of difference between darkness and
lightness.
0 to 100
Sharpness
Adjusts the clarity and visibility of the edges of the subjects 1 to 10
in the image.
Gamma
Adjusts the tone luminance. The default value is 3 (the
standard value for Windows).
Navigating the main menu
•1
•2
•3
•4
•5
Item
Function
Color
Normal
Temperature
Range
Allows video and still photographs to be viewed
with natural coloring. This is the factory default
color.
Bluish
Applies a cool tint to the image and is factory
pre-set to the PC industry standard white color.
Reddish
Applies a warm tint to the image and is factory
pre-set to the news print standard white color.
User
Define
The blend of the Red, Green and Blue primary • R (0~100)
colors can be altered to change the color tint of • G (0~100)
the image. Go to the succeeding R (red),
• B (0~100)
G (green), and B (blue) menus to change the
settings.
Decreasing one or more of the colors will
reduce their respective influence on the color
tint of the image. (e.g. if you reduce the Blue
level the image will gradually take on a yellowish
tint. If you reduce Green, the image will become
a magenta tint.)
Hue
Adjusts the degree of how we perceive colors.
0 ~ 100
Saturation
Adjusts the purity degree of colors.
0 ~ 100
Reset Color
Resets the custom color settings to the factory defaults.
• YES
• NO
AMA
Improves the gray level response time of the LCD panel.
• OFF
• High
• Premium
Navigating the main menu
29
Picture Advanced menu
Available menu options may vary depending on the input sources, functions and settings. Menu
options that are not available will become grayed out. And keys that are not available will be
disabled and the corresponding OSD icons will disappear. For models without certain functions,
their settings and related items will not appear on the menu.
Mode: Standard
Display
Picture Mode
Standard
Picture
Senseye Demo
Low Blue Light
Picture Advanced
Dynamic Contrast
Movie
Audio
Overscan
Game
System
Display Mode
Photo
Color Format
sRGB
HDMI RGB PC Range
Eco
User
1. Select Menu from the hot key menu.
2. Use
or
3. Select
4. Use
to select Picture Advanced.
to go to a sub menu, and then use
or
to make adjustments, or use
5. To return to the previous menu, select
6. To exit the menu, select
to select a menu item.
to make selection.
.
.
Item
Picture
Mode
or
Function
Range
Select a picture mode that best suits the type of images shown on
the screen.
Standard
For basic PC application.
Low Blue
Light
Decreases the blue light emitted from the display to
reduce the risk of blue light exposure to your eyes.
The value for each Low Blue Light mode indicates how
much blue light is decreased compared with the Standard
mode.
Multimedia
For viewing multimedia files.
Web Surfing For web surfing.
Movie
30
Navigating the main menu
-30%
-50%
Office
For office works or office environment. -60%
Reading
For reading e-books or documents.
For viewing videos.
-70%
Item
Function
Range
Game
For playing video games.
Photo
For viewing still images.
sRGB
For better color matching representation with the
peripheral devices, such as printers, digital cameras,
etc.
Eco
For saving electricity with low power consumption by
providing minimum brightness for all running
programs.
User
Applies a combination of picture settings defined by
users.
Senseye
Demo
Displays the preview of screen images under the selected mode
from Picture Mode. The screen will be divided into two windows;
the left window demonstrates images of Standard mode, while the
right window presents the images under the specified mode.
• ON
• OFF
Dynamic
Contrast
The function is to automatically detect the distribution of an input
visual signal, and then to create the optimal contrast.
0 to 5
Overscan
Slightly enlarges the input image. Use this feature to hide annoying
edge noise if present around your image.
• ON
• OFF
Available only when the input source is HDMI or D-Sub (VGA converted
from Component).
Display
Mode
This feature is provided to allow aspect ratios other than 16:9 to be
displayed without geometric distortion.
The options under Display Mode will be different depending on the input
signal sources.
Depending on your selection of Picture Mode, different Display Mode
option is pre-set. Change the setting if needed.
Full
Scales the input image to fill the screen. Ideal for 16:9
aspect images.
Aspect
The input image is displayed without geometric
distortion filling as much of the display as possible.
Navigating the main menu
31
Item
Color
Format
Function
Range
Determines the color space (RGB or YUV) based on the detected
video signal.
You might need to manually set the Color Format if colors shown on the
monitor screen do not display properly.
If the input source is HDMI, color format is not selectable. In other words,
Color Format is automatically set depending on the input video source.
HDMI RGB
PC Range
(for models
with HDMI
inputs)
32
RGB
• For D-Sub (VGA) input source from PC.
• For DVI input source.
YUV
For D-Sub (Component converted from VGA) input
source from a video device.
Determines the range of color scales. Select an option that matches • RGB (0 ~
the RGB range setting on the connected HDMI device.
255)
• RGB (16 ~
235)
Navigating the main menu
Audio menu
Available menu options may vary depending on the input sources, functions and settings. Menu
options that are not available will become grayed out. And keys that are not available will be
disabled and the corresponding OSD icons will disappear. For models without certain
functions, their settings and related items will not appear on the menu.
Mode: Standard
Display
Volume
Picture
Mute
Picture Advanced
Audio Select
92
Audio
System
1. Select Menu from the hot key menu.
2. Use
3. Select
4. Use
or
to select Audio.
to go to a sub menu, and then use
or
to make adjustments, or use
5. To return to the previous menu, select
6. To exit the menu, select
Item
or
to select a menu item.
to make selection.
.
.
Function
Range
Volume
Adjusts the audio volume.
0 ~ 100
Mute
Mutes the audio input.
• ON
• OFF
Audio Select
Allow users to select the audio source or let the
monitor detect it automatically.
• PC Audio
• HDMI Audio
• Auto Detect
(for models with
more than 2 audio
sources)
Navigating the main menu
33
System menu
Available menu options may vary depending on the input sources, functions and settings. Menu
options that are not available will become grayed out. And keys that are not available will be
disabled and the corresponding OSD icons will disappear. For models without certain functions,
their settings and related items will not appear on the menu.
Mode: Standard
Display
OSD Settings
Language
5 Sec.
Picture
Custom Key 1
Display Time
10 Sec.
Picture Advanced
Custom Key 2
OSD Lock
15 Sec.
Audio
Custom Key 3
20 Sec.
System
DDC/CI
25 Sec.
HDMI Auto Switch
30 Sec.
Auto Power Off
Resolution Notice
1. Select Menu from the hot key menu.
2. Use
or
3. Select
4. Use
to select System.
to go to a sub menu, and then use
or
to make adjustments, or use
5. To return to the previous menu, select
6. To exit the menu, select
34
Navigating the main menu
.
.
or
to select a menu item.
to make selection.
Item
OSD
Settings
Function
Language
Range
Sets the OSD menu language.
• English
• Français
The language options displayed on your OSD may • Deutsch
differ from those shown on the right, depending
• Italiano
on the product supplied in your region.
• Español
• Polski
• Česky
• Magyar
• SiCG/BiH/CRO
• Română
• Nederlands
• Русский
• Svenska
• Português
•日本語
• 繁體中文
• 简体中文
Display
Time
Adjusts the display time of the OSD menu.
• 5 Sec.
• 10 Sec.
• 15 Sec.
• 20 Sec.
• 25 Sec.
• 30 Sec.
OSD Lock
Prevents all the monitor settings from being
accidentally changed. When this function is
activated, the OSD controls and hotkey
operations will be disabled.
• YES
• NO
To unlock the OSD controls, press and hold any
key for 10 seconds.
Navigating the main menu
35
Item
Function
Custom Key Sets the function to be accessed by custom key 1.
1
Custom Key Sets the function to be accessed by custom key 2.
2
Custom Key Sets the function to be accessed by custom key 3.
3
Range
• Picture Mode
• Low Blue Light
• Display Mode
• Brightness
• Contrast
• Auto
Adjustment
• Volume
• Mute
• Input
DDC/CI
Allows the monitor settings to be set through the software • ON
on the PC.
• OFF
DDC/CI, short for Display Data Channel/Command Interface,
which was developed by Video Electronics Standards Association
(VESA). DDC/CI capability allows monitor controls to be sent via
the software for remote diagnostics.
When this function is activated, HDMI port will be in the
input auto select loop. Otherwise, HDMI can only be
selected by input select or by hot key.
• ON
• OFF
Auto Power
Off
Sets the time to power off the monitor automatically in
power saving mode.
• OFF
• 10min.
• 20min.
• 30min.
Resolution
Notice
Sets whether to display the resolution notice of the
recommended resolution when a new input source is
detected by the monitor.
• ON
• OFF
Information
Displays the current monitor property settings.
• Input
• Current
Resolution
HDMI Auto
Switch
(for models
with HDMI
inputs)
• Optimum
Resolution
(best with the
monitor)
• Model Name
Reset All
36
Resets all mode, color and geometry settings to the
factory default values.
Navigating the main menu
• YES
• NO
Troubleshooting
Frequently asked questions (FAQ)
The image is blurred.
Read the instructions on the link "Adjusting the Screen Resolution" on the CD, and then
select the correct resolution, refresh rate and make adjustments based on these instructions.
How do you use a VGA extension cable?
Remove the extension cable for the test. Is the image now in focus? If not, optimize the image
by working through the instructions in the "Adjusting the refresh rate" section on the link
"Adjusting the Screen Resolution". It is normal for blurring to occur due to conduction
losses in extension cables. You can minimize these losses by using an extension cable with
better conduction quality or with a built-in booster.
Does the blurring only occur at resolutions lower than the native (maximum) resolution?
Read the instructions on the link "Adjusting the Screen Resolution" on the CD. Select the
native resolution.
Pixel errors can be seen.
One of several pixels is permanently black, one or more pixels are permanently white, one or
more pixels are permanently red, green, blue or another color.
• Clean the LCD screen.
• Cycle power on-off.
• These are pixels that are permanently on or off and is a natural defect that occurs in LCD
technology.
The image has a faulty coloration.
It has a yellow, blue or pink appearance.
Go to Picture and Reset Color, and then choose YES to reset the color settings to the
factory defaults.
If the image is still not correct and the OSD also has faulty coloration, this means one of the
three primary colors is missing in the signal input. Now check the signal cable connectors. If
any pin is bent or broken off, please contact your dealer to get necessary support.
No image can be seen.
Is the prompt on the display illuminated in green?
If the LED is illuminated in green and there is a message Out of Range on the screen, this
means you are using a display mode that this monitor does not support, please change the
setting to one of the supported mode. Please read the "Preset display modes" section from
the link "Adjusting the Screen Resolution".
Troubleshooting
37
Faint shadow from the static image displayed is visible on the screen.
• Activate the power management function to let your computer and monitor go into a low
power "sleep" mode when not actively in use.
• Use a screensaver to prevent the occurrence of image retention.
Is the prompt on the display illuminated in orange?
If the LED is illuminated in orange, the power management mode is active. Press any button on
the computer keyboard or move the mouse. If that does not help, check the signal cable
connectors. If any pin is bent or broken off, please contact your dealer to get necessary
support.
Is the prompt on the display not illuminated at all?
Check the power supply mains socket, the external power supply and the mains switch.
The image is distorted, flashes or flickers.
Read the instructions on the link "Adjusting the Screen Resolution" on the CD, and then
select the correct resolution, refresh rate and make adjustments based on these instructions.
You are running the monitor at its native resolution, but the image is still distorted.
Images from different input sources may appear distorted or stretched on the monitor running
at its native resolution. To have the optimal display performance of each type of input sources,
you can use the Display Mode function to set a proper aspect ratio for the input sources. See
Display Mode on page 31 for details.
The image is displaced in one direction.
Read the instructions on the link "Adjusting the Screen Resolution" on the CD, and then
select the correct resolution, refresh rate and make adjustments based on these instructions.
The OSD controls are inaccessible.
To unlock the OSD controls when it is preset to be locked, press and hold any key for 10
seconds.
No sound can be heard from the connected external speakers (for models with speakers
only).
• Remove your headphone (if the headphone is connected to the monitor).
• Check whether the headphone jack is properly connected.
• If the external speakers are USB-powered, check whether the USB connection is OK.
• Increase the volume (volume may be muted or too low) on the external speakers.
38
Troubleshooting
Need more help?
If your problems remain after checking this manual, please contact your place of purchase or
e-mail us at: [email protected].
Troubleshooting
39