1
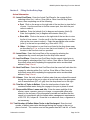
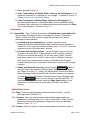
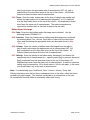
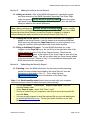
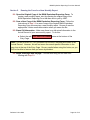
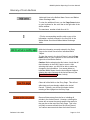
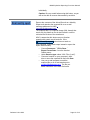
Ballast Water Management (BWM)
Equivalent Reporting Form
User Manual
BWM Equivalent Reporting Form User Manual
Contents
Overview
3
Software Requirements and Setup
4
Downloading the Required Software ......................................................................... 4
Opening BWM Equivalent Reporting Form................................................................ 4
Verify Vessel-specific Information.............................................................................. 4
Step-by-Step Instructions
5
Saving the BWM Equivalent Reporting Form .............................................................. 5
Before Starting a New Monthly Report
After Adding Each Arrival to the Arrival Record
Filling Out the Entry Page.......................................................................................... . 6
Arrival Information
Tanks/Holds
Ballast Water Source
Ballast Water Discharge
Adding Arrivals to Arrival Record ................................................................................ 9
Adding an Arrival
Viewing the Arrival Record
Filling in Additional Voyages
Submitting the Monthly Report .................................................................................... 9
Reusing the Form for a New Monthly Report............................................................. 10
Open the Original Copy of the BWM Equivalent Reporting Form
Save a New Copy of the BWM Equivalent Reporting Form
Erase Old Information
Begin Entering a New Voyage
Glossary of Form Buttons …...................................................................................... 11
Released 1-Oct-2012
Page 2 of 12
BWM Equivalent Reporting Form User Manual
Overview
The BWM Equivalent Reporting Form is a vessel-specific form that should be saved to a
computer hard drive and reused each month. The form contains two key elements: the
Entry Page and the Arrival Record.
The Entry Page is what the user sees when the form is first opened, and is
where he or she can enter voyage-specific BWM information. Once the BWM
information for an individual voyage has been completely entered, the user
selects the green Add this arrival to monthly report button to add the
individual BWM report to the Arrival Record.
• The Arrival Record is the growing collection of individual BWM reports that will
eventually be submitted together as the monthly report. Each voyage that is
entered into the Entry Page and added to the Arrival Record by clicking the green
button will have an individual BWM report associated with it in the Arrival Record.
•
To meet the requirements of the BWM Equivalent Reporting Program, form submitters
must:
• Enter into the Entry Page the BWM information for each voyage to a U.S. port or
place conducted during the monthly reporting period;
• Add each voyage’s information to the Arrival Record individually;
• Submit the completed BWM Equivalent Reporting Form to the National Ballast
Information Clearinghouse (NBIC) prior to each month’s due date. Submissions
must be sent via e-mail to the address [email protected].
Form submitters should reuse the originally-issued form each month by saving copies to
their computer hard drives. See NVIC 07-04, Change-1, Enclosure (1), available at
http://www.uscg.mil/hq/cg5/cg522/cg5224/bwm.asp , for requirements and guidance on
BWM reporting.
Each completed BWM Equivalent Reporting Form must be received by the National
Ballast Information Clearinghouse by each month’s assigned due date in order to
remain in compliance with the Coast Guard’s BWM reporting requirements.
Failure to meet the report due date or the Eligibility Criteria of an individual vessel or
company for two or more months will result in cancellation of eligibility for the Equivalent
Reporting Program. Compliance deficiencies identified during vessel inspections or
audits may also result in cancellation of eligibility for the Equivalent Reporting Program.
If any of the information that was submitted in the BWM Equivalent Reporting Program
Application changes, a new application must be filed.
Released 1-Oct-2012
Page 3 of 12
BWM Equivalent Reporting Form User Manual
Software Requirements and Setup
Section 1.
Downloading the Required Software
Adobe Acrobat, Standard or Pro versions, must be installed prior to using the BWM
Equivalent Reporting Form. Information about Adobe Acrobat is available at the
Adobe website: http://www.adobe.com/products/acrobat.html.
Section 2.
Opening BWM Equivalent Reporting Form
To open Ballast Water Reporting Form you should first open Adobe Acrobat. Once
it has started up, select Open from the File Menu and choose the BWM Equivalent
Reporting Form sent to you by NBIC.
Section 3.
Verify Vessel-specific Information
Prior to beginning data entry, ensure that the vessel-specific information inside the
grey box at the top of the BWM Equivalent Reporting Form you received from NBIC
is accurate. If any information is incorrect or has changed, or for technical
assistance, e-mail NBIC immediately at [email protected].
Released 1-Oct-2012
Page 4 of 12
BWM Equivalent Reporting Form User Manual
Step-by-Step Instructions
Section 1.
Saving the BWM Equivalent Reporting Form
1.1. Before Starting a New Monthly Report: Before you begin adding a new
month’s data to the BWM Equivalent Reporting Form, you will want to
save the entire document as a new monthly report. To do this:
a. Select the Save As… function under File in the menu at the top of the
Adobe window.
b. A box will appear allowing you to enter a name for the document and to
choose a location on your hard drive where the document should be
saved.
c. Enter a name for the document using the following format:
First three letters of the vessel’s name, underscore, official number,
underscore, month (3-letter abbreviation) and year (4-digits) the report
will be submitted:
Example: NAM_123456_Nov2004
d. Select the hard drive location on the computer where the file will be
kept.
e. Select the Save Button.
This will create a new copy of the BWM Equivalent Reporting Form to which
you can add the data for the month in question. To begin adding information,
go to Step 2.1.
1.2. After Adding Each Arrival to the Arrival Record: It is important to save
your work each time that you add a new arrival to the Arrival Record. To
do this:
a. Select the Save function under File in the menu at the top of the Adobe
window.
This will save the data you have added to the current copy of the BWM
Equivalent Reporting Form without creating a new copy.
Released 1-Oct-2012
Page 5 of 12
BWM Equivalent Reporting Form User Manual
Section 2.
Filling Out the Entry Page
Arrival Information
2.1. Arrival Port/Place: Enter the Arrival Port/Place for the voyage by first
selecting either Port, Lat/Lon, River Mile or Other from the drop-down
menu, then completing one of the following:
a. Port: Click on the arrow on the right side of the text box to view the list
of ports. Use the scroll bar to find the correct port, then click the port
name to select it.
b. Lat/Lon: Enter the latitude (Lat) in degrees and minutes North (N).
Enter the longitude (Lon) in degrees and minutes West (W).
c. River Mile: Click on the arrow on the right side of the text box to view
the list of river names. Use the scroll to find the appropriate river, then
click on the river name to select it. Enter the appropriate mile number
(mile #) in the text box provided (e.g. Ohio mile #: 237).
d. Other: If the location is a port that is not listed in the drop down menu
as described by 2.1.a, or is on a river that is not listed in 2.1.c, enter the
location in the free-form text box provided.
2.2. Arrival Date: Enter the Arrival Date of the voyage by selecting the
appropriate day, month and year from the drop-down menus.
2.3. Last Port/Place: Enter the Last Port/Place that the vessel visited prior to
this voyage by selecting either Port, Lat/Lon, River Mile or Other from the
drop-down menu and completing the appropriate action as described
above in Step 2.1.a–d.
2.4. Next Port/Place: Enter the Next Port/Place that the vessel will visit after this
voyage by selecting either Port, Lat/Lon, River Mile or Other from the
drop-down menu and completing the appropriate action as described
above in Step 2.1.a–d.
2.5. Volume: Enter the total volume of ballast water that was onboard the vessel
during the voyage to the port or place of arrival and select the appropriate
unit of measurement (MT, m3, gal) from the drop-down box to the right.
2.6. Total No. of Tanks in Ballast: Enter the total number of tanks that
contained ballast water during the voyage to the port or place of arrival.
2.7. Responsible Officer’s name and title: Enter the name and title of the
master, owner, operator, person-in-charge, or responsible officer who
attests to the accuracy of the information provided and certifies that the
vessel is in compliance with the ballast water management requirements
of 33 CFR 151, subpart B. Since this is an electronic form, a signature is
not necessary.
2.8. Total Number of Ballast Water Tanks to be Discharged: Enter the total
number of ballast water tanks discharged during the voyage to the port or
place of arrival. This number must not be greater than the Total No. of Tanks
Released 1-Oct-2012
Page 6 of 12
BWM Equivalent Reporting Form User Manual
in Ballast entered in Step 2.6.
a. If the Total number of Ballast Water Tanks to be Discharged = 0, no
additional information is required for this voyage. Proceed to Section 3:
Adding Arrivals to Arrival Record, below.
b. If the Total number of Ballast Water Tanks to be Discharged ≥ 1,
text boxes should appear in the Ballast Water Source and Ballast Water
Discharge Table once you have entered the number and pressed the Enter
key on your keyboard. Proceed to Step 2.9.
Tanks/Holds
2.9. Tanks/Holds: Enter Tank/Holds names for all ballast water tanks and holds
that you have discharged or plan to discharge into waters of the United
States. Follow each tank across the page listing all source(s) and all
discharge events separately.
a. List each tank on a separate line. However, paired port and
starboard tanks with identical ballast water histories may be included on
same line. In this case, the volumes entered (Steps 2.12 and 2.16) should
represent the sum of the two tanks’ volumes.
b. For tanks with multiple sources: List the 3 largest sources from last
30 days on separate lines. If there are more than 3 sources, include a
4th line for the respective tank(s). On this line, select “Other” from the
drop-down menu in the “Location” column, type in "Multiple" in the text
field, and list the remaining tank volume not included in the 3 largest
sources already listed (i.e. total tank volume minus volume of the 3 largest
sources).
c. If more tank lines are necessary, select the grey Add tanks button to
the right of the Total Number of Ballast Water Tanks to be Discharged
box, filled out in Step 2.8. Initially, the Ballast Water Source and Ballast
Water Discharge Table will be filled with tank lines based on the number
you entered in the Total Number of Ballast Water Tanks Discharged box.
Using the Add tanks button, you may add up to 19 total tank lines. To
view these additional tank lines, select the Page Down button on your
keyboard, or use the scroll bar at the right hand side of the Adobe
window.
Ballast Water Source
2.10. Date: Enter the date that ballast water was taken on board. Use the
following format: DD/MM/YYYY.
2.11. Location: Enter the source location where ballast water uptake was
conducted by selecting either Port, Lat/Lon, River Mile or Other from the
drop-down menu and completing the appropriate action as described
above in Step 2.1.a – d.
2.12. Volume: Enter the volume of source water taken into the tank (or pair of
Released 1-Oct-2012
Page 7 of 12
BWM Equivalent Reporting Form User Manual
tanks) and ensure the appropriate unit of measurement (MT, m3, gal) is
selected from the drop-down menu at the top of the column. All volumes
listed must have the same unit of measurement.
2.13. Temp: Enter the water temperature at the time of ballast water uptake and
ensure the appropriate unit of measurement (degrees C or F) is selected
from the drop-down menu at the top of the column. All temperatures listed
must have the same unit of measurement. The water temperature as
reported by weather radio at the time of uptake may be used.
Ballast Water Discharge
2.14. Date: Enter the date ballast water discharge was conducted. Use the
following format: DD/MM/YYYY.
2.15. Location: Enter the location where ballast water discharge was conducted
by selecting either Port, Lat/Lon, River Mile or Other from the drop-down
menu and completing the appropriate action as described above in Step
2.1.a – d.
2.16. Volume: Enter the volume of ballast water discharged from the tank (or
pair of tanks) and ensure the appropriate unit of measurement (MT, m3,
gal) is selected from the drop-down menu at the top of the column. All
volumes listed must have the same unit of measurement.
2.17. Salinity: Enter the salinity of the ballast water discharged, and ensure the
appropriate unit of measurement (i.e., specific gravity [sg] or parts per thousand
[ppt]) is selected from the drop-down menu at the top of the column. All
salinities listed must have the same unit of measurement. If unable to measure,
salinity may be reported as 1.0 for fresh water or N/A for salt water. In this case,
you should select “sg” as the unit of measurement.
Note: To automatically copy Tank/Holds, Date, Location, Volume, Temp, and
Salinity information from the first line to subsequent lines in the table, select the button
located in the right margin. This function is provided as a convenience to the user.
All copied fields must be edited to accurately reflect tank history.
Released 1-Oct-2012
Page 8 of 12
BWM Equivalent Reporting Form User Manual
Section 3.
Adding Arrivals to Arrival Record
3.1. Adding an Arrival: After all the BWM information for a particular voyage
has been entered on the BWM Equivalent Reporting Form Entry Page,
select the green Add this arrival to monthly report button in the upper
right hand corner of the Entry Page. Follow Step 1.2 to save the data you
have just added to the current document.
Note: Before selecting the Add this arrival to monthly report button, carefully
check that all the information in the Entry Page is correct. Once you have added
the arrival to the Arrival Record, you will not be able to change it or delete it
without deleting the entire contents of the Arrival Record (See Step 5.3).
3.2. Viewing the Arrival Record: Once the BWM information for a voyage is
added to the Arrival Record, it can be viewed as a completed individual
BWM report by selecting the Page Down button on your keyboard, or by
using the scroll bar at the right-hand side of the Adobe window.
3.3. Filling in Additional Voyages: To enter BWM information for a new
voyage, use the Page Up key or the scroll bar at the right hand side of the
Adobe window to return to the Entry Page at the top. Select the red
Clear this page button at the bottom of the Entry Page to clear all of the
fields on the Entry Page. This will not affect data you have already added
to the Arrival Record. Return to Step 1.1 to proceed with entering the new
BWM information for the voyage.
Section 4.
Submitting the Monthly Report
4.1. E-mailing: Once the BWM information for the entire monthly reporting
period has been entered and added to the Arrival Record, save the
document as described in Step 2.2. Then, select the blue
Email monthly report button at the bottom of the Entry Page.
Note: If the Email monthly report button does not work with your computer,
follow these steps instead to export the report data manually:
•
•
•
•
Choose Document ¯ Fill-in Form ¯ Export Forms Data... from the
Acrobat Reader menu.
Under Save As type:, select “XML Files (*.xml)”.
Choose a location on your computer’s hard drive to store the exported file
and click Save.
Use your e-mail program to send the exported file as an e-mail attachment
to [email protected]. The file you attach should be in the XML
file format.
Released 1-Oct-2012
Page 9 of 12
BWM Equivalent Reporting Form User Manual
Section 5.
Reusing the Form for a New Monthly Report
5.1. Open the Original Copy of the BWM Equivalent Reporting Form: To
create a new monthly report, start by opening the original copy of the
BWM Equivalent Reporting Form that was sent to you by NBIC.
5.2. Save a New Copy of the BWM Equivalent Reporting Form: Follow the
instructions in Step 1.1 to save a copy of the original BWM Equivalent
Reporting Form document as a new monthly report. Be sure to use the
appropriate 3-letter month abbreviation when you name the file.
5.3. Erase Old Information: Make sure there is no old arrival information in the
Arrival Record of your new monthly report. To do this:
a. Select the red Erase entire document button at the bottom of the
Entry Page.
Note: This will ERASE ALL DATA entered into the form, including all arrivals in the
Arrival Record. However, this will not erase the vessel-specific information in the
grey box at the top of the Entry Page. Be very careful when using this button, as you
will not be able to recover data you erase by accident.
5.4. Begin Entering a New Voyage: Proceed with filling out the new form
starting with Step 2.1.
Released 1-Oct-2012
Page 10 of 12
BWM Equivalent Reporting Form User Manual
Glossary of Form Buttons
Adds tank lines to the Ballast Water Source and Ballast
Water Discharge table.
To view the additional lines, use the Page Down button
on your keyboard or the scroll bar at the right side of the
Adobe window.
The maximum number of tank lines is 19.
Fills the corresponding tank line with a copy of the
information currently entered in the first line of the
Ballast Water Source and Ballast Water Discharge
table.
Adds the information currently entered in the Entry
Page to the Arrival Record as an individual BWM
Report.
To view the report in the Arrival Record, use the Page
Down button on your keyboard or the scroll bar at the
right side of the Adobe window.
Caution: Before selecting the this button, check that all
the information in the Entry Page is correct. After
selecting this button, you will not be able to make any
changes to the information. You cannot delete an
individual BWM Report from the Arrival Record without
deleting the entire contents of the Arrival Record (See
Erase entire document button, below).
Clears all of the fields on the Entry Page. This will not
affect data you have already added to the Arrival
Record. Typically, you will use this button before
entering a new voyage into the Entry Page.
Erases all data entered into the form, including all
arrivals in the Arrival Record. However, selecting this
button will not erase the vessel-specific information in
the grey box at the top of the Entry Page. This is the
only way to remove arrivals from the Arrival Record.
You cannot remove arrivals from the Arrival Record
Released 1-Oct-2012
Page 11 of 12
BWM Equivalent Reporting Form User Manual
individually.
Caution: Be very careful when using this button, as you
will not be able to recover data erased by accident.
Exports the contents of the Arrival Record as a Monthly
Report and attaches the exported file to an e-mail
message addressed to NBIC
([email protected]).
The exported file is in a special format (XML format) that
sends only the data from the Arrival Record in order to
minimize the file size of the attachment.
NBIC is aware that this button may not function
properly with certain e-mail services. If the
Email monthly report button does not work on
your computer, follow these steps instead to export the
report data manually:
• Choose Document ¯ Fill-in Form ¯
Export Forms Data... from the Acrobat
Reader menu.
• Under Save As type: select “XML Files (*.xml)".
• Choose a location on your computer’s hard
drive to store the exported file and click Save.
• Use your e-mail program to send the
exported file as an e-mail attachment to
[email protected]. The file you
attach should be in the XML file format.
Released 1-Oct-2012
Page 12 of 12