1
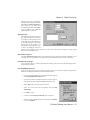
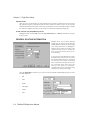
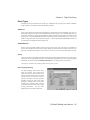
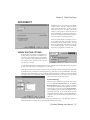
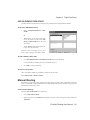
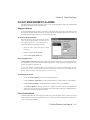
CHAPTER 5 — FLIGHT PLAN SETUP
The Preflight Menu is designed to help you cover all aspects of the flight-planning process, from creating
your route and determining aircraft load to accessing current weather conditions and generating your
flight reports.
•
Select Aircraft
•
Route Wizard
•
Add/Remove SIDs/STARs
•
Plan Alternate
•
Weight & Balance
•
Weather Access
•
Reports
Simply start at the top and work down the menu — the entire purpose of FliteStar is to help you set up a
safe and enjoyable flight as easily and accurately as possible.
AIRCRAFT SELECTION
If you’re using the Route Wizard, the aircraft selection dialog will be your first option. If you’re planning
a route manually, please go to FliteStar Basics in your on-line Help file, or see the Pilot and Aircraft
Selection section in Chapter 1 to perform this step..
ROUTE WIZARD
Since FliteStar routing options are extremely flexible, the program incorporates a Route Wizard to simplify planning even the most complex routes. The Route Wizard uses wizard functionality common to
most Windows programs. The Route Wizard prompts you only for the information needed to plan the
flight based on the parameters you set. For example, a short VFR flight will bring up fewer and different
dialogs than a multi-leg airway route.
To Open the Route Wizard:
Click on Preflight/Route Wizard, or click the Route Wizard icon
located on the quick bar.
To open the Route Wizard automatically each time you start FliteStar, check the box marked “Show this
Wizard at Start Up.” If you don’t like this feature, simply clear the check box.
PILOT/AIRCRAFT SELECTION
The current pilot displayed is based on the selection
you made when you opened FliteStar.
For more information on pilot selection see Pilot
Profiles in your on-line Help, or the section on Pilot
and Aircraft Selection in Chapter 1.
Chapter 5 Flight Plan Setup
Select your Aircraft
Click on the arrow next to the aircraft
field and select an aircraft from the
drop-down list.
Performance Settings
Once you select your aircraft, you’ll
see some basic performance default
values. Some windows will be grayed
out, depending on the type of aircraft
model used. You may change the
other performance settings manually.
For aircraft that use manifold pressure
and/or RPM, you can simply edit the
box directly.
To change the default values that
appear in the Wizard, go to
Edit/Aircraft Data/ Default Settings.
Override Cruise
For aircraft models that display cruise settings, you can click Override
Cruise and enter the values you would like FliteStar to use for the current flight plan.
Default Winds
You may also set default winds in this window of the Route Wizard.
Enter a speed and direction in the appropriate boxes. These values will
be applied throughout the route. This is of value for what-if calculations
prior to obtaining weather.
If you fly the same aircraft most of the time, you can check the Skip This Page option. Next time the
Route Wizard will open on the second page. You can use the Back button to get back to the aircraft
selection page later.
INITIAL ROUTE INFORMATION
This is where you enter your departure, destination, departure time, and any intervening stops or must-fly
waypoints.
Enter Departure and Destination Points:
•
Click on the Departure or Destination field.
•
Type the ICAO 4-letter identifier, the IATA code, a city or airport name.
•
Hit Enter or Tab and the waypoint name will display to the right of the field. Recently used departure and destination points will display in the list box, opened by clicking on the dropdown arrow to
the right of the field.
5-2 FliteStar/FliteMap User Manual
Chapter 5 Flight Plan Setup
If the name you enter corresponds to
multiple possible waypoints, FliteStar
will display the Select an Item dialog
from which you can choose your
desired departure point. Select OK to
accept or Info to view additional
information about a selection.
Departure Time:
The departure time field contains a
day, date, and time that you can alter
by clicking on the up/down arrows
to the right side of the window. The
arrows adjust the values of the highlighted field in the window. Use
your mouse or keyboard arrow keys
to move the highlight within the
window. Once complete, use the checkbox to select local or Zulu time for display in nav logs, flight
plans and weather dialups either.
Show Route Progress:
Check the Show Route Progress box if you would like to see a graphic representation of FliteStar’s route
searching. This is a good way to see at what point any problems may arise in the route calculation.
Plan Alternate Landings:
If you select this option, you will be presented with a dialog at the end of the route planning process to
choose alternate airports.
Fuel Stops/Must Fly Points:
If you want to plan stops or fly-over points along your route, you can enter the waypoint using the same
method as the departure/destination selection described above.
•
Enter the waypoint identifier or name in the field to the right of
the Fuel Stops/Must Fly Points list box.
•
If your entry references multiple waypoints, use Tab or Enter to
bring up the selection dialog and highlight the desired stop.
•
Select Add to place the waypoint in the list box.
•
Select one of the Land and Fuel options from the Stop
Information.
•
Click OK to accept.
•
Continue to enter Fuel stops/Must fly points as desired.
•
To delete a stop, highlight its name in the list and use the Delete
key or click Remove.
FliteStar/FliteMap User Manual 5-3
Chapter 5 Flight Plan Setup
Optimize Order:
After you enter a second stop/flyover point, FliteStar asks if you want to optimize stop order. If you click
Yes, FliteStar will plan your flight using the shortest possible route between points. If you click No,
FliteStar will plan stops and flyovers in the order you listed them. You can use the Back button to change
the check box, Optimize Stop Order, if you change your mind before finishing the flight plan.
To Edit or Delete Fuel Stops/Must Fly Points:
Highlight the Stop and click Edit to open the Stop Information box or Remove to delete the waypoint
from your route.
GENERAL ROUTING INFORMATION
FliteStar allows you to specify different
routing types for each leg of your flight. By
default, FliteStar assumes you want to apply
your routing preferences to All Legs, as
indicated in the field at the top left of the
window. The great circle, i.e. shortest, distance of your route is shown in the top center of the dialog.
If you want to specify different route types
for different legs, click on the arrow next to
the uppermost field, select a leg, and specify
the route type and settings as described
below. Then, before moving to the next dialog, click again on the arrow, select your
next leg, and specify the parameters.
Continue until you have specified routing
parameters for all legs of your flight.
Select the Flight Rules to follow for your route or route leg. FliteStar includes flight plan types for FAA
and JAR regulations:
•
IFR
•
VFR
•
DVFR
•
VFR Night
•
Yankee
•
Zulu
5-4 FliteStar/FliteMap User Manual
Chapter 5 Flight Plan Setup
Route Types
FliteStar provides you with four basic routing types. Although airway routing is not available in FliteStar
VFR, all options are available in FliteStar IFR and Corporate.
GPS/Direct
Direct routes follow the shortest path from departure to destination with no intermediate stops. You can
add specific waypoints using the "Fuel Stops/Must-Fly Points" dialog, or have FliteStar generate waypoints at set intervals by specifying a maximum leg length. FliteStar will plot waypoints at that interval
and give their corresponding latitude/longitude in your flight plan and navigation log. To use nav aid
radials as waypoints check "Create RNAV waypoints". The navaid identifier, radial/DME and distance
are included in your flight plan and navigation log.
VOR/NDB/Airport
Plans a route using VORs, NDBs, and/or Airports as check points. Since the legs are planned direct
between fixes, FliteStar provides options in a later dialog to route around various classes of airspace. You
may select a maximum leg length or set the value to zero for a direct route; the default length is 250 nm.
Airway
Selecting this option will bring up another dialog after Fuel Planning with specific options for airway
routing. The airway type defaults to High or Low depending on the altitude you choose for this flight and
the defaults you have set under Tools/Options/Routing. You can change this in a later dialog.
This option is available only in FliteStar IFR and Corporate versions.
Plain Language Routing
The plain language option takes direct
input of waypoints and routing. Pilots
often know exactly what clearances ATC
will give them for certain routes. Since this
may not be the most efficient in terms of
aircraft performance, FliteStar probably
wouldn’t develop the same route. Plain
language is available only for routes with
no fuel stops or must-fly points, and you
must follow the format shown here when
entering information. See also Other
Editing Options in the Online Help file.
FliteStar/FliteMap User Manual 5-5
Chapter 5 Flight Plan Setup
When you have selected the route type(s), choose a preferred Cruise Altitude for the route or route leg.
The default altitude is based on the default for the aircraft you have selected. (To change this value, go to
Edit/Aircraft Data/Default Settings). When you enter a multi-leg route and select All Legs, the Cruise
Altitude field is blank. Select a leg and FliteStar will display correct altitudes in the drop-down box for
the route type and direction you are flying. You may also enter an altitude manually.
Enter a Maximum Leg Length (NM) if applicable. GPS/Direct and VOR/NDB/Airport routing both
allow you specify a desired maximum leg length between waypoints. FliteStar will then limit its search to
potential paths that do not exceed your specified length. If after attempting to find a route, the program
tells you it cannot find a path, try increasing the leg length.
If you would like to use departures and/or arrivals, check the Use SIDs and STARs box. You will specify procedures in a dialog after Routing Options. If after attempting to find a route, the program tells you
it cannot find a path, try changing either or both procedures; sometimes the selected entry/exit points
conflict with each other or the airways.
Unless you selected All Legs (the default), repeat these instructions for each route leg.
Beyond this point, the dialogs you see in the wizard will vary depending on which routing options you
chose. You may see all or none of the following screens.
FUEL PLANNING
This dialog also allows planning for individual legs or an entire trip. The Ramp Fuel value, toward the top
left side of the dialog, is taken from your aircraft model data. You can adjust load amounts for this flight
doing Weight and Balance, after finishing the Route Wizard.
To change the default, see Aircraft
Modeling/Entering the Data/ Weight and
Balance Data in your online Help file.
Add whatever reserve and contingency values you are comfortable with for this flight.
The Additional Fuel and Approach Time
fields are designed primarily for ICAO
users.
FliteStar will use these values in route calculation, whether you choose the
Automatic Fuel Planning feature or not.
Check the “Use Automatic Fuel Planning”
box to have FliteStar choose which airports
to plan as fuel stops. The requirements you
set on this side of the dialog will limit
FliteStar’s selection to those airports within
the limitations you set here, and gives you
an option to set a maximum leg time.
5-6 FliteStar/FliteMap User Manual
Chapter 5 Flight Plan Setup
GPS/DIRECT
This dialog takes the place of the previous RNAV
and direct router. For faster route generation,
move the slider bar to the left. For more efficient
routes, move the bar to the right. If the router
displays a message that it can't find a path for
your intended flight, try moving the slider bar to
the left, or increasing the maximum leg length, to
give it more options in finding waypoints.
Check the Use Maximum Leg Length box to create waypoints at the Max Leg Length you set in
the General Routing Options dialog. Leaving
this box unchecked will create a direct route with
no intervening waypoints. Use the Create RNAV
Waypoints box to generate an RNAV route.
AIRWAY ROUTING OPTIONS
In this window you confirm or change the Low
or High airway system choice and indicate specific airway entry and exit points you would like
to use. If you leave these fields blank, FliteStar
will select the most efficient way to enter and
exit the airway structure.
Use the Advanced button to control how far the router will jump from the procedure’s end or beginning
point to the airway system by setting distance or cost limits.
Other options include selecting from preferred routes (if available), include all intersections (which adds
all intersections to your Route List and Navigation Log), and a place to set maximum MEA. The maximum MEA option tells FliteStar to plan your flight on airways that have an MEA at or below the altitude
you specify. This can be particularly useful in mountainous areas where you are flying a non-pressurized
aircraft and want to avoid using oxygen.
Preferred Routing
FliteStar contains a database of preferred routes. Check
the box, Search Preferred Routes in the Airway
Routing Options dialog, and you will be presented
with a list of the preferred routes available. To select a
preferred route, check the box Use Preferred Route.
Then, highlight a preferred route. This displays a list of
associated waypoints. If you would like to see what
each preferred route looks like, check the Preview box.
A depiction of the route will be presented in the active
chart view.
Selecting a preferred route will add the route and all its associated fixes to your flight plan. In the US,
Preferred Routes are available only for low and high altitude airway routing.
FliteStar/FliteMap User Manual 5-7
Chapter 5 Flight Plan Setup
ROUTE-AROUND OPTIONS
If you selected GPS/Direct, Airway or
VOR/NDB/Airport routing, FliteStar asks you to
select the classes of airspace you want to avoid.
You may select any or all of the airspace classes
to route around. To select all classes at once, click
All (located at the bottom of the list). If FliteStar
cannot find a path for your proposed route, try
removing the checks from some of the airspace
classes.
You may also elect to avoid (or remain within)
certain FIR/UIR boundaries. If you don’t select
any FIR/UIRs, FliteStar will ignore these boundaries during its routing calculations.
To avoid boundaries you created earlier, check
the “Avoid Boundaries” box at the top right.
Finally, in this dialog you can specify a minimum altitude for terrain clearance. Remember, FliteStar’s
terrain information should be used as a guide and should not be interpreted as a guarantee of terrain
avoidance.
DEPARTURES AND ARRIVALS (SIDs AND STARs)
FliteStar contains a database of
all
published
Standard
Instrument Departures and
Standard Terminal Arrivals. If
you
checked
the
Use
SIDs/STARs box earlier, you
will be presented with this dialog. Select each leg of a multileg route using the dropdown
box in the top left.
SID/STAR identifiers and their
associated fixes are listed by
airport, the departure on top
and the arrival below. View the
SIDs/STARs available for an
airport by selecting the Use
SIDs or Use STARs check
boxes.
Click on Show “Suggested” Procedures First to sort them by compatibility with your route direction.
To see a closeup view of a SID or STAR in the Chart view, check Preview and highlight the procedure.
Once selected, the SID and its associated fixes will be added to your Route List, Flight Plan, and
Navigation Log.
5-8 FliteStar/FliteMap User Manual
Chapter 5 Flight Plan Setup
ADD OR REMOVE SIDS/STARS
Use these functions if you decide to change airport procedures after exiting the Route Wizard.
To Open the SIDs/STARs dialog:
•
Select Preflight/Add/Remove SIDs/
STARs.
Or
•
Right click on a route in the Chart View
or on the Route List and select Add/
Remove SIDs/STARs from the right
click menu.
•
Check Preview at the bottom of the dialog to view your selections.
The active chart view changes to show you a
preview of the routing for each SID or STAR.
To Add or Modify a Sid or Star:
•
Click Insert/Replace SID or Insert/Replace STAR at the top of the dialog.
•
Click on the SID or STAR on the list you would like to select.
•
Click OK to accept your change.
To Remove a Sid or Star:
Click on the SID or STAR you would like to remove from your route.
Select Remove SIDs or Remove STARs.
Manual Routing
Sometimes you just want a quick plan that goes from point A to point B with a minimum of time and
choice. Use FliteStar’s VFR, Default and Low or High Altitude Enroute Chart Themes to help you point
and click Direct and Airway routes.
Create a Route Manually:
Open the route creation mode one of four ways:
•
Go to Tools/Add New Route.
•
Right mouse-click in the Route List (anywhere except on a route or waypoint name), and select
Add Route.
FliteStar/FliteMap User Manual 5-9
Chapter 5 Flight Plan Setup
•
Right mouse-click on the Chart View and select Add Route.
•
Use the short cut keys CTRL+A.
The Route Properties dialog appears so you can rename the route, set default winds and select the flight
rules. Click OK when done.
When you are in route creation mode, the cursor symbol will change to a waypoint icon
•
Click on the Chart View (either vector or raster) where you want to start your route.
•
Click the successive locations where you want the next waypoints.
.
If you are on the map at a location that does not contain an established waypoint, an icon
will be
inserted in your route. If you click on a location that has co-located waypoints, for example, a VOR and
an airport, a dialog appears asking you to select one.
You can scroll and zoom in and out on the chart as you continue adding waypoints to complete your
route.
To stop adding waypoints, right click and select Finish Route. You can also end your route by going to
the Tools menu and clicking on Add Waypoints. The checkmark next to Add Waypoints will disappear,
indicating that route creation mode is no longer active.
Alternate Planning
Alternate airports are added your flight plan by
checking the Select Alternate Airport(s) dialog
box in the second page of the Route Wizard. If you
skipped that option and then decide later that you
want to include them, right click on the route in the
Chart View or the route title in the Route List and
select Plan Alternate.
The Select Alternate Airport(s) dialog asks you to
define criteria for acceptable alternates. You can do
this for the entire route at once or define each leg
differently. FliteStar will search the airports near
your destination and list those meeting your
requirements. You can view information about each
airport listed by right-clicking on its name.
The airport highlighted becomes the alternate for
that leg. Continue until you are done selecting alternates for each leg. If you don’t want to select an
alternate for a particular leg, select None.
Finally, select Finish. At this point you are given the option to use the Route Wizard to further modify or
refine the alternate route. Routes to your alternate airport will be calculated and the routing information
added to your navigation log.
5-10 FliteStar/FliteMap User Manual
Chapter 5 Flight Plan Setup
FLIGHT MANAGEMENT ALARMS
FliteMap includes two features that allow you to set up warning boundaries along your intended flight
path, Waypoint Alarms and Cross-track Alarms.
Waypoint Alarms
A waypoint alarm notifies you with a sound and a visual signal when you reach a certain distance from
the waypoint. Waypoint alarms can be set for an entire route or for individual waypoints. You can also set
the radius from the waypoint where you want the alarm to sound.
To Open the Route Properties:
The Route Properties dialog automatically displays
when starting a Manual Route, but will not let you
enter alarms until there are waypoints in the route.
Open the Route Properties dialog as follows:
•
Select the route on the Chart View or in the
Route List.
•
Right click and choose Properties.
•
Select the Waypount Alarms Tab.
Select the Waypoint(s):
The Waypoint Alarms dialog will come up with all the waypoints selected. You can set the alarm for all
the waypoints or you may want different alarm properties for various waypoints. Highlight the waypoint(s) you want to set properties for.
You can select multiple waypoints from the list by holding down the control key and clicking on the waypoint name(s), or you can select multiple consecutive waypoints by clicking on the first, holding down the
Shift key and then clicking on the last waypoint you want to select.
Set the Waypoint Alarms:
•
Check the Alarm Enabled box to activate the waypoint alarms.
•
Check Continuous Notification to set the visual notification to continue until you acknowledge it.
•
Check Continuous Sound to set the audio alarm to continue until you acknowledge it.
•
Set the Alarm Radius by moving the slider bar or typing in a distance. The slider bar displays feet
until you reach .5 NM. If you type in a distance, that distance will be either feet or NM depending on
what units are listed next to the distance field.
Cross-Track Alarms
Available in FliteMap real-time moving map mode only, cross-track alarms warn you when you reach a
certain lateral deviation from your planned course. Set cross track alarms from the Route Properties dialog as you do Waypoint Alarms.
FliteStar/FliteMap User Manual 5-11
Chapter 5 Flight Plan Setup
To Set a Cross-Track Alarm:
•
Select the route on the Chart View or in the
Route List.
•
Right click and choose Properties from the
right mouse click menu.
•
Select the Cross-Track Alarm Tab.
•
Check Enable Cross-Track Alarm.
•
Set the Cross Track Limit (Distance). The
slider bar will display feet until you reach .5
NM. You can also manually set a distance by
typing it in the field. The distance will be in
either feet or NM depending on the units
appearing after the distance field.
REVERSE ROUTE
Once you’ve planned a route, you can easily create a return route by clicking Tools/Reverse Route.
FliteStar reverses the waypoints of the original route to create a new route that appears in the Chart view,
route list and nav log.
To Create a Reverse Route:
5-12 FliteStar/FliteMap User Manual
•
Select your route on the Route List or the Chart View.
•
Click on the Tools Menu.
•
Choose Reverse Route.