1
Windows XP Virtual Private Network Connection Setup Instructions
Find your “ My Network Places “ icon on your desktop or in your control panel under “ Network and
Internet Connections “ By default, this is NOT on your desktop.
Once you find either the Icon or the listing:
Right click on “My Network Places“
Left Click on “Properties“
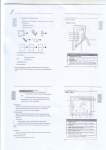
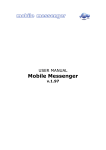
This window will open.
Click on “Create a new connection “
Select “Next“
Select ”Connect to the network at my workplace” Select ”Next”
Select ”Virtual Private Network connection“ ( VPN ) Select “Next “
Type in a descriptive name of your choosing Select “Next “
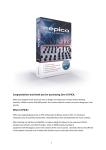
Depending on your existing setup, you may see the following window.
Select “Do not dial “ Select “Next “
Type in the address of the PNG network. In this case, it’s www.pngisd.org
Select “Next “
If you want to place an icon on your desktop then check the box. Select “Finish”
As the name implies, you have “Finished“ setting up the VPN connection.
Logon Setup
Double click on the newly created network connection icon . You should see a window similar to the one
below.
Select “Properties“
Select “Options“
Select “Options”
Click “Include Windows logon Domain”
Select “Ok“
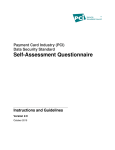
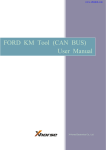
You will be returned to this window
Type in YOUR PNGISD username and password, not the sample provided.
Make sure PNGISD is in the domain box, NOT PNGISD.ORG
If you wish to save the user name, check the box
Decide if you want these settings to be saved for just you, or everyone who uses the computer.
Once you have entered this information, all you need to do is select “Connect“ to log on to the PNGISD
network.
You will see the following two boxes popup in the center of your screen, one after the other
Then you will see this message in your TaskBar
At this point, you are fully connected to the PNGISD network
What Can I Do Now? / How Do I Use This Thing?
Ok, now that you’re connected, nothing really looks any different. That’s a good thing.
One of the things VPN allows you to do is to access data that you have stored on the PNGISD network
from home. If you had access to the data from your school computer, you can now setup your home
computer to access that same data. This will require that you change the way you do some things. You
will need to start saving files that you normally place in your “My Documents“ folder on your network
drive instead. This is actually easier than you may think.
In the Microsoft applications, you can change the default location for the opening and saving of data
files.
Change this to your network drive, usually H:, and you’re done.
Microsoft Office is the software package used by PNGISD and the only one supported by the
Technology Department. For help with anything else, you will need to read the user manual.
Practical Applications?
Some of you have teacher webpages. These can now be edited from home.
Some of you have to go through your student’s folders and grade their work. This can be done from
home.
Accelerated Reader / Star Reader / Star Math / can all be managed from home.
The Librarians can work from home.
Grade machine, if the data is on the network, can be maintained from home.
No more taking a floppy back and forth to work just to find out the thing can’t be read by either
system. (I hate floppies.)
If you can access the data from your desk, you can now access it from home as well.
Now That It’s Working, How Do I Use It?
Your VPN connection to PNGISD has been setup and tested. It works.
In order to access any of your data you are going to need to “Map“ a drive.
This is a very simple process that can be done in any given number of ways. For the purpose of this
document I am going to go over the easiest method.
Ok, the data you wish to access is in your user folder @ the High School. What you want to do is to
map a shared resource on the high school server to your local computer. To do this, perform the
following steps:
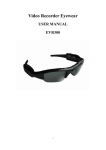
Start | Run | \\HS-NT.PNGISD.ORG { Press Enter }
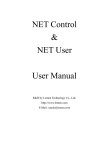
A window similar to the one below will now open showing you the available printers and shared folders,
just like you would see from your desk at work.
Right click on the “Staff “folder Choose “Map Network Drive“
Select an open drive letter.
That’s all there is to it.
To access your data, open “My Computer“, open the drive you just mapped and scroll down until you see
your user folder. Double click on it to open it. Any files you copied there from work will be accessible
to you.
Edit the file just like you would from work.
All this is based on the assumption that you have the appropriate software installed at home. For
instance, if you wish to edit a Word document at home, you will have to have Word installed at home,
no matter where the file is stored.
I’m Done, How Do I Stop This Thing?
You’re finished, the project is done, and you want to “hang up“. Before doing anything else, make sure
that you have saved all your changes and closed any files that you had open from the VPN connection.
To disconnect from the session, locate the connection icon in the taskbar or on the Desktop, right
click on it and select “Disconnect“.
Windows XP Home vs Windows XP Professional
The most important difference between the “Home” and “Professional” versions of Windows XP is the
way it works within a network. As the name implies, the “Home” version is meant to be used in the
home were network functionality is not a big issue. “Professional” was designed for the office and adds
enhanced network functionality to Windows XP. “Home” users can still access networks, it just does
so in a different manner.
How does that affect you? Ok, simple example.
At work you have WinXP Pro. You want to connect to a networked server. You would type
\\server_name and press enter. A window would open showing you the available resources on that
server.
You VPN into work from a computer running WinXP Home, you would have to append the DOMAIN
name to the server name in order to connect.
\\server_name.domain_name
A small difference, but one works while the other will not.
Did This Thing Really Work?
As I stated before, once you’ve connected nothing appears to have changed. No new icon, no popup
screens, nothing. It just sits there waiting.
The easiest / quickest way to see if anything has changed is to do the following.
Before connecting to the PNGISD network, open a CMD box.
(Start | Run | CMD { Press enter })
A black box will open.
In this box type the following “ping gms-nt“ (not the quotes) and press enter It will sit there for a
few seconds and tell you that it could not find gms-nt. And it shouldn’t if you are at home because
your home computer is not part of the PNGISD domain and has no way of determining what gms-nt is.
Now, connect to the PNGISD network using the new connection you just created. Try the command
again (press the up arrow key and press enter ). You should get a series of 4 responses. Your home
computer is now “virtually“ part of the PNGISD network and will be until you disconnect from the
session.
If, after you have connected to the PNGISD network, you try to ping gms-nt and do not get the
proper response, try to ping gms-nt.pngisd.org and see if it works.
Possible Problems
The above instructions have been tested, and for most users, will work without modifications.
One exception to this will be those users who have home networks that are being protected by a
PHYSICAL hardware router/firewall that provides DHCP IP address assignment for your network.
One example of a hardware router/firewall would be the LinkSys Cable/DSL Router with 4-Port
Switch. This particular device has one port on the back labeled “WAN “ where your Cable/DSL modem
will be plugged in and is the “PUBLIC “ side of your home network’s internet connection. This device
handles the actual connection to your ISP and is assigned what the rest of the world sees as your
“PUBLIC “ IP address. So, anyone who might try to break in to your home computers would have to get
through this device first. If you leave the default name/password unchanged on this device then
breaking into your system would be fairly easy. All anyone need do is download the user manual from
LinkSys and find out what the default name and password is. So, if you are using a device of this type,
make sure that you change the default admin name and password.
This device has an additional 4 ports on the back that are available for you to plug in whatever
network devices you desire. Printers, computers, wireless access points, whatever you can think up.
By default, this device will listen for requests for an IP address from anything that is attached to
these 4 ports.
*This is what may cause you problems.*
This device, and devices like it, will work fine for most home users as soon as you plug it in. In
situations where the users of this network will be connecting to another network (VPN), the user will
have to ensure that the settings of this device do not conflict with the settings of the network they
are attempting to connect to.
Possible Solution
Devices of this type will generally issue IP address to devices attached to the local ports in the
192.168.1.x or 192.168.100.* ranges. Unfortunately, both of these address ranges are already used by
the PNGISD network.
If your home network is using a network IP address that is in use by the PNGISD network, you may
experience problems when trying to access network shares. If you should experience this situation,
use the software that came with your device and change the IP range that it assigns addresses from.
The following ranges are in use and should not be used if you plan on using VPN to access the PNGISD
network.
192.168.1.*
192.168.2.*
192.168.11.*
192.168.12.*
192.168.13.*
192.168.40.*
192.168.80.*
192.168.14.*
192.168.50.*
192.168.90.*
192.168.20.*
192.168.60.*
192.168.100.*
192.168.30.*
192.168.70.*
192.168.110*
** Notice **
It is absolutely imperative that if you have a child at home who is a PN-G student, he or she is NOT
allowed to access the network in any form or fashion! You, as the employee, are responsible to make
sure that this does not happen. All connections are logged and are subject to review. Anyone caught
abusing this privilege, either willingly or unknowingly (you leave it connected to the network and forget
and later your child gets on the network), will have the privilege revoked.
When you connect to the PNGISD network via VPN connection, you may do so from any computer that
has Internet access. This allows for very flexible access to your data, allowing you to transfer files to
and from your remote site.
Windows XP introduced something called the “Remote Desktop Connection“. What this does is allow
you to log onto your desktop computer from another computer. When using this software to connect
to your computer, you have complete access to your machine.
The software to CONNECT to a Windows XP computer is installed on both the XP Home and
Professional versions.
Due to the fact that the PNGISD network is protected by a firewall, access to your work computer
from home is very restricted.
In order for you to be able to log on to your work desktop computer, several conditions have to be
met.
1: You MUST request VPN access to the network.
2: You NEED a broadband (DSL/Cable) internet connection at home.
3: You have to leave your work computer turned on. (Turn off the monitor though)
4: Your work computer must be Windows XP Professional.
5: Remote Desktop must be enabled on your work computer.
6: You need to know the name of your work computer.
Ok, why, why, and why. Right?
The amount of data being sent between the two computers is substantial, the faster the connection,
the better the experence. So, broadband is a must for this to be functional.
You have to leave your work computer turned on because you cannot connect to it if it is turned off.
Only Windows XP Pro has the Remote functionality built-in.
You need the name so you can specify which computer you wish to connect to.
Enable Remote Desktop
Perform the following steps to enable Remote Desktop on your work computer.
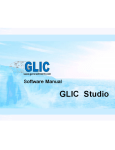
Right click on My Computer, left click on “Properties “.
Click on the tab labeled “Remote“. In the middle of that window will be a checkbox that enables
Remote Desktop. Make sure it is checked.
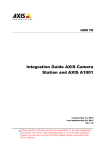
** Note ** While enabling this feature does allow others to connect to your work computer, access to
your computer is controlled through the “Select Remote Users“ button. Selecting this will open the
windows below. Here you can select who you want to allow access to your computer.
To find the name of your computer, click on the tab labeled “Computer Name” shown in the first
picture.
Using Remote Desktop
On your home computer go to “Start | All Programs | Accessories | Communications | Remote Desktop
Connection “
The box below will open
Type in the name of your computer. XP Home users be sure to add the “.pngisd.org” to this name.
When the logon screen appears, type in the same username/password that you would use if you were
at work. After you enter this information, you will presented with your normal desktop. Use the
machine as you normally would.