1
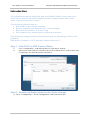
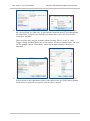
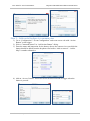
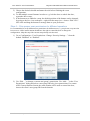
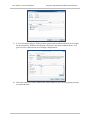
HOW TO Integration Guide AXIS Camera Station and AXIS A1001 Created: May 13, 2015 Last updated: May 20, 2015 Rev: 1.0 1 Please note that AXIS does not take any responsibility for how this configuration may affect your system. If the modification fails or if you get other unexpected results, you may have to restore the factory default settings as described in the User’s manual. HOW TO – Axis CommunicationsIntegration Guide AXIS Camera Station and AXIS A1001 Introduction The following document highlights how to add AXIS A1001 access control to Axis Camera Station and then complete further configurations that can be made to meet an operator’s need: The document explains how to: Add A1001 to Axis Camera Station. Receive notifications when the door status changes Add control buttons to a camera view Give suitable user permissions to different operators This following configuration has been tested with the following products and firmware: AXIS A1001, firmware 1.25.2 and Axis Camera Station 4.2. Step 1 – Add A1001 to AXIS Camera Station 1) 2) Go to “Configuration”/ “Add/Edit Aux Devices” and choose “Search…” Select access control when it is found by the search to add the device to the system. Once it’s added give it a name the operator can relate to. Step 2 – Receive notification when the door status changes 1) Go to “Configuration”/ “Event Configuration” and create a new rule. Rev: 1.0, Last updated: 27/05/2015 2 HOW TO – Axis CommunicationsIntegration Guide AXIS Camera Station and AXIS A1001 2) Select “Access Control Event” and then “Access denied” as the trigger for example. Set “Access Point” to “Door (in)” to get notified if someone tries to get in through the door but failed. As can be seen from the screenshot above, there are several other event types available. There are many more triggers available when selecting “Device event” in “Add Trigger” dialog and then choose the access control. See the screenshot below. The user can for example choose “Door Mode” and setup an alarm whenever the door is unlocked. 3) Create a “Raise Alarm” action titled “Access to door X denied”. A notification box will be shown on the right bottom corner of the main screen on AXIS Camera Station client whenever someone’s request to enter the door is denied. Rev: 1.0, Last updated: 27/05/2015 3 HOW TO – Axis CommunicationsIntegration Guide AXIS Camera Station and AXIS A1001 Step 3 – Add control buttons to a camera view 1) Go to “Configuration”/ “Event Configuration” and create a new rule with “Action Button” as the trigger. 2) Select “Command button” in “Add Action Button” dialog. 3) Enter the name and instruction for the button, choose the camera views on which the button should be added from the dropdown list besides “Add to camera”. “Add to Map” is another alternative. 4) Add an “Access Control” action and select the desired action to trigger when the button is pressed. Rev: 1.0, Last updated: 27/05/2015 4 HOW TO – Axis CommunicationsIntegration Guide AXIS Camera Station and AXIS A1001 5) Choose the desired schedule and name the rule before finishing the event configuration. 6) To add multiple control buttons in order to e.g. lock the door or unlock the door, repeat the above steps. 7) If the buttons were added to a map, the default position of the buttons can be changed by going to the live view workspace > right click the map view > choose “Edit View”. Now click and drag the buttons to arrange them to your preference. Step 4 – Give proper user permissions to different operators It’s recommended to set up different user permissions for different users, e.g. maybe not everyone who has access to AXIS Camera Station should have the right to control the door or change the configurations. Skip this step if the current setup already suits the need. 1) Go to Configuration > User Permissions. Change “Security Settings…” from the default “Disabled” to “Enabled”. 2) Use “Edit…” to change a current user/group’s permission. Use “Add…” in the “User Permissions” dialog and select a user/group ID to be given permissions. If a remote AXIS Camera Station client in the same domain will be used to control the door, choose the client’s user/group ID from the domain. Rev: 1.0, Last updated: 27/05/2015 5 HOW TO – Axis CommunicationsIntegration Guide AXIS Camera Station and AXIS A1001 3) A “User/Group Privileges” dialog will be opened and from here different access rights can be assigned to different users/groups. Operator is the most common choice, as it gives access to cameras but not to change configurations. 4) Check the camera(s) which contains the control button to give the user/group privilege to control the door. Rev: 1.0, Last updated: 27/05/2015 6