1
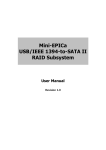
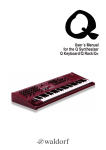
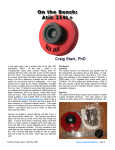
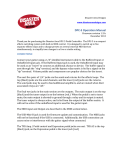
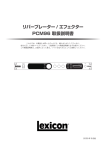
The sound of EPICA is rich, full and 'Real', its presets just fit into your projects ready to go. I have always found that virtual synths need a lot of work to make them fit into mixes, to my ears they always have a plastic two-‐dimensional sound to them. EPICA instantly sounds like it has come off a record from the beginning as the sound sources are from real hardware instruments and 100% hardware processors. You will find that you do not need to reach for the compressor, eq or other plug-‐ins as EPICA just sounds so good on its own. All samples were hand looped and with Kontakt key mapping never stretching a sample more than 1 note from its root they sound as real as the instruments they came from. In fact all of the non-‐ looped samples are mapped to every key for 6 octaves with a large amount of them 3 to 4 x Round Robins on every key. Technical Recording Data Samples were processed through various top of the range equipment including Eventide H8000FW, UBK FATSO, Neve 1073 preamp, Lexicon PCM 96 and various analog guitar pedals. My particular favourite was the Eventide H8000FW which just adds a beautiful sheen to anything it touches, but a big shout has to go to the amazing UBK Fatso hardware giving all the recordings that lovely hardware thick feel to all that pass through it. Samples were themselves sourced from Various analog synths from my home built Modular System, Arp Odyssey Mk3, Sequential Pro-‐1, Yamaha CS-‐30, Oberheim's and Future Retro to digital synths like the Virus Ti, DX9 and Roland D-‐50. Real life recordings were also used. 2 600 presets using 17,247 recordings were made, all at 24bit 44.1khz totalling 13GB of raw sample recordings. No dead space and all obsessively hand looped by a human (me) rather than an auto looping program (no dodgy loop points here). Some Multi presets have Reverb type effects from hardware units such as the Eventide H8000FW and Lexicon PCM96. Instead of recording the presets with the reverb on them I sampled the reverb separately. This enables you to dial in how much reverb and also to synthesize it as you wish, you will be amazed at how real this sounds and how much it can increase sound design. A lot of libraries are recorded extremely hot, what do I mean by hot? There is no need with a 24 bit high end A/D converter to record right up to 0db, in fact nearly all sound cards sound better in the -‐12 to -‐6db range. The problem with recording so hot is that you can very easily overload plugins but within the context of the Kontakt 5 engine you can also overload the modules inside it, for example the Filters. Giving the recordings the correct headroom makes for a much more natural and honest to the source sound. The key to a great sound when using digital devices is to not overload any plugins with a signal that is too hot. 3 Epica Interface To Minimise the GUI so as to concentrate on other presets simply click as per the red arrow below. Clicking it again This part of the GUI allows you to also choose the following: Output: Choose the audio out channel of the preset Voices: How many notes of Polyphony you would like for that preset, useful for changing monophonic sounds to Polyphonic. It is also great for lowering the amount of CPU a preset uses by restricting the amount of notes it can play. Midi Ch: Which midi channel you want the preset to respond to, Omni setting is used when making a huge sound from lots of presets as Omni mode will set the preset to receive from any of the 16 midi channels. Memory: Shows you how much memory (RAM) a preset is using, the 3 rectangles to the right of this show you how much of the preset is to be loaded. There are also Tune, Balance and Volume adjustments. As with all adjustment, to fine tune them just hold the 'Shift' key on the QWERTY keyboard when moving the adjustment control with the mouse. The Epica Synthesizer You should think of the presets that you load as the raw oscillators for your sound creation. This is where Epica excels as the sound sources come from a huge range of analog and digital hardware recorded through a very boutique chain of analog hardware. The samples are very long and have been obsessively sampled and looped by hand. A lot of the sounds use the actual analog filter sweeps of the synthesizers that they were sampled from and implemented using sample start points assigned to either velocity or random so as to enable the true sound of the sampled synth. That being said, Kontakt 5's newly modelled filters are astoundingly good and give a huge palette of sonic possibilities to anything you create. The rest of the synthesizer engine is broken down into the following parts: 7 Amplitude This is the Amplitude Envelope Generator that controls the volume of the synth. Unlike most VCA ADSR's Kontakt 5 has added a 'Hold' function, which can be very useful. A: Attack is the initial bite of a sound. It can be instant, for example bass or a slow increase in volume for, say, strings H: Hold keeps the synth at full volume for a set time before passing it on to the decay phase. D: Decay controls how slow the sound fades to the volume set by the Sustain knob. S: Sustain sets the volume that the synth will stay at until the note is released. R: Release controls how long the note will continue sounding after you release the key. Velocity You can assign Velocity (how hard you hit the notes) to: To Filter: If you are using one of the 6 analog modelled filters available in Epica then you can further control the filter by Velocity. 0 to +5 increases the Filter setting depending on how hard you hit the note whilst -‐5 to 0 decreases the Filter depending on how hard you hit the note. 8 To Amp: This basically allows you to adjust the volume of the sound by how hard you hit the note. When emulating analog mono synths it is best set to 0. Pitch Envelope With its Attack, Decay and Sustain controls the Pitch Envelope is great for creating all sorts of effects. The amount that the pitch is affected by the Attack, Decay and Sustain controls can be determined by the Amount knob. This works from -‐5 to +5, which means that you can have a pitch either climbing or falling. Start Point Mod Personally, for me, this is my favourite control in Epica as it enables you to use the actual synthesizer filter that was sampled. When you move the Startpoint knob it basically just plays further along the 9 sample and the Velocity knob will assign Note Velocity between the Startpoint knob setting and the Velocity knob setting. When say a Sequential Pro-‐1 preset with a filter sweep has been sampled you can now play the sample back at different points of the sweep using either the Velocity or Random knobs. Or you can lock it into place with the StartPoint knob. But it comes into its own when using a tiny amount of the Random knob (by holding Shift key and moving the knob with mouse) because this gets rid of the issue that I have always had with samplers.....it stops the sample from starting at the same start point in the oscillator. An analog synth’s oscillators are always running so they never start in the same place twice. However, by assigning a small amount of the Random knob to the start point of the sample you ensure that the sample never gets played from the same point either. It's a big part of why analog sounds so...analog. Using the Startpoint Mod controls alone, you have access to a huge palette of different sounds using the same preset. Experiment, the whole interface screams "Abuse me!". Assigning your controller’s Modulation Wheel to Startpoint (how to do this will be explained later in this manual) can create some truly amazingly playable synth creations with the Mod Wheel controlling the 'Actual' real world synth filter. Because the Amplitude AHDSR is so fast you might need to add a tiny amount of Attack to the Amplitude AHDSR so as to avoid any clicks when using/abusing the Startpoint controls. This is because the starting point of the waveform might fall either above or below the 0DB line thus creating a click. Delay We decided to only use the Delay as an effect in Epica because we all have so many reverb and multi FX at our disposal in our digital workstations that if you wanted an effect you could always add your own. If I had to choose one effect to take with me on my studio desert island it would be Delay. When a Reverb or Multi FX was needed for a preset I tended to record the samples through the awesome Eventide H-‐8000 FW or Lexicon PCM 96. 10 Delay Bypass: You can Bypass the delay by clicking on the Bypass switch. Time: Time basically is the divisions of time for the Delay set to the BPM of your workstation. Feedback: Adjusts the amount of delay that is fed back on itself or in layman’s terms...the number of echoes! Pan: This control determines whether the Delay will be mono or ping pong in stereo. Amount: How loud you want the Delay to be in comparison to the source sound. Filter You can select one of the 6 filter types by clicking in the 'Type' Box and choosing a filter from: Lowpass 12db Lowpass 24db Highpass 12db Highpass 24db Bandpass 12db Bandpass 24db All the filters are of the Ladder type, analog modelled and surprisingly good for a digitally modelled filter. 11 The ADSR knobs have the same functions as the Amplitude Envelope part of Epica except that they obviously control the Filter. It also does not have a Hold function. Freq: Controls how much the Filter is initially opened or closed. If you right click on the Filter knob you can assign a controller like say the Modulation Wheel to it. This gives a huge controllability to the sound. Res: This controls the Resonance peak of a filter, the higher the setting the more it will be affected when the filter is swept. Think high resonance for those TB-‐303 squelchy type sounds. If you are not au fait with how filters work it would be best to look up on the Internet about Filter Resonance and Filters in general as it is beyond the scope of this manual. Env Amt: This knob controls how much the Filter is controlled by the ADSR section. It can be set to negative -‐5 to 0 and positive 0 to +5. Keytrack: Is for when you want the Filter to open up as you play up the octaves on the keyboard making a sound brighter as you play higher notes. LFO 12 Epica has 3 x LFO's and each LFO has 5 Waveforms: Sine, Triangle, Saw, Square and Random. They can be assigned to Pitch, Filter and Amp (Volume). LFO stands for Low Frequency Oscillator which can be thought of as a slower non audible wave which can be used to control a particular section of a synthesizer. Taking a look at the Pitch LFO controls: To Pitch: This assigns how much the Pitch destination is assigned to the LFO, this can be Negative -‐5 to 0 or Positive 0 to +5. Freq: This is the speed of the LFO, how fast it modulates. Delay: Delay is basically an Attack Envelope for the LFO. It will gradually fade in the LFO. The higher the number the longer the delay. It can be very useful for sound creation. Modwheel: You can control the LFO by the Modulation Wheel on your controller by using this knob, this can be Negative -‐5 to 0 or Positive 0 to +5. This is how you add the classic vibrato effect to be controlled by the Mod Wheel that is common to most synthesizers. You might have to use the shift key on your keyboard to go into fine tune mode on some of the controls on the LFO section as it is quite sensitive. This was needed so as to give you full control from slight to extreme in the way the LFO interacts with the Synthesizer. Assigning Epica functions to your midi controller You can very quickly use your midi controller to control any knob on Epica simply by right mouse clicking on the knob you wish to control. Then select 'Learn Midi CC# Automation', at this point you just move the hardware controller that you want assigned to that knob. For further control you can limit where the assigned knob starts from and ends when linked to your hardware controller. In the picture below you can see on the left where you would normally select the presets to load, at the top there is a Tab called 'Auto'. If you click the Auto tab you will be taken to the Automation screen which shows any midi CC Controllers that are assigned to any Epica functions. It will default to 'Host Automation' so select 'Midi Automation' to show any midi controller data. Selecting a Midi CC allows you, at the bottom of the picture, to define low and high settings. You can go Negative to Positive and also Positive to Negative. And you can have, for example, the Modulation Wheel Controlling the Filter Cut off, Delay amount and also the Filter Resonance .... as many sources and destinations as you can think of! We hope that you enjoy using Epica as much as we have creating it. Go create! Zero-‐G Limited / xfonic limited 13